
IM-000305A

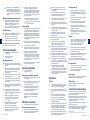
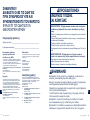
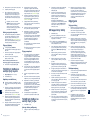
IMPORTANT!
READ ALL INSTRUCTIONS
CAREFULLY BEFORE ASSEMBLING
AND USING THE SOFT CARRIER.
KEEP INSTRUCTIONS
FOR FUTURE USE

10
2
1
3
4
5
6
7
8
9
11
12

24
22
14 17
15 18
1613
20
21
19
23

30
29
28
27
26
31
32
33
35
34
36
25

37
38
39
40
41
42
43
44
1
2
45
46
47
48

54
49
51
50
2
52
53 56
55
57 60
58
59

65
61
62
63
64

EN
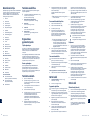
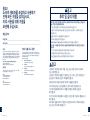
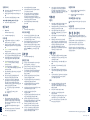
Contents
Product Information 3
Product Registration
Warranty
Contact
Child Usage Requirements 4
Warnings 5
Parts List 7
Product Set Up 9
Product Use 11
Facing In 13
Head Support
Facing Out 15
Back Carry 16
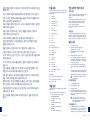
Accessories 17
Bib
Harness Covers
Hood
Breeze Cover
Storage Pocket
Storage Bag
Cleaning and Maintenance 18
Francais (FR) 19
Deutsch (DE) 39
Nederlands (NL) 58
Italiano (IT) 64
Español (ES) 70
Português (PT) 77
Polski (PL) 83
Česky (CZ) 89
Slovenčina (SK) 95
Hrvatski (HR) 101
Slovenščina (SL) 107
(RU) 113
Norsk (NO) 121
Svenska (SV) 127
Suomi (FI) 133
Danish (DK) 139
Română (RO) 145
(EL) 151
Turkçe (TR) 158
Hungarian (HU) 164
)AR
한국어 (KO) 177
簡中 183
2
Designed
around your life
CUDL™ clik instructions

EN
EN
Product Information
Model Number: ____________________________________________________________________________________________________________________________________
Manufactured in (date): ____________________________________________________________________________________________________________________
Product Registration
(available for products purchased in the USA only)
Please fill in the above information. The model number and the manufactured
in date are located on a label on the product. Fill out the prepaid registration
postcard attached to the product and mail it today.
To register your product please visit:
www.nunababy.com
Click the “Register Gear” link on the homepage.
Warranty
We have purposely designed our high-quality products so that they can grow
with both your child and your family. Because we stand by our product, our
gear is covered by a custom warranty per product, starting from the day it was
purchased. Please have the proof of purchase, model number and manufactured
in date available when you contact us.
For warranty information please visit:
www.nunababy.com
Click the “Warranty” link on the homepage.
Contact
For replacement parts, service, or additional warranty questions, please contact
our customer service department
In the USA
infousa@nunababy.com
www.nunababy.com
1.855.NUNA.USA
In the United Kingdom
infouk@nunababy.com
www.nunababy.com
NUNA International B.V.
Van der Valk Boumanweg 178 C
2352JD Leiderdorp
The Netherlands
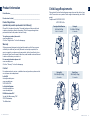
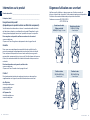
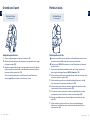
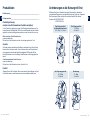
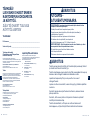
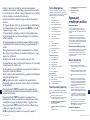
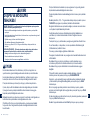
Child Usage Requirements
Please refer to the chart below for proper usage to ensure the safety of your
child. There are four carry modes. Mode usage is determined by your child's
weight.
Complies with EN 13209-2:2015
ASTM F2236-16a
Facing Out
20–30 lb (9–13.5 kg)
6+ months
Back Carry
25–35 lb (11–16 kg)
9+ months
Facing In/Infant Booster
8–15 lb (3.5–7 kg)
Birth - 4 months
Facing In
15–30 lb (7–13.5 kg)
4+ months
3 4
CUDL™ clik instructions CUDL™ clik instructions

EN
EN
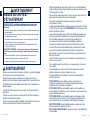
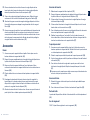
WARNING
Check to assure all buckles, snaps, straps, and adjustments are
secure before each use.
Check for ripped seams, torn straps or fabric and damaged
fasteners before each use.
Stop using the carrier if parts are missing or damaged.
Child must face towards you until he or she can hold head upright.
Ensure proper placement of child in product including leg
placement.
Make sure baby's legs are straddling the seat and arms extend
through arm holes.
Regularly check that your child is comfortably and securely seated
in the baby carrier, especially when using as a back carrier.
To prevent hazards from falling, ensure that your child is securely
positioned in the carrier.
FALL HAZARD - Infants can fall through a wide leg opening or out of
carrier. Follow instructions for use.
• Adjust leg openings to fit baby's legs snugly.
• Before each use, make sure all buckles, fasteners, and adjustments are
secure.
• Take special care when leaning or walking.
• Never bend at waist; bend at knees.
• Only use this carrier for children between 8 lb (3.5 kg) and 35 lb (16 kg).
SUFFOCATION HAZARD - Infants under 4 months can suffocate in this
product if face is pressed tight against your body.
• Do not strap baby too tight against your body.
• Allow room for head movement.
• Keep infant’s face free from obstructions at all times.
Hold your baby closely at all times until correctly attached.
The infant booster must be used for children weighing 8–15 lb
(3.5 kg–7 kg) and should ONLY be used with your child facing in.
Premature infants, infants with respiratory problems, and infants
under 4 months are at greatest risk of suffocation.
For low birth weight babies and children with medical conditions,
seek advice from a health professional before using the product.
When using the soft carrier, monitor your child.
Be aware of hazards in the domestic environment e.g. heat
sources, spilling of hot drinks.
Take care when bending or leaning forward or sideways.
Your balance may be adversely affected by your movement and
that of your child.
This baby carrier is designed for use by adults while walking,
standing or sitting only.
This baby carrier is not suitable for use during sporting activities.
DO NOT use this soft carrier if you use a pacemaker, as the
magnetic buckles can interfere with the pacemaker.
NEVER use a soft carrier when balance or mobility is impaired
because of exercise, drowsiness, or medical conditions.
NEVER use a soft carrier while engaging in activities such as
cooking and cleaning which involve a heat source or exposure to
chemicals.
NEVER wear a soft carrier while driving or being a passenger in a
motor vehicle.
NEVER lie down or sleep with baby in the baby carrier.
WARNING
FALL AND SUFFOCATION HAZARD
5 6
CUDL™ clik instructions CUDL™ clik instructions

EN
EN
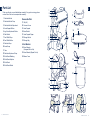
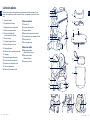
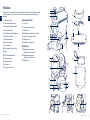
Parts List
Make sure all parts are available before assembly. If any part is missing, please
contact Nuna. No tools are required for assembly.
1 Shoulder Buckle
2 Shoulder Buckle Strap
3 Shoulder Buckle Adjustment
4 Head Support Button
5 Leg Hole Adjustment Button
6 Side Buckle
7 Seat Width Strap
8 Seat Width Button
9 Shoulder Strap
10 Hood Snaps
11 Yoke
12 Shoulder Adjustment Strap
13 Waist Band Webbing
14 Waist Band Adjuster
15 Waist Band
16 Waist Band Buckle
Removable Parts
17 Bib (x2)
18 Harness Covers
19 Head Support
20 Hood Pocket
21 Head Support Zipper
22 Storage Pocket
23 Storage Bag
Infant Booster
24 Infant Booster
(Unzipped/Not in Use)
25 Infant Booster (Zipped/In Use)
26 Breeze Cover
8
1
3
2
4
67
5
17
18
19
21
20
24
22
23
25 26
10
9
11
12
15
16
13
14
7 8
CUDL™ clik instructions CUDL™ clik instructions

EN
EN
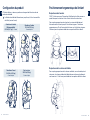
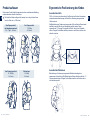
Product Set Up
Based on the chart below, position the head support according to your baby’s
weight.
Your baby's head should be supported until he or she has strong head control
(approximately 4 months of age).
Ergonomic Child Positioning
Hip-Healthy
CUDL™ clik is acknowledged by the International Hip Dysplasia Institute as a
hip-healthy product when used as directed.
For hip-healthy babywearing, baby's thighs should be supported from the hip to
the knee joint. This ergonomic "M" shape seating reduces forces on the hip joint.
Never force baby's legs into a position that is not easily achieved.
Spine-Healthy
For spine-healthy babywearing, proper support is needed. The baby's spine
should be allowed to naturally form a "C" shape. Never force baby into a position
that is not easily achieved.
OR
Facing In/Infant Booster
8–15 lb (3.5–7 kg)
Birth - 4 months
Facing In
15–30 lb (7–13.5 kg)
4+ months
Facing Out
20–30 lb (9–13.5 kg)
6+ months
Back Carry
25–35 lb (11–16 kg)
9+ months
9 10
CUDL™ clik instructions CUDL™ clik instructions

EN
EN
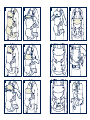
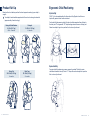
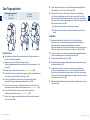
Product Use
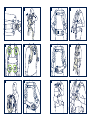
1 - Open the waist band. (1)
2 - Make sure both the shoulder buckles and the side buckles are connected
(circled in green) (2)
3 - Holding the carrier in front of you, slide your arms through the shoulder
straps. (3)
4 - Pull the carrier over your head. (4)
5 - Make sure the yoke is connected (circled in blue). Adjust the height and
width of the yoke vertically and sideways to achieve a comfortable fit. The
yoke should rest between your shoulder blades. (5)
6 - Secure the waist band behind your back, engaging the waist buckle to hold
the band firmly in place. (6)
7 - To adjust the waist band, pull on the webbing to tighten (7), or pull on the
waist band adjuster to loosen (8).
To remove the carrier, reverse the steps above.
DO NOT remove the carrier while your child is in it.
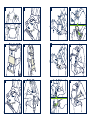
Opening Baby Carrier
1 - Release both shoulder buckles. (9)
2 - Release both side buckles. (10)
3 - The carrier is open. (11)
4 - If your child weighs more than 15 lb (7 kg), the leg hole adjustments are not
needed. Slide the leg hole adjustment button out of the button hole on the
shoulder strap near the side buckle. (12)
Leg hole adjustments MUST be used for children less than 15 lb (7 kg)
to decrease the size of the leg hole and prevent sliding without pinching
or chafing your child's leg.
Magnetic Buckle Indicators
5 - When following the steps for securing your child, secure all four magnetic
buckles by attaching them where you see the green indicators. The buckle
must click into place on the raised indicator area. (13)
Infant Booster
The infant booster MUST be used if your child weighs less than 15 lb (7 kg).
1 - Locate the unzipped infant booster inside the carrier. (14)
2 - Zip the infant booster sides together. (15)
When your child grows out of the infant booster:
3 - Unzip both sides of the infant booster to remove it when it is no longer
needed. (16)
11 12
CUDL™ clik instructions CUDL™ clik instructions

EN
EN
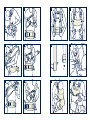
Facing In
Securing Your Child
We recommend sitting down while securing your child in the carrier, as it
provides better control.
1 - Begin with the carrier fully open (and the infant booster secured if your child
weighs less than 15 lb [7 kg]). (17)
2 - Attach one side buckle where you see the green indicator. (18)
3 - Hold your child securely against your chest with one hand, and use the
other to raise the front of the carrier. (19)
4 - Guide your child's leg down and through the opening between the seat/
booster and the attached side buckle. (20)
5 - Use one hand to hold the carrier and your child against you, and use the
other to secure the other side buckle where you see the green indicator. (21)
6 - Holding your child in the carrier with one hand, secure the shoulder buckles
one at a time where you see the green indicators. (22)
7 - Gently pull both shoulder buckle adjustments down to adjust the fit. (23)
8 - Adjust the shoulder straps by gently pulling both shoulder adjustment
straps evenly out in front of you. (24)
9 - Make sure your child is comfortable and securely seated in the baby carrier.
Adjust the straps around your child and check to make sure all buckles and
snaps are secure. Allow room for your child's head movements and keep
child's face free from obstructions. (25)
Your child should be positioned close to you, high on your body.
Keep your child's face visible to you at all times.
Head Support
1 - For a child weighing 8–15 lb (3.5–7 kg), secure the head support so that it is
up and supporting the child's head and neck area. Attach the head support
to the upper head support buttons. Only fold the head support down when
the child is able to hold his or her head up (approx. 4 months). (26)
2 - To fold down, slide both upper head support buttons out of the button holes
on the head support. (27)
3 - Fold the head support down. (28)
4 - Attach both bottom head support buttons into the button holes on the head
support. (29)
5 - Make sure your child is comfortable and securely seated in the baby carrier.
Adjust the straps around your child and check to make sure all buckles and
snaps are secure. Allow room for your child's head movements and keep
child's face free from obstructions. (30)
6 - To remove the head support, unzip it from the carrier. (31)
OR
Infant Booster
8–15 lb (3.5–7 kg)
Birth - 4 months
15–30 lb (7–13.5 kg)
4+ months
13 14
CUDL™ clik instructions CUDL™ clik instructions

EN
EN
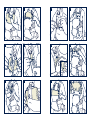
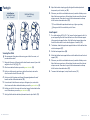
Facing Out
Seat Width Strap
1 - Pull the seat width strap out. (32)
2 - Attach the seat width button into the button hole on the seat width strap.
(33)
3 - Fold the head support down so your child's face will be above the top edge
of the carrier. The carrier is now ready for you to secure your child. (34)
Follow the same steps for securement as Facing In mode (page 13), but face
your child outward.
Back Carry
Back Carry Position
We recommend practicing this method a few times without a child in the
carrier before attempting it with your child.
Child should NEVER be facing out (away from you) in back carry mode.
1 - With your child in the baby carrier facing inward, loosen both shoulder
adjustment straps (DO NOT unbuckle). (35)
2 - Slide your right arm out of the right shoulder strap while cradling your child
with your left arm. (36)
3 - Slide your left arm under the shoulder adjustment strap on the side while
cradling your child with your right arm. (37)
4 - Cradling your child with your right arm, guide your child to your right hip
using your left arm. (38)
5 - Still supporting your child, grab the shoulder strap with your left hand and
pull it down over your shoulder. (39)
6 - Slightly lean forward and move your child onto your back. (40)
7 - Slide your left arm up through the shoulder adjustment strap on the side
while cradling your child behind your back with your right arm. (41)
8 - Slide your right arm down through the shoulder strap while cradling your
child with your left arm. Both shoulder straps should now be secure around
your shoulders. (42)
OR
20–30 lb (9–13.5 kg)
6+ months
OR
25–35 lb (11–16 kg)
9+ months
15 16
CUDL™ clik instructions CUDL™ clik instructions

EN
EN
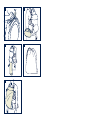
9 - Pull down on the shoulder adjustment straps to tighten. Adjust the yoke up
or down vertically and side to side. (43)
10 - Roll up the excess length of the shoulder adjustment straps and use the
elastic loop to wrap around the rolled up strap to store it out of the way. (44)
11 - Make sure your child is comfortable and securely seated in the baby carrier.
Adjust the straps around your child and check to make sure all buckles and
snaps are secure. Allow room for your child's head movements and keep
child's face free from obstructions. (45)
Accessories
Bib
1 - Make sure the head support is folded down and secured in place with the
lower head support buttons. (46)
2 - Store the extra length of the shoulder buckle adjustment in the pocket on
the shoulder buckle strap. (47)
3 - Cover the front of the head support with the front of the bib and slide both
head support buttons through the button holes on the bib. (48)
4 - Fold and tuck the bib over the top edge of the head support. (49)
5 - Wrap both side edges of the bib around the shoulder buckle strap. The
back edge of the bib is slid between the shoulder strap and shoulder buckle
strap. The front edge of the bib is laid over the shoulder buckle strap. (50)
6 - Attach the sides of the hook and loop. Make sure the bib is laying flat and is
secure to the top edge of baby carrier. (51)
Harness Covers
1 - Unbutton the head support and fold it down. (52)
2 - Store the extra length of the shoulder buckle adjustment in the pocket on
the shoulder buckle strap. (53)
3 - Slide the harness cover between the shoulder strap and the shoulder buckle
strap. (54)
4 - Slide the button on the shoulder buckle strap through the button hole on the
harness cover. (55)
5 - Attach the hook and loop. Make sure the bottom edge of the harness cover
is tucked behind the head support. (56)
6 - Repeat on the other side. When both harness covers are secure, attach both
bottom head support buttons into the button holes on the head support.
(57)
Hood
1 - Make sure the head support is up and secured in place with the upper head
support buttons. Undo the snap on the pocket located on the top edge of
the head support. (58)
2 - Pull the hood out of the hood pocket. (59)
3 - Adjust the hood to the desired position to shade your child. (60)
4 - Attach three snaps on the hood strap to the three snaps on the shoulder
strap. Repeat for the other side. (61)
Make sure the hood is not covering your child's mouth or laying too tightly
over their head.
Breeze Cover
1 - Unroll breeze cover from pocket at the bottom of the carrier when needed.
(62)
2 - Attach breeze cover by fastening to head support button. (63)
Storage Pocket
Storage Pocket can be tied to waist band or used separately. (64)
Storage Bag
CUDL™ clik can be stored in storage bag. (65)
Cleaning and Maintenance
Refer to the care label attached to the carrier fabric for washing and drying
instructions. Carrier MUST be washed inside a mesh laundry bag.
It is normal for fabric to fade from sunlight and to show wear and tear after a
long period of use, even when used normally.
For safety reasons, only use original Nuna parts.
Check regularly that everything functions properly. If any parts are torn, broken,
or missing, stop using this product.
NUNA International B.V. Nuna and all associated logos are trademarks.
17 18
CUDL™ clik instructions CUDL™ clik instructions

FR
FR
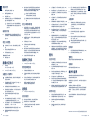
Sommaire
Informations sur le produit 21
Enregistrement du produit
Garantie
Contact
Exigences d'utilisation avec un enfant 22
Avertissements 23
Liste des pièces 25
Configuration du produit 27
Utilisation du produit 29
Orienté vers l'arrière 31
Support de tête
Orienté vers l'avant 33
Porté sur le dos 34
Accessoires 35
Bavoir
Housses des boucles
Capuche pare-soleil
Housse anti-brise
Poche de taille
Sac de rangement
Nettoyage et entretien 37
19 20
IMPORTANT !
LISEZ TOUTES LES
INSTRUCTIONS AVANT
D'ASSEMBLER ET D'UTILISER
LE PORTE-BÉBÉ SOUPLE.
CONSERVEZ LES INSTRUCTIONS
POUR UNE UTILISATION FUTURE.
Instructions CUDL™ clik Instructions CUDL™ clik

FR
FR
Informations sur le produit
Numéro de modèle : __________________________________________________________________________________________________________________________
Fabriqué en (date) : ____________________________________________________________________________________________
Enregistrement du produit
(disponible pour les produits achetes aux Etats-Unis uniquement)
Veuillez indiquer les informations ci-dessus. Le numéro de modèle et la date
de fabrication se situent sur une étiquette sur le produit. Remplissez la carte
d'enregistrement prépayée fournie avec le produit et envoyez-la aujourd'hui.
Pour enregistrer votre produit, veuillez vous rendre sur le site suivant :
www.nunababy.com
Cliquez sur le lien « Enregistrer un équipement » dans la page d'accueil
Garantie
Nous avons conçu spécialement nos produits de haute qualité afin qu'ils
puissent accompagner le développement de votre enfant et de votre famille.
Nous soutenons notre produit en couvrant notre matériel par une garantie
personnalisée, commençant le jour de son achat. Veuillez disposer de la preuve
d'achat, du numéro de modèle et de la date de fabrication lorsque vous nous
contactez.
Pour des informations sur la garantie, veuillez visiter :
www.nunababy.com
Cliquez sur le lien « Garantie » dans la page d'accueil
Contact
Pour des demandes de pièces de rechange, de service ou des questions
supplémentaires sur la garantie, veuillez contacter notre service client
Aux États-Unis
infousa@nunababy.com
www.nunababy.com
1.855.NUNA.USA
Au Royaume-Uni
infouk@nunababy.com
www.nunababy.com
Exigences d'utilisation avec un enfant
Veuillez consulter le tableau ci-dessous pour une utilisation correcte afin
d'assurer la sécurité de votre enfant. Quatre modes de portage sont disponibles.
L'utilisation d'un mode est déterminée par le poids de votre enfant.
Conforme aux normes EN 13209-2:2015
ASTM F2236-16a
Porté sur le dos
20-30 lb (9-13,5 kg)
6 mois et plus
Porté sur le dos
25-35 lb (11-16 kg)
9 mois et plus
Orienté vers l'arrière/
Réhausseur bébé
8-15 lb (3.5-7 kg)
0 - 4 mois
Orienté vers l'arrière
15-30 lb (7-13,5 kg)
4 mois et plus
21 22
Instructions CUDL™ clik Instructions CUDL™ clik

FR
FR
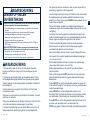
AVERTISSEMENT
Assurez-vous que toutes les boucles, attaches, sangles et réglages
sont bien fixés avant chaque utilisation.
Recherchez les coutures arrachées, les sangles ou les tissus
déchirés et les fermetures endommagées avant chaque utilisation.
Arrêtez d'utiliser le porte-bébé si des pièces sont manquantes ou
endommagées.
L'enfant doit être orienté vers vous jusqu'à ce qu'il puisse tenir la
tête droite.
Assurez-vous de la position correcte de l'enfant dans le produit, y
compris la position des jambes.
Assurez-vous que les jambes de bébé chevauchent l'assise et que
les bras passent dans les ouvertures pour les bras.
Vérifiez régulièrement que votre enfant est assis confortablement
et de manière sûre dans le porte-bébé, en particulier lorsque vous
l'utilisez porté sur le dos.
Pour éviter les risques de chute, assurez-vous que votre enfant est
positionné de manière sûre dans le porte-bébé.
Tenez bien votre bébé en permanence jusqu'à ce qu'il soit
correctement attaché.
Le réhausseur bébé doit être utilisé pour les enfants pesant entre 8
et 15 lb (3,5 kg et 7 kg) et doit UNIQUEMENT être utilisé avec votre
enfant orienté vers l'arrière.
Les nourrissons prématurés, souffrant de problèmes respiratoires
et de moins de 4 mois présentent un risque accru d'étouffement.
Pour les bébés présentant une insuffisance pondérale à la
naissance et les enfants souffrant de problèmes médicaux,
consultez un professionnel de santé avant d'utiliser le produit.
Lors de l'utilisation du porte-bébé souple, surveillez votre enfant.
Ayez conscience des dangers présents dans l'environnement
domestique, tels que les sources de chaleur, le renversement de
boissons chaudes.
Faites attention lorsque vous vous courbez ou vous penchez vers
l'avant ou sur le côté.
Votre équilibre peut être affecté par vos mouvements et ceux de
votre enfant.
Ce porte-bébé est conçu pour être utilisé uniquement par des
adultes marchant ou se tenant debout ou assis.
Ce porte-bébé n'est pas adapté à une utilisation pendant des
activités sportives.
N'UTILISEZ PAS ce porte-bébé souple si vous utilisez un
stimulateur cardiaque, car les boucles magnétiques peuvent
interférer avec le stimulateur cardiaque.
N'UTILISEZ JAMAIS un porte-bébé souple si votre équilibre ou
votre mobilité sont altérées en raison de l'exercice, de somnolence
ou de problèmes médicaux.
N'UTILISEZ JAMAIS un porte-bébé souple en entreprenant des
activités telles que la cuisine et le nettoyage qui impliquent une
source de chaleur ou une exposition à des produits chimiques.
NE PORTEZ JAMAIS un porte-bébé souple en conduisant ou en
étant passager d'un véhicule à moteur.
NE VOUS ALLONGEZ JAMAIS et ne dormez jamais avec bébé dans
le porte-bébé.
RISQUE DE CHUTE - Les bébés peuvent tomber par une ouverture pour
la jambe trop large ou hors du porte-bébé. Respectez les instructions
d'utilisation.
• Ajustez les ouvertures pour les jambes afin de les adapter parfaitement aux
jambes de bébé.
• Avant chaque utilisation, assurez-vous que toutes les boucles, fermetures
et réglages sont bien fixés.
• Soyez particulièrement prudent lorsque vous vous penchez ou marchez.
• Ne courbez jamais la taille ; pliez les genoux.
• Utilisez uniquement ce porte-bébé pour des enfants pesant entre 8 lb
(3,5 kg) et 35 lb (16 kg).
RISQUE D'ÉTOUFFEMENT - Les nourrissons de moins de 4 mois peuvent
s'étouffer dans ce produit si leur visage est appuyé fortement contre votre
corps.
• N'attachez pas bébé en le serrant trop fortement contre votre corps.
• Laissez de la place pour les mouvements de la tête.
• Protégez le visage du bébé contre les obstructions en permanence.
AVERTISSEMENT
RISQUE DE CHUTE ET
D'ÉTOUFFEMENT
23 24
Instructions CUDL™ clik Instructions CUDL™ clik
Sayfa yükleniyor...
Sayfa yükleniyor...
Sayfa yükleniyor...
Sayfa yükleniyor...
Sayfa yükleniyor...
Sayfa yükleniyor...
Sayfa yükleniyor...
Sayfa yükleniyor...
Sayfa yükleniyor...
Sayfa yükleniyor...
Sayfa yükleniyor...
Sayfa yükleniyor...
Sayfa yükleniyor...
Sayfa yükleniyor...
Sayfa yükleniyor...
Sayfa yükleniyor...
Sayfa yükleniyor...
Sayfa yükleniyor...
Sayfa yükleniyor...
Sayfa yükleniyor...
Sayfa yükleniyor...
Sayfa yükleniyor...
Sayfa yükleniyor...
Sayfa yükleniyor...
Sayfa yükleniyor...
Sayfa yükleniyor...
Sayfa yükleniyor...
Sayfa yükleniyor...
Sayfa yükleniyor...
Sayfa yükleniyor...
Sayfa yükleniyor...
Sayfa yükleniyor...
Sayfa yükleniyor...
Sayfa yükleniyor...
Sayfa yükleniyor...
Sayfa yükleniyor...
Sayfa yükleniyor...
Sayfa yükleniyor...
Sayfa yükleniyor...
Sayfa yükleniyor...
Sayfa yükleniyor...
Sayfa yükleniyor...
Sayfa yükleniyor...
Sayfa yükleniyor...
Sayfa yükleniyor...
Sayfa yükleniyor...
Sayfa yükleniyor...
Sayfa yükleniyor...
Sayfa yükleniyor...
Sayfa yükleniyor...
Sayfa yükleniyor...
Sayfa yükleniyor...
Sayfa yükleniyor...
Sayfa yükleniyor...
Sayfa yükleniyor...
Sayfa yükleniyor...
Sayfa yükleniyor...
Sayfa yükleniyor...
Sayfa yükleniyor...
Sayfa yükleniyor...
Sayfa yükleniyor...
Sayfa yükleniyor...
Sayfa yükleniyor...
Sayfa yükleniyor...
Sayfa yükleniyor...
Sayfa yükleniyor...
Sayfa yükleniyor...
Sayfa yükleniyor...
Sayfa yükleniyor...
Sayfa yükleniyor...
Sayfa yükleniyor...
Sayfa yükleniyor...
Sayfa yükleniyor...
Sayfa yükleniyor...
Sayfa yükleniyor...
Sayfa yükleniyor...
Sayfa yükleniyor...
Sayfa yükleniyor...
Sayfa yükleniyor...
Sayfa yükleniyor...
Sayfa yükleniyor...
Sayfa yükleniyor...
-
 1
1
-
 2
2
-
 3
3
-
 4
4
-
 5
5
-
 6
6
-
 7
7
-
 8
8
-
 9
9
-
 10
10
-
 11
11
-
 12
12
-
 13
13
-
 14
14
-
 15
15
-
 16
16
-
 17
17
-
 18
18
-
 19
19
-
 20
20
-
 21
21
-
 22
22
-
 23
23
-
 24
24
-
 25
25
-
 26
26
-
 27
27
-
 28
28
-
 29
29
-
 30
30
-
 31
31
-
 32
32
-
 33
33
-
 34
34
-
 35
35
-
 36
36
-
 37
37
-
 38
38
-
 39
39
-
 40
40
-
 41
41
-
 42
42
-
 43
43
-
 44
44
-
 45
45
-
 46
46
-
 47
47
-
 48
48
-
 49
49
-
 50
50
-
 51
51
-
 52
52
-
 53
53
-
 54
54
-
 55
55
-
 56
56
-
 57
57
-
 58
58
-
 59
59
-
 60
60
-
 61
61
-
 62
62
-
 63
63
-
 64
64
-
 65
65
-
 66
66
-
 67
67
-
 68
68
-
 69
69
-
 70
70
-
 71
71
-
 72
72
-
 73
73
-
 74
74
-
 75
75
-
 76
76
-
 77
77
-
 78
78
-
 79
79
-
 80
80
-
 81
81
-
 82
82
-
 83
83
-
 84
84
-
 85
85
-
 86
86
-
 87
87
-
 88
88
-
 89
89
-
 90
90
-
 91
91
-
 92
92
-
 93
93
-
 94
94
-
 95
95
-
 96
96
-
 97
97
-
 98
98
-
 99
99
-
 100
100
-
 101
101
-
 102
102


diğer dillerde
- slovenčina: Nuna CUDL Clik Používateľská príručka
- italiano: Nuna CUDL Clik Manuale utente
- dansk: Nuna CUDL Clik Brugermanual
- română: Nuna CUDL Clik Manual de utilizare

