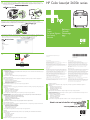
HP COLOR LASERJET 2600N PRINTER Hızlı başlangıç Kılavuzu
- Tip
- Hızlı başlangıç Kılavuzu

Macintosh USB
Macintosh USB
Macintosh USB
www.hp.com/support/clj2600n
© 2005 Hewlett-Packard Development Company, L.P.
www.hp.com
Informations de copyright
© 2005 Copyright Hewlett-Packard Development Company, L.P.
Il est interdit de reproduire, adapter ou traduire ce manuel sans autorisation expresse par
écrit, sauf dans les cas permis par les lois régissant les droits d'auteur.
Les informations contenues dans ce document sont sujettes à modification sans préavis.
Les seules garanties concernant les produits et services HP sont énoncées dans la garantie
qui accompagne ces produits et services. Rien en ceci ne devra être interprété comme
constituant une garantie supplémentaire. HP ne pourra être tenue pour responsable des
erreurs techniques et rédactionnelles ou des omissions présentes dans ce document.
Edition 1, 2/2005
Réglementations de la FCC
Ce matériel a été testé et déclaré conforme aux limites imposées à un appareil numérique de
classe B, en vertu de l'article 15 des réglementations de la FCC. Ces limites sont conçues
pour assurer une protection raisonnable contre les interférences nuisibles dans une
installation résidentielle. Ce matériel génère, utilise et peut émettre de l'énergie sous forme
de fréquences radio. Si ce matériel n'est pas installé et utilisé conformément aux instructions,
il peut causer des interférences nuisibles aux communications radio. Toutefois, aucune
garantie n'est donnée concernant l'absence d'interférences pour une installation particulière.
Si cet équipement produit des interférences nuisibles à la réception radio ou télévision, ce
que vous pouvez déterminer en éteignant puis en rallumant l'appareil, essayez de résoudre
le problème de l'une des manières suivantes :
•
Modifiez l'orientation de l'antenne de réception ou déplacez-la.
•
Augmentez la distance séparant l'équipement du récepteur.
•
Raccordez l'appareil à une prise d'un circuit différent de celui sur lequel est branché le
récepteur.
•
Demandez conseil à votre revendeur ou à un spécialiste radio/TV.
Tout changement ou modification de l'imprimante n'ayant pas été expressément approuvé
par HP peut entraîner la révocation du droit de l'utilisateur à exploiter cet appareil. Pour des
raisons de conformité aux limites de la classe B de l'article 15 des réglementations de la
FCC, il est nécessaire d'utiliser un câble d'interface blindé.
HP Color LaserJet 2600n series
8
9
•
Connect USB cable to printer and computer
•
USB
•
USB
•
USB êàáåë³í ïðèíòåð ìåí êîìïüþòåðãå æàë¬à¦ûç
•
USB
•
Yazıcıya ve bilgisayara USB kablosunu takın
•
' USB '
•
Connectez le câble
USB à l’imprimante et à l’ordinateur
•
•
Install software and reboot computer
•
•
µ
•
Áà¬äàðëàìàëûº æàñàºòàìàíû îðíàòû¦ûç äà, êîìïüþòåð æµìûñûí ºàéòà áàñòà¦ûç
•
•
Yazılımı yükleyip bilgisayarı yeniden başlatın
•
'
•
Installez le logiciel, puis relancez l’ordinateur
•
•
Use Print Center to add USB printer
•
Print Center ( ) USB
•
USB Print Center
•
USB ïðèíòåð³í ¯ñòåó ¯ø³í Print Center ïàéäàëàíû¦ûç
•
Print Center USB
•
USB yazıcısı eklemek için Print Center’ı (Yazdırma Merkezi) kullanın
•
USB
•
Utilisez le centre d’impression pour ajouter l’imprimante USB
•
•
Finished
•
•
•
Àÿºòàëäû
•
•
Son
•
•
Terminé
•
Start
µ
Iñêå ºîñó
Başlangıç
Démarrage
English῝․― ‚‛—‒
ᡘᡘᡔᡚᡖᡗ䵢
—‚ ‗‛…—
¼àçàº
¼àçàº
ò
³
ë
³
῭”‛‛—‒–Türkçe
. CD-ROM,
.
-
-
-
-
www.hp.com/support/clj2600n
Ek Bilgiler
Aşağıdaki konular hakkında daha fazla bilgi edinmek için yazıcıyla birlikte gelen CD-ROM’daki elektronik Kullanıcı
Kılavuzu’na bakın:
- Ayrıntılı kullanıcı yönergeleri
- Sorun giderme bilgileri
- Önemli güvenlik uyarısı
- Düzenleme bilgileri
Bu bilgilere www.hp.com/support/clj2600n adresinden de erişilebilir.
.
CD-ROM, .
-
-
-
-
web- www.hp.com/support/clj2600n
¼îñûìøà àºïàðàò
Ò£ìåíäåãi ì¡ñåëåëåð òóðàëû òîëû¬ûðຠàºïàðàò àëó ¯øií ïðèíòåðìåí áiðãå æåòêiçiëåòií CD-ROM-äà¬û
Ïàéäàëàíóøûíû¦ ýëåêòðîíäûº íµñºàóëû¬ûí ºàðà¦ûç.
- Ïàéäàëàíóøû¬à àðíàë¬àí åãæåé-òåãæåéë³ íµñºàóëàð
- Àºàóëûºòû æîþ æ£í³íäåã³ àºïàðàò
- ¼àó³ïñ³çä³ê òóðàëû ìà¦ûçäû õàáàðëàìà
- ¼µºûºòûº àºïàðàò
Áµë àºïàðàòòû ñîíäàé-ຠwww.hp.com/support/clj2600n ñàéòûíàí òàáó¬à áîëàäû
! " CD-ROM #
µ.
- $µ "
- µ µ%
- µ %
- µ#
# www.hp.com/support/clj2600n
, ,
- .
-
-
-
-
www.hp.com/support/clj2600n
Additional Information
See the electronic User Guide on the CD-ROM that came with the printer for more information about the following topics.
- Detailed user instructions
- Troubleshooting information
- Important safety notice
- Regulatory information
This information is also available at www.hp.com/support/clj2600n
Copyright Information
© 2005 Copyright Hewlett-Packard Development Company, L.P.
Reproduction, adaptation or translation without prior written permission is prohibited, except
as allowed under the copyright laws.
The information contained herein is subject to change without notice.
The only warranties for HP products and services are set forth in the express warranty
statements accompanying such products and services. Nothing herein should be construed as
constituting an additional warranty. HP shall not be liable for technical or editorial errors or
omissions contained herein.
Edition 1, 2/2005
FCC regulations
This equipment has been tested and found to comply with the limits for a Class B digital
device, pursuant to Part 15 of the FCC rules. These limits are designed to provide reasonable
protection against harmful interference in a residential installation. This equipment generates,
uses, and can radiate radio frequency energy. If this equipment is not installed and used in
accordance with the instructions, it might cause harmful interference to radio
communications. However, there is no guarantee that interference will not occur in a
particular installation. If this equipment does cause harmful interference to radio or television
reception, which can be determined by turning the equipment off and on, the user is
encouraged to try to correct the interference by one or more of the following measures:
•
Reorient or relocate the receiving antenna.
•
Increase separation between equipment and receiver.
•
Connect equipment to an outlet on a circuit different from that to which the receiver is
located.
•
Consult your dealer or an experienced radio/TV technician.
Any changes or modifications to the printer that are not expressly approved by HP could void
the user's authority to operate this equipment. Use of a shielded interface cable is required to
comply with the Class B limits of Part 15 of FCC rules.
Informations supplémentaires
Pour plus d’informations concernant les rubriques suivantes, reportez-vous au manuel d’utilisation électronique situé sur
le CD-ROM livré avec l’imprimante.
- Instructions détaillées destinées à l’utilisateur
- Informations sur le dépannage
- Notice importante de sécurité
- Informations réglementaires
Ces informations sont également disponibles à l’adresse suivante : www.hp.com/support/clj2600n
Français
*Q6455-90934*
*Q6455-90934*
Q6455-90934

.
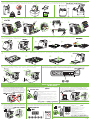
1
1 2 3 4
1 2 3 42
1 2 3
4
5
1
2
4x
4x
3
Windows USB
Windows USB
Windows USB
•
Remove shipping tape
•
•
µ
•
Îðàì òàñïàëàðûí àëûï òàñòà¦ûç
•
•
Ambalaj bantını çıkartın
•
•
Enlevez le ruban d’expédition
•
•
Install accessories
•
•
µ
•
Êåðåê-æàðàºòàðäû îðíàòó
•
•
Aksesuarları
takın
•
•
Installez les accessoires
•
•
Remove paper tray lock
•
•
•
¼à¬àç íàóàñûíû¦ áåê³òïåñ³í àëû¦ûç
•
•
Kağıt tepsisi kilidini çıkartın
•
•
Enlevez le verrou du bac à papier
•
•
Load paper into tray
•
•
•
Íàóà¬à ºà¬àç æ¯êò妳ç
•
•
Tepsiye kağıt yerleştirin
•
•
Chargez le papier dans le bac
•
•
Connect power
•
•
•
Òîê ê£çiíå ºîñû¦ûç
•
•
Güç kaynağına bağlayın
•
'
•
Branchez l’imprimante à la source d’alimentation
•
•
Set default language and paper size
•
•
µ µ
•
¢äåïê³ ò³ëä³ æ¡íå ºà¬àç ì£ëøåð³í îðíàòû¦ûç
•
•
Varsayılan dili ve kağıt boyutunu ayarlayın
•
•
Définissez la langue et la taille de papier par défaut
•
•
Go to step 6, 7, or 8 to finish
•
6, 7 8,
•
µ 6, 7 8
•
ÀÿºòàóÀÿºòàó ¯ø³í¯ø³í 6- 6-øûøû, 7-, 7-ø³ø³ íåìåñåíåìåñå 8- 8-ø³ø³ ºàäàìäûºàäàìäû æàñà¦ûçæàñà¦ûç
•
6, 7 8
•
İşlemi tamamlamak için 6., 7. veya 8. adımları uygulayın
•
, 6, 7 8
•
Passez à l’étape 6, 7 ou 8 pour terminer
•
•
Do NOT connect USB until prompt
•
USB ,
•
!"# USB µ
•
Òàëàï åò³ëìåé³íøå USB êàáåë³í æàë¬àìà¦ûç
•
USB
•
İstenene dek USB bağlantısını yapmayın
•
'
USB, '
•
NE connectez PAS le câble USB tant qu’il
ne vous l’a pas été demandé
•
•
Windows and Macintosh connect LAN (optional)
•
Windows Macintosh
()
•
LAN Windows Macintosh ()
•
Windows áåí Macintosh
ºîñó¬à àðíàë¬àí æåðã³ë³êò³ æåë³ (ºîñûìøà)
•
Windows Macintosh
() ( )
•
Windows ve Macintosh LAN bağlantısı (isteğe bağlı)
•
' LAN Windows Macintosh ( )
•
Connexion à un réseau de type
LAN sous Windows et Macintosh (facultatif)
•
•
Print configuration report for IP address or mDNS name
•
IP
mDNS
•
$ µ% IP µ mDNS
•
IP ìåêåí-æàéû
íåìåñå mDNS àòàóû ¯ø³í ³øºµðûëûìäàó åñåá³í áàñûï øû¬àðó
•
IP- mDNS
•
IP adresi veya mDNS adı için yapılandırma raporunu yazdırın
•
IP- mDNS
•
Imprimez le rapport de configuration pour l’adresse IP ou le nom mDNS
•
•
Install software
•
•
$ µ
•
Áà¬äàðëàìàëûº æàñàºòàìàíû îðíàòû¦ûç
•
•
Yazılımı yükleyin
•
•
Installez le logiciel
•
•
Finished
•
•
•
Àÿºòàëäû
•
•
Son
•
•
Terminé
•
•
Use Print Center to add Rendezvous Printer
•
Print Center ( ),
Rendezvous ()
•
& % Rendezvous Print Center
•
Rendezvous ïðèíòåð³í ¯ñòåó ¯ø³í Print Center
ïàéäàëàíû¦ûç
•
Print Center Rendezvous Printer
•
Rendezvous Yazıcısı eklemek için Print Center’ı
(Yazdırma Merkezi) kullanın
•
Rendezvous
•
Utilisez le centre d’impression pour ajouter l’imprimante Rendezvous
•
Macintosh
•
Finished
•
•
•
Àÿºòàëäû
•
•
Son
•
•
Terminé
•
•
Install software
•
•
$ µ
•
Áà¬äàðëàìàëûº æàáäûºòàóäû îðíàòû¦ûç
•
•
Yazılımı yükleyin
•
•
Installez le logiciel
•
•
Connect USB cable at prompt
•
USB ,
•
USB '
•
Òàëàï åò³ëãåíäå USB êàáåë³í æàë¬à¦ûç
•
USB
•
İstendiğinde USB kablosunu takın
•
' USB, '
•
Connectez le câble USB quand la demande
vous est faite
•
If the Welcome screen does not open, double-click on setup.exe on the CD-ROM.
Welcome ( ) ,
setup.exe .
%µ, setup.exe
CD-ROM.
Õîø êåë䳦³ç òåðåçåñ³ àøûëìàéòûí áîëñà, CD-ROM-äà¬û
setup.exe
¯ñò³íåí åê³
ðåò øåðò³¦³ç.
, setup.exe
CD-ROM.
Karşılama ekranı açılmazsa, CD-ROM’daki setup.exe uygulamasını çift tıklatın.
, setup.exe CD-ROM.
Si l’écran de bienvenue ne s’ouvre pas, double-cliquez sur le fichier setup.exe sur
le CD-ROM.
1
23
4
5
6
7
8
407 mm
(16.0 in.)
373 mm
(14.7 in.)
660 mm
(26.8 in.)
360.7 mm
(14.2 in.)
18 Kg.
40 lbs
•
Install in a well-ventilated, dust-free area
•
,
•
µ 'µ %
•
Æàºñû æåëäåò³ëåò³í, øঠò¯ñïåéò³í æåðãå îðíàòû¦ûç
•
•
İyi havalandırılan tozsuz bir yere kurun
•
,
•
Installez l'imprimante dans une zone correctement ventilée et libre de poussière
•
-
 1
1
-
 2
2


HP COLOR LASERJET 2600N PRINTER Hızlı başlangıç Kılavuzu
- Tip
- Hızlı başlangıç Kılavuzu
diğer dillerde
İlgili makaleler
-
HP COLOR LASERJET 1600 PRINTER Hızlı başlangıç Kılavuzu
-
-
-
-
-
HP Photosmart 8400 Printer series Başvuru Kılavuzu
-
-
HP LaserJet 1200 Printer series Hızlı başlangıç Kılavuzu
-
HP LaserJet P2055 Printer series Kullanım kılavuzu
-