
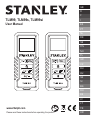
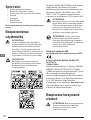
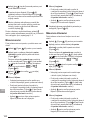
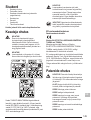
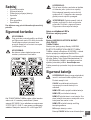
TLM99, TLM99s, TLM99si
User Manual
Please read these instructions before operating the product.
www.2helpU.com
DOC100270398
GB
NL
GR
I
FIN
HU
BG
LV
D
DK
CZ
ES
NO
SK
RO
LT
F
SE
RU
PT
PL
SI
EE
TR
HR

C
1
2
E
2
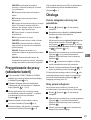
Figures
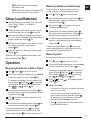
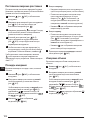
A
4
STHT77509
6.21ft
6.17ft
1
2
6.17ft
4
3
6.21ft
B
1
2
5
2
D
AAA
6
1
3
7
5
6

2
1
3
F G
H

4
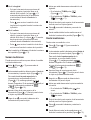
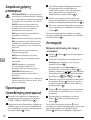
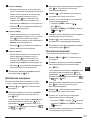
GB
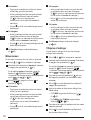
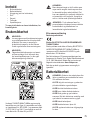
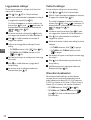
Contents
• User Safety
• Battery Safety
• Setup (Load Batteries)
• Operation
• Warranty
• Error Codes
• Specications
Retain all sections of this manual for future
reference.
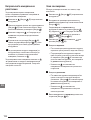
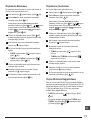
User Safety
WARNING:
Carefully read the Safety Instructions and
Product Manual before using this product.
The person responsible for the product must
ensure that all users understand and adhere to
these instructions.
WARNING:
The following label information is placed on
your laser tool to inform you of the laser class
for your convenience and safety.
STHT77509
STHT77511
TLM99s
S
S
SI
TLM99si
SI
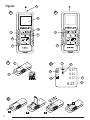
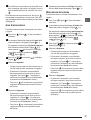
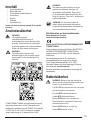
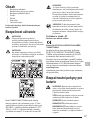
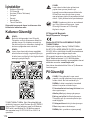
The TLM99/TLM99s/TLM99si tool emits a visible laser
beam, as shown in Figure A. The laser beam emitted
is Laser Class 2 per IEC 60825-1 and complies with
21 CFR 1040.10 and 1040.11 except for deviations
pursuant to Laser Notice No. 50, dated June 24, 2007.
WARNING:
While the laser tool is in operation, be careful
not to expose your eyes to the emitting laser
beam (red light source). Exposure to a laser
beam for an extended time period may be
hazardous to your eyes. Do not look into
the beam with optical aids.
WARNING: To reduce the risk of injury, user
must read the Product User manual, Laser
Safety manual, and Battery Safety information.
EC-Declaration of Conformity
Radio Equipment Directive
Stanley Laser Distance Measurer
TLM99s and TLM99si
Stanley hereby declares that the Stanley Laser
Distance Measurer TLM99s/TLM99si is in compliance
with the Directive 2014/53/EU and to all applicable EU
directive requirements.
The full text of the EU Declaration of Conformity
can be requested at Stanley Tools, Egide
Walschaertsstraat 14-16, 2800 Mechelen, Belgium
or is available at the following internet address:
www.2helpu.com.
Search by the Product and Type Number indicated on
the nameplate.
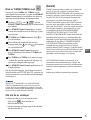
Battery Safety
WARNING: Batteries can explode or leak and
cause serious injury or re. To reduce the risk:
ALWAYS follow all instructions and warnings
on the battery label and package.
DO NOT short any battery terminals.
DO NOT charge alkaline batteries.
DO NOT mix old and new batteries. Replace
all of them at the same time with new batteries
of the same brand and type.
DO NOT mix battery chemistries.
DO NOT dispose of batteries in re.
ALWAYS keep batteries out of reach of
children.
ALWAYS remove batteries if the device will not
be used for several months.

5
GB
NOTE: Ensure that the recommended
batteries are used.
NOTE: Ensure the batteries are inserted in the
correct manner, with the correct polarity.
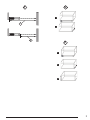
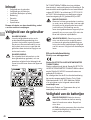
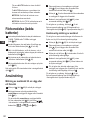
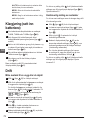
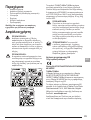
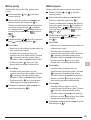
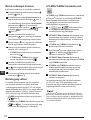
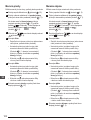
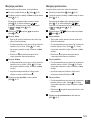
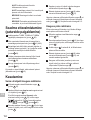
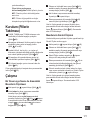
Setup (Load Batteries)
1.
Locate the battery compartment latch on the back
of the TLM99, TLM99s, or TLM99si tool
(Figure
C
#2).
2.
Using your finger, pull the latch up to unlock and
remove the battery door (Figure
D
#1 and #2).
3.
Insert two AAA batteries, making sure to position
the - and + ends of each battery as noted inside the
battery compartment (Figure
D
#3).
4.
Slide the pins at the bottom of the battery door into
the notches in the battery compartment
(Figure
D
#4).
5.
Push the battery door down until it snaps in place
(Figure
D
#5).
When the tool is ON, the battery level appears in the
display window (Figure
E
#1).
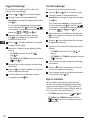
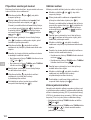
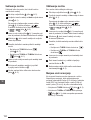
Operation
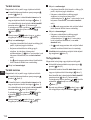
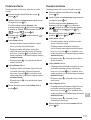
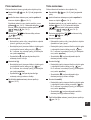
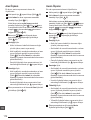
Measuring Distance to a Wall or Object
1.
Click (Figure
A
#5) to turn on the tool.
2.
The tool will measure the distance from the bottom
of the tool to the wall or object (Figure
F
#1).
To measure from the top of the tool instead of the
bottom (Figure
F
#2), hold for 2 seconds.
On the display window, the tool icon will change
from
to (Figure
E
#5).
3.
Point the laser at the top of the tool (Figure
A
#1)
toward the wall or object whose distance you need
to measure (Figure
F
).
4.
Click to measure the distance from the tool to
the wall or object.
5.
At the bottom of the display window (Figure
A
#2),
view the current measurement (Figure
E
#3).
To take a new measurement, click
to move the
current measurement up to the previous line on the
display window (Figure
E
#2). Then repeat steps 2-5.
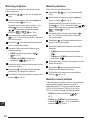
Measuring Distances Continuously
To take a series of measurements as you move
around, change to Continuous Measure mode.
1.
Click (Figure
A
#5) to turn on the tool.
2.
Point the laser at the top of the tool (Figure
A
#1)
toward the wall or object whose distance you need
to measure (Figure
F
).
3.
Click and hold for 2 seconds to turn on the
Continuous Measure mode.
4.
At the bottom of the display window (Figure
A
#2), view the current measurement (Figure
E
#3),
which will keep changing as you move the tool.
5.
To take the current measurement (from the tool to
the wall or object) and exit Continuous Measure
mode, click
.
To take a new measurement, click
to move the
current measurement up to the previous line on the
display window. Then repeat steps 2-5.
Measuring Area
You can measure the area of a wall, floor, or object.
1.
Click (Figure
A
#5) to turn on the tool.
2.
The tool will measure the distance from the bottom
of the tool to the wall or object (Figure
F
#1).
To measure from the top of the tool instead of the
bottom (Figure
F
#2), hold for 2 seconds.
On the display window, the tool icon will change
from
to (Figure
E
#5).
3.
Click to show on the display window
(Figure
E
#4).
4.
Measure the width.
• Point the top of the tool at one side of the target
(wall, floor, or object).
• Position the tool at one end of the target and
point the laser dot across the width. (Figure
G
#1 shows where to position the tool if you are
measuring from the bottom of the tool.)
• Click
to display the width measurement at the
top of the display window.

6
GB
5.
Measure the length.
• Position the tool at one end of the target and
point the laser dot across the length. (Figure
G
#2 shows where to position the tool if you are
measuring from the bottom of the tool.)
• Click
to display the length measurement on
the second line of the display window.
6.
View the Area measurement at the bottom of the
display window (Figure
E
#3).
Measuring Volume
You can measure the volume of a room or object.
1.
Click (Figure
A
#5) to turn on the tool.
2.
The tool will measure the distance from the bottom
of the tool to the wall or object (Figure
F
#1).
To measure from the top of the tool instead of the
bottom (Figure
F
#2), hold for 2 seconds.
On the display window, the tool icon will change
from
to (Figure
E
#5).
3.
Click twice to show on the display
window (Figure
E
#4).
4.
Measure the width.
• Point the top of the tool at one side of the target
(room or object).
• Position the tool at one end of the target and
point the laser dot across the width. (Figure
H
#1 shows where to position the tool if you are
measuring from the bottom of the tool.)
• Click
to display the width measurement at the
top of the display window.
5.
Measure the length.
• Position the tool at one end of the target and
point the laser dot across the length. (Figure
H
#2 shows where to position the tool if you are
measuring from the bottom of the tool.)
• Click
to display the length measurement on
the second line of the display window.
6.
Measure the height.
• Positon the tool at one end of the target and
point the laser dot across the height. (Figure
H
#3 shows where to position the tool if you are
measuring from the bottom of the tool).
• Click
to display the height measurement on
the third line of the display window.
7.
View the Volume measurement at the bottom of the
display window (Figure
E
#3).
Adding Measurements
You can add two measurements to get a total
measurement of the two distances.
1.
Click (Figure
A
#5) to turn on the tool.
2.
The tool will measure the distance from the bottom
of the tool to the wall or object (Figure
F
#1).
To measure from the top of the tool instead of the
bottom (Figure
F
#2), hold for 2 seconds.
On the display window, the tool icon will change
from
to (Figure
E
#5).
3.
Point the laser at the top of the tool (Figure
A
#1)
toward the wall or object whose distance you need
to measure.
4.
Click to measure the distance from the tool to
the wall or object.
5.
Indicate that you want to add this measurement to
the next measurement.
• On the TLM99 keypad, click
(Figure
A
#7).
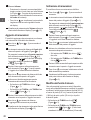
• On the TLM99s or TLM99si keypad, click
(Figure
B
#1).
6.
Point the laser at the top of the tool toward the next
wall or object.
7.
Click to measure the distance and add it to the
previous measurement.
8.
View the total of the two measurements at the
bottom of the display window (Figure
E
#3).
Sayfa yükleniyor ...
Sayfa yükleniyor ...

9
GB
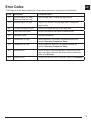
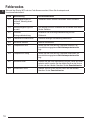
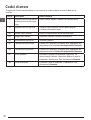
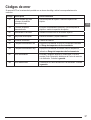
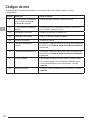
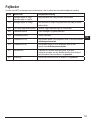
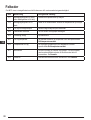
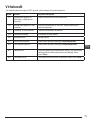
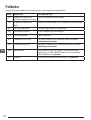
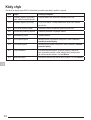
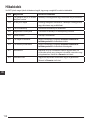
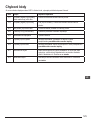
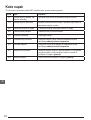
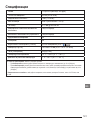
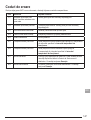
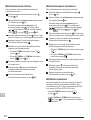
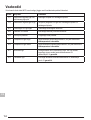
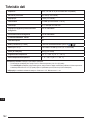
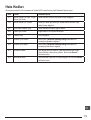
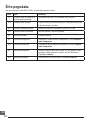
Error Codes
If INFO appears on the display window with a Code number, perform the corresponding Corrective Action.
Code Description Corrective Action
101 Received Signal Too Weak,
Measuring Time Too Long
Use the target plate or change the target surface.
102 Received Signal Too High Target is too reective. Use the target plate or change the
target surface.
201 Too Much Background Light Reduce the background light on the target area.
202 Laser Beam Interrupted Remove the obstacle and repeat the measurement.
203 Insufcient Power Replace the batteries.
301 Temperature Too High Allow the device to cool down to a temperature within the
specied Operating Temperature Range.
302 Temperature Too Low Allow the device to warm up to a temperature within the
specied Operating Temperature Range.
401 Hardware Error Switch the device on/off several times. If the error still occurs,
return the defective device to the Service Center or distributor.
Refer to the Warranty.
402 Unknown Error Contact the Service Center or distributor. Refer to the Warranty.

10
GB
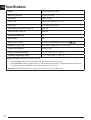
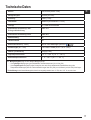
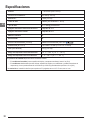
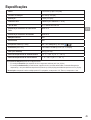
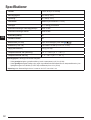
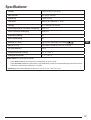
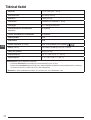
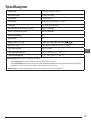
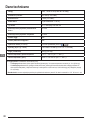
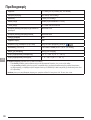
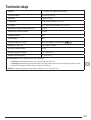
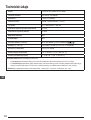
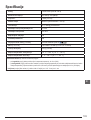
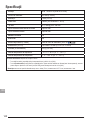
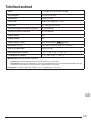
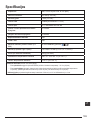
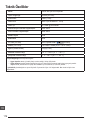
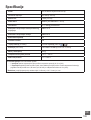
Specications
Range .1m to 30m (4in to 100ft)
Measuring Accuracy* ± 2mm (± 3/32in)*
Resolution** 1mm (1/16in)**
Laser Class Class 2 (IEC/EN60825-1: 2014)
Laser Type ≤ 1.0mW @ 620-690nm
Laser/Backlight Automatic Switch-off After 30s
Unit Automatic Switch-off After 90s
Continuous Measuring Yes
Area/Volume Yes
Battery Life (2 x AAA) Up to 3000 Measurements (2500 with
)
Dimension (H x D x W) 120 x 48.5 x 26mm (4.72 x 1.91 x 1.02in)
Weight (with Batteries) 100g (3.21oz)
Storage Temperature Range -10° C ~ +60 C (14° F ~ 140° F)
Operating Temperature Range 0° C ~ +40° C (32° F ~ 104° F)
*Measuring Accuracy depends on the current conditions:
• Under favorable conditions (good target surface and room temperature), up to 10m (33ft).
• Under unfavorable conditions (bright sunlight, a very weak reecting target surface, or large temperature uctuations), the
error can increase by to ± 0.25mm/m (± 0.003 in/ft) for distances over 10m (33ft).
**Resolution is the nest measurement you can see. In inches, that is 1/16". In mm, that is 1mm.
Sayfa yükleniyor ...
Sayfa yükleniyor ...
Sayfa yükleniyor ...
Sayfa yükleniyor ...
Sayfa yükleniyor ...

Fehlercodes
Wenn auf dem Display INFO und eine Code-Nummer erscheint, führen Sie die entsprechende
Korrekturmaßnahme durch.
Code Beschreibung Korrekturmaßnahme
101 Empfangenes Signal zu
schwach, Messung dauert
zu lange
Verwenden Sie die Zieltafel oder ändern Sie die Zieläche.
102 Das empfangene Signal ist
zu stark
Ziel reektiert zu stark. Verwenden Sie die Zieltafel oder ändern
Sie die Zieläche.
201 Zu starke
Hintergrundbeleuchtung
Reduzieren Sie die Hintergrundbeleuchtung auf den
Zielbereich.
202 Laserstrahl ist unterbrochen Hindernis beseitigen und Messung wiederholen.
203 Schwache Batterien Batterien austauschen.
301 Temperatur zu hoch Lassen Sie das Gerät auf eine Temperatur abkühlen, die
innerhalb des angegebenen Betriebstemperaturbereichs
liegt.
302 Temperatur zu niedrig Lassen Sie das Gerät auf eine Temperatur aufwärmen, die
innerhalb des angegebenen Betriebstemperaturbereichs
liegt.
401 Hardware-Fehler Schalten Sie das Gerät mehrmals ein und aus. Wenn der Fehler
weiterhin auftritt, senden Sie das defekte Gerät an das Service
Center oder den Händler. Beachten Sie die Garantiehinweise.
402 Unbekannter Fehler Wenden Sie sich an das Service Center oder den Händler.
Beachten Sie die Garantiehinweise.
D
16

Technische Daten
Bereich 1m bis 30m (4in bis 100ft)
Messgenauigkeit* ± 2mm (± 3/32in)*
Auösung** 1mm (1/16in)**
Laserklasse Klasse 2 (IEC/EN60825-1: 2014)
Lasertyp ≤ 1,0mW bei 620-690nm
Automatische Abschaltung Laser/
Hintergrundbeleuchtung
Nach 30s
Automatische Abschaltung Gerät Nach 90s
Dauermessung Ja
Fläche/Volumen Ja
Batteriebetriebszeit (2 x AAA) Bis zu 3000 Messungen (2500 mit
)
Abmessungen (H x T x B) 120 x 48,5 x 26mm (4,72 x 1,91 x 1,02in)
Gewicht (mit Batterien) 100g (3,21oz)
Lagertemperaturbereich -10° C ~ +60° C (14° F ~ 140° F)
Betriebstemperaturbereich 0° C ~ +40° C (32° F ~ 104° F)
Die *Messgenauigkeit hängt von den aktuellen Bedingungen ab:
• Unter günstigen Bedingungen (gute Zieloberäche und Raumtemperatur) bis zu 10m (33ft).
• Unter ungünstigen Bedingungen (helles Sonnenlicht, eine sehr wenig reektierende Zieloberäche oder große
Temperaturschwankungen) kann der Fehler bei Entfernungen über 10m (33ft) um ± 0,25mm/m (± 0,003 in/ft) höher liegen.
**Die Auösung ist das feinste Messergebnis, dass Ihnen angezeigt werden kann. In Zoll, also 1/16". In mm, also 1mm.
17
D
Sayfa yükleniyor ...
Sayfa yükleniyor ...
Sayfa yükleniyor ...
Sayfa yükleniyor ...
Sayfa yükleniyor ...

23
F
Codes erreurs
Si INFO apparaît dans la fenêtre d'affichage avec un numéro de Code, exécutez l'Action Corrective
correspondante.
Code Descriptif Action corrective
101 Signal reçu trop faible, Délai de
la prise de mesure trop long
Utilisez une plaque sur la cible ou changez de surface cible.
102 Signal reçu trop élevé La cible est trop rééchissante. Utilisez une plaque sur la cible
ou changez de surface cible.
201 Trop de lumière en arrière-plan Réduisez la lumière à l'arrière-plan de la zone cible.
202 Interruption du faisceau laser Retirez l'obstacle et répétez la prise de mesure.
203 Puissance insufsante Remplacez les piles.
301 Température trop élevée Laissez l'appareil refroidir à une température comprise dans la
plage de températures de fonctionnement spéciée.
302 Température trop faible Laissez l'appareil remonter à une température comprise dans la
plage de températures de fonctionnement spéciée.
401 Erreur Matérielle Éteignez et rallumez l'appareil plusieurs fois. Si l'erreur persiste,
renvoyez l'outil défectueux au centre d'assistance ou au
revendeur. Consultez la Garantie.
402 Erreur inconnue Contactez le Centre d'assistance ou le revendeur. Consultez
la Garantie.

F
24
Caractéristiques
Portée 1m à 30m (4in à 100ft)
Précision des mesures* ± 2mm (± 3/32in)*
Résolution** 1mm (1/16in)**
Classe laser Classe 2 (IEC/EN60825-1: 2014)
Type laser ≤ 1,0mW à 620-690nm
Extinction automatique Laser/Rétro-éclairage Après 30s
Extinction automatique de l'unité Après 90s
Mesure Continue Oui
Zone/Volume Oui
Durée de vie des piles (2 x AAA) Jusqu'à 3000 prises de mesures (2500 avec
)
Dimensions (H x P x L) 120 x 48,5 x 26mm (4,72 x 1,91 x 1,02in)
Poids (avec piles) 100 g (3,21 oz)
Plage de températures de stockage -10° C ~ +60 C (14° F ~ 140° F)
Plage de températures de fonctionnement 0° C ~ +40° C (32° F ~ 104° F)
*La précision de la prise de mesure dépend des conditions ambiantes :
• Si les conditions sont favorables (bonne surface de la cible et bonne température de la pièce), jusqu'à 10m (33ft).
• Si les conditions sont défavorables (forte lumière du soleil, surface de cible peu rééchissante, fortes uctuations des
températures), le taux d'erreur peut augmenter de ± 0,25mm/m (± 0,003 in/ft) pour des distances de plus de 10 m (33ft).
**Résolution est la plus afnée des mesures que vous puissiez voir. En pouces, 1/16". En mm, 1mm.
Sayfa yükleniyor ...
Sayfa yükleniyor ...

27
I
5.
Per effettuare la misurazione corrente (dal fondo
dello strumento alla parete o all’oggetto) e uscire
dalla modalità Misurazione continua, fare clic su
.
Per effettuare una nuova misurazione, fare clic su
per spostare la misurazione corrente verso l’alto, alla
riga precedente della finestra su display, quindi ripetere
i passaggi 2-5.
Area di misurazione
È possibile misurare l'area di una parete, pavimento
o oggetto.
1.
Fare clic su (Figura
A
n. 5) per accendere lo
strumento.
2.
Lo strumento misurerà la distanza dal fondo dello
stesso alla parete o all’oggetto (Figura
F
n. 1).
Per eseguire la misurazione dalla parte superiore
dello strumento anziché fondo (Figura
F
n. 2),
tenere premuto
per 2 secondi. Sul display
l’icona dello strumento cambierà da
a (Figura
E
n.5).
3.
Fare clic su per mostrare sul display
(Figura
E
n. 4).
4.
Misurare la larghezza.
• Puntare la parte superiore del misuratore a un
lato del target (parete, pavimento od oggetto).
• Posizionare lo strumento a una estremità
del target e puntare il punto laser su tutta la
larghezza. (La Figura
G
n. 1 mostra dove
posizionare lo strumento se si sta effettuando
la misurazione dal fondo dello stesso.)
• Fare clic su
per visualizzare la misura della
larghezza nella parte superiore della finestra
del display.
5.
Misurare la lunghezza.
• Posizionare lo strumento a una estremità
del target e puntare il punto laser su tutta la
lunghezza. (La Figura
G
n. 2 mostra dove
posizionare lo strumento se si sta effettuando
la misurazione dal fondo dello stesso.)
• Fare clic su
per visualizzare la misura della
lunghezza nella seconda riga della finestra
del display.
6.
Visualizzare la misurazione dell'Area nella parte
inferiore della finestra sul display (Figura
E
n. 3).
Misurazione del volume
È possibile misurare il volume di una stanza o di un
oggetto.
1.
Fare clic su (Figura
A
n. 5) per accendere il
misuratore.
2.
Lo strumento misurerà la distanza dal fondo dello
stesso alla parete o all’oggetto (Figura
F
n. 1).
Per eseguire la misurazione dalla parte superiore
dello strumento anziché fondo (Figura
F
n. 2),
tenere premuto
per 2 secondi. Sul display
l’icona dello strumento cambierà da
a (Figura
E
n. 5).
3.
Fare clic su due volte per mostrare sul
display (Figura
E
n. 4).
4.
Misurare la larghezza.
• Puntare la parte superiore del misuratore
a un lato del target (stanza od oggetto).
• Posizionare lo strumento a una estremità
del target e puntare il punto laser su tutta la
larghezza. (La Figura
H
n. 1 mostra dove
posizionare lo strumento se si sta effettuando
la misurazione dal fondo dello stesso.)
• Fare clic su
per visualizzare la misura della
larghezza nella parte superiore della finestra
del display.
5.
Misurare la lunghezza.
• Posizionare lo strumento a una estremità
del target e puntare il punto laser su tutta la
lunghezza. (La Figura
H
n. 2 mostra dove
posizionare lo strumento se si sta effettuando
la misurazione dal fondo dello stesso.)
• Fare clic su
per visualizzare la misura della
lunghezza nella seconda riga della finestra
del display.
Sayfa yükleniyor ...
Sayfa yükleniyor ...

I
30
Codici di errore
Se appare INFO sulla finestra del display con un numero di un codice, eseguire la corrispondente azione
correttiva.
Codice Descrizione Azione correttiva
101 Segnale ricevuto troppo debole
o tempo di misurazione troppo
lungo
Usare la piastra segnale o cambiare la supercie target.
102 Segnale ricevuto troppo forte Il target è troppo riettente. Usare la piastra segnale
o cambiare la supercie target.
201 Sfondo troppo luminoso Ridurre la luminosità dello sfondo dell’area target.
202 Raggio laser interrotto Rimuovere l'ostacolo e ripetere la misurazione.
203 Alimentazione insufciente Sostituire le batterie.
301 Temperatura troppo elevata Lasciare che il dispositivo si raffreddi no a raggiungere una
temperatura inclusa nell'Intervallo temperature di esercizio.
302 Temperatura troppo bassa Lasciare che il dispositivo si raffreddi no a raggiungere una
temperatura inclusa nell'Intervallo temperature di esercizio.
401 Errore hardware Accendere e spegnere ripetutamente il dispositivo. Se
l'errore persiste, restituire il dispositivo difettoso al centro di
assistenza o al distributore. Fare riferimento alla Garanzia.
402 Errore sconosciuto Contattare il centro di assistenza o il distributore. Fare
riferimento alla Garanzia.

31
I
Speciche
Intervallo Da 1 m a 30 m (da 4 in a 100 ft)
Accuratezza di misurazione* ± 2 mm (± 3/32 in)*
Risoluzione** 1 mm (1/16 in)**
Classe laser Classe 2 (IEC/EN60825-1: 2014)
Tipo laser ≤ 1,0 mW @ 620-690 nm
Spegnimento automatico laser/
retroilluminazione
Dopo 30 secondi
Spegnimento automatico dell'unità Dopo 90s
Misurazione continua Sì
Area/Volume Sì
Durata delle batterie (2 x AAA) Fino a 3000 misurazioni (2.500 con
)
Dimensioni (A x P x L) 120 x 48,5 x 26 mm (4,72 x 1,91 x 1,02 in)
Peso (batterie incluse) 100 g (3,21 oz)
Intervallo temperature di stoccaggio -10° C ~ +60 C (14° F ~ 140° F)
Intervallo temperature di esercizio 0° C ~ +40° C (32° F ~ 104° F)
*L'accuratezza di misurazione dipende dalle condizioni operative:
• In condizioni operative favorevoli (supercie del target e temperatura ambientale buone) no a 10 m (33 ft).
• In condizioni operative sfavorevoli (sfondo fortemente illuminato, target molto poco riettente o forti oscillazioni della
temperatura), l'errore può aumentare di ± 0,25mm/m (± 0,003 in/ft) per distanze superiori a 10 m (33 ft).
**Risoluzione è la misurazione più ne visibile. In pollici, è 1/16”. In mm, è 1 mm.

ES
32
Contenido
• Seguridad del usuario
• Seguridad de la batería
• Conguración (Cargar baterías)
• Funcionamiento
• Garantía
• Códigos de error
• Especicaciones
Por favor, guarde este manual al completo para
futura referencia.
Seguridad del usuario
ADVERTENCIA:
Lea con atención las instrucciones de
seguridad y el manual del producto
antes de usar el producto. La persona
responsable del producto debe asegurarse
de que todos los usuarios entiendan
y cumplan con estas instrucciones.
ADVERTENCIA:
La siguiente etiqueta de información
se coloca en su herramienta láser para
informarle de la clase de láser, para su
comodidad y seguridad.
STHT77509
STHT77511
TLM99s
S
S
SI
TLM99si
SI
La herramienta TLM99/TLM99s/TLM99si emite un
rayo láser visible, tal y como se muestra en la Figura
A. El rayo láser emitido es un Láser Clase 2 de
conformidad con la norma IEC 60825-1 y cumple las
normas 21 CFR 1040.10 y 1040.11, excepto en las
desviaciones, que es conforme a lo establecido en el
Laser Notice n.º 50, de 24 de junio de 2007.
ADVERTENCIA:
Mientras esté en uso la herramienta láser,
tenga cuidado de no exponer la vista al rayo
láser (fuente de luz roja). La exposición
a un rayo láser durante un largo período de
tiempo podría ser peligroso para sus ojos.
No mire directamente al rayo con ayudas
ópticas.
ADVERTENCIA: Para reducir el riesgo de
lesiones, el usuario debe leer el manual
de usuario del producto, el manual de
seguridad del láser y la información de
seguridad de la batería.
Declaración de conformidad CE
Directiva sobre equipos radioeléctricos
MEDIDOR LÁSER DE DISTANCIA CON
BLUETOOTH Stanley
TLM99s/TLM99si
Stanley declara por la presente que la MEDIDOR
LÁSER DE DISTANCIA CON BLUETOOTH Stanley
TLM99s/TLM99si cumple todos los requisitos de
la directiva 2014/53/UE y de todas las directivas
aplicables de la Unión Europea.
El texto completo de la Declaración de conformidad
UE puede solicitarse a Stanley Tools, Egide
Walschaertsstraat 14-16, 2800 Mechelen, Bélgica,
y también está disponible en la siguiente dirección
web: www.2helpu.com.
Buscar por número de producto y tipo indicado en la
placa de datos
.
Sayfa yükleniyor ...
Sayfa yükleniyor ...
Sayfa yükleniyor ...
Sayfa yükleniyor ...

37
ES
Códigos de error
Si aparece INFO en la ventana de la pantalla con un número de código, realice la correspondiente acción
correctiva.
Código Descripción Acción correctora
101 Señal recibida muy débil
o tiempo de medición
demasiado largo
Utilice una placa de objetivo o cambie la supercie de
objetivo.
102 La señal recibida es
demasiado alta
El objetivo es demasiado reectante. Utilice una placa de
objetivo o cambie la supercie de objetivo.
201 Demasiada luz de fondo Reduzca la luz de fondo en la zona del objetivo.
202 Rayo láser interrumpido Elimine el obstáculo y repita la medición.
203 Potencia insuciente Cambie las baterías.
301 Temperatura demasiado alta Deje que la herramienta se enfríe a la temperatura indicada
en Rango de temperatura de funcionamiento.
302 Temperatura demasiado baja Deje que la herramienta se caliente hasta la temperatura
indicada en Rango de temperatura de funcionamiento.
401 Error de hardware Encienda y apague el dispositivo varias veces. Si el error
persiste, lleve el dispositivo defectuoso al Centro de servicios
o al distribuidor. Consulte la garantía.
402 Error desconocido Contacte con el Centro de servicios o el distribuidor. Consulte
la garantía.

ES
38
Especicaciones
Alcance . 1 m a 30 m (4 in a 100 ft)
Precisión de la medición* ± 2 mm (± 3/32 in)*
Resolución** 1 mm (1/16 in)**
Clase de láser Clase 2 (IEC/EN60825-1: 2014)
Tipo de láser ≤ 1.0 mW @ 620-690 nm
Apagado automático láser/retroiluminación Después de 30 s
Apagado automático unidad Después de 90 s
Medición continua Sí
Área/volumen Sí
Duración de las baterías (2 x AAA) Hasta 3000 mediciones (2500 con
)
Dimensiones (H x D x A) 120 x 48.5 x 26 mm (4.72 x 1.91 x 1.02 in)
Peso (con baterías) 100 g (3.21 oz)
Rango de temperatura de almacenamiento -10 °C ~ +60 °C (14 °F ~ 140 °F)
Rango de temperatura de funcionamiento 0 °C ~ +40 °C (32 °F ~ 104 °F)
*La precisión de la medida dependerá de las condiciones actuales:
• En condiciones favorables (buena supercie del objetivo y temperatura ambiente), hasta 10 m (33 ft).
• En condiciones desfavorables (luz solar brillante, supercie del objetivo poco reectante o grandes uctuaciones de
temperatura), el error puede aumentar de ± 0.25 mm/m (± 0.003 in/ft) para distancias superiores a 10 m (33 ft).
**La resolución es la medición más na que se puede ver. En pulgadas, esto es 1/16". En mm, esto es 1 mm.
Sayfa yükleniyor ...

PT
40
NÃO provoque um curto-circuito nos
terminais das baterias.
NÃO carregue baterias alcalinas.
NÃO misture baterias novas e antigas.
Substitua todas as baterias ao mesmo
tempo por novas da mesma marca e tipo.
NÃO misture os produtos químicos das
baterias.
NÃO deite as baterias numa fogueira.
Mantenha SEMPRE as baterias fora do
alcance das crianças.
Retire SEMPRE as baterias se não utilizar
o dispositivo durante vários meses.
NOTA: Certique-se de que utiliza as
baterias recomendadas.
NOTA: Certique-se de que as baterias
estão inseridas correctamente, com
a polaridade correcta.
Instalação (colocar as
baterias)
1.
Procure a patilha do compartimento das baterias
na parte de trás da ferramenta TLM99, TLM99s ou
TLM99si (Figura
C
n.º 2).
2.
Com um dedo, puxe a patilha para baixo para
desbloquear e remover a porta das baterias
(Figura
D
n.º 1 e n.º 2).
3.
Insira duas pilhas AAA, certificando-se de que
posiciona as extremidades - e + de cada bateria,
como indicado no compartimento da bateria
(Figura
D
n.º 3).
4.
Faça deslizar os pinos na parte inferior da porta
das pilhas nas ranhuras do compartimento das
pilhas (Figura
D
n.º 4).
5.
Empurre a porta para baixo até encaixar no
respectivo local (Figura
D
n.º 5).
Quando a ferramenta é ligada, o nível de carga das
pilhas na janela do visor (Figura
E
n.º 1).
Funcionamento
Medir a distância até uma parede ou
objecto
1.
Clique em (Figura
A
n.º 5) para ligar
a ferramenta.
2.
A ferramenta mede a distância a partir da parte
inferior da ferramenta até à parede ou objecto
(Figura
F
n.º 1).
Para fazer medições a partir da parte superior da
ferramenta em vez da parte inferior (Figura
F
n.º
2), mantenha premido
durante 2 segundos.
Na janela de visualização, o ícone de ferramenta
muda de
para (Figura
E
n.º 5).
3.
Aponte o laser na parte superior da ferramenta
(Figura
A
n.º 1) para a parede ou objecto cuja
distância necessita de medir (Figura
F
).
4.
Clique em para medir a distância entre
a ferramenta e a parede ou objecto.
5.
Na parte inferior da janela de visualização
(Figura
A
n.º 2), visualize a medição actual
(Figure
E
n.º 3).
Para fazer uma nova medição, clique em
para
mover a medição actual até à linha anterior na janela
de visualização (Figura
E
n.º 2). Em seguida, repita
os passos 2 a 5.
Medir distâncias de maneira contínua
Para fazer várias medições enquanto se desloca,
mude para o modo Medição contínua.
1.
Clique em (Figura
A
n.º 5) para ligar
a ferramenta.
2.
Aponte o laser na parte superior da ferramenta
(Figura
A
n.º 1) para a parede ou objecto cuja
distância necessita de medir (Figura
F
).
3.
Clique e mantenha premido durante 2 segundos
para activar o modo Medição contínua.
4.
Na parte inferior da janela de visualização
(Figura
A
n.º 2), verifique a medição actual
(Figura
E
n.º 3), que altera à medida que move
a ferramenta.
Sayfa yükleniyor ...

PT
42
7.
Visualize a medição Volume na parte inferior da
janela de visualização (Figura
E
n.º 3).
Adicionar medições
Pode adicionar duas medições para obter uma
medição total das duas distâncias.
1.
Clique em (Figura
A
n.º 5) para ligar
a ferramenta.
2.
A ferramenta mede a distância a partir da parte
inferior da ferramenta até à parede ou objecto
(Figura
F
n.º 1).
Para fazer medições a partir da parte superior da
ferramenta em vez da parte inferior
(Figura
F
n.º 2), mantenha premido
durante 2 segundos. Na janela de visualização,
o ícone de ferramenta muda de
para
(Figura
E
n.º 5).
3.
Aponte o laser na parte superior da ferramenta
(Figura
A
n.º 1) para a parede ou objecto cuja
distância necessita de medir.
4.
Clique em para medir a distância entre
a ferramenta e a parede ou objecto.
5.
Indique que pretende adicionar esta medição
à medição seguinte.
• No teclado da TLM99, clique em
(Figura
A
n.º 7).
• No teclado da TLM99s ou da TLM99si, cliqu
em
(Figura
B
n.º 1).
6.
Aponte o laser para a parte superior da ferramenta
para a janela ou objecto.
7.
Clique em para medir a distância e adicioná-la
à medição anterior.
8.
Visualize das duas medições na parte inferior da
janela de visualização (Figura
E
n.º 3).
Subtrair medições
Pode subtrair uma medição de outra.
1.
Clique em (Figura
A
n.º 5) para ligar
a ferramenta.
2.
A ferramenta mede a distância a partir da parte
inferior da ferramenta até à parede ou objecto
(Figura
F
n.º 1).
Para fazer medições a partir da parte superior da
ferramenta em vez da parte inferior
(Figura
F
n.º 2), mantenha premido
durante 2 segundos. Na janela de visualização,
o ícone de ferramenta muda de
para
(Figura
E
n.º 5).
3.
Aponte o laser na parte superior da ferramenta
(Figura
A
n.º 1) para a parede ou objecto cuja
distância necessita de medir.
4.
Clique em para medir a distância entre
a ferramenta e a parede ou objecto.
5.
Indica que pretende subtrair a próxima desta
medição.
• No teclado da TLM99, clique em
duas
vezes.
• No teclado da TLM99s ou da TLM99si, clique
em
duas vezes.
6.
Aponte o laser para a parte superior da ferramenta
para a janela ou objecto.
7.
Clique em para medir a distância e subtraí-la
à medição anterior.
8.
Visualize a diferença entre as duas medições na
parte inferior da janela de visualização
(Figura
E
n.º 3).
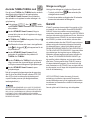
Alterar a unidade de medida
Quando a medição actual é efectuada (o dispositivo
não está no modo Medição contínua), pode alterar
a unidade de medida de pés decimais (6,21 pés) para
pés fraccionais (6'02"
9/16), pés fraccionais para metros
(1.894 m), metros para polegadas (74
9/16 pol), ou de
polegadas para pés decimais.
• No teclado da TLM99, clique em (Figura
A
n.º 3).
• No teclado da TLM99s ou da TLM99si, mantenha
premido (Figura
B
n.º 1) até a medição ser
alterada (2-3 segundos).
Sayfa yükleniyor ...
Sayfa yükleniyor ...
Sayfa yükleniyor ...
Sayfa yükleniyor ...
Sayfa yükleniyor ...
Sayfa yükleniyor ...
Sayfa yükleniyor ...
Sayfa yükleniyor ...
Sayfa yükleniyor ...
Sayfa yükleniyor ...
Sayfa yükleniyor ...
Sayfa yükleniyor ...
Sayfa yükleniyor ...
Sayfa yükleniyor ...
Sayfa yükleniyor ...
Sayfa yükleniyor ...
Sayfa yükleniyor ...
Sayfa yükleniyor ...
Sayfa yükleniyor ...
Sayfa yükleniyor ...
Sayfa yükleniyor ...
Sayfa yükleniyor ...
Sayfa yükleniyor ...
Sayfa yükleniyor ...
Sayfa yükleniyor ...
Sayfa yükleniyor ...
Sayfa yükleniyor ...
Sayfa yükleniyor ...
Sayfa yükleniyor ...
Sayfa yükleniyor ...
Sayfa yükleniyor ...
Sayfa yükleniyor ...
Sayfa yükleniyor ...
Sayfa yükleniyor ...
Sayfa yükleniyor ...
Sayfa yükleniyor ...
Sayfa yükleniyor ...
Sayfa yükleniyor ...
Sayfa yükleniyor ...
Sayfa yükleniyor ...
Sayfa yükleniyor ...
Sayfa yükleniyor ...
Sayfa yükleniyor ...
Sayfa yükleniyor ...
Sayfa yükleniyor ...
Sayfa yükleniyor ...
Sayfa yükleniyor ...
Sayfa yükleniyor ...
Sayfa yükleniyor ...
Sayfa yükleniyor ...
Sayfa yükleniyor ...
Sayfa yükleniyor ...
Sayfa yükleniyor ...
Sayfa yükleniyor ...
Sayfa yükleniyor ...
Sayfa yükleniyor ...
Sayfa yükleniyor ...
Sayfa yükleniyor ...
Sayfa yükleniyor ...
Sayfa yükleniyor ...
Sayfa yükleniyor ...
Sayfa yükleniyor ...
Sayfa yükleniyor ...
Sayfa yükleniyor ...
Sayfa yükleniyor ...
Sayfa yükleniyor ...
Sayfa yükleniyor ...
Sayfa yükleniyor ...
Sayfa yükleniyor ...
Sayfa yükleniyor ...
Sayfa yükleniyor ...
Sayfa yükleniyor ...
Sayfa yükleniyor ...
Sayfa yükleniyor ...
Sayfa yükleniyor ...
Sayfa yükleniyor ...
Sayfa yükleniyor ...
Sayfa yükleniyor ...
Sayfa yükleniyor ...
Sayfa yükleniyor ...
Sayfa yükleniyor ...
Sayfa yükleniyor ...
Sayfa yükleniyor ...
Sayfa yükleniyor ...
Sayfa yükleniyor ...
Sayfa yükleniyor ...
Sayfa yükleniyor ...
Sayfa yükleniyor ...
Sayfa yükleniyor ...
Sayfa yükleniyor ...
Sayfa yükleniyor ...
Sayfa yükleniyor ...
Sayfa yükleniyor ...
Sayfa yükleniyor ...
Sayfa yükleniyor ...
Sayfa yükleniyor ...
Sayfa yükleniyor ...
Sayfa yükleniyor ...
Sayfa yükleniyor ...
Sayfa yükleniyor ...
Sayfa yükleniyor ...
Sayfa yükleniyor ...
Sayfa yükleniyor ...
Sayfa yükleniyor ...
Sayfa yükleniyor ...
Sayfa yükleniyor ...
Sayfa yükleniyor ...
Sayfa yükleniyor ...
Sayfa yükleniyor ...
Sayfa yükleniyor ...
Sayfa yükleniyor ...
Sayfa yükleniyor ...
Sayfa yükleniyor ...
Sayfa yükleniyor ...
Sayfa yükleniyor ...
Sayfa yükleniyor ...
Sayfa yükleniyor ...
Sayfa yükleniyor ...
Sayfa yükleniyor ...
Sayfa yükleniyor ...
Sayfa yükleniyor ...
Sayfa yükleniyor ...
Sayfa yükleniyor ...
Sayfa yükleniyor ...
Sayfa yükleniyor ...
Sayfa yükleniyor ...
Sayfa yükleniyor ...
Sayfa yükleniyor ...
Sayfa yükleniyor ...
Sayfa yükleniyor ...
Sayfa yükleniyor ...
Sayfa yükleniyor ...
Sayfa yükleniyor ...
Sayfa yükleniyor ...
Sayfa yükleniyor ...
Sayfa yükleniyor ...
Sayfa yükleniyor ...
Sayfa yükleniyor ...
Sayfa yükleniyor ...
Sayfa yükleniyor ...
Sayfa yükleniyor ...
Sayfa yükleniyor ...
Sayfa yükleniyor ...
Sayfa yükleniyor ...
-
 1
1
-
 2
2
-
 3
3
-
 4
4
-
 5
5
-
 6
6
-
 7
7
-
 8
8
-
 9
9
-
 10
10
-
 11
11
-
 12
12
-
 13
13
-
 14
14
-
 15
15
-
 16
16
-
 17
17
-
 18
18
-
 19
19
-
 20
20
-
 21
21
-
 22
22
-
 23
23
-
 24
24
-
 25
25
-
 26
26
-
 27
27
-
 28
28
-
 29
29
-
 30
30
-
 31
31
-
 32
32
-
 33
33
-
 34
34
-
 35
35
-
 36
36
-
 37
37
-
 38
38
-
 39
39
-
 40
40
-
 41
41
-
 42
42
-
 43
43
-
 44
44
-
 45
45
-
 46
46
-
 47
47
-
 48
48
-
 49
49
-
 50
50
-
 51
51
-
 52
52
-
 53
53
-
 54
54
-
 55
55
-
 56
56
-
 57
57
-
 58
58
-
 59
59
-
 60
60
-
 61
61
-
 62
62
-
 63
63
-
 64
64
-
 65
65
-
 66
66
-
 67
67
-
 68
68
-
 69
69
-
 70
70
-
 71
71
-
 72
72
-
 73
73
-
 74
74
-
 75
75
-
 76
76
-
 77
77
-
 78
78
-
 79
79
-
 80
80
-
 81
81
-
 82
82
-
 83
83
-
 84
84
-
 85
85
-
 86
86
-
 87
87
-
 88
88
-
 89
89
-
 90
90
-
 91
91
-
 92
92
-
 93
93
-
 94
94
-
 95
95
-
 96
96
-
 97
97
-
 98
98
-
 99
99
-
 100
100
-
 101
101
-
 102
102
-
 103
103
-
 104
104
-
 105
105
-
 106
106
-
 107
107
-
 108
108
-
 109
109
-
 110
110
-
 111
111
-
 112
112
-
 113
113
-
 114
114
-
 115
115
-
 116
116
-
 117
117
-
 118
118
-
 119
119
-
 120
120
-
 121
121
-
 122
122
-
 123
123
-
 124
124
-
 125
125
-
 126
126
-
 127
127
-
 128
128
-
 129
129
-
 130
130
-
 131
131
-
 132
132
-
 133
133
-
 134
134
-
 135
135
-
 136
136
-
 137
137
-
 138
138
-
 139
139
-
 140
140
-
 141
141
-
 142
142
-
 143
143
-
 144
144
-
 145
145
-
 146
146
-
 147
147
-
 148
148
-
 149
149
-
 150
150
-
 151
151
-
 152
152
-
 153
153
-
 154
154
-
 155
155
-
 156
156
-
 157
157
-
 158
158
-
 159
159
-
 160
160
-
 161
161
-
 162
162
-
 163
163
-
 164
164
-
 165
165
-
 166
166
-
 167
167
-
 168
168
-
 169
169
-
 170
170
-
 171
171
-
 172
172
-
 173
173
-
 174
174
-
 175
175
-
 176
176
-
 177
177
-
 178
178
-
 179
179
-
 180
180
-
 181
181
-
 182
182
-
 183
183
-
 184
184
-
 185
185
-
 186
186


Stanley STHT1-77138RC Kullanım kılavuzu
- Tip
- Kullanım kılavuzu
- Bu kılavuz için de uygundur
Diğer dillerde
- eesti: Stanley STHT1-77138RC Kasutusjuhend
- slovenčina: Stanley STHT1-77138RC Používateľská príručka
- español: Stanley STHT1-77138RC Manual de usuario
- français: Stanley STHT1-77138RC Manuel utilisateur
- italiano: Stanley STHT1-77138RC Manuale utente
- svenska: Stanley STHT1-77138RC Användarmanual
- čeština: Stanley STHT1-77138RC Uživatelský manuál
- polski: Stanley STHT1-77138RC Instrukcja obsługi
- Deutsch: Stanley STHT1-77138RC Benutzerhandbuch
- português: Stanley STHT1-77138RC Manual do usuário
- English: Stanley STHT1-77138RC User manual
- dansk: Stanley STHT1-77138RC Brugermanual
- русский: Stanley STHT1-77138RC Руководство пользователя
- suomi: Stanley STHT1-77138RC Ohjekirja
- Nederlands: Stanley STHT1-77138RC Handleiding
- română: Stanley STHT1-77138RC Manual de utilizare