
Türkçe | Ελληνικάعربي | Български
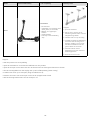
e-scooters
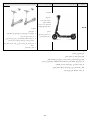
user manual

English .........................................02
Italiano .........................................26
Español........................................50
Français ....................................... 74
Deutsch .......................................98
Polski ......................................... 122
Čeština....................................... 146
Slovenčina................................. 170
Türkçe ........................................ 194
Ελληνικά .................................... 218
Slovenščina............................... 242
Srpski......................................... 266
Nederlands ................................ 290
يب
�رع....................................................314
Български..................................339

02
User manual
Instructions translated from the original Italian
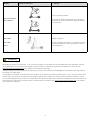
Thank you for choosing this product.
warranty, please contact your dealer or visit the website www.ducatiurbanemobility.com
English
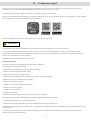
This manual is valid for the following electric scooters:
Pro-I Evo (Black Edition / White Edition), Pro-II Plus, Pro-II Evo, Pro-III
1. Safety instructions
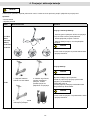
2. Package contents and assembly
3. Product overview
5. Command information / Control panel
6. Quick guide
7. Folding and carrying
9. Storage, maintenance and cleaning
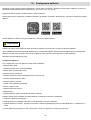
10. App configuration
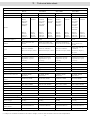
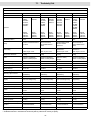
11. Technical data sheet
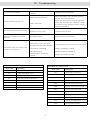
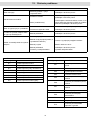
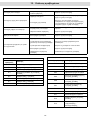
12. Troubleshooting
13. Liability and general terms of warranty
Contents

03
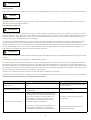
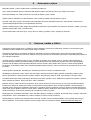
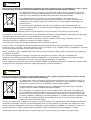
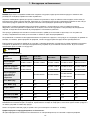
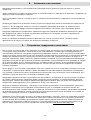
1. Safety instructions
CAUTION
IMPORTANT! Read and follow the instructions carefully before using the item. Keep this manual for future reference or new
users.
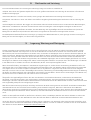
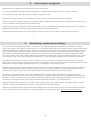
Take the time to learn the basics of the procedure to avoid severe accidents that may occur in the first few months. Contact
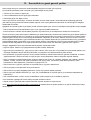
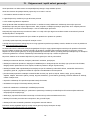
The company assumes no direct or indirect responsibility arising from misuse of the item, non-compliance with both the
highway code and the instructions in the manual, accidents or disputes caused by non-compliance or illegal activity.
This product is to be used for recreational purposes, by one person only and without passengers, therefore it cannot be used
by more than one person at a time.
objects, towing other vehicles or trailers.
The electric scooter must be used carefully, always respecting the rules imposed by the Highway Code of the country where
it is used, in order to avoid dangerous situations andto take the utmost care of yourself and others.
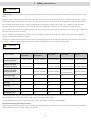
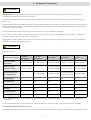
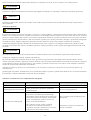
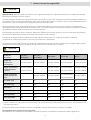
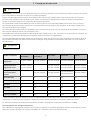
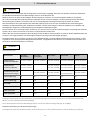
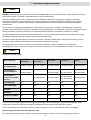
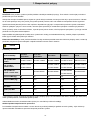
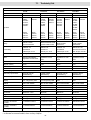
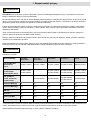
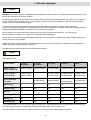
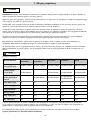
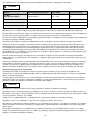
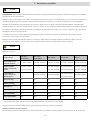
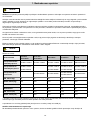
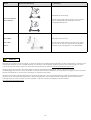
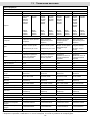
Driving requirements:
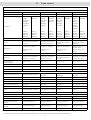
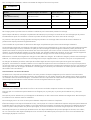
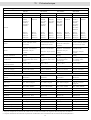
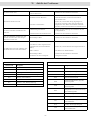
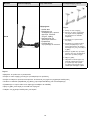
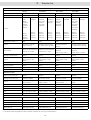
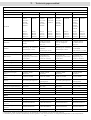
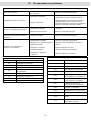
Scooter model Pro-I Evo
black edition
Pro-I Evo
white edition
Pro-II Plus Pro-II Evo Pro-III
Product code
without indicators DU-MO- 210001 DU-MO- 210004 DU-MO- 210005 DU-MO- 210009 MN-DUC-PRO3
Product code with
indicators included
DU-MO- 210011
DU-MO-220004 -DU-MO- 210010
DU-MO-220008
DU-MO- 210012
DU-MO-220005
DU-MO- 210013
DU-MO-220006
Product code with
two brake controls - DU-MO-220019 DU-MO-220020 DU-MO-220022
DU-MO-220013 DU-MO-220021
MIN weight (Kg) 30 30 30 30 30
MAX weight (Kg) 100 100 100 100 100
MIN age *14 14 14 14 14
MAX age *65 65 65 65 65
MIN height (cm) 120 120 120 120 120
MAX height (cm) 200 200 200 200 200
* Before using the product, check and follow local regulations regarding the minimum age of the driver, restrictions on the
type of drivers who can use the product and on the use of the product itself.
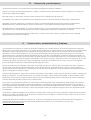
IThe A-weighted emission sound pressure level (noise) at the rider’s ear is less than 70dB(A).
Symbols identifying the safety warnings
of the reader/user to the proper, safe use of the item.
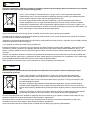
CAUTION

04
CAUTION
Highlights the rules to follow to prevent damage to the item and/or prevent hazardous situations from arising.
DANGER
Residual risks
material damage.
General warnings
CAUTION
other vehicles, obstacles or persons. Misuse of the item or non-compliance with the instructions provided in this manual may
cause severe injury.
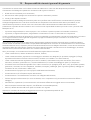
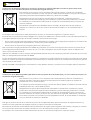
This product is an electric vehicle. The faster you ride, the longer the braking distance. Emergency braking on slippery,
muddy, wet or icy roads may result in wheel spin and loss of balance. Adequate speeds and safety distances from other
vehicles or pedestrians must be adhered to. Take extra care when riding on unfamiliar roads. Do not open the kickstand
when using the item, risk of severe personal injury and damage to item.
CAUTION
On wet roads, the braking distance increases and the grip decreases compared to dry roads!
Drive more carefully, keep a safe distance!
For personal safety, wear a helmet, and knee and elbow pads to protect against falls and injuries while riding the item. When
allowing others to use the item, ensure that the rider wears the safety equipment and explain the operation of the vehicle.
To avoid injury, do not allow other persons to use the item if they do not know how to use it. Wear shoes before using the
item.
operations.
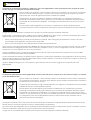
When riding, take special care to not frighten children or pedestrians. When passing behind them, warn them by sounding
the horn and slow down using the minimum speed of 6km/h.
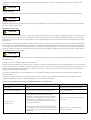
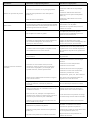
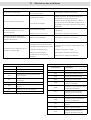
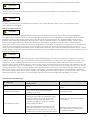
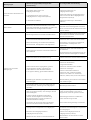
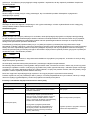
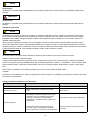
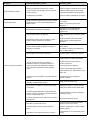
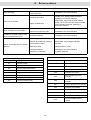
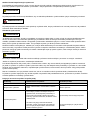
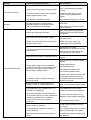
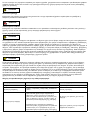
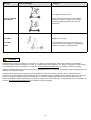
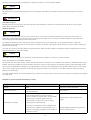
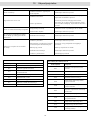
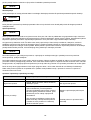
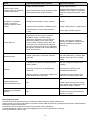
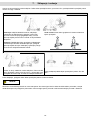
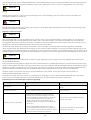
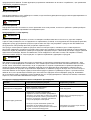
Instructions and warnings on rider behaviour
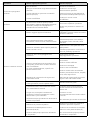
Conditions Appropriate/intended use Improper use
Riders One More than one person, with children
or animals
Safety equipment Helmet, knee pads, elbow pads, reflective vest No safety equipment
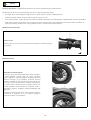
Pre-riding check
Prior to each use, check brakes and any
wear, check tyre pressure (see side of tyre
for recommended value), wheel wear,
Never checking the item prior to use
If any unusual noises or faults are detected,
do not use the item and contact your
Using the item when noise or faults
are present

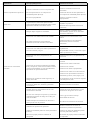
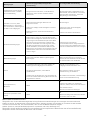
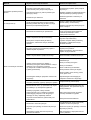
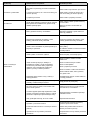
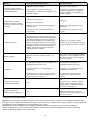
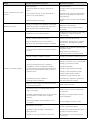
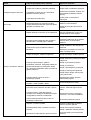
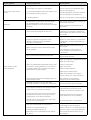
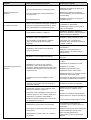
Conditions Appropriate/intended use Improper use
Walking while pushing
the item
Not accelerating
Pushing while walking across pedestrian
crossings
Riding the vehicle on pedestrian
crossings
In pedestrian areas when not in pedestrian
mode (6 km/h)
Riding the vehicle in pedestrian areas
when not in pedestrian mode (6 km/h)
In overcrowded areas Riding the vehicle in overcrowded
areas
Stationary
The person riding the item must be able to
easily place both feet on the ground while
holding the handlebars at the correct height
Not being able to keep the item
stationary and balanced.
or stationary
No objects hanging from handlebars
Objects hanging from handlebars
result in instability and may impede
manoeuvring
Riding with both hands on handlebars. One-handed or hand-free riding
Not using devices such as phones,
Using devices such as phones,
headphones
Riding with both feet on the footrest
Riding with one or both feet outside
the footrest
It is prohibited to place or amass
weight on the rear mudguard.
Riding with helmet and protective
equipment
Riding without helmet and protective
equipment
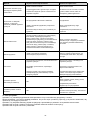
Riding under normal
conditions
Riding on easily accessible, smooth and
compact roads, avoiding areas with intense
Riding on motorways, long-distance
roads
Riding on busy roads
Riding on pavements
Riding in overcrowded areas
Riding on very rough roads
Riding near: ravines, escarpments,
harbours, sea, lakes or rivers
Complying with local regulations and the
highway code
Failure to comply with regulations and
the highway code
Looking ahead and watching out for
obstacles, vehicles or nearby pedestrians Becoming distracted while riding
Changing direction, making sure to be seen,
moderating speed
Changing direction abruptly at high
speed without making sure that you
have been seen
Anticipating the route and moderating speed
while observing the highway code and those
that are the most vulnerable
Braking and cornering at the same
time makes the vehicle unstable
Using direction indicators, if included on
the item Not using direction indicators
Slowing down when pedestrians are present Accelerating or maintaining a constant
speed when pedestrians are present
Using pedestrian mode in pedestrian areas
(6 km/h)
Riding without using pedestrian mode
in pedestrian areas (6 km/h)
Warning others of your presence by using
the bell
Not warning others of your presence
by using the bell

06
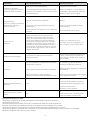
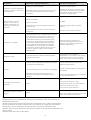
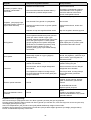
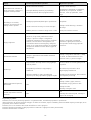
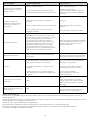
Conditions Appropriate/intended use Improper use
Uneven road conditions:
speed bumps/ steps/rough
Riding at moderate speeds High-speed riding
Accelerating over bumps or ditches,
going down steps, jumping over
obstacles, climbing pavements, riding
harshly.
Behaviour: around bends,
down slopes, in the presence
of nearby obstacles, vehicles
and pedestrians
Keeping at a safe distance Not observing safety distances
Ceasing to accelerate Accelerating
Riding at moderate speed and braking safely Riding at high speed, braking
suddenly
obstacles Traversing beneath high obstacles
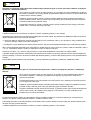
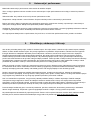
Visibility conditions
Only ride if there is enough light to ride
safely. When riding in unfavourable lighting
conditions (from half an hour following
sunset, throughout the entire period
of darkness and even during the day, if
weather conditions preclude road visibility,
when driving through tunnels), remember
to switch on the item’s lights and wear a
reflective vest, belts or bands.
Riding in unfavourable lighting
using a reflective vest, belts or bands
Weather conditions Driving in optimal conditions (no rain)
Driving in adverse conditions: in
the rain, in case of snowfall, in the
presence of ice or mud on the road, in
case of strong wind and fog.
Parking
In designated areas without impeding
movement of vehicles or pedestrians
Everywhere, impeding movement of
vehicles or pedestrians
maintained
ensuring stability
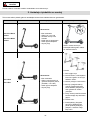
Leaving the item switched on,
acrobatics NO
YES
Riding near: ravines, escarpments,
harbours, sea, lakes or rivers
Riding through puddles
Racing with other vehicles
Subjecting the item to
forceful impact NO
YES
jumping over object or persons,
controls.
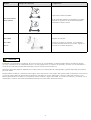
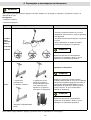
Check that all vehicle components are in place and securely fastened.
Check tyre wear and pressure (see side of tyre for recommended value).
Check the wear of the brakes and cables.

07
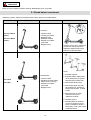
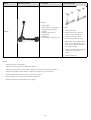
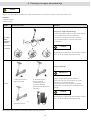
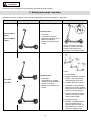
DANGER
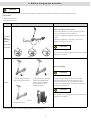
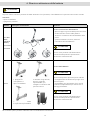
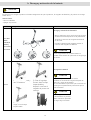
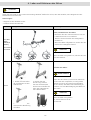
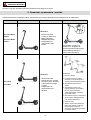
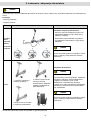
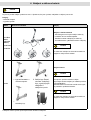
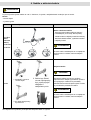
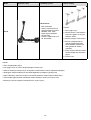
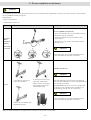
Assembled item, the handlebar must be installed using the special screws contained in the package.
Model Reference picture In the package Handlebar assembly
Pro-I Evo Black
edition
Pro-I Evo White
edition
Accessories:
- Allen wrenches
- 4 screws forhandlebars
- Spare air chamber
- Spare sticker
- Tyre inflation adapter
- Charger
without tightening them, then
use the hex wrench supplied to
tighten them and secure the
handlebars.
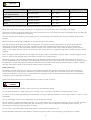
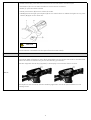
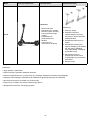
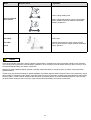
Pro-II Plus
Pro-II Evo
- Allen wrenches
- Components for handlebar
assembly (hook, plastic
- Tyre inflation adapter
- Charger
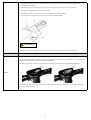
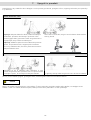
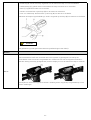
Steps:
1. Open the kickstand
2. Pick up the handlebar, place
the lever in the closed position
and lower the safety ring.
3. Install the handlebar on
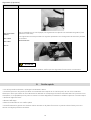
4. Install the hook (see photo)
by approaching it to the rod,
making sure that it is aligned
the screws.
outside into the hole located
under the control panel.
6. Tighten the screws.
7. Align the plastic plate (see
photo) with the second hole/
profile of the control panel,
screw.
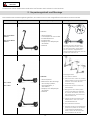
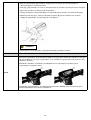
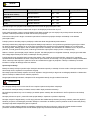
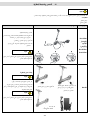
2. Package contents and assembly

08
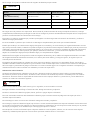
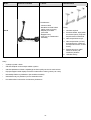
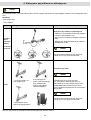
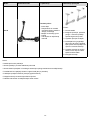
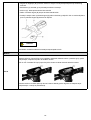
Model Reference picture In the package Handlebar assembly
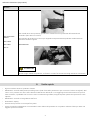
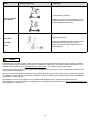
Pro-III
Accessories:
- Allen wrenches
- Components for handlebar
assembly (hook, plastic
- Tyre inflation adapter
- Charger
- 2 RF Keys for scooter
ignition
Method:
1. Open the kickstand
2. Pick up the handlebar, place
the lever in the closed position
and lower the safety ring.
3. Install the handlebar on
4. Install the hook (see photo)
by approaching it to the rod,
making sure that it is aligned
the screws.
outside into the hole located
under the control panel.
6. Tighten the screws.
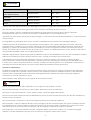
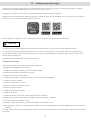
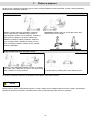
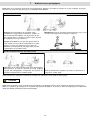
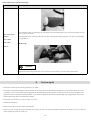
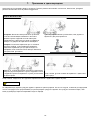
Method:
• Take the item out of the packaging
• Open the kickstand and check that the item is stable
• Open the handlebar stem and secure it by closing the lever of the closing mechanism
• Connect the display power cable to the main wiring (if necessary)
• Install the handlebar on the stem (do not crush the cables)
• Tighten the screws on the stem using the wrench supplied
• Adjust the stem closing mechanism*

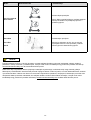
09
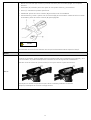
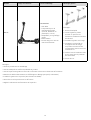
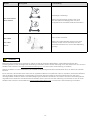
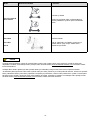
Model Reference picture * Adjustment
Pro-I Evo black &
white edition
Wobbly handlebar stem
If the handlbar stem is wobbly, you can tighten
the screws on the folding system using the
wrench supplied.
Pro-II Plus
Pro-II Evo
Pro-III
Adjust the handlebar:
If the handlebar stem vibrates during use, adjust
the screw by means of the hexagon wrench as
illustrated in the figure.
CAUTION
assembly or adjustments occur, do not ride the vehicle and contact your dealer or visit www.ducatiurbanemobility.com for
integrity and cause damage. Remove any sharp edges caused by misuse, breakage or damage to the item. If any factory
defects, unusual noises or faults are detected, do not ride the vehicle and contact your dealer or visit
www.ducatiurbanemobility.com

10
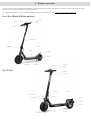
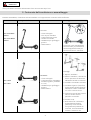
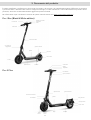
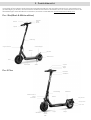
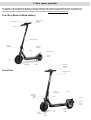
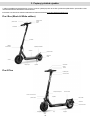
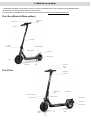
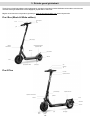
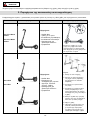
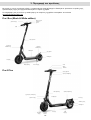
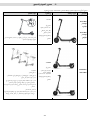
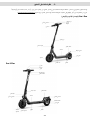
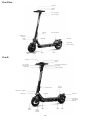
closing mechanism
front headlight
drive wheel frame
footrest
safety clip
hub/motor
lock hook
display
accelerator
horn
brake lever
rear light
rear wheel
disc brake
lock hook
kickstand
brake light
disc brake
handlebar stem
accelerator
front light
motor
folding
mechanism
footrest
control panel
horn
brake
lock hook
kickstand
In the interest of technological development, the manufacturer reserves the right to modify the item with no prior notice
and this manual will not be automatically updated.
www.ducatiurbanemobility.com
Pro-I Evo (Black & White edition)
3. Product overview
Pro-II Plus

11
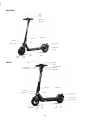
Pro-II Evo
Pro-III
closing mechanism
lock hook
lock hook
front headlight rear light
front headlight
rear wheel
display
front wheel frame kickstand
footrest
safety clip
accelerator
horn
right brake lever
motor
rear disc brake
front disc
brake
lock hook
kickstand
lock hook
rear ligh
rear wheel
display
frame
footrest
safety clip
accelerator
horn
brake lever
hub/motor
disc brake
closing mechanism
front headlight
drive wheel

12
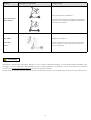
CAUTION
- Open the kickstand
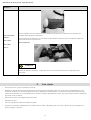
Modello Immagine di riferimento Istruzioni
Pro-I Evo
(black
and white
edition)
Pro-II Plus
Pro-II Evo
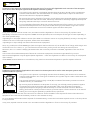
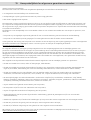
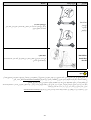
1. Open the rubber cap on the charging socket
socket.
CAUTION
The red light on the charger will turn green when
charging is complete.
Pro-III
waterproof cover.
and open the kickstand.
2. Turn the Ducati logo,
open the waterproof
cover, then connect
the charger to the
CAUTION
Charge the device before the first use. We
and before storing it. It is advisable to allow
the vehicle to discharge completely to prevent
CAUTION
The red light on the charger will turn green when
charging is complete.
4.

13
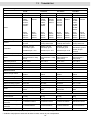
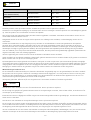
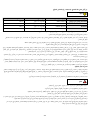
CAUTION
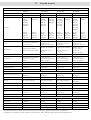
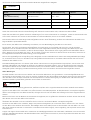
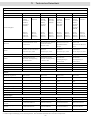
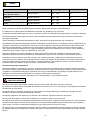
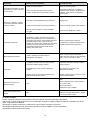
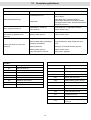
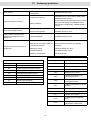
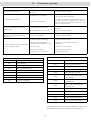
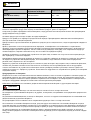
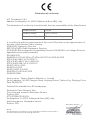
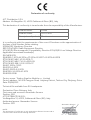
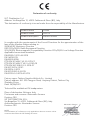
Model Output voltage Charging time
Pro-I Evo
(black & white edition) XHK-916-42015 42V – 1.5A 4 h
Pro-II Plus XVE063-4200150 42V – 1.5A 4 h
Pro-II Evo XVE063-4200150 42V – 1.5A 7 h
Pro-III XVE063-4200150 42V – 1.5A 8 h
Using another type of charger may damage the scooter or entail other potential risks.
Never leave the product unsupervised while it is charging. Do not switch the product on while it is charging.
scooter to cool for an hour before recharging.
hazards.
charged.
mental capabilities or lack of experience and knowledge if they have been given supervision or instruction concerning use of
and user maintenance shall not be made by children without supervision.
compliance with all applicable regulations.
DANGER
environments containing explosive gases or flames.

14
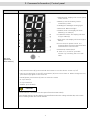
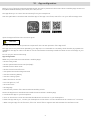
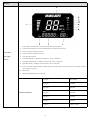
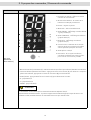
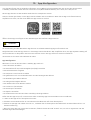
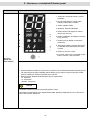
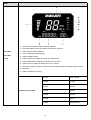
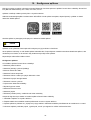
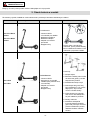
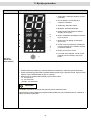
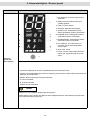
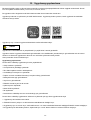
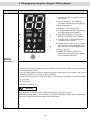
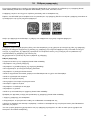
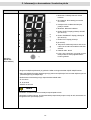
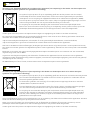
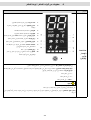
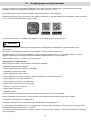
Model
Pro-I Evo
(black and
white edition)
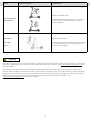
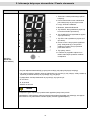
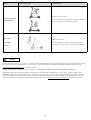
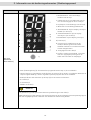
1. Speedometer: displays the current speed
of the scooter.
indicated by 5 bars.
3. Headlights: Headlight warning light.
4. Bluetooth: Bluetooth light.
5. SPORT mode: The display will show
SPORT (up to 25km/h).
6. COMFORT mode: The display will show
D (up to 20km/h).
7. ECO mode: The display will show E (up to
6km/h).
8. Cruise Control: Speed control. It is
maintained for a few seconds.
9. Pedestrian mode: 6km/h
10. Fault: If on, check for a possible
solution by consulting the error code
table
- E: up to 6 km/h
- D: up to 20 km/h
- SPORT: up to 25 km/h
CAUTION
The accelerator is activated once the speed of travel exceeds 3 km/h.
time a warning buzzer also sounds 6 times.
5. Command information / Control panel

15
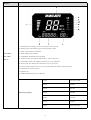
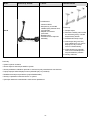
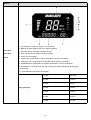
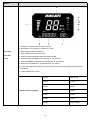
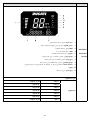
Modello
Pro-II Plus
Pro-II Evo
Pro-III
1. Speedometer: displays the current speed of the scooter.
3. ODO: Total distance travelled.
4. TRIP: Single trip distance.
5. Headlights: Headlight warning light.
6. SPORT mode: The display will show S+. (up to 25 km/h).
7. COMFORT mode: The display will show D. (up to 20km/h).
8. ECO mode: The display will show ECO. (up to 15 km/h).
maintained for a few seconds.
10. Bluetooth
11. PEDESTRIAN mode (up to 6km/h)
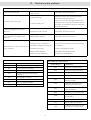
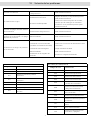
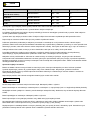
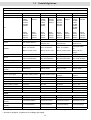
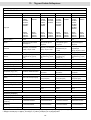
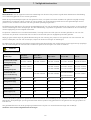
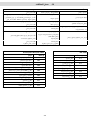
Electricity display
7 bars More than 38V
6 bars 37-38V
5 bars 36-37V
4 bars 35-36V
3 bars 34-35V
2 bars 33-34V
1 bars Less than 33V

16
• Brake (C): press and hold to brake
CAUTION
The accelerator is activated once the speed of travel exceeds 3 km/h.
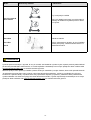
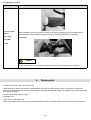
Model
Pro-III
The Ducati PRO III features a motor block integrated into the system that needs to be unblocked
RF KEY: Approach the RF key (supplied) to the display to activate the electric scooter.

17
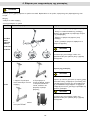
Indicatori di direzione (se presenti)
Models *
Pro-I Evo black
edition
Pro-II Plus
Pro-II Evo
Pro-III
The direction indicators are required to provide early warning of any change in direction while
riding.
CAUTION
Before each use of the product, check the correct operation of the direction indicators.
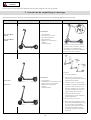
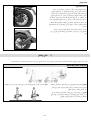
• Prior to using the item for the first time, charge to 100%.
• Check tyre pressure (see side of tyre for recommended value). If the item does not reach at least 60% of the declared kms,
or the maximum speed within the first 3 months of use, it is likely that the wheels have deflated once more. In this case,
restore pressure as indicated.
• Check and adjust the brakes.
• Turn on the display.
• Hold the handlebar firmly using both hands. Step onto the footrest with one foot and use the other to give yourself a
gentle push and accelerate.
6. Quick guide

18
CAUTION
the accelerator is activated once the forward speed exceeds 3 km/h. For safety reasons, the item is initially
• When riding the item, tilt the body in the riding direction during a turn and slowly turn the handlebars.
• To stop the item, release the accelerator, pull the brake lever.
• Prior to each use, check brakes and any wear, check tyre pressure (see side of tyre for recommended value), wheel wear,
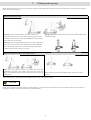
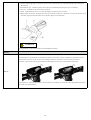
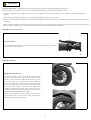
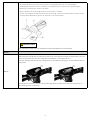
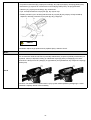
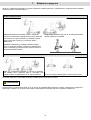
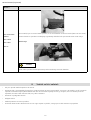
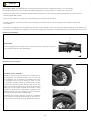
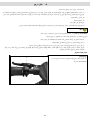
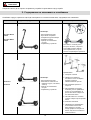
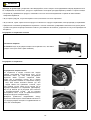
Brake lever adjustment
Brake levers
Refer to point A (see photo) to adjust the position of the brake lever, if
necessary.
Regolazione dei freni
Adjusting the brake calliper
If the brake is too tight or too loose, use the hex
wrench to loosen the nut (A), then adjust the brake
and then, retighten the nut (A). If the wire is too loose
be necessary to adjust the (fixed) brake pad by means
away (see picture).
Check the correct alignment between the brake caliper
and the disc. Use screws C and D to adjust the position
/ alignment on the disc, if necessary.

19
CAUTION
the accelerator is activated once the forward speed exceeds 3 km/h. For safety reasons, the item is initially
• When riding the item, tilt the body in the riding direction during a turn and slowly turn the handlebars.
• To stop the item, release the accelerator, pull the brake lever.
• Prior to each use, check brakes and any wear, check tyre pressure (see side of tyre for recommended value), wheel wear,
Brake lever adjustment
Brake levers
Refer to point A (see photo) to adjust the position of the brake lever, if
necessary.
Regolazione dei freni
Adjusting the brake calliper
If the brake is too tight or too loose, use the hex
wrench to loosen the nut (A), then adjust the brake
and then, retighten the nut (A). If the wire is too loose
be necessary to adjust the (fixed) brake pad by means
away (see picture).
Check the correct alignment between the brake caliper
and the disc. Use screws C and D to adjust the position
/ alignment on the disc, if necessary.
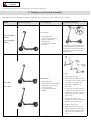
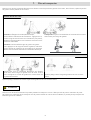
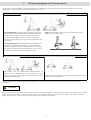
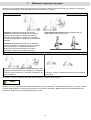
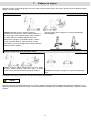
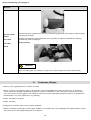
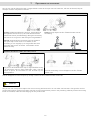
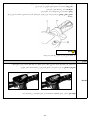
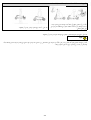
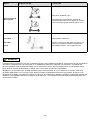
the footrest and fasten it.
Closing
closing mechanism: press the red hook and pull the lever
outwards (see picture), move the handlebar stem inwards
and make sure it is locked.
Opening: Unlock the handlebar stem from the mudguard:
stem all the way and lock it in place by pushing the lever
inwards.Switch on the electric scooter.
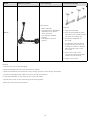
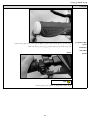
Always carry the scooter with one or both hands holding the
handlebar stem.
handlebar rod with your hand, then pull the lever and
align the handlebar hook with the hook located on the rear
mudguard.
hands.
CAUTION
dropped, the item may cause severe injury and damage.
7.
Sayfa yükleniyor...
Sayfa yükleniyor...
Sayfa yükleniyor...
Sayfa yükleniyor...
Sayfa yükleniyor...
Sayfa yükleniyor...
Sayfa yükleniyor...
Sayfa yükleniyor...
Sayfa yükleniyor...
Sayfa yükleniyor...
Sayfa yükleniyor...
Sayfa yükleniyor...
Sayfa yükleniyor...
Sayfa yükleniyor...
Sayfa yükleniyor...
Sayfa yükleniyor...
Sayfa yükleniyor...
Sayfa yükleniyor...
Sayfa yükleniyor...
Sayfa yükleniyor...
Sayfa yükleniyor...
Sayfa yükleniyor...
Sayfa yükleniyor...
Sayfa yükleniyor...
Sayfa yükleniyor...
Sayfa yükleniyor...
Sayfa yükleniyor...
Sayfa yükleniyor...
Sayfa yükleniyor...
Sayfa yükleniyor...
Sayfa yükleniyor...
Sayfa yükleniyor...
Sayfa yükleniyor...
Sayfa yükleniyor...
Sayfa yükleniyor...
Sayfa yükleniyor...
Sayfa yükleniyor...
Sayfa yükleniyor...
Sayfa yükleniyor...
Sayfa yükleniyor...
Sayfa yükleniyor...
Sayfa yükleniyor...
Sayfa yükleniyor...
Sayfa yükleniyor...
Sayfa yükleniyor...
Sayfa yükleniyor...
Sayfa yükleniyor...
Sayfa yükleniyor...
Sayfa yükleniyor...
Sayfa yükleniyor...
Sayfa yükleniyor...
Sayfa yükleniyor...
Sayfa yükleniyor...
Sayfa yükleniyor...
Sayfa yükleniyor...
Sayfa yükleniyor...
Sayfa yükleniyor...
Sayfa yükleniyor...
Sayfa yükleniyor...
Sayfa yükleniyor...
Sayfa yükleniyor...
Sayfa yükleniyor...
Sayfa yükleniyor...
Sayfa yükleniyor...
Sayfa yükleniyor...
Sayfa yükleniyor...
Sayfa yükleniyor...
Sayfa yükleniyor...
Sayfa yükleniyor...
Sayfa yükleniyor...
Sayfa yükleniyor...
Sayfa yükleniyor...
Sayfa yükleniyor...
Sayfa yükleniyor...
Sayfa yükleniyor...
Sayfa yükleniyor...
Sayfa yükleniyor...
Sayfa yükleniyor...
Sayfa yükleniyor...
Sayfa yükleniyor...
Sayfa yükleniyor...
Sayfa yükleniyor...
Sayfa yükleniyor...
Sayfa yükleniyor...
Sayfa yükleniyor...
Sayfa yükleniyor...
Sayfa yükleniyor...
Sayfa yükleniyor...
Sayfa yükleniyor...
Sayfa yükleniyor...
Sayfa yükleniyor...
Sayfa yükleniyor...
Sayfa yükleniyor...
Sayfa yükleniyor...
Sayfa yükleniyor...
Sayfa yükleniyor...
Sayfa yükleniyor...
Sayfa yükleniyor...
Sayfa yükleniyor...
Sayfa yükleniyor...
Sayfa yükleniyor...
Sayfa yükleniyor...
Sayfa yükleniyor...
Sayfa yükleniyor...
Sayfa yükleniyor...
Sayfa yükleniyor...
Sayfa yükleniyor...
Sayfa yükleniyor...
Sayfa yükleniyor...
Sayfa yükleniyor...
Sayfa yükleniyor...
Sayfa yükleniyor...
Sayfa yükleniyor...
Sayfa yükleniyor...
Sayfa yükleniyor...
Sayfa yükleniyor...
Sayfa yükleniyor...
Sayfa yükleniyor...
Sayfa yükleniyor...
Sayfa yükleniyor...
Sayfa yükleniyor...
Sayfa yükleniyor...
Sayfa yükleniyor...
Sayfa yükleniyor...
Sayfa yükleniyor...
Sayfa yükleniyor...
Sayfa yükleniyor...
Sayfa yükleniyor...
Sayfa yükleniyor...
Sayfa yükleniyor...
Sayfa yükleniyor...
Sayfa yükleniyor...
Sayfa yükleniyor...
Sayfa yükleniyor...
Sayfa yükleniyor...
Sayfa yükleniyor...
Sayfa yükleniyor...
Sayfa yükleniyor...
Sayfa yükleniyor...
Sayfa yükleniyor...
Sayfa yükleniyor...
Sayfa yükleniyor...
Sayfa yükleniyor...
Sayfa yükleniyor...
Sayfa yükleniyor...
Sayfa yükleniyor...
Sayfa yükleniyor...
Sayfa yükleniyor...
Sayfa yükleniyor...
Sayfa yükleniyor...
Sayfa yükleniyor...
Sayfa yükleniyor...
Sayfa yükleniyor...
Sayfa yükleniyor...
Sayfa yükleniyor...
Sayfa yükleniyor...
Sayfa yükleniyor...
Sayfa yükleniyor...
Sayfa yükleniyor...
Sayfa yükleniyor...
Sayfa yükleniyor...
Sayfa yükleniyor...
Sayfa yükleniyor...
Sayfa yükleniyor...
Sayfa yükleniyor...
Sayfa yükleniyor...
Sayfa yükleniyor...
Sayfa yükleniyor...
Sayfa yükleniyor...
Sayfa yükleniyor...
Sayfa yükleniyor...
Sayfa yükleniyor...
Sayfa yükleniyor...
Sayfa yükleniyor...
Sayfa yükleniyor...
Sayfa yükleniyor...
Sayfa yükleniyor...
Sayfa yükleniyor...
Sayfa yükleniyor...
Sayfa yükleniyor...
Sayfa yükleniyor...
Sayfa yükleniyor...
Sayfa yükleniyor...
Sayfa yükleniyor...
Sayfa yükleniyor...
Sayfa yükleniyor...
Sayfa yükleniyor...
Sayfa yükleniyor...
Sayfa yükleniyor...
Sayfa yükleniyor...
Sayfa yükleniyor...
Sayfa yükleniyor...
Sayfa yükleniyor...
Sayfa yükleniyor...
Sayfa yükleniyor...
Sayfa yükleniyor...
Sayfa yükleniyor...
Sayfa yükleniyor...
Sayfa yükleniyor...
Sayfa yükleniyor...
Sayfa yükleniyor...
Sayfa yükleniyor...
Sayfa yükleniyor...
Sayfa yükleniyor...
Sayfa yükleniyor...
Sayfa yükleniyor...
Sayfa yükleniyor...
Sayfa yükleniyor...
Sayfa yükleniyor...
Sayfa yükleniyor...
Sayfa yükleniyor...
Sayfa yükleniyor...
Sayfa yükleniyor...
Sayfa yükleniyor...
Sayfa yükleniyor...
Sayfa yükleniyor...
Sayfa yükleniyor...
Sayfa yükleniyor...
Sayfa yükleniyor...
Sayfa yükleniyor...
Sayfa yükleniyor...
Sayfa yükleniyor...
Sayfa yükleniyor...
Sayfa yükleniyor...
Sayfa yükleniyor...
Sayfa yükleniyor...
Sayfa yükleniyor...
Sayfa yükleniyor...
Sayfa yükleniyor...
Sayfa yükleniyor...
Sayfa yükleniyor...
Sayfa yükleniyor...
Sayfa yükleniyor...
Sayfa yükleniyor...
Sayfa yükleniyor...
Sayfa yükleniyor...
Sayfa yükleniyor...
Sayfa yükleniyor...
Sayfa yükleniyor...
Sayfa yükleniyor...
Sayfa yükleniyor...
Sayfa yükleniyor...
Sayfa yükleniyor...
Sayfa yükleniyor...
Sayfa yükleniyor...
Sayfa yükleniyor...
Sayfa yükleniyor...
Sayfa yükleniyor...
Sayfa yükleniyor...
Sayfa yükleniyor...
Sayfa yükleniyor...
Sayfa yükleniyor...
Sayfa yükleniyor...
Sayfa yükleniyor...
Sayfa yükleniyor...
Sayfa yükleniyor...
Sayfa yükleniyor...
Sayfa yükleniyor...
Sayfa yükleniyor...
Sayfa yükleniyor...
Sayfa yükleniyor...
Sayfa yükleniyor...
Sayfa yükleniyor...
Sayfa yükleniyor...
Sayfa yükleniyor...
Sayfa yükleniyor...
Sayfa yükleniyor...
Sayfa yükleniyor...
Sayfa yükleniyor...
Sayfa yükleniyor...
Sayfa yükleniyor...
Sayfa yükleniyor...
Sayfa yükleniyor...
Sayfa yükleniyor...
Sayfa yükleniyor...
Sayfa yükleniyor...
Sayfa yükleniyor...
Sayfa yükleniyor...
Sayfa yükleniyor...
Sayfa yükleniyor...
Sayfa yükleniyor...
Sayfa yükleniyor...
Sayfa yükleniyor...
Sayfa yükleniyor...
Sayfa yükleniyor...
Sayfa yükleniyor...
Sayfa yükleniyor...
Sayfa yükleniyor...
Sayfa yükleniyor...
Sayfa yükleniyor...
Sayfa yükleniyor...
Sayfa yükleniyor...
Sayfa yükleniyor...
Sayfa yükleniyor...
Sayfa yükleniyor...
Sayfa yükleniyor...
Sayfa yükleniyor...
Sayfa yükleniyor...
Sayfa yükleniyor...
Sayfa yükleniyor...
Sayfa yükleniyor...
Sayfa yükleniyor...
Sayfa yükleniyor...
Sayfa yükleniyor...
Sayfa yükleniyor...
Sayfa yükleniyor...
Sayfa yükleniyor...
Sayfa yükleniyor...
Sayfa yükleniyor...
Sayfa yükleniyor...
Sayfa yükleniyor...
Sayfa yükleniyor...
Sayfa yükleniyor...
Sayfa yükleniyor...
Sayfa yükleniyor...
Sayfa yükleniyor...
Sayfa yükleniyor...
Sayfa yükleniyor...
Sayfa yükleniyor...
Sayfa yükleniyor...
Sayfa yükleniyor...
Sayfa yükleniyor...
Sayfa yükleniyor...
Sayfa yükleniyor...
Sayfa yükleniyor...
Sayfa yükleniyor...
Sayfa yükleniyor...
Sayfa yükleniyor...
Sayfa yükleniyor...
Sayfa yükleniyor...
Sayfa yükleniyor...
Sayfa yükleniyor...
Sayfa yükleniyor...
Sayfa yükleniyor...
Sayfa yükleniyor...
Sayfa yükleniyor...
Sayfa yükleniyor...
Sayfa yükleniyor...
Sayfa yükleniyor...
Sayfa yükleniyor...
Sayfa yükleniyor...
Sayfa yükleniyor...
Sayfa yükleniyor...
Sayfa yükleniyor...
Sayfa yükleniyor...
Sayfa yükleniyor...
Sayfa yükleniyor...
Sayfa yükleniyor...
-
 1
1
-
 2
2
-
 3
3
-
 4
4
-
 5
5
-
 6
6
-
 7
7
-
 8
8
-
 9
9
-
 10
10
-
 11
11
-
 12
12
-
 13
13
-
 14
14
-
 15
15
-
 16
16
-
 17
17
-
 18
18
-
 19
19
-
 20
20
-
 21
21
-
 22
22
-
 23
23
-
 24
24
-
 25
25
-
 26
26
-
 27
27
-
 28
28
-
 29
29
-
 30
30
-
 31
31
-
 32
32
-
 33
33
-
 34
34
-
 35
35
-
 36
36
-
 37
37
-
 38
38
-
 39
39
-
 40
40
-
 41
41
-
 42
42
-
 43
43
-
 44
44
-
 45
45
-
 46
46
-
 47
47
-
 48
48
-
 49
49
-
 50
50
-
 51
51
-
 52
52
-
 53
53
-
 54
54
-
 55
55
-
 56
56
-
 57
57
-
 58
58
-
 59
59
-
 60
60
-
 61
61
-
 62
62
-
 63
63
-
 64
64
-
 65
65
-
 66
66
-
 67
67
-
 68
68
-
 69
69
-
 70
70
-
 71
71
-
 72
72
-
 73
73
-
 74
74
-
 75
75
-
 76
76
-
 77
77
-
 78
78
-
 79
79
-
 80
80
-
 81
81
-
 82
82
-
 83
83
-
 84
84
-
 85
85
-
 86
86
-
 87
87
-
 88
88
-
 89
89
-
 90
90
-
 91
91
-
 92
92
-
 93
93
-
 94
94
-
 95
95
-
 96
96
-
 97
97
-
 98
98
-
 99
99
-
 100
100
-
 101
101
-
 102
102
-
 103
103
-
 104
104
-
 105
105
-
 106
106
-
 107
107
-
 108
108
-
 109
109
-
 110
110
-
 111
111
-
 112
112
-
 113
113
-
 114
114
-
 115
115
-
 116
116
-
 117
117
-
 118
118
-
 119
119
-
 120
120
-
 121
121
-
 122
122
-
 123
123
-
 124
124
-
 125
125
-
 126
126
-
 127
127
-
 128
128
-
 129
129
-
 130
130
-
 131
131
-
 132
132
-
 133
133
-
 134
134
-
 135
135
-
 136
136
-
 137
137
-
 138
138
-
 139
139
-
 140
140
-
 141
141
-
 142
142
-
 143
143
-
 144
144
-
 145
145
-
 146
146
-
 147
147
-
 148
148
-
 149
149
-
 150
150
-
 151
151
-
 152
152
-
 153
153
-
 154
154
-
 155
155
-
 156
156
-
 157
157
-
 158
158
-
 159
159
-
 160
160
-
 161
161
-
 162
162
-
 163
163
-
 164
164
-
 165
165
-
 166
166
-
 167
167
-
 168
168
-
 169
169
-
 170
170
-
 171
171
-
 172
172
-
 173
173
-
 174
174
-
 175
175
-
 176
176
-
 177
177
-
 178
178
-
 179
179
-
 180
180
-
 181
181
-
 182
182
-
 183
183
-
 184
184
-
 185
185
-
 186
186
-
 187
187
-
 188
188
-
 189
189
-
 190
190
-
 191
191
-
 192
192
-
 193
193
-
 194
194
-
 195
195
-
 196
196
-
 197
197
-
 198
198
-
 199
199
-
 200
200
-
 201
201
-
 202
202
-
 203
203
-
 204
204
-
 205
205
-
 206
206
-
 207
207
-
 208
208
-
 209
209
-
 210
210
-
 211
211
-
 212
212
-
 213
213
-
 214
214
-
 215
215
-
 216
216
-
 217
217
-
 218
218
-
 219
219
-
 220
220
-
 221
221
-
 222
222
-
 223
223
-
 224
224
-
 225
225
-
 226
226
-
 227
227
-
 228
228
-
 229
229
-
 230
230
-
 231
231
-
 232
232
-
 233
233
-
 234
234
-
 235
235
-
 236
236
-
 237
237
-
 238
238
-
 239
239
-
 240
240
-
 241
241
-
 242
242
-
 243
243
-
 244
244
-
 245
245
-
 246
246
-
 247
247
-
 248
248
-
 249
249
-
 250
250
-
 251
251
-
 252
252
-
 253
253
-
 254
254
-
 255
255
-
 256
256
-
 257
257
-
 258
258
-
 259
259
-
 260
260
-
 261
261
-
 262
262
-
 263
263
-
 264
264
-
 265
265
-
 266
266
-
 267
267
-
 268
268
-
 269
269
-
 270
270
-
 271
271
-
 272
272
-
 273
273
-
 274
274
-
 275
275
-
 276
276
-
 277
277
-
 278
278
-
 279
279
-
 280
280
-
 281
281
-
 282
282
-
 283
283
-
 284
284
-
 285
285
-
 286
286
-
 287
287
-
 288
288
-
 289
289
-
 290
290
-
 291
291
-
 292
292
-
 293
293
-
 294
294
-
 295
295
-
 296
296
-
 297
297
-
 298
298
-
 299
299
-
 300
300
-
 301
301
-
 302
302
-
 303
303
-
 304
304
-
 305
305
-
 306
306
-
 307
307
-
 308
308
-
 309
309
-
 310
310
-
 311
311
-
 312
312
-
 313
313
-
 314
314
-
 315
315
-
 316
316
-
 317
317
-
 318
318
-
 319
319
-
 320
320
-
 321
321
-
 322
322
-
 323
323
-
 324
324
-
 325
325
-
 326
326
-
 327
327
-
 328
328
-
 329
329
-
 330
330
-
 331
331
-
 332
332
-
 333
333
-
 334
334
-
 335
335
-
 336
336
-
 337
337
-
 338
338
-
 339
339
-
 340
340
-
 341
341
-
 342
342
-
 343
343
-
 344
344
-
 345
345
-
 346
346
-
 347
347
-
 348
348
-
 349
349
-
 350
350
-
 351
351
-
 352
352
-
 353
353
-
 354
354
-
 355
355
-
 356
356
-
 357
357
-
 358
358
-
 359
359
-
 360
360
-
 361
361
-
 362
362
-
 363
363
-
 364
364
-
 365
365
-
 366
366
-
 367
367
-
 368
368


diğer dillerde
- slovenčina: Ducati PRO-I EVO Používateľská príručka
Diğer belgeler
-
 Mobility AL EXT Electric Scooter Kullanım kılavuzu
-
Segway P65E Kullanım kılavuzu
-
-
Razor 13173895 Kullanım kılavuzu
-
 KikkaBoo Lunox Kullanım kılavuzu
-
 KikkaBoo BON BON Kullanım kılavuzu
-
-
-


