


2.3 2.4

2.2

5
11 Guarantee and service 20
12 Troubleshooting 21
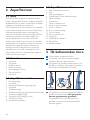
1 Important
Read this user manual carefully before you use the
appliance and save it for future reference.
1.0.1 Danger
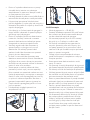
• To avoid a hazard, do not move the appliance
over its own mains cord or the mains cords of
other appliances.
• To prevent electric shocks, never immerse the
mopping nozzle or the body of the appliance
in water or any other liquid, nor rinse it under
the tap.
• To prevent electric shocks, never move the
1.0.2 Warning
• The plug must be removed from the socket-
outlet before cleaning or maintaining the
appliance.
• Never disassemble the upper body from the
lower body after assembly. If you disassemble
the upper body, the appliance cannot be
assembled again.
• Do not let the appliance pick up sharp objects,
to avoid a hazard.
•
or combustible liquids in the clean water tank,
to avoid a hazard.
Table of contents
1 Important 5
1.1 Electromagneticelds(EMF) 7
1.2 Activeprotectionsystem 7
1.3 Usagerestrictions 7
1.4 Floormaintenance 7
2 Your AquaTrio 8
2.1 Introduction 8
2.2 Whatisinthebox 8
2.3 FrontofAquaTrio 8
2.4 BackofAquaTrio 8
3 Beforerstuse 8
4 Preparing for use 9
4.1 Fillingthecleanwatertank 9
5 Using your AquaTrio 10
5.1 Cleaningoors 10
5.2 Cleaningtips 11
5.3 Pausingduringuse 11
5.4 Tankfull/tankemptylight 12
5.5 Emptyingthedirtywatertank 12
5.6 Activeprotectionsystemisactivated13
6 Cleaning and maintenance 14
6.1 FlushingyourAquaTrio 14
6.2 Cleaningthemoppingnozzle 15
6.3 Cleaningthewatertanks 16
6.4 Reassemblingthemoppingnozzle 17
6.5 Maintenance 18
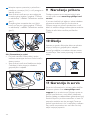
7 Storing and moving your AquaTrio 1 8
7.1 StoringyourAquaTrio 18
7.2 MovingyourAquaTrio 18
8 Replacing the mopping brushes 19
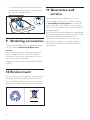
9 Ordering accessories 20
10 Environment 20
ENGLISH

6
1.0.3 Caution
• Noise level: Lc = 85 dB(A).
• Always unplug the appliance before you
remove one of the water tanks or open the
mopping nozzle.
• Do not plug in, unplug or operate the
appliance with wet hands.
• Never tilt the upper body of the appliance
too far backwards or put the appliance on
its side when the dirty water tank contains
wastewater to prevent leakage.
• Only use the lime green parts to operate,
clean and maintain the appliance.
• This appliance is intended for indoor
household use only.
• Do not try to override the safety lock by
securing the power-on button in pressed-
down position.
• Do not block the ventilation openings of the
appliance.
• Do not let the appliance pick up foreign
objects other than dirt or liquid to prevent
the active protection system from being
activated.
• Never put acetic acid (vinegar) or a descaler
in the clean water tank or let the appliance
pick them up to prevent damage.
•
products that cannot be diluted in the clean
water tank, nor let the appliance pick them up
to prevent damage.
•
the water of the clean water tank.
• Never exceed the maximum quantities
mentioned on the bottle when you use a
• Never put ethereal oils or similar substances
in the clean water tank or let the appliance
pick them up, to prevent damage.
• Do not let the appliance pick up ashes until
they are cold to avoid a hazard.
•
parts and objects away from the moving parts
and openings in the mopping nozzle.
• Do not lift or tilt the mopping nozzle during
use, as water may spray out of the mopping
nozzle.
• Check if the voltage indicated on the
appliance corresponds to the local mains
voltage before you connect the appliance, to
prevent injury or damage to the motor.
• Regularly check the mains cord and the
appliance for damage. Do not use the
appliance if the plug, the mains cord or the
appliance itself is damaged.
• If the mains cord is damaged, you must have it
replaced by Philips, a service centre authorised
order to avoid a hazard.
• This appliance is not intended for use by
persons (including children) with reduced
physical, sensory or mental capabilities, or lack
of experience and knowledge, unless they
have been given supervision or instruction
concerning use of the appliance by a person
responsible for their safety.
• Children should be supervised to ensure that
they do not play with the appliance.
• Never store the appliance at a temperature
lower than 0°C.

7
1.3 Usage restrictions
•
a water-resistant top coat (such as linoleum,
enamelled tiles and varnished parquet). These
treated to make it water-resistant, check with
the manufacturer if you can use water to
clean it. Do not use this appliance on hard
damaged.
• Do not use this appliance to clean carpets.
•
grilles of convector heaters. As the appliance
cannot pick up water that comes out of the
nozzle when you move it over the grille, water
ends up at the bottom of the convector pit.
• Do not move the mopping nozzle sideways,
as this leaves water traces. Only move the
mopping nozzle forwards and backwards.
1.4 Floor maintenance
• Always follow the cleaning and maintenance
instructions and the maintenance programme
appliance.
• This appliance is meant for regular cleaning
• Do not clean the mopping brushes with a
sharp object, as this may damage the brush
hairs and reduce the cleaning performance of
the mopping brushes.
• Do not let the appliance operate in the same
• Clean the mopping brushes according to
the instructions in chapter ‘Cleaning and
maintenance’.
• The mopping brushes are not dishwasher-
proof or washing machine-proof.
• Only replace the mopping brushes with
original mopping brushes from Philips. For
replacement instructions and information, see
chapter ‘Replacing the mopping brushes’. For
ordering new mopping brushes, see chapter
‘Ordering accessories’.
1.1Electromagneticelds
(EMF)
This appliance complies with all standards
properly and according to the instructions in this
user manual, the appliance is safe to use based on
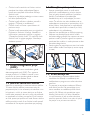
1.2 Active protection system
The AquaTrio is equipped with an active
protection system. This active protection system
has been designed to recognise when a foreign
object other than dirt or liquid is picked up from
the mopping brushes immediately to prevent
damage to the object and appliance. The motor
sound decreases and the appliance no longer
system is also activated when the mopping
brushes are too wet or when you move the
appliance over a carpet.
ENGLISH

8
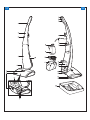
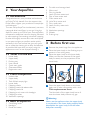
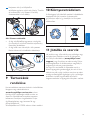
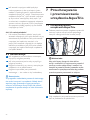
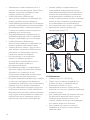
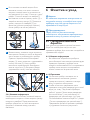
4 Turnable cord storage hook
6 Carrying handle
7 Lever for clean water tank
8 Cap of clean water tank
9 Clean water tank
10 Lid of dirty water tank
11 Dirty water tank
12 Lever for dirty water tank
13 Air inlet
14 Ventilation openings
15 Wheels
16 Flushing tray
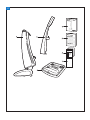
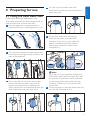
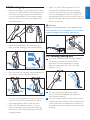
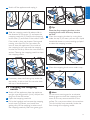
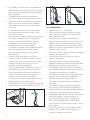
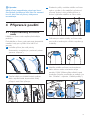
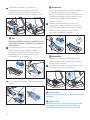
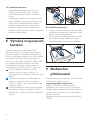
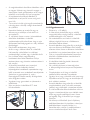
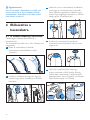
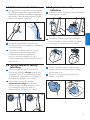
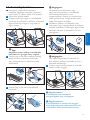
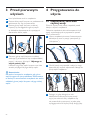
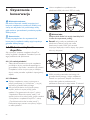
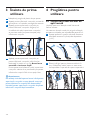
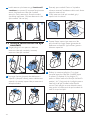
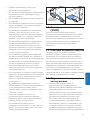
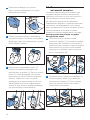
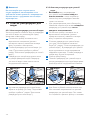
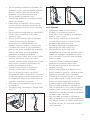
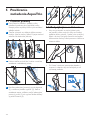
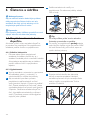
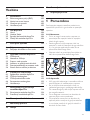
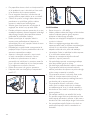
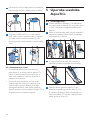
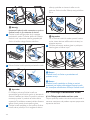
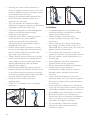
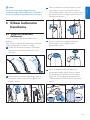
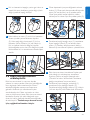
3 Beforerstuse
1 Remove the plastic bags from the appliance.
2
prevent it from rolling away.
3 Place the upper body on the lower body.
lower body.
4 Press the upper body down on the lower
body until it locks into position with a click.
This requires some force!
onto the lower body without any gap.
B
Warning:
Neverusetheappliancewhentheupperbody
isnotplacedonthelowerbodyproperly.Never
disassembletheupperbodyfromthelower
bodyafterassembly.
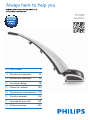
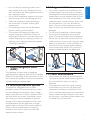
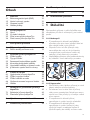
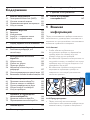
2 Your AquaTrio
2.1 Introduction
Congratulations on your purchase and welcome
Philips offers, register your product at www.philips.
com/welcome.
The new Philips AquaTrio simultaneously vacuums,
AquaTrio saves up to 50% of your time and effort
compared to traditional vacuum cleaning followed
brushes thoroughly remove dirt, stains and liquids
in one pass and give you perfect results quickly
and easily. In this user manual we give you some
as possible. We hope that you enjoy using this
appliance as much as we enjoyed creating it.
2.2 What is in the box
1 Lower body
2 Upper body
3 Flushing tray
4 User manual
5 Quick start guide
7 Registration card
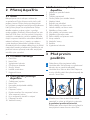
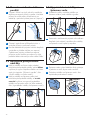
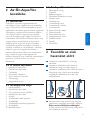
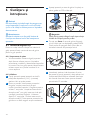
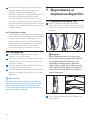
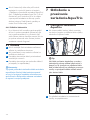
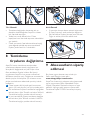
2.3 Front of AquaTrio
1 Unlock slide
2 Upper body
3 Tank full/tank empty light
4 Lower body
10 Ventilation openings
2.4 Back of AquaTrio
2 Handgrip
3 Power-on button

9
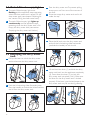
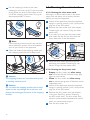
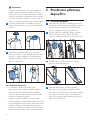
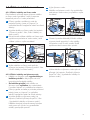
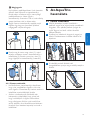
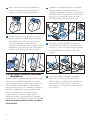
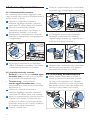
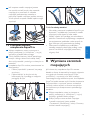
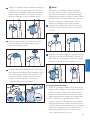
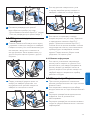
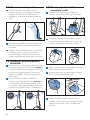
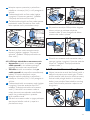
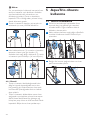
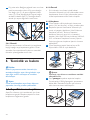
4 Turn the cap of the clean water tank
anticlockwise and remove the cap from the
clean water tank.
5 Fill the clean water tank with cold or
indication. If you wish, you can add a few
(see chapter ‘Important’, section ‘Floor
maintenance’).
D
Note:
on the bottle. As the clean water tank has
a capacity of 700ml, you only have to add
a few drops.
6 Put the cap back on the clean water tank and
4 Preparing for use
4.1 Filling the clean water tank
Fill the clean water tank before every use.
A full clean water tank provides enough water to
clean a surface area of more than 60m².
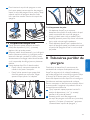
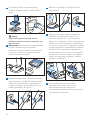
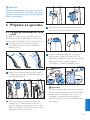
1 Place the appliance in upright position. It
automatically locks in parking position (‘click’).
2 Turn the cord storage hook downwards and
remove the cord to gain proper access to the
back of the appliance.
3 Pull up the lever to unlock the clean water
tank and remove the clean water tank. To
prevent the appliance from toppling over,
hold it upright with one hand and remove the
clean water tank with your other hand.
ENGLISH

10
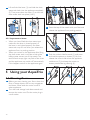
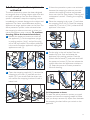
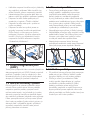
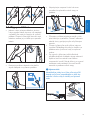
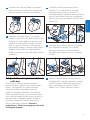
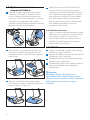
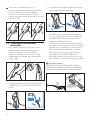
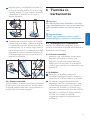
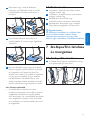
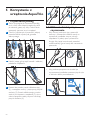
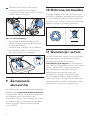
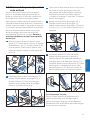
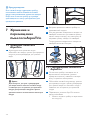
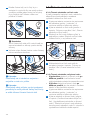
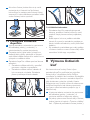
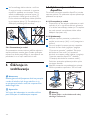
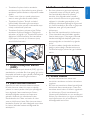
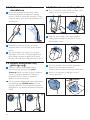
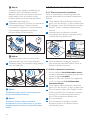
3 Press the top of the nozzle with your foot and
release the appliance from parking position.
4 Push the unlock slide forwards (1) and press
and hold the power-on button (2). You can
release the unlock slide when the appliance
switches on (3), but keep the power-on
button pressed during cleaning (4).
4
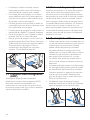
7 Lift and hold the lever (1) and slide the clean
water tank back into the appliance completely
(2). Then press down the lever (3) to lock the
clean water tank into place (‘click’).
4.1.1 Important to know
•
make sure the lever is closed properly. If
the lever is not locked properly, the clean
water tank may fall out when you release the
appliance from its parking position.
•
the clean water tank, it can take a little while
before water comes out of the nozzle. The
and the appliance may switch off automatically.
If this happens, switch on the appliance again.
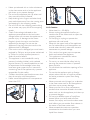
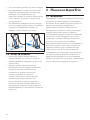
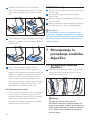
5 Using your AquaTrio
5.1Cleaningoors
1
other appliances.
2 Turn the cord storage hook downwards and
remove the mains cord. Put the mains plug in
a wall socket.

11
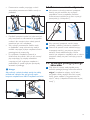
• After you switch off the appliance, move
it forwards and backwards a few times to
remove the liquid that is present between
the two mopping brushes. If you switch off
the appliance and lift it up, the water that was
present between the brushes leaves a trace of
C
Caution:
Nevertilttheupperbodyoftheappliancetoo
farbackwardsorputtheapplianceonitssideto
preventleakagefromthedirtywatertank.
5.3 Pausing during use
1 If you want to pause for a moment, release
the power-on button to switch off the
appliance. Place the appliance in upright
position. It automatically locks in parking
position (‘click’).
2 To continue cleaning, press the nozzle
with your foot and release the appliance
from parking position.
3 Push the unlock slide forwards and press and
hold the power-on button. You can release the
unlock slide when the appliance switches on,
but keep the power-on button pressed during
cleaning.
5.2 Cleaning tips
• Hold the handgrip in one hand and the mains
cord in your other hand to avoid tripping over
the mains cord and to prevent water traces
• Work backwards and in the direction of a
• Do not move the mopping nozzle sideways, as
• You can move the appliance just as quickly as
move the appliance slowly over the stain.
• Switch off the appliance before you pull it
over a threshold to prevent water traces on
mopping nozzle.
ENGLISH

12
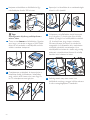
3 Pour the dirty water out. To prevent spilling,
always pour out from one of the corners of
the tank.
4 Rinse the empty dirty water tank and its lid
under the tap.
5 Place the lid back onto the dirty water tank
and pull the lid unlocking slides backwards
(towards the handle) to lock the lid.
6 Lift and hold the lever (1) and slide the dirty
water tank back into the appliance completely
(2). Press down the lever (3) to lock the
the lever for the dirty water tank is locked
properly. If the lever is not locked properly, the
dirty water tank may fall out during cleaning.
5.4 Tank full/tank empty light
1 The tank full/tank empty light starts
ashing and the appliance stops operating
when the clean water tank is empty. Fill the
clean water tank (see chapter ‘Preparing for
use’, section ‘Filling the clean water tank’).
2 The tank full/tank empty light lights up
continuously and the appliance stops
operating when the dirty water tank is full.
Empty the dirty water tank (see section
‘Emptying the dirty water tank’ below).
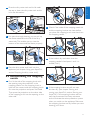
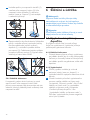
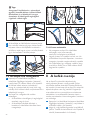
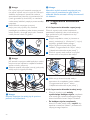
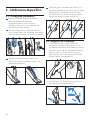
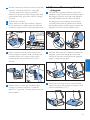
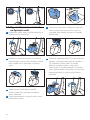
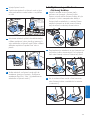
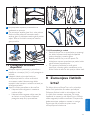
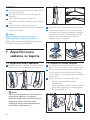
5.5 Emptying the dirty water
tank
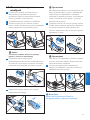
1 Pull up the lever to unlock the dirty water
tank and remove the dirty water tank.
2 Push the lid unlocking slides forwards (away
from the handle) to unlock the lid and remove
the lid from the dirty water tank.

13
3 If the active protection system was activated
because the mopping brushes are too wet,
remove the mopping brushes and squeeze
them over the sink (see chapter ‘Cleaning and
maintenance’, section ‘ Cleaning the mopping
nozzle’).
4 Place the mopping brush cover (1) and close
the mopping brush lid (2). Press the mopping
nozzle lid (3) to lock it (‘click’), otherwise the
appliance is not reset.
5 Put the plug in the wall socket. Press the
nozzle with your foot and release the
appliance from parking position. Push the
unlock slide forwards (1) and press and hold
the power-on button (2). You can release the
unlock slide when the appliance switches on
(3). Keep the power-on button pressed to
continue cleaning.
5.6.1 Important to know
To reset the active protection system you need
sure you always remove any object from between
the mopping brushes before you switch on the
appliance.
5.6 Active protection system is
activated
The active protection system has been designed
to recognise when a foreign object other than dirt
system is activated, it stops the mopping brushes
immediately to prevent damage to the object and
appliance. The motor sound decreases and the
active protection system is also activated when
the mopping brushes are too wet or when you
move the appliance over a carpet. To continue
cleaning, follow the instructions below!
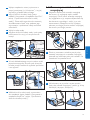
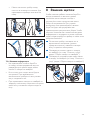
1 Release the power-on button to switch off
the appliance (1). Put the appliance upright
in parking position (‘click’) and pull the plug
out of the wall socket. If the object picked up
is the cord of another appliance, unplug this
appliance as well (2).
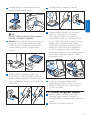
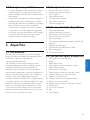
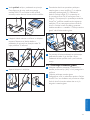
2 Open the mopping nozzle lid (1), remove the
mopping brush cover (2) and take out the
can remove the mopping brushes to have a
better look.
ENGLISH

14
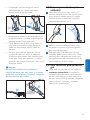
3
measuring cup with 300ml of water.
E
Tip:
Ifyouwish,youcanaddsomeliquidoor
cleanertothewater.
4 Pour the water slowly
become too wet, the active protection system
is activated.
5 Put the mains plug in the wall socket and
switch on the appliance. Let the appliance
used up. This takes approximately 15 seconds.
6 Cleaning and
maintenance
A Danger:
Neverimmersethemoppingnozzleorthebody
oftheapplianceinwateroranyotherliquid,nor
rinseitunderthetaptopreventelectricshocks.
B
Warning:
Theplugmustberemovedfromthesocket-
outletbeforecleaningormaintainingthe
appliance.
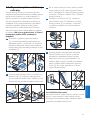
6.1 Flushing your AquaTrio
To clean the inside of the AquaTrio, you have to
6.1.1 Important to know
•
after every use to prevent dirt from
accumulating and bacteria from growing inside.
use, this may lead to an unpleasant smell.
6.1.2 Flushing
1 Switch off the appliance, place the appliance
upright in parking position (‘click’) and pull the
plug out of the wall socket.
2
‘Preparing for use’, section ‘Filling the clean
water tank’) or empty the dirty water tank
(see chapter ‘Using your AquaTrio’, section
‘Emptying the dirty water tank’). Interruption
the result.

15
E Tip:
Placethedirtymoppingbrushesonthe
moppingbrushcoverandcarrythemto
thesink.
4 Clean the mopping brushes by rinsing them
under the tap. If you want, you can use a liquid
household cleaner or some washing-up liquid
to clean the mopping brushes.
5 Clean the mopping brush cover under a tap.
D
Note:
Do not use a scouring pad or an abrasive
cleaning agent to clean the mopping brush
cover, as this may cause scratches on the
surface. Dirt may accumulate in the scratches.
This dirt buildup may eventually hinder the
6 Switch off the appliance and unplug it.
7 Slide the mopping nozzle lid release slide in
the direction of the arrow (1) and open the
mopping nozzle lid (2). Remove the mopping
brush cover (3) and check if the inside is clean.
If the inside is clean, see chapter ‘Storing and
moving your AquaTrio’ for instructions on
how to store the appliance. If the inside of
the mopping brush cover and the mopping
brushes are still dirty, follow the instructions in
section ‘Cleaning the mopping nozzle’ to clean
the mopping nozzle.
8
tap and dry it with a cloth. You can also clean
the tray in the dishwasher.
6.2 Cleaning the mopping
nozzle
1 Switch off the appliance, place the appliance
upright in parking position (‘click’) and pull the
plug out of the wall socket.
2 Open the mopping nozzle lid.
3 Pull at the handgrip and remove the mopping
brush cover. To prevent your hands from
getting dirty, lift the mopping brushes out of
the mopping nozzle by their lime green grips.
ENGLISH

16
6.3 Cleaning the water tanks
6.3.1 Cleaning the clean water tank
Although it is safe to leave water in the clean
water tank, we advise you to empty the tank
before you store the appliance.
1 Switch off the appliance, place the appliance
upright in parking position (‘click’) and pull the
plug out of the wall socket.
2 Remove the clean water tank (see chapter
‘Preparing for use’, section ‘Filling the clean
water tank’).
3 If you want, you can clean the clean water
tank under the tap. You can also clean the
clean water tank in the dishwasher.
4 Place the clean water tank back into the
appliance (see chapter ‘Preparing for use’,
section ‘Filling the clean water tank’).
6.3.2 Cleaning the dirty water tank
• Empty the dirty water tank after every
use and when the tank full/tank empty light
lights up continuously.
• Clean the dirty water tank after every
use to prevent the growth of bacteria and an
unpleasant smell.
1 Switch off the appliance, place the appliance
upright in parking position (‘click’) and pull the
plug out of the wall socket.
2 Remove the dirty water tank (see chapter
‘Using your AquaTrio’, section ‘Emptying
the dirty water tank’). The dirty water tank
contains concentrated wastewater. Be careful
when you remove and empty it.
3 Pour the dirty water out.
6 Put the mopping brushes on the clean
mopping brush cover to dry. To ensure proper
drying, place one end of the brushes on the
rim of the mopping brush cover. Drying can
take approximately 24 hours.
D
Note:
If the mopping brushes are still too wet, the
active protection system will be activated as
soon as you switch on the appliance.
7 Clean the inside of the mopping nozzle and
the mopping nozzle lid with a damp cloth.
C
Caution:
Themoppingbrushesarenotdishwasher-proof
orwashingmachine-proof.
C
Caution:
Donotcleanthemoppingbrusheswithasharp
object,asthismaydamagethebrushhairsand
reducethecleaningperformanceofthemopping
brushes.

17
2 Check if the inside of the mopping nozzle lid
and the mopping brushes are clean before
you place the mopping brush cover back into
the mopping nozzle.
3 If the inside is dry and clean, close the
mopping nozzle lid and press it until it is
locked (‘click’).
4 If the mopping brushes are still too wet,
let them dry (see chapter ‘Storing and
moving your AquaTrio’, section ‘Storing your
AquaTrio’). If the mopping brushes are too
wet, they encounter too heavy resistance
and will activate the active protection system
the mopping brushes are dry before you start
4 Rinse the dirty water tank and its lid under
the tap, or clean the dirty water tank and its
lid in the dishwasher.
5 For extra thorough cleaning, you can pull up
water tank. This enables you to rinse the
6 Place the dirty water tank back into the
appliance (see chapter ‘Using your AquaTrio’,
section ‘Emptying the dirty water tank’).
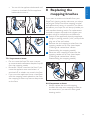
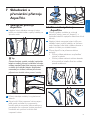
6.4 Reassembling the mopping
nozzle
1
the opening onto the projection in the
mopping nozzle. Turn the mopping brush a
little until the recess inside the mopping brush
Then press the projection on the other side
of the mopping brush into the opening on the
other side.
ENGLISH

18
E Tip:
Foreasyreleaseandeasyaccesstothe
watertanks,youcanalsowindupthemains
cordandhangitonthecordstoragehook.
Youcanusethecordcliptoxtheendof
thecordtokeepitinplacewhenthecordis
wrappedforstorage.
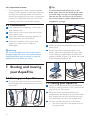
2 When you store the appliance, place it on the
3 If the inside of the mopping nozzle is not
yet dry, place the mopping brush cover back
in the mopping nozzle askew and leave the
mopping nozzle lid open. This allows the inside
of the mopping nozzle to dry.
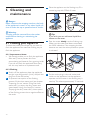
7.2 Moving your AquaTrio
1 Switch off the appliance, place the appliance
upright in parking position (‘click’) and pull the
plug out of the wall socket.
2 Wrap the mains cord around the cord
storage hook and the lever for the dirty water
tank. Instead, you can also wind up the mains
cord and hang it on the cord storage hook.
3 You can move the AquaTrio in two ways:
• You can lift and carry the appliance by its
carrying handle.
6.4.1 Important to know
• The mopping brush cover cannot be placed
properly if the mopping brushes are not placed
correctly. The mopping nozzle lid cannot be
closed if the mopping brush cover is not placed
properly. The appliance does not work if the
mopping nozzle lid is not closed properly.
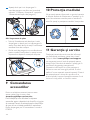
6.5 Maintenance
1 If the outside of the appliance is dirty, clean it
with a damp cloth.
2 When the air inlet is dirty, clean the air inlet
with a damp cloth.
3 Check the ventilation openings regularly to
ensure that they are not blocked.
4 Check the condition of the mains cord
regularly to make sure it is safe and
undamaged.
B
Warning:
Donotusetheapplianceifthemainscordis
damaged.Havethemainscordreplacedbyan
authorisedPhilipsservicecentreortakethe
appliancetoyourdealerforrepair.
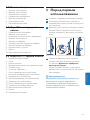
7 Storing and moving
your AquaTrio
7.1 Storing your AquaTrio
1 To store the mains cord, wrap it around the
cord storage hook and the lever for the dirty
water tank.

19
8 Replacing the
mopping brushes
AquaTrio’s cleaning results, make sure you always
and replace them every six months. If you follow
this advice, your AquaTrio will always provide you
with excellent cleaning results. For replacement
reminders, support, tips and tricks, register your
product online at www.philips.com/welcome
1 Switch off the appliance, place the appliance
upright in parking position (‘click’) and pull the
plug out of the wall socket.
2 Remove the old mopping brushes from the
mopping nozzle one by one (see chapter
‘Cleaning and maintenance’, section
‘Reassembling the mopping nozzle’).
3 Place two new mopping brushes into the
mopping nozzle one by one (see chapter
‘Cleaning and maintenance’, section
‘Reassembling the mopping nozzle’).
8.0.1 Important to know
• Always replace the two old mopping
brushes with two new mopping brushes at
the same time if you want to retain good
cleaning results.
• You can tilt the appliance backwards until
it leans on its wheels. Pull the appliance
backwards to move it.
7.2.1 Important to know
• Do not move the AquaTrio over a carpet,
as concentrated wastewater droplets may fall
from the mopping nozzle.
•
move the appliance over sand when it is
•
the mopping brushes may leave a damp trace
ENGLISH

20
11 Guarantee and
service
If you need service or information or if you
have a problem, please visit the Philips website
at www.philips.com/support or contact the
Philips Consumer Care Centre in your country.
Your AquaTrio has been designed and developed
with the greatest possible care. In the unfortunate
case that the appliance needs repair, the
Consumer Care Centre in your country will
help you by arranging any necessary repairs in
the shortest possible time and with maximum
convenience.
• The old mopping brushes do not harm the
environment. You can throw them away with
the normal household waste.
9 Ordering accessories
To purchase accessories for this appliance, please
visit our website www.shop.philips.com/
service.
for your AquaTrio, please contact the Philips
Consumer Care Centre in your country or visit
your vacuum cleaner specialist.
FC8054.
10 Environment
Do not throw away the appliance with the normal
household waste at the end of its life, but hand
doing this, you help to preserve the environment.
Sayfa yükleniyor...
Sayfa yükleniyor...
Sayfa yükleniyor...
Sayfa yükleniyor...
Sayfa yükleniyor...
Sayfa yükleniyor...
Sayfa yükleniyor...
Sayfa yükleniyor...
Sayfa yükleniyor...
Sayfa yükleniyor...
Sayfa yükleniyor...
Sayfa yükleniyor...
Sayfa yükleniyor...
Sayfa yükleniyor...
Sayfa yükleniyor...
Sayfa yükleniyor...
Sayfa yükleniyor...
Sayfa yükleniyor...
Sayfa yükleniyor...
Sayfa yükleniyor...
Sayfa yükleniyor...
Sayfa yükleniyor...
Sayfa yükleniyor...
Sayfa yükleniyor...
Sayfa yükleniyor...
Sayfa yükleniyor...
Sayfa yükleniyor...
Sayfa yükleniyor...
Sayfa yükleniyor...
Sayfa yükleniyor...
Sayfa yükleniyor...
Sayfa yükleniyor...
Sayfa yükleniyor...
Sayfa yükleniyor...
Sayfa yükleniyor...
Sayfa yükleniyor...
Sayfa yükleniyor...
Sayfa yükleniyor...
Sayfa yükleniyor...
Sayfa yükleniyor...
Sayfa yükleniyor...
Sayfa yükleniyor...
Sayfa yükleniyor...
Sayfa yükleniyor...
Sayfa yükleniyor...
Sayfa yükleniyor...
Sayfa yükleniyor...
Sayfa yükleniyor...
Sayfa yükleniyor...
Sayfa yükleniyor...
Sayfa yükleniyor...
Sayfa yükleniyor...
Sayfa yükleniyor...
Sayfa yükleniyor...
Sayfa yükleniyor...
Sayfa yükleniyor...
Sayfa yükleniyor...
Sayfa yükleniyor...
Sayfa yükleniyor...
Sayfa yükleniyor...
Sayfa yükleniyor...
Sayfa yükleniyor...
Sayfa yükleniyor...
Sayfa yükleniyor...
Sayfa yükleniyor...
Sayfa yükleniyor...
Sayfa yükleniyor...
Sayfa yükleniyor...
Sayfa yükleniyor...
Sayfa yükleniyor...
Sayfa yükleniyor...
Sayfa yükleniyor...
Sayfa yükleniyor...
Sayfa yükleniyor...
Sayfa yükleniyor...
Sayfa yükleniyor...
Sayfa yükleniyor...
Sayfa yükleniyor...
Sayfa yükleniyor...
Sayfa yükleniyor...
Sayfa yükleniyor...
Sayfa yükleniyor...
Sayfa yükleniyor...
Sayfa yükleniyor...
Sayfa yükleniyor...
Sayfa yükleniyor...
Sayfa yükleniyor...
Sayfa yükleniyor...
Sayfa yükleniyor...
Sayfa yükleniyor...
Sayfa yükleniyor...
Sayfa yükleniyor...
Sayfa yükleniyor...
Sayfa yükleniyor...
Sayfa yükleniyor...
Sayfa yükleniyor...
Sayfa yükleniyor...
Sayfa yükleniyor...
Sayfa yükleniyor...
Sayfa yükleniyor...
Sayfa yükleniyor...
Sayfa yükleniyor...
Sayfa yükleniyor...
Sayfa yükleniyor...
Sayfa yükleniyor...
Sayfa yükleniyor...
Sayfa yükleniyor...
Sayfa yükleniyor...
Sayfa yükleniyor...
Sayfa yükleniyor...
Sayfa yükleniyor...
Sayfa yükleniyor...
Sayfa yükleniyor...
Sayfa yükleniyor...
Sayfa yükleniyor...
Sayfa yükleniyor...
Sayfa yükleniyor...
Sayfa yükleniyor...
Sayfa yükleniyor...
Sayfa yükleniyor...
Sayfa yükleniyor...
Sayfa yükleniyor...
Sayfa yükleniyor...
Sayfa yükleniyor...
Sayfa yükleniyor...
Sayfa yükleniyor...
Sayfa yükleniyor...
Sayfa yükleniyor...
Sayfa yükleniyor...
Sayfa yükleniyor...
Sayfa yükleniyor...
Sayfa yükleniyor...
Sayfa yükleniyor...
Sayfa yükleniyor...
Sayfa yükleniyor...
Sayfa yükleniyor...
Sayfa yükleniyor...
Sayfa yükleniyor...
Sayfa yükleniyor...
Sayfa yükleniyor...
Sayfa yükleniyor...
Sayfa yükleniyor...
Sayfa yükleniyor...
Sayfa yükleniyor...
Sayfa yükleniyor...
Sayfa yükleniyor...
Sayfa yükleniyor...
Sayfa yükleniyor...
Sayfa yükleniyor...
Sayfa yükleniyor...
Sayfa yükleniyor...
Sayfa yükleniyor...
Sayfa yükleniyor...
Sayfa yükleniyor...
Sayfa yükleniyor...
Sayfa yükleniyor...
Sayfa yükleniyor...
Sayfa yükleniyor...
Sayfa yükleniyor...
Sayfa yükleniyor...
Sayfa yükleniyor...
Sayfa yükleniyor...
Sayfa yükleniyor...
Sayfa yükleniyor...
Sayfa yükleniyor...
Sayfa yükleniyor...
Sayfa yükleniyor...
Sayfa yükleniyor...
Sayfa yükleniyor...
Sayfa yükleniyor...
Sayfa yükleniyor...
Sayfa yükleniyor...
Sayfa yükleniyor...
Sayfa yükleniyor...
Sayfa yükleniyor...
Sayfa yükleniyor...
Sayfa yükleniyor...
Sayfa yükleniyor...
Sayfa yükleniyor...
Sayfa yükleniyor...
Sayfa yükleniyor...
Sayfa yükleniyor...
Sayfa yükleniyor...
Sayfa yükleniyor...
Sayfa yükleniyor...
Sayfa yükleniyor...
Sayfa yükleniyor...
Sayfa yükleniyor...
Sayfa yükleniyor...
Sayfa yükleniyor...
Sayfa yükleniyor...
Sayfa yükleniyor...
Sayfa yükleniyor...
Sayfa yükleniyor...
Sayfa yükleniyor...
Sayfa yükleniyor...
Sayfa yükleniyor...
Sayfa yükleniyor...
Sayfa yükleniyor...
Sayfa yükleniyor...
Sayfa yükleniyor...
Sayfa yükleniyor...
Sayfa yükleniyor...
Sayfa yükleniyor...
Sayfa yükleniyor...
Sayfa yükleniyor...
Sayfa yükleniyor...
Sayfa yükleniyor...
Sayfa yükleniyor...
Sayfa yükleniyor...
-
 1
1
-
 2
2
-
 3
3
-
 4
4
-
 5
5
-
 6
6
-
 7
7
-
 8
8
-
 9
9
-
 10
10
-
 11
11
-
 12
12
-
 13
13
-
 14
14
-
 15
15
-
 16
16
-
 17
17
-
 18
18
-
 19
19
-
 20
20
-
 21
21
-
 22
22
-
 23
23
-
 24
24
-
 25
25
-
 26
26
-
 27
27
-
 28
28
-
 29
29
-
 30
30
-
 31
31
-
 32
32
-
 33
33
-
 34
34
-
 35
35
-
 36
36
-
 37
37
-
 38
38
-
 39
39
-
 40
40
-
 41
41
-
 42
42
-
 43
43
-
 44
44
-
 45
45
-
 46
46
-
 47
47
-
 48
48
-
 49
49
-
 50
50
-
 51
51
-
 52
52
-
 53
53
-
 54
54
-
 55
55
-
 56
56
-
 57
57
-
 58
58
-
 59
59
-
 60
60
-
 61
61
-
 62
62
-
 63
63
-
 64
64
-
 65
65
-
 66
66
-
 67
67
-
 68
68
-
 69
69
-
 70
70
-
 71
71
-
 72
72
-
 73
73
-
 74
74
-
 75
75
-
 76
76
-
 77
77
-
 78
78
-
 79
79
-
 80
80
-
 81
81
-
 82
82
-
 83
83
-
 84
84
-
 85
85
-
 86
86
-
 87
87
-
 88
88
-
 89
89
-
 90
90
-
 91
91
-
 92
92
-
 93
93
-
 94
94
-
 95
95
-
 96
96
-
 97
97
-
 98
98
-
 99
99
-
 100
100
-
 101
101
-
 102
102
-
 103
103
-
 104
104
-
 105
105
-
 106
106
-
 107
107
-
 108
108
-
 109
109
-
 110
110
-
 111
111
-
 112
112
-
 113
113
-
 114
114
-
 115
115
-
 116
116
-
 117
117
-
 118
118
-
 119
119
-
 120
120
-
 121
121
-
 122
122
-
 123
123
-
 124
124
-
 125
125
-
 126
126
-
 127
127
-
 128
128
-
 129
129
-
 130
130
-
 131
131
-
 132
132
-
 133
133
-
 134
134
-
 135
135
-
 136
136
-
 137
137
-
 138
138
-
 139
139
-
 140
140
-
 141
141
-
 142
142
-
 143
143
-
 144
144
-
 145
145
-
 146
146
-
 147
147
-
 148
148
-
 149
149
-
 150
150
-
 151
151
-
 152
152
-
 153
153
-
 154
154
-
 155
155
-
 156
156
-
 157
157
-
 158
158
-
 159
159
-
 160
160
-
 161
161
-
 162
162
-
 163
163
-
 164
164
-
 165
165
-
 166
166
-
 167
167
-
 168
168
-
 169
169
-
 170
170
-
 171
171
-
 172
172
-
 173
173
-
 174
174
-
 175
175
-
 176
176
-
 177
177
-
 178
178
-
 179
179
-
 180
180
-
 181
181
-
 182
182
-
 183
183
-
 184
184
-
 185
185
-
 186
186
-
 187
187
-
 188
188
-
 189
189
-
 190
190
-
 191
191
-
 192
192
-
 193
193
-
 194
194
-
 195
195
-
 196
196
-
 197
197
-
 198
198
-
 199
199
-
 200
200
-
 201
201
-
 202
202
-
 203
203
-
 204
204
-
 205
205
-
 206
206
-
 207
207
-
 208
208
-
 209
209
-
 210
210
-
 211
211
-
 212
212
-
 213
213
-
 214
214
-
 215
215
-
 216
216
-
 217
217
-
 218
218
-
 219
219
-
 220
220
-
 221
221
-
 222
222
-
 223
223
-
 224
224
-
 225
225
-
 226
226
-
 227
227
-
 228
228
-
 229
229
-
 230
230


Philips FC7070/01 Kullanım kılavuzu
- Kategori
- Elektrikli süpürgeler
- Tip
- Kullanım kılavuzu
diğer dillerde
- slovenčina: Philips FC7070/01 Používateľská príručka
- polski: Philips FC7070/01 Instrukcja obsługi
- română: Philips FC7070/01 Manual de utilizare