
Rain Bird 11000 Series Rotors
Operations & Maintenance Manual
Rain Bird 11000 Serisi Rotorlar
Kullanım ve Bakım Kılavuzu

2
Rain Bird 11000 Series Rotor Operation and Maintenance Manual
THANK YOU FOR CHOOSİNG
RAİN BİRD.
We are aware that you have a choce, and we are
happy you chose Ran Brd.
Ran Brd Rotors oer a wde range of features plus
easy mantenance.
Ths manual shows how to perform common
nstallaton and mantenance procedures. If you
have any comments or questons please call your
local Ran Brd dstrbutor.
TABLE OF CONTENTS
Important Installaton & Mantenance Tps ......3
Arc Adjustment ...............................4
11000 Full/Part-Crcle Adjustment ..............5
Removng the Internal Assembly ...............7
Installng the Internal Assembly ................8
Rain Bird 11000 Series Rotor Operation and Maintenance Manual
Rain Bird 11000 Serisi Rotor Kullanım ve Bakım Kılavuzu
RAİN BİRD’Ü SEÇTİĞİNİZ İÇİN
TEŞEKKÜR EDERİZ.
Seçeneklernz olduğunu blyoruz ve Ran
Brd’ü terch etmş olmanızdan mutluluk
duyuyoruz.
Ran Brd Rotorları sze çok çeştl özellklern
yanı sıra bakım kolaylığı sunmaktadır.
Bu kılavuzda, genel kurulum ve bakım
şlemlernn nasıl yapılacağı açıklanmıştır.
Herhang br yorumunuz veya sorunuz çn
lütfen bölgenzdek Ran Brd dstrbütörüyle
rtbata geçn.
İÇİNDEKİLER
Öneml Kurulum ve Bakım Tavsyeler ........3
Açı Ayarı.................................4
11000 Tam/Kısm Çevrm Ayarı .............5
İç Bağlantının Çıkarılması..................7
İç Bağlantının Takılması ...................8

3
Rain Bird 11000 Series Rotor Operation and Maintenance Manual
IMPORTANT INSTALLATION &
MAINTENANCE TIPS
• To avod debrs problems, ush the system
before nstallng the ROTOR on the swng jonts.
If debrs gets n the lne, ush the lne.
• For ACME thread rotors, you must use an ACME
thread swng jont assembly. DO NOT use
plumbers tape or ppe dope. Do not tghten
completely aganst swng jont fttng. (Turn the
rotor back counter-clockwse one-quarter (¼) of a
turn from tghtened poston.)
• Ran Brd does not recommend usng metal
fttngs wth Ran Brd Rotors. If metal fttngs
must be used, hand tighten only.
• Ran Brd Rotors may be nstalled at ground level
n all sol types.
• For part-crcle applcatons, locate the
fxed left edge by rotatng the nozzle turret
counterclockwse.
Rain Bird 11000 Series Rotor Operation and Maintenance Manual
Rain Bird 11000 Serisi Rotor Kullanım ve Bakım Kılavuzu
ÖNEMLİ KURULUM VE BAKIM
TAVSİYELERİ
• Döküntü sorunlarından kaçınmak çn ROTORU
hareketl bağlantı elemanlarına takmadan
önce sstem yıkayın. Eğer hatta döküntü
grerse hattı yıkayın.
• ACME dşl rotorları çn br ACME dşl hareketl
bağlantı elemanı kullanmalısınız. Tessatçı
bandı veya boru macunu KULLANMAYIN.
Hareketl bağlantı parçası üzernde tamamen
sıkmayın. (Rotoru sıkıştırılmış konumdan
saat yönünün tersne br çeyrek (¼) tur ger
döndürün.)
• Ran Brd, Ran Brd Rotorları le brlkte metal
bağlantı parçaları kullanılmasını tavsye
etmez. Metal bağlantı parçaları kullanmanız
gerekyorsa sadece elinizle sıkın.
• Ran Brd Rotorları tüm toprak türler üzernde
zemn sevyesnde monte edleblr.
• Kısm çevrml uygulamalar çn, nozul taretn
saat yönünün tersne çevrerek sabt sol kenarı
bulun.

4
Rain Bird 11000 Series Rotor Operation and Maintenance Manual
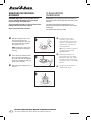
ARC ADJUSTMENT
Required Tool: Flat-head screwdriver
The LEFT leg of the sprnkler’s arc s
the fxed leg. The 11000 Seres Rotor
s shpped n full crcle mode. Algn
the left leg where t s needed for
your desred waterng pattern whle
nstallng the rotor case on the
swng jont.
The RIGHT leg of the arc s the
adjustable leg. It s shpped from the
factory at approxmately 180 degrees
from the fxed leg.
For best results, turn the head ON
to see where both legs “trp” (the
trp pont s the pont where the
rotor turns and begns rotatng n
the opposte drecton). To manually
advance the nozzle housng, SLOWLY
move t n the same drecton t s
currently movng. After notng where
the head trps, return the head to
the left trp pont. CAUTION: Do not
turn the turret manually against
the direction of rotation while in
operation.
Usng a at-head screwdrver, turn
the arc adjustment screw on top of
the nozzle housng to reach your
desred arc.
Turn the screw clockwise to add arc,
or counterclockwise to subtract arc.
One complete turn of the adjustment
screw equals approximately 58
degrees of arc. 11000 Series rotors
are adjustable from 30° to 345°.
CAUTION: Turning the arc adjustment
past the stop may damage the
internal.
Turn on the rotor and let t run through
the forward and backward trp ponts to
verfy the arc settng. Repeat steps 1 through 4 as needed. You
may also pull the nternal assembly out of the rotor and adjust
the arc. Then renstall the nternal assembly and check for
performance.
Rain Bird 11000 Series Rotor Operation and Maintenance Manual
Rain Bird 11000 Serisi Rotor Kullanım ve Bakım Kılavuzu
AÇI AYARI
Gerekli Alet: Düz uçlu tornavida
Sprnkler açısının SOL ayağı sabt
ayaktır. 11000 Sers Rotor tam
çevrm modunda gönderlr. Rotor
muhafazasını hareketl bağlantı
elemanı üzerne monte ederken arzu
ettğnz sulama model çn sol ayağı
gerektğ şeklde hzalayın.
Açının SAĞ ayağı ayarlanablr
ayaktır. Fabrkadan, sabt ayaktan
yaklaşık 180 derece açı mesafesnde
olacak şeklde gönderlr.
En y sonuçları elde etmek amacıyla
her k bacağın "tetklendğ" yer
görmek çn başlığı AÇIK konuma
getrn (tetkleme noktası, rotorun
ger döndüğü ve ters yönde
dönmeye başladığı noktadır). Nozul
yuvasını manüel olarak lerletmek
çn hâlhazırda hareket ettğ
yönde YAVAŞÇA lerletn. Başlığın
tetklendğ yer not aldıktan
sonra, başlığı tekrar sol tetkleme
noktasına ger döndürün. DİKKAT:
Çalıştığı esnada, tareti manuel
olarak dönme yönünün tersine
çevirmeyin.
Düz uçlu br tornavda kullanarak,
stedğnz açıya ulaşmak çn nozul
yuvasının üstündek açı ayar vdasını
çevrn.
Açı eklemek çn vdayı saat yönünde
veya açı çıkarmak çn saat yönünün
tersne çevrn. Ayar vdasının br tam
dönüşü yaklaşık olarak 58 derecelk
açıya karşılık gelr. 11000 Sers
rotorlar 30° le 345° arasında br
değere ayarlanablr.
DİKKAT: Açı ayarını durma noktasının
ötesine çevirmek iç kısma hasar
verebilir.
Rotoru açın ve açı ayarını doğrulamak
çn tetkleme noktalarından lerye ve
gerye doğru geçmesne zn vern. 1 la 4
adımlarını gerektğ şeklde tekrarlayın.
Aynı zamanda ç bağlantıyı rotordan
çekp çıkararak da açıyı ayarlayablrsnz.
Ardından ç bağlantıyı tekrar takın ve
performansı kontrol edn.

5
Rain Bird 11000 Series Rotor Operation and Maintenance Manual
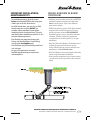
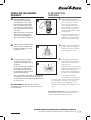
11000 FULL/PARTCIRCLE
ADJUSTMENT
Required Tool: Flat-head screwdriver
The FULL/PART-CIRCLE choce s made
by turnng the whte adjustment
arrow n the approprate drecton
untl t stops. Towards the HALF
CIRCLE for Part-Crcle operaton.
Towards the SOLID CIRCLE for Full
Crcle operaton. When the whte
screw s returned to the PART CIRCLE
poston, the prevously set edge
adjustments are used.
IMPORTANT NOTE: Apply downward
pressure on screw drver to ensure t fully
engages nto the slot.
The 11000 Seres rotor can operate n
one of two Part Crcle arc settngs. The
prmary arc (Arc A) and a secondary
arc (Arc B)
Note: When nternal s removed from
the case, to ensure the rotor s n the
Prmary arc, put nternal n Full Crcle
algn arrows on rser assembly and
nozzle base, then put the unt back
nto Part Crcle mode. Install the
nternal n case.
To change rrgaton from Arc A to Arc
B: Turn the Rotor rotaton adjustment
screw from ts PART CIRCLE to FULL
CIRCLE settng. Allow the Rotor to
turn untl the spray drecton s n the
Arc B range. Turn the Rotor rotaton
adjustment screw from FULL CIRCLE
to PART CIRCLE. Reverse these steps
to change back from Arc B to Arc A.
Arc A /
Sector A
Arc A /
A Açısı
B Açısı
Rain Bird 11000 Series Rotor Operation and Maintenance Manual
Rain Bird 11000 Serisi Rotor Kullanım ve Bakım Kılavuzu
11000 TAM/KISMİ ÇEVRİM
AYARI
Gerekli Alet: Düz uçlu tornavida
TAM/KISMİ ÇEVRİM terch, beyaz
ayar oku durana kadar uygun yönde
çevrlerek yapılır. Kısm Çevrm şlem
çn YARIM DAİREYE doğru. Tam Çevrm
şlem çn TAM DAİREYE doğru. Beyaz
vda YARI DAİRE konumuna ger
getrldğnde, daha önce ayarlanan
kenar ayarları kullanılır.
ÖNEMLİ NOT: Yuvaya tam olarak
oturduğundan emn olmak çn tornavdaya
aşağı doğru baskı uygulayın.
11000 Sers rotor, k Kısm Çevrm
açısı ayarından brnde çalışablr.
Brncl açı (A açısı) ve kncl açı (B
açısı)
Not: İç kısım muhafazadan
çıkarıldığında, rotorun Brncl açıda
olduğundan emn olmak çn ç kısmı
Tam Çevrm moduna getrn, yükseltc
tertbatı ve nozul tabanındak okları
hzalayın ve ardından üntey tekrar
Kısm Çevrm moduna getrn. İç kısmı
muhafazaya takın.
Sulamayı A Açısı'ndan B Açısı'na
geçrmek çn: Rotor dönüş ayar
vdasını KISMİ ÇEVRİM'den TAM
ÇEVRİM ayarına getrn. Püskürtme
yönü B Açısı aralığına gelene kadar
Rotorun dönmesne zn vern. Rotor
dönüş ayar vdasını TAM ÇEVRİM'den
KISMİ ÇEVRİM'e getrn. B Açısı'ndan A
Açısı'na ger dönmek çn bu adımları
tersne çevrn.

6
Rain Bird 11000 Series Rotor Operation and Maintenance Manual
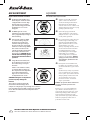
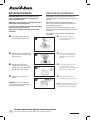
REMOVING THE INTERNAL
ASSEMBLY
IMPORTANT NOTE: Make sure the sprinkler does not
operate automatically while you are removing the
internal assembly. Turn off the water.
Clean around the top of the case to prevent debris from
falling in when the internal is removed.
Required Tool: Flat-head screwdriver
Whle pressng down on the center
of the nozzle housng, nsert a
screwdrver nto the slot on the snap
rng and pry up the snap rng from
the top of the rotor case.
NOTE: You MUST press down on the
nozzle housng when removng the
snap rng.
Insert a at-head screwdrver nto the
groove (or under the small tabs) on
the outsde edge of the bearng gude
and use the screwdrver to gently pry
up the nternal assembly.
Lft the nternal assembly up and out
of the case.
Rain Bird 11000 Series Rotor Operation and Maintenance Manual
Rain Bird 11000 Serisi Rotor Kullanım ve Bakım Kılavuzu
İÇ BAĞLANTININ
ÇIKARILMASI
ÖNEMLİ NOT: İç bağlantıyı çıkarırken sprinkler’in
otomatik olarak çalışmadığından emin olun. Suyu
kapatın.
İç bağlantı çıkarıldığında döküntülerin içeri
düşmesini önlemek için muhafazanın üst tarafını
temizleyin.
Gerekli Alet: Düz uçlu tornavida
Nozul yuvasının ortasına
bastırırken, tespt segmanı
üzerndek delğe br tornavda
sokun ve tespt segmanını rotor
muhafazasının üst kısmından
kanırtarak kaldırın.
NOT: Tespt segmanını çıkarırken
nozul yuvasını aşağı doğru
BASTIRMALISINIZ.
Yataklama kılavuzunun dış
kenarındak oluğa (veya küçük
kulakçıkların altına) düz uçlu br
tornavda sokun ve tornavdayla
ç bağlantıyı nazkçe yukarı doğru
kanırtın.
İç bağlantıyı yukarı kaldırın ve
muhafazadan çıkarın.

7
Rain Bird 11000 Series Rotor Operation and Maintenance Manual
INSTALLING THE INTERNAL
ASSEMBLY
PART-CIRCLE ROTORS: To fnd the
left-stop, turn the nozzle housng
to the rght untl t reaches ts “trp”
pont. Then turn the nozzle housng
back to the left untl t “trps” agan.
The locaton of the arrow on top of the
nozzle housng ndcates the drecton
of the nozzle.
Algn the arrow on the nozzle housng
wth the left edge of the grass lne
(left edge of your waterng pattern).
Then make your rght arc adjustment.
Lower the nternal assembly back nto
the case and press down frmly untl
the nternal assembly seats securely
and evenly n the case.
Clean and poston the snap rng n
the groove on the top of the rotor
case wth the bottom of the snap rng
facng down.
Press the end of the snap rng wthout
the screwdrver slot nto the groove.
Press and twst the snap rng down
n a crcular moton untl t s nstalled
about two-thrds of the way.
Step on or pound the snap rng (wth a screwdrver handle
or a smlar tool) to nsert t the rest of the way. Make sure
the snap rng fastens securely n place and s ush wth the
top of the rotor case.
FULL-CIRCLE MODELS: Installng the full-crcle nternal
assembly s the same as the part-crcle, except that you do not
need to adjust the arc.
Rain Bird 11000 Series Rotor Operation and Maintenance Manual
Rain Bird 11000 Serisi Rotor Kullanım ve Bakım Kılavuzu
İÇ BAĞLANTININ
TAKILMASI
KISMİ ÇEVRİMLİ ROTORLAR: Sol
durma noktasını bulmak çn nozul
yuvasını “tetkleme” noktasına
ulaşıncaya kadar sağa doğru
çevrn. Ardından nozul yuvasını
tekrar “tetklennceye” kadar sola
doğru çevrn. Nozul yuvasının
üstündek okun konumu, nozulun
yönünü gösterr.
Nozul yuvası üzerndek oku, çm
çzgsnn sol kenarıyla (sulama
modelnzn sol kenarı) hzalayın.
Ardından sağ açı ayarınızı yapın.
İç bağlantıyı tekrar muhafaza çne
ndrn ve emnyetl ve düzgün
şeklde yerne oturuncaya kadar
sıkıca aşağı doğru bastırın.
Tespt segmanını temzleyp alt
kısmı aşağı bakacak şeklde rotor
muhafazasının üst kısmındak
oluğa yerleştrn.
Tespt segmanının ucunu tornavda
kullanmadan oluğa bastırın. Tespt
segmanını, üçte k oranında
yerne oturuncaya kadar daresel
hareketlerle bastırarak döndürün.
Tespt segmanını tamamen
yerleştrmek çn segmanın üzerne
(tornavda sapıyla veya benzer br aletle) bastırarak
veya vurarak yce yerleştrn. Tespt segmanının
emnyetl şeklde yerne oturduğundan ve rotor
muhafazasının üst kısmıyla hzalı olduğundan emn
olun.
TAM ÇEVRİMLİ MODELLER: Tam çevrm ç bağlantısının
takılması şlem, açı ayarı gerekmemes dışında kısm
çevrm ç bağlantısının takılmasıyla aynıdır.

8
Rain Bird 11000 Series Rotor Operation and Maintenance Manual
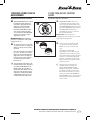
REPLACING THE NOZZLE
IMPORTANT NOTE: Make sure the sprinkler does not
operate automatically while you are changing the
nozzle. Turn off the water.
NOTE: Make sure the snap ring is securely in place before
removing the nozzle housing screws.
Clean top of case assembly to prevent debris from falling
in when nozzle housing is removed.
Required Tools: Phillips-head screwdriver; Flat-head
screwdriver.
Use a Phllps-head screwdrver to
loosen the nozzle housng screws.
Grasp the nozzle housng screws and
lft up to separate the nozzle housng
from the nternal.
Press the replacement nozzle
assembly nto the nozzle housng,
makng sure the nozzle front s ush
wth the outsde of the housng.
An O-rng seal s requred on all
nozzles.
CAUTION: If the nozzle s not ush and
seated properly n the nozzle housng, the
rotor may not perform properly.
Rain Bird 11000 Series Rotor Operation and Maintenance Manual
Rain Bird 11000 Serisi Rotor Kullanım ve Bakım Kılavuzu
NOZULUN DEĞİŞTİRİLMESİ
ÖNEMLİ NOT: Nozulu değiştirirken sprinkler’in
otomatik olarak çalışmadığından emin olun. Suyu
kapatın.
NOT: Nozul yuvasının vidalarını çıkarmadan
önce tespit segmanının emniyetli şekilde yerine
oturduğundan emin olun.
Nozul yuvası çıkarıldığında döküntülerin içeri
düşmesini önlemek için muhafazanın üst tarafını
temizleyin.
Gerekli Aletler: Yıldız uçlu tornavida, düz uçlu
tornavida.
Nozul yuvasının vdalarını
gevşetmek çn yıldız uçlu br
tornavda kullanın.
Nozul yuvasını ç bağlantıdan
ayırmak çn nozul yuvasının
vdalarını kavrayın ve yukarı
kaldırın.
Yen nozul bağlantısını nozul
yuvasına bastırın, nozul ön
kısmının yuvanın dış tarafıyla aynı
hzada olmasına dkkat edn.
Tüm nozullarda br O-rng
sızdırmazlık elemanı gerekldr.
DİKKAT: Nozul hzalı değlse ve nozul
yuvasına uygun şeklde oturmamışsa
rotor düzgün şeklde çalışmayablr.

At Rain Bird, we believe it is our responsibility
to develop products and technologies that
use water eiciently. Our commitment also
extends to education, training and services for
our industry and our communities.
The need to conserve water has never
been greater. We want to do even
more, and with your help, we can. Visit
www.rainbird.com for more information
about The Intelligent Use of Water.™
The Intelligent Use of Water.
™
LEADERSHIP • EDUCATION • PARTNERSHIPS • PRODUCTS
® Registered Trademark of Rain Bird Corporation © 2023 Rain Bird Corporation 6/23
Rain Bird Corporation
6991 E. Southpoint Road
Tucson, AZ 85756
Phone: (520) 741-6100
Fax: (520) 741-6522
Rain Bird Technical Services
(800) RAINBIRD (1-800-724-6247)
(U.S. and Canada)
Rain Bird Corporation
970 West Sierra Madre Avenue
Azusa, CA 91702
Phone: (626) 812-3400
Fax: (626) 812-3411
Specification Hotline
800-458-3005 (U.S. and Canada)
Rain Bird International, Inc.
1000 West Sierra Madre Ave.
Azusa, CA 91702
Phone: (626) 963-9311
Fax: (626) 852-7343
The Intelligent Use of Water™
www.rainbird.com
D42213
-
 1
1
-
 2
2
-
 3
3
-
 4
4
-
 5
5
-
 6
6
-
 7
7
-
 8
8
-
 9
9


