Kenwood KVL6320S CHEF XL ELITE El kitabı
- Kategori
- Mikser / mutfak robotu aksesuarları
- Tip
- El kitabı

TYPE KVC51 (Chef)
TYPE KVL61 (Chef XL)
instructions
istruzioni
instrucciones
Bedienungsanleitungen
gebruiksaanwijzing

English 2 - 10
Nederlands 11 - 20
Français 21 - 31
Deutsch 32 - 41
Italiano 42 - 51
Português 52 - 61
Español 62 - 71
Dansk 72 - 81
Svenska 82 - 90
Norsk 91 - 99
Suomi 100 - 109
Türkçe 110 - 119
Ïesky 120 - 129
Magyar 130 - 139
Polski 140 - 149
Ekkgmij 150 - 160
Slovenčina 161 - 170
Українська 171 - 181
´¸∂w
281 - 981

l
k
7
8
o
a
o
b
n
p
b
p
a
6
4
1
5
9
m
3
2
2

1


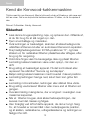
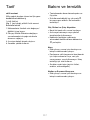
Know your Kenwood Kitchen Machine
Congratulations on buying a Kenwood. With such a wide range of attachments
available, it’s more than just a mixer. It’s a state-of-the-art Kitchen Machine. We
hope you’ll enjoy it.
Robust. Reliable. Versatile. Kenwood.
2
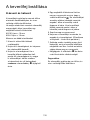
Safety
l
Read these instructions carefully and retain for future
reference.
l
Remove all packaging and any labels.
l
If the cord is damaged it must, for safety reasons, be replaced
by KENWOOD or an authorised KENWOOD repairer.
l
Turn the speed control to ‘O’ OFF position and unplug before
fitting or removing tools/attachments, after use and before
cleaning.
l
Keep your fingers away from moving parts and fitted
attachments.
l
Never leave the Kitchen Machine unattended when it is
operating.
l
Never use a damaged appliance. Get it checked or repaired:
see ‘service and customer care’ section.
l
Never operate the Kitchen Machine with the head in the raised
position.
l
Never let the cord hang down where a child could grab it.
l
Never let the power unit, cord or plug get wet.
l
Never use an unauthorised attachment or more than one
attachment at once.
l
Never exceed the quantities stated in the maximum capacity
chart.
l
When using an attachment, read and follow the safety
instructions that are supplied with it.
l
Take care when lifting this appliance as it is heavy. Ensure the
head is correctly latched in the down position and that the
bowl, tools, outlet covers and cord are secure before lifting.
English

Before plugging in
• Make sure your electricity supply is
the same as the one shown on the
underside of your machine.
• This appliance conforms to EC
Regulation 1935/2004 on materials and
articles intended to come into contact
with food.
Before using for the first time
• Wash the parts: see ‘care and cleaning’
section.
l
Take care when removing bowl tools after extended use as
they may get hot.
l
Ensure the cord is fully unfolded from the cord storage
compartment
m
before using the Kitchen Machine.
l
Children should be supervised to ensure that they do not play
with the appliance.
l
Do not move or raise the mixer head with an attachment fitted
as the Kitchen Machine could become unstable.
l
Do not operate your appliance near the edge of a work
surface.
l
Appliances can be used by persons with reduced physical,
sensory or mental capabilities or lack of experience and
knowledge if they have been given supervision or instruction
concerning use of the appliance in a safe way and if they
understand the hazards involved.
l
Misuse of your appliance can result in injury.
l
This appliance shall not be used by children. Keep the
appliance and its cord out of reach of children.
l
The maximum rating is based on the attachment that draws
the greatest load. Other attachments may draw less power.
l
Only use the appliance for its intended domestic use.
Kenwood will not accept any liability if the appliance is subject
to improper use, or failure to comply with these instructions.
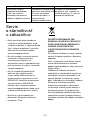
3

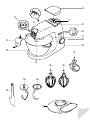
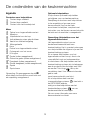
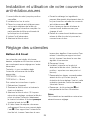
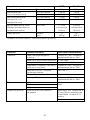
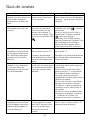
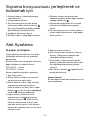
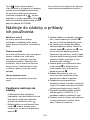
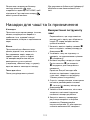
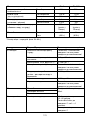
Key
Attachment outlets
1
high-speed outlet
2
slow-speed outlet
3
bowl tool socket
Mixer
4
high speed outlet cover
5
mixer head
6
head release lever
7
mixer ready indicator light
8
on/off and speed control
9
power unit
bk
bowl
bl
slow speed outlet cover
bm
cord storage compartment
bn
K-beater
bo
a
whisk (if supplied)
bo
b
power whisk (if supplied)
bp
a
dough hook (if supplied)
bp
b
spiral dough hook (if supplied)
bq
spatula
br
splashguard
Note: Spanner
bl
shown is for illustration
purposes only and is not supplied in pack.
Optional attachments
There are a range of optional attachments
available to use with your Kitchen Machine.
See the attachment leaflet included in your
pack or visit www.kenwoodworld.com
to see the full range and how to buy an
attachment not included in your pack.
Note: Slow Speed outlet attachments
The slow speed outlet on your Kitchen
Machine model features the Twist
Connection System. It is designed
to accept Twist Connection System
attachments.
When purchasing new attachments
for the slow speed outlet you should
check compatibility with your Kitchen
Machine. All Twist Connection System
attachments can be identified by the
product code which starts with KAX and
also by the Twist logo
which is visible
on packaging. For more information visit
www.kenwoodworld.com/twist.
If you own attachments featuring the Bar
Connection System
you will need to
use the KAT002ME
adaptor to connect these to the Twist
Connection System
on your Kitchen
Machine.
For more information visit
www.kenwoodworld.com/twist.
4
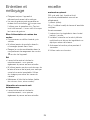
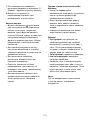
Know your Kitchen Machine
K-beater
For making cakes, biscuits, pastry, icing,
fillings, éclairs and mashed potato.
Whisk
For eggs, cream, batters, fatless sponges,
meringues, cheesecakes, mousses,
soufflés. Do not use the whisk for heavy
mixtures (e.g. creaming fat and sugar) -
you could damage it.
Dough Hook
For yeast mixtures only.
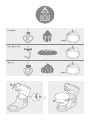
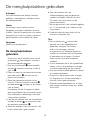
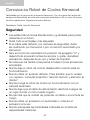
The bowl tools and some of their uses

To use your bowl tools
Ensure the cord is fully unfolded from the
cord storage compartment
m
before
using the Kitchen Machine.
1 Push the head-lift lever
1
down and
raise the mixer head until it locks
2
.
2 Fit the bowl on the base and turn
clockwise
3
to secure in position .
3 Place the required tool into the socket.
Then push up
4
and turn
5
the tool to
lock into position.
Note: If the K-beater or Whisk are
not picking up ingredients from the
bottom of the bowl refer to the “Tool
Adjustment” section.
4 Lower the mixer head by pushing the
head release lever down
6
and lower
the mixer head until it locks
7
.
5 Plug into the power supply and the
‘mixer ready indicator light’ will illuminate.
6 Start the machine by turning the speed
control to the desired speed setting. Use
the pulse (P) position for short bursts of
maximum speed.
7 After use, return the speed control to ‘O’
OFF position and unplug your Kitchen
Machine.
8 Release the tool by turning clockwise
to unlock from the tool socket and then
remove.
Hints
• The fold function
can be used for
folding light ingredients into heavier
mixtures for example meringues,
mousses, fruit fools, Genoese sponges
and soufflés, and to slowly incorporate
flour and fruit into cake mixtures. The
mixer will operate at a constant slow
speed.
• To fully incorporate the ingredients stop
mixing and scrape down the bowl with
the spatula frequently.
• For best results when whisking use eggs
at room temperature.
• Before whisking egg whites, make sure
there is no grease or egg yolk on the
whisk or bowl.
• Use cold ingredients for pastry unless
your recipe says otherwise.
Points for bread making
Important
• Never exceed the maximum capacities
stated - you may overload the machine.
• If you hear the machine labouring, switch
off, remove half the dough and do each
half separately.
• The ingredients mix best if you put the
liquid in first.
Yeast
• Dried yeast (the type that needs
reconstituting): pour the warm water into
the bowl. Then add the yeast and the
sugar and leave to stand for about 10
minutes until frothy.
• Fresh yeast: crumble into the flour.
• Other types of yeast: follow the
manufacturer’s instructions.
• Put the dough into a greased polythene
bag or a bowl covered with a tea towel.
Then leave somewhere warm until
doubled in size.
Important
Ensure that no bowl tools are fitted or
stored in the bowl when using other
outlets.
5

6
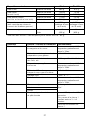
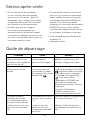
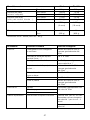
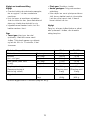
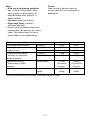
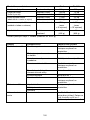
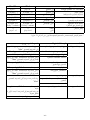
Maximum capacities Chef Chef XL
Shortcrust pastry Flour weight 680g/1lb 8oz 910g/2lb
Bread dough Flour weight 1.36kg/3lb 1.6kg/3lb 8oz
(stiff yeasted) Total weight 2.18kg/4lb 3oz 2.56kg/5lb 10oz
Soft yeasted dough Flour weight 1.3kg/2lb 14oz 2.6kg/5lb 12oz
(enriched with butter and eggs) Total weight 2.5kg/5lb 8oz 5kg/11lb
Fruit cake mix Total weight 2.72kg/6lb 4.55kg/10lb
(Creaming fat and sugar method) (9 Egg mix) (15 Egg mix)
Egg whites Number 12 16
Weight (455g) (605g)
* Eggs sizes used = medium sized (Weight 53 – 63g)
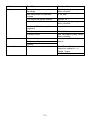
Tool Recipe/Process Recommended Speed
K-beater Creaming butter/margarine Start on ‘Min’ and gradually
and sugar increase to ‘Max’
Beating eggs into cake mixes ‘4’ to ‘Max’
Folding in flour, fruit etc ‘Fold’ to ‘1’
All In one cake mixes Start on ‘Min’ and gradually
increase to ‘Max’
Pastry & Biscuits – rubbing fat ‘Min’ to’ 2’
into flour
Royal Icing ‘Min’ to ‘1’
Mashed Potatoes Start on ‘Min’ and gradually
increase to ‘Max’
Whisk Egg Whites
Fatless sponges Gradually increase to ‘Max’
Cream
Dough Hook For Yeasted dough mixes ‘Min’ speed for 45 - 60 secs.
Then increase to speed 1 for
approx. 3 – 4minutes.
Re-knead on speed 1

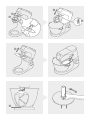
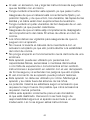
1 Raise the mixer head until it locks.
2 Fit the bowl onto the base.
3 Push the splashguard onto the underside
of the mixer head
8
until fully located.
The hinged section should be positioned as
shown.
4 Insert required tool.
5 Lower the mixer head.
• During mixing, ingredients can be added
directly to the bowl via the hinged
section of the splashguard
9
.
• You do not need to remove the
splashguard to change tools.
6 Remove the splashguard by raising the
mixer head and pushing it down.
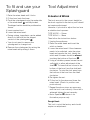
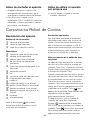
K-beater & Whisk
The tools are set to the correct height for
the bowl supplied in the factory and should
not require adjustment.
However, if you wish to adjust the tool use
a suitable sized spanner:
TYPE KVC51 = 15mm
TYPE KVL61 = 19mm
Then follow the instructions below:
1 Unplug the appliance.
2 Raise the mixer head and insert the
whisk or beater.
3 Lower the mixer head. If the clearance
needs to be adjusted, raise the mixer
head and remove the tool. Ideally the
whisk and K-beater should be almost
touching the bottom of the bowl
bk
.
4 Using a suitable spanner loosen the nut
sufficiently to allow adjustment of the
shaft
bl
. To lower the tool closer to the
bottom of the bowl, turn the shaft anti-
clockwise. To raise the tool away from
the bottom of the bowl turn the shaft
clockwise.
5 Re-tighten the nut.
6 Fit the tool to the mixer and lower the
mixer head. (Check its position see
points above).
7 Repeat the above steps as necessary
until the tool is set correctly. Once this is
achieved tighten the nut securely.
• Note: Spanner
bl
shown is for
illustration purpose only.
Dough Hook
This tool is set at the factory and should
require no adjustment.
7
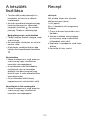
To fit and use your
Splashguard
Tool Adjustment

8
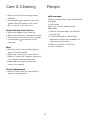
Care & Cleaning Recipe
• Always switch off and unplug before
cleaning.
• A little grease may appear at the slow
speed outlet
2
when you first use it.
This is normal – just wipe it off.
Power Unit And Outlet Covers
• Wipe with a damp cloth, then dry.
• Never use abrasives or immerse in water.
• Store excess cord into the cord storage
compartment
bm
at the back of the
machine.
Bowl
• Wash by hand, then dry thoroughly or
wash in the dishwasher.
• Never use a wire brush, steel wool or
bleach to clean your stainless steel bowl.
Use vinegar to remove limescale.
• Keep away from heat (cooker tops,
ovens, microwaves).
Tools & Splashguard
• Wash by hand, then dry thoroughly or
wash in the dishwasher.
chilli marinade
200g cold clear runny honey (refrigerated
overnight)
1 chilli (whole)
20g (1tsp) crunchy peanut butter
Seasoning
1 Place all the ingredients into the mini
chopper/mill.
2 Fit the attachment to the Kitchen
Machine and allow the ingredients to
settle around the blade.
3 Switch to pulse for 4 seconds.
4 Use as required.

• If you experience any problems with
the operation of your appliance, before
requesting assistance refer to the
“troubleshooting guide” section in the
manual or visit www.kenwoodworld.com.
• Please note that your product is covered
by a warranty, which complies with
all legal provisions concerning any
existing warranty and consumer rights
in the country where the product was
purchased.
• If your Kenwood product malfunctions
or you find any defects, please send it
or bring it to an authorised KENWOOD
Service Centre. To find up to date
details of your nearest authorised
KENWOOD Service centre visit
www.kenwoodworld.com or the website
specific to your Country.
• Designed and engineered by Kenwood
in the UK.
• Made in China.
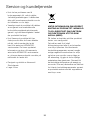
IMPORTANT INFORMATION FOR
CORRECT DISPOSAL OF THE
PRODUCT IN ACCORDANCE
WITH THE EUROPEAN DIRECTIVE
ON WASTE ELECTRICAL AND
ELECTRONIC EQUIPMENT (WEEE)
At the end of its working life, the product
must not be disposed of as urban waste.
It must be taken to a special local authority
differentiated waste collection centre or to
a dealer providing this service.
Disposing of a household appliance
separately avoids possible negative
consequences for the environment and
health deriving from inappropriate disposal
and enables the constituent materials to be
recovered to obtain significant savings in
energy and resources. As a reminder of the
need to dispose of household appliances
separately, the product is marked with a
crossed-out wheeled dustbin.
9
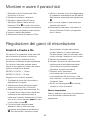
Service and Customer Care

10
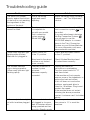
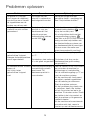
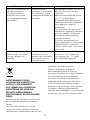
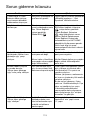
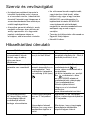
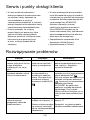
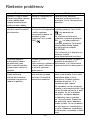
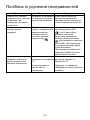
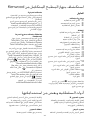
Troubleshooting guide
Problem Cause Solution
The whisk or K-beater Tool at the wrong Adjust the height using a suitable
knocks against the bottom height and needs spanner – see “Tool Adjustment”
of the bowl or not reaching adjusting. section.
the ingredients in the
bottom of the bowl.
Slow speed attachment Check your attachment Attachment must have the KAX
cannot be fitted. is compatible for twist connection system
to fit
use with your model. the outlet.
Twist connection If you own attachments featuring
system required the Bar Connection System
(Model KAX)
you will need to use the
KAT002ME adaptor to connect
these to the Twist Connection
System on your Kitchen Machine.
For more information visit www.
kenwoodworld.com/twist
‘Mixer ready indicator light’ Speed control not Check and turn speed control
flashing when Kitchen in the ‘O’ position. to the ‘O’ position.
Machine first plugged in.
Mixer head in the raised Check Kitchen Machine head
position or not locked is locked down correctly.
down correctly.
The Kitchen Machine Overload protection or Unplug and check for
stops during operation. overheat system obstruction or overloading.
‘Mixer ready indicator light’ activated. Turn the speed control to “O”
flashing rapidly. Maximum capacity and then restart.
exceeded. If the machine will not operate,
remove some of the ingredients to
reduce the load and restart.
If this still does not resolve the
problem, unplug and allow to
stand for 15 minutes. Plug in and
reselect the speed.
If the machine does not restart
following the above procedure
contact “customer care” for further
advice.
‘Mixer ready indicator light’ Kitchen machine has been Turn the speed control to ‘min’
off whilst machine plugged left plugged in for more then return to ‘O’ to reset the
in. than 30 minutes without machine.
being operated and has
gone into Standby mode.

Kennismaking met de Kenwood
keukenmachine
U bent de gelukkige eigenaar van een Kenwood. Dankzij het grote assortiment
beschikbare hulpstukken, is deze machine veel meer dan zomaar een mixer. Het is
een geavanceerde keukenmachine. We hopen dat u er veel plezier van zult hebben.
Robuust. Betrouwbaar. Veelzijdig. Kenwood.
11
Nederlands
Veiligheid
l
Lees deze instructies zorgvuldig door en bewaar ze voor
toekomstig gebruik.
l
Verwijder alle verpakking en labels.
l
Als het snoer beschadigd is, moet het om veiligheidsredenen
door Kenwood of een door Kenwood geautoriseerd
reparatiebedrijf vervangen worden.
l
Zet de snelheidsregeling op ‘O’ (uit) en haal de stekker uit het
stopcontact voordat u hulpstukken monteert of verwijdert,
zowel na het gebruik als voor de reiniging.
l
Houd uw vingers uit de buurt van bewegende onderdelen en
aangebrachte hulpstukken.
l
Laat de keukenmachine nooit onbeheerd aan staan.
l
Gebruik nooit een machine die beschadigd is. Laat de
machine controleren of repareren: raadpleeg het deel
‘onderhoud en klantenservice’.
l
Zet de keukenmachine nooit aan als de kop omhoog staat.
l
Laat het snoer nooit overhangen, zodat een kind erbij kan.
l
Zorg ervoor dat het motorgedeelte, het snoer en de stekker
nooit nat worden.
l
Gebruik nooit een hulpstuk dat niet goedgekeurd is en gebruik
nooit meer dan één hulpstuk per keer.
l
Overschrijd nooit de hoeveelheden die staan vermeld op de
tabel met de maximumcapaciteiten.
l
Als u een hulpstuk gebruikt, dient u de meegeleverde
veiligheidsinstructies te lezen en op te volgen.
l
Wees voorzichtig wanneer u de machine optilt. Hij is zwaar.

Zorg ervoor dat de kop omlaag staat en vergrendeld is, en dat
de kom, de hulpstukken, de contactdeksels en het snoer vast
zitten, voordat u de machine optilt.
l
Wees voorzichtig bij het verwijderen van de komhulpstukken
na langdurig gebruik, omdat ze heet kunnen zijn.
l
Zorg ervoor dat u het hele snoer uit het opbergvak
m
hebt
gehaald, voordat u de keukenmachine gebruikt.
l
Kinderen mogen de machine alleen onder toezicht gebruiken,
om te voorkomen dat ze ermee spelen.
l
Verplaats de machine niet en haal de Mixerkop niet omhoog
als een hulpstuk aangebracht is, omdat de keukenmachine
dan instabiel kan worden.
l
Gebruik de machine niet aan de rand van het werkoppervlak.
l
Dit apparaat kan worden gebruikt door personen met
verminderde lichamelijke, sensorische of geestelijke
capaciteiten of gebrek aan ervaring en kennis mits ze onder
toezicht staan of instructie hebben gekregen over het veilig
gebruik van het apparaat en de betrokken risico’s begrijpen.
l
Misbruik van uw apparaat kan tot letsel leiden.
l
Dit apparaat mag niet door kinderen worden gebruikt. Houd
het apparaat en het snoer buiten het bereik van kinderen.
l
Het maximum vermogen is afhankelijk van het hulpstuk dat de
grootste hoeveelheid energie verbruikt. Andere hulpstukken
verbruiken misschien minder energie.
l
Gebruik het apparaat alleen voor het huishoudelijke gebruik
waarvoor het is bedoeld. Kenwood kan niet aansprakelijk
worden gesteld in het geval dat het apparaat niet correct is
gebruikt, of waar deze instructies niet worden opgevolgd.
12
Voordat u de stekker in het
stopcontact steekt
• Zorg dat de elektriciteitsvoorziening
dezelfde spanning heeft als op de
onderkant van het apparaat wordt
aangegeven.
• Dit apparaat voldoet aan EG Verordening
1935/2004 inzake materialen en
voorwerpen die bestemd zijn om met
levensmiddelen in contact te komen.
Voordat u de machine voor
het eerst gebruikt
• Lees het deel ‘Onderhoud en reiniging’,
voordat u de onderdelen gaat
schoonmaken.

legenda
Contacten voor hulpstukken
1
Contact hoge snelheid
2
Contact lage snelheid
3
Contact voor het komhulpstuk
Mixer
4
Deksel voor hogesnelheidscontact
5
Mixerkop
6
Vrijzethendel voor de kop
7
Indicatielampje mixer gebruiksklaar
8
Aan/uit en snelheidsregeling
9
Motorgedeelte
k
Kom
l
Deksel voor lagesnelheidscontact
m
Opbergvak voor het snoer
n
K-klopper
o
a
Garde (indien meegeleverd)
o
b
Robuuste garde (indien meegeleverd)
p
a
Deeghaak (indien meegeleverd)
p
b
Ronde deeghaak (indien meegeleverd)
Spatel
Spatscherm
Opmerking: De weergegeven sleutel
bl
dient alleen ter illustratie en wordt niet met
de verpakking meegeleverd.
Optionele hulpstukken
Er zijn diverse optionele hulpstukken
verkrijgbaar voor uw keukenmachine.
Raadpleeg de brochure met hulpstukken
in de verpakking of ga naar www.
kenwoodworld.com om het hele
assortiment te bekijken, compleet met
instructies voor het kopen van een hulpstuk
dat niet met de machine is meegeleverd.
Opmerking: Hulpstukken voor het
lagesnelheidscontact
Het lagesnelheidscontact van uw
keukenmachinemodel heeft een
draaiverbinding. Het is speciaal ontworpen
voor hulpstukken die uitgerust zijn met het
draaiverbindingssysteem.
Als u nieuwe hulpstukken voor het
lagesnelheidscontact koopt, dient u de
compatibiliteit met uw keukenmachine
te controleren. Alle hulpstukken met het
draaiverbindingssysteem zijn te herkennen
aan de productcode die begint met KAX
en aan het Twist-logo
dat op de
verpakking staat. Voor nadere informatie
gaat u naar
www.kenwoodworld.com/twist.
Als u hulpstukken hebt met het
stangverbindingssysteem
, dan hebt u
de KAT002ME-adapter
nodig om deze
hulpstukken aan het
draaiverbindingssysteem
van uw
keukenmachine te bevestigen.
Ga voor meer informatie naar www.
kenwoodworld.com/twist.
13
De onderdelen van de keukenmachine

K-klopper
Voor het bereiden van taarten, koekjes,
gebakjes, suikerglazuur, vullingen, éclairs
en aardappelpuree.
Garde
Voor eieren, room, beslag, vetloos
eiergebak, meringue, kaastaart, mousse,
soufflés. Gebruik de garde niet voor zware
mengsels (bijv. boter en suiker), omdat de
garde daardoor beschadigd kan raken.
Deeghaak
Alleen voor gistmengsels.
De menghulpstukken
gebruiken
Zorg ervoor dat u het hele snoer uit het
opbergvak
m
hebt gehaald, voordat u
de keukenmachine gebruikt.
1 Duw de vrijzethendel
1
naar beneden
en haal de mixerkop omhoog, totdat hij
vast zit
2
.
2 Plaats de kom op het onderstel en draai
hem naar rechts
3
om hem op zijn
plaats vast te zetten.
3 Steek het gewenste hulpstuk in het
contact. Duw het hulpstuk omhoog
4
en draai eraan
5
om hem op zijn plaats
vast te zetten.
Opmerking: Als de K-klopper of garde
geen ingrediënten van de bodem van de
kom meenemen, raadpleegt u het deel
‘Hulpstukken afstellen’.
4 Laat de kop zakken door de vrijzethendel
omlaag te duwen
6
en zorg ervoor dat
de mixerkop vergrendelt
7
.
5 Steek de stekker in het stopcontact. Het
lichtje ‘mixer klaar’ gaat branden.
6 Start de machine door de
snelheidsregeling naar de gewenste
snelheid te draaien. Gebruik de stoot
(P) stand voor korte stoten op de
maximumsnelheid.
7 Na het gebruik zet u de snelheidsregeling
op ‘O’ (uit) en haalt u de stekker uit het
stopcontact.
8 Draai het hulpstuk naar rechts uit het
contact en verwijder het.
Tips
• Het vouwhulpstuk
kan worden
gebruikt om lichte ingrediënten in
zwaardere mengsels te vouwen,
zoals voor meringue, mousse,
vruchtenmousse, Genuese taarten en
soufflés en om bloem en fruit langzaam
in taartmixen op te nemen. De mixer
werkt op een constante langzame
snelheid.
• Om te verzekeren dat u alle ingrediënten
mengt, stopt u de machine en schraapt
u de kom regelmatig met de spatel af.
• Voor het beste resultaat gebruikt u eieren
op kamertemperatuur.
• Zorg ervoor dat er geen boter of eigeel
op de garde of in de kom aanwezig is,
voordat u eiwit gaat opkloppen.
• Gebruik koude ingrediënten als u deeg
gaat maken, tenzij het recept iets anders
voorschrijft.
14
De menghulpstukken gebruiken

Tips voor het bereiden van brood
Belangrijk
• Nooit de opgegeven maximumcapaciteit
overschrijden – anders raakt de machine
overbelast.
• Als u hoort dat de machine het deeg
niet goed aan kan, zet u de machine
uit, verwijdert u de helft van het deeg en
mengt u elke helft afzonderlijk.
• De ingrediënten zullen het beste mengen
als u eerst de vloeistof in de kom giet.
Gist
• Gedroogde gist (het soort dat
gereconstitueerd moet worden): giet
het warme water in de kom. Voeg er
de gist en de suiker aan toe en laat het
mengsel ca. 10 minuten rusten, totdat
het opschuimt.
• Verse gist: brokkel de gist in de bloem.
• Andere soorten gist: volg de
aanwijzingen van de producent.
• Doe het deeg in een ingevette plastic zak
of in een kom met daar overheen een
theedoek. Laat het op een warme plek
rusten, totdat de deegbal tweemaal zo
groot is geworden.
Belangrijk
Zorg ervoor dat er geen menghulpstukken
zijn geplaatst of in de kom aanwezig zijn
wanneer u andere contacten gebruikt.
15
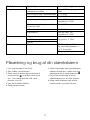
Maximumcapaciteit Chef Chef XL
Kruimeldeeg Bloemgewicht 680 gr 910 gr
Brooddeeg Bloemgewicht 1,36 kg 1,6 kg
(stijf gegist) Totaalgewicht 2,18 kg 2,56 kg
Zacht gegist deeg Bloemgewicht 1,3 kg 2,6 kg
(verrijkt met boter en eieren) Totaalgewicht 2,5 kg 5 kg
Fruittaartmix Totaalgewicht 2,72 kg 4,55 kg
(roomvet en suiker methode) (mengsel met (mengsel met
9 eieren) 15 eieren)
Eiwit Aantal 12 16
Gewicht (455 gr) (605 gr)
* Gebruikte eieren = medium (gewicht 53 – 63 gr)

1 Breng de mixerkop omhoog totdat deze
wordt vergrendeld.
2 Plaats de kom op het onderstel.
3 Monteer het spatscherm onderaan
de mixerkop
8
, tot hij goed vast zit.
Het scharnier bevindt zich zoals op de
afbeelding staat aangegeven.
4 Monteer het gewenste hulpstuk.
5 Laat de mixerkop zakken.
• Tijdens het mixen kunt u ingrediënten
rechtstreeks aan de kom toevoegen
via het scharnierende deel van het
spatscherm
9
.
• U hoeft het spatscherm niet te
verwijderen om van hulpstuk te wisselen.
6 Verwijder het s spatscherm door de
mixerkop omhoog te halen en het
spatscherm ervan af te drukken.
16
Hulpmiddel Recept/proces Aanbevolen snelheid
K-klopper Boter/margarine en suiker romig Start op ‘min’ en verhoog
maken geleidelijk tot ‘max’.
Eieren in cakemix kloppen 4 naar ‘max’
Bloem, fruit, enz. in het mengsel ‘Fold’ naar 1
vouwen
All-in-one cakemix Start op ‘min’ en ga geleidelijk
naar ‘max’.
Deegwaren en koekjes – boter en ‘min’ naar 2
de bloem vermengen
Royal icing ‘min’ naar 1
Aardappelpuree Start op ‘min’ en ga geleidelijk
naar ‘max’.
Garde Eiwit
Vetloze sponge cake Verhoog geleidelijk maar ‘max’
Room
Deeghaak Voor gegiste deegmengsels Op ‘min’ snelheid gedurende
45 - 60 seconden.
Verhoog naar snelheid 1
gedurende ca. 3 – 4 minuten.
Kneed het deeg opnieuw op
snelheid 1
Het spatscherm plaatsen en gebruiken
Sayfa yükleniyor ...
Sayfa yükleniyor ...
Sayfa yükleniyor ...
Sayfa yükleniyor ...
Sayfa yükleniyor ...
Sayfa yükleniyor ...
Sayfa yükleniyor ...
Sayfa yükleniyor ...
Sayfa yükleniyor ...
Sayfa yükleniyor ...
Sayfa yükleniyor ...
Sayfa yükleniyor ...
Sayfa yükleniyor ...
Sayfa yükleniyor ...
Sayfa yükleniyor ...
Sayfa yükleniyor ...
Sayfa yükleniyor ...
Sayfa yükleniyor ...
Sayfa yükleniyor ...
Sayfa yükleniyor ...
Sayfa yükleniyor ...
Sayfa yükleniyor ...
Sayfa yükleniyor ...
Sayfa yükleniyor ...
Sayfa yükleniyor ...
Sayfa yükleniyor ...
Sayfa yükleniyor ...
Sayfa yükleniyor ...
Sayfa yükleniyor ...
Sayfa yükleniyor ...
Sayfa yükleniyor ...
Sayfa yükleniyor ...
Sayfa yükleniyor ...
Sayfa yükleniyor ...
Sayfa yükleniyor ...
Sayfa yükleniyor ...
Sayfa yükleniyor ...
Sayfa yükleniyor ...
Sayfa yükleniyor ...
Sayfa yükleniyor ...
Sayfa yükleniyor ...
Sayfa yükleniyor ...
Sayfa yükleniyor ...
Sayfa yükleniyor ...
Sayfa yükleniyor ...
Sayfa yükleniyor ...
Sayfa yükleniyor ...
Sayfa yükleniyor ...
Sayfa yükleniyor ...
Sayfa yükleniyor ...
Sayfa yükleniyor ...
Sayfa yükleniyor ...
Sayfa yükleniyor ...
Sayfa yükleniyor ...
Sayfa yükleniyor ...
Sayfa yükleniyor ...
Sayfa yükleniyor ...
Sayfa yükleniyor ...
Sayfa yükleniyor ...
Sayfa yükleniyor ...
Sayfa yükleniyor ...
Sayfa yükleniyor ...
Sayfa yükleniyor ...
Sayfa yükleniyor ...
Sayfa yükleniyor ...
Sayfa yükleniyor ...
Sayfa yükleniyor ...
Sayfa yükleniyor ...
Sayfa yükleniyor ...
Sayfa yükleniyor ...
Sayfa yükleniyor ...
Sayfa yükleniyor ...
Sayfa yükleniyor ...
Sayfa yükleniyor ...
Sayfa yükleniyor ...
Sayfa yükleniyor ...
Sayfa yükleniyor ...
Sayfa yükleniyor ...
Sayfa yükleniyor ...
Sayfa yükleniyor ...
Sayfa yükleniyor ...
Sayfa yükleniyor ...
Sayfa yükleniyor ...
Sayfa yükleniyor ...
Sayfa yükleniyor ...
Sayfa yükleniyor ...
Sayfa yükleniyor ...
Sayfa yükleniyor ...
Sayfa yükleniyor ...
Sayfa yükleniyor ...
Sayfa yükleniyor ...
Sayfa yükleniyor ...
Sayfa yükleniyor ...
Sayfa yükleniyor ...
Sayfa yükleniyor ...
Sayfa yükleniyor ...
Sayfa yükleniyor ...
Sayfa yükleniyor ...
Sayfa yükleniyor ...
Sayfa yükleniyor ...
Sayfa yükleniyor ...
Sayfa yükleniyor ...
Sayfa yükleniyor ...
Sayfa yükleniyor ...
Sayfa yükleniyor ...
Sayfa yükleniyor ...
Sayfa yükleniyor ...
Sayfa yükleniyor ...
Sayfa yükleniyor ...
Sayfa yükleniyor ...
Sayfa yükleniyor ...
Sayfa yükleniyor ...
Sayfa yükleniyor ...
Sayfa yükleniyor ...
Sayfa yükleniyor ...
Sayfa yükleniyor ...
Sayfa yükleniyor ...
Sayfa yükleniyor ...
Sayfa yükleniyor ...
Sayfa yükleniyor ...
Sayfa yükleniyor ...
Sayfa yükleniyor ...
Sayfa yükleniyor ...
Sayfa yükleniyor ...
Sayfa yükleniyor ...
Sayfa yükleniyor ...
Sayfa yükleniyor ...
Sayfa yükleniyor ...
Sayfa yükleniyor ...
Sayfa yükleniyor ...
Sayfa yükleniyor ...
Sayfa yükleniyor ...
Sayfa yükleniyor ...
Sayfa yükleniyor ...
Sayfa yükleniyor ...
Sayfa yükleniyor ...
Sayfa yükleniyor ...
Sayfa yükleniyor ...
Sayfa yükleniyor ...
Sayfa yükleniyor ...
Sayfa yükleniyor ...
Sayfa yükleniyor ...
Sayfa yükleniyor ...
Sayfa yükleniyor ...
Sayfa yükleniyor ...
Sayfa yükleniyor ...
Sayfa yükleniyor ...
Sayfa yükleniyor ...
Sayfa yükleniyor ...
Sayfa yükleniyor ...
Sayfa yükleniyor ...
Sayfa yükleniyor ...
Sayfa yükleniyor ...
Sayfa yükleniyor ...
Sayfa yükleniyor ...
Sayfa yükleniyor ...
Sayfa yükleniyor ...
Sayfa yükleniyor ...
Sayfa yükleniyor ...
Sayfa yükleniyor ...
Sayfa yükleniyor ...
Sayfa yükleniyor ...
Sayfa yükleniyor ...
Sayfa yükleniyor ...
Sayfa yükleniyor ...
Sayfa yükleniyor ...
Sayfa yükleniyor ...
Sayfa yükleniyor ...
Sayfa yükleniyor ...
Sayfa yükleniyor ...
Sayfa yükleniyor ...
Sayfa yükleniyor ...
Sayfa yükleniyor ...
Sayfa yükleniyor ...
Sayfa yükleniyor ...
-
 1
1
-
 2
2
-
 3
3
-
 4
4
-
 5
5
-
 6
6
-
 7
7
-
 8
8
-
 9
9
-
 10
10
-
 11
11
-
 12
12
-
 13
13
-
 14
14
-
 15
15
-
 16
16
-
 17
17
-
 18
18
-
 19
19
-
 20
20
-
 21
21
-
 22
22
-
 23
23
-
 24
24
-
 25
25
-
 26
26
-
 27
27
-
 28
28
-
 29
29
-
 30
30
-
 31
31
-
 32
32
-
 33
33
-
 34
34
-
 35
35
-
 36
36
-
 37
37
-
 38
38
-
 39
39
-
 40
40
-
 41
41
-
 42
42
-
 43
43
-
 44
44
-
 45
45
-
 46
46
-
 47
47
-
 48
48
-
 49
49
-
 50
50
-
 51
51
-
 52
52
-
 53
53
-
 54
54
-
 55
55
-
 56
56
-
 57
57
-
 58
58
-
 59
59
-
 60
60
-
 61
61
-
 62
62
-
 63
63
-
 64
64
-
 65
65
-
 66
66
-
 67
67
-
 68
68
-
 69
69
-
 70
70
-
 71
71
-
 72
72
-
 73
73
-
 74
74
-
 75
75
-
 76
76
-
 77
77
-
 78
78
-
 79
79
-
 80
80
-
 81
81
-
 82
82
-
 83
83
-
 84
84
-
 85
85
-
 86
86
-
 87
87
-
 88
88
-
 89
89
-
 90
90
-
 91
91
-
 92
92
-
 93
93
-
 94
94
-
 95
95
-
 96
96
-
 97
97
-
 98
98
-
 99
99
-
 100
100
-
 101
101
-
 102
102
-
 103
103
-
 104
104
-
 105
105
-
 106
106
-
 107
107
-
 108
108
-
 109
109
-
 110
110
-
 111
111
-
 112
112
-
 113
113
-
 114
114
-
 115
115
-
 116
116
-
 117
117
-
 118
118
-
 119
119
-
 120
120
-
 121
121
-
 122
122
-
 123
123
-
 124
124
-
 125
125
-
 126
126
-
 127
127
-
 128
128
-
 129
129
-
 130
130
-
 131
131
-
 132
132
-
 133
133
-
 134
134
-
 135
135
-
 136
136
-
 137
137
-
 138
138
-
 139
139
-
 140
140
-
 141
141
-
 142
142
-
 143
143
-
 144
144
-
 145
145
-
 146
146
-
 147
147
-
 148
148
-
 149
149
-
 150
150
-
 151
151
-
 152
152
-
 153
153
-
 154
154
-
 155
155
-
 156
156
-
 157
157
-
 158
158
-
 159
159
-
 160
160
-
 161
161
-
 162
162
-
 163
163
-
 164
164
-
 165
165
-
 166
166
-
 167
167
-
 168
168
-
 169
169
-
 170
170
-
 171
171
-
 172
172
-
 173
173
-
 174
174
-
 175
175
-
 176
176
-
 177
177
-
 178
178
-
 179
179
-
 180
180
-
 181
181
-
 182
182
-
 183
183
-
 184
184
-
 185
185
-
 186
186
-
 187
187
-
 188
188
-
 189
189
-
 190
190
-
 191
191
-
 192
192
-
 193
193
-
 194
194
-
 195
195


Kenwood KVL6320S CHEF XL ELITE El kitabı
- Kategori
- Mikser / mutfak robotu aksesuarları
- Tip
- El kitabı
Diğer dillerde
- slovenčina: Kenwood KVL6320S CHEF XL ELITE Návod na obsluhu
- français: Kenwood KVL6320S CHEF XL ELITE Le manuel du propriétaire
- italiano: Kenwood KVL6320S CHEF XL ELITE Manuale del proprietario
- polski: Kenwood KVL6320S CHEF XL ELITE Instrukcja obsługi
- dansk: Kenwood KVL6320S CHEF XL ELITE Brugervejledning