Samsung VP-D371 Kullanım kılavuzu
- Kategori
- Kameralar
- Tip
- Kullanım kılavuzu

ENGLISH
GREEK
AD68-01227K
≈≈„„˜˜ÂÂÈÈÒÒflfl‰‰ÈÈÔÔ ÔÔ‰‰ÁÁ„„ÈÈ˛˛ÌÌ
–ÒÔÙÔ˝ ˜ÒÁÛÈÏÔÔÈfiÛÂÙÂ ÙÁ
‚ÈÌÙÂÔÍ‹ÏÂÒ·, ‰È·‚‹ÛÙ ÒÔÛÂÍÙÈÍ‹
·ıÙ¸ ÙÔ Â„˜ÂÈÒfl‰ÈÔ Í·È ˆı΋ÓÙ ÙÔ
„È· ÏÂÎÎÔÌÙÈÍfi ·Ì·ˆÔÒ‹.
◊ÒÁÛÈÏÔÔÈÂflÙ ϸÌÔ Â„ÍÂÍÒÈÏ›ÌÂÚ Ï·Ù·ÒflÂÚ.
ƒÈ·ˆÔÒÂÙÈÍ‹, ı‹Ò˜ÂÈ Ífl̉ıÌÔÚ ıÂÒË›ÒÏ·ÌÛÁÚ, ˆ˘ÙÈ‹Ú fi ›ÍÒÁÓÁÚ.
« ÂÙ·ÈÒfl· Samsung ‰ÂÌ ˆ›ÒÂÈ ÂıË˝ÌÁ „È· ÒÔ‚ÎfiÏ·Ù· Ôı
Ẩ›˜ÂÙ·È Ì· ÒÔÍ˝¯ÔıÌ ·¸ ÙÁ ˜ÒfiÛÁ ÏÁ „ÍÂÍÒÈÏ›Ì˘Ì
Ï·Ù·ÒÈ˛Ì.
ÿÿÁÁˆˆÈÈ··ÍÍfifi ‚‚ÈÈÌÌÙÙÂÂÔÔÍÍ‹‹ÏÏÂÂÒÒ··
VP-D371(i)/D371W(i)/
D372WH(i)/D375W(i)/
D975W(i)
AF
¡¡ııÙÙ¸¸ÏÏ··ÙÙÁÁ ÂÂÛÛÙÙflfl··ÛÛÁÁ
CCD
ƒƒÈÈ‹‹ÙÙ··ÓÓÁÁ ÛÛııÊÊÂÂıı„„ÏÏ››ÌÌÔÔıı
ˆˆÔÔÒÒÙÙflflÔÔıı
LCD
œœË˸¸ÌÌÁÁ ıı„„ÒÒ˛˛ÌÌ
ÍÍÒÒııÛÛÙÙ‹‹ÎÎÎ΢˘ÌÌ
Owner’s Instruction Book
Before operating the unit, please read
this Instruction Book thoroughly, and
retain it for future reference.
Use only approved battery packs.
Otherwise, there is a danger of overheating, fire or explosion.
Samsung is not responsible for problems occurring due to
using unapproved batteries.
Digital Video Camcorder
VP-D371(i)/D371W(i)/
D372WH(i)/D375W(i)/
D975W(i)
AF Auto Focus
CCD Charge Coupled
Device
LCD Liquid Crystal Display
01227K VPD371 UK+GRE~022 2/3/07 9:55 AM Page 1

ENGLISH
GREEK
22
Contents
Features .....................................................................................................................................7
Accessories Supplied with Camcorder......................................................................................8
Front & Left View .......................................................................................................................9
Left Side View ..........................................................................................................................10
Right & Top View......................................................................................................................11
Rear & Bottom View ................................................................................................................12
Remote Control (VP-D375W(i)/D975W(i) only) ......................................................................13
Using the Hand Strap & Lens Cover.......................................................................................14
Lithium Battery Installation.......................................................................................................15
Using the Lithium Ion Battery Pack.........................................................................................16
Connecting a Power Source....................................................................................................19
About the Operating Modes.....................................................................................................19
Using the QUICK MENU .........................................................................................................20
OSD (On Screen Display) in Camera/Player Modes .............................................................21
OSD (On Screen Display) in M.Cam/M.Player Modes (VP-D375W(i)/D975W(i) only) .........22
Turning the OSD (On Screen Display) On/Off .......................................................................22
Setting the Clock (Clock Set)..................................................................................................23
Setting the Wireless Remote Control Acceptance (Remote) (VP-D375W(i)/D975W(i) only)
...24
Setting the Beep Sound (Beep Sound)..................................................................................25
Setting the Shutter Sound (Shutter Sound) (VP-D375W(i)/D975W(i) only) .........................26
Selecting the OSD Language (Language) .............................................................................27
Viewing the Demonstration (Demonstration) ........................................................................28
Adjusting the LCD Screen (LCD Bright/LCD Colour)...........................................................29
Displaying the Date/Time (Date/Time)....................................................................................30
Setting the TV Display (TV Display) .......................................................................................31
Using the Viewfinder................................................................................................................32
Inserting / Ejecting a Cassette.................................................................................................32
Various Recording Techniques ................................................................................................33
Making your First Recording....................................................................................................34
Recording with Ease for Beginners (EASY.Q Mode) .............................................................35
Reviewing and Searching a Recording (REC SEARCH).......................................................36
Searching quickly for a desired scene (Setting the ZERO MEMORY)
(VP-D375W(i)/D975W(i) only) .................................................................................................37
Self Record using the Remote Control (Setting the Self Timer)
(VP-D375W(i)/D975W(i) only) .................................................................................................38
Zooming In and Out .................................................................................................................39
Using the Fade In and Out ......................................................................................................40
Using the COLOUR NITE (COLOUR NITE)...........................................................................41
Using the LIGHT (VP-D372WH(i)/D375W(i)/D975W(i) only)...................................................42
Getting to Know Your Camcorder ........................................7
Initial Setting : System Menu Setting ..................................23
Notes and Safety Instructions ...............................................5
Basic Recording...................................................................32
Initial Setting : Display Menu Setting..................................29
Preparation..........................................................................14
––ÂÂÒÒÈȘ˜¸¸ÏÏÂÂÌÌ··
◊·Ò·ÍÙÁÒÈÛÙÈÍ‹.................................................................................................................................7
–·ÒÂÎ͸ÏÂÌ· Ôı ·Ò›˜ÔÌÙ·È Ï ÙÁ ‚ÈÌÙÂÔÍ‹ÏÂÒ· .................................................................8
ÃÒÔÛÙÈÌfi & ·ÒÈÛÙÂÒfi ÎÂıÒ‹ .....................................................................................................9
¡ÒÈÛÙÂÒfi ÎÂıÒ‹............................................................................................................................10
ƒÂÓÈ‹ & Â‹Ì˘ ÎÂıÒ‹ ..................................................................................................................11
–flÛ˘ Í·È Í‹Ù˘ ÎÂıÒ‹...................................................................................................................12
‘ÁΘÂÈÒÈÛÙfiÒÈÔ (ϸÌÔ „È· Ù· ÏÔÌٛη VP-D375W(i)/D975W(i))............................................13
◊ÒfiÛÁ ÙÔı ÈÏ‹ÌÙ· ˜ÂÒÈÔ˝ Í·È ÙÔı ͷνÏÏ·ÙÔÚ ˆ·ÍÔ˝...........................................................14
‘ÔÔË›ÙÁÛÁ Ï·Ù·Òfl·Ú ÎÈËflÔı ....................................................................................................15
◊ÒfiÛÁ ·̷ˆÔÒÙÈʸÏÂÌÁÚ Ï·Ù·Òfl·Ú ȸÌÙ˘Ì ÎÈËflÔı ............................................................16
”˝Ì‰ÂÛÁ Á„fiÚ ÒÂ˝Ï·ÙÔÚ ............................................................................................................19
–ÎÁÒÔˆÔÒflÂÚ „È· ÙÔıÚ ÙÒ¸ÔıÚ ÎÂÈÙÔıÒ„fl·Ú ...........................................................................19
◊ÒfiÛÁ ÙÔı ÍÔıÏÈÔ˝ QUICK MENU (√Òfi„ÔÒÔ ÏÂÌÔ˝)............................................................20
≈ψ‹ÌÈÛÁ ẨÂflÓÂ˘Ì ÛÙÁÌ Ô˸ÌÁ Û ÙÒ¸ÔıÚ ÎÂÈÙÔıÒ„fl·Ú Camera/Player .......................21
≈ψ‹ÌÈÛÁ ẨÂflÓÂ˘Ì ÛÙÁÌ Ô˸ÌÁ Û ÙÒ¸ÔıÚ ÎÂÈÙÔıÒ„fl·Ú M.Cam/M.Player
(ϸÌÔ „È· Ù· ÏÔÌٛη VP-D375W(i)/D975W(i))...........................................................................22
≈ÌÂÒ„ÔÔflÁÛÁ/·ÂÌÂÒ„ÔÔflÁÛÁ ÙÁÚ ÎÂÈÙÔıÒ„fl·Ú Âψ‹ÌÈÛÁÚ ẨÂflÓÂ˘Ì ÛÙÁÌ Ô˸ÌÁ .....22
—˝ËÏÈÛÁ ÙÔı ÒÔÎÔ„ÈÔ˝
((CClloocckk SSeett))
..............................................................................................23
—˝ËÏÈÛÁ ÙÁÚ ÎÂÈÙÔıÒ„fl·Ú ·Ô‰Ô˜fiÚ ·Û˝ÒÏ·ÙÔı ÙÁΘÂÈÒÈÛÏÔ˝
((RReemmoottee))
(ϸÌÔ „È· Ù· ÏÔÌٛη VP-D375W(i)/D975W(i))...........................................................................24
—˝ËÏÈÛÁ ÙÔı fi˜Ôı "ÏÈ"
((BBeeeepp SSoouunndd))
....................................................................................25
—˝ËÏÈÛÁ ÙÔı fi˜Ôı ÙÔı ÍÎÂflÛÙÒÔı
((SShhuutttteerr SSoouunndd))
(ϸÌÔ „È· Ù· ÏÔÌٛη VP-D375W(i)/D975W(i))...........................................................................26
≈ÈÎÔ„fi ÙÁÚ „βÛÛ·Ú Ù˘Ì ẨÂflÓÂ˘Ì ÛÙÁÌ Ô˸ÌÁ
((LLaanngguuaaggee))
............................................27
–ÒÔ‚ÔÎfi ÙÁÚ Âfl‰ÂÈÓÁÚ
((DDeemmoonnssttrraattiioonn))
...................................................................................28
—˝ËÏÈÛÁ ÙÁÚ Ô˸ÌÁÚ LCD
((LLCCDD BBrriigghhtt// LLCCDD CCoolloouurr))
..............................................................29
≈ψ‹ÌÈÛÁ ÁÏÂÒÔÏÁÌfl·Ú/˛Ò·Ú
((DDaattee//TTiimmee))
.................................................................................30
—˝ËÏÈÛÁ ÙÁÚ Ô˸ÌÁÚ TV
((TTVV DDiissppllaayy))
..........................................................................................31
◊ÒfiÛÁ ÙÔı ÛÍÔ½ÙÒÔı ................................................................................................................32
≈ÈÛ·„˘„fi / ÂÓ·„˘„fi Í·Û›Ù·Ú .....................................................................................................32
ƒÈ‹ˆÔÒÂÚ Ù˜ÌÈÍ›Ú Â„„Ò·ˆfiÚ......................................................................................................33
–Ò·„Ï·ÙÔÔflÁÛÁ ÙÁÚ Ò˛ÙÁÚ Â„„Ò·ˆfiÚ...................................................................................34
≈˝ÍÔÎÂÚ ÒıËÏflÛÂÈÚ Â„„Ò·ˆfiÚ „È· ·Ò˜‹ÒÈÔıÚ
((‘‘ÒÒ¸¸ÔÔÚÚ ÎÎÂÂÈÈÙÙÔÔııÒÒ„„flfl··ÚÚ EEAASSYY..QQ))
...................35
¡Ì·Û͸ÁÛÁ Í·È ·Ì·ÊfiÙÁÛÁ Í·Ù‹ ÙÁÌ Â„„Ò·ˆfi
((RREECC SSEEAARRCCHH))
..........................................36
√Òfi„ÔÒÁ ·Ì·ÊfiÙÁÛÁ ÏÈ·Ú Ûı„ÍÂÍÒÈÏ›ÌÁÚ ÛÍÁÌfiÚ
((——˝˝ËËÏÏÈÈÛÛÁÁ ÙÙÔÔıı ZZEERROO MMEEMMOORRYY))
(ϸÌÔ „È· Ù· ÏÔÌٛη VP-D375W(i)/D975W(i))...........................................................................37
¡ıٸϷÙÁ „„Ò·ˆfi Ï ˜ÒfiÛÁ ÙÔı ÙÁΘÂÈÒÈÛÙÁÒflÔı
((——˝˝ËËÏÏÈÈÛÛÁÁ ÙÙÔÔıı ··ııÙÙ¸¸ÏÏ··ÙÙÔÔıı
˜˜ÒÒÔÔÌÌÔÔ‰‰ÈÈ··Í͸¸ÙÙÁÁ))
(ϸÌÔ „È· Ù· ÏÔÌٛη VP-D375W(i)/D975W(i)) ............................................38
Ä›ËıÌÛÁ Í·È ÛÏflÍÒıÌÛÁ ...........................................................................................................39
◊ÒfiÛÁ Ù˘Ì ÎÂÈÙÔıÒ„È˛Ì Fade In Í·È Fade Out
.........................................................................40
◊ÒfiÛÁ ÙÁÚ ÎÂÈÙÔıÒ„fl·Ú COLOUR NITE......................................................................................41
◊ÒfiÛÁ ÙÁÚ ÎÂÈÙÔıÒ„fl·Ú LIGHT (ϸÌÔ „È· Ù· ÏÔÌٛη VP-D372WH(i)/D375W(i)/D975W(i))
..42
––··ÒÒÔÔııÛÛflfl··ÛÛÁÁ ÙÙÁÁÚÚ ‚‚ÈÈÌÌÙÙÂÂÔÔÍÍ‹‹ÏÏÂÂÒÒ··ÚÚ ............................................................................77
¡¡ÒÒ˜˜ÈÈÍÍfifi ÒÒ˝˝ËËÏÏÈÈÛÛÁÁ:: ——ııËËÏÏflflÛÛÂÂÈÈÚÚ ÏÏÂÂÌÌÔÔ˝˝ ÛÛııÛÛÙÙfifiÏÏ··ÙÙÔÔÚÚ......................2233
≈≈Èȉ‰ÔÔÔÔÈÈfifiÛÛÂÂÈÈÚÚ ÍÍ··ÈÈ ÔÔ‰‰ÁÁ„„flflÂÂÚÚ ··ÛÛˆˆ‹‹ÎÎÂÂÈÈ··ÚÚ ............................................................55
¬¬··ÛÛÈÈÍÍ››ÚÚ ÒÒııËËÏÏflflÛÛÂÂÈÈÚÚ Â„„„„ÒÒ··ˆˆfifiÚÚ ..................................................................................3322
¡¡ÒÒ˜˜ÈÈÍÍfifi ÒÒ˝˝ËËÏÏÈÈÛÛÁÁ:: ——˝˝ËËÏÏÈÈÛÛÁÁ ÏÏÂÂÌÌÔÔ˝˝ ÔÔË˸¸ÌÌÁÁÚÚ............................................2299
––ÒÒÔÔÂÂÙÙÔÔÈÈÏÏ··ÛÛflfl·· ........................................................................................................................................1144
01227K VPD371 UK+GRE~022 2/3/07 9:55 AM Page 2

ENGLISH
GREEK
33
Selecting the Record Mode & Audio Mode .............................................................................43
Cutting Off Wind Noise (WindCut Plus).................................................................................44
Selecting the Real Stereo Function.........................................................................................45
Setting the Shutter Speed & Exposure ...................................................................................46
Auto Focus / Manual Focus.....................................................................................................47
Programmed Automatic Exposure Modes (Program AE)......................................................48
Setting the White Balance .......................................................................................................50
Applying Visual Effects ............................................................................................................52
Setting the 16:9 Wide mode ....................................................................................................54
Using the Tele Macro (Macro) .................................................................................................55
Setting the Digital Image Stabilizer (DIS)................................................................................56
Using Back Light Compensation Mode (BLC) ........................................................................57
Zooming In and Out with Digital Zoom (Digital Zoom)..........................................................58
Still Image Recording...............................................................................................................59
Searching for a still image ................................................................................................59
Playing Back a Tape on the LCD Screen................................................................................60
Various Functions while in Player Mode .................................................................................61
Audio Dubbing (VP-D375W(i)/D975W(i) only) ........................................................................63
Dubbed Audio Playback...........................................................................................................64
Tape Playback on TV Screen ..................................................................................................65
VOICE + Function....................................................................................................................67
Audio Effect..............................................................................................................................68
Setting the AV In/Out (VP-D371i/D371Wi/D372WHi/D375Wi/D975Wi only) .........................69
Copying a Camcorder Tape onto a Video Tape......................................................................70
Recording (Copying) a TV Programme or Video Tape onto a Camcorder Tape
(VP-D371i/D371Wi/D372WHi/D375Wi/D975Wi only).............................................................71
Using a Memory Card (Usable Memory Card) (not supplied)
...................................................72
Memory Card Functions...................................................................................................72
Inserting a Memory Card..................................................................................................72
Ejecting a Memory Card ..................................................................................................72
Structure of Folders and Files on the Memory Card...............................................................73
Selecting the Photo Quality .....................................................................................................74
Selecting the recording Photo Size (VP-D975W(i) only) ........................................................75
Setting the File Number...........................................................................................................76
Taking a Photo Image (JPEG) on the Memory Card..............................................................77
Viewing Photo Images (JPEG)................................................................................................78
To view a Single Image ....................................................................................................78
To view a Slide Show ......................................................................................................78
To view the Multi Display ................................................................................................78
Protection from accidental Erasure .........................................................................................79
Deleting Photo Images and Moving Images...........................................................................80
Contents
Advanced Recording ...........................................................43
Playback ..............................................................................60
Digital Still Camera Mode (VP-D375W(i)/D975W(i) only)
....72
Connection
....................................................................................70
≈ÈÎÔ„fi ÙÔı ÙÒ¸Ôı ÎÂÈÙÔıÒ„fl·Ú „„Ò·ˆfiÚ (Rec Mode) Í·È ÙÔı ÙÒ¸Ôı ÎÂÈÙÔıÒ„fl·Ú
fi˜Ôı (Audio Mode) .........................................................................................................................
43
K·Ù·ÛÙÔÎfi ËÔÒ˝‚Ôı ·Ì›ÏÔı
((WWiinnddCCuutt PPlluuss))
...........................................................................44
≈ÈÎÔ„fi ÙÁÚ ÎÂÈÙÔıÒ„fl·Ú Ò·„Ï·ÙÈÍÔ˝ ÛÙÂÒÂÔˆ˘ÌÈÍÔ˝ fi˜Ôı (Real Stereo)......................45
—˝ËÏÈÛÁ ÙÁÚ Ù·˜˝ÙÁÙ·Ú ÍÎÂflÛÙÒÔı (Shutter Speed) & ÙÁÚ ›ÍËÂÛÁÚ (Exposure) ...............
46
¡ıٸϷÙÁ ÂÛÙfl·ÛÁ / ÃÁ ·ıٸϷÙÁ ÂÛÙfl·ÛÁ (AF/MF)................................................................47
ÀÂÈÙÔıÒ„fl· ÒÔ„Ò·ÏÏ·ÙÈÛÏÔ˝ ·ıٸϷÙÁÚ ›ÍËÂÛÁÚ
((PPrrooggrraamm AAEE))
.......................................48
—˝ËÏÈÛÁ ÙÁÚ …ÛÔÒÒÔfl·Ú ÎÂıÍÔ˝ (White Balance)....................................................................50
≈ˆ·ÒÏÔ„fi ÔÙÈÍ˛Ì Âˆ› (Visual effect) ......................................................................................52
—˝ËÏÈÛÁ ÙÁÚ ÎÂÈÙÔıÒ„fl·Ú ÂıÒÂfl·Ú Ô˸ÌÁÚ (16:9 Wide) ...........................................................54
◊ÒfiÛÁ ÙÁÚ ÎÂÈÙÔıÒ„fl·Ú Tele Macro ............................................................................................55
—˝ËÏÈÛÁ ÙÔı ÛÙ·ËÂÒÔÔÈÁÙfi ¯ÁˆÈ·ÍfiÚ ÂÈ͸̷Ú
((DDIISS))
............................................................56
◊ÒfiÛÁ ÙÔı ÙÒ¸Ôı ÎÂÈÙÔıÒ„fl·Ú ¡ÌÙÈÛÙ‹ËÏÈÛÁÚ Í¸ÌÙÒ· ˆ˘ÙÈÛÏÔ˝ (BLC) ..........................57
Ä›ËıÌÛÁ Í·È ÛÏflÍÒıÌÛÁ Ï ÙÁ ÎÂÈÙÔıÒ„fl· ¯ÁˆÈ·ÍÔ˝ ÊÔıÏ
((DDiiggiittaall ZZoooomm))
.....................58
Àfi¯Á ˆ˘ÙÔ„Ò·ˆÈ˛Ì ......................................................................................................................59
¡Ì·ÊfiÙÁÛÁ ˆ˘ÙÔ„Ò·ˆfl·Ú ..................................................................................................59
¡Ì··Ò·„˘„fi Í·Û›Ù·Ú Ôı ›˜ÂÙ ͷٷ„Ò‹¯ÂÈ ÛÙÁÌ Ô˸ÌÁ LCD ........................................60
ƒÈ‹ˆÔÒÂÚ ÎÂÈÙÔıÒ„flÂÚ ÛÙÔÌ ÙÒ¸Ô ÎÂÈÙÔıÒ„fl·Ú Player (¡Ì··Ò·„˘„fi) .............................61
ÃflÓÁ fi˜Ôı (ϸÌÔ „È· Ù· ÏÔÌٛη VP-D375W(i)/D975W(i)) .......................................................63
¡Ì··Ò·„˘„fi ÏÈÓ·ÒÈÛÏ›ÌÔı fi˜Ôı ..............................................................................................64
¡Ì··Ò·„˘„fi Í·Û›Ù·Ú ÛÙÁÌ ÙÁθҷÛÁ .................................................................................65
ÀÂÈÙÔıÒ„fl· ÷ŸÕ«+ .........................................................................................................................67
«˜ÁÙÈÍ‹ ˆ› .....................................................................................................................................68
—˝ËÏÈÛÁ ÙÁÚ ÎÂÈÙÔıÒ„fl·Ú AV In/Out (≈flÛÔ‰ÔÚ/∏ÓÔ‰ÔÚ AV)
(ϸÌÔ „È· Ù· ÏÔÌٛη VP-D371i/D371Wi/D372WHi/D375Wi/D975Wi) ....................................69
¡ÌÙÈ„Ò·ˆfi ·¸ Í·Û›Ù· ‚ÈÌÙÂÔÍ‹ÏÂÒ·Ú Û ‚ÈÌÙÂÔÍ·Û›Ù·......................................................70
≈„„Ò·ˆfi (¡ÌÙÈ„Ò·ˆfi) ÂÌ¸Ú ÙÁÎÂÔÙÈÍÔ˝ ÒÔ„Ò‹ÏÏ·ÙÔÚ fi ÏÈ·Ú ‚ÈÌÙÂÔÍ·Û›Ù·Ú Û ͷۛٷ
‚ÈÌÙÂÔÍ‹ÏÂÒ·Ú (ϸÌÔ „È· Ù· ÏÔÌٛη VP-D371i/D371Wi/D372WHi/D375Wi/D975Wi)
.............71
◊ÒfiÛÁ ÙÁÚ Í‹ÒÙ·Ú ÏÌfiÏÁÚ
((ÛÛııÏÏ‚‚··ÙÙfifi ÍÍ‹‹ÒÒÙÙ·· ÏÏÌÌfifiÏÏÁÁÚÚ)) ((‰‰ÂÂÌÌ ··ÒÒ››˜˜ÂÂÙÙ··ÈÈ))
................................72
ÀÂÈÙÔıÒ„flÂÚ Í‹ÒÙ·Ú ÏÌfiÏÁÚ..............................................................................................72
≈ÈÛ·„˘„fi Í‹ÒÙ·Ú ÏÌfiÏÁÚ..................................................................................................72
≈Ó·„˘„fi Í‹ÒÙ·Ú ÏÌfiÏÁÚ ...................................................................................................72
ƒÈ‹ÒËÒ˘ÛÁ ˆ·Í›Î˘Ì Í·È ·Ò˜Âfl˘Ì ÛÙÁÌ Í‹ÒÙ· ÏÌfiÏÁÚ ..........................................................73
≈ÈÎÔ„fi ÙÁÚ ÎÂÈÙÔıÒ„fl·Ú Photo Quality (–ÔȸÙÁÙ· ˆ˘ÙÔ„Ò·ˆfl·Ú).......................................74
≈ÈÎÔ„fi ÙÔı Ï„›ËÔıÚ Â„„Ò·ˆfiÚ ·Ò˜ÂflÔı Photo (ϸÌÔ „È· Ù· ÏÔÌٛη VP-D975W(i))...75
—˝ËÏÈÛÁ File Number (¡ÒÈËÏ¸Ú ·Ò˜ÂflÔı) ...................................................................................76
Àfi¯Á ˆ˘ÙÔ„Ò·ˆfl·Ú (JPEG) ÛÙÁÌ Í‹ÒÙ· ÏÌfiÏÁÚ......................................................................77
–ÒÔ‚ÔÎfi ˆ˘ÙÔ„Ò·ˆÈ˛Ì (JPEG) ..................................................................................................78
√È· ÒÔ‚ÔÎfi Ïfl·Ú ϸÌÔ ÂÈÍ¸Ì·Ú .......................................................................................78
√È· ‰È·‰Ô˜ÈÍfi ÒÔ‚ÔÎfi ˆ˘ÙÔ„Ò·ˆÈ˛Ì............................................................................78
√È· ÒÔ‚ÔÎfi ÔÎÎ˛Ì ÂÈÍ¸Ì˘Ì Ù·ıÙ¸˜ÒÔÌ· ...................................................................78
–ÒÔÛÙ·Ûfl· ·¸ ·ÍÔ˝ÛÈ· ‰È·„Ò·ˆfi .............................................................................................79
ƒÈ·„Ò·ˆfi ˆ˘ÙÔ„Ò·ˆÈ˛Ì Í·È ÍÈÌÔ˝ÏÂÌ˘Ì ÂÈÍ¸Ì˘Ì ..................................................................80
––ÂÂÒÒÈȘ˜¸¸ÏÏÂÂÌÌ··
””˝˝ÌÌËËÂÂÙÙÂÂÚÚ ÒÒııËËÏÏflflÛÛÂÂÈÈÚÚ Â„„„„ÒÒ··ˆˆfifiÚÚ..............................................................................4433
¡¡ÌÌ····ÒÒ··„„˘˘„„fifi........................................................................................................................................6600
‘‘ÒÒ¸¸ÔÔÚÚ ÎÎÂÂÈÈÙÙÔÔııÒÒ„„flfl··ÚÚ ¯¯ÁÁˆˆÈÈ··ÍÍfifiÚÚ ˆˆ˘˘ÙÙÔÔ„„ÒÒ··ˆˆÈÈÍÍfifiÚÚ ÏÏÁÁ˜˜··ÌÌfifiÚÚ
((Ïϸ¸ÌÌÔÔ „„ÈÈ·· ÙÙ·· ÏÏÔÔÌÌÙÙ››Îη· VVPP--DD337755WW((ii))//DD997755WW((ii))))
....................................7722
””˝˝Ì̉‰ÂÂÛÛÁÁ ..........................................................................................................................................................7700
01227K VPD371 UK+GRE~022 2/3/07 9:55 AM Page 3

ENGLISH
GREEK
44
Contents
Formatting a Memory Card......................................................................................................82
Recording Moving Images (MPEG) on a Memory Card.........................................................83
Playing the Moving Images (MPEG) on a Memory Card (M.Play Select) ............................85
Recording Photo Image from a Cassette................................................................................86
Copying Still Images from a Cassette to a Memory Card (Photo Copy)..............................87
Marking Images for Printing (Print Mark) ...............................................................................88
Removing the Print Mark .................................................................................................88
Printing Your Pictures – Using the PictBridge
TM
......................................................................89
Connecting To a Printer....................................................................................................89
Selecting Images..............................................................................................................90
Setting the Number of Prints ............................................................................................90
Setting the Date/Time Imprint Option ...............................................................................90
Printing Images................................................................................................................90
Canceling the Printing......................................................................................................90
Transferring IEEE1394 (i.LINK)-DV Standard Data Connections ..........................................91
Connecting to a DV Device (DVD Recorder, Camcorder, etc.)...................................................91
Connecting to a PC ..........................................................................................................91
System Requirements.......................................................................................................91
Recording with a DV Connection Cable (VP-D371i/D371Wi/D372WHi/D375Wi/D975Wi only)
..92
Using USB Interface ................................................................................................................93
Transferring a Digital Image through a USB Connection....................................................93
USB Connection Speed depending on the System..............................................................93
System Requirements.......................................................................................................93
Selecting the USB Device (USB Connect) ............................................................................94
Installing DV Media PRO Program..........................................................................................95
Connecting to a PC..................................................................................................................96
Disconnecting the USB Cable...........................................................................................96
Using the PC Camera Function.........................................................................................97
Using the USB Streaming Function ..................................................................................98
Using the removable Disk Function ..................................................................................98
After Finishing a Recording .....................................................................................................99
Usable Cassette Tapes............................................................................................................99
Cleaning and Maintaining the Camcorder.............................................................................100
Using Your Camcorder Abroad..............................................................................................101
Troubleshooting......................................................................................................................102
Self Diagnosis Display...................................................................................................102
Self Diagnosis Display in M.Cam/M.Player Modes (VP-D375W(i)/D975W(i) only) .........103
Setting menu items................................................................................................................105
IEEE 1394 Data Transfer......................................................91
USB Interface (VP-D375W(i)/D975W(i) only).....................93
Maintenance........................................................................99
Troubleshooting.................................................................102
Specifications ................................................................... 107
Index ................................................................................ 108
PictBridge
TM
(VP-D375W(i)/D975W(i) only) .......................89
––ÂÂÒÒÈȘ˜¸¸ÏÏÂÂÌÌ··
ƒÈ·Ï¸Òˆ˘ÛÁ ÙÁÚ Í‹ÒÙ·Ú ÏÌfiÏÁÚ ................................................................................................82
≈„„Ò·ˆfi ÍÈÌÔ˝ÏÂÌ˘Ì ÂÈÍ¸Ì˘Ì (MPEG) ÛÙÁÌ Í‹ÒÙ· ÏÌfiÏÁÚ .................................................83
¡Ì··Ò·„˘„fi Ù˘Ì ÍÈÌÔ˝ÏÂÌ˘Ì ÂÈÍ¸Ì˘Ì (MPEG) ÛÙÁÌ Í‹ÒÙ· ÏÌfiÏÁÚ
((MM..PPllaayy SSeelleecctt))
....85
≈„„Ò·ˆfi ÍÈÌÔ˝ÏÂÌÁÚ ÂÈÍ¸Ì·Ú ·¸ Í·Û›Ù· ˘Ú ˆ˘ÙÔ„Ò·ˆfl· ..................................................86
¡ÌÙÈ„Ò·ˆfi ˆ˘ÙÔ„Ò·ˆÈ˛Ì ·¸ Í·Û›Ù· Û ͋ÒÙ· ÏÌfiÏÁÚ
((PPhhoottoo CCooppyy))
...............................87
”fiÏ·ÌÛÁ ÂÈÍ¸Ì˘Ì „È· ÂÍÙ˝˘ÛÁ
((PPrriinntt MMaarrkk))
............................................................................88
K·Ù‹Ò„ÁÛÁ ÙÁÚ ÛfiÏ·ÌÛÁÚ ÂÍÙ˝˘ÛÁÚ............................................................................88
≈ÍÙ˝˘ÛÁ ˆ˘ÙÔ„Ò·ˆÈ˛Ì - ◊ÒfiÛÁ ÙÔı PictBridge
TM
.................................................................89
”˝Ì‰ÂÛÁ Ï ÂÍÙı˘Ùfi ........................................................................................................89
≈ÈÎÔ„fi ÂÈÍ¸Ì˘Ì ..................................................................................................................90
œÒÈÛÏ¸Ú ÙÔı ·ÒÈËÏÔ˝ ·ÌÙÈÙ˝˘Ì .....................................................................................90
—˝ËÏÈÛÁ ÙÁÚ ÂÈÎÔ„fiÚ ÂÌÛ˘Ï‹Ù˘ÛÁÚ ÁÏÂÒÔÏÁÌfl·Ú/˛Ò·Ú ..........................................90
≈ÍÙ˝˘ÛÁ ÂÈÍ¸Ì˘Ì ..............................................................................................................90
¡Í˝Ò˘ÛÁ ÙÁÚ ÂÍÙ˝˘ÛÁÚ...................................................................................................90
ÃÂÙ·ˆÔÒ‹ Ï›Û˘ IEEE1394 (i.LINK) - ”ı̉›ÛÂÈÚ ÏÂÙ·ˆÔÒ‹Ú ‰Â‰ÔÏ›Ì˘Ì Ï ÙÔ Ò¸ÙıÔ DV
..91
”˝Ì‰ÂÛÁ Ï ÏÈ· ÛıÛÍÂıfi DV (ÛıÛÍÂıfi „„Ò·ˆfiÚ DVD, ‚ÈÌÙÂÔÍ‹ÏÂÒ· Í.Î.)........91
”˝Ì‰ÂÛÁ Ï ıÔÎÔ„ÈÛÙfi.....................................................................................................91
¡·ÈÙfiÛÂÈÚ ÛıÛÙfiÏ·ÙÔÚ .....................................................................................................91
≈„„Ò·ˆfi Ï ͷβ‰ÈÔ Û˝Ì‰ÂÛÁÚ DV
(ϸÌÔ „È· Ù· ÏÔÌٛη VP-D371i/D371Wi/D372WHi/D375Wi/D975Wi) .........................92
◊ÒfiÛÁ ÙÁÚ ‰È·Û˝Ì‰ÂÛÁÚ USB.......................................................................................................93
ÃÂÙ‹‰ÔÛÁ ¯ÁˆÈ·ÍfiÚ ÂÈÍ¸Ì·Ú Ï›Û˘ Û˝Ì‰ÂÛÁÚ USB.............................................................93
« Ù·˜˝ÙÁÙ· ÙÁÚ Û˝Ì‰ÂÛÁÚ USB ÂÓ·ÒÙ‹Ù·È ·¸ ÙÔ Û˝ÛÙÁÏ· ......................................93
¡·ÈÙfiÛÂÈÚ ÛıÛÙfiÏ·ÙÔÚ .....................................................................................................93
≈ÈÎÔ„fi ÙÁÚ ÛıÛÍÂıfiÚ USB
((UUSSBB CCoonnnneecctt))
..............................................................................94
≈„Í·Ù‹ÛÙ·ÛÁ ÙÔı DV Media PRO Program ...............................................................................95
”˝Ì‰ÂÛÁ Ï ıÔÎÔ„ÈÛÙfi ................................................................................................................96
¡ÔÛ˝Ì‰ÂÛÁ ÙÔı ͷ΢‰flÔı USB ......................................................................................96
◊ÒfiÛÁ ÙÁÚ ÎÂÈÙÔıÒ„fl·Ú Í‹ÏÂÒ·Ú Web (PC Camera).....................................................97
◊ÒfiÛÁ ÙÁÚ ÎÂÈÙÔıÒ„fl·Ú ÒÔfiÚ ‰Â‰ÔÏ›Ì˘Ì USB (USB Streaming)..............................98
◊ÒfiÛÁ ÙÁÚ ÎÂÈÙÔıÒ„fl·Ú ·ˆ·ÈÒÔ˝ÏÂÌÔı ‰flÛÍÔı .............................................................98
ÃÂÙ‹ ÙÁÌ ÔÎÔÍÎfiÒ˘ÛÁ ÏÈ·Ú Â„„Ò·ˆfiÚ ......................................................................................99
‘˝ÔÈ ‚ÈÌÙÂÔÍ·Û›Ù·Ú Ôı ÏÔÒÔ˝Ì Ì· ˜ÒÁÛÈÏÔÔÈÁËÔ˝Ì......................................................99
K·Ë·ÒÈÛÏ¸Ú Í·È ÛıÌÙfiÒÁÛÁ ÙÁÚ ‚ÈÌÙÂÔÍ‹ÏÂÒ·Ú ....................................................................100
◊ÒfiÛÁ ÙÁÚ ‚ÈÌÙÂÔÍ‹ÏÂÒ·Ú ÛÙÔ ÂÓ˘ÙÂÒÈ͸...............................................................................101
¡ÌÙÈÏÂÙ˛ÈÛÁ ÒÔ‚ÎÁÏ‹Ù˘Ì.......................................................................................................102
œË¸ÌÁ ·ıÙԉȷ„Ì˘ÛÙÈÍÔ˝ ÂΛ„˜Ôı ...............................................................................102
œË¸ÌÁ ·ıÙԉȷ„Ì˘ÛÙÈÍÔ˝ ÂΛ„˜Ôı Û ÙÒ¸Ô ÎÂÈÙÔıÒ„fl·Ú M.Cam/M.Player
(ϸÌÔ „È· Ù· ÏÔÌٛη VP-D375W(i)/D975W(i))..............................................................103
—˝ËÏÈÛÁ ÛÙÔȘÂfl˘Ì ÏÂÌÔ˝ ...........................................................................................................105
ÃÃÂÂÙÙ··ˆˆÔÔÒÒ‹‹ ‰‰Â‰‰ÔÔÏÏ››ÌÌ˘˘ÌÌ ÏÏ ÙÙÔÔ ÒÒ¸¸ÙÙııÔÔ IIEEEEEE 11339944..............9911
ƒƒÈÈ··ÛÛ˝˝Ì̉‰ÂÂÛÛÁÁ UUSSBB ((Ïϸ¸ÌÌÔÔ „„ÈÈ·· ÙÙ·· ÏÏÔÔÌÌÙÙ››Îη· VVPP--DD337755WW((ii))//DD997755WW((ii))))
........9933
””ııÌÌÙÙfifiÒÒÁÁÛÛÁÁ..................................................................................................................................................9999
¡¡ÌÌÙÙÈÈÏÏÂÂÙÙ˛˛ÈÈÛÛÁÁ ÒÒÔÔ‚‚ÎÎÁÁÏÏ‹‹ÙÙ˘˘ÌÌ..................................................................................110022
‘‘˜˜ÌÌÈÈÍÍ››ÚÚ ÒÒÔÔ‰‰ÈÈ··„„ÒÒ··ˆˆ››ÚÚ .............................................................................................. 110077
≈≈ııÒÒÂÂÙÙfifiÒÒÈÈÔÔ.............................................................................................................................................. 110088
PPiiccttBBrriiddggee
TTMM
((Ïϸ¸ÌÌÔÔ „„ÈÈ·· ÙÙ·· ÏÏÔÔÌÌÙÙ››Îη· VVPP--DD337755WW((ii))//DD997755WW((ii))))
........8899
01227K VPD371 UK+GRE~022 2/3/07 9:55 AM Page 4
Sayfa yükleniyor...
Sayfa yükleniyor...

ENGLISH
GREEK
77
Getting to Know Your Camcorder
Features
■ Digital Data Transfer Function with IEEE1394
By incorporating the IEEE 1394 (i.LINK™: i.LINK is a serial data transfer
protocol and interconnectivity system, used to transmit DV data) high speed
data transport port, both moving and photo images can be transferred to a PC,
making it possible to produce or edit various images.
■ USB Interface for Digital Image Data Transfer (VP-D375W(i)/D975W(i) only)
You can transfer images to a PC using the USB interface without an add-on card.
■ Still Image Recording on a Tape
Still image recording makes it possible to record a still image on a tape.
■ Mega-pixel CCD (VP-D975W(i) only)
Your camcorder incorporates a 1.0 mega-pixel CCD. High-resolution photo
images can be recorded to a Memory card.
■ 1200x Digital Zoom
Allows you to magnify an image up to 1200 times its original size.
■ Audio Enhancement
Provides more powerful sound with the Real Stereo and Audio Effect features.
■ Colour TFT LCD
A high-resolution colour TFT LCD gives you clean, sharp images as well as the
ability to review your recordings immediately.
■ Digital Image Stabilizer (DIS)
The DIS compensates for any handshake, reducing unstable images
particularly at high magnification.
■ Various Visual Effects
The Visual Effects allow you to give your films a special look by adding various
special effects.
■ Back Light Compensation (BLC)
The BLC function compensates for a bright background behind a subject you're
recording.
■ Program AE
The Program AE enables you to alter the shutter speed and aperture to suit the
type of scene/action to be filmed.
■ High Power Zoom Lens
Power Zoom lens allows users to magnify the subject clearly up to X34
(VP-D371(i)/D371W(i)/D372WH(i)/D375W(i) only), X26(VP-D975W(i) only)
■ Digital Still Camera Function (VP-D375W(i)/D975W(i) only)
- Using Memory Card, you can easily record and playback standard photo
images.
- You can transfer standard photo images on the Memory Card to your PC
using the USB interface.
■ Moving Image Recording on a Memory Card (VP-D375W(i)/D975W(i) only)
Moving image recording makes it possible to record video onto a Memory Card.
■ MMC/SD card slot (VP-D375W(i)/D975W(i) only)
MMC/SD card slot is able to use MMC(Multi Media Cards) and SD cards.
––··ÒÒÔÔııÛÛflfl··ÛÛÁÁ ÙÙÁÁÚÚ ‚‚ÈÈÌÌÙÙÂÂÔÔÍÍ‹‹ÏÏÂÂÒÒ··ÚÚ
◊◊··ÒÒ··ÍÍÙÙÁÁÒÒÈÈÛÛÙÙÈÈÍÍ‹‹
■
ÀÀÂÂÈÈÙÙÔÔııÒÒ„„flfl·· ÏÏÂÂÙÙ··ˆˆÔÔÒÒ‹‹ÚÚ ¯¯ÁÁˆˆÈÈ··ÍͲ˛ÌÌ ‰‰Â‰‰ÔÔÏÏ››ÌÌ˘˘ÌÌ ÍÍ··ÙÙ‹‹ ÙÙÔÔ ÒÒ¸¸ÙÙııÔÔ IIEEEEEE11339944
àÙÁ Ë˝Ò· ÏÂÙ‹‰ÔÛÁÚ ‰Â‰ÔÏ›Ì˘Ì ı¯ÁÎfiÚ Ù·˜˝ÙÁÙ·Ú IEEE 1394 (i.LINK(tm): ÙÔ i.LINK
ÂflÌ·È ›Ì· Ò˘Ù¸ÍÔÎÎÔ ÛÂÈÒÈ·ÍfiÚ ÏÂÙ·ˆÔÒ‹Ú ‰Â‰ÔÏ›Ì˘Ì Í·È Û˝ÛÙÁÏ· ‰È·Û˝Ì‰ÂÛÁÚ, ÙÔ
ÔÔflÔ ˜ÒÁÛÈÏÔÔÈÂflÙ·È „È· ÙÁ ÏÂÙ‹‰ÔÛÁ ‰Â‰ÔÏ›Ì˘Ì DV), ÏÔÒÂflÙ ̷ ÏÂÙ·ˆ›ÒÂÙÂ
ÍÈÌÔ˝ÏÂÌÂÚ ÂÈ͸ÌÂÚ Í·È ˆ˘ÙÔ„Ò·ˆflÂÚ Û ›Ì·Ì ıÔÎÔ„ÈÛÙfi, Í·ËÈÛÙ˛ÌÙ·Ú ‰ıÌ·Ùfi ÙÁ
‰ÁÏÈÔıÒ„fl· fi ÙÁÌ ÂÂÓÂÒ„·Ûfl· ‰È·ˆ¸Ò˘Ì ÂÈÍ¸Ì˘Ì.
■
ƒƒÈÈ··ÛÛ˝˝Ì̉‰ÂÂÛÛÁÁ UUSSBB „„ÈÈ·· ÏÏÂÂÙÙ··ˆˆÔÔÒÒ‹‹ ‰‰Â‰‰ÔÔÏÏ››ÌÌ˘˘ÌÌ ¯¯ÁÁˆˆÈÈ··ÍͲ˛ÌÌ ÂÂÈÈÍ͸¸ÌÌ˘˘ÌÌ
((Ïϸ¸ÌÌÔÔ „„ÈÈ·· ÙÙ·· ÏÏÔÔÌÌÙÙ››Îη· VVPP--DD337755WW((ii))//DD997755WW((ii))))
ÃÔÒÂflÙ ̷ ÏÂÙ·ˆ›ÒÂÙ ÂÈ͸ÌÂÚ Û ›Ì·Ì ıÔÎÔ„ÈÛÙfi ˜ÒÁÛÈÏÔÔÈ˛ÌÙ·Ú ÙÁ ‰È·Û˝Ì‰ÂÛÁ
USB ˜˘ÒflÚ Ò¸ÛËÂÙÁ Í‹ÒÙ·.
■
≈≈„„„„ÒÒ··ˆˆfifi ˆˆ˘˘ÙÙÔÔ„„ÒÒ··ˆˆÈÈ˛˛ÌÌ ÛÛ ÍÍ··ÛÛ››ÙÙ··
« ÎÂÈÙÔıÒ„fl· „„Ò·ˆfiÚ ˆ˘ÙÔ„Ò·ˆÈ˛Ì Í·ËÈÛÙ‹ ‰ıÌ·Ùfi ÙÁÌ Â„„Ò·ˆfi ˆ˘ÙÔ„Ò·ˆÈ˛Ì ÛÂ
Í·Û›Ù·.
■
MMeeggaa--ppiixxeell CCCCDD ((Ïϸ¸ÌÌÔÔ „„ÈÈ·· ÙÙ·· ÏÏÔÔÌÌÙÙ››Îη· VVPP--DD997755WW((ii))))
« ‚ÈÌÙÂÔÍ‹ÏÂÒ· ÂÌÛ˘Ï·Ù˛ÌÂÈ Ù˜ÌÔÎÔ„fl· 1.0 mega-pixel CCD. ≈flÌ·È ‰ıÌ·Ùfi Á „„Ò·ˆfi
ˆ˘ÙÔ„Ò·ˆÈ˛Ì ı¯ÁÎfiÚ ·Ì‹ÎıÛÁÚ Û ÏÈ· Í‹ÒÙ· ÏÌfiÏÁÚ.
■
ÿÿÁÁˆˆÈÈ··Í͸¸ ÊÊÔÔııÏÏ 11220000xx
”‹Ú ÂÈÙÒ›ÂÈ Ì· Ï„ÂË˝ÌÂÙ ÏÈ· ÂÈ͸̷ ›˘Ú Í·È 1200 ˆÔÒ›Ú Û ۘ›ÛÁ Ï ÙÔ Í·ÌÔÌÈ͸
ÙÁÚ Ï›„ÂËÔÚ.
■
¬¬ÂÂÎÎÙÙflfl˘˘ÛÛÁÁ fifi˜˜ÔÔıı
–·Ò›˜ÂÈ Í·Î˝ÙÂÒÔ fi˜Ô ˜‹ÒÁ ÛÙÈÚ Ò¸ÛËÂÙÂÚ ‰ıÌ·Ù¸ÙÁÙÂÚ Real Stereo (–Ò·„Ï·ÙÈÍ‹
ÛÙÂÒÂÔˆ˘ÌÈÍ¸Ú fi˜ÔÚ) Í·È Audio Effect («˜ÁÙÈ͸ ˆ›).
■
∏∏„„˜˜ÒÒ˘˘ÏÏÁÁ ÔÔË˸¸ÌÌÁÁ TTFFTT LLCCDD
« ›„˜Ò˘ÏÁ Ô˸ÌÁ LCD TFT ı¯ÁÎfiÚ ·Ì‹ÎıÛÁÚ Û‹Ú ÒÔÛˆ›ÒÂÈ ÂıÍÒÈÌÂflÚ Í·È Í·Ë·Ò›Ú
ÂÈ͸ÌÂÚ, Í·Ë˛Ú Í·È ÙÁ ‰ıÌ·Ù¸ÙÁÙ· ·Ì·Û͸ÁÛÁÚ Ù˘Ì Â„„Ò·ˆ˛Ì Û·Ú.
■
””ÙÙ··ËËÂÂÒÒÔÔÔÔÈÈÁÁÙÙfifiÚÚ ¯¯ÁÁˆˆÈÈ··ÍÍfifiÚÚ ÂÂÈÈÍ͸¸ÌÌ··ÚÚ ((DDIISS))
« ÎÂÈÙÔıÒ„fl· DIS ·ÌÙÈÛÙ·ËÏflÊÂÈ ÔÔÈ·‰fiÔÙ ·ÛÙ‹ËÂÈ· ÙÔı ˜ÂÒÈÔ˝, ÏÂÈ˛ÌÔÌÙ·Ú Ù·
ÍÔıÌfiÏ·Ù· ȉȷflÙÂÒ· Û ÂÒÈÙ˛ÛÂÈÚ Ï„‹ÎÁÚ Ï„›ËıÌÛÁÚ.
■
ƒƒÈÈ‹‹ˆˆÔÔÒÒ·· ÔÔÙÙÈÈÍÍ‹‹ ˆˆ››
‘· ÔÙÈÍ‹ ˆ› Û‹Ú ÂÈÙÒ›ÔıÌ Ì· ·Ô‰fl‰ÂÙ Ï ȉȷflÙÂÒÔ ÙÒ¸Ô ÙÈÚ Ù·ÈÌflÂÚ Û·Ú,
ÒÔÛË›ÙÔÌÙ·Ú ‰È‹ˆÔÒ· ÂȉÈÍ‹ ˆ›.
■
¡¡ÌÌÙÙÈÈÛÛÙÙ‹‹ËËÏÏÈÈÛÛÁÁ Í͸¸ÌÌÙÙÒÒ·· ˆˆ˘˘ÙÙÈÈÛÛÏÏÔÔ˝˝ ((BBLLCC))
« ÎÂÈÙÔıÒ„fl· BLC ·ÌÙÈÛÙ·ËÏflÊÂÈ ÙÔ ˆ˘ÙÂÈ̸ ˆ¸ÌÙÔ Ôı ı‹Ò˜ÂÈ flÛ˘ ·¸ ÙÔ
·ÌÙÈÍÂflÏÂÌÔ Ôı Í·Ù·„Ò‹ˆÂÙ Ï ÙÁÌ Í‹ÏÂÒ·.
■
––ÒÒÔÔ„„ÒÒ··ÏÏÏÏ··ÙÙÈÈÛÛÏϸ¸ÚÚ ··ııÙÙ¸¸ÏÏ··ÙÙÁÁÚÚ ››ÍÍËËÂÂÛÛÁÁÚÚ
œ ÒÔ„Ò·ÏÏ·ÙÈÛÏ¸Ú ·ıٸϷÙÁÚ ›ÍËÂÛÁÚ Û‹Ú ÂÈÙÒ›ÂÈ Ì· ·Î΋ÊÂÙ ÙÁÌ Ù·˜˝ÙÁÙ· ÙÔı
ÍÎÂflÛÙÒÔı Í·È ÙÔı ‰È·ˆÒ‹„Ï·ÙÔÚ, ·Ì‹ÎÔ„· Ï ÙÔÌ Ù˝Ô ÙÔı ÛÍÁÌÈÍÔ˝ fi ÙÁÚ ‰Ò‹ÛÁÚ Ôı
ÍÈÌÁÏ·ÙÔ„Ò·ˆÂflÙÂ.
■
÷÷··Í͸¸ÚÚ ÊÊÔÔııÏÏ ıı¯¯ÁÁÎÎfifiÚÚ ÈÈÛÛ˜˜˝˝ÔÔÚÚ
œ ÈÛ˜ıÒ¸Ú ˆ·Í¸Ú ÊÔıÏ Û‹Ú ÂÈÙÒ›ÂÈ Ì· Ï„ÂË˝ÌÂÙ ÙÔ ·ÌÙÈÍÂflÏÂÌÔ ›˘Ú Í·È 34(ϸÌÔ „È·
Ù· ÏÔÌٛη VP-D371(i)/D371W(i)/D372WH(i)/D375W(i)), 26(ϸÌÔ „È· Ù· ÏÔÌٛη VP-
D975W(i)) ˆÔÒ›Ú.
■
ÀÀÂÂÈÈÙÙÔÔııÒÒ„„flfl·· ¯¯ÁÁˆˆÈÈ··ÍÍfifiÚÚ ˆˆ˘˘ÙÙÔÔ„„ÒÒ··ˆˆÈÈÍÍfifiÚÚ ÏÏÁÁ˜˜··ÌÌfifiÚÚ ((Ïϸ¸ÌÌÔÔ „„ÈÈ·· ÙÙ·· ÏÏÔÔÌÌÙÙ››Îη· VVPP--DD337755WW((ii))//DD997755WW((ii))))
- ◊ÒÁÛÈÏÔÔÈ˛ÌÙ·Ú ÙÁÌ Í‹ÒÙ· ÏÌfiÏÁÚ, ÏÔÒÂflÙ ½ÍÔη Ì· ÙÒ·‚fiÓÂÙÂ Í·È Ì·
ÒÔ‚‹ÎÂÙ ÙıÈÍ›Ú ˆ˘ÙÔ„Ò·ˆflÂÚ.
- ÃÔÒÂflÙ ̷ ÏÂÙ·ˆ›ÒÂÙ ÙıÈÍ›Ú ˆ˘ÙÔ„Ò·ˆflÂÚ ·¸ ÙÁÌ Í‹ÒÙ· ÏÌfiÏÁÚ ÛÙÔÌ
ıÔÎÔ„ÈÛÙfi Û·Ú ˜ÒÁÛÈÏÔÔÈ˛ÌÙ·Ú ÙÁ ‰È·Û˝Ì‰ÂÛÁ USB.
■
≈≈„„„„ÒÒ··ˆˆfifi ÍÍÈÈÌÌÔÔ˝˝ÏÏÂÂÌÌÁÁÚÚ ÂÂÈÈÍ͸¸ÌÌ··ÚÚ ÛÛ ÍÍ‹‹ÒÒÙÙ·· ÏÏÌÌfifiÏÏÁÁÚÚ ((Ïϸ¸ÌÌÔÔ „„ÈÈ·· ÙÙ·· ÏÏÔÔÌÌÙÙ››Îη· VVPP--DD337755WW((ii))//DD997755WW((ii))))
« „„Ò·ˆfi ÍÈÌÔ˝ÏÂÌ˘Ì ÂÈÍ¸Ì˘Ì Í·ËÈÛÙ‹ ‰ıÌ·Ùfi ÙÁÌ Â„„Ò·ˆfi ‚flÌÙÂÔ Û ÏÈ· Í‹ÒÙ·
ÏÌfiÏÁÚ.
■
’’ÔÔ‰‰ÔÔ˜˜fifi ÍÍ‹‹ÒÒÙÙ··ÚÚ MMMMCC//SSDD ((Ïϸ¸ÌÌÔÔ „„ÈÈ·· ÙÙ·· ÏÏÔÔÌÌÙÙ››Îη· VVPP--DD337755WW((ii))//DD997755WW((ii))))
« ıÔ‰Ô˜fi Í·ÒÙ˛Ì MMC/SD ÂÈÙÒ›ÂÈ ÙÁ ˜ÒfiÛÁ Í·ÒÙ˛Ì MMC (Multi Media
Cards) Í·È SD.
01227K VPD371 UK+GRE~022 2/3/07 9:55 AM Page 7
Sayfa yükleniyor...

ENGLISH
GREEK
99
Getting to Know Your Camcorder
Front & Left View
––··ÒÒÔÔııÛÛflfl··ÛÛÁÁ ÙÙÁÁÚÚ ‚‚ÈÈÌÌÙÙÂÂÔÔÍÍ‹‹ÏÏÂÂÒÒ··ÚÚ
ÃÃÒÒÔÔÛÛÙÙÈÈÌÌfifi && ··ÒÒÈÈÛÛÙÙÂÂÒÒfifi ÎÎÂÂııÒÒ‹‹
11.. ÷÷··Í͸¸ÚÚ
22.. ¡¡ÈÈÛÛËËÁÁÙÙfifiÒÒ··ÚÚ ÙÙÁÁÎΘ˜ÂÂÈÈÒÒÈÈÛÛÏÏÔÔ˝˝ ((Ïϸ¸ÌÌÔÔ „„ÈÈ·· ÙÙ·· ÏÏÔÔÌÌÙÙ››Îη· VVPP--DD337755WW((ii))//DD997755WW((ii))))
33.. ÀÀıı˜˜ÌÌflfl·· ˆˆ˘˘ÙÙÈÈÛÛÏÏÔÔ˝˝ ((Ïϸ¸ÌÌÔÔ „„ÈÈ·· ÙÙ·· ÏÏÔÔÌÌÙÙ››Îη·
VVPP--DD337722WWHH((ii))//DD337755WW((ii))//DD997755WW((ii))
))
44.. ≈≈ÓÓ··„„˘˘„„fifi ÍÍ··ÛÛ››ÙÙ··ÚÚ
55.. KKÔÔııÏÏflfl EEAASSYY..QQ
➥
ÛÛÂÂÎÎflfl‰‰·· 3355
66.. KKÔÔııÏÏÈÈ‹‹ ÎÎÂÂÈÈÙÙÔÔııÒÒ„„ÈÈ˛˛ÌÌ
77.. œœË˸¸ÌÌÁÁ LLCCDD TTFFTT
88.. ≈≈ÛÛ˘˘ÙÙÂÂÒÒÈÈÍ͸¸ ÏÏÈÈÍÍÒÒ¸¸ˆˆ˘˘ÌÌÔÔ
[[ ––ÒÒÔÔÛÛÔÔ˜˜fifi ]]
÷ÒÔÌÙflÛÙ ˛ÛÙ ÙÔ ÂÛ˘ÙÂÒÈ͸ ÏÈÍÒ¸ˆ˘ÌÔ Í·È Ô ˆ·Í¸Ú Ì· ÏÁÌ ÂflÌ·È Í·ÎıÏÏ›ÌÔÚ Í·Ù‹ ÙÁÌ
„„Ò·ˆfi.
[[ ””ÁÁÏÏÂÂÈÈ˛˛ÛÛÂÂÈÈÚÚ ]]
■
œÈ ÂÈ͸ÌÂÚ Ôı ı‹Ò˜ÔıÌ ÛÙÈÚ Ô‰Á„flÂÚ ˜ÒfiÛÁÚ, ·Ì·ˆ›ÒÔÌÙ·È ÛÙÔ ÏÔÌÙ›ÎÔ VP-D375W.
■
–·Ò¸ÎÔ Ôı Ù· ÏÔÌٛη VP-D371(i), VP-D371W(i), VP-D372WH(i), VP-D375W(i) Í·È
VP-D975W(i) ‰È·ˆ›ÒÔıÌ ˘Ú ÒÔÚ ÙÁÌ ÂÓ˘ÙÂÒÈÍfi ÙÔıÚ Âψ‹ÌÈÛÁ, ÎÂÈÙÔıÒ„Ô˝Ì
¸Î· Ï ÙÔÌ fl‰ÈÔ ÙÒ¸Ô.
KKÔÔııÏÏflfl
<<PPllaayyeerr>>
((¡¡ÌÌ····ÒÒ··„„˘˘„„fifi))
<<CCaammeerraa>>
((KK‹‹ÏÏÂÂÒÒ··))
<<MM..PPllaayyeerr>> ((¡¡ÌÌ····ÒÒ··„„˘˘„„fifi ··¸¸ ÍÍ‹‹ÒÒÙÙ·· ÏÏÌÌfifiÏÏÁÁÚÚ))
((Ïϸ¸ÌÌÔÔ „„ÈÈ·· ÙÙ·· ÏÏÔÔÌÌÙÙ››Îη· VVPP--DD337755WW((ii))//DD997755WW((ii))))
œœœœ
REW (√Òfi„ÔÒÁ ÏÂÙ·ÍflÌÁÛÁ
ÒÔÚ Ù· flÛ˘)
REC SEARCH -
(√Òfi„ÔÒÁ ·Ì·ÊfiÙÁÛÁ)
REV (√Òfi„ÔÒÁ ÏÂÙ·ÍflÌÁÛÁ ÒÔÚ Ù· flÛ˘)
√√√√
FF (√Òfi„ÔÒÁ ÏÂÙ·ÍflÌÁÛÁ
ÒÔÚ Ù· ÂÏÒ¸Ú)
REC SEARCH +
(√Òfi„ÔÒÁ ·Ì·ÊfiÙÁÛÁ +)
FWD (√Òfi„ÔÒÁ ÏÂÙ·ÍflÌÁÛÁ ÒÔÚ Ù· ÂÏÒ¸Ú)
√√
❙❙
PLAY/STILL(¡Ì··Ò·„˘„fi/
–‹„˘Ï· ÂÈ͸̷Ú)
FADE (”Ù·‰È·Ífi Âψ‹ÌÈÛÁ/
Û‚fiÛÈÏÔ ÂÈÍ¸Ì·Ú Í·È fi˜Ôı)
S.SHOW (ƒÈ·‰Ô˜ÈÍfi ÒÔ‚ÔÎfi ˆ˘ÙÔ„Ò·ˆÈ˛Ì)
■
STOP (ƒÈ·ÍÔfi)
C.NITE/LIGHT
(ϸÌÔ „È· Ù· ÏÔÌٛη VP-
D372WH(i)/D375W(i)/D975W(i))
MULTI (–ÔÎηÎfi ÒÔ‚ÔÎfi)
!!
@@
**
&&
##
$$
^^
%%
(VP-D375W(i)/D975W(i) only)
1. Lens
2. Remote Sensor (VP-D375W(i)/D975W(i) only)
3. Light (VP-D372WH(i)/D375W(i)/D975W(i) only)
4. TAPE EJECT Switch
5. EASY.Q Button ➥page 35
6. Function Buttons
7. TFT LCD Screen
8. Internal Microphone
[ Caution ]
Be careful not to cover the internal microphone and lens during recording.
[ Notes ]
■
Illustrations of VP-D375W are used in this owner’s instructions.
■
Although the external appearances of VP-D371(i), VP-D371W(i), VP-D372WH(i),
VP-D375W(i) and VP-D975W(i) are different, they are both operated in the same way.
Button
<Player>
<Camera>
<M.Player> (VP-D375W(i)/D975W(i) only)
œœœœ
REW
REC SEARCH –
REV
√√√√
FF
REC SEARCH +
FWD
√√
❙❙
PLAY/STILL
FADE
S.SHOW (SLIDE SHOW)
■
STOP
C.NITE/LIGHT
(VP-D372WH(i)/D375W(i)/D975W(i) only)
MULTI (MULTI DISPLAY)
01227K VPD371 UK+GRE~022 2/3/07 9:55 AM Page 9

GREEK
ENGLISH
1010
Getting to Know Your Camcorder
Left Side View
!!
@@
##
$$
%%
^^
(VP-D375W(i)/D975W(i) only)
––··ÒÒÔÔııÛÛflfl··ÛÛÁÁ ÙÙÁÁÚÚ ‚‚ÈÈÌÌÙÙÂÂÔÔÍÍ‹‹ÏÏÂÂÒÒ··ÚÚ
¡¡ÒÒÈÈÛÛÙÙÂÂÒÒfifi ÎÎÂÂııÒÒ‹‹
11.. KKÔÔııÏÏflfl QQ..MMEENNUU
➥
ÛÛÂÂÎÎflfl‰‰·· 2200
22.. KKÔÔııÏÏflfl ((WW //TT))
[▲ / ▼]
33.. KKÔÔııÏÏflfl OOKK
44.. ””Í͸¸ÂÂııÙÙÒÒÔÔ
55.. ÃÄ„‹‹ˆˆ˘˘ÌÌÔÔ
66.. ƒƒÈÈ··Í͸¸ÙÙÁÁÚÚ ÙÙÒÒ¸¸ÔÔıı ÎÎÂÂÈÈÙÙÔÔııÒÒ„„flfl··ÚÚ ((CCAARRDD//TTAAPPEE))
((Ïϸ¸ÌÌÔÔ „„ÈÈ·· ÙÙ·· ÏÏÔÔÌÌÙÙ››Îη· VVPP--DD337755WW((ii))//DD997755WW((ii))))
[[ ””ÁÁÏÏÂÂflfl˘˘ÛÛÁÁ ]]
ºÙ·Ì ÍÎÂflÌÂÙ ÙÁÌ Ô˸ÌÁ LCD Ï ÙÁÌ ÂȈ‹ÌÂÈ· LCD ÛÙÒ·ÏÏ›ÌÁ ÒÔÚ Ù· ›Ó˘,
Á ÎÂÈÙÔıÒ„fl· ÙÔı ÍÔıÏÈÔ˝ [▲ / ▼] ·ÌÙÈÛÙÒ›ˆÂÙ·È.
MMEENNUU // QQ..MMEENNUU
<<PPllaayyeerr>> ((¡¡ÌÌ····ÒÒ··„„˘˘„„fifi))
<<CCaammeerraa>> ((KK‹‹ÏÏÂÂÒÒ··))
<<MM..CCaamm>>
((Ïϸ¸ÌÌÔÔ „„ÈÈ·· ÙÙ·· ÏÏÔÔÌÌÙÙ››Îη·
VVPP--DD337755WW((ii))//DD997755WW((ii))))
<<MM..PPllaayyeerr>>
((Ïϸ¸ÌÌÔÔ „„ÈÈ·· ÙÙ·· ÏÏÔÔÌÌÙÙ››Îη·
VVPP--DD337755WW((ii))//DD997755WW((ii))))
W (
……
)
KflÌÁÛÁ Â‹Ì˘
¡˝ÓÁÛÁ ›ÌÙ·ÛÁÚ
≈ıÒÂfl· / —˝ËÏÈÛÁ ÏÁ
·ıٸϷÙÁÚ ÂÛÙfl·ÛÁÚ
≈ıÒÂfl· / —˝ËÏÈÛÁ ÏÁ
·ıٸϷÙÁÚ ÂÛÙfl·ÛÁÚ
–ÒÔÁ„Ô˝ÏÂÌÔ
T (
††
)
KflÌÁÛÁ Í‹Ù˘
ÃÂfl˘ÛÁ ›ÌÙ·ÛÁÚ
‘ÁΈ·Í¸Ú / —˝ËÏÈÛÁ ÏÁ
·ıٸϷÙÁÚ ÂÛÙfl·ÛÁÚ
‘ÁΈ·Í¸Ú / —˝ËÏÈÛÁ ÏÁ
·ıٸϷÙÁÚ ÂÛÙfl·ÛÁÚ
≈¸ÏÂÌÔ
1. Q.MENU Button ➥page 20
2. [▲ / ▼] (W /T) Button
3. OK Button
4. Viewfinder
5. Speaker
6. Mode Switch (CARD/TAPE) (VP-D375W(i)/D975W(i) only)
[ Note ]
When you close LCD panel with the LCD screenfacing out, [▲ / ▼] button
function works reversely.
MENU / Q.MENU
<Player>
<Camera>
<M.Cam>
(VP-D375W(i)/D975W(i) only)
<M.Player>
(VP-D375W(i)/D975W(i) only)
W (
……
)
Move Up
Volume Up
Wide / Adjust MF
Wide / Adjust MF
Previous
T (
††
)
Move Down
Volume Down
Tele / Adjust MF
Tele / Adjust MF
Next
01227K VPD371 UK+GRE~022 2/3/07 9:55 AM Page 10

ENGLISH
GREEK
1111
Getting to Know Your Camcorder
Right & Top View
1. Zoom Lever
2. PHOTO Button ➥page 59
3. DISPLAY Button
4. MENU Button
5. Start/Stop Button
6. Power Switch
(CAMERA or PLAYER)
7. DC Jack
8. Jacks
9. Jack Cover
10. Cassette Door
11. Hand Strap
Jacks
$$
%%
^^
!!
@@
##
&&
((
))
**
11
IEEE1394
AV Jack
USB IEEE1394
AV Jack
VP-
D375W(i)/
D975W(i)
VP-D371(i)/
D371W(i)/
D372WH(i)
––··ÒÒÔÔııÛÛflfl··ÛÛÁÁ ÙÙÁÁÚÚ ‚‚ÈÈÌÌÙÙÂÂÔÔÍÍ‹‹ÏÏÂÂÒÒ··ÚÚ
ƒƒÂÂÓÓÈÈ‹‹ && ‹‹ÌÌ˘˘ ÎÎÂÂııÒÒ‹‹
11.. ÃÃÔÔ˜˜Îθ¸ÚÚ ÊÊÔÔııÏÏ
22.. KKÔÔııÏÏflfl PPHHOOTTOO
➥
ÛÛÂÂÎÎflfl‰‰·· 5599
33.. KKÔÔııÏÏflfl DDIISSPPLLAAYY ((œœË˸¸ÌÌÁÁ))
44.. KKÔÔııÏÏflfl MMEENNUU
55.. KKÔÔııÏÏflfl ››ÌÌ··ÒÒÓÓÁÁÚÚ//‰‰ÈÈ··ÍÍÔÔfifiÚÚ
66.. ƒƒÈÈ··Í͸¸ÙÙÁÁÚÚ ÎÎÂÂÈÈÙÙÔÔııÒÒ„„flfl··ÚÚ
((CCAAMMEERRAA fifi PPLLAAYYEERR))
77.. ’’ÔÔ‰‰ÔÔ˜˜fifi DDCC
88.. ’’ÔÔ‰‰ÔÔ˜˜››ÚÚ
99.. KK‹‹ÎÎııÏÏÏÏ·· ııÔÔ‰‰ÔÔ˜˜˛˛ÌÌ
1100.. »»˝˝ÒÒ·· ÍÍ··ÛÛ››ÙÙ··ÚÚ
1111.. ……ÏÏ‹‹ÌÌÙÙ··ÚÚ ˜˜ÂÂÒÒÈÈÔÔ˝˝
’’ÔÔ‰‰ÔÔ˜˜››ÚÚ
IEEE1394
’Ô‰Ô˜fi AV
USB
IEEE1394
’Ô‰Ô˜fi AV
VP-
D375W(i)/
D975W(i)
VP-D371(i)/
D371W(i)/
D372WH(i)
01227K VPD371 UK+GRE~022 2/3/07 9:55 AM Page 11

GREEK
ENGLISH
1212
Getting to Know Your Camcorder
Rear & Bottom View
1. Lithium Battery Cover
2. Charging Indicator
3. Memory Card Slot (VP-D375W(i)/D975W(i) only)
4. Tripod Receptacle
5. Battery Release Switch
Usable Memory Cards
$$
##
!!
%%
@@
(VP-D375W(i)/D975W(i) only)
VP-D375W(i)/D975W(i) only
MMC/SD
––··ÒÒÔÔııÛÛflfl··ÛÛÁÁ ÙÙÁÁÚÚ ‚‚ÈÈÌÌÙÙÂÂÔÔÍÍ‹‹ÏÏÂÂÒÒ··ÚÚ
––flflÛÛ˘˘ ÍÍ··ÈÈ ÍÍ‹‹ÙÙ˘˘ ÎÎÂÂııÒÒ‹‹
11.. KK‹‹ÎÎııÏÏÏÏ·· ÏÏ··ÙÙ··ÒÒflfl··ÚÚ ÎÎÈÈËËflflÔÔıı
22.. ∏∏Ì̉‰ÂÂÈÈÓÓÁÁ ˆˆ¸¸ÒÒÙÙÈÈÛÛÁÁÚÚ
33.. ’’ÔÔ‰‰ÔÔ˜˜fifi ÍÍ‹‹ÒÒÙÙ··ÚÚ ÏÏÌÌfifiÏÏÁÁÚÚ
((Ïϸ¸ÌÌÔÔ „„ÈÈ·· ÙÙ·· ÏÏÔÔÌÌÙÙ››Îη· VVPP--DD337755WW((ii))//DD997755WW((ii))))
44.. ’’ÔÔ‰‰ÔÔ˜˜fifi „„ÈÈ·· ÙÙÒÒflflÔÔ‰‰ÔÔ
55.. ÃÃÔÔ˜˜Îθ¸ÚÚ ÂÂÓÓ··„„˘˘„„fifiÚÚ ÏÏ··ÙÙ··ÒÒflfl··ÚÚ
◊◊ÒÒÁÁÛÛÈÈÏÏÔÔÔÔÈÈfifiÛÛÈÈÏÏÁÁ ÍÍ‹‹ÒÒÙÙ·· ÏÏÌÌfifiÏÏÁÁÚÚ
Ïϸ¸ÌÌÔÔ „„ÈÈ·· ÙÙ·· ÏÏÔÔÌÌÙÙ››Îη· VVPP--DD337755WW((ii))//DD997755WW((ii))
MMC/SD
01227K VPD371 UK+GRE~022 2/3/07 9:55 AM Page 12

ENGLISH
GREEK
1313
Getting to Know Your Camcorder
Remote Control (VP-D375W(i)/D975W(i) only)
1. PHOTO Button ➥page 59
2. START/STOP Button
3. SELF TIMER Button
➥page 38
4. ZERO MEMORY Button
➥page 37
5. PHOTO SEARCH Button
6. A.DUB Button ➥page 63
7.
√√√√
(FF) Button
8.
œœœœ
(REW) Button
9.
√√
(PLAY) Button
10.
œœ
❙❙ / ❙❙
√√
(Direction) Button
➥page 61
11. F. ADV Button ➥page 62
12. ■ (STOP) Button
13. ❙❙ (STILL) Button
14. SLOW (❙
√√
) Button
15. DATE/TIME Button
16. X2 Button ➥page 62
17. W/T (Zoom) Button
18. DISPLAY Button
!!
@@
##
$$
%%
^^
&&
((
))
88
77
66
55
44
33
11
22
**
––··ÒÒÔÔııÛÛflfl··ÛÛÁÁ ÙÙÁÁÚÚ ‚‚ÈÈÌÌÙÙÂÂÔÔÍÍ‹‹ÏÏÂÂÒÒ··ÚÚ
‘‘ÁÁÎΘ˜ÂÂÈÈÒÒÈÈÛÛÙÙfifiÒÒÈÈÔÔ ((Ïϸ¸ÌÌÔÔ „„ÈÈ·· ÙÙ·· ÏÏÔÔÌÌÙÙ››Îη· VVPP--DD337755WW((ii))//DD997755WW((ii))))
11.. KKÔÔııÏÏflfl PPHHOOTTOO
((÷÷˘˘ÙÙÔÔ„„ÒÒ··ˆˆflfl··))
➥
ÛÛÂÂÎÎflfl‰‰·· 5599
22.. KKÔÔııÏÏflfl SSTTAARRTT//SSTTOOPP
33.. KKÔÔııÏÏflfl SSEELLFF TTIIMMEERR
➥
ÛÛÂÂÎÎflfl‰‰·· 3388
44.. KKÔÔııÏÏflfl ZZEERROO MMEEMMOORRYY
➥
ÛÛÂÂÎÎflfl‰‰·· 3377
55.. KKÔÔııÏÏflfl PPHHOOTTOO SSEEAARRCCHH
66.. KKÔÔııÏÏflfl AA..DDUUBB
➥
ÛÛÂÂÎÎflfl‰‰·· 6633
77.. KKÔÔııÏÏflfl ((FFFF)) √√√√
88.. KKÔÔııÏÏflfl ((RREEWW)) œœœœ
99.. KKÔÔııÏÏflfl ((PPLLAAYY)) √√
1100.. KKÔÔııÏÏflfl œœ
❙❙ / ❙❙
√√
➥
ÛÛÂÂÎÎflfl‰‰·· 6611
1111.. KKÔÔııÏÏflfl FF.. AADDVV
➥
ÛÛÂÂÎÎflfl‰‰·· 6622
1122.. KKÔÔııÏÏflfl ((SSTTOOPP))
■
((ƒƒÈÈ··ÍÍÔÔfifi))
1133.. KKÔÔııÏÏflfl ((SSTTIILLLL))
❙❙
((––‹‹„„˘˘ÏÏ··
ÂÂÈÈÍ͸¸ÌÌ··ÚÚ))
1144.. KKÔÔııÏÏflfl SSLLOOWW ((
❙
√√ ))
1155.. KKÔÔııÏÏflfl DDAATTEE//TTIIMMEE
1166.. KKÔÔııÏÏflfl XX22
➥
ÛÛÂÂÎÎflfl‰‰·· 6622
1177.. KKÔÔııÏÏflfl WW//TT ((∆∆ÔÔııÏÏ))
1188.. KKÔÔııÏÏflfl DDIISSPPLLAAYY
01227K VPD371 UK+GRE~022 2/3/07 9:55 AM Page 13

It is very important to ensure that the Hand Strap has been correctly
adjusted before you begin your recording.
The Hand Strap enables you to:
- Hold the Camcorder in a stable, comfortable position.
- Press the [Zoom] and [Start/Stop] button without having to change
the position of your hand.
Hand Strap
Adjusting the Hand
Strap
1. Insert the Hand Strap into the
Hand Strap Hook on the front
side of the Camcorder and pull its end through
the hook.
2. Insert your hand into the Hand Strap and
adjust its length for your convenience.
3. Close the Hand Strap.
Lens Cover
Attaching the Lens Cover
1. Hook up the Lens Cover with the Lens Cover
Strap as illustrated.
2. Hook up the Lens Cover Strap to the Hand
Strap, and adjust it following the steps as
described for the Hand Strap.
3. Close the Hand Strap.
Installing the Lens Cover after
Operation
Press buttons on both sides of the Lens Cover, then
attach it to the Camcorder Lens.
GREEK
ENGLISH
1414
Preparation
Using the Hand Strap & Lens Cover
≈flÌ·È Ôν ÛÁÏ·ÌÙÈ͸ Ì· ÒıËÏflÛÂÙÂ Û˘ÛÙ‹ ÙÔÌ ÈÏ‹ÌÙ· ˜ÂÒÈÔ˝ ÒÈÌ
·Ò˜flÛÂÙ ÙÁÌ Â„„Ò·ˆfi.
œ ÈÏ‹ÌÙ·Ú ˜ÂÒÈÔ˝ Û‹Ú ÂÈÙÒ›ÂÈ:
- Õ· Íҷً٠ÙÁ ‚ÈÌÙÂÔÍ‹ÏÂÒ· Û ÛÙ·ËÂÒfi Í·È ‹ÌÂÙÁ Ë›ÛÁ.
- Õ· ·Ù‹Ù ÙÔ ÍÔıÏfl [Zoom] (∆ÔıÏ) Í·È [Start/Stop] (∏Ì·ÒÓÁ/
ƒÈ·ÍÔfi) ˜˘ÒflÚ Ì· ˜ÒÂÈ‹ÊÂÙ·È Ì· ·Î΋ÊÂÙ ÙÁ Ë›ÛÁ ÙÔı ˜ÂÒÈÔ˝
Û·Ú.
……ÏÏ‹‹ÌÌÙÙ··ÚÚ ˜˜ÂÂÒÒÈÈÔÔ˝˝
——˝˝ËËÏÏÈÈÛÛÁÁ ÙÙÔÔıı ÈÈÏÏ‹‹ÌÌÙÙ·· ˜˜ÂÂÒÒÈÈÔÔ˝˝
1. ≈ÈÛ·„‹„ÂÙ ÙÔÌ ÈÏ‹ÌÙ·
˜ÂÒÈÔ˝ ÛÙÔ Û˜ÂÙÈ͸
‹„ÍÈÛÙÒÔ Ôı ‚ÒflÛÍÂÙ·È
ÛÙÔ ÏÒÔÛÙÈ̸ Ï›ÒÔÚ ÙÁÚ
‚ÈÌÙÂÔÍ‹ÏÂÒ·Ú Í·È
ÙÒ·‚fiÓÙÂ ÙÔÌ.
2. –ÂÒ‹ÛÙ ÙÔ ˜›ÒÈ Û·Ú ÛÙÔÌ ÈÏ‹ÌÙ· ˜ÂÒÈÔ˝ Í·È
ÒıËÏflÛÙ ÙÔ ÏfiÍÔÚ ÙÔı ¸˘Ú Û·Ú ‚ÔνÂÈ.
3. KÎÂflÛÙ ÙÔÌ ÈÏ‹ÌÙ· ˜ÂÒÈÔ˝.
KK‹‹ÎÎııÏÏÏÏ·· ˆˆ··ÍÍÔÔ˝˝
‘‘ÔÔÔÔËË››ÙÙÁÁÛÛÁÁ ÙÙÔÔıı ÍÍ··Îν˝ÏÏÏÏ··ÙÙÔÔÚÚ ÙÙÔÔıı ˆˆ··ÍÍÔÔ˝˝
1. ”ı̉›ÛÙ ÙÔ Í‹ÎıÏÏ· ÙÔı ˆ·ÍÔ˝ ÛÙÔÌ
ÈÏ‹ÌÙ· ͷνÏÏ·ÙÔÚ ˆ·ÍÔ˝ ¸˘Ú ˆ·flÌÂÙ·È
ÛÙÁÌ ÂÈ͸̷.
2. ”ı̉›ÛÙ ÙÔÌ ÈÏ‹ÌÙ· ÙÔı ͷνÏÏ·ÙÔÚ ÙÔı
ˆ·ÍÔ˝ ÛÙÔÌ ÈÏ‹ÌÙ· ˜ÂÒÈÔ˝ Í·È
ÒÔÛ·ÒϸÛÙ ÙÔÌ ·ÍÔÎÔı˲ÌÙ·Ú Ù·
‚fiÏ·Ù· Ôı ÂÒÈ„Ò‹ˆÔÌÙ·È ÛÙÁÌ Â̸ÙÁÙ·
„È· ÙÔÌ ÈÏ‹ÌÙ· ˜ÂÒÈÔ˝.
3. KÎÂflÛÙ ÙÔÌ ÈÏ‹ÌÙ· ˜ÂÒÈÔ˝.
‘‘ÔÔÔÔËË››ÙÙÁÁÛÛÁÁ ÙÙÔÔıı ÍÍ··Îν˝ÏÏÏÏ··ÙÙÔÔÚÚ ˆˆ··ÍÍÔÔ˝˝
ÏÏÂÂÙÙ‹‹ ÙÙÁÁ ÎÎÂÂÈÈÙÙÔÔııÒÒ„„flfl··
–È›ÛÙ ٷ ÍÔıÏÈ‹ Ôı ‚ÒflÛÍÔÌÙ·È
ÂÍ·Ù›Ò˘ËÂÌ ÙÔı ͷνÏÏ·ÙÔÚ ÙÔı ˆ·ÍÔ˝ Í·È,
ÛÙÁ ÛıÌ›˜ÂÈ·, ÂÈÛ·„‹„ÂÙ ÙÔ Í‹ÎıÏÏ· ÛÙÔÌ
ˆ·Í¸ ÙÁÚ ‚ÈÌÙÂÔÍ‹ÏÂÒ·Ú.
––ÒÒÔÔÂÂÙÙÔÔÈÈÏÏ··ÛÛflfl··
◊◊ÒÒfifiÛÛÁÁ ÙÙÔÔıı ÈÈÏÏ‹‹ÌÌÙÙ·· ˜˜ÂÂÒÒÈÈÔÔ˝˝ ÍÍ··ÈÈ ÙÙÔÔıı ÍÍ··Îν˝ÏÏÏÏ··ÙÙÔÔÚÚ ˆˆ··ÍÍÔÔ˝˝
1 2 3
1 2
2 3
01227K VPD371 UK+GRE~022 2/3/07 9:55 AM Page 14
Sayfa yükleniyor...
Sayfa yükleniyor...
Sayfa yükleniyor...
Sayfa yükleniyor...

✤ There are two types of power source that can be connected to your
Camcorder.
- The AC Power Adapter: used for indoor recording.
- The Battery Pack: used for outdoor recording.
Using a Household Power Source
Connect to a household power source to use the
Camcorder without having to worry about the
battery power. You can keep the Battery Pack
attached; the battery power will not be consumed.
1. Turn the [Power] switch to [OFF].
2. Connect the AC Power adapter (AA-E9 TYPE)
to a wall socket.
■
The plug and wall socket type may differ
according to your resident country.
3. Connect the DC cable to the DC jack of the
Camcorder.
4. Set the Camcorder to each mode by holding down the tab on the [Power]
switch and turning it to the [CAMERA] or [PLAYER] mode.
✤ The operating modes are determined by the position of the [Power] switch
and the [Mode] switch.
✤ Set the Operation Mode by adjusting [Power] switch and [Mode] switch
before operating any functions.
✤ M.Cam Mode : Memory Camera Mode / M.Player Mode : Memory Player
Mode
✤ The <M.Cam Mode> and the <M.Player Mode> are only enabled on
VP-D375W(i)/D975W(i).
ENGLISH
GREEK
1919
About the Operating Modes
Preparation
Connecting a Power Source
<Camera Mode>
<M.Cam Mode>
<Player Mode>
<M.Player
Mode>
Mode Name
[Power] Switch
[Mode] Switch
(VP-D375W(i)/
D975W(i) only)
✤ ’‹Ò˜ÔıÌ ‰˝Ô Ù˝ÔÈ Á„˛Ì ÒÂ˝Ï·ÙÔÚ Ôı ÏÔÒÔ˝Ì Ì· Ûı̉ÂËÔ˝Ì Ï ÙÁ
‚ÈÌÙÂÔÍ‹ÏÂÒ‹ Û·Ú.
- ‘Ô ÙÒÔˆÔ‰ÔÙÈ͸ : „È· „„Ò·ˆfi Û ÂÛ˘ÙÂÒÈÍÔ˝Ú ˜˛ÒÔıÚ.
- « Ï·Ù·Òfl· : „È· ˜ÒfiÛÁ Û ÂÓ˘ÙÂÒÈÍÔ˝Ú ˜˛ÒÔıÚ.
◊◊ÒÒfifiÛÛÁÁ ÔÔÈÈÍÍÈÈ··ÍÍfifiÚÚ ÁÁ„„fifiÚÚ ÒÒ½˝ÏÏ··ÙÙÔÔÚÚ
”ı̉›ÛÙ ÙÁ ‚ÈÌÙÂÔÍ‹ÏÂÒ· Û ÏÈ· ÔÈÍÈ·Ífi Á„fi
ÒÂ˝Ï·ÙÔÚ ˛ÛÙ ̷ ÙÁ ˜ÒÁÛÈÏÔÔÈÂflÙ ˜˘ÒflÚ Ì·
·ÌÁÛı˜ÂflÙ „È· ÙÁÌ ÈÛ˜˝ ÙÁÚ Ï·Ù·Òfl·Ú. ÃÔÒÂflÙ ̷
‰È·ÙÁÒfiÛÂÙ ÙÁÌ Ï·Ù·Òfl· ÂÌÙ¸Ú ÙÁÚ ‚ÈÌÙÂÔÍ‹ÏÂÒ·Ú,
˜˘ÒflÚ Ì· ÂÓ·ÌÙÎÁËÂfl Á ÈÛ˜˝Ú ÙÁÚ.
1. ”ÙÒ›¯Ù ÙÔÌ ‰È·Í¸ÙÁ
[[PPoowweerr]]
ÛÙÁ Ë›ÛÁ
[[OOFFFF]]
.
2. ”ı̉›ÛÙ ÙÔ Í·Î˛‰ÈÔ ÒÂ˝Ï·ÙÔÚ (Ù˝Ôı AA-
E9).ÛÙÁÌ ÒflÊ·.
■
œ Ù˝ÔÚ ˆÈÚ Í·È ÒflÊ·Ú ÔÈÍflÎÎÔıÌ ·Ì‹ÎÔ„· ÏÂ
ÙÁ ˜˛Ò· ÛÙÁÌ ÔÔfl· ‚ÒflÛÍÂÛÙÂ.
3. ”ı̉›ÛÙ ÙÔ Í·Î˛‰ÈÔ DC ÛÙÁÌ ıÔ‰Ô˜fi DC ÙÁÚ
‚ÈÌÙÂÔÍ‹ÏÂÒ·Ú.
4. √È· Ì· ÂÌÂÒ„ÔÔÈfiÛÂÙ ›Ì·Ì ÙÒ¸Ô ÎÂÈÙÔıÒ„fl·Ú ÛÙÁ ‚ÈÌÙÂÔÍ‹ÏÂÒ·,
ÍÒ·ÙfiÛÙ ·ÙÁÏ›ÌÁ ÙÁ „΢ÙÙfl‰· ÙÔı ‰È·Í¸ÙÁ
[[PPoowweerr]]
Í·È Í·Ù¸ÈÌ
„ıÒflÛÙ ÙÔÌ ‰È·Í¸ÙÁ ÛÙÔÌ ÙÒ¸Ô ÎÂÈÙÔıÒ„fl·Ú
[[CCAAMMEERRAA]]
fi
[[PPLLAAYYEERR]]
.
✤ œÈ ÙÒ¸ÔÈ ÎÂÈÙÔıÒ„fl·Ú Í·ËÔÒflÊÔÌÙ·È ·¸ ÙÁ Ë›ÛÁ ÙÔı ‰È·Í¸ÙÁ
[[PPoowweerr]]
Í·È
ÙÔı ‰È·Í¸ÙÁ
[[MMooddee]]
.
✤ ≈ÌÂÒ„ÔÔÈfiÛÙ ÙÔÌ ÙÒ¸Ô ÎÂÈÙÔıÒ„fl·Ú Ôı Ë›ÎÂÙ ÒıËÏflÊÔÌÙ·Ú ÙÔıÚ
‰È·Í¸ÙÂÚ
[[PPoowweerr]]
Í·È
[[MMooddee]]
ÒÈÌ Ì· ˜ÒÁÛÈÏÔÔÈfiÛÂÙ ÔÔÈ·‰fiÔÙÂ
ÎÂÈÙÔıÒ„fl·.
✤ ‘Ò¸ÔÚ ÎÂÈÙÔıÒ„fl·Ú M.Cam: ‘Ò¸ÔÚ ÎÂÈÙÔıÒ„fl·Ú Memory Camera / ÙÒ¸ÔÚ
ÎÂÈÙÔıÒ„fl·Ú M.Player : ‘Ò¸ÔÚ ÎÂÈÙÔıÒ„fl·Ú Memory Player
✤ œÈ ÙÒ¸ÔÈ ÎÂÈÙÔıÒ„fl·Ú <M.Cam> Í·È <M.Player> ÂÌÂÒ„ÔÔÈÔ˝ÌÙ·È Ï¸ÌÔÌ
ÛÙ· ÏÔÌٛη VP-D375W(i)/D975W(i).
––ÎÎÁÁÒÒÔÔˆˆÔÔÒÒflflÂÂÚÚ „„ÈÈ·· ÙÙÔÔııÚÚ ÙÙÒÒ¸¸ÔÔııÚÚ ÎÎÂÂÈÈÙÙÔÔııÒÒ„„flfl··ÚÚ
––ÒÒÔÔÂÂÙÙÔÔÈÈÏÏ··ÛÛflfl··
””˝˝Ì̉‰ÂÂÛÛÁÁ ÁÁ„„fifiÚÚ ÒÒ½˝ÏÏ··ÙÙÔÔÚÚ
<<CCaammeerraa MMooddee>>
<<MM..CCaamm MMooddee>>
<<PPllaayyeerr MMooddee>>
<<MM..PPllaayyeerr MMooddee>>
ººÌÌÔÔÏÏ·· ÙÙÒÒ¸¸ÔÔıı
ÎÎÂÂÈÈÙÙÔÔııÒÒ„„flfl··ÚÚ
ƒƒÈÈ··Í͸¸ÙÙÁÁÚÚ [[PPoowweerr]]
ƒƒÈÈ··Í͸¸ÙÙÁÁÚÚ [[MMooddee]]
((Ïϸ¸ÌÌÔÔ „„ÈÈ·· ÙÙ··
ÏÏÔÔÌÌÙÙ››Îη· VVPP--
DD337755WW((ii))//DD997755WW((ii))))
Power Switch
01227K VPD371 UK+GRE~022 2/3/07 9:55 AM Page 19
Sayfa yükleniyor...
Sayfa yükleniyor...
Sayfa yükleniyor...

ENGLISH
GREEK
2323
✤ Clock setup works in <Camera>/<Player>/<M.Cam>/
<M.Player> modes. ➥page 19
✤ The Date/Time is automatically recorded onto a tape. Before
recording, please set the <Date/Time>. ➥page 30
1. Set the [Power] switch to [CAMERA] or [PLAYER].
2. Set the [Mode] switch to [TAPE] or [CARD].
(VP-D375W(i)/D975W(i) only)
3. Press the [MENU] button.
■
The menu list will appear.
4. Press the [▲ / ▼] button to select <System>, then
press the [OK] button.
5. Press the [▲ / ▼] button to select <Clock Set>, then
press the [OK] button.
■
The year will be highlighted first.
6. Press the [▲ / ▼] button to set current <Year>, then press
the [OK] button.
■
The month will be highlighted.
7. You can set the month, day, hour and minute following the
same procedure after setting the year.
8. Press the [OK] button after setting the minutes.
■
A message <Complete !> is displayed.
■
To adjust the clock, select the Year, Month, Day, Hour or
Min by pressing the [OK] button, then press the [▲ / ▼]
button to set respective values.
9. To exit, press the [MENU] button.
[ Notes ]
■
After the Lithium Battery loses its charge (after about 6
months), the date/time appears on the screen as <00:00
1.JAN.2007>.
■
You can set the year up to 2037.
■
If the Lithium Battery is not installed, any inputted data will
not be backed up.
Displays in this manual
- OSD illustrations of VP-D375W are used in this manual.
- Some of the OSD in this manual may differ slightly from the
actual items of your camcorder.
Initial Setting : System Menu Setting
Setting the Clock (Clock Set)
✤ « Ò˝ËÏÈÛÁ ÙÔı ÒÔÎÔ„ÈÔ˝ ÂflÌ·È ‰È·Ë›ÛÈÏÁ ÛÙÔıÚ ÙÒ¸ÔıÚ
ÎÂÈÙÔıÒ„fl·Ú
<<CCaammeerraa>>//<<PPllaayyeerr>>//<<MM..CCaamm>>//<<MM..PPllaayyeerr>>
.
➥ÛÂÎfl‰· 19
✤ « ›Ì‰ÂÈÓÁ ÁÏÂÒÔÏÁÌfl·Ú/˛Ò·Ú Í·Ù·„Ò‹ˆÂÙ·È ·ıٸϷٷ Û ÏÈ·
ÂÒÈÔ˜fi ‰Â‰ÔÏ›Ì˘Ì ÙÁÚ Í·Û›Ù·Ú. –ÒÈÌ ÙÁÌ Â„„Ò·ˆfi,
ÂÌÂÒ„ÔÔÈfiÛÙÂ ÙÁ ÎÂÈÙÔıÒ„fl·
<<DDaattee//TTiimmee>> ((««ÏÏÂÂÒÒÔÔÏÏÁÁÌÌflfl··//˛˛ÒÒ··))
.
➥ÛÂÎfl‰· 30
1. ”ÙÒ›¯Ù ÙÔÌ ‰È·Í¸ÙÁ
[[PPoowweerr]]
ÛÙÁ Ë›ÛÁ
[[CCAAMMEERRAA]]
fi
[[PPLLAAYYEERR]]
.
2. ”ÙÒ›¯Ù ÙÔÌ ‰È·Í¸ÙÁ
[[MMooddee]]
ÛÙÁ Ë›ÛÁ
[[TTAAPPEE]]
fi
[[CCAARRDD]]
.
(ϸÌÔ „È· Ù· ÏÔÌٛη VP-D375W(i)/D975W(i))
3. –·ÙfiÛÙÂ ÙÔ ÍÔıÏfl
[[MMEENNUU]]
.
■
≈ψ·ÌflÊÂÙ·È Á ÎflÛÙ· ÙÔı ÏÂÌÔ˝.
4. –·ÙfiÛÙ ÙÔ ÍÔıÏfl [▲ / ▼] „È· Ì· ÂÈΛÓÂÙÂ
<<SSyysstteemm>>
((””˝˝ÛÛÙÙÁÁÏÏ··))
Í·È, ÛÙÁ ÛıÌ›˜ÂÈ·, ·ÙfiÛÙ ÙÔ ÍÔıÏfl
[[OOKK]]
.
5. –·ÙfiÛÙ ÙÔ ÍÔıÏfl [▲ / ▼] „È· Ì· ÂÈΛÓÂÙÂ
<<CClloocckk SSeett>> ((——
˝˝ËËÏÏÈÈÛÛÁÁ ÒÒÔÔÎÎÔÔ„„ÈÈÔÔ˝˝))
Í·È, ÛÙÁ ÛıÌ›˜ÂÈ·, ·ÙfiÛÙ ÙÔ ÍÔıÏfl
[[OOKK]]
.
■
–Ò˛Ù· ÂÈÛÁÏ·flÌÂÙ·È ÙÔ ›ÙÔÚ.
6. –·ÙfiÛÙ ÙÔ ÍÔıÏfl [▲ / ▼] „È· Ì· ÂÈΛÓÂÙ ÙÔ ÙÒ›˜ÔÌ
<<YYeeaarr>>
((∏∏ÙÙÔÔÚÚ))
Í·È, ÛÙÁ ÛıÌ›˜ÂÈ·, ·ÙfiÛÙ ÙÔ ÍÔıÏfl
[[OOKK]]
.
■
”ÙÁ ÛıÌ›˜ÂÈ·, ÂÈÛÁÏ·flÌÂÙ·È Ô ÏfiÌ·Ú.
7. ÃÔÒÂflÙ ̷ ÒıËÏflÛÂÙ ÙÔÌ ÏfiÌ·, ÙÁÌ Áϛҷ, ÙÈÚ ˛ÒÂÚ Í·È Ù·
ÎÂÙ‹ ·ÍÔÎÔı˲ÌÙ·Ú ÙÁÌ fl‰È· ‰È·‰ÈÍ·Ûfl· Ï ÂÍÂflÌÁ Ôı „È· ÙÁ
Ò˝ËÏÈÛÁ ÙÔı ›ÙÔıÚ.
8. —ıËÏflÛÙÂ Ù· ÎÂÙ‹ Í·È ·ÙfiÛÙÂ ÙÔ ÍÔıÏfl
[[OOKK]]
.
■
≈ψ·ÌflÊÂÙ·È ÙÔ ÏfiÌıÏ·
<<CCoommpplleettee !!>> ((œœÎÎÔÔÍÍÎÎÁÁÒÒ˛˛ËËÁÁÍÍÂÂ))
.
■
√È· Ì· ÒıËÏflÛÂÙ ÙÔ ÒÔθÈ, ÂÈΛÓÙ ÙÔ ›ÙÔÚ, ÙÔ ÏfiÌ·, ÙÁÌ
Áϛҷ, ÙÁÌ ˛Ò· fi Ù· ÎÂÙ‹ ·Ù˛ÌÙ·Ú ÙÔ ÍÔıÏfl
[[OOKK]]
Í·È,
ÛÙÁ ÛıÌ›˜ÂÈ·, ·ÙfiÛÙ ÙÔ ÍÔıÏfl [▲ / ▼] „È· Ì· ÒıËÏflÛÂÙÂ
ÙÈÚ ·ÌÙflÛÙÔȘÂÚ ÙÈÏ›Ú.
9. √È· Ì· ÂÓ›ÎËÂÙÂ, ·ÙfiÛÙ ÙÔ ÍÔıÏfl
[[MMEENNUU]]
.
[[ ””ÁÁÏÏÂÂÈÈ˛˛ÛÛÂÂÈÈÚÚ ]]
■
ÃÂÙ‹ ÙÁÌ ·Ôˆ¸ÒÙÈÛÁ ÙÁÚ Ï·Ù·Òfl·Ú ÎÈËflÔı (˝ÛÙÂÒ· ·¸
ÂÒflÔı 6 ÏfiÌÂÚ), Á ÁÏÂÒÔÏÁÌfl·/˛Ò· Âψ·ÌflÊÂÙ·È ÛÙÁÌ Ô˸ÌÁ
˘Ú ÂÓfiÚ
<<0000::0000 11..JJAANN..22000077>>
.
■
ÃÔÒÂflÙ ̷ ÒıËÏflÛÂÙ ÙÔ ›ÙÔÚ ›˘Ú ÙÔ 2037.
■
≈‹Ì Á Ï·Ù·Òfl· ÎÈËflÔı ‰ÂÌ ÂflÌ·È ÙÔÔËÂÙÁÏ›ÌÁ ÛÙÁ
‚ÈÌÙÂÔÍ‹ÏÂÒ·, Ù· ‰Â‰Ôϛ̷ Ôı ÂÈÛ‹„ÔÌÙ·È ‰ÂÌ ˆı΋ÛÛÔÌÙ·È
ÛÙÁ ÏÌfiÏÁ ¸Ù·Ì Á ‚ÈÌÙÂÔÍ‹ÏÂÒ· ÙÂËÂfl ÂÍÙ¸Ú ÎÂÈÙÔıÒ„fl·Ú.
≈≈ÈÈÍ͸¸ÌÌÂÂÚÚ ÙÙÔÔıı „„˜˜ÂÂÈÈÒÒÈȉ‰flflÔÔıı ··ııÙÙÔÔ˝˝
- œÈ ÂÈ͸ÌÂÚ Ù˘Ì ẨÂflÓÂ˘Ì Âfl ÙÁÚ Ô˸ÌÁÚ Ôı Âψ·ÌflÊÔÌÙ·È
Û ·ıÙ¸ ÙÔ Â„˜ÂÈÒfl‰ÈÔ, ÂflÌ·È ÙÔı ÏÔÌÙ›ÎÔı VP-D375W.
- œÒÈÛÏ›ÌÂÚ ẨÂflÓÂÈÚ Âfl ÙÁÚ Ô˸ÌÁÚ Ôı ·Ì·ˆ›ÒÔÌÙ·È ÛÂ
·ıÙ¸ ÙÔ Â„˜ÂÈÒfl‰ÈÔ, Ẩ›˜ÂÙ·È Ì· ‰È·ˆ›ÒÔıÌ Â΋˜ÈÛÙ· ÛÂ
Û˜›ÛÁ Ï ÙÈÚ ·ÌÙflÛÙÔȘÂÚ ẨÂflÓÂÈÚ Ôı ı‹Ò˜ÔıÌ ÛÙÁ
‚ÈÌÙÂÔÍ‹ÏÂÒ‹ Û·Ú.
¡¡ÒÒ˜˜ÈÈÍÍfifi ÒÒ˝˝ËËÏÏÈÈÛÛÁÁ::
——ııËËÏÏflflÛÛÂÂÈÈÚÚ ÏÏÂÂÌÌÔÔ˝˝ ÛÛııÛÛÙÙfifiÏÏ··ÙÙÔÔÚÚ
——˝˝ËËÏÏÈÈÛÛÁÁ ÙÙÔÔıı ÒÒÔÔÎÎÔÔ„„ÈÈÔÔ˝˝ ((CClloocckk SSeett))
Camera Mode
Back
Clock Set
Remote
Beep Sound
Shutter Sound
Language
Demonstration
Set Time
Camera Mode
Back
Clock Set
Remote
Beep Sound
Shutter Sound
Language
Demonstration
1 JAN 2007
00 : 00
Complete !
Camera Mode
√System
Clock Set
Remote
Beep Sound
Shutter Sound
Language
Demonstration
√On
√On
√On
√English
√On
4
5
8
Move Select Exit
MENUOK
Move Select Exit
MENUOK
Move Select Exit
MENUOK
Camera Mode
Back
Clock Set
Remote
Beep Sound
Shutter Sound
Language
Demonstration
1 JAN 2007
00 : 00
…
†
Adjust Select Exit
MENUOK
6
01227K VPD371 UK+GRE~042 2/3/07 9:58 AM Page 23

ENGLISH
GREEK
2424
✤ The Remote function works in <Camera>/<Player>/<M.Cam>/
<M.Player> modes. ➥page 19
✤ The Remote function allows you to enable or disable the remote
control for use with the Camcorder.
1. Set the [Power] switch to [CAMERA] or [PLAYER].
2. Set the [Mode] switch to [TAPE] or [CARD].
3. Press the [MENU] button.
■
The menu list will appear.
4. Press the [▲ / ▼] button to select <System>, then
press the [OK] button.
5. Press the [▲ / ▼] button to select <Remote>, then
press the [OK] button.
6. Press the [▲ / ▼] button to select <On> or <Off>,
then press the [OK] button.
7. To exit, press the [MENU] button.
[ Note ]
If you set the <Remote> to <Off> in the menu and try
to use it, the remote control icon ( ) will blink for 3
seconds on the LCD Screen and then disappear.
Initial Setting : System Menu Setting
Setting the Wireless Remote Control Acceptance (Remote)
(VP-D375W(i)/D975W(i) only)
✤ « ÎÂÈÙÔıÒ„fl· Remote ÂflÌ·È ‰È·Ë›ÛÈÏÁ ÛÙÔıÚ ÙÒ¸ÔıÚ ÎÂÈÙÔıÒ„fl·Ú
<<CCaammeerraa>>//<<PPllaayyeerr>>//<<MM..CCaamm>>//<<MM..PPllaayyeerr>>
. ➥ÛÂÎfl‰· 19
✤ « ÎÂÈÙÔıÒ„fl· Remote Û‹Ú ÂÈÙÒ›ÂÈ Ì· Ë›ÙÂÙ ÙÔ ÙÁΘÂÈÒÈÛÙfiÒÈÔ
ÂÌÙ¸Ú fi ÂÍÙ¸Ú ÎÂÈÙÔıÒ„fl·Ú „È· ˜ÒfiÛÁ ÏÂ ÙÁ ‚ÈÌÙÂÔÍ‹ÏÂÒ·.
1. ”ÙÒ›¯Ù ÙÔÌ ‰È·Í¸ÙÁ
[[PPoowweerr]]
ÛÙÁ Ë›ÛÁ
[[CCAAMMEERRAA]]
fi
[[PPLLAAYYEERR]]
.
2. ”ÙÒ›¯Ù ÙÔÌ ‰È·Í¸ÙÁ
[[MMooddee]]
ÛÙÁ Ë›ÛÁ
[[TTAAPPEE]]
fi
[[CCAARRDD]]
.
3. –·ÙfiÛÙÂ ÙÔ ÍÔıÏfl
[[MMEENNUU]]
.
■
≈ψ·ÌflÊÂÙ·È Á ÎflÛÙ· ÙÔı ÏÂÌÔ˝.
4. –·ÙfiÛÙ ÙÔ ÍÔıÏfl [▲ / ▼] „È· Ì· ÂÈΛÓÂÙÂ
<<SSyysstteemm>> ((””˝˝ÛÛÙÙÁÁÏÏ··))
Í·È, ÛÙÁ ÛıÌ›˜ÂÈ·, ·ÙfiÛÙÂ
ÙÔ ÍÔıÏfl
[[OOKK]]
.
5. –·ÙfiÛÙ ÙÔ ÍÔıÏfl [▲ / ▼] „È· Ì· ÂÈΛÓÂÙÂ
<<RReemmoottee>> ((‘‘ÁÁÎΘ˜ÂÂÈÈÒÒÈÈÛÛÙÙfifiÒÒÈÈÔÔ))
Í·È, ÛÙÁ ÛıÌ›˜ÂÈ·,
·ÙfiÛÙÂ ÙÔ ÍÔıÏfl
[[OOKK]]
.
6. –·ÙfiÛÙ ÙÔ ÍÔıÏfl [▲ / ▼] „È· Ì· ÂÈΛÓÂÙÂ
<<OOnn>>
fi
<<OOffff>>
Í·È, ÛÙÁ ÛıÌ›˜ÂÈ·, ·ÙfiÛÙ ÙÔ
ÍÔıÏfl
[[OOKK]]
.
7. √È· Ì· ÂÓ›ÎËÂÙÂ, ·ÙfiÛÙ ÙÔ ÍÔıÏfl
[[MMEENNUU]]
.
[[ ””ÁÁÏÏÂÂflfl˘˘ÛÛÁÁ ]]
¡Ì ÒıËÏflÛÂÙÂ ÙÁ ÎÂÈÙÔıÒ„fl·
<<RReemmoottee>>
ÛÙÁ Ë›ÛÁ
<<OOffff>> ((¡¡ÂÂÌÌÂÂÒÒ„„ÔÔÔÔflflÁÁÛÛÁÁ))
ÛÙÔ ÏÂÌÔ˝ Í·È
ÒÔÛ·ËfiÛÂÙÂ Ì· ˜ÒÁÛÈÏÔÔÈfiÛÂÙÂ ÙÔ
ÙÁΘÂÈÒÈÛÙfiÒÈÔ, ÙÔ ÂÈÍÔÌfl‰ÈÔ ( ) ÙÔı
ÙÁΘÂÈÒÈÛÙÁÒflÔı Ë· ·Ì·‚ÔÛ‚fiÛÂÈ „È· 3
‰ÂıÙÂÒ¸ÎÂÙ· ÛÙÁÌ Ô˸ÌÁ LCD Í·È, ÛÙÁ ÛıÌ›˜ÂÈ·,
Ë· ÂÓ·ˆ·ÌÈÛÙÂfl.
¡¡ÒÒ˜˜ÈÈÍÍfifi ÒÒ˝˝ËËÏÏÈÈÛÛÁÁ::
——˝˝ËËÏÏÈÈÛÛÁÁ ÏÏÂÂÌÌÔÔ˝˝ ÛÛııÛÛÙÙfifiÏÏ··ÙÙÔÔÚÚ
——˝˝ËËÏÏÈÈÛÛÁÁ ÙÙÁÁÚÚ ÎÎÂÂÈÈÙÙÔÔııÒÒ„„flfl··ÚÚ ··ÔÔ‰‰ÔÔ˜˜fifiÚÚ ··ÛÛ˝˝ÒÒÏÏ··ÙÙÔÔıı ÙÙÁÁÎΘ˜ÂÂÈÈÒÒÈÈÛÛÏÏÔÔ˝˝
((RReemmoottee)) ((Ïϸ¸ÌÌÔÔ „„ÈÈ·· ÙÙ·· ÏÏÔÔÌÌÙÙ››Îη· VVPP--DD337755WW((ii))//DD997755WW((ii))))
1
Camera Mode
√System
Clock Set
Remote
Beep Sound
Shutter Sound
Language
Demonstration
√On
√On
√On
√English
√On
Move Select Exit
MENUOK
4
Move Select Exit
MENUOK
Off
On
6
Camera Mode
Back
Clock Set
Remote
Beep Sound
Shutter Sound
Language
Demonstration
01227K VPD371 UK+GRE~042 2/3/07 9:58 AM Page 24

ENGLISH
GREEK
2525
✤ The Beep Sound function works in <Camera>/<Player>/<M.Cam>/
<M.Player> modes. ➥page 19
✤ You can turn the Beep Sound on or off, when on, each press of a
button sounds a beep.
1. Set the [Power] switch to [CAMERA] or [PLAYER].
2. Set the [Mode] switch to [TAPE] or [CARD].
(VP-D375W(i)/D975W(i) only)
3. Press the [MENU] button.
■ The menu list will appear.
4. Press the [▲ / ▼] button to select <System>,
then press the [OK] button.
5. Press the [▲ / ▼] button to select <Beep
Sound>, then press the [OK] button.
6. Press the [▲ / ▼] button to select <On> or <Off>,
then press the [OK] button.
7. To exit, press the [MENU] button.
Initial Setting : System Menu Setting
Setting the Beep Sound (Beep Sound)
✤ « ÎÂÈÙÔıÒ„fl· Beep Sound (π˜ÔÚ ÏÈ) ÂflÌ·È ‰È·Ë›ÛÈÏÁ ÛÙÔıÚ
ÙÒ¸ÔıÚ ÎÂÈÙÔıÒ„fl·Ú
<<CCaammeerraa>>//<<PPllaayyeerr>>//<<MM..CCaamm>>//<<MM..PPllaayyeerr>>
.
➥ÛÂÎfl‰· 19
✤ ÃÔÒÂflÙ ̷ ÂÌÂÒ„ÔÔÈfiÛÂÙ fi Ì· ·ÂÌÂÒ„ÔÔÈfiÛÂÙ ÙÔÌ fi˜Ô
"ÏÈ". ºÙ·Ì Á ÎÂÈÙÔıÒ„fl· ·ıÙfi ÂflÌ·È ÂÌÂÒ„ÔÔÈÁÏ›ÌÁ, Û ͋ËÂ
‹ÙÁÏ· ÍÔıÏÈÔ˝ ·ÍÔ˝„ÂÙ·È Ô fi˜ÔÚ "ÏÈ".
1. ”ÙÒ›¯Ù ÙÔÌ ‰È·Í¸ÙÁ
[[PPoowweerr]]
ÛÙÁ Ë›ÛÁ
[[CCAAMMEERRAA]]
fi
[[PPLLAAYYEERR]]
.
2. ”ÙÒ›¯Ù ÙÔÌ ‰È·Í¸ÙÁ
[[MMooddee]]
ÛÙÁ Ë›ÛÁ
[[TTAAPPEE]]
fi
[[CCAARRDD]]
.
(ϸÌÔ „È· Ù· ÏÔÌٛη VP-D375W(i)/D975W(i))
3. –·ÙfiÛÙÂ ÙÔ ÍÔıÏfl
[[MMEENNUU]]
.
■
≈ψ·ÌflÊÂÙ·È Á ÎflÛÙ· ÙÔı ÏÂÌÔ˝.
4. –·ÙfiÛÙ ÙÔ ÍÔıÏfl [▲ / ▼] „È· Ì· ÂÈΛÓÂÙÂ
<<SSyysstteemm>> ((””˝˝ÛÛÙÙÁÁÏÏ··))
Í·È, ÛÙÁ ÛıÌ›˜ÂÈ·, ·ÙfiÛÙÂ
ÙÔ ÍÔıÏfl
[[OOKK]]
.
5. –·ÙfiÛÙ ÙÔ ÍÔıÏfl [▲ / ▼] „È· Ì· ÂÈΛÓÂÙÂ
<<BBeeeepp SSoouunndd>> ((ππ˜˜ÔÔÚÚ ÏÏÈÈ))
Í·È, ÛÙÁ ÛıÌ›˜ÂÈ·,
·ÙfiÛÙÂ ÙÔ ÍÔıÏfl
[[OOKK]]
.
6. –·ÙfiÛÙ ÙÔ ÍÔıÏfl [▲ / ▼] „È· Ì· ÂÈΛÓÂÙÂ
<<OOnn>>
fi
<<OOffff>>
Í·È, ÛÙÁ ÛıÌ›˜ÂÈ·, ·ÙfiÛÙ ÙÔ
ÍÔıÏfl
[[OOKK]]
.
7. √È· Ì· ÂÓ›ÎËÂÙÂ, ·ÙfiÛÙ ÙÔ ÍÔıÏfl
[[MMEENNUU]]
.
¡¡ÒÒ˜˜ÈÈÍÍfifi ÒÒ˝˝ËËÏÏÈÈÛÛÁÁ::
——˝˝ËËÏÏÈÈÛÛÁÁ ÏÏÂÂÌÌÔÔ˝˝ ÛÛııÛÛÙÙfifiÏÏ··ÙÙÔÔÚÚ
——˝˝ËËÏÏÈÈÛÛÁÁ ÙÙÔÔıı fifi˜˜ÔÔıı ""ÏÏÈÈ"" ((BBeeeepp SSoouunndd))
Move Select Exit
MENUOK
Off
On
1
Camera Mode
√System
Clock Set
Remote
Beep Sound
Shutter Sound
Language
Demonstration
√On
√On
√On
√English
√On
Move Select Exit
MENUOK
4
6
Camera Mode
Back
Clock Set
Remote
Beep Sound
Shutter Sound
Language
Demonstration
01227K VPD371 UK+GRE~042 2/3/07 9:58 AM Page 25

ENGLISH
GREEK
2626
Initial Setting : System Menu Setting
✤ The Shutter Sound function works in <Camera>/<Player>/<M.Cam>
modes. ➥page 19
✤ You can turn the Shutter Sound on or off, when on, with each press
of the [PHOTO] button, the Shutter will sound.
1. Set the [Power] switch to [CAMERA] or [PLAYER].
2. If the [Power] switch to [CAMERA], set the [Mode]
switch to [TAPE] or [CARD].
If the [Power] switch to [PLAYER], set the [Mode]
switch to [TAPE].
3. Press the [MENU] button.
■
The menu list will appear.
4. Press the [▲ / ▼] button to select <System>,
then press the [OK] button.
5. Press the [▲ / ▼] button to select <Shutter Sound>,
then press the [OK] button.
6. Press the [▲ / ▼] button to select <On> or <Off>,
then press the [OK] button.
7. To exit, press the [MENU] button.
Setting the Shutter Sound (Shutter Sound)
(VP-D375W(i)/D975W(i) only)
¡¡ÒÒ˜˜ÈÈÍÍfifi ÒÒ˝˝ËËÏÏÈÈÛÛÁÁ::
——˝˝ËËÏÏÈÈÛÛÁÁ ÏÏÂÂÌÌÔÔ˝˝ ÛÛııÛÛÙÙfifiÏÏ··ÙÙÔÔÚÚ
✤ « ÎÂÈÙÔıÒ„fl· fi˜Ôı ÙÔı ÍÎÂflÛÙÒÔı ÂflÌ·È ‰È·Ë›ÛÈÏÁ ÛÙÔıÚ
ÙÒ¸ÔıÚ ÎÂÈÙÔıÒ„fl·Ú
<<CCaammeerraa>>
/
<<PPllaayyeerr>>
/
<<MM..CCaamm>>
. ➥ÛÂÎfl‰· 19
✤ ÃÔÒÂflÙ ̷ ÂÌÂÒ„ÔÔÈfiÛÂÙ fi Ì· ·ÂÌÂÒ„ÔÔÈfiÛÂÙ ·ıÙ¸Ì
ÙÔÌ fi˜Ô ÙÔı ÍÎÂflÛÙÒÔı. ºÙ·Ì Á ÎÂÈÙÔıÒ„fl· ·ıÙfi ÂflÌ·È
ÂÌÂÒ„ÔÔÈÁÏ›ÌÁ, Í‹Ë ˆÔÒ‹ Ôı ·Ù‹Ù ÙÔ
ÍÔıÏfl
[[PPHHOOTTOO]]
Ë· ·ÍÔ˝„ÂÙ·È Ô fi˜ÔÚ ÙÔı
ÍÎÂflÛÙÒÔı.
1. ”ÙÒ›¯Ù ÙÔÌ ‰È·Í¸ÙÁ
[[PPoowweerr]]
ÛÙÁ Ë›ÛÁ
[[CCAAMMEERRAA]]
fi
[[PPLLAAYYEERR]]
.
2. ≈‹Ì Ô ‰È·Í¸ÙÁÚ
[[PPoowweerr]]
›˜ÂÈ ÙÂËÂfl ÛÙÁ Ë›ÛÁ
[[CCAAMMEERRAA]]
, Û˝ÒÂÙ ÙÔ ‰È·Í¸ÙÁ
[[MMooddee]]
ÛÙÁ
Ë›ÛÁ
[[TTAAPPEE]]
fi
[[CCAARRDD]]
.
≈‹Ì Ô ‰È·Í¸ÙÁÚ
[[PPoowweerr]]
›˜ÂÈ ÙÂËÂfl ÛÙÁ Ë›ÛÁ
[[PPLLAAYYEERR]]
, Û˝ÒÂÙ ÙÔ ‰È·Í¸ÙÁ
[[MMooddee]]
ÛÙÁ
Ë›ÛÁ
[[TTAAPPEE]]
.
3. –·ÙfiÛÙÂ ÙÔ ÍÔıÏfl
[[MMEENNUU]]
.
■
≈ψ·ÌflÊÂÙ·È Á ÎflÛÙ· ÙÔı ÏÂÌÔ˝.
4. –·ÙfiÛÙ ÙÔ ÍÔıÏfl [▲ / ▼] „È· Ì· ÂÈΛÓÂÙÂ
<<SSyysstteemm>> ((””˝˝ÛÛÙÙÁÁÏÏ··))
Í·È, ÛÙÁ ÛıÌ›˜ÂÈ·, ·ÙfiÛÙÂ
ÙÔ ÍÔıÏfl
[[OOKK]]
.
5. –·ÙfiÛÙ ÙÔ ÍÔıÏfl [▲ / ▼] „È· Ì· ÂÈΛÓÂÙÂ
<<SShhuutttteerr SSoouunndd>> ((ƒƒÈÈ‹‹ˆˆÒÒ··„„ÏÏ·· fifi˜˜ÔÔıı))
Í·È, ÛÙÁ
ÛıÌ›˜ÂÈ·, ·ÙfiÛÙ ÙÔ ÍÔıÏfl
[[OOKK]]
.
6. –·ÙfiÛÙ ÙÔ ÍÔıÏfl [▲ / ▼] „È· Ì· ÂÈΛÓÂÙÂ
<<OOnn>>
fi
<<OOffff>>
Í·È, ÛÙÁ ÛıÌ›˜ÂÈ·, ·ÙfiÛÙ ÙÔ
ÍÔıÏfl
[[OOKK]]
.
7. √È· Ì· ÂÓ›ÎËÂÙÂ, ·ÙfiÛÙ ÙÔ ÍÔıÏfl
[[MMEENNUU]]
.
——˝˝ËËÏÏÈÈÛÛÁÁ ÙÙÔÔıı fifi˜˜ÔÔıı ÙÙÔÔıı ÍÍÎÎÂÂflflÛÛÙÙÒÒÔÔıı ((SShhuutttteerr SSoouunndd))
((Ïϸ¸ÌÌÔÔ „„ÈÈ·· ÙÙ·· ÏÏÔÔÌÌÙÙ››Îη· VVPP--DD337755WW((ii))//DD997755WW((ii))))
Move Select Exit
MENUOK
Off
On
1
Camera Mode
√System
Clock Set
Remote
Beep Sound
Shutter Sound
Language
Demonstration
√On
√On
√On
√English
√On
Move Select Exit
MENUOK
4
6
Camera Mode
Back
Clock Set
Remote
Beep Sound
Shutter Sound
Language
Demonstration
01227K VPD371 UK+GRE~042 2/3/07 9:58 AM Page 26
Sayfa yükleniyor...
Sayfa yükleniyor...

✤ Adjusting the LCD Screen works in <Camera>/<Player>/<M.Cam>/
<M.Player> modes. ➥page 19
✤ Your Camcorder is equipped with a 2.5 inch (VP-D371(i) only) / 2.7 inch
wide (VP-D371W(i)/D372WH(i)/D375W(i)/D975W(i) only) colour Liquid
Crystal Display (LCD) Screen, which enables you to view what you are
recording or playing back directly.
✤ Depending on the conditions under which you are using the Camcorder
(indoors or outdoors for example), you can adjust;
- <LCD Bright>
- <LCD Colour>
1. Set the [Power] switch to [CAMERA] or [PLAYER].
2. Set the [Mode] switch to [TAPE] or [CARD].
(VP-D375W(i)/D975W(i) only)
3. Press the [MENU] button.
■
The menu list will appear.
4. Press the [▲ / ▼] button to select <Display>, then
press the [OK] button.
5. Press the [▲ / ▼] button to select the item you want to
adjust <LCD Bright> or <LCD Colour>, then press the
[OK] button.
6. Press the [▲ / ▼] button to adjust the value of the
selected item <LCD Bright> or <LCD Colour>,
then press the [OK] button.
■
You can set values for <LCD Bright> and
<LCD Colour> between <0> ~ <35>.
7. To exit, press the [MENU] button.
■
Adjusting the LCD Screen does not affect the
brightness and colour of the image to be recorded.
ENGLISH
GREEK
2929
Initial Setting : Display Menu Setting
Adjusting the LCD Screen (LCD Bright/LCD Colour)
✤ « ‰ıÌ·Ù¸ÙÁÙ· Ò˝ËÏÈÛÁÚ ÙÁÚ Ô˸ÌÁÚ LCD ÂflÌ·È ‰È·Ë›ÛÈÏÁ ÛÙÔıÚ
ÙÒ¸ÔıÚ ÎÂÈÙÔıÒ„fl·Ú
<<CCaammeerraa>>//<<PPllaayyeerr>>//<<MM..CCaamm>>//<<MM..PPllaayyeerr>>
.
➥ÛÂÎfl‰· 19
✤ « ‚ÈÌÙÂÔÍ‹ÏÂÒ· ‰È·Ë›ÙÂÈ ÏÈ· ›„˜Ò˘ÏÁ Ô˸ÌÁ ı„Ò˛Ì ÍÒıÛÙ‹Î΢Ì
(LCD) 2,5 ÈÌÙÛ˛Ì (ϸÌÔ „È· Ù· ÏÔÌٛη VP-D371(i)) / 2,7 ÈÌÙÛ˛Ì (ϸÌÔ
„È· Ù· ÏÔÌٛη VP-D371W(i)/D372WH(i)/D375W(i)/D975W(i)), Á ÔÔfl·
Û‹Ú ÂÈÙÒ›ÂÈ Ì· ‚ΛÂÙ ‹ÏÂÛ· ¸,ÙÈ Í·Ù·„Ò‹ˆÂÙ fi ·Ì··Ò‹„ÂÙÂ.
✤ ¡Ì‹ÎÔ„· Ï ÙÈÚ ÛıÌËfiÍÂÚ ÛÙÈÚ ÔÔflÂÚ
˜ÒÁÛÈÏÔÔÈÂflÙ ÙÁ ‚ÈÌÙÂÔÍ‹ÏÂÒ· („È· ·Ò‹‰ÂÈ„Ï·,
Û ÂÛ˘ÙÂÒÈ͸ fi ÂÓ˘ÙÂÒÈ͸ ˜˛ÒÔ), ÏÔÒÂflÙ ̷
ÒÔÛ·ÒϸÛÂÙ ÙÈÚ ÂÓfiÚ ÒıËÏflÛÂÈÚ:
-- <<LLCCDD BBrriigghhtt>> ((÷÷˘˘ÙÙÂÂÈÈÌ̸¸ÙÙÁÁÙÙ·· LLCCDD))
-- <<LLCCDD CCoolloouurr>> ((◊◊ÒÒ˛˛ÏÏ··ÙÙ·· LLCCDD))
1. ”ÙÒ›¯Ù ÙÔÌ ‰È·Í¸ÙÁ
[[PPoowweerr]]
ÛÙÁ Ë›ÛÁ
[[CCAAMMEERRAA]]
fi
[[PPLLAAYYEERR]]
.
2. ”ÙÒ›¯Ù ÙÔÌ ‰È·Í¸ÙÁ
[[MMooddee]]
ÛÙÁ Ë›ÛÁ
[[TTAAPPEE]]
fi
[[CCAARRDD]]
.
(ϸÌÔ „È· Ù· ÏÔÌٛη VP-D375W(i)/D975W(i))
3. –·ÙfiÛÙÂ ÙÔ ÍÔıÏfl
[[MMEENNUU]]
.
■
≈ψ·ÌflÊÂÙ·È Á ÎflÛÙ· ÙÔı ÏÂÌÔ˝.
4. –·ÙfiÛÙ ÙÔ ÍÔıÏfl [▲ / ▼] „È· Ì· ÂÈΛÓÂÙÂ
<<DDiissppllaayy>> ((œœË˸¸ÌÌÁÁ))
Í·È, ÛÙÁ ÛıÌ›˜ÂÈ·, ·ÙfiÛÙ ÙÔ
ÍÔıÏfl
[[OOKK]]
.
5. –·ÙfiÛÙ ÙÔ ÍÔıÏfl [▲ / ▼] „È· Ì· ÂÈΛÓÂÙ ÙÔ
ÛÙÔȘÂflÔ Ôı Ë›ÎÂÙ ̷ ÒıËÏflÛÂÙÂ
<<LLCCDD BBrriigghhtt>>
((÷÷˘˘ÙÙÂÂÈÈÌ̸¸ÙÙÁÁÙÙ··))
fi
<<LLCCDD CCoolloouurr>> ((◊◊ÒÒ˛˛ÏÏ··))
Í·È, ÛÙÁ
ÛıÌ›˜ÂÈ·, ·ÙfiÛÙ ÙÔ ÍÔıÏfl
[[OOKK]]
.
6. –·ÙfiÛÙÂ ÙÔ ÍÔıÏfl [▲ / ▼] „È· Ì· ÒıËÏflÛÂÙÂ ÙÁÌ
ÙÈÏfi ÙÔı ÂÈ΄ϛÌÔı ÛÙÔȘÂflÔı
<<LLCCDD BBrriigghhtt>>
((÷÷˘˘ÙÙÂÂÈÈÌ̸¸ÙÙÁÁÙÙ··))
fi
<<LLCCDD CCoolloouurr>> ((◊◊ÒÒ˛˛ÏÏ··))
Í·È, ÛÙÁ
ÛıÌ›˜ÂÈ·, ·ÙfiÛÙ ÙÔ ÍÔıÏfl
[[OOKK]]
.
■
ÃÔÒÂflÙ ̷ ÔÒflÛÂÙ ÙÈÏ›Ú „È· Ù· ÛÙÔȘÂfl·
<<LLCCDD
BBrriigghhtt>>
Í·È
<<LLCCDD CCoolloouurr>>
ÏÂÙ·Ó˝
<<00>> ~~ <<3355>>
.
7. √È· Ì· ÂÓ›ÎËÂÙÂ, ·ÙfiÛÙ ÙÔ ÍÔıÏfl
[[MMEENNUU]]
.
■
« Ò˝ËÏÈÛÁ ÙÁÚ Ô˸ÌÁÚ LCD ‰ÂÌ ÂÁÒ‹ÊÂÈ ÙÁ
ˆ˘ÙÂÈ̸ÙÁÙ· Í·È Ù· ˜Ò˛Ï·Ù· ÙÁÚ ÂÈÍ¸Ì·Ú Ôı
„„Ò‹ˆÂÙ·È.
¡¡ÒÒ˜˜ÈÈÍÍfifi ÒÒ˝˝ËËÏÏÈÈÛÛÁÁ::
——˝˝ËËÏÏÈÈÛÛÁÁ ÏÏÂÂÌÌÔÔ˝˝ ÔÔË˸¸ÌÌÁÁÚÚ
——˝˝ËËÏÏÈÈÛÛÁÁ ÙÙÁÁÚÚ ÔÔË˸¸ÌÌÁÁÚÚ LLCCDD ((LLCCDD BBrriigghhtt//LLCCDD CCoolloouurr))
Move Select Exit
MENUOK
6
[18]
1
Move Select Exit
MENUOK
Camera Mode
√Display
LCD Bright
LCD Colour
Date/Time
TV Display
4
√Off
√On
Camera Mode
Back
LCD Bright
LCD Colour
Date/Time
TV Display
01227K VPD371 UK+GRE~042 2/3/07 9:58 AM Page 29

ENGLISH
GREEK
3030
Displaying the Date/Time (Date/Time)
✤ The Date/Time function works in <Camera>/<Player>/<M.Cam>/
<M.Player> modes. ➥page 19
✤ The date and time are automatically recorded on a special data area
of the tape.
1. Set the [Power] switch to [CAMERA] or [PLAYER].
2. Set the [Mode] switch to [TAPE] or [CARD].
(VP-D375W(i)/D975W(i) only)
3. Press the [MENU] button.
■
The menu list will appear.
4. Press the [▲ / ▼] button to select <Display>, then
press the [OK] button.
5. Press the [▲ / ▼] button to select
<Date/Time>, then press the [OK] button.
6. Press the [▲ / ▼] button to select the display type
of the Date/Time, then press the [OK] button.
■
Display type of the Date/Time: <Off>, <Date>,
<Time>, <Date&Time>.
7. To exit, press the [MENU] button.
[ Notes ]
■
The Date/Time will read <00:00 1.JAN.2007> in
the following conditions.
- During playback of a blank section of a tape.
- If the tape was recorded before setting the clock
function in the Camcorder.
- When the Lithium Battery becomes weak or dead.
■
Before you use the <Date/Time> function, you must
set the clock. ➥page 23
Initial Setting : Display Menu Setting
≈≈Ïψˆ‹‹ÌÌÈÈÛÛÁÁ ÁÁÏÏÂÂÒÒÔÔÏÏÁÁÌÌflfl··ÚÚ//˛˛ÒÒ··ÚÚ ((DDaattee//TTiimmee))
✤ « ÎÂÈÙÔıÒ„fl· Date/Time («ÏÂÒÔÏÁÌfl·/øÒ·) ÂflÌ·È ‰È·Ë›ÛÈÏÁ ÛÙÔıÚ
ÙÒ¸ÔıÚ ÎÂÈÙÔıÒ„fl·Ú
<<CCaammeerraa>>//<<PPllaayyeerr>>//<<MM..CCaamm>>//<<MM..PPllaayyeerr>>
.
➥ÛÂÎfl‰· 19
✤ « ÁÏÂÒÔÏÁÌfl· Í·È Á ˛Ò· Í·Ù·„Ò‹ˆÔÌÙ·È ·ıٸϷٷ Û ÏÈ· ÂȉÈÍfi
ÂÒÈÔ˜fi Í·Ù·„Ò·ˆfiÚ ‰Â‰ÔÏ›Ì˘Ì ÙÁÚ Ù·ÈÌfl·Ú.
1. ”ÙÒ›¯Ù ÙÔÌ ‰È·Í¸ÙÁ
[[PPoowweerr]]
ÛÙÁ Ë›ÛÁ
[[CCAAMMEERRAA]]
fi
[[PPLLAAYYEERR]]
.
2. ”ÙÒ›¯Ù ÙÔÌ ‰È·Í¸ÙÁ
[[MMooddee]]
ÛÙÁ Ë›ÛÁ
[[TTAAPPEE]]
fi
[[CCAARRDD]]
.
(ϸÌÔ „È· Ù· ÏÔÌٛη VP-D375W(i)/D975W(i))
3. –·ÙfiÛÙÂ ÙÔ ÍÔıÏfl
[[MMEENNUU]]
.
■
≈ψ·ÌflÊÂÙ·È Á ÎflÛÙ· ÙÔı ÏÂÌÔ˝.
4.
–·ÙfiÛÙ ÙÔ ÍÔıÏfl [▲ / ▼] „È· Ì· ÂÈΛÓÂÙÂ
<<DDiissppllaayy>> ((œœË˸¸ÌÌÁÁ))
Í·È, ÛÙÁ ÛıÌ›˜ÂÈ·, ·ÙfiÛÙ ÙÔ
ÍÔıÏfl
[[OOKK]]
.
5. –·ÙfiÛÙ ÙÔ ÍÔıÏfl [▲ / ▼] „È· Ì· ÂÈΛÓÂÙÂ
<<DDaattee//TTiimmee>> ((««ÏÏÂÂÒÒÔÔÏÏÁÁÌÌflfl··//øøÒÒ··))
Í·È, ÛÙÁ ÛıÌ›˜ÂÈ·,
·ÙfiÛÙÂ ÙÔ ÍÔıÏfl
[[OOKK]]
.
6. –·ÙfiÛÙ ÙÔ ÍÔıÏfl [▲ / ▼] „È· Ì· ÂÈΛÓÂÙ ÙÔÌ
Ù˝Ô ÒÔ‚ÔÎfiÚ ÙÁÚ «ÏÂÒÔÏÁÌfl·Ú/øÒ·Ú Í·È, ÛÙÁ
ÛıÌ›˜ÂÈ·, ·ÙfiÛÙ ÙÔ ÍÔıÏfl
[[OOKK]]
.
■
‘Ò¸ÔÚ Âψ‹ÌÈÛÁÚ ÁÏÂÒÔÏÁÌfl·Ú/˛Ò·Ú:
<<OOffff>>
((¡¡ÂÂÌÌÂÂÒÒ„„ÔÔÔÔÈÈÁÁÏÏ››ÌÌÁÁ)),, <<DDaattee>> ((««ÏÏÂÂÒÒÔÔÏÏÁÁÌÌflfl··)),,
<<TTiimmee>> ((øøÒÒ··)),, <<DDaattee&&TTiimmee>>
.
7. √È· Ì· ÂÓ›ÎËÂÙÂ, ·ÙfiÛÙ ÙÔ ÍÔıÏfl
[[MMEENNUU]]
.
[[ ””ÁÁÏÏÂÂÈÈ˛˛ÛÛÂÂÈÈÚÚ ]]
■
« ›Ì‰ÂÈÓÁ ÁÏÂÒÔÏÁÌfl·Ú / ˛Ò·Ú ›˜ÂÈ ÙÁ ÏÔÒˆfi
<<0000::0000 11..JJAANN..22000077>>
ÛÙÈÚ ÂÓfiÚ ÂÒÈÙ˛ÛÂÈÚ.
- K·Ù‹ ÙÁÌ ·Ì··Ò·„˘„fi ÂÌ¸Ú ÍÂÌÔ˝ ÙÏfiÏ·ÙÔÚ
ÙÁÚ Ù·ÈÌfl·Ú.
- ≈‹Ì Á Í·Û›Ù· „„Ò‹ˆÁÍ ÒÈÌ ·¸ ÙÁ
Ò˝ËÏÈÛÁ ÙÔı ÒÔÎÔ„ÈÔ˝ ÛÙÁ ‚ÈÌÙÂÔÍ‹ÏÂÒ·.
-
ºÙ·Ì Á Ï·Ù·Òfl· ÎÈËflÔı ÂflÌ·È ÏÂÒÈÍ˛Ú fi ÎfiÒ˘Ú
·ÔˆÔÒÙÈÛÏ›ÌÁ.
■
–ÒÔÙÔ˝ ˜ÒÁÛÈÏÔÔÈfiÛÂÙÂ ÙÁ ÎÂÈÙÔıÒ„fl·
<<DDaattee//TTiimmee>>
, Ò›ÂÈ Ì· ÒıËÏflÛÂÙ ÙÔ ÒÔθÈ.
➥ÛÂÎfl‰· 23
¡¡ÒÒ˜˜ÈÈÍÍfifi ÒÒ˝˝ËËÏÏÈÈÛÛÁÁ::
——˝˝ËËÏÏÈÈÛÛÁÁ ÏÏÂÂÌÌÔÔ˝˝ ÔÔË˸¸ÌÌÁÁÚÚ
Move Select Exit
MENUOK
Camera Mode
√Display
LCD Bright
LCD Colour
Date/Time
TV Display
4
Move Select Exit
MENUOK
Off
Date
Time
Date&Time
1
√Off
√On
6
Camera Mode
Back
LCD Bright
LCD Colour
Date/Time
TV Display
01227K VPD371 UK+GRE~042 2/3/07 9:58 AM Page 30

ENGLISH
GREEK
3131
Initial Setting : Display Menu Setting
Setting the TV Display (TV Display)
✤ The TV Display function works in <Camera>/<Player>/<M.Cam>/
<M.Player> modes. ➥page 19
✤ You can select the output path of the OSD (On Screen Display).
- <Off>: The OSD appears in the LCD Screen and Viewfinder only.
- <On>: The OSD appears in the LCD Screen, Viewfinder and TV.
(Connecting to a TV ➥pages 65~67)
- Use the [DISPLAY] button to turn the OSD on/off on the LCD
Screen/Viewfinder/TV.
1. Set the [Power] switch to [CAMERA] or [PLAYER].
2. Set the [Mode] switch to [TAPE] or [CARD].
(VP-D375W(i)/D975W(i) only)
3. Press the [MENU] button.
■
The menu list will appear.
4. Press the [▲ / ▼] button to select <Display>,
then press the [OK] button.
5. Press the [▲ / ▼] button to select <TV Display>,
then press the [OK] button.
6. To activate TV Display function, press the [▲ / ▼]
button to select <On> or <Off>, then press the
[OK] button.
7. To exit, press the [MENU] button.
¡¡ÒÒ˜˜ÈÈÍÍfifi ÒÒ˝˝ËËÏÏÈÈÛÛÁÁ::
——˝˝ËËÏÏÈÈÛÛÁÁ ÏÏÂÂÌÌÔÔ˝˝ ÔÔË˸¸ÌÌÁÁÚÚ
——˝˝ËËÏÏÈÈÛÛÁÁ ÙÙÁÁÚÚ ÔÔË˸¸ÌÌÁÁÚÚ TTVV ((TTVV DDiissppllaayy))
✤ « Ò˝ËÏÈÛÁ ÙÁÚ ÎÂÈÙÔıÒ„fl·Ú TV Display (œË¸ÌÁ TV) ÂflÌ·È ‰È·Ë›ÛÈÏÁ
ÛÙÔıÚ ÙÒ¸ÔıÚ ÎÂÈÙÔıÒ„fl·Ú
<<CCaammeerraa>>//<<PPllaayyeerr>>//<<MM..CCaamm>>//
<<MM..PPllaayyeerr>>
. ➥ÛÂÎfl‰· 19
✤ ÃÔÒÂflÙ ̷ ÂÈΛÓÂÙ Խ Ë›ÎÂÙ ̷ Âψ·ÌflÊÔÌÙ·È ÔÈ ẨÂflÓÂÈÚ
Âfl ÙÁÚ Ô˸ÌÁÚ.
-
<<OOffff>> ((¡¡ÂÂÌÌÂÂÒÒ„„ÔÔÔÔflflÁÁÛÛÁÁ))
: œÈ ẨÂflÓÂÈÚ Ôı Âψ·ÌflÊÔÌÙ·È Ï¸ÌÔ
ÛÙÁÌ Ô˸ÌÁ LCD Í·È ÛÙÔ Û͸ÂıÙÒÔ.
-
<<OOnn>> <<≈≈ÌÌÂÂÒÒ„„ÔÔÔÔÈÈÁÁÏÏ››ÌÌÁÁ>>::
œÈ ẨÂflÓÂÈÚ ÛÙÁÌ Ô˸ÌÁ
Âψ·ÌflÊÔÌÙ·È ÛÙÁÌ Ô˸ÌÁ LCD, ÙÔ Û͸ÂıÙÒÔ
Í·È ÙÁÌ ÙÁθҷÛÁ.
(”˝Ì‰ÂÛÁ Ï ÙÁθҷÛÁ ➥ÛÂÎfl‰· 65~67)
- ◊ÒÁÛÈÏÔÔÈfiÛÙÂ ÙÔ ÍÔıÏfl
[[DDIISSPPLLAAYY]]
„È· Ì·
ÂÌÂÒ„ÔÔÈfiÛÂÙÂ/·ÂÌÂÒ„ÔÔÈfiÛÂÙÂ ÙÁÌ
Âψ‹ÌÈÛÁ Ù˘Ì ẨÂflÓÂ˘Ì ÛÙÁÌ Ô˸ÌÁ LCD,
ÛÙÔ Û͸ÂıÙÒÔ Í·È ÙÁÌ ÙÁθҷÛÁ.
1. ”ÙÒ›¯Ù ÙÔÌ ‰È·Í¸ÙÁ
[[PPoowweerr]]
ÛÙÁ Ë›ÛÁ
[[CCAAMMEERRAA]]
fi
[[PPLLAAYYEERR]]
.
2. ”ÙÒ›¯Ù ÙÔÌ ‰È·Í¸ÙÁ
[[MMooddee]]
ÛÙÁ Ë›ÛÁ
[[TTAAPPEE]]
fi
[[CCAARRDD]]
.
(ϸÌÔ „È· Ù· ÏÔÌٛη VP-D375W(i)/D975W(i))
3. –·ÙfiÛÙÂ ÙÔ ÍÔıÏfl
[[MMEENNUU]]
.
■
≈ψ·ÌflÊÂÙ·È Á ÎflÛÙ· ÙÔı ÏÂÌÔ˝.
4. –·ÙfiÛÙ ÙÔ ÍÔıÏfl [▲ / ▼] „È· Ì· ÂÈΛÓÂÙÂ
<<DDiissppllaayy>> ((œœË˸¸ÌÌÁÁ))
Í·È, ÛÙÁ ÛıÌ›˜ÂÈ·, ·ÙfiÛÙ ÙÔ
ÍÔıÏfl
[[OOKK]]
.
5. –·ÙfiÛÙ ÙÔ ÍÔıÏfl [▲ / ▼] „È· Ì· ÂÈΛÓÂÙÂ
<<TTVV
DDiissppllaayy>> ((œœË˸¸ÌÌÁÁ TTVV))
Í·È, ÛÙÁ ÛıÌ›˜ÂÈ·, ·ÙfiÛÙÂ
ÙÔ ÍÔıÏfl
[[OOKK]]
.
6. √È· Ì· ÂÌÂÒ„ÔÔÈfiÛÂÙ ÙÁ ÎÂÈÙÔıÒ„fl· ÒÔ‚ÔÎfiÚ
Û ÙÁθҷÛÁ, ·ÙfiÛÙ ÙÔ ÍÔıÏfl [▲ / ▼] „È· Ì·
ÂÈΛÓÂÙÂ
<<OOnn>>
fi
<<OOffff>>
Í·È, ÛÙÁ ÛıÌ›˜ÂÈ·,
·ÙfiÛÙÂ ÙÔ ÍÔıÏfl
[[OOKK]]
.
7. √È· Ì· ÂÓ›ÎËÂÙÂ, ·ÙfiÛÙ ÙÔ ÍÔıÏfl
[[MMEENNUU]]
.
Camera Mode
√Display
LCD Bright
LCD Colour
Date/Time
TV Display
Move Select Exit
MENUOK
√Off
√On
1
4
Move Select Exit
MENUOK
Off
On
6
Camera Mode
Back
LCD Bright
LCD Colour
Date/Time
TV Display
01227K VPD371 UK+GRE~042 2/3/07 9:58 AM Page 31
Sayfa yükleniyor...
Sayfa yükleniyor...
Sayfa yükleniyor...

ENGLISH
GREEK
3535
Basic Recording
Recording with Ease for Beginners (EASY.Q Mode)
✤ The EASY.Q function works only in <Camera> mode. ➥page 19
✤ The EASY.Q function allows a beginner to easily make good
recordings.
1. Set the [Power] switch to [CAMERA].
2. Set the [Mode] switch to [TAPE].
(VP-D375W(i)/D975W(i) only)
3. By pressing the [EASY.Q] button, all functions on
the Camcorder will be set to off and the recording
settings will be set to the following basic modes:
■
The words <EASY.Q> and <DIS ( )> are
displayed at the same time.
4. Press the [Start/Stop] button to start recording.
■
Recording will begin using the basic automatic
settings.
5. Press the [EASY.Q] button again in the STBY mode
and then turn the EASY.Q mode off.
■
The EASY.Q function will not turn off while you
are recording.
■
The Camcorder will return to the settings that
were set prior to activating EASY.Q mode.
[ Notes ]
■
Unavailable buttons during operation
During operation EASY.Q, the following buttons are
unavailable because the items are automatically set.
The corresponding messages may appear if
unavailable operations are attempted.
- MENU button
- C.NITE button
- Q.MENU button
■
The EASY.Q mode settings are deleted when the
Battery Pack is removed from the Camcorder and
must be reset when the Battery Pack is replaced.
■
Taking a still image using the [PHOTO] button while EASY.Q is set
releases DIS function.
¬¬··ÛÛÈÈÍÍ››ÚÚ ÒÒııËËÏÏflflÛÛÂÂÈÈÚÚ Â„„„„ÒÒ··ˆˆfifiÚÚ
≈≈˝˝ÍÍÔÔÎÎÂÂÚÚ ÒÒııËËÏÏflflÛÛÂÂÈÈÚÚ Â„„„„ÒÒ··ˆˆfifiÚÚ „„ÈÈ·· ··ÒÒ˜˜‹‹ÒÒÈÈÔÔııÚÚ ((‘‘ÒÒ¸¸ÔÔÚÚ ÎÎÂÂÈÈÙÙÔÔııÒÒ„„flfl··ÚÚ EEAASSYY..QQ))
✤ « ÎÂÈÙÔıÒ„fl· EASY.Q ÂflÌ·È ‰È·Ë›ÛÈÏÁ ϸÌÔ ÛÙÔÌ ÙÒ¸Ô ÎÂÈÙÔıÒ„fl·Ú
<<CCaammeerraa>> ((KK‹‹ÏÏÂÂÒÒ··))
. ➥ÛÂÎfl‰· 19
✤ « ÎÂÈÙÔıÒ„fl· EASY.Q ÂÈÙÒ›ÂÈ ÛÙÔıÚ ·Ò˜‹ÒÈÔıÚ ˜ÒfiÛÙÂÚ Ì·
Ò·„Ï·ÙÔÔÈÔ˝Ì Â˝ÍÔη Í·Î›Ú Â„„Ò·ˆ›Ú.
1. ”ÙÒ›¯Ù ÙÔÌ ‰È·Í¸ÙÁ
[[PPoowweerr]]
ÛÙÁ Ë›ÛÁ
[[CCAAMMEERRAA]]
.
2. ”ÙÒ›¯Ù ÙÔÌ ‰È·Í¸ÙÁ
[[MMooddee]]
ÛÙÁ Ë›ÛÁ
[[TTAAPPEE]]
.
(ϸÌÔ „È· Ù· ÏÔÌٛη VP-D375W(i)/D975W(i))
3. øÎÈÚ ·ÙfiÛÂÙ ÙÔ ÍÔıÏfl
[[EEAASSYY..QQ]]
, ¸ÎÂÚ ÔÈ
ÎÂÈÙÔıÒ„flÂÚ ÛÙÁ ‚ÈÌÙÂÔÍ‹ÏÂÒ· ·ÂÌÂÒ„ÔÔÈÔ˝ÌÙ·È Í·È
ÔÈ ÒıËÏflÛÂÈÚ Â„„Ò·ˆfiÚ ÙflËÂÌÙ·È ÛÙÔıÚ ·Ò·Í‹Ù˘
‚·ÛÈÍÔ˝Ú ÙÒ¸ÔıÚ ÎÂÈÙÔıÒ„fl·Ú:
■
œÈ ẨÂflÓÂÈÚ
<<EEAASSYY..QQ>>
Í·È
<<DDIISS (( ))>>
Âψ·ÌflÊÔÌÙ·È Ù·ıÙ¸˜ÒÔÌ·.
4. √È· Ì· ÓÂÍÈÌfiÛÂÙ ÙÁÌ Â„„Ò·ˆfi, ·ÙfiÛÙ ÙÔ ÍÔıÏfl
[[SSttaarrtt//SSttoopp]]
.
■
« „„Ò·ˆfi Ë· ·Ò˜flÛÂÈ Ï ÙÈÚ ‚·ÛÈÍ›Ú ·ıٸϷÙÂÚ
ÒıËÏflÛÂÈÚ.
5. –·ÙfiÛÙÂ ÙÔ ÍÔıÏfl
[[EEAASSYY..QQ]]
Ó·Ì‹ ÛÙÁÌ Í·Ù‹ÛÙ·ÛÁ
STBY Í·È, ÛÙÁ ÛıÌ›˜ÂÈ·, ·ÂÌÂÒ„ÔÔÈfiÛÙ ÙÔÌ ÙÒ¸Ô
ÎÂÈÙÔıÒ„fl·Ú EASY.Q.
■
« ÎÂÈÙÔıÒ„fl· EASY.Q ‰ÂÌ Ë· ·ÂÌÂÒ„ÔÔÈÁËÂfl Í·Ù‹
ÙÁÌ Â„„Ò·ˆfi Û·Ú.
■
« ‚ÈÌÙÂÔÍ‹ÏÂÒ· Ë· ·̛ÎËÂÈ ÛÙÈÚ ÒıËÏflÛÂÈÚ Ôı
Âfl˜·Ì ÔÒÈÛÙÂfl ÒÈÌ ÙÁÌ ÂÌÂÒ„ÔÔflÁÛÁ ÙÔı ÙÒ¸Ôı
ÎÂÈÙÔıÒ„fl·Ú EASY.Q.
[[ ””ÁÁÏÏÂÂÈÈ˛˛ÛÛÂÂÈÈÚÚ ]]
■
KKÔÔııÏÏÈÈ‹‹ ÏÏÁÁ ‰‰ÈÈ··ËË››ÛÛÈÈÏÏ·· ÍÍ··ÙÙ‹‹ ÙÙÁÁ ÎÎÂÂÈÈÙÙÔÔııÒÒ„„flfl··
K·Ù‹ ÙÁ ÎÂÈÙÔıÒ„fl· EASY.Q, Ù· ·Í¸ÎÔıË· ÍÔıÏÈ‹
ÂflÌ·È ÏÁ ‰È·Ë›ÛÈÏ·, θ„˘ ÙÁÚ ·ıٸϷÙÁÚ Ò˝ËÏÈÛÁÚ Ù˘Ì
ÛÙÔȘÂfl˘Ì.
≈‹Ì ÂȘÂÈÒfiÛÂÙ ͋ÔÈÂÚ ÎÂÈÙÔıÒ„flÂÚ Ôı ‰ÂÌ ÂflÌ·È
‰È·Ë›ÛÈÏÂÚ, Ë· Âψ·ÌÈÛÙÔ˝Ì Ù· ·ÌÙflÛÙÔȘ· ÏÁÌ˝Ï·Ù·.
- KÔıÏfl MENU
- KÔıÏfl C.NITE
- KÔıÏfl Q.MENU
■
œÈ ÒıËÏflÛÂÈÚ ÙÔı ÙÒ¸Ôı ÎÂÈÙÔıÒ„fl·Ú EASY.Q
‰È·„Ò‹ˆÔÌÙ·È ¸Ù·Ì ·ˆ·ÈÒÂflÙ ÙÁÌ Ï·Ù·Òfl· ·¸ ÙÁ
‚ÈÌÙÂÔÍ‹ÏÂÒ· Í·È Ò›ÂÈ Ì· ÙÈÚ ÔÒflÛÂÙ ÂÍ Ì›Ôı ¸Ù·Ì
ÙÔÔËÂÙÂflÙÂ Ó·Ì‹ ÙÁÌ Ï·Ù·Òfl·.
■
≈‹Ì ÙÒ·‚fiÓÂÙ ÏÈ· ˆ˘ÙÔ„Ò·ˆfl· Ï ÙÔ ÍÔıÏfl
[[PPHHOOTTOO]]
ÏÂ
ÂÌÂÒ„ÔÔÈÁÏ›ÌÔ ÙÔÌ ÙÒ¸Ô ÎÂÈÙÔıÒ„fl·Ú EASY.Q Á ÎÂÈÙÔıÒ„fl· DIS
·ÂÌÂÒ„ÔÔÈÂflÙ·È.
3
1
60min
0:00:10
SP
STBY
√
01227K VPD371 UK+GRE~042 2/3/07 9:58 AM Page 35
Sayfa yükleniyor...
Sayfa yükleniyor...
Sayfa yükleniyor...
Sayfa yükleniyor...
Sayfa yükleniyor...
Sayfa yükleniyor...
Sayfa yükleniyor...
Sayfa yükleniyor...
Sayfa yükleniyor...
Sayfa yükleniyor...
Sayfa yükleniyor...
Sayfa yükleniyor...
Sayfa yükleniyor...
Sayfa yükleniyor...
Sayfa yükleniyor...
Sayfa yükleniyor...
Sayfa yükleniyor...
Sayfa yükleniyor...
Sayfa yükleniyor...
Sayfa yükleniyor...
Sayfa yükleniyor...
Sayfa yükleniyor...
Sayfa yükleniyor...
Sayfa yükleniyor...
Sayfa yükleniyor...
Sayfa yükleniyor...
Sayfa yükleniyor...
Sayfa yükleniyor...
Sayfa yükleniyor...
Sayfa yükleniyor...
Sayfa yükleniyor...
Sayfa yükleniyor...
Sayfa yükleniyor...
Sayfa yükleniyor...
Sayfa yükleniyor...
Sayfa yükleniyor...
Sayfa yükleniyor...
Sayfa yükleniyor...
Sayfa yükleniyor...
Sayfa yükleniyor...
Sayfa yükleniyor...
Sayfa yükleniyor...
Sayfa yükleniyor...
Sayfa yükleniyor...
Sayfa yükleniyor...
Sayfa yükleniyor...
Sayfa yükleniyor...
Sayfa yükleniyor...
Sayfa yükleniyor...
Sayfa yükleniyor...
Sayfa yükleniyor...
Sayfa yükleniyor...
Sayfa yükleniyor...
Sayfa yükleniyor...
Sayfa yükleniyor...
Sayfa yükleniyor...
Sayfa yükleniyor...
Sayfa yükleniyor...
Sayfa yükleniyor...
Sayfa yükleniyor...
Sayfa yükleniyor...
Sayfa yükleniyor...
Sayfa yükleniyor...
Sayfa yükleniyor...
Sayfa yükleniyor...
Sayfa yükleniyor...
Sayfa yükleniyor...
Sayfa yükleniyor...
Sayfa yükleniyor...
Sayfa yükleniyor...
Sayfa yükleniyor...
Sayfa yükleniyor...
Sayfa yükleniyor...
Sayfa yükleniyor...
Sayfa yükleniyor...
-
 1
1
-
 2
2
-
 3
3
-
 4
4
-
 5
5
-
 6
6
-
 7
7
-
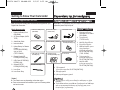 8
8
-
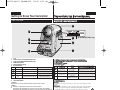 9
9
-
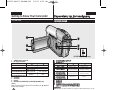 10
10
-
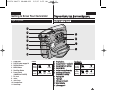 11
11
-
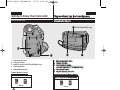 12
12
-
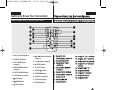 13
13
-
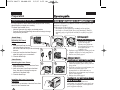 14
14
-
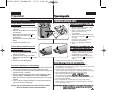 15
15
-
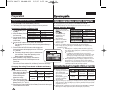 16
16
-
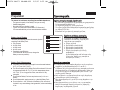 17
17
-
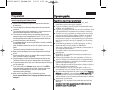 18
18
-
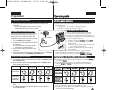 19
19
-
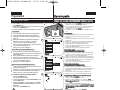 20
20
-
 21
21
-
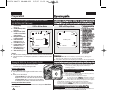 22
22
-
 23
23
-
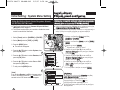 24
24
-
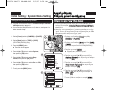 25
25
-
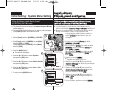 26
26
-
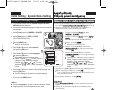 27
27
-
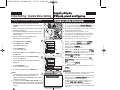 28
28
-
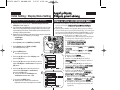 29
29
-
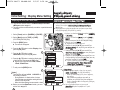 30
30
-
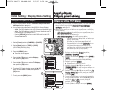 31
31
-
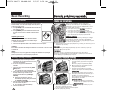 32
32
-
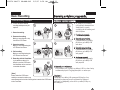 33
33
-
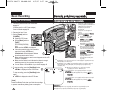 34
34
-
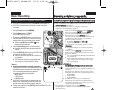 35
35
-
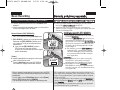 36
36
-
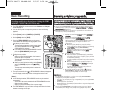 37
37
-
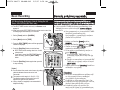 38
38
-
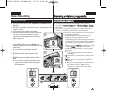 39
39
-
 40
40
-
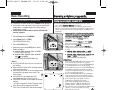 41
41
-
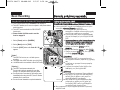 42
42
-
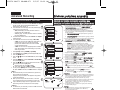 43
43
-
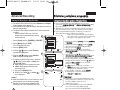 44
44
-
 45
45
-
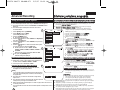 46
46
-
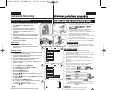 47
47
-
 48
48
-
 49
49
-
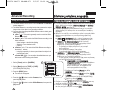 50
50
-
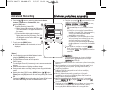 51
51
-
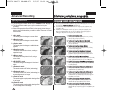 52
52
-
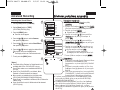 53
53
-
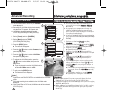 54
54
-
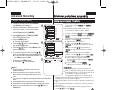 55
55
-
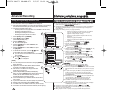 56
56
-
 57
57
-
 58
58
-
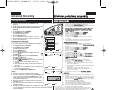 59
59
-
 60
60
-
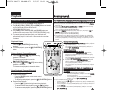 61
61
-
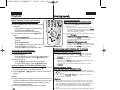 62
62
-
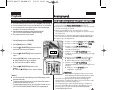 63
63
-
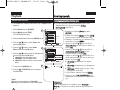 64
64
-
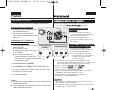 65
65
-
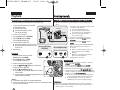 66
66
-
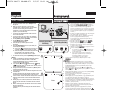 67
67
-
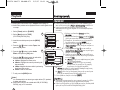 68
68
-
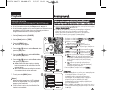 69
69
-
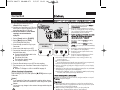 70
70
-
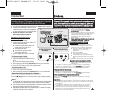 71
71
-
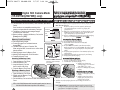 72
72
-
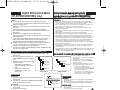 73
73
-
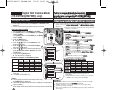 74
74
-
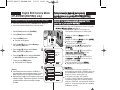 75
75
-
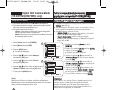 76
76
-
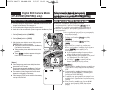 77
77
-
 78
78
-
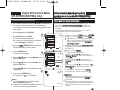 79
79
-
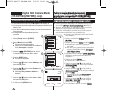 80
80
-
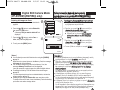 81
81
-
 82
82
-
 83
83
-
 84
84
-
 85
85
-
 86
86
-
 87
87
-
 88
88
-
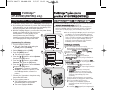 89
89
-
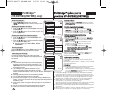 90
90
-
 91
91
-
 92
92
-
 93
93
-
 94
94
-
 95
95
-
 96
96
-
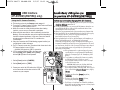 97
97
-
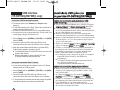 98
98
-
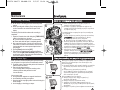 99
99
-
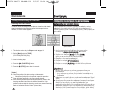 100
100
-
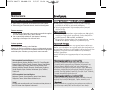 101
101
-
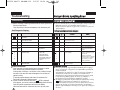 102
102
-
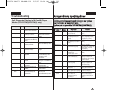 103
103
-
 104
104
-
 105
105
-
 106
106
-
 107
107
-
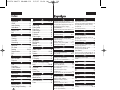 108
108
-
 109
109
-
 110
110


Samsung VP-D371 Kullanım kılavuzu
- Kategori
- Kameralar
- Tip
- Kullanım kılavuzu
diğer dillerde
- English: Samsung VP-D371 User manual
Diğer belgeler
-
AIPTEK PocketDV AHD C 100 El kitabı
-
AIPTEK SeeMe HD Şartname
-
Toshiba Camileo Pro HD Kullanici rehberi
-
-
Motorola CM140 Basic User's Manual
-
Braun MR 400 HC Plus El kitabı
-
-
Olympus Stylus 710 Kullanım kılavuzu
-
-
Zanussi ZDK320X Kullanım kılavuzu