Microlife BP B1 Classic Kullanım kılavuzu
- Kategori
- Kan basıncı birimleri
- Tip
- Kullanım kılavuzu

Microlife AG
Espenstrasse 139
9443 Widnau / Switzerland
www.microlife.com
IB BP B1 Classic EN-TR 5119
BP
B1 Classic
Blood Pressure Monitor
EN
1
TR
7

1
3
2
4
5
6
7
8
9
Microlife BP B1 Classic Microlife BP B1 ClassicGuarantee Card
Name of Purchaser / Alıcının adı
Serial Number / Seri numarası
Date of Purchase / Satın alma tarihi
Specialist Dealer / Uzman satıcı

1BP B1 Classic
EN
Display
Read the instructions carefully before using this device.
Type BF applied part
Intended use:
This oscillometric blood pressure monitor is intended for
measuring non-invasive blood pressure in people aged 12 years or
older.
Dear Customer,
This device was developed in collaboration with physicians and
clinical tests carried out prove its measurement accuracy to be of
a very high standard.*
If you have any questions, problems or want to order spare parts
please contact your local Microlife-Customer Service. Your dealer
or pharmacy will be able to give you the address of the Microlife
dealer in your country. Alternatively, visit the internet at
www.microlife.com where you will find a wealth of invaluable infor-
mation on our products.
Stay healthy – Microlife AG!
* This device uses the same measuring technology as the award
winning «BP 3BTO-A» model tested according to the British and
Irish Hypertension Society (BIHS) protocol.
Table of Contents
1. Using the Device for the First Time
• Inserting the batteries
• Setting the date and time
• Selecting the correct cuff
2. Checklist for Taking a Reliable Measurement
3. Taking a Blood Pressure Measurement
• Manual inflation
• How not to store a reading
• How do I evaluate my blood pressure?
• Appearance of the Pulse Arrhythmia (PAD)
4. Data Memory
• Viewing the stored values
• Clearing all values
5. Battery Indicator and Battery change
• Low battery
• Flat battery – replacement
• Which batteries and which procedure?
Microlife BP B1 Classic
EN
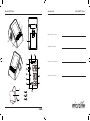
1
ON/OFF button
2
Display
3
M-button (memory)
4
Time Button
5
Cuff Socket
6
Battery Compartment
7
Cuff
8
Cuff Connector
9
Cuff Tube
AT
Systolic Value
AK
Diastolic Value
AL
Pulse Rate
AM
Battery Display
AN
Traffic Light Indicator
AO
Stored Value
AP
Pulse Indicator
AQ
Cuff Fit Check
-A: Suboptimal Cuff Fit
-B: Arm Movement Indicator «Err 2»
-C: Cuff Pressure Check «Err 3»
AR
Cuff Signal Indicator «Err 1»
AS
Pulse Arrhythmia Indicator (PAD)
BT
Date/Time
Keep dry

2
6. Error Messages
7. Safety, Care, Accuracy Test and Disposal
• Safety and protection
• Device care
• Cleaning the cuff
• Accuracy test
• Disposal
8. Guarantee
9. Technical Specifications
Guarantee Card (see Back Cover)
1. Using the Device for the First Time
Inserting the batteries
After you have unpacked your device, first insert the batteries. The
battery compartment 6 is on the bottom of the device. Insert the
batteries (4 x 1.5 V, size AAA), thereby observing the indicated
polarity.
Setting the date and time
1. After the new batteries are fitted, the year number flashes in the
display. You can set the year by pressing the M-button 3. To
confirm and then set the month, press the time button 4.
2. Press the M-button to set the month. Press the time button to
confirm and then set the day.
3. Follow the instructions above to set the day, hour and minutes.
4. Once you have set the minutes and pressed the time button, the
date and time are set and the time is displayed.
5. If you want to change the date and time, press and hold the time
button down for approx. 3 seconds until the year number starts
to flash. Now you can enter the new values as described above.
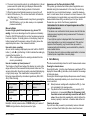
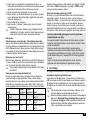
Selecting the correct cuff
Microlife offers different cuff sizes. Select the cuff size to match the
circumference of your upper arms (measured by close fitting in the
centre of the upper arm).
Pre-shaped cuffs are optionally available.
Only use Microlife cuffs.
This device is not compatible with other Microlife cuff sizes
except M and M-L.
Contact your local Microlife Service if the enclosed cuff 7 does
not fit.
Connect the cuff to the device by inserting the cuff connector 8
into the cuff socket 5 as far as it will go.
2. Checklist for Taking a Reliable Measurement
Avoid activity, eating or smoking immediately before the
measurement.
Sit down on a back-supported chair and relax for 5 minutes.
Keep the feet flat on the floor and do not cross your legs.
Always measure on the same arm (normally left). It is recom-
mended that doctors perform double arm measurements on a
patients first visit in order to determine which arm to measure in
the future. The arm with the higher blood pressure should be
measured.
Remove close-fitting garments from the upper arm. To avoid
constriction, shirt sleeves should not be rolled up - they do not
interfere with the cuff if they are laid flat.
Always ensure that the correct cuff size is used (marking on the
cuff).
Fit the cuff closely, but not too tight.
Make sure that the cuff is positioned 1-2 cm above the elbow.
The artery mark on the cuff must lie over the artery which
runs down the inner side of the arm.
Support your arm so it is relaxed.
Ensure that the cuff is at the same height as your heart.
3. Taking a Blood Pressure Measurement
1. Press the ON/OFF button 1 to start the measurement.
2. The cuff will now pump up automatically. Relax, do not move
and do not tense your arm muscles until the measurement
result is displayed. Breathe normally and do not talk.
3. The cuff fit check AQ on the display indicates that the cuff is
perfectly placed. If the icon AQ-A appears, the cuff is fitted
suboptimally, but it is still ok to measure.
4. When the correct pressure is reached, the pumping stops and
the pressure falls gradually. If the required pressure was not
reached, the device will automatically pump some more air into
the cuff.
5. During the measurement, the pulse indicator AP flashes in the
display.
Cuff size for circumference of upper arm
M 22 - 32 cm
M - L 22 - 42 cm

3BP B1 Classic
EN
6. The result, comprising the systolic AT and the diastolic AK blood
pressure and the pulse rate AL is displayed. Note also the
explanations on further display symbols in this booklet.
7. When the device has finished measuring, remove the cuff.
8. Switch off the device. (The monitor does switch off automati-
cally after approx. 1 min.).
You can stop the measurement at any time by pressing the
ON/OFF button (e.g. if you feel uneasy or an unpleasant
pressure sensation).
Manual inflation
In case of high systolic blood pressure (e.g. above 135
mmHg), it can be an advantage to set the pressure individually.
Press the ON/OFF button after the monitor has been pumped up
to a level of approx. 30 mmHg (shown on the display). Keep the
button pressed until the pressure is about 40 mmHg above the
expected systolic value – then release the button.
How not to store a reading
As soon as the reading is displayed press and hold the ON/OFF
button 1 until «M» AO is flashing. Confirm to delete the reading by
pressing the time button 4.
«CL» is displayed when the reading is deleted from the
memory successfully.
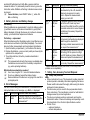
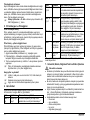
How do I evaluate my blood pressure?
The triangle on the left-hand edge of the display AN points at the
range within which the measured blood pressure value lies. The
value is either within the optimum (white), elevated (hatched gray)
or high (black) range. The classification corresponds to the
following ranges defined by international guidelines (ESH, ESC,
JSH). Data in mmHg.
The higher value is the one that determines the evaluation.
Example: a blood pressure value of 140/80 mmHg or a value of
130/90 mmHg indicates «blood pressure too high».
Appearance of the Pulse Arrhythmia (PAD)
This symbol AS indicates that certain pulse irregularities were
detected during the measurement. In this case, the result may
deviate from your normal blood pressure – repeat the measure-
ment. In most cases, this is no cause for concern. However, if the
symbol appears on a regular basis (e.g. several times a week with
measurements taken daily) we advise you to tell your doctor.
Please show your doctor the following explanation:
4. Data Memory
This device automatically stores the last 30 measurement values.
Viewing the stored values
Press the M-button 3 briefly, when the device is switched off. The
display first shows «M» AO and «A», which stands for the average
of all stored values.
Pressing the M-button again displays the previous value. Pressing
the M-button repeatedly enables you to move from one stored
value to another.
Blood pressure readings with suboptimal cuff fit AQ-A are
not considered in the average value.
Pay attention that the maximum memory capacity of 30
memories is not exceeded. When the 30 memory is full,
the oldest value is automatically overwritten with the 31
value. Values should be evaluated by a doctor before the
memory capacity is reached – otherwise data will be lost.
Clearing all values
If you are sure that you want to permanently remove all stored
values, hold down the M-button (the device must have been
Range Systolic Diastolic Recommendation
1. blood pressure
too high
≥135 ≥85 Seek medical
advice
2. blood pressure
elevated
130 - 134 80 - 84 Self-check
3. blood pressure
normal
<130 <80 Self-check
Information for the doctor on frequent appearance of the
Arrhythmia indicator
This device is an oscillometric blood pressure monitor that also
analyses pulse irregularity during measurement. The device is
clinically tested.
The arrhythmia symbol is displayed after the measurement, if
pulse irregularities occur during measurement. If the symbol
appears more frequently (e.g. several times per week on
measurements performed daily) we recommend the patient to
seek medical advice.
This device does not replace a cardiac examination, but serves
to detect pulse irregularities at an early stage.

4
switched off beforehand) until «CL ALL» appears and then
release the button. To permanently clear the memory, press the
time button while «CL ALL» is flashing. Individual values cannot
be cleared.
Cancel deletion: press ON/OFF button 1 while «CL
ALL» is flashing.
5. Battery Indicator and Battery change
Low battery
When the batteries are approximately ¾ empty the battery symbol
AM will flash as soon as the device is switched on (partly filled
battery displayed). Although the device will continue to measure
reliably, you should obtain replacement batteries.
Flat battery – replacement
When the batteries are flat, the battery symbol AM will flash as soon
as the device is switched on (flat battery displayed). You cannot
take any further measurements and must replace the batteries.
1. Open the battery compartment 6 at the back of the device.
2. Replace the batteries – ensure correct polarity as shown by the
symbols in the compartment.
3. To set date and time, follow the procedure described in
«Section 1.».
The measurements stored in the memory are deleted when
the batteries are removed from the battery compartment
(e.g. when replacing batteries).
Which batteries and which procedure?
Use 4 new, long-life 1.5 V, size AAA alkaline batteries.
Do not use batteries beyond their date of expiry.
Remove batteries if the device is not going to be used for a
prolonged period.
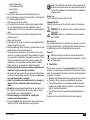
6. Error Messages
If an error occurs during the measurement, the measurement is
interrupted and an error message, e.g. «Err 3», is displayed.
* Please immediately consult your doctor, if this or any other
problem occurs repeatedly.
7. Safety, Care, Accuracy Test and Disposal
Safety and protection
Follow instructions for use. This document provides important
product operation and safety information regarding this device.
Please read this document thoroughly before using the device
and keep for future reference.
This device may only be used for the purposes described in
these instructions. The manufacturer cannot be held liable for
damage caused by incorrect application.
This device comprises sensitive components and must be
treated with caution. Observe the storage and operating condi-
tions described in the «Technical Specifications» section.
Protect it from:
- water and moisture
- extreme temperatures
Error
Description
Potential cause and remedy
«
Err 1
»
AR
Signal too
weak
The pulse signals on the cuff are too
weak. Re-position the cuff and repeat the
measurement.*
«
Err 2
»
AQ-B
Error signal During the measurement, error signals
were detected by the cuff, caused for
instance by movement or muscle
tension. Repeat the measurement,
keeping your arm still.
«
Err 3
»
AQ-C
Abnormal
cuff pres-
sure
An adequate pressure cannot be gener-
ated in the cuff. A leak may have
occurred. Check that the cuff is correctly
connected and is not too loose. Replace
the batteries if necessary. Repeat the
measurement.
«
Err 5
»
Abnormal
result
The measuring signals are inaccurate
and no result can therefore be displayed.
Read through the checklist for
performing reliable measurements and
then repeat the measurement.*
«
HI
»
Pulse or
cuff pres-
sure too
high
The pressure in the cuff is too high (over
299 mmHg) OR the pulse is too high
(over 200 beats per minute). Relax for 5
minutes and repeat the measurement.*
«
LO
»
Pulse too
low
The pulse is too low (less than 40 beats
per minute). Repeat the measurement.*
Error
Description
Potential cause and remedy

5BP B1 Classic
EN
- impact and dropping
- contamination and dust
- direct sunlight
- heat and cold
The cuffs are sensitive and must be handled with care.
Do not exchange or use any other kind of cuff or cuff connector
for measuring with this device.
Only pump up the cuff once fitted.
Do not use this device close to strong electromagnetic fields
such as mobile telephones or radio installations. Keep a
minimum distance of 3.3 m from such devices when using this
device.
Do not use this device if you think it is damaged or notice
anything unusual.
Never open this device.
If the device is not going to be used for a prolonged period the
batteries should be removed.
Read the additional safety information provided within the indi-
vidual sections of this instruction manual.
The measurement results given by this device is not a diag-
nosis. It is not replacing the need for the consultation of a physi-
cian, especially if not matching the patient’s symptoms. Do not
rely on the measurement result only, always consider other
potentially occurring symptoms and the patient’s feedback.
Calling a doctor or an ambulance is advised if needed.
Permanently high blood pressure values can damage your
health and must be treated by your doctor!
Always discuss your values with your doctor and tell him/her if
you have noticed anything unusual or feel unsure. Never rely
on single blood pressure readings.
Under no circumstances should you alter the dosages of
drugs or initiate a treatment without consulting your
doctor.
Deviations between measurements taken by your doctor or in
the pharmacy and those taken at home are quite normal, as
these situations are completely different.
The pulse display is not suitable for checking the
frequency of heart pacemakers!
If you are pregnant, you should monitor your blood pressure
regularly as it can change drastically during this time.
Ensure that children do not use this device unsupervised;
some parts are small enough to be swallowed. Be aware of
the risk of strangulation in case this device is supplied with
cables or tubes.
Device care
Clean the device only with a soft, dry cloth.
Cleaning the cuff
Carefully remove spots on the cuff with a damp cloth and soap-
suds.
WARNING: Do not wash the cuff in a washing machine or
dishwasher!
WARNING: Under no circumstances may you wash the
inner bladder!
Accuracy test
We recommend this device is tested for accuracy every 2 years or
after mechanical impact (e.g. being dropped). Please contact your
local Microlife-Service to arrange the test (see foreword).
Disposal
Batteries and electronic devices must be disposed of in
accordance with the locally applicable regulations, not with
domestic waste.
8. Guarantee
This device is covered by a 5 year guarantee from the date of
purchase. The guarantee is valid only on presentation of the guar-
antee card completed by the dealer (see back) confirming date of
purchase or the receipt.
Batteries and parts that become worn with use are not included.
Opening or altering the device invalidates the guarantee.
The guarantee does not cover damage caused by improper
handling, discharged batteries, accidents or non-compliance
with the operating instructions.
The cuff has a functional guarantee (bladder tightness) for 2
years.
Please contact your local Microlife-Service (see foreword).

6
9. Technical Specifications
This device complies with the requirements of the Medical Device
Directive 93/42/EEC.
Technical alterations reserved.
Operating condi-
tions:
10 - 40 °C / 50 - 104 °F
15 - 95 % relative maximum humidity
Storage conditions: -20 - +55 °C / -4 - +131 °F
15 - 95 % relative maximum humidity
Weight: 251 g (including batteries)
Dimensions: 124 x 92 x 61 mm
Measuring proce-
dure:
oscillometric, corresponding to Korotkoff
method: Phase I systolic, Phase V
diastolic
Measurement range: 20 - 280 mmHg – blood pressure
40 - 200 beats per minute – pulse
Cuff pressure display
range: 0 - 299 mmHg
Resolution: 1 mmHg
Static accuracy: pressure within ± 3 mmHg
Pulse accuracy: ± 5 % of the readout value
Voltage source:
4 x 1.5 V alkaline batteries; size AAA
Battery lifetime: approx. 400 measurements
(using new batteries)
IP Class: IP20
Reference to
standards:
EN 1060-1 /-3 /-4; IEC 60601-1;
IEC 60601-1-2 (EMC); IEC 60601-1-11
Expected service life: Device: 5 years or 10000 measurements
Accessories: 2 years

7BP B1 Classic
TR
Ekran
Aygıtı kullanmadan önce, talimatları dikkatle okuyun.
BF tipi ekipman
Kullanım amacı:
Bu osilometrik tansiyon aletinin kullanım amacı, 12 yaşından
büyük kişilerin girişimsel olmayan kan basıncının ölçülmesidir.
Sayın Müşterimiz,
Aygıt, hekimlerle işbirliği içerisinde geliştirilmiştir ve yapılan
bilimsel testlerin sonucunda ölçüm doğruluğunun oldukça yüksek
olduğu kanıtlanmıştır.*
Sorularınız, sorunlarınız ve yedek parça siparişleriniz için, lütfen,
yerel Microlife-Müşteri Servisi ile görüşün. Ülkenizdeki Microlife
bayisinin adresini satıcınızdan ya da eczanenizden öğrenebilir-
siniz. İkinci bir yol olarak, ürünlerimiz hakkında geniş bilgi edinebi-
leceğiniz www.microlife.com internet adresini de ziyaret edebilir-
siniz.
Sağlıkla kalın – Microlife AG!
* Bu aygıt,
İngiliz Hipertansiyon Cemiyeti - British and Irish Hyper-
tension Society (BIHS) - protokolüne uygun olarak test edilen ödül
sahibi «BP 3BTO-A» modeli ile aynı ölçüm teknolojisine sahiptir.
İçindekiler
1. Aygıtın İlk Kez Kullanımı
• Pillerin yerleştirilmesi
• Tarih ve saatin ayarlanması
•Doğru kaf seçimi
2. Güvenilir Bir Ölçüm Alma Kontrol Listesi
3. Tansiyonun Ölçülmesi
•Elle şişirme
• Ölçüm sonucu nasıl silinir?
• Tansiyonumu nasıl değerlendirebilirim?
• Kalp ritim bozukluğu göstergesi (PAD)
4. Veri Belleği
• Kaydedilen değerlerin görüntülenmesi
• Tüm değerlerin silinmesi
5. Pil Göstergesi ve Pil değişimi
• Piller neredeyse bitmiş
• Piller bitmiş – pillerin değiştirilmesi
• Hangi piller ve yöntem?
6. Hata İletileri
Microlife BP B1 Classic
TR
1
AÇ/KAPA Düğmesi
2
Ekran
3
M-Düğme (Bellek)
4
Zaman Düğmesi
5
Kaf Soketi
6
Pil Bölmesi
7
Kaf
8
Kaf Bağlantısı
9
Kaf Hortumu
AT
Büyük Tansiyon Değeri
AK
Küçük Tansiyon Değeri
AL
Nabız Sayısı
AM
Pil Göstergesi
AN
Trafik Işığı Göstergesi
AO
Kaydedilen Değer
AP
Nabız Göstergesi
AQ
Kaf Uyum Kontrolü
-A: Optimal Olmayan Kaf Uyumu
-B: Kol Hareketi Göstergesi «Err 2»
-C: Kaf Basınç Kontrolü «Err 3»
AR
Kaf Sinyal Göstergesi «Err 1»
AS
Nabız Kalp Rtim Bozukluğu Göstergesi (PAD)
BT
Tarih/Saat
Kuru tutun

8
7. Güvenlik, Bakım, Doğruluk Testi ve Elden Çıkarma
• Güvenlik ve koruma
•Aygıtın bakımı
•Kafın temizlenmesi
•Doğruluk testi
• Elden çıkarma
8. Garanti Kapsamı
9. Teknik Özellikler
Garanti Belgesi (bkz Arka Kapak)
1. Aygıtın İlk Kez Kullanımı
Pillerin yerleştirilmesi
Aygıtın ambalajını açtıktan sonra, ilk önce pilleri yerleştirin. Pil
bölmesi 6, aygıtın alt tarafındadır. Pilleri (4 x AAA 1.5 V boyu-
tunda) yerleştirin; bunu yaparken kutupların gösterildiği gibi doğru
konumda bulunmasına dikkat edin.
Tarih ve saatin ayarlanması
1. Yeni piller takılınca, yıl sayısı ekranda yanıp söner. M-düğme-
sine 3 basarak yılı ayarlayabilirsiniz. Ayı teyit edip ayarlamak
için, zaman düğmesine 4 basın.
2. M-düğmesini kullanarak şimdi ayı ayarlayabilirsiniz. Günü teyit
etmek ve ayarlamak için, zaman düğmesine basın.
3. Günü, saati ve dakikayı ayarlamak için, lütfen, yukarıdaki tali-
matları uygulayın.
4. Dakikayı ayarlayıp zaman düğmesine bastık
tan sonra, tarih ve
saat ayarlanır ve zaman görüntülenir.
5. Tarih ve saati değiştirmek isterseniz, zaman düğmesine basın
ve yıl sayısı yanıp sönünceye kadar 3 saniye basılı tutun. Şimdi
yeni değerleri yukarıda açıklandığı şekilde girebilirsiniz.
Doğru kaf seçimi
Microlife değişik ebatlarda kaflar sunar. Üst kolunuzun çevresine
uygun kaf boyutunu seçin (üst kolunuzun ortasını en uygun şekilde
kavrayarak ölçülür).
Sert manşonlar opsiyonel olarak alınabilmektedir.
Sadece Microlife kaf kullanın!
Bu cihaz, M ve M-L harici diğer Microlife kaflarla uyumlu
değildir.
Ürünle birlikte verilen kaf 7 uymazsa, yerel Microlife Servisi ile
görüşün.
Kaf bağlantısını 8 olabildiğince kaf soketine 5 yerleştirerek,
kafı aygıta bağlayın.
2. Güvenilir Bir Ölçüm Alma Kontrol Listesi
Ölçümden hemen önce, hareket etmekten kaçının; herhangi bir
şey yemeyin ve sigara içmeyin.
Sırt destekli bir sandalyeye oturun ve 5 dakika süre ile bekleyin.
Ayaklarınızı yerde düz bir şekilde konumlandırın, ayak ayak
üstüne atmayınız.
Her zaman aynı koldan ölçüm yapın (normalde sol kol).
Doktorlara hastaların ilk ziyaretlerinde gelecekte hangi koldan
ölçüm almaları gerektiğini belirlemek için genellikle iki koldan
birden ölçüm almaları tavsiye edilir. Yüksek kan basıncını veren
kol seçilmelidir.
Üst kolunuzu sıkıca kavrayan giysileri çıkarın. Basınç oluştur-
maması için, gömlek kollarını kıvırmayın - düz bırakıldıklarında
kaf işlevini engellemezler.
Her zaman doğru ölçüdeki kafın (ölçü kafın üzerindedir) kulla-
nıldığından emin olun.
Kaf, üst kolunuzu yeterince kavrasın; ancak, çok sıkı
olmasın.
Kafın iç dirseğinizin 1-2 cm yukarısına yerleştirildiğinden
emin olun.
Kafın üzerine konumlanmış olan atardamar işareti kolu-
nuzun iç kısmından aşağı doğru inen atardamarın
üzerinde olmalıdır.
Rahatça ölçüm yapılması için, kolunuzu destekleyin.
Kafın kalbinizle aynı yükseklikte olmasını sağlayın.
3. Tansiyonun Ölçülmesi
1. Ölçüm işlemini başlatmak için, AÇ/KAPA düğmesine 1 basın.
2. Kaf şimdi otomatik olarak şişecektır. Gevşeyin; ölçüm sonucu
görüntüleninceye kadar hareket etmeyin ve kol kaslarınızı
kasmayı n. Normal biçimde soluk alıp verin ve konuşmayın.
3. Ekrandaki kaf uyum kontrolü AQ, kafın mükemmel şekilde
yerleştirilmiş olduğunu gösterir. AQ-A simgesi görünürse, kaf
optimal olmayan şekilde takılmış, ancak yine de ölçüm yapıla-
bilir demektir.
Kaf boyutu üst kolunuzun çevresi için
M 22 - 32 cm
M - L 22 - 42 cm

9BP B1 Classic
TR
4. Doğru basınca ulaşıldığında, pompalama işlemi durur ve
basınç dereceli olarak düşer. İstenilen basınca ulaşılamamışsa,
aygıt kafa otomatik olarak biraz daha hava pompalar.
5. Ölçüm sırasında nabız göstergesi AP yanıp söner.
6. Büyük tansiyon AT ile küçük tansiyonu AK ve nabzı AL içeren
sonuç görüntülenir. Broşürdeki diğer görüntülerle ilgili açıkla-
maları da dikkate alınız.
7. Ölçüm bittiğinde kafı çıkarınız.
8. Aygıtı kapatın. (Yaklaşık 1 dakika sonra monitör otomatik
olarak kapanır).
AÇ/KAPA düğmesine basarak, aygıtı istediğiniz zaman
kapatabilirsiniz (örneğin, kendinizi rahat hissetmiyorsanız
ya da rahatsız edici bir basınç algılanması halinde).
Elle şişirme
Yüksek tansiyon varsa (örneğin, 135 mmHg’nin üzerinde),
basıncı özel olarak ayarlamak avantajlı olabilir. Monitör yaklaşık
30 mmHg düzeyine pompaladıktan sonra (ekranda gösterilir) AÇ/
KAPA düğmesine basın. Basınç beklenen büyük tansiyon değe-
rinin yaklaşık 40 mmHg üzerinde olana kadar düğmeyi basılı tutun
– ardından düğmeyi serbest bırakın.
Ölçüm sonucu nasıl silinir?
Ölçülen değer görüntülenir görüntülenmez AÇ/KAPA düğmesine
1 basın ve «M» AO yanıp sönene kadar basılı tutun. time düğme-
sine 4 basarak ekrandaki değeri silmeyi onaylayın.
Ölçülen değer bellekten başarıyla silindiğinde «CL» ibaresi
görüntülenir.
Tansiyonumu nasıl değerlendirebilirim?
Ekranın sol kenarındaki üçgen AN ölçülen tansiyon değerinin
içinde bulunduğu aralığa işaret eder. Değer, normal (beyaz),
yükselmiş (tireli gri) veya yüksek (siyah) aralıklarından birindedir.
Sınıflandırma, uluslararası kılavuzların (ESH, ESC, JSH) tanım-
landığı aşağıdaki aralıklara denk düşer. Veriler mmHg cinsindedir.
Değerlendirmeyi belirleyen, daha yüksek olan değerdir. Örneğin:
Kan basıncı 140/80 mmHg değeri veya değeri 130/90 mmHg,
«tansiyon oldukça yüksek» gösterir.
Kalp ritim bozukluğu göstergesi (PAD)
Bu simge AS, ölçüm sırasın
da birtakım nabız düzensizliklerinin
algılandığını gösterir. Bu durumda, sonuç, normal tansiyonu-
nuzdan farklı olabilir – ölçümü tekrarlayın. Birçok durumda, kaygı-
lanmak için herhangi bir neden söz konusu değildir. Bununla
birlikte, simge sık sık görüntüleniyorsa (örneğin, günlük ölçüm
yapıldığında haftada birkaç kez), bu durumu doktorunuza bildirme-
nizi öneririz. Lütfen, doktorunuza aşağıdaki açıklamayı gösteriniz:
4. Veri Belleği
Bu aygıtı otomatik olarak son 30 ölçüm değerleri depolar.
Kaydedilen değerlerin görüntülenmesi
Aygıt kapanınca M-düğmesine 3 kısaca basın. Ekranda, önce
«M» AO simgesi ve «A» tüm saklı değerlerin ortalamasını gösterir.
M-düğmesine tekrar basıldığında, bir önceki değer görüntülenir.
M-düğmesine üst üste basarak, bir kayıtlı değerden diğerine geçe-
bilirsiniz.
Optimal olmayan kaf uyumuyla tansiyon ölçümleri AQ-A,
ortalama değerin hesabında dikkate alınmaz.
Maksimum bellek kapasitesi olan 30 sayısının aşılmadığına
dikkat edin. Bellekteki 30 değer dolduğunda, en eski veri
31. yeni veri ile değişir. Bellek kapasitesi dolmadan önce,
değerlerin doktor tarafından değerlendirilmesi gerekmek-
tedir – aksi takdirde veriler kaybolur.
Düzey
Büyük
Tansiyon
Küçük
Tansiyon Öneri
1. tansiyon çok
yüksek
≥135 ≥85 Tıbbi kontrolden
geçiniz
2. tansiyon yükseldi 130 - 134 80 - 84 Kendiniz kontrol
ediniz
3. tansiyon normal <130 <80 Kendiniz kontrol
ediniz
Kalp atışı düzensizliği göstergesinin sık sık görünmesi
hakkında doktor için bilgi
Bu aygıt osilometrik ölçüm yöntemi ile ölçüm yapan ve ölçüm
sırasında nabız düzensizliklerini analiz eden bir cihazdır. Klinik
olarak test edilmiştir.
Ölçüm sırasında nabız düzensizlikleri meydana gelirse,
ölçümden sonra kalp atışı düzensizliği simgesi görüntülenir.
Simge daha sık görüntülenirse (örneğin, günlük ölçüm yapıldı-
ğında haftada birkaç kez), hastaya tıbbi kontrolden geçmesini
öneririz.
Aygıt, bir kalp muayenesi işlevi görmez; ancak, erken bir
aşamada nabız düzensizliklerinin algılanmasını sağlar.

10
Tüm değerlerin silinmesi
Kayıtlı tüm değerleri kalıcı olarak silmek istediğinizden emin değil-
seniz, «CL ALL» ibaresi görünene kadar M düğmesini basılı tutun
ve ardından düğmeyi serbest bırakın. Belleği kalıcı olarak temiz-
lemek için, «CL ALL» ibaresi yanıp sönerken saat düğmesine
basın. Tek tek değerler silinemez.
Silmeyi iptal etme: «CL ALL» ibaresi yanıp sönerken AÇ/
KAPA düğmesine 1 basın.
5. Pil Göstergesi ve Pil değişimi
Piller neredeyse bitmiş
Piller, yaklaşık olarak ¾ oranında kullanıldığında, aygıt açılır
açılmaz kullanılmış pil simgesi AM yanıp söner (kısmen dolu bir pil
görüntülenir). Her ne kadar aygıt, güvenilir ölçüm yapmaya devam
etse de pilleri değiştirmeniz gerekir.
Piller bitmiş – pillerin değiştirilmesi
Piller bittiğinde, aygıt açılır açılmaz pil simgesi AM yanıp söner
(bitmiş bir pil görüntülenir). Piller bitttiğinde, artık ölçüm yapamaz-
sınız ve pilleri değiştirmeniz gerekir.
1. Aygıtın arkasındaki pil bölmesinin 6 kapağını açınız.
2. Pilleri değişt
irin – bölmedeki simgelerle gösterildiği şekilde
kutupların doğru konumda olup olmadığına dikkat edin.
3. Tarih ve saati ayarlamak için, «Bölüm 1.» de açıklanan yöntemi
uygulayın.
Piller, pil bölmesinden çıkarıldığında; bellekte saklanan
ölçümler silinir. (örn. pilleri değiştirirken)
Hangi piller ve yöntem?
Lütfen, 4 adet yeni ve uzun ömürlü 1.5V, AAA alkalin pili
kullanın.
Kullanım süresi geçen pilleri kullanmayın.
Aygıt uzun bir süre kullanılmayacaksa, pilleri çıkarın.
6. Hata İletileri
Ölçüm sırasında hata meydana gelirse, ölçüm işlemi durdurulur ve
bir hata iletisi, örneğin «Err 3», görüntülenir.
* Bu veya başka bir problem tekrarlar ise, lütfen acilen doktoru-
nuza başvurunuz.
7. Güvenlik, Bakım, Doğruluk Testi ve Elden Çıkarma
Güvenlik ve koruma
Kullanım için talimatları okuyunuz. Bu doküman cihazın güvenli
kullanımı için önemli bilgiler içermektedir. Lütfen cihazı kullan-
madan önce bu dökümanı tamamen okuyunuz ve gelecekte
tekrar başvurmak üzere saklayınız.
Bu ürün, sadece bu broşürde açıklanan amaçlar çerçevesinde
kullanılabilir. İmalatçı, yanlış uygulamadan kaynaklanan zarar
ziyan için sorumlu tutulamaz.
Aygıt, hassas parçalara sahiptir ve dikkatli biçimde kullanılma-
lıdır. «Teknik Özellikler» bölümünde açıklanan saklama ve
çalıştırma koşullarını göz önünde bulundurun!
Aşağıdaki durumlara maruz kalmasına engel olun:
- su ve nem
-aşırı sıcaklıklar
- darbe ve düşürülme
- kir ve toz
-doğrudan güneş ışığı
Hata Açıkl
ama Olası nedeni ve çözümü
«
Err 1
»
AR
Sinyal çok
zayıf
Kaf nabız sinyalleri çok zayıf. Kafı
yeniden takın ve ölçümü tekrarlayın.*
«
Err 2
»
AQ-B
Hata sinyali Ölçüm sırasında, kaf, hareket etmekten
ya da adale kasılmasından kaynaklanan
hata sinyalleri algıladı. Kolunuzu kımıl-
datmadan ölçümü tekrarlayın.
«
Err 3
»
AQ-C
Anormal kaf
basıncı
Kaf uygun basınç oluşturulamıyor.
Kaçak meydana gelmiş olabilir. Kafın
doğru takılıp takılmadığını ve çok gevşek
olup olmadığını konrol edin. Gerekirse,
pilleri değiştirin. Ölçümü tekrarlayın.
«
Err 5
»
Anormal
sonuç
Ölçüm sinyalleri doğru değil ve bu
nedenle sonuç görüntülenemiyor. Güve-
nilir ölçüm yapılabilmesi için, kontrol
listesini okuyun ve ölçümü tekrarlayın.*
«
HI
»
Nabız ya da
kaf basıncı
çok yüksek
Kaf basınç çok yüksek (299 mmHg'nin
üzerinde) YA DA nabız çok yüksek (daki-
kada 200 atıştan fazla). 5 dakika
gevşeyin ve ölçümü tekrarlayın.*
«
LO
»
Nabız çok
düşük
Nabız çok düşük (dakikada 40 atıştan
daha düşük). Ölçümü tekrarlayın.*
Hata Açıklama Olası nedeni ve çözümü

11BP B1 Classic
TR
-sıcak ve soğuk
Kaf, hassastır ve dikkatli biçimde kullanılmalıdır.
Bu cihaz ile ölçüm yaparken başka çeşit kaf veya kaf konnek-
törü kullanmayınız ya da değiştirmeyiniz.
Kafı cihaza taktıktan sonra pompalayın.
Aygıtı cep telefonları ya da radyo donanımları gibi güçlü elek-
tromanyetik alanlara yakın yerlerde kullanmayın. Aygıtı kulla-
nırken bu tip cihazlardan minimum 3.3 metre uzakta olun.
Hasar gördüğünü düşünüyorsanız ya da herhangi bir anormal
durum sezdiyseniz, aygıtı kullanmayın.
Aygıtı kesinlikle açmayın.
Aygıtın uzun bir süre kullanılmaması durumunda, pillerin çıka-
rılması gerek
ir.
Broşürün ilgili bölümlerindeki diğer güvenlik talimatlarını da
okuyun.
Bu cihaz tarafından verilen ölçüm sonuçları bir teşhis olarak
değerlendirilmemelidir. Mutlaka doktorunuza danışınız. Özel-
likle, hasta semptomları cihaz ölçümüyle uyuşmuyorsa sadce
ölçüm sonucuna güvenmeyin. Diğer semptomları ve hastanın
geri bildirimini göz önünde bulundurarak doktorunuzla görüşün
veya gerekiyorsa ambulans çağırın.
Sürekli yüksek tansiyon değerleri, sağlığınıza zarar vere-
bilir ve doktorunuz tarafından tedavi edilmesi gerekir!
Ölçüm değerlerini her zaman doktorunuza bildirin ve olağandışı
bir şey fark ettiğinizde ya da emin olmadığınız bir durum söz
konusu olduğunda doktorunuza danışın. Kesinlikle tek bir
tansiyon ölçüm sonucuna güvenmeyin.
Hiçbir sart altında ilaçlarınızın doz
unu artırmamalı ve
doktorunuza danışmadan bir tedaviye başlamamalısınız.
Doktorunuz ya da eczacınız tarafından veya evde yapılan
ölçümler arasındaki sapmalar, söz konusu durumlar tamamen
farklı olduğu için, oldukça normaldir.
Nabız göstergesi, kalp pillerinin frekansının kontrolü için
uygun değildir!
Hamilelik döneminde çok değişiklik gösterdiği için tansiyonu-
nuzu düzenli kontrol etmeniz gerekmektedir.
Çocukların denetimsiz bir şekilde ürünü kullanmalarına izin
vermeyin; bazı parçalar, yutulabilecek kadar küçüktür.
Aygıtın kablo veya borularının olması nedeni ile yaratabile-
ceği boğulma riskinin farkında olun.
Aygıtın bakımı
Aygıtı sadece yumuşak ve kuru bir bezle temizleyin.
Kafın temizlenmesi
Kaf üzerindeki noktaları sabunlu su ile nemlendirilmiş bezle dikkatli
bir şekilde gideriniz.
UYARI: Kafı çamaşır veya bulaşık makinesinde yıkama-
yınız!
UYARI: Hiçbir koşulda iç keseyi yıkamayın!
Doğruluk testi
Her 2 yılda bir ya da mekanik darbeye maruz kalması (örneğin,
düşürülmesi) durumunda, ürünün doğru çalışıp çalışmadığının
test edilmesini öneririz. Test işlemini ayarlamak için, lütfen, yerel
Microlife-Servisi ile görüşün (bkz ön söz).
Elden çıkarma
Piller ve elektronik ürünler, çöpe atılmamalı; ancak, yürür-
lükteki yönetmeliklere uygun olarak elden çıkarılmalıdır.
8. Garanti Kapsamı
Bu aygıt, satın alındığı tarihten itibaren 5 yıl garanti kapsamın-
dadır. Garanti, sadece satıcınız (arkaya bakınız) tarafından doldu-
rulan ve satın alma ya da fatura tarihini teyit eden garanti belge-
sinin mevcudiyeti ile geçerlilik kazanır.
Yıpranmış pillerle ve parçalarla kullanımı garanti kapsamında
değildir.
Aygıtın açılması ya da üzerinde değişiklik yapılması, garantiyi
geçersiz kılar.
Garanti, yanlış kullanımdan, pillerin boşalmasından, kazalar ve
çalıştırma talimatlarına uygun davranılmamaktan kaynaklanan
zarar ziyanı kapsamaz.
Kafın 2
yıllık fonksiyonel bir garantisi vardır (hava kesesinin
sıkılığı).
Lütfen, yerel Microlife-Servisi ile görüşün (bkz ön söz).

12
9. Teknik Özellikler
Bu cihaz, 93/42/EEC Tıbbi Cihaz Yönetmenliği gereksinimleri ile
uyumludur.
Teknik özelliklerin değiştirilmesi hakkı saklıdır.
Çalışma koşulları: 10 - 40 °C / 50 - 104 °F
%15 - 95 maksimum bağıl nem
Saklama koşulları: -20 - +55 °C / -4 - +131 °F
%15 - 95 maksimum bağıl nem
Ağırlık: 251 g (piller dahil)
Boyutlar: 124 x 92 x 61 mm
Ölçüm yöntemi: osilometrik, Korotkoff yöntemine uygun:
Aşama I büyük tansiyon, Aşama V küçük
tansiyon
Ölçüm aralığı: 20 - 280 mmHg – tansiyon
dakikada 40 - 200 atış – nabız
Kaf basıncı görüntü-
leme aralığı: 0 - 299 mmHg
Çözünürlük: 1 mmHg
Statik doğruluk: ±3 mmHg aralığında basınç
Nabız doğruluğu: ±ölçülen değerin %5'i
Gerilim kaynağı:
4 x
1.5 V alkalin piller; boyut AAA
Pil ömrü: Yaklaşık 400 ölçüm (Yeni pillerle)
IP sınıfı: IP20
İlgili standartlar: EN 1060-1 /-3 /-4; IEC 60601-1;
IEC 60601-1-2 (EMC); IEC 60601-1-11
Beklenen servis
ömrü:
Cihaz: 5 yıl veya 10000 ölçüm
Aksesuarlar: 2 yıl
-
 1
1
-
 2
2
-
 3
3
-
 4
4
-
 5
5
-
 6
6
-
 7
7
-
 8
8
-
 9
9
-
 10
10
-
 11
11
-
 12
12
-
 13
13
-
 14
14


Microlife BP B1 Classic Kullanım kılavuzu
- Kategori
- Kan basıncı birimleri
- Tip
- Kullanım kılavuzu
Diğer dillerde
- English: Microlife BP B1 Classic User manual
İlgili Makaleler
-
Microlife BP A130 Kullanım kılavuzu
-
-
Microlife BP A2 Classic Kullanım kılavuzu
-
Microlife BP 3AG1 Kullanım kılavuzu
-
Microlife BP B1 Classic Kullanım kılavuzu
-
-
Microlife BP A90-30 Kullanım kılavuzu
-
Microlife BP A3 Plus Kullanım kılavuzu
-
Microlife BP N2 Easy Kullanım kılavuzu
-
Microlife BP 3AS1-2 Kullanım kılavuzu