Makita AS001G Kullanım kılavuzu
- Kategori
- Hava üfleyiciler / kurutucular
- Tip
- Kullanım kılavuzu

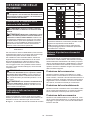
AS001G
EN Cordless Dust Blower INSTRUCTION MANUAL 9
FR MANUEL D’INSTRUCTIONS 23
DE Akku Gebläse BETRIEBSANLEITUNG 38
IT ISTRUZIONI PER L’USO 53
NL GEBRUIKSAANWIJZING 69
ES MANUAL DE
INSTRUCCIONES 84
PT MANUAL DE INSTRUÇÕES 99
DA BRUGSANVISNING 114
EL 128
TR KULLANMA KILAVUZU 144

2
1
1
2
2
3
2
1
1
2
1
2
3
4
2
4
31
1
2
3
12

3
12
12
3
4
5
6
2
1
3
4
5
1 1
2
3
1
2
3
4
1
4
5
3
2
1
2
3
4

4
2
4
31
1
1
2
3
1
2
1
2
1
2
34
1
1
2
1
2
3
4
5

5
1
2
3
1
2
1
2
3
3
1
2
1
2

6
11
2
3
4
5
4
1

7
1
2
3
4
1
1

8
1
2
4
31

9ENGLISH
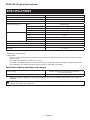
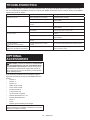
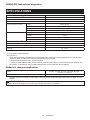
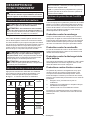
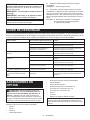
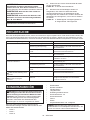
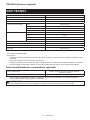
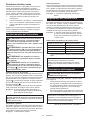
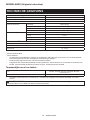
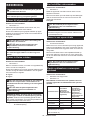
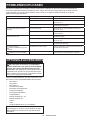
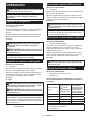
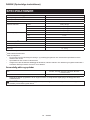
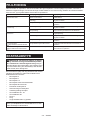
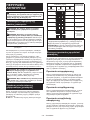
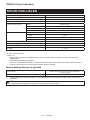
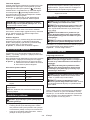
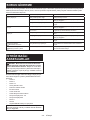
SPECIFICATIONS
Model: AS001G
Air speed (average) *2 *3 163 m/s
Air speed (max.) *2 *3 200 m/s
Maximum air volume *1 *2 1.1 m3/min
Maximum blowing force *1 *2 4: Max 2.8 N (0.29 kgf)
3: High 2.3 N (0.23 kgf)
2: Medium 1.7 N (0.17 kgf)
1: Low 1.1 N (0.11 kgf)
Continuous use *1 *2 4: Max 13 min
3: High 17 min
2: Medium 25 min
1: Low 50 min
Maximum air pressure *2 *3 29.7 kPa
Dimensions (L x W x H) *1 *2 180 mm x 94 mm x 300 mm
Rated voltage D.C. 36 V - 40 V max
Net weight 1.5 - 2.9 kg
*1 Without nozzles
*2 With battery model BL4025
*3 With nozzle 7
without notice.
-
est combination, according to EPTA-Procedure 01/2014, are shown in the table.
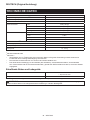
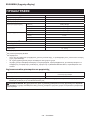
Battery cartridge BL4020* / BL4025* / BL4040* / BL4050F / BL4080F
* : Recommended battery
Charger DC40RA / DC40RB / DC40RC
• Some of the battery cartridges and chargers listed above may not be available depending on your region of
residence.
WARNING: Use of any other battery cartridges

10 ENGLISH
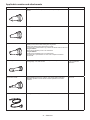
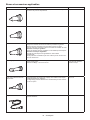
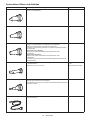
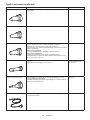
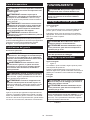
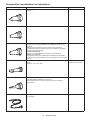
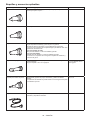
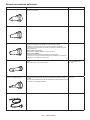
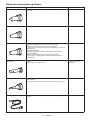
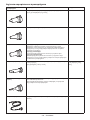
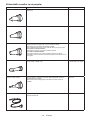
Nozzle 3
ø3.0 mm
Nozzle 7 ø7.0 mm
Nozzle 13 Using as blower
Cleaning work surfaces and blowing dust in general.
Anchor hole cleaning with optional long nozzles.
attachments.
ø13 mm
Wide range nozzle Blowing air over dirt and liquid on desktop and wide-open area.
Blowing range: 120° with 5 holes
ø6.0 mm
* As a single hole
diameter
Pinch valve nozzle
complete.
ø7.0 mm
Flexible nozzle 6 Blowing dust out of any hard-to-reach spots, PCs and similar devices. ø6.0 mm x 800 mm

11 ENGLISH
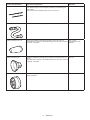
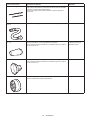
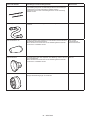
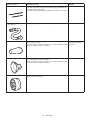
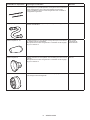
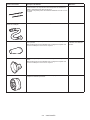
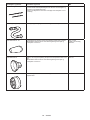
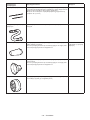
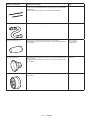
Long nozzles set A set of nozzles suitable for blowing dust out of anchor holes and narrow
spots. Nozzle lengths can be changed by attaching and detaching two
nozzle heads.
ø8.0 mm
Air vent hose complete -
Rubber attachment 20 - 30
* This attachment requires to be installed with the air vent hose complete
and nozzle 13 together.
ø20 - 30 mm
* Measured as outer
diameter.
Rubber attachment 65 Attachment suitable for packaging your clothes by compressing air out
of them.
* This attachment requires to be installed with the air vent hose complete
and nozzle 13 together.
ø65 mm
Filter C Attachment designed to reduce dust intake into the motor under dusty
working conditions.
-

12 ENGLISH
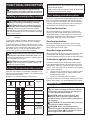
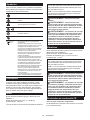
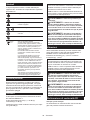
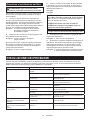
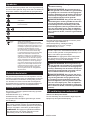
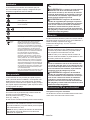
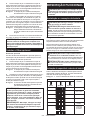
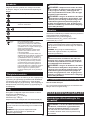
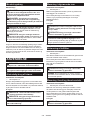
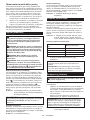
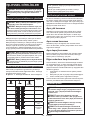
The followings show the symbols which may be used
for the equipment. Be sure that you understand their
meaning before use.
Read instruction manual.
Keep hands away from rotating parts.
Long hair may cause entanglement
accident.
Keep bystanders away.
Wear eye and ear protection.
Do not expose to moisture.
Ni-MH
Li-ion
Only for EU countries
Due to the presence of hazardous com-
ponents in the equipment, waste electrical
and electronic equipment, accumulators
and batteries may have a negative impact
on the environment and human health.
Do not dispose of electrical and electronic
appliances or batteries with household
waste!
In accordance with the European Directive
on waste electrical and electronic equip-
ment and on accumulators and batteries
and waste accumulators and batteries,
as well as their adaptation to national law,
waste electrical equipment, batteries and
accumulators should be stored separately
and delivered to a separate collection point
for municipal waste, operating in accor-
dance with the regulations on environmen-
tal protection.
This is indicated by the symbol of the
crossed-out wheeled bin placed on the
equipment.
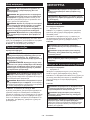
to your preferences. Suitable for both commercial and
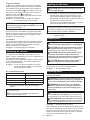
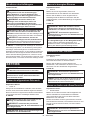
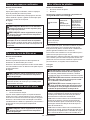
The typical A-weighted noise level determined accord-
ing to EN62841-1:
Sound pressure level (LpA) : 79 dB(A)
Uncertainty (K) : 3 dB(A)
The noise level under working may exceed 80 dB (A).
NOTE: The declared noise emission value(s) has
been measured in accordance with a standard test
method and may be used for comparing one tool with
another.
NOTE: The declared noise emission value(s)
may also be used in a preliminary assessment of
exposure.
WARNING:
WARNING:
-
WARNING:
-
-
The vibration total value (tri-axial vector sum) deter-
mined according to EN62841-1:
Work mode: operation without load
Vibration emission (ah) : 2.5 m/s2 or less
Uncertainty (K) : 1.5 m/s2
NOTE: The declared vibration total value(s) has been
measured in accordance with a standard test method
and may be used for comparing one tool with another.
NOTE: The declared vibration total value(s) may also
be used in a preliminary assessment of exposure.
WARNING:
WARNING: -
The EC declaration of conformity is included as Annex A
to this instruction manual.
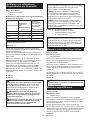
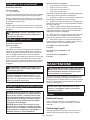
SAFETY WARNINGS
WARNING: -
Failure to follow all instructions
-
The term "power tool" in the warnings refers to your
mains-operated (corded) power tool or battery-operated
(cordless) power tool.

13 ENGLISH
1.
2.
3.
4.
1.
2.
3.
Protective equipment such
as a dust mask, non-skid safety shoes, hard hat or
hearing protection used for appropriate conditions
1. -
•
•
•
•
2.
3.
4.
5.
6.
7.
8. Your
lungs may be damaged by inhaling toxic fumes.
9.
10.
•
-
•
11.
-
12.
13.
14.
15. -
Using the tool at output
pressure greater than the maximum output pres-
1.
2.
3.
4.
1.
Otherwise,
-
2.
They
3.
Otherwise, the tool or
4.
5.
6.
It otherwise may burst the
7.
8.
9.
Performing dust collection may damage the tool.

14 ENGLISH
10.
11.
The use of any other accessories
persons.
1.
2.
3.
4.
5.
The tool may be damaged
6.
7.
8.
1.
The cell may explode. Check with local codes for
possible special disposal instructions.
2.
Released electrolyte is corrosive and may cause
damage to the eyes or skin. It may be toxic if
swallowed.
3.
4.
5.
6.
7.
8.
-
9.
Water entering the tool will increase the risk
of electric shock.
1.
This will ensure that the safety of the power
tool is maintained.
2. Service
of battery packs should only be performed by the
manufacturer or authorized service providers.
WARNING:
1. -
2.
or explosion.
3.
4.
-
5.
(1) -
(2) -
(3)
6. -
7.
8.
Such conduct may result in a
9.
10.
-
For commercial transports e.g. by third parties,
forwarding agents, special requirement on pack-
aging and labeling must be observed.
For preparation of the item being shipped, consult-
ing an expert for hazardous material is required.
Please also observe possibly more detailed
national regulations.
battery in such a manner that it cannot move
around in the packaging.

15 ENGLISH
11.
12.
Installing the batteries to
-
sive heat, explosion, or leak of electrolyte.
13.
14.
-
15. -
16.
burst and malfunction of the tool or battery car-
17.
-
It may result in a malfunction
or breakdown of the tool or battery cartridge.
18.
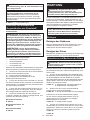
CAUTION:
Use of non-genuine Makita batteries, or batteries that
have been altered, may result in the battery bursting
also void the Makita warranty for the Makita tool and
charger.
1.
2. -
3. -
4.
5.
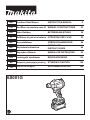
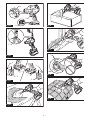
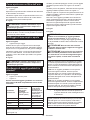
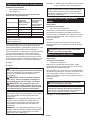
ASSEMBLY
CAUTION:
notches on the lock sleeve of the tool, then push the
with a click. Having installed the nozzle, try pulling it
back to ensure it is securely held in place.
Locking notches
Lock sleeve
NOTICE:
-
Hold the nozzle end and rotate it in a direction indicated
by the arrows on the nozzle end to release the lock. Pull
the nozzle apart from the lock sleeve after it becomes
unlocked.
Nozzle end Lock sleeve
NOTICE:
CAUTION:
The
lock sleeve slides back towards the motor housing
when the nozzle is released from the lock.
Lock sleeve Motor housing
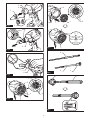
Turn the dust cap on the suction inlet at the rear of
the housing counterclockwise to take the dust cap out
of the housing. Two locking tabs on the dust cap can be
disengaged by aligning them with the guide grooves on
the housing.
Dust cap Locking tabs Suction inlet
Guide grooves
Reassemble the dust cap onto the suction inlet,
aligning the two locking tabs on the dust cap with the
guide grooves on the housing. Then turn the dust cap
clockwise to secure it in place.
Dust cap Locking tabs Suction inlet
Guide grooves

16 ENGLISH
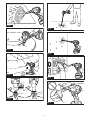
A set of long nozzles help clean dust out of small holes
and narrow spots. Nozzle lengths can be arranged
according to your requirements.
Nozzle 13 Long nozzle R Long noz-
zle F
Insert the long nozzle R through the air hole of the
nozzle 13 from back to front. Pass it though until the nozzle
13 secures in place at the rear end of the long nozzle R.
Nozzle 13 Long nozzle R
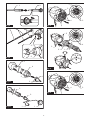
Place the long nozzle F over the front end of the
long nozzle R. Hand screw the long nozzle F until you
Long nozzle F Long nozzle R
the locking notches on the lock sleeve of the tool, then
locks in place with a click.
Locking notch Lock
sleeve Nozzle 13 Long nozzle R Long
nozzle F
NOTE: Use the long nozzle R only to have a shorter
operating range. Use both the long nozzle R and F to
allow a wider operating range.
To remove the long nozzles, detach the nozzle 13
from the lock sleeve of the tool, and then disassemble
the long nozzles.
NOTICE:
Handling the air vent hose complete assembled
into the tool may cause the tool to stand unstable
resulting in it falling over.
with the locking notches on the lock sleeve of the air vent
the lock sleeve until it locks in place with a click.
Pinch valve nozzle
Locking notches Lock sleeve Air
vent hose complete
Optional rubber attachments require to be placed over
the nozzle. Be careful not to attach rubber attachments
directly to the air vent hose complete.
the locking notches on the lock sleeve of the air vent
sleeve until it locks in place with a click.
ii Place a rubber attachment over the nozzle head
by pushing and hand screwing it in place.
Rubber attachments Nozzle 13 Air
vent hose complete
NOTICE:
Turn the dust cap on the suction inlet at the rear of
the housing counterclockwise to take the dust cap out
of the housing. Two locking tabs on the dust cap can be
disengaged by aligning them with the guide grooves on
the housing.
Dust cap Locking tabs Suction inlet
Guide grooves
Attach the end of the air vent hose complete to
the suction inlet, aligning the two locking tabs on the
air vent hose complete with the guide grooves on the
hose complete clockwise to secure it in place.
Air vent hose complete
Suction inlet Locking tabs Guide
grooves
follow the installation steps in reverse.
NOTICE:
for restricting dust intake into the motor under dusty
working conditions.
Turn the dust cap on the suction inlet at the rear of
the housing counterclockwise to take the dust cap out
of the housing. Two locking tabs on the dust cap can be
disengaged by aligning them with the guide grooves on
the housing.
Dust cap Locking tabs Suction inlet
Guide grooves
the suction inlet, aligning the two locking tabs on the
place.
Locking tabs Suction inlet Guide
grooves
NOTICE:
-
NOTICE:

17 ENGLISH
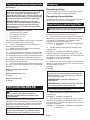
FUNCTIONAL DESCRIPTION
CAUTION:
CAUTION:
CAUTION: -
Failure to hold the tool and the battery
and result in damage to the tool and battery cartridge
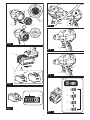
Red indicator Button Battery
cartridge
To remove the battery cartridge, slide it from the tool
while sliding the button on the front of the cartridge.
To install the battery cartridge, align the tongue on the
battery cartridge with the groove in the housing and slip
it into place. Insert it all the way until it locks in place
with a little click. If you can see the red indicator as
CAUTION:
If not,
you or someone around you.
CAUTION:
If the cartridge does not slide in easily, it is
not being inserted correctly.
Press the check button on the battery cartridge to indi-
cate the remaining battery capacity. The indicator lamps
light up for a few seconds.
Indicator lamps Check button
75% to 100%
50% to 75%
25% to 50%
0% to 25%
Charge the
battery.
The battery
may have
malfunctioned.
NOTE: Depending on the conditions of use and the
from the actual capacity.
NOTE:
the battery protection system works.
The tool is equipped with a tool/battery protection sys-
motor to extend tool and battery life. The tool will auto-
matically stop during operation if the tool or battery is
placed under one of the following conditions:
When the tool/battery is operated in a manner that
causes it to draw an abnormally high current, the tool
and stop the application that caused the tool to become
overloaded. Then turn the tool on to restart.
When the tool/battery is overheated, the tool stops
automatically. In this situation, let the tool cool down
before turning the tool on again.
When the battery capacity is not enough, the tool stops
automatically and the lamp will blink. In this case,
remove the battery from the tool and charge the battery.
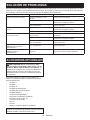
Protection system is also designed for other causes
that could damage the tool and allows the tool to stop
automatically. Take all the following steps to clear the
causes, when the tool has been brought to a temporary
halt or stop in operation.
1.
2. Charge the battery(ies) or replace it/them with
recharged battery(ies).
3. Let the tool and battery(ies) cool down.
If no improvement can be found by restoring protection
system, then contact your local Makita Service Center.
CAUTION: -
CAUTION:
CAUTION:
CAUTION:

18 ENGLISH
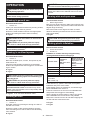
To prevent the switch trigger from being accidentally
pulled, the trigger-lock button is provided. To start the
tool, depress the trigger-lock button from the side on
which an unlocking mark ( ) is indicated. To lock the
tool, depress the trigger-lock button from the side on
which a locking mark ( ) is indicated.
Make sure to set the trigger-lock button back in a lock-
ing position after each use.
Switch trigger Trigger-lock button
Unlocking mark Locking mark
NOTICE:
This can
cause switch breakage.
Air volume can be controlled by squeezing the switch
trigger. Air volume is grown by increasing pressure on
the switch trigger. Release the switch trigger to stop.
Switch trigger
For continuous operation, push in the lock button while
pulling the switch trigger and then release the switch
trigger. To cancel the locked-on operation, pull the
switch trigger fully, then release it.
Switch trigger Lock button
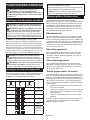
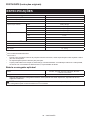
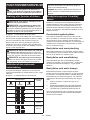
Air volume can be changed in four modes, that is, 4
(Max), 3 (High), 2 (Medium) and 1 (Low), depending on
the application and workload.
in the following sequence. The mode changes every
time you press the button.
Low air volume Medium air volume
High air volume Max air volume Air
4: Max 1.1 m3/min
3: High 1.0 m3/min
2: Medium 0.8 m3/min
1: Low 0.6 m3/min
* Maximum air volumes are measured without
nozzles.
NOTE: Air volume mode can be changed before
turning the tool on.
NOTE: The tool starts operation with the last air
volume mode settings in use.
CAUTION:
To turn the lamp on, perform one of the following steps.
• Pull the switch trigger to light the lamp up. The
lamp keeps on lighting while the switch trigger is
being pulled. The lamp goes out approximately 10
seconds after stopping operation.
NOTE: When the remaining battery capacity gets low,
the lamp starts blinking. The timing, at which the lamp
starts blinking depends on the temperature at work
place and the battery cartridge conditions.
Switch trigger
button Lamp
CAUTION:
CAUTION:
Using for unintended
CAUTION:
CAUTION:
Use the hanging hole at the top rear of the housing to
hang the tool on a hook of racks and holders.
Hanging hole Hook
WARNING:
WARNING:
-
CAUTION:
If not, the hook may
CAUTION:
Groove Hook Screw
The hook is convenient for temporarily hanging the tool.
This can be installed on either side of the tool. To install
the hook, insert it into a groove in the tool housing on
either side and then secure it with a screw. To remove,
loosen the screw and then take it out.

19 ENGLISH
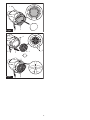
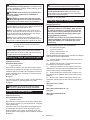
OPERATION
CAUTION:
NOTICE:
Recommended nozzles
— Nozzle 13
dirt, debris, scrap or waste in general.
Direct the nozzle towards surfaces at an appropriate
CAUTION:
CAUTION: -
NOTICE:
Recommended nozzles
— Nozzle 3
Point the nozzle straight at spaces at a reasonable
distance and squeeze the switch trigger to control blow-
ing air volume.
CAUTION:
CAUTION: -
NOTICE:
It otherwise may cause
the tool performance.
Air vent holes Blower outlet
Recommended nozzles
— Nozzle 7
-
tance and swing it from side to side to blow dust away
from surfaces.
CAUTION: -
NOTE: Point the nozzle at an angle according to the
removed.
Recommended nozzles
— Wide range nozzle
Blow air over dirt and liquid on wide-open surfaces such
degree range of blowing.
Direct the nozzle over a large area within a certain
distance and swing it back and forth and from side to
side to blow widely.
CAUTION: -
Recommended nozzles
— Pinch valve nozzle
— Nozzle 13
4: Max 8.9 m375
3: High 9.5 m380
2: Medium 13.0 m3110
1: Low 21.3 m3180
NOTE: The maximum output air pressure of this tool
is 20.6 kPa.
(With nozzle 13)
Slowly release the switch trigger to reduce air volume
Remove the nozzle from the air inlet after stopping the

20 ENGLISH
CAUTION: -
It otherwise may
CAUTION:
CAUTION:
NOTE: Make sure to insert the pinch valve nozzle
fully through the air inlet so the nozzle head serves to
NOTE:
opening, insert the narrow tip of the pinch valve noz-
zle in the air inlet until the bottleneck of the nozzle
head touches the rim of the air inlet.
NOTE:
opening, insert the pinch valve nozzle head fully into
Flap valve Small air inlet opening
Large air inlet opening Bottleneck
Air vent hole
NOTE:
smaller than the pinch valve nozzle head, squeeze
and enlarge the air inlet by hand and then twist and
hold the nozzle head into the air inlet.
Recommended nozzles
— Long nozzles set
Clean dust out of small holes and narrow spots. Nozzle
lengths can be arranged according to your requirements.
Assemble the long nozzle R and F together to allow a
longer operating range, for instance, cleaning anchor
holes at your feet.
Use the long nozzle R only to have a shorter operating
range, for instance, cleaning spots on the wall.
CAUTION: -
Recommended nozzles
— Flexible nozzle 6
-
tive for engine cleaning, in-car dust removal, computer
case dust blowing.
Point the nozzle at an angle within touching distance,
and blow back and forth to clean out lingering dust.
blow out some of the tougher pieces of debris and dust.
CAUTION: -
NOTICE:
It otherwise may
cause sudden noise and vibrations and could possi-
Air vent holes
NOTICE:
-
-
NOTICE:
-
— Air vent hose complete
— Pinch valve nozzle
— Rubber attachment 20 - 30
— Rubber attachment 65
your preferences and applications.
Place a nozzle or rubber attachment onto the air
vent hose complete.
Replace the dust cap on the suction inlet of the
tool with the air vent hose complete.
Insert the nozzle into the air valve or place the
Slowly release the switch trigger to reduce suc-
Remove the nozzle or attachment from the air
valve.
Sayfa yükleniyor ...
Sayfa yükleniyor ...
Sayfa yükleniyor ...
Sayfa yükleniyor ...
Sayfa yükleniyor ...
Sayfa yükleniyor ...
Sayfa yükleniyor ...
Sayfa yükleniyor ...
Sayfa yükleniyor ...
Sayfa yükleniyor ...
Sayfa yükleniyor ...
Sayfa yükleniyor ...
Sayfa yükleniyor ...
Sayfa yükleniyor ...
Sayfa yükleniyor ...
Sayfa yükleniyor ...
Sayfa yükleniyor ...
Sayfa yükleniyor ...
Sayfa yükleniyor ...
Sayfa yükleniyor ...
Sayfa yükleniyor ...
Sayfa yükleniyor ...
Sayfa yükleniyor ...
Sayfa yükleniyor ...
Sayfa yükleniyor ...
Sayfa yükleniyor ...
Sayfa yükleniyor ...
Sayfa yükleniyor ...
Sayfa yükleniyor ...
Sayfa yükleniyor ...
Sayfa yükleniyor ...
Sayfa yükleniyor ...
Sayfa yükleniyor ...
Sayfa yükleniyor ...
Sayfa yükleniyor ...
Sayfa yükleniyor ...
Sayfa yükleniyor ...
Sayfa yükleniyor ...
Sayfa yükleniyor ...
Sayfa yükleniyor ...
Sayfa yükleniyor ...
Sayfa yükleniyor ...
Sayfa yükleniyor ...
Sayfa yükleniyor ...
Sayfa yükleniyor ...
Sayfa yükleniyor ...
Sayfa yükleniyor ...
Sayfa yükleniyor ...
Sayfa yükleniyor ...
Sayfa yükleniyor ...
Sayfa yükleniyor ...
Sayfa yükleniyor ...
Sayfa yükleniyor ...
Sayfa yükleniyor ...
Sayfa yükleniyor ...
Sayfa yükleniyor ...
Sayfa yükleniyor ...
Sayfa yükleniyor ...
Sayfa yükleniyor ...
Sayfa yükleniyor ...
Sayfa yükleniyor ...
Sayfa yükleniyor ...
Sayfa yükleniyor ...
Sayfa yükleniyor ...
Sayfa yükleniyor ...
Sayfa yükleniyor ...
Sayfa yükleniyor ...
Sayfa yükleniyor ...
Sayfa yükleniyor ...
Sayfa yükleniyor ...
Sayfa yükleniyor ...
Sayfa yükleniyor ...
Sayfa yükleniyor ...
Sayfa yükleniyor ...
Sayfa yükleniyor ...
Sayfa yükleniyor ...
Sayfa yükleniyor ...
Sayfa yükleniyor ...
Sayfa yükleniyor ...
Sayfa yükleniyor ...
Sayfa yükleniyor ...
Sayfa yükleniyor ...
Sayfa yükleniyor ...
Sayfa yükleniyor ...
Sayfa yükleniyor ...
Sayfa yükleniyor ...
Sayfa yükleniyor ...
Sayfa yükleniyor ...
Sayfa yükleniyor ...
Sayfa yükleniyor ...
Sayfa yükleniyor ...
Sayfa yükleniyor ...
Sayfa yükleniyor ...
Sayfa yükleniyor ...
Sayfa yükleniyor ...
Sayfa yükleniyor ...
Sayfa yükleniyor ...
Sayfa yükleniyor ...
Sayfa yükleniyor ...
Sayfa yükleniyor ...
Sayfa yükleniyor ...
Sayfa yükleniyor ...
Sayfa yükleniyor ...
Sayfa yükleniyor ...
Sayfa yükleniyor ...
Sayfa yükleniyor ...
Sayfa yükleniyor ...
Sayfa yükleniyor ...
Sayfa yükleniyor ...
Sayfa yükleniyor ...
Sayfa yükleniyor ...
Sayfa yükleniyor ...
Sayfa yükleniyor ...
Sayfa yükleniyor ...
Sayfa yükleniyor ...
Sayfa yükleniyor ...
Sayfa yükleniyor ...
Sayfa yükleniyor ...
Sayfa yükleniyor ...
Sayfa yükleniyor ...
Sayfa yükleniyor ...
Sayfa yükleniyor ...
Sayfa yükleniyor ...
Sayfa yükleniyor ...
Sayfa yükleniyor ...
Sayfa yükleniyor ...
Sayfa yükleniyor ...
Sayfa yükleniyor ...
Sayfa yükleniyor ...
Sayfa yükleniyor ...
Sayfa yükleniyor ...
Sayfa yükleniyor ...
Sayfa yükleniyor ...
Sayfa yükleniyor ...
Sayfa yükleniyor ...
Sayfa yükleniyor ...
Sayfa yükleniyor ...
Sayfa yükleniyor ...
Sayfa yükleniyor ...
Sayfa yükleniyor ...
-
 1
1
-
 2
2
-
 3
3
-
 4
4
-
 5
5
-
 6
6
-
 7
7
-
 8
8
-
 9
9
-
 10
10
-
 11
11
-
 12
12
-
 13
13
-
 14
14
-
 15
15
-
 16
16
-
 17
17
-
 18
18
-
 19
19
-
 20
20
-
 21
21
-
 22
22
-
 23
23
-
 24
24
-
 25
25
-
 26
26
-
 27
27
-
 28
28
-
 29
29
-
 30
30
-
 31
31
-
 32
32
-
 33
33
-
 34
34
-
 35
35
-
 36
36
-
 37
37
-
 38
38
-
 39
39
-
 40
40
-
 41
41
-
 42
42
-
 43
43
-
 44
44
-
 45
45
-
 46
46
-
 47
47
-
 48
48
-
 49
49
-
 50
50
-
 51
51
-
 52
52
-
 53
53
-
 54
54
-
 55
55
-
 56
56
-
 57
57
-
 58
58
-
 59
59
-
 60
60
-
 61
61
-
 62
62
-
 63
63
-
 64
64
-
 65
65
-
 66
66
-
 67
67
-
 68
68
-
 69
69
-
 70
70
-
 71
71
-
 72
72
-
 73
73
-
 74
74
-
 75
75
-
 76
76
-
 77
77
-
 78
78
-
 79
79
-
 80
80
-
 81
81
-
 82
82
-
 83
83
-
 84
84
-
 85
85
-
 86
86
-
 87
87
-
 88
88
-
 89
89
-
 90
90
-
 91
91
-
 92
92
-
 93
93
-
 94
94
-
 95
95
-
 96
96
-
 97
97
-
 98
98
-
 99
99
-
 100
100
-
 101
101
-
 102
102
-
 103
103
-
 104
104
-
 105
105
-
 106
106
-
 107
107
-
 108
108
-
 109
109
-
 110
110
-
 111
111
-
 112
112
-
 113
113
-
 114
114
-
 115
115
-
 116
116
-
 117
117
-
 118
118
-
 119
119
-
 120
120
-
 121
121
-
 122
122
-
 123
123
-
 124
124
-
 125
125
-
 126
126
-
 127
127
-
 128
128
-
 129
129
-
 130
130
-
 131
131
-
 132
132
-
 133
133
-
 134
134
-
 135
135
-
 136
136
-
 137
137
-
 138
138
-
 139
139
-
 140
140
-
 141
141
-
 142
142
-
 143
143
-
 144
144
-
 145
145
-
 146
146
-
 147
147
-
 148
148
-
 149
149
-
 150
150
-
 151
151
-
 152
152
-
 153
153
-
 154
154
-
 155
155
-
 156
156
-
 157
157
-
 158
158
-
 159
159
-
 160
160


Makita AS001G Kullanım kılavuzu
- Kategori
- Hava üfleyiciler / kurutucular
- Tip
- Kullanım kılavuzu
Diğer dillerde
- español: Makita AS001G Manual de usuario
- français: Makita AS001G Manuel utilisateur
- italiano: Makita AS001G Manuale utente
- Deutsch: Makita AS001G Benutzerhandbuch
- português: Makita AS001G Manual do usuário
- dansk: Makita AS001G Brugermanual
- Nederlands: Makita AS001G Handleiding
İlgili Makaleler
-
Makita AS001G Kullanım kılavuzu
-
Makita DUB362 Kullanım kılavuzu
-
Makita DUB184 Kullanım kılavuzu
-
-
Makita DVC750L Kullanım kılavuzu
-
-
Makita CL001G Kullanım kılavuzu
-
-
Makita MT401 El kitabı
-
Makita DBO480 Kullanım kılavuzu