Yamaha YAS-105 El kitabı
- Kategori
- Bluetooth müzik alıcıları
- Tip
- El kitabı

http://europe.yamaha.com/warranty/
AVEEA71102A
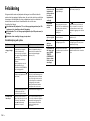
Wichtiger Hinweis: Garantie-Information für Kunden in der EWR*
und der Schweiz
Deutsch
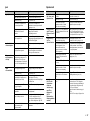
Remarque importante: informations de garantie pour les clients
de l’EEE et la Suisse
Français
Viktigt: Garantiinformation för kunder i EES-området* och Schweiz
Svenska
Für nähere Garantie-Information über dieses Produkt von Yamaha, sowie über den
Pan-EWR*- und Schweizer Garantieservice, besuchen Sie bitte entweder die folgend angegebene
Internetadresse (eine druckfähige Version befindet sich auch auf unserer Webseite), oder wenden
Sie sich an den für Ihr Land zuständigen Yamaha-Vertrieb. *EWR: Europäischer Wirtschaftsraum
Pour des informations plus détaillées sur la garantie de ce produit Yamaha et sur le service de
garantie applicable dans l’ensemble de l’EEE ainsi qu’en Suisse, consultez notre site Web à
l’adresse ci-dessous (le fichier imprimable est disponible sur notre site Web) ou contactez
directement Yamaha dans votre pays de résidence. * EEE : Espace Economique Européen
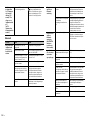
Belangrijke mededeling: Garantie-informatie voor klanten in de
EER* en Zwitserland
Nederlands
Aviso importante: información sobre la garantía para los clientes
del EEE* y Suiza
Español
Avviso importante: informazioni sulla garanzia per i clienti
residenti nell’EEA* e in Svizzera
Italiano
Voor gedetailleerde garantie-informatie over dit Yamaha-product en de garantieservice in heel
de EER* en Zwitserland, gaat u naar de onderstaande website (u vind een afdrukbaar bestand
op onze website) of neemt u contact op met de vertegenwoordiging van Yamaha in uw land.
* EER: Europese Economische Ruimte
Para una información detallada sobre este producto Yamaha y sobre el soporte de garantía
en la zona EEE* y Suiza, visite la dirección web que se incluye más abajo (la version del
archivo para imprimir esta disponible en nuestro sitio web) o póngase en contacto con el
representante de Yamaha en su país. * EEE: Espacio Económico Europeo
Per informazioni dettagliate sulla garanzia relativa a questo prodotto Yamaha e l’assistenza in
garanzia nei paesi EEA* e in Svizzera, potete consultare il sito Web all’indirizzo riportato di
seguito (è disponibile il file in formato stampabile) oppure contattare l’ufficio di rappresentanza
locale della Yamaha. * EEA: Area Economica Europea
För detaljerad information om denna Yamahaprodukt samt garantiservice i hela EES-området*
och Schweiz kan du antingen besöka nedanstående webbaddress (en utskriftsvänlig fil finns
på webbplatsen) eller kontakta Yamahas officiella representant i ditt land. * EES: Europeiska
Ekonomiska Samarbetsområdet
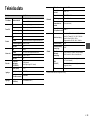
Important Notice: Guarantee Information for customers in EEA*
and Switzerland
For detailed guarantee information about this Yamaha product, and Pan-EEA* and
Switzerland warranty service, please either visit the website address below (Printable file is
available at our website) or contact the Yamaha representative office for your country.
* EEA: European Economic Area
English
© 2015 Yamaha Corporation Printed in Indonesia ZR10520
G
Front Surround System
Système Surround Frontal
Owner’s Manual
Mode d’emploi
Bedienungsanleitung
Bruksanvisning
Manuale di istruzioni
Manual de Instrucciones
Gebruiksaanwijzing
Инструкция по эксплуатации
YAS-105

i
En
• To assure the finest performance, please read this
manual carefully. Keep it in a safe place for future
reference.
• Install this unit in a well ventilated, cool, dry, clean
place - away from direct sunlight, heat sources,
vibration, dust, moisture, and/or cold. For proper
ventilation, allow the following minimum
clearances.
Top: 10 cm (4 in), Rear: 10 cm (4 in), Sides: 10 cm
(4 in)
• Locate this unit away from other electrical
appliances, motors, or transformers to avoid
humming sounds.
• Do not expose this unit to sudden temperature
changes from cold to hot, and do not locate this
unit in an environment with high humidity (i.e. a
room with a humidifier) to prevent condensation
inside this unit, which may cause an electrical
shock, fire, damage to this unit, and/or personal
injury.
• Avoid installing this unit where foreign objects
may fall onto this unit and/or this unit may be
exposed to liquid dripping or splashing. On the top
of this unit, do not place:
− Other components, as they may cause damage
and/or discoloration on the surface of this unit.
− Burning objects (i.e. candles), as they may cause
fire, damage to this unit, and/or personal injury.
− Containers with liquid in them, as they may fall
and liquid may cause electrical shock to the user
and/or damage to this unit.
• Do not cover this unit with a newspaper,
tablecloth, curtain, etc., in order not to obstruct
heat radiation. If the temperature inside this unit
rises, it may cause fire, damage to this unit, and/or
personal injury.
• Do not plug in this unit to a wall outlet until all
connections are complete.
• Do not operate this unit upside-down. It may
overheat, possibly causing damage.
• Do not use force on switches, knobs and/or cords.
• When disconnecting the power cable from the wall
outlet, grasp the plug; do not pull the cable.
• Do not clean this unit with chemical solvents; this
might damage the finish. Use a clean, dry cloth.
• Only voltage specified on this unit must be used.
Using this unit with a higher voltage than specified
is dangerous and may cause fire, damage to this
unit, and/or personal injury. Yamaha will not be
held responsible for any damage resulting from use
of this unit with a voltage other than specified.
• To prevent damage by lightning, keep the power
cable and outdoor antennas disconnected from a
wall outlet or the unit during a lightning storm.
• Do not attempt to modify or fix this unit. Contact
qualified Yamaha service personnel when any
service is needed. The cabinet should never be
opened for any reasons.
• When not planning to use this unit for long periods
of time (i.e. vacation), disconnect the AC power
plug from the wall outlet.
• Be sure to read the “Troubleshooting” section on
common operating errors before concluding that
this unit is faulty.
• Before moving this unit, press to set this unit in
standby mode, and disconnect the power supply
cable from the wall outlet.
• Condensation will form when the surrounding
temperature changes suddenly. Disconnect the
power supply cable from the outlet, then leave the
unit alone.
• Install this unit near the wall outlet and where the
AC power plug can be reached easily.
• Secure placement or installation is the owner’s
responsibility. Yamaha shall not be liable for any
accident caused by improper placement or
installation of speakers.
• Keep the product out of reach of children to avoid
them swallowing small parts.
Notes on remote controls and batteries
• Do not spill water or other liquids on the remote
control.
• Do not drop the remote control.
• Do not leave or store the remote control in the
following places:
− places of high humidity, such as near a bath
− places of high temperatures, such as near a
heater or a stove
− places of extremely low temperatures
− dusty places
• Do not expose the remote control sensor of this
unit to direct sunlight or lighting such as inverted
fluorescent lamps.
• If the batteries grow old, the effective operation
range of the remote control decreases
considerably. If this happens, replace the batteries
with two new ones as soon as possible.
• Do not use old batteries together with new ones.
• Do not use different types of batteries (such as
alkaline and manganese batteries) together. Read
the packaging carefully as these different types of
batteries may have the same shape and color.
• Exhausted batteries may leak. If the batteries have
leaked, dispose of them immediately. Avoid
touching the leaked material or letting it come into
contact with clothing, etc. Clean the battery
compartment thoroughly before installing new
batteries.
• Do not carry batteries in a pocket or purse with
metal objects like coins, etc.
• Do not throw away batteries with general house
waste. Dispose of them correctly in accordance
with your local regulations.
• Keep batteries away from children. If a battery is
accidentally swallowed, contact your doctor
immediately.
• When not planning to use the remote control for
long periods of time, remove the batteries from the
remote control.
• Do not charge or disassemble the supplied
batteries.
• The batteries shall not be exposed to excessive
heat such as sunshine, fire or like.
FOR U.K. CUSTOMERS
If the socket outlets in the home are not suitable for
the plug supplied with this appliance, it should be cut
off and an appropriate 3 pin plug fitted. For details,
refer to the instructions described below.
NOTE
The plug severed from the mains lead must be
destroyed, as a plug with bared flexible cord is
hazardous if engaged in a live socket outlet.
SPECIAL INSTRUCTIONS FOR U.K.
MODEL
CAUTION: READ THIS BEFORE OPERATING YOUR UNIT.
WARNING
TO REDUCE THE RISK OF FIRE OR
ELECTRIC SHOCK, DO NOT EXPOSE THIS
UNIT TO RAIN OR MOISTURE.
As long as this unit is connected to the AC wall
outlet, it is not disconnected from the AC power
source even if you turn off this unit by . In this
state, this unit is designed to consume a very
small quantity of power.
(Power key)
Turns on the power of this unit or sets it to the
standby mode.
Do not use this unit within 22 cm (9 inches) of
persons with a heart pacemaker implant or
defibrillator implant.
Radio waves may affect electro-medical devices.
Do not use this unit near medical devices or
inside medical facilities.
The name plate is located on the bottom of the
unit.
IMPORTANT
THE WIRES IN THE MAINS LEAD ARE
COLOURED IN ACCORDANCE WITH THE
FOLLOWING CODE:
Blue: NEUTRAL
Brown: LIVE
As the colours of the wires in the mains lead of this
apparatus may not correspond with the coloured
markings identifying the terminals in your plug,
proceed as follows:
The wire which is coloured BLUE must be connected
to the terminal which is marked with the letter N or
coloured BLACK. The wire which is coloured
BROWN must be connected to the terminal which is
marked with the letter L or coloured RED.
Making sure that neither core is connected to the
earth terminal of the three pin plug.

1
En
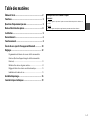
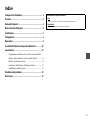
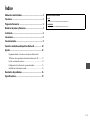
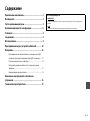
Contents
Supplied items ..................................................................... 2
Features ................................................................................ 3
Frequently asked questions ................................................ 3
Part names and functions .................................................... 4
Installation ............................................................................ 5
Connections .......................................................................... 6
Operations ............................................................................ 8
Listening to the sound from a Bluetooth device .............. 10
Settings................................................................................ 12
Programming the sound bar with the TV’s remote control
(TV’s remote control learning function).................................................... 12
Using an external subwoofer............................................................................ 14
Setting the auto power standby function ............................................... 15
Initializing the sound bar ............................................................................... 15
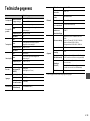
Troubleshooting ................................................................. 16
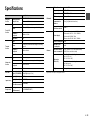
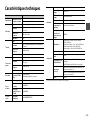
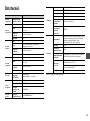
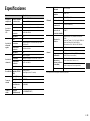
Specifications...................................................................... 19
About this manual
NOTE
This indicates precautions for use of the product and its feature limitations.
HINT
This indicates supplementary explanations for better use.

2
En
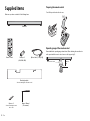
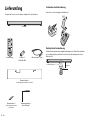
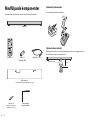
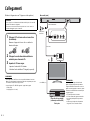
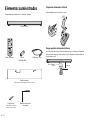
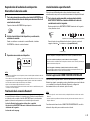
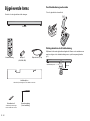
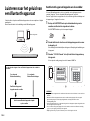
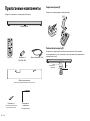
Supplied items
Make sure you have received all of the following items.
Preparing the remote control
Peel off the protection sheet before use.
Operating range of the remote control
Remain within the operating range shown below. When attaching the sound bar to a
wall, operate with the remote control sensor on the top panel (p.5).
Sound bar
Remote control Battery x 2
(AAA, R03, UM4)
Optical cable (1.5 m [4.9 ft])
Mounting template
* Use when attaching the sound bar to a wall
Spacer × 2
* Use when attaching the sound
bar to a wall
Owner’s Manual
(This manual)
Remote control sensor
Within 6 m
(20 ft)

3
En
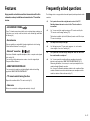
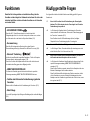
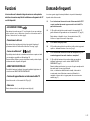
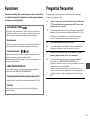
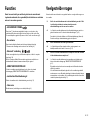
Features
Enjoy powerful and realistic sound from the sound bar with built-in
subwoofer, and easy installation and connection to a TV and other
devices.
Frequently asked questions
The following section covers popular functions and frequently asked questions about the
sound bar.
•AIR SURROUND XTREME
Enjoy 7.1 channel surround sound, which creates a wide and deep soundstage, as
if speakers are set, not only on the front, but also on the left and right, and behind
the listener (p.9).
• Bass extension
Enjoy a powerful bass sound with the Yamaha original bass boost technology
“Advanced Bass Extension Processing” (p.9).
• Bluetooth® connection
Content on a Bluetooth compatible smartphone, tablet, or computer can be played
back easily (p.10).
You can enjoy realistic and impressive sound as close to the original by the
Compressed Music Enhancer.
• HOME THEATER CONTROLLER
You can operate the sound bar easily by installing the dedicated controlling
application “HOME THEATER CONTROLLER.”
• TV’s remote control learning function
Operate the sound bar with the TV’s remote control (p.12).
•Clear voice
Makes voice sound (such as dialogues and narrations) clear (p.9).
Q1
Can I operate the sound bar using the remote control of the TV?
Switching between the remote controls of the TV and sound bar is
inconvenient.
A1
Yes. You can control the sound bar using your TV’s remote control by the
“TV’s remote control learning” function (p.12).
This function is available only for the IR (infrared) remote control. Check your
TV’s remote control type.
Q2
Can I improve the clarity of dialogue?
A2
Yes. Dialogue in movies, TV news, sports programs, etc., can be made
clearer using the “clear voice” function (p.9).
Q3
Can I operate the sound bar using a smartphone? And, can I turn on/off
the sound bar with a smartphone?
A3
Yes. You can operate the sound bar with your smartphone by using the
dedicated control application “HOME THEATER CONTROLLER” (p.11).
When using this function, it is necessary to connect your smartphone to the
sound bar through B luetooth connection.
Also, if you use the Bluetooth standby mode function, the sound bar will turn
on when a Bluetooth connection is made between your smartphone and the
sound bar, and turns off when disconnected (p.11).

4
En
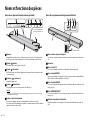
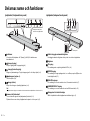
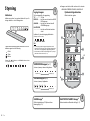
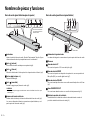
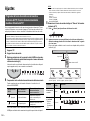
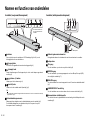
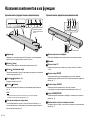
Part names and functions
Sound bar (front panel/top panel)
A Indicators
Indicate the status of the sound bar. Refer to “Operations” (p.8 to 9) for the main
functions of the indicators.
B (input) key
Selects an input source to be played back (p.8).
C (mute) key
Mutes the audio output. Press the key again to unmute (p.9).
D / (volume +/-) keys
Adjust the volume (p.8).
E (power) key
Turns on or off (standby) the sound bar (p.9).
HINT
• The sound bar may automatically turn off when the auto power standby function is enabled (p.15).
F Remote control sensors
Receive infrared signals from the remote control of the sound bar (p.2).
The remote control sensors are located on the front panel and on the top panel of the
sound bar (p.5).
Sound bar (rear panel/bottom panel)
G Dual built-in subwoofers
The built-in subwoofers are located in the top part of the sound bar.
H Speakers
I TV input jack
For connecting to a TV with an optical cable (p.6).
J BD/DVD input jack
For connecting to a playback device, such as a Blu-ray Disc (BD) player, with a
coaxial digital cable (p.7).
K ANALOG input jack
For connecting an external device with a 3.5 mm stereo mini plug cable (p.7).
L SUBWOOFER OUT jack
For connecting an external subwoofer with a monaural pin cable (p.14).
M Installation position selector switch
Sets the sound quality appropriate to the installation position of the sound bar (p.5).
* Keys are located in the rear
part of the sound bar.
** *
*
* Bottom panel
*

5
En
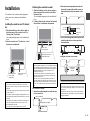
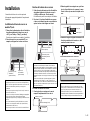
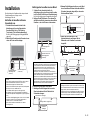
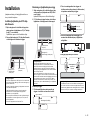
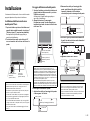
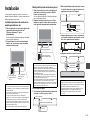
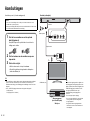
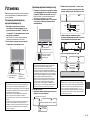
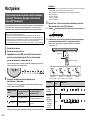
Installation
The orientation of the sound bar and the appropriate
remote control sensor depend on the installation
location.
Installing the sound bar on a TV cabinet,
etc.
1 Slide the installation position selector switch on
the bottom panel of the sound bar to the T (for
Tabletop) side (T, by default).
The sound quality appropriate to the installation will
be set.
2 Place the sound bar on a TV cabinet, etc., so that
the keys are facing the wall.
Attaching the sound bar to a wall
1 Slide the installation position selector switch on
the bottom panel of the sound bar to the W (for
Wall mount) side.
The sound quality appropriate to the installation will
be set.
2 Following “How to install on the wall” below, install
the sound bar so that the keys face upwards.
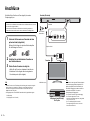
How to install on the wall
1 Attach the mounting template on a wall and mark
for the screw holes.
2 Remove the mounting template from the wall,
then install commercially available screws (as
illustrated below) at the points marked on the
wall.
3 Peel off the backing paper from the spacers and
attach the adhesive face to the sound bar as
illustrated below.
4 Hang the sound bar on the screws.
Cautions
• Do not stack the sound bar and a BD player or other device
directly on each other. Doing so may cause a malfunction due to
vibrations.
• Do not hold the speaker portion (fabric parts) on the front and the
top of the sound bar.
• The sound bar contains non-magnetic shielding speakers. Do not
place magnetically sensitive items (hard disk drive, etc.) near the
sound bar.
• Depending on your installation environment, it may be better to
connect the sound bar and external devices (such as a TV)
before installing the sound bar.
• Do not place the sound bar within 50 mm (2") of the TV.
Installation position
selector switch
(bottom panel)
Remote control sensor
(front panel)
Cautions
• When installing the sound bar on a wall, all installation work must
be performed by a qualified contractor or dealer. The customer
must never attempt to perform this installation work. Improper or
inadequate installation could cause the sound bar to fall,
resulting in personal injury.
• Do not attach the sound bar to a wall that is made of weak
materials such as plaster or veneered woods. Doing so may
cause the sound bar to fall.
• Make sure you use commercially available screws that can
support the weight of the installation (specified in Step 2 on the
right). Using clamps other than specified screws, such as short
screws, nails, and two-sided tape, may cause the sound bar to
fall.
Remote control
sensor (top panel)
Keys
Installation position selector
switch (bottom panel)
Tapes or thumbtacks
Mounting template (supplied)
Screw
holes
Cautions
• Fix the cables in place where they will not become loose. If your
foot or hand accidentally gets caught on a loose cable, the sound
bar may fall.
• Check that the sound bar is fixed securely after the installation.
Yamaha will bear no responsibility for any accidents caused by
improper installations.
7 to 9 mm
(1/4" to 3/8")
10 to 12 mm (3/8" to 1/2")
4 mm (#8)
20 mm (3/4")
or more
Spacer
Mounting holes
on bottom of
sound bar

6
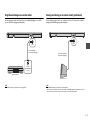
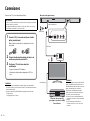
En
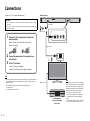
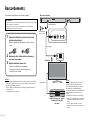
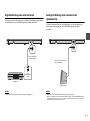
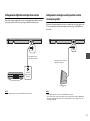
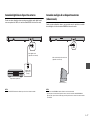
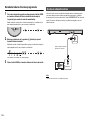
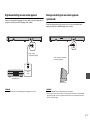
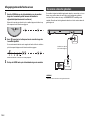
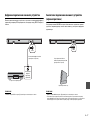
Connections
Power cable
To AC wall outlet
Sound bar (rear)
Optical cable
Playback device
(such as a BD player)
Set top box
OPTICAL OUTPUT
TV
HINT
In the following cases, connect the coaxial digital
audio output of the playback device to the BD/DVD
input of the sound bar with a coaxial digital cable
(commercially available), then select the BD/DVD
key on the remote control for the input source.
− The TV does not have an optical output.
− The TV does not output audio (or outputs low
volume audio) from the connected playback
device.
− The audio from the playback device connected to
the TV cannot be heard as surround sound.
Connect to a TV (or other peripheral device).
HINT
• If a setting to disable the speaker output is not available on your TV, you may disable it
by connecting headphones to the headphone jack on the TV. For details, refer to the
manuals of the TV.
• The TV and BD/DVD input jacks support the following audio signals.
− PCM (2 channel)
− Dolby Digital (up to 5.1 channel)
CAUTIONS
• Do not connect the power cable of the sound bar to the AC wall outlet before making
connections.
• Do not use excessive force when inserting the cable plug. Doing so may damage the
cable plug or terminal.
1 Connect the TV and sound bar with the optical
cable (supplied).
Remove the cap of the optical cable and check the
direction of the plug.
2 Connect the power cable of the sound bar to an
AC wall outlet.
3 Set the TV as follows.
• Set the TV volume to minimum.
• Disable the TV built-in speaker output (if available).
HDMI cable (etc.)

7
En
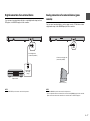
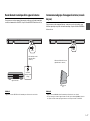
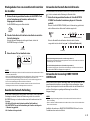
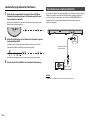
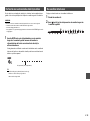
Digital connection of an external device
You can connect an external device that has a coaxial digital audio output, such as a
DVD player, to the BD/DVD input jack of the sound bar.
NOTE
• Select the BD/DVD key on the remote control for the input source.
Analog connection of an external device (game
console)
You can connect an external device, such as a game console or TV that does not have
a digital audio output, to the ANALOG input jack of the sound bar.
NOTE
• Select the ANALOG key on the remote control for the input source.
• If you can adjust the volume on an external device connected to the ANALOG input jack of the sound bar,
adjust it to the same volume as the external device connected to the TV or BD/DVD input jack.
Coaxial digital cable
(commercially available)
Coaxial digital
audio output
(orange)
Playback device
3.5 mm stereo mini plug cable
(commercially available)
Game console (etc.)

8
En
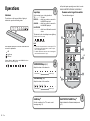
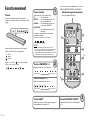
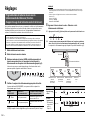
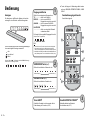
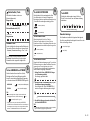
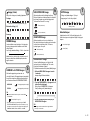
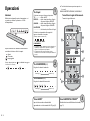
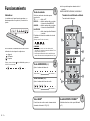
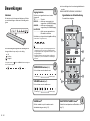
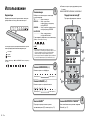
Operations
Indicators
The indicators on the top panel flash or light up, to
indicate the operation and setting status.
In this manual, illustrations of the nine in-line indicators
are used for explanation.
: Off
: Lights up
: Flashes
(Example: When the PLII indicator and SURROUND indicator
flash, and the TV indicator lights up)
★: Keys that require pressing for more than 3 seconds
LEARN, BLUETOOTH STANDBY, AUDIO DELAY
Input keys
Select an input source to be played back.
TV ....................TV audio
BD/DVD...........Audio from a device connected to
the BD/DVD input jack
ANALOG .........Audio from a device connected to
the ANALOG input jack
BLUETOOTH
.........................Audio from a Bluetooth connected
device
The indicator for the selected input source lights up.
(Example: when TV is selected)
HINT
• To play audio of the playback device connected to the TV or
to watch videos of the playback device, set the TV’s input
source to the playback device.
• For details on Bluetooth connection, refer to “Listening to the
sound from a Bluetooth device” (p.10).
SUBWOOFER keys (+/-)
Adjust the volume of the subwoofer.
VOLUME keys (+/-)
Adjust the volume of the sound bar.
Volume down (–) Volume up (+)
Volume down (–) Volume up (+)
1
2
LEARN key
★
Sets the sound bar to the TV’s remote control
learning mode (p.12).
BLUETOOTH STANDBY key
★
Enables/disables the Bluetooth standby mode
(p.11).
3
Remote control signal transmitter
Transmits infrared signals.
★
★

9
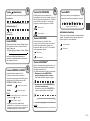
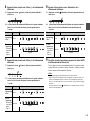
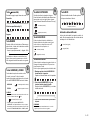
En
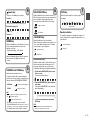
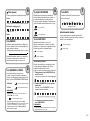
Decoder indication
The sound bar supports the following audio signals. You
can check the type of the input audio signal by the color
of the indicator.
(power) key
Turns on or off (standby) the sound bar.
Turned on
Bluetooth standby (p.11)
Turned off
DIMMER key
Switches the brightness of the indicators. Pressing
the key each time switches the status of the
indicators as follows.
Dim (default setting) → Off → Bright
↑
Indicators illuminate bright just after the operation
and become the set brightness after a few
seconds.
Indicator of the selected input source lights up (green)
Lights up (red)
SURROUND and STEREO keys
Switch between surround and stereo
(2 channel) playback. When surround playback is
selected, you can enjoy a realistic sound effect using
Yamaha’s exclusive AIR SURROUND XTREME.
HINT
• When 2 channel stereo signals are played in surround,
the PLII indicator lights up.
• By installing the dedicated free application “HOME
THEATER CONTROLLER” to a Bluetooth device, such as a
smartphone, you can choose the following surround modes:
TV PROGRAM, MOVIE, MUSIC, SPORTS, and GAME.
Lights up (surround playback)
Off (stereo playback)
SURROUND
STEREO
Lights up (Dolby Pro Logic II)
4
5
BASS EXTENSION key
Enables/disables the bass extension function.
When this function is enabled, you can enjoy a powerful
bass sound with the Yamaha original bass boost
technology “Advanced Bass Extension Processing.”
CLEAR VOICE key
Enables/disables the clear voice function.
When this function is enabled, you can enjoy clear
voice sounds while watching movies, TV dramas,
news programs or sports programs.
AUDIO DELAY key
★
Adjusts the audio delay to synchronize the sound
with the video when the video image on the TV
may seem delayed with respect to the sound.
Follow the procedure below to adjust the audio delay.
1 Hold down the AUDIO DELAY key for more
than 3 seconds.
The left most indicator flashes.
2 Press the SUBWOOFER (+/-) key to adjust the
audio delay.
Pressing the SUBWOOFER (+) key delays the
audio output timing.
3 To finish the adjustment, press the AUDIO
DELAY key.
HINT
• The adjustment will be finished automatically if no
operations are performed for 20 seconds.
Lights up (enabled)
Off (disabled)
Lights up (enabled)
Off (disabled)
(–) (+)
6
MUTE key
Mutes the audio output. Press the key again
to unmute.
Flash (on mute)
7
Green (Dolby Digital)
Off (PCM)

10
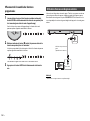
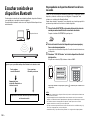
En
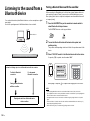
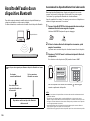
Listening to the sound from a
Blueto oth device
You can play back wirelessly from Bluetooth devices, such as a smartphone or digital
music player.
See also the operating manual of the Bluetooth device for more details.
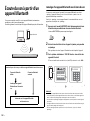
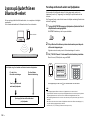
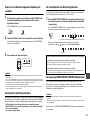
Pairing a Bluetooth device with the sound bar
When connecting to a Bluetooth device for the first time, “pairing” between the device
and sound bar is required. “Pairing” is necessary for each Bluetooth device you use.
Once “pairing” with a device is completed, subsequent connection with that device will
not require “pairing.”
1 Press the BLUETOOTH key on the sound bar’s remote control to
select Bluetooth as the input source.
The BLUETOOTH indicator on the top panel flashes.
2 Turn on the Bluetooth function of the device to be paired, and
perform pairing.
The operation varies depending on the device. Refer to the operation manual of the
device.
3 Select “YAS-105 Yamaha” in the Bluetooth device list on the device.
If a passkey (PIN) is required, enter the number “0000.”
When pairing is completed, or a completion message appears on the device.
NOTE
• Perform pairing with the Bluetooth device and sound bar within 10 meters (33 ft) of each other.
• Up to eight Bluetooth devices can be paired with the sound bar. If a ninth device is paired, pairing data for
the device with the oldest connection date will be deleted.
• If pairing information for a device is deleted, to use that device again, pairing of the device is required
again.
• If a Bluetooth device is already connected to the sound bar, terminate that Blu etooth connection (p.11),
then perform pairing with the new device.
• Refer to “Bluetooth” (p.18) in “Troubleshooting” if pairing cannot be achieved.
Perform the following steps to use a Bluetooth device with the sound bar.
Bluetooth devices
Playing back audio from a Bluetooth device
on the sound bar
For the first Bluetooth
connection
Pairing a Bluetooth device
with the sound bar
For subsequent
Bluetooth connection
Flashes
YAS-105 Yamaha
PIN 0 0 0 0
123
456
789
0

11
En
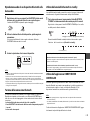
Playing back audio from a Bluetooth device on the
sound bar
1 With the sound bar turned on, press the BLUETOOTH key on the
sound bar’s remote control to select Bluetooth as the input source.
The BLUETOOTH indicator on the top panel flashes.
2 Turn on the Bluetooth function of the device and then connect.
When Bluetooth connection is made correctly, the BLUETOOTH indicator of the
sound bar lights up.
3 Play back a song on the device.
NOTE
• Perform Bluetooth connection with the device and sound bar within 10 meters (33 ft) of each other.
• It may be necessary to select “YAS-105 Yamaha” in the Bluetooth device list again, in the event that a
connection problem occurs. You may have to change the output setting to output audio to the sound bar,
depending on the Bluetooth device you are using.
• Adjust the volume level of the Bluetooth device as required.
• If a Bluetooth device is already connected to the sound bar, terminate that Bluetooth connection, then
connect with the new device.
Terminating Bluetooth connection
Bluetooth connection is terminated in the following cases. When the Bluetooth connection
is terminated with the sound bar turned on, the BLUETOOTH indicator changes from the lit
status to the flashing status and the sound bar enters the connection wait status.
• The Bluetooth function is turned off on the compatible device.
• The BLUETOOTH key on the sound bar’s remote control is pressed for more
than 3 seconds.
• The sound bar is turned off.
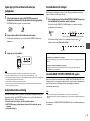
Using the Bluetooth standby mode
The Bluetooth standby mode allows you to turn on (or off) the sound bar automatically,
linked with the operation of the Bluetooth device.
1 With the sound bar turned on, hold down the BLUETOOTH STANDBY
key on the sound bar’s remote control for more than 3 seconds.
Holding down the BLUETOOTH STANDBY key for 3 seconds each time toggles the
mode between enabled and disabled.
When the Bluetooth standby mode is enabled and the sound bar is turned off, the
D indicator lights up in red (Bluetooth standby).
Using the HOME THEATER CONTROLLER application
By installing the dedicated free application “HOME THEATER CONTROLLER” to a
Bluetooth device, such as a smartphone, you can perform various operations easily and
conveniently with the Bluetooth device. (Setting items: basic operation, surround mode,
sound adjustments)
NOTE
• To use the application, connect the sound bar and a Bluetooth device via Bluetooth connection.
• If you enable the Bluetooth standby mode of the sound bar, you can turn on the power of the sound bar
with the Bluetooth device.
For details on “HOME THEATER CONTROLLER”, see the product information on our
website.
Flashes
Lights up
Functions available on Bluetooth devices with Bluetooth standby mode enabled
Power on interlock function (when the sound bar is turned off)
When Bluetooth connection is made on the device, the sound bar will turn on and will be ready to play
back sound from the device.
Power off interlock function (when the sound bar is turned on)
The sound bar will be turned off when Bluetooth connection is terminated on a Bluetooth device. (Only
when BLUETOOTH is selected as the input source.)
Flash 3 times (enabled), flash once (disabled)
Lights up (red)

12
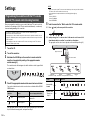
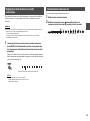
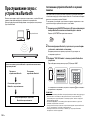
En
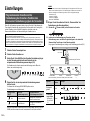
Settings
Once you program the sound bar, you can control it with your TV’s remote control for
functions such as turning on/off the TV and sound bar simultaneously, or volume up/
down and muting/unmuting of the sound bar.
1 Turn off the TV.
2 Turn off the sound bar.
3 Hold down the LEARN key on the sound bar’s remote control for
more than 3 seconds while pointing at the appropriate remote
control sensor (p.5).
The sound bar enters the learning mode, and the indicators on the top panel flash
as shown below.
4 Check if the appropriate remote control sensor has been activated.
You can check which remote control sensor has been activated with the CLEAR
VOICE indicator.
If the appropriate remote control sensor has not been activated, press the LEARN
key to exit from the learning mode, and repeat from Step 3.
NOTE
• Steps 5 to 8 require only the TV’s remote control and the keys on the rear panel of the sound bar.
The remote control of the sound bar is not necessary.
• If the sound bar has already learned functions, the following indicators light up.
Mute: TV
Volume (-): BD/DVD
Volume (+): ANALOG
Power: BLUETOOTH
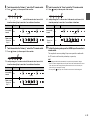
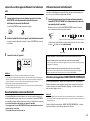
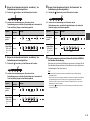
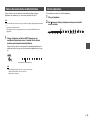
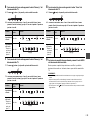
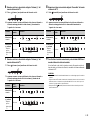
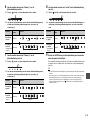
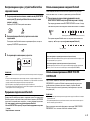
5 Teach the sound bar the “Mute” code of the TV’s remote control.
5-1 Press (mute) on the rear panel of the sound bar.
5-2 While pointing your TV’s remote control at the remote control sensor, hold
down the mute key for more than 1 second twice or three times.
The appropriate remote control sensor depends on the installation position (p.5).
Programming the sound bar with the TV’s remote
control (TV’s remote control learning function)
• This function is available only when your TV’s remote control uses IR (infrared) signal.
• A radio wave remote control will not work.
• If you want to use a cable or satellite set top box’s remote control to operate the sound bar, use your
original TV’s IR (infrared) remote control to program the sound bar, then use the set top box’s remote
control to operate.
• If by changing the volume of the sound bar the TV’s volume also changes, set the TV’s volume to
minimum, or disable speaker output.
CLEAR VOICE
indicator
Activated remote control
sensor
Activated remote control
sensor is appropriate when…
Off On the front panel
Installing the sound bar on a TV
cabinet, etc.
Lights up On the top panel
Attaching the sound bar to a
wall
Result Bleep/buzzer Indicators
Successfully
learned
Once
Failed to learn
* Repeat from
Step 5-1.
Twice
Approx. 30 cm (1 ft)
TV’s remote control
Hold down
(more than 1 second)
Release
(more than 1 second)
Hold down
(more than 1 second)
Release
(...)
Lights up
Flash

13
En
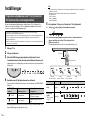
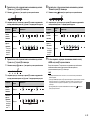
6
Teach the sound bar the “Volume (–)” code of the TV’s remote control.
6-1 Press (volume -) on the rear panel of the sound bar.
6-2 While pointing your TV’s remote control at the remote control sensor, hold
down the volume (–) key for more than 1 second twice or three times.
7 Teach the sound bar the “Volume (+)” code of the TV’s remote control.
7-1 Press (volume +) on the rear panel of the sound bar.
7-2 While pointing your TV’s remote control at the remote control sensor, hold
down the volume (+) key for more than 1 second twice or three times.
8 Teach the sound bar the “Power” code of the TV’s remote control.
8-1 Press (power) on the rear panel of the sound bar.
8-2 While pointing your TV’s remote control at the remote control sensor, hold
down the power key for more than 1 second twice or three times.
9 To finish the learning mode, press the LEARN key on the sound bar’s
remote control.
This completes the necessary settings. Now you can operate the sound bar with
the TV’s remote control’s mute key, volume keys, or power key.
HINT
• The learning mode will be finished automatically if no operations are performed for 5 minutes.
• Set the TV volume to minimum. When you turn up the volume of the sound bar with the TV’s remote
control, the volume of the TV may be turned up at the same time. In this case, follow Step 3 in
“Connections” (p.6) to change the TV setting.
• You can press the (power) key on the sound bar’s remote control to finish learning mode.
Result Bleep/buzzer Indicators
Successfully
learned
Once
Failed to learn
* Repeat from
Step 6-1.
Twice
Result Bleep/buzzer Indicators
Successfully
learned
Once
Failed to learn
* Repeat from
Step 7-1.
Twice
Lights up
Flash
Lights up
Flash
Result Bleep/buzzer Indicators
Successfully
learned
Once
Failed to learn
* Repeat from
Step 8-1.
Twice
Lights up
Flash

14
En
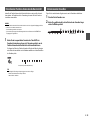
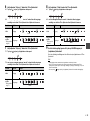
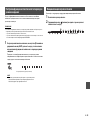
Clearing all programmed functions
1 With the sound bar turned off, hold down the LEARN key on the
sound bar’s remote control for more than 3 seconds (for entering the
learning mode).
When the sound bar is in the learning mode, the indicators on the top panel flash as
shown below.
2 Hold down (input) on the rear panel of the sound bar for more
than 3 seconds.
The corresponding indicator of the learned function turns off and the indicators on
the top panel flash as shown below.
If the clearing is completed, you will hear the bleep sound three times.
3 Press the LEARN key on the sound bar’s remote control.
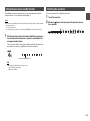
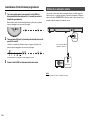
The sound bar has dual built-in subwoofers; however you can connect an external
subwoofer when you want to enhance low frequency sound. Connect a subwoofer to the
SUBWOOFER OUT jack of the sound bar. Sound is output from both the built-in
subwoofers and external subwoofer.
NOTE
• Use an external subwoofer with built-in amplifier.
Using an external subwoofer
Pin cable for subwoofer
(commercially available)
Mono input

15
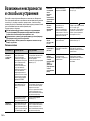
En
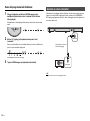
By enabling the auto power standby function, you can avoid forgetting to turn off the
sound bar after use, or if you fall asleep while watching TV.
NOTE
• When the auto power standby function is enabled and one of the following conditions is met, the sound bar
will automatically turn off.
− No operations for 8 hours
− No audio input and no operations for 20 minutes when BLUETOOTH is selected as the input source.
1 With the sound bar turned off, hold down the MUTE key on the sound
bar’s remote control for more than 3 seconds to enable/disable the
auto power standby function.
You can check the status of the auto power standby function with the indicators on
the top panel for several seconds right after the sound bar is turned on.
HINT
• Initial setting varies depending on the country or region.
− U.K. and Europe models: enabled
− Other models: disabled
Follow the procedure below to initialize the sound bar.
1 Turn off the sound bar.
2 Hold down (power) on the rear panel of the sound bar for more
than 3 seconds.
Setting the auto power standby function
Off (enabled), lights up (disabled)
Initializing the sound bar
Flash (initialized)

16
En
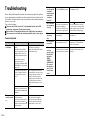
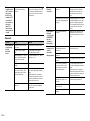
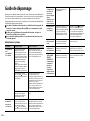
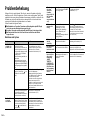
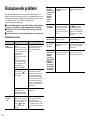
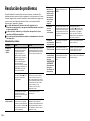
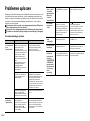
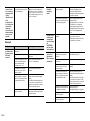
Troubleshooting
Refer to the table below when the sound bar does not function properly. If the problem
you are experiencing is not listed below or if the instructions below do not help, turn off
the sound bar, disconnect the power cable, and contact the nearest authorized Yamaha
dealer or service center.
First, check the following:
A The power cables of the sound bar, TV and playback devices (such as BD
players) are connected to AC wall outlets securely.
B The sound bar, TV and playback devices (such as BD players) are turned on.
C The connectors of each cable are securely inserted into jacks on each device.
Power and system
Problem Cause Remedy
The power turns
off suddenly.
The auto power standby function
worked.
When the auto power standby
function is enabled and one of the
following conditions is met, the
sound bar will automatically turn
off.
- No operations for 8 hours
- No audio input and no
operations for 20 minutes when
BLUETOOTH is selected as the
input source.
Turn on the sound bar again. To stop
the sound bar from turning off
automatically, disable the auto power
standby function (p.15).
The protection circuitry has been
activated. (The D indicator on
the top panel of the sound bar
flashes.)
After confirming that all connections
are made properly, turn on the sound
bar again. If the power still turns off
suddenly or cannot be turned on,
unplug the power cable from the AC
wall outlet and contact the nearest
authorized Yamaha dealer or service
center.
Bluetooth connection is
terminated on a Bluetooth device
when the Bluetooth standby mode
is enabled.
Disable the Bluetooth standby mode
(p.11).
The power
cannot be turned
on.
The protection circuitry has been
activated three times
consecutively. (If you try to turn on
the power in this condition, the
D indicator on the top panel of the
sound bar flashes.)
To protect the product, the power
cannot be turned on. Unplug the
power cable from the AC wall outlet
and contact the nearest authorized
Yamaha dealer or service center.
All indicators go
out although the
sound bar is
turned on (it may
seem that the
sound bar is
turned off).
The brightness of indicators is set
to off on the DIMMER key setting.
Operate the DIMMER key to select the
desired brightness (p.9).
The sound bar is
not responding
correctly.
The internal microcomputer is
frozen, due to an external electric
shock (such as lightning or
excessive static electricity) or to a
drop in the power supply voltage.
Hold down (power) on the rear
panel of the sound bar for more than
10 seconds to reboot it. (If the problem
persists, unplug the power cable from
the AC wall outlet and plug it again.)
The sound bar
operates by
itself.
Another Bluetooth device is being
operated nearby.
Terminate Bluetooth connection of the
sound bar (p.11).
TV’s 3D glasses
do not work.
The sound bar is blocking the 3D
glasses transmitter of your TV.
Check the position of the 3D glasses
transmitter of your TV and adjust the
position of the sound bar.
The sound bar
cannot be
operated using
the dedicated
application
“HOME
THEATER
CONTROLLER.”
(The screen of
the application
does not shift
from the demo
mode.)
The Bluetooth device on which
the application has been installed
is not connected to the sound bar.
Connect the Bluetooth device and the
sound bar via Bluetooth and use the
application.

17
En
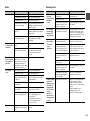
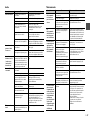
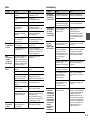
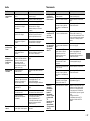
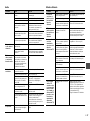
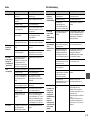
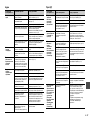
Audio Remote control
Problem Cause Remedy
No sound.
Another input source is selected. Select an appropriate input source (p.8).
The mute function is activated. Cancel the mute function (p.9).
The volume is too low. Turn up the volume (p.8).
The power cable of the sound bar
is not connected properly.
Make sure that the power cable of the
sound bar is connected to an AC wall
outlet securely (p.6).
Input jacks on both devices are
connected.
Connect the input jack on the sound
bar and the output jack on the external
playback device.
Signals that the sound bar cannot
play back are being input.
Change the digital audio output setting
on the playback device to PCM or
Dolby Digital.
No sound is
coming from the
subwoofer.
The volume of the subwoofer is
too low.
Turn up the volume of the subwoofer
(p.8).
The playback source does not
contain low-frequency signals.
Play back a sound source containing
low-frequency signals, and confirm
that the sound is output from the
subwoofer.
The volume
decreases when
the sound bar is
turned on.
The automatic volume adjustment
function worked. To prevent
excessive loudness, the sound
bar automatically controls its
volume within a certain level when
the sound bar is turned on.
If necessary, turn up the volume (p.8).
No surround
effect.
Stereo playback is selected. Select surround playback (p.9).
The volume is too low. Turn up the volume (p.8).
The TV or playback device is set
to output 2 channel audio (such
as PCM) only.
Change the digital audio output setting
on the TV or playback device to Dolby
Digital or BitStream.
The audio is output from the TV
built-in speakers.
Set the TV volume to minimum (p.6).
The listening position is too close
to the sound bar.
Listen from a position at some
distance from the sound bar.
The installation position selector
switch is not set appropriately.
When placing the sound bar in front of
a TV, set the installation position
selector switch to “T.”
When attaching the sound bar to a
wall, set the installation position
selector switch to “W.”
Noise is heard.
The sound bar is too close to
another digital or high-frequency
device.
Move those devices away from the
sound bar.
Problem Cause Remedy
The sound bar
cannot be
controlled using
the remote
control.
The sound bar is out of the
operating range.
Use the remote control within the
operating range (p.2).
The batteries are weak. Replace with new batteries (p.2).
The remote control sensor of the
sound bar is exposed to direct
sunlight or strong lighting.
Adjust the lighting angle, or reposition
the sound bar.
The TV cannot
be controlled
using the TV’s
remote control.
The remote control sensor of the
TV is hidden by the sound bar.
Adjust the installation position of the
sound bar so that the remote control
sensor of the TV is not hidden by the
sound bar when operating the TV from
the ordinary operation position.
The sound bar
does not learn
TV’s remote
control
operations.
The TV’s remote control key was
not held down long enough.
Hold down the key for more than 1
second twice or three times (p.12).
The TV’s remote control does not
use infrared signals. (Some
remote controls may not work
even if it uses infrared signals.)
The TV’s remote control learning
function cannot be used in this case.
Use the sound bar’s remote control to
operate the sound bar.
The position where you operated
the TV’s remote control is not
appropriate.
Operate the TV’s remote control at the
appropriate position (p.12).
The batteries of the TV’s remote
control are weak.
Replace with new batteries.
The remote control sensor of the
sound bar is exposed to direct
sunlight or strong lighting.
Adjust the lighting angle, or reposition
the sound bar.
The transmission of the remote
control signal was disturbed by
the TV screen light.
Turn off the TV and perform the
learning operation again (p.12).
Sound is coming
from the TV
when the sound
bar volume is
turned up with
the TV’s remote
control.
(when TV’s
remote control
learning function
is used)
Audio output is enabled on the
TV.
Change the TV setting to disable the
TV speaker output. If a setting to
disable the speaker output is not
available on your TV, try the following
methods.
- Connect headphones to the
headphone jack on the TV.
- Set the TV volume to minimum.

18
En
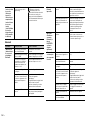
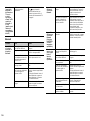
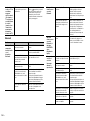
Bluetooth
The power of the
sound bar and of
the TV switch in
the opposite
direction. (For
example, the TV
is turned off if
the sound bar is
turned on.)
(when TV’s
remote control
learning function
is used)
The power of the TV was on when
you performed the learning
operation.
Press the power key on the TV and
(power) on the rear panel of the sound
bar to turn them on and then press the
power key on the TV’s remote control
to turn them off.
Problem Cause Remedy
Cannot make the
sound bar pair
with the
Bluetooth
device.
Bluetooth is not selected as the
input source.
Select Bluetooth as the input source.
The device does not support
A2DP.
Perform pairing operations with a
device which supports A2DP.
A Bluetooth adaptor, etc., that you
want to pair with the sound bar
has a password other than
“0000.”
Use a Blu etooth adaptor, etc., whose
password is “0000.”
The sound bar and device are too
far apart.
Move the device closer to the sound
bar.
There is a device (microwave
oven, wireless LAN, etc.) that
outputs signals in the 2.4 GHz
frequency band nearby.
Move the sound bar away from the
device that is emitting radio frequency
signals.
If the Bluetooth device is equipped
with the wireless LAN function, turn off
the wireless LAN function, and turn on
the Bluetooth function only.
Another Bluetooth device is
connected.
Terminate current Bluetooth
connection, and perform pairing with
the new device.
Cannot make a
Bluetooth
connection.
Another Bluetooth device is
connected.
The sound bar cannot make multiple
Bluetooth connections. Terminate
current Bluetooth connection, and
make connection for the desired
device.
More than nine devices are paired
and the oldest pairing information
is deleted.
Perform pairing again. The sound bar
can retain pairing information for up to
eight devices. When pairing a ninth
device, pairing data for the device with
the oldest connection date will be
deleted.
Cannot make a
Bluetooth
connection (the
BLUETOOTH
indicator
continues to
flash rapidly).
There is a problem within the
sound bar.
Unplug the power cable from the AC
wall outlet and contact the nearest
authorized Yamaha dealer or service
center.
No sound is
produced or the
sound is
interrupted
during playback.
The Bluetooth connection of the
sound bar with the device is
disconnected.
Perform Bluetooth connection
operations again (p.10).
Bluetooth is not selected as the
input source.
Select Bluetooth as the input source.
The sound bar and device are too
far apart.
Move the device closer to the sound
bar.
There is a device (microwave
oven, wireless LAN, etc.) that
outputs signals in the 2.4 GHz
frequency band nearby.
Move the sound bar away from the
device that is emitting radio frequency
signals.
If the Bluetooth device is equipped
with the wireless LAN function, turn off
the wireless LAN function, and turn on
the Bluetooth function only.
The device is not set to send
Bluetooth audio signals to the
sound bar.
Change the audio output setting and
connection setting on the device.
Playback on the device has not
been performed.
Perform playback on the device.
The device’s volume is set to
minimum.
Turn up the device’s volume level.
Sayfa yükleniyor...
Sayfa yükleniyor...
Sayfa yükleniyor...
Sayfa yükleniyor...
Sayfa yükleniyor...
Sayfa yükleniyor...
Sayfa yükleniyor...
Sayfa yükleniyor...
Sayfa yükleniyor...
Sayfa yükleniyor...
Sayfa yükleniyor...
Sayfa yükleniyor...
Sayfa yükleniyor...
Sayfa yükleniyor...
Sayfa yükleniyor...
Sayfa yükleniyor...
Sayfa yükleniyor...
Sayfa yükleniyor...
Sayfa yükleniyor...
Sayfa yükleniyor...
Sayfa yükleniyor...
Sayfa yükleniyor...
Sayfa yükleniyor...
Sayfa yükleniyor...
Sayfa yükleniyor...
Sayfa yükleniyor...
Sayfa yükleniyor...
Sayfa yükleniyor...
Sayfa yükleniyor...
Sayfa yükleniyor...
Sayfa yükleniyor...
Sayfa yükleniyor...
Sayfa yükleniyor...
Sayfa yükleniyor...
Sayfa yükleniyor...
Sayfa yükleniyor...
Sayfa yükleniyor...
Sayfa yükleniyor...
Sayfa yükleniyor...
Sayfa yükleniyor...
Sayfa yükleniyor...
Sayfa yükleniyor...
Sayfa yükleniyor...
Sayfa yükleniyor...
Sayfa yükleniyor...
Sayfa yükleniyor...
Sayfa yükleniyor...
Sayfa yükleniyor...
Sayfa yükleniyor...
Sayfa yükleniyor...
Sayfa yükleniyor...
Sayfa yükleniyor...
Sayfa yükleniyor...
Sayfa yükleniyor...
Sayfa yükleniyor...
Sayfa yükleniyor...
Sayfa yükleniyor...
Sayfa yükleniyor...
Sayfa yükleniyor...
Sayfa yükleniyor...
Sayfa yükleniyor...
Sayfa yükleniyor...
Sayfa yükleniyor...
Sayfa yükleniyor...
Sayfa yükleniyor...
Sayfa yükleniyor...
Sayfa yükleniyor...
Sayfa yükleniyor...
Sayfa yükleniyor...
Sayfa yükleniyor...
Sayfa yükleniyor...
Sayfa yükleniyor...
Sayfa yükleniyor...
Sayfa yükleniyor...
Sayfa yükleniyor...
Sayfa yükleniyor...
Sayfa yükleniyor...
Sayfa yükleniyor...
Sayfa yükleniyor...
Sayfa yükleniyor...
Sayfa yükleniyor...
Sayfa yükleniyor...
Sayfa yükleniyor...
Sayfa yükleniyor...
Sayfa yükleniyor...
Sayfa yükleniyor...
Sayfa yükleniyor...
Sayfa yükleniyor...
Sayfa yükleniyor...
Sayfa yükleniyor...
Sayfa yükleniyor...
Sayfa yükleniyor...
Sayfa yükleniyor...
Sayfa yükleniyor...
Sayfa yükleniyor...
Sayfa yükleniyor...
Sayfa yükleniyor...
Sayfa yükleniyor...
Sayfa yükleniyor...
Sayfa yükleniyor...
Sayfa yükleniyor...
Sayfa yükleniyor...
Sayfa yükleniyor...
Sayfa yükleniyor...
Sayfa yükleniyor...
Sayfa yükleniyor...
Sayfa yükleniyor...
Sayfa yükleniyor...
Sayfa yükleniyor...
Sayfa yükleniyor...
Sayfa yükleniyor...
Sayfa yükleniyor...
Sayfa yükleniyor...
Sayfa yükleniyor...
Sayfa yükleniyor...
Sayfa yükleniyor...
Sayfa yükleniyor...
Sayfa yükleniyor...
Sayfa yükleniyor...
Sayfa yükleniyor...
Sayfa yükleniyor...
Sayfa yükleniyor...
Sayfa yükleniyor...
Sayfa yükleniyor...
Sayfa yükleniyor...
Sayfa yükleniyor...
Sayfa yükleniyor...
Sayfa yükleniyor...
Sayfa yükleniyor...
Sayfa yükleniyor...
Sayfa yükleniyor...
Sayfa yükleniyor...
Sayfa yükleniyor...
Sayfa yükleniyor...
Sayfa yükleniyor...
Sayfa yükleniyor...
Sayfa yükleniyor...
Sayfa yükleniyor...
Sayfa yükleniyor...
Sayfa yükleniyor...
Sayfa yükleniyor...
Sayfa yükleniyor...
Sayfa yükleniyor...
Sayfa yükleniyor...
Sayfa yükleniyor...
Sayfa yükleniyor...
Sayfa yükleniyor...
-
 1
1
-
 2
2
-
 3
3
-
 4
4
-
 5
5
-
 6
6
-
 7
7
-
 8
8
-
 9
9
-
 10
10
-
 11
11
-
 12
12
-
 13
13
-
 14
14
-
 15
15
-
 16
16
-
 17
17
-
 18
18
-
 19
19
-
 20
20
-
 21
21
-
 22
22
-
 23
23
-
 24
24
-
 25
25
-
 26
26
-
 27
27
-
 28
28
-
 29
29
-
 30
30
-
 31
31
-
 32
32
-
 33
33
-
 34
34
-
 35
35
-
 36
36
-
 37
37
-
 38
38
-
 39
39
-
 40
40
-
 41
41
-
 42
42
-
 43
43
-
 44
44
-
 45
45
-
 46
46
-
 47
47
-
 48
48
-
 49
49
-
 50
50
-
 51
51
-
 52
52
-
 53
53
-
 54
54
-
 55
55
-
 56
56
-
 57
57
-
 58
58
-
 59
59
-
 60
60
-
 61
61
-
 62
62
-
 63
63
-
 64
64
-
 65
65
-
 66
66
-
 67
67
-
 68
68
-
 69
69
-
 70
70
-
 71
71
-
 72
72
-
 73
73
-
 74
74
-
 75
75
-
 76
76
-
 77
77
-
 78
78
-
 79
79
-
 80
80
-
 81
81
-
 82
82
-
 83
83
-
 84
84
-
 85
85
-
 86
86
-
 87
87
-
 88
88
-
 89
89
-
 90
90
-
 91
91
-
 92
92
-
 93
93
-
 94
94
-
 95
95
-
 96
96
-
 97
97
-
 98
98
-
 99
99
-
 100
100
-
 101
101
-
 102
102
-
 103
103
-
 104
104
-
 105
105
-
 106
106
-
 107
107
-
 108
108
-
 109
109
-
 110
110
-
 111
111
-
 112
112
-
 113
113
-
 114
114
-
 115
115
-
 116
116
-
 117
117
-
 118
118
-
 119
119
-
 120
120
-
 121
121
-
 122
122
-
 123
123
-
 124
124
-
 125
125
-
 126
126
-
 127
127
-
 128
128
-
 129
129
-
 130
130
-
 131
131
-
 132
132
-
 133
133
-
 134
134
-
 135
135
-
 136
136
-
 137
137
-
 138
138
-
 139
139
-
 140
140
-
 141
141
-
 142
142
-
 143
143
-
 144
144
-
 145
145
-
 146
146
-
 147
147
-
 148
148
-
 149
149
-
 150
150
-
 151
151
-
 152
152
-
 153
153
-
 154
154
-
 155
155
-
 156
156
-
 157
157
-
 158
158
-
 159
159
-
 160
160
-
 161
161
-
 162
162
-
 163
163
-
 164
164
-
 165
165
-
 166
166
-
 167
167


Yamaha YAS-105 El kitabı
- Kategori
- Bluetooth müzik alıcıları
- Tip
- El kitabı
diğer dillerde
- español: Yamaha YAS-105 El manual del propietario
- français: Yamaha YAS-105 Le manuel du propriétaire
- italiano: Yamaha YAS-105 Manuale del proprietario
- svenska: Yamaha YAS-105 Bruksanvisning
- Deutsch: Yamaha YAS-105 Bedienungsanleitung
- English: Yamaha YAS-105 Owner's manual
- dansk: Yamaha YAS-105 Brugervejledning
- русский: Yamaha YAS-105 Инструкция по применению
- suomi: Yamaha YAS-105 Omistajan opas
- Nederlands: Yamaha YAS-105 de handleiding
İlgili makaleler
Diğer belgeler
-
Grundig GSB 910 SW Kullanım kılavuzu
-
Grundig DSB 990 Kullanım kılavuzu
-
Grundig DSB 2000 Kullanım kılavuzu
-
Sennheiser AMBEO Soundbar | Mini Kullanma talimatları
-
-
PEAQ PSB 400 El kitabı
-
Avermedia GS331 Hızlı başlangıç Kılavuzu
-
Philips TAB7305/98 Hızlı başlangıç Kılavuzu
-
-