Electrolux ER8126B Kullanım kılavuzu
- Kategori
- Kombi buzdolapları
- Tip
- Kullanım kılavuzu

Fridge-Freezer / Derin donduruculu buzdolabi
INSTALLATION AND INSTRUCTION MANUAL
MONTAJ VE KULLANIM KILAVUZU
ER 8126 B
2222 008-95
ELECTROLUX HOME PRODUCTS OPERATIONS EUROPE

2
It is most important that this instruction book should be retained with the appliance for future
reference. Should the appliance be sold or transferred to another owner, or should you move house and
leave the appliance, always ensure that the book is supplied with the appliance in order that the new
owner can be acquainted with the functioning of the appliance and the relevant warnings.
If this appliance featuring magnetic door seals is to replace an older appliance having a spring lock
(latch) on the door or lid, be sure to make that spring lock unusable before you discard the old
appliance. This will prevent it from becoming a death-trap for a child.
These warnings are provided in the interest of safety. You must read them carefully before installing or
using the appliance.
WARNINGS
General Safety
• This appliance is designed to be operated by
adults. Children should not be allowed to tamper
with the controls or play with the product.
• It is dangerous to alter the specifications or
modify this product in any way.
• Before any cleaning or maintenance work is
carried out, be sure to switch off and unplug the
appliance.
• This appliance is heavy. Care should be taken
when moving it
• ce lollies can cause frost burns if consumed
straight from the appliance.
Service/Repair
• Any electrical work required to install this
appliance should be carried out by a qualified
electrician or competent person
• This product should be serviced by an authorized
Service Centre, and only genuine spare parts
should be used.
• Under no circumstances should you attempt to
repair the appliance yourself. Repairs carried out
by inexperienced persons may cause injury or
more serious malfunctioning. Refer to your local
Service Centre, and always insist on genuine
spare parts.
Use
• The domestic refrigerators and freezers are
designed to be used specifically for the storage of
edible foodstuffs only.
• Best performance is obtained with ambient
temperature between +18°C and +43°C (class T);
+18°C and +38°C (class ST); +16°C and +32°C
(class N); +10°C and +32°C (class SN). The
class of your appliance is shown on its rating
plate.
Warning: when the ambient temperature is not
included within the range indicated for the class
of this appliance, the following instructions must
be observed: when the ambient temperature
drops below the minimum level, the storage
temperature in the freezer compartment cannot
be guaranteed; therefore it is advisable to use the
food stored as soon as possible.
• Frozen food must not be re-frozen once it has
been thawed out.
• Manufacturers’ storage recommendations should
be strictly adhered to. Refer to relevant
instructions.
• The inner lining of the appliance consists of
channels through which the refrigerant passes. If
these should be punctured this would damage
the appliance beyond repair and cause food loss.
DO NOT USE SHARP INSTRUMENTS to scrape
off frost or ice. Frost may be removed by using
the scraper provided. Under no circumstances
should solid ice be forced off the liner. Solid ice
should be allowed to thaw when defrosting the
appliance. See defrost instructions.
• Do not place carbonated or fizzy drinks in the
freezer as it creates pressure on the container,
which may cause it to explode, resulting in
damage to the appliance.
Installation
• There are working parts in this product which
heat up. Always ensure that there is adequate
ventilation as a failure to do this will result in
component failure and possible food loss. See
installation instructions.
• Care must be taken to ensure that the appliance
does not stand on the electrical supply cable.
Important: if the supply cord is damaged, it must
be replaced by a special cord or assembly
available from the manufacturer or its service
agent.
• Parts which heat up should not be exposed.
Wherever possible the back of the product should
be against a wall.
• If the appliance has been transported horizontally,
it is possible that the oil contained in the
compressor flows in the refrigerant circuit. It is
advisable to wait at least two hours before
connecting the appliance to allow the oil to flow
back in the compressor.
Printed on recycled paper

3
CONTENTS
Warnings 2
Use 4
Control panel 4
Cleaning the interior 4
Use of the freezer - Starting 4
Temperature regulation 4
Quick-freezing 4
The temperature alarm light 5
Freezing fresh food 5
Storage of frozen food 5
Thawing 5
Ice-cube production 5
Cold accumulators 5
Use of the refrigerator - Operation 5
Temperature regulation 5
Fresh food refrigeration 6
Movable shelves 6
Positioning the door shelves 6
Hints 7
hints for refrigeration 7
Hints for freezing 7
Hints for storage of frozen food 7
Maintenance 8
Periodic cleaning 8
Periods of no operation 8
Interior light 8
Defrosting 8
Customer service and spare parts 9
Installation 10
Location 10
Rear spacers 10
Electrical connection 10
Changing the opening direction of the doors 11
Environment Protection
This appliance does not contain gasses which
could damage the ozone layer, in either its
refrigerant circuit or insulation materials. The
appliance shall not be discarded together with
the urban refuse and rubbish. Avoid damaging
the cooling unit, especially at the rear near the
heat exchanger. Information on your local
disposal sites may be obtained from municipal
authorities. The materials used on this appliance
marked by the symbol are recicable.
2222 008-95

4
Cleaning the interior
Before using the appliance for the first time, wash
the interior and all internal accessories with luke-
warm water and some neutral soap so as to remove
the typical smell of a brand-new product, then dry
thoroughly.
Do not use detergents or abrasive
powders, as these will damage the finish.
USE OF THE FREEZER
This freezer compartment has been marked with
the symbol , which means that it is
suited to the freezing of fresh foods, the
conservation of frozen foods and the production
of ice-cubes.
Starting
Insert the power supply plug into the nearest wall
socket (the function indicator light (D) will light up
indicating that the freezer is receiving electrical
input.)
Turn the thermostat knob (E) to the right to a
medium setting (the temperature alarm light (A) will
light up).
To turn off the freezer, turn the thermostat knob to
the «
■» position.
The refrigerator compartment will remain operating.
Temperature regulation
The temperature is automatically regulated and can
be increased to achieve a higher temperature
(warmer) by rotating the thermostat knob toward
lower settings or reduced (colder) rotating the knob
towards higher settings.
However, the exact setting should be chosen
keeping in mind that the temperature inside the
refrigerator depends on:
• room temperature;
• how often the door is opened;
• the quantity of food stored;
• location of appliance.
A medium setting is generally the most suitable.
Important
If the ambient temperature is high or the
appliance is fully loaded, and the appliance is
set to the lowest temperatures, it may run
continuously causing frost to form on the rear
wall. In this case the dial must be set to a higher
temperature to allow automatic defrosting and
therefore reduced energy consumption.
Quick-freezing
For quick-freezing, press the quick-freezing switch
(B). The quick-freezing indicator light (C) will then
light up.
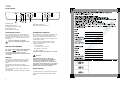
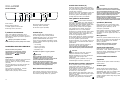
USE
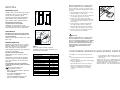
Control panel
A. Warning light
B. Quick-freezing switch
C. SUPER operating control light
D. Pilot light (freezer)
E. Thermostat knob (freezer)
F. Pilot light (refrigerator)
G. Thermostat knob (refrigerator)
minmax
A
B
CD
E
ONSUPERALARM
minmax
ON
FG

5
Storage of frozen food
When first starting-up or after a period out of use,
before putting the products in the compartment let
the appliance run for at least two hours on the
coldest setting, then turn the thermostat knob to the
normal operating position.
To obtain the best performance from this appliance,
you should:
if large quantities of food are to be stored, remove
all drawers and baskets from appliance and place
food on cooling shelves.
Thawing
Deep-frozen or frozen food, prior to being used, can
be thawed in the refrigerator compartment or at
room temperature, depending on the time available
for this operation.
Small pieces may even be cooked still frozen,
directly from the freezer: in this case, cooking will
take longer.
Ice-cube production
This appliance is equipped with one or more trays
for the production of ice-cubes. Fill these trays with
water, then put them in the freezer compartment.
Do not use metallic instruments to remove the
trays from the freezer.
Freezing fresh food
The 4-star compartment is suitable for
long term storage of commercially frozen food, and
for freezing fresh food. Do not exceed the storage
times shown by the manufacturer on the
commercially frozen food packets.
Set the freezer to quick-freezing operational status.
Wait at least 3 hours before introducing fresh foods
into the freezer if it has only recently been turned on.
If the freezer has already been working for some
time, press the respective switch at least 24 hours
before introducing the food into the freezer in order
to ensure better freezing results.
Under normal circumstances, to freeze fresh foods it
is not necessary to change the setting of the thermo-
stat knob with respect to the normal running
position.
To help you make the most of the freezing process,
here are some important hints:
Place the food to be frozen in the top basket of the
freezing compartment as this is the coldest part.
The maximum quantity of food which can be fro-
zen in 24 hrs is shown on the rating plate.
Important
Do not put carbonated liquids (fizzy drinks, etc.) in
the freezing compartment as they may burst.
Water ices, if consumed immediately after removal
from the freezing compartment, can possibly cause
the skin to be freeze burnt.
Remember that, once thawed, frozen food deterio-
rates rapidly.
The temperature alarm light (A)
The temperature alarm light turns on automatically
whenever the temperature within the freezer rises
above a certain value which might endanger
satisfactory long-term conservation.
It is perfectly normal for the temperature alarm light
to remain lit up for a short time after the freezer is
initially turned on. It will remain lit up until the
optimum temperature for the conservation of frozen
food is attained.
Pay careful attention not to exceed load limit stated
on the side of the upper section (where applicable).
Important
If there is a power failure when food is in the
freezer, do not open the door of the freezer
compartment. The frozen food will not be
affected if the power cut is of short duration (up
to 6-8 hours) and the freezer compartment is full,
otherwise, it is recommended that the food
should be used within a short time (a
temperature increase of the frozen food
shortens its safe storage period).
USE OF THE REFRIGERATOR
Operation
The temperature inside the refrigerator compartment
can be selected using thermostat (F).
Temperature regulation
The temperature is automatically regulated and can
be increased to achieve a higher temperature
(warmer) by rotating the thermostat knob toward
lower settings or reduced (colder) rotating the knob
towards higher settings.
However, the exact setting should be chosen
keeping in mind that the temperature inside the
refrigerator depends on:
Cold accumulators
Two cold accumulators are supplied in the freezer;
these increase the leght of time for which food will
keep in the event of the power failure or breakdown.
They must be placed in the top drawer.

6
Positioning the door shelves
To permit storage of food packages of various sizes,
the door shelves can be placed at different heights.
To make these adjustments proceed as follows:
Gradually pull the shelf in the direction of the arrows
until it comes free, then reposition as required.
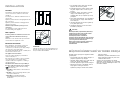
PR249
D040
Movable shelves
The walls of the refrigerator are equipped with a
series of runners so that the shelves can be
positioned as desired.
Fresh food refrigeration
To obtain the best performance:
• do not store warm food or evaporating liquids in
the refrigerator;
• do cover or wrap the food, particularly if it has a
strong flavour.
• Position food so that air can circulate freely round it.
room temperature;
how often the door is opened;
the quantity of food stored;
location of appliance.
A medium setting is generally the most suitable.
To stop operation, simply turn the thermostat knob to
position «
■».
Important
If the ambient temperature is high or the
appliance is fully loaded, and the appliance is
set to the lowest temperatures, it may run
continuously causing frost to form on the rear
wall. In this case the dial must be set to a higher
temperature to allow automatic defrosting and
therefore reduced energy consumption.

7
Hints for freezing
To help you make the most of the freezing process,
here are some important hints:
• the maximum quantity of food which can be
frozen in 24 hrs. is shown on the rating plate;
• the freezing process takes 24 hours. No further
food to be frozen should be added during this
period;
• only freeze top quality, fresh and thoroughly
cleaned, foodstuffs;
• prepare food in small portions to enable it to be
rapidly and completely frozen and to make it
possible subsequently to thaw only the quantity
required;
• wrap up the food in aluminium foil or polythene
and make sure that the packages are airtight;
• do not allow fresh, unfrozen food to touch food
which is already frozen, thus avoiding a rise in
temperature of the latter;
• lean foods store better and longer than fatty
ones; salt reduces the storage life of food;
• water ices, if consumed immediately after
removal from the freezer compartment, can
possibly cause the skin to be freeze burnt;
• it is advisable to show the freezing-in date on
each individual pack to enable you to keep tab of
the storage time;
HINTS
Hints for refrigeration
Useful hints:
Meat (all types): wrap in polythene bags and place
on the glass shelf above the vegetable drawer.
For safety, store in this way only one or two days
at the most.
Cooked foods, cold dishes, etc..: these should be
covered and may be placed on any shelf.
Fruit and vegetables: these should be thoroughly
cleaned and placed in the special drawer(s)
provided.
Butter and cheese: these should be placed in
special airtight containers or wrapped in aluminium
foil or polythene bags to exclude as much air as
possible.
Milk bottles: these should have a cap and should
be stored in the bottle rack on the door.
Bananas, potatoes, onions and garlic, if not
packed, must not be kept in the refrigerator.
Hints for storage of frozen food
To obtain the best performance from this appliance,
you should:
• make sure that the commercially frozen
foodstuffs were adequately stored by the retailer;
• be sure that frozen foodstuffs are transferred
from the foodstore to the freezer in the shortest
possible time;
• not open the door frequently or leave it open
longer than absolutely necessary.
• Once defrosted, food deteriorates rapidly and
cannot be refrozen.
• Do not exceed the storage period indicated by
the food manufacturer.
• The symbols on the drawers show different types
of frozen goods.
The numbers indicate storage times in months
for the appropriate types of frozen goods.
Whether the upper or lower value of the indicated
storage time is valid depends on the quality of
the foods and pre-treating before freezing.
• do not put carbonated liquids (fizzy drinks,
etc.) in the freezer compartment as they may
burst.

8
Interior light
The light bulb inside the refrigerator compartment
can be reached as follows:
- unscrew the light cover securing screw.
- unhook the moving part as shown in the figure.
If the light does not come on when the door is open,
check that it is screwed into place properly. If it still
does not light up, change the bulb.
The rating is shown on the light bulb cover.
D731
Defrosting
Frost is automatically eliminated from the evaporator
of the refrigerator compartment every time the motor
compressor stops, during normal use. The defrost
water drains out through a trough into a special
container at the back of the appliance, over the
motor compressor, where it evaporates.
It is important to periodically clean the defrost
water drain hole in the middle of the refrigerator
compartment channel to prevent the water
overflowing and dripping onto the food inside.
Use the special cleaner provided, which you will
find already inserted into the drain hole.
The freezer compartment, however, will become
progressively covered with frost. This should be
removed with the special plastic scraper provided,
whenever the thickness of the frost exceeds 4 mm.
During this operation it is not necessary to switch off
the power supply or to remove the foodstuffs.
D037
MAINTENANCE
Unplug the appliance before carrying out
any maintenance operation.
Periodic cleaning
Clean the inside with warm water and bicarbonate of
soda.
Rinse and dry thoroughly.
Clean the condenser (black grill) and the
compressor at the back of the appliance with a
brush or a vacuum cleaner. This operation will
improve the performance of the appliance and save
electricity consumption.
Many proprietary kitchen surface cleaners
contain chemicals that can attack/damage the
plastics used in this appliance. For this reason it
is recommended that the outer casing of this
appliance is only cleaned with warm water with a
little washing-up liquid added.
Periods of non-operation
When the appliance is not in use for long periods,
take the following precautions:
remove the plug from the wall socket;
remove all food;
defrost and clean the interior and all accessories;
leave the door ajar to allow air to circulate to prevent
unpleasant smells.
21
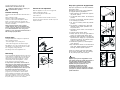
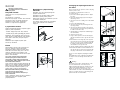
Kap› aç›l›fl yönünün de¤ifltirilmesi
Hiçbir ifllem yapmadan önce ilk olarak buzdolab›n›n
fiflini prizden çekiniz.
Buzdolab›n›n kap›s›n›n aç›l›fl yönünü de¤ifltirmek
için afla¤›daki ifllemleri gerçeklefltiriniz:
1. Klipsle tutturulmufl olan havaland›rma ›zgaras›n›
(D) çekerek ç›kart›n›z
2. Üç adet tesbit vidasını sökerek alt mentefleyi (E)
çıkartınız
3. Alt kap›y› orta mentefleden kayd›rarak ç›kart›n›z.
4. Orta mentefleyi (H) sökünüz.
5. Üst kapıyı üst mentefle piminden (G) kurtararak
çıkartınız;
6. Pimi çıkartınız ve akabinde bunu, di¤er tarafa
takılmaları gereken tapaları çıkarttıktan sonra,
karflı tarafa takınız.
7. Buzdolab›n›n kap›s›n› tak›n›z. Orta mentefleyi sol
tarafa tak›n›z.
8. Dondurucu bölme kapa¤›n› tak›n›z.
9 Mentefle pimini (E) 10 mm aç›k a¤›zl› anahtar ile
sökünüz ve menteflenin di¤er taraf›na tak›n›z.
10.Söktü¤ünüz vidalar› kullanarak alt mentefleyi (E)
di¤er tarafa tak›n›z. Kapa¤› (F) ok yönünde iterek
havaland›rma ›zgaras›n›n (D) üstünden kayd›r›p
ç›kart›n›z ve di¤er tarafa tak›n›z.
11.Havaland›rma ›zgaras›n› (D) takarak klipslerle
yerine tutturunuz.
12.Kap› tutamaklar›n› sökünüz ve aksi tarafa tak›n›z.
Aç›kta kalan delikleri buzdolab›na ait belgelerin
bulundu¤u torbadaki tapalarla kapat›n›z.
Kapılar orta mentefle ayarlanarak hizalanabilirler.
‹ki adet vidas›n› gevflettikten sonra orta mentefleyi
bir alet yard›m›yla yatay olarak ayarlay›n›z.
Uyar›:
Kap›lar›n aç›lma yönünü de¤ifltirdikten sonra
tüm vidalar›n düzgün bir flekilde s›k›ld›¤›ndan ve
manyetik lasti¤in buzdolab›n›n gövdesine
yap›flt›¤›ndan emin olunuz. Ortam s›cakl›¤›
düflükse (örne¤in k›fl aylar›nda) conta
buzdolab›n›n gövdesine tam olarak
oturmayabilir. Bu durumda contan›n
kendili¤inden oturmas›n› bekleyiniz ya da ilgili
parçayı bir saç kurutma makinesi ile ısıtarak bu
ifllemi hızlandırınız.
H
PR228
G
F
D
PR18
F
F
F
E
E

9
Never use sharp metal tools to scrape off frost
from the evaporator as you could damage it.
However, when the ice becomes very thick on the
inner liner, complete defrosting should be carried out
as follows:
1. pull out the plug from the wall socket or turn the
thermostat knob to the «
■» setting;
2. remove any stored food, wrap it in several layers
of newspaper and put it in a cool place;
3. leave the door open, and insert the plastic
scraper in the appropriate seating at the bottom
centre, placing a basin underneath to collect the
defrost water.
4. when defrosting is completed, dry the interior
thoroughly; keep the scraper for future use;
5. turn the thermostat knob back to the required
setting or replace the plug in the power socket.
6. After two or three hours, reload the previously
removed food into the compartment.
Important:
Never use sharp metal tools to scrape off frost
from the evaporator as you could damage it.
Do not use a maechanical device or any artificial
means to speed up the thawing process other
than those recommended by the manufacturer.
A temperature rise of the frozen food packs,
during defrosting, may shorten their safe
storage life.
CUSTOMER SERVICE AND SPARE PARTS
If the appliance is not functioning properly, check
that:
• the plug is firmly in the wall socket and the mains
power switch is on;
• there is an electricity supply (find out by plugging
in another appliance);
• the thermostat knob is in the correct position.
• If there are water drops on the bottom of the
cabinet, check that the defrost water drain
opening is not obstructed (see “Defrosting”
section).
• If your appliance is still not working properly after
making the above checks, contact the nearest
service centre.
To obtain fast service, it is essential that when you
apply for it you specify the model and serial number
of your appliance which can be found on the
guarantee certificate or on the rating plate located
inside the appliance, on the bottom left-hand side.
D068
20
Elektrik ba¤lant›lar›
Buzdolab›n›n fiflini takmadan önce seri numaras›
plakas›nda belirtilen voltaj ve frekans de¤erlerinin
kulland›¤›n›z flebekeye uygun olmas›na dikkat
ediniz. Voltaj de¤eri ±%6 farkl›k gösterebilir.
Farkl› voltajlarda çal›flt›rmak için uygun ölçülerde bir
otomatik trafo kullan›lmal›d›r.
Buzdolab› mutlaka topraklanmal›d›r.
Elektrik kablosunun fifli bu amaçla bir kontak ile
donat›lm›flt›r.
Kullanaca¤›n›z priz toprakl› de¤il ise ehliyetli bir
teknisyene dan›flarak ve mevcut yönetmeliklere
uygun olarak buzdolab›n› ayr› bir toprak hatt›na
irtibatlay›n›z.
Yukar›da belirtilen güvenlik uygulamalar›na
uyulmamas› halinde üreticiye hiçbir sorumluluk
yüklenemez.
Bu ürün afla¤›da belirtilen A.E.T.
yönetmeliklerine uygundur.
- Radyo giriflimi parazit gidericileri ile ilgili 2/6/87
tarihli 87/308 AET
- 19.2.73 tarihli 73/23 AET (Düflük Voltaj
Yönetmeli¤i) ve de¤ifliklikleri
- 3.5.89 tarihli 89/336 AET Elektromanyetik
Uygunluk Yönetmeli¤i ve de¤ifliklikleri
MONTAJ
Buzdolab›n›n yeri
Buzdolab› radyatör, kazan, direkt günefl ›fl›¤› gibi ›s›
kaynaklar›ndan uzak bir yere monte edilmelidir.
Güvenlik amac› ile sa¤lanmas› gereken
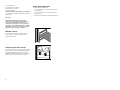
havaland›rma yandaki flekillerde belirtilmektedir.
Mutfak dolaplar›n›n alt›na yerlefltirme (fiekil A)
Mutfak dolaplar› olmadan yerlefltirme (fiekil B)
Dikkat: Havaland›rma a¤›zlar›n›n
engellenmemesine özen gösteriniz.
Buzdolab›n›n alt k›sm›nda bulunan iki adet
ayarlanabilir ayak buzdolab›n›n seviyesinin düzgün
bir flekilde ayarlanmas›na olanak sa¤lamaktad›r.
Arka takozlar
Buzdolab›na ait belgelerin bulundu¤u torbada
arka üst köflelere vidalanmas› gereken iki adet
takoz bulunmaktad›r.
Vidalar› gevfleterek takozlar› takt›ktan sonra vidalar›
tekrar s›k›n›z.
NP002
100 mm10 mm
10 mm
A
B
D594
TEKN‹K ÖZELL‹KLER
ÇALIfiMA GER‹L‹M‹ 220-240 V/50 Hz
YÜKSEKL‹K (mm) 1850
GEN‹fiL‹K (mm) 600
DER‹NL‹K (mm) 600
‹KL‹M SINIFI SN-T
YILDIZ SINIFI ****
TOPLAM KAPAS‹TE (NET) 289 lt
SO⁄T. BÖL. KAPAS‹TES‹ (NET) 212 lt
DOND. BÖL. KAPAS‹TES‹ (NET) 77 lt
DONDURMA KAPAS‹TES‹ 10 kg/24 sa
SO⁄UTUCU AKIfiKAN R 134a
M‹KTARI (gr) 55+100
ENERJ‹ SARF‹YATI 1.15 kWh/24 sa
ENERJI SINIFI B
D‹KKAT!
Cihaz, ana besleme flebekesi devresinden
çıkartılabilir olmalıdır; bu açıdan, kurulmadan sonra
prize kolaylıkla ulaflılabilmelidir.

10
Electrical connection
Before plugging in, ensure that the voltage and
frequency shown on the serial number plate
correspond to your domestic power supply. Voltage
can vary by ±6% of the rated voltage.
For operation with different voltages, a suitably sized
auto-transformer must be used.
The appliance must be earthed.
The power supply cable plug is provided with a
contact for this purpose.
If the domestic power supply socket is not earthed,
connect the appliance to a separate earth in
compliance with current regulations, consulting a
specialist technician.
The Manufacturer declines all responsibility if
the above safety precautions are not observed.
This appliance complies with the following
E.E.C. Directives:
- 87/308 EEC of 2/6/87 relative to radio interference
suppression.
- 73/23 EEC of 19.2.73 (Low Voltage Directive) and
subsequent modifications;
- 89/336 EEC of 3.5.89 (Electromagnetic
Compatibility Directive) and subsequent
modifications.
INSTALLATION
Location
The appliance should be installed well away from
sources of heat such as radiators, boilers, direct
sunlight etc.
For safety reasons, minimum ventilation must be as
shown in Fig.
Appliance positioned under overhanging kitchen wall
units (see Fig. A).
Appliance positioned without overhanging kitchen
wall units (see Fig. B).
Attention: keep ventilation openings clear of
obstruction.
Two adjustable feet at the cabinet base allow
accurate levelling of the appliance.
Rear spacers
In the bag with the documentation, there are two
spacers which must be fitted in the two top
corners.
Slacken the screws and insert the spacer under the
screw head, then re-tighten the screws.
NP002
100 mm10 mm
10 mm
A
B
D594
ATTENTION!
It must be possible to disconnect the appliance from
the mains power supply; the plug must therefore be
easily accessible after installation.
19
1. Fifli duvardaki prizden çekiniz veya termostat
dü¤mesini <
■> konumuna getiriniz.
2. buzdolab›nda bulunan g›dalar› ç›kart›n›z, birkaç
kat gazete ka¤›d›na sar›n›z ve serin bir yere
b›rak›n›z.
3. buzdolab›n›n kap›s›n› aç›k b›rak›n›z ve plastik
raspay› alt orta bölümde do¤ru yuvaya
yerlefltiriniz alt›na da suyu toplamak için bir kap
yerlefltiriniz.
4. eritme ifllemi tamamland›ktan sonra buzdolab›n›n
içini iyice kurulay›n›z; raspay› ileride kullanmak
üzere saklay›n›z.
5. termostat dü¤mesini eski konumuna getiriniz ya
da fifli tekrar prize tak›n›z.
6. Ç›kartt›¤›n›z g›dalar› iki üç saat sonra tekrar
buzdolab›na yerlefltiriniz.
Önemlidir:
Buharlaflt›r›c›daki (evaparatördeki) karlanmay›
temizlemek için hiçbir zaman keskin madeni
aletler kullanmay›n›z, aksi taktirde
buharlaflt›r›c›ya hasar verebilirsiniz.
Çözdürme ifllemini h›zland›rmak amac› ile üretici
taraf›ndan önerilenler d›fl›nda bir mekanik ayg›t
ya da suni yöntemler kullanmay›n›z.
Eritme ifllemi s›ras›nda donmufl g›dalar›n ›s›s›
artaca¤›ndan güvenli saklama süreleri
k›salabilecektir.
MÜfiTER‹ H‹ZMETLER‹ VE YEDEK PARÇA
Buzdolab› düzgün çal›flm›yorsa afla¤›daki kontrolleri
gerçeklefltiriniz:
• Fiflin duvardaki prize s›k›ca tak›lm›fl oldu¤unu ve
çal›flt›rma dü¤mesinin aç›k oldu¤unu
• fiebekede elektrik oldu¤unu, (ayn› prize baflka bir
cihaz›n fiflini takarak deneyebilirsiniz).
• Termostat dü¤mesinin do¤ru konumda oldu¤unu
• Bölmenin alt k›sm›nda su damlac›klar› varsa su
tahliye a¤z›n›n herhangi bir madde ile
kapat›lmam›fl oldu¤unu kontrol ediniz ("Eritme"
bölümüne bak›n›z).
• Buzdolab›n›n yukar›daki kontrollerden sonra da
düzgün çal›flmamas› halinde en yak›n servis
merkezi ile irtibat kurunuz.
Servisten h›zl› hizmet alabilmek için irtibata
geçti¤inizde, garanti belgesinde ya da buzdolab›n›n
içinde sol alt k›s›mda bulabilece¤iniz model ve seri
numaralar›n› bildiriniz.
D068

11
Changing the opening direction of
the doors
Before carrying out any operations, remove the plug
from the power socket.
To change the opening direction of the door,
proceed as follows:
1. pull off the ventilation grille (D) which is clipped
into place;
2. remove the bottom hinge (E) by unscrewing its
three fixing screws;
3. remove the lower door, sliding it out of the middle
hinge;
4. unscrew the middle hinge (H);
5. remove the upper door by releasing it from the
top hinge pin (G);
6. remove the pin then mount this on the opposite
side, after having removed the plugs which must
be refitted on the other side;
7. refit the fridge door. Replace the middle hinge to
the left hand side;
8. replace the freezer door;
9 using a 10 mm spanner, unscrew the hinge pin
(E) and reassemble it on the opposite side of the
hinge;
10.reassemble the lower hinge (E) on the opposite
side, using the screws previously removed. Slide
the hole cover (F) out of the ventilation grille (D)
by pushing it in the direction of the arrow and
reassemble it on the opposite side;
11.refit the ventilation grille (D), clipping it into place.
12.Dismantle the handles and reassemble them on
the opposite side. Cover the holes left open with
the plugs contained in the documentation pack.
The doors can be aligned by adjusting the middle
hinge.
The middle hinge can be adjusted horizontally, with
the help of a tool, after having slackened the two
screws.
Warning:
After having reversed the opening direction of the
doors check that all the screws are properly
tightened and that the magnetic seal adheres to the
cabinet. If the ambient temperature is cold (i.e. in
Winter), the gasket may not fit perfectly to the
cabinet. In that case, wait for the natural fitting of the
gasket or accelerate this process by heating up the
part involved with a normal hairdrier.
H
PR228
G
F
D
PR18
F
F
F
E
E
18
‹ç ayd›nlatma lambas›
So¤utucu bölmesindeki lamban›n ampulüne afla¤›da
aç›klanan flekilde ulaflabilirsiniz:
- lamban›n kapa¤›n› tespit eden viday› sökünüz.
- Hareketli parçay› flekilde gösterildi¤i gibi ç›kart›n›z .
Buzdolab›n›n kap›s› aç›ld›¤›nda lamba yanm›yorsa
yerine düzgün bir flekilde vidalanm›fl olup olmad›¤›n›
kontrol ediniz. Lamba hala yanm›yorsa ampulü
de¤ifltiriniz.
Kullan›lacak ampul de¤erleri ampulün kapak
k›sm›nda yer almaktad›r.
D731
D037
BAKIM
Herhangi bir bak›m ifllemini
gerçeklefltirmeden önce buzdolab›n›n
fiflini çekiniz.
Periyodik Temizlik
Cihazın içini ılık su ve sodyum bikarbonat ile
temizleyiniz.
‹yice durulayınız ve kurulayınız.
Kondensör (siyah ızgara) ve cihazın arka kısmındaki
kompresörü bir fırça veya elektrik süpürgesiyle
temizleyiniz. Bu ifllem cihazın performansını
arttıracak ve enerji tasarrufu sa¤layacaktır.
Buzdolab›n›n çal›flt›r›lmad›¤›
dönemler
Buzdolab›n› uzun süre çal›flt›rmayaca¤›n›zda
afla¤›daki önlemleri al›n›z:
Buzdolab›n›n fiflini duvardaki prizden çekiniz.
Buzdolab›n›n içindeki g›dalar› ç›kart›n›z
Eritme ifllemi uygulay›n›z ve buzdolab›n›n içi ile tüm
aksesuarlar›n› temizleyiniz
Hofl olmayan kokular› önlemek için buzdolab›n›n
kap›s›n› aral›k b›rakarak hava sirkülasyonu
sa¤lay›n›z.
Eritme
Normal kullan›m s›ras›nda motor kompresörü her
devre d›fl› kald›¤›nda so¤utucu bölümündeki
buharlaflt›r›c›da biriken karlanma otomatik olarak
eritilir. Eritme sonucunda ortaya ç›kan su bir oluk
vas›tas› ile buzdolab›n›n arka taraf›nda, motor
kompresörünün üst k›sm›nda bulunan özel bir kapta
birikir ve orada buharlafl›r.
Suyun tafl›p g›dalar›n üstüne damlamas›n›
önlemek için so¤utucu bölmesi kanal›n›n
ortas›ndaki su tahliye deli¤i periyodik olarak
temizlenmelidir. Tahliye deli¤inin içinde bulunan
özel temizlik aletini kullan›n›z.
Ancak dondurucu bölümü zamanla karlanacakt›r. Bu
karlanma 4 mm .kal›nl›¤›na ulaflt›¤›nda buzdolab› ile
birlikte verilen özel plastik raspa ile temizlenmelidir.
Bu ifllem s›ras›nda buzdolab›n› kapatmak ya da
içindeki g›dalar› ç›kartmak gerekmemektedir.
Buharlaflt›r›c›daki karlanmay› temizlemek için
hiçbir zaman keskin madeni aletler
kullanmay›n›z, aksi taktirde buharlaflt›r›c›ya
hasar verebilirsiniz.
Ancak iç kaplaman›n üstünde çok kal›n bir buzlanma
olufltu¤unda eritme ifllemi afla¤›daki flekilde
gerçeklefltirilmelidir:

12
Bu k›lavuz bir baflvuru kayna¤› olarak ürünle birlikte muhafaza edilmelidir. Ürünün sat›lmas› veya
baflka bir kifliye devredilmesi ya da evinizden tafl›n›rken ürünü b›rakman›z halinde yeni sahibinin de
ürünün kullan›lmas› ve gerekli uyar›lar konusunda bilgi sahibi olabilmesi amac› ile k›lavuzun ürünle
birlikte kalmas›n› temin ediniz.
Manyetik kap› lastikleri ile donat›lm›fl bu ürünü, kapak kilidi yayl› tip olan eski bir ürünün yerine
kullanacaksan›z, eski ürünü atmadan önce yayl› kilidi çal›flmaz hale getirmeyi ihmal etmeyiniz. Aksi
taktirde bu tür ürünler çocuklar için bir ölüm tuza¤› haline gelebilmektedir.
Bu uyar›lar güvenlik amac› ile yap›lmaktad›r. Ürünü monte etmeden veya kullanmadan önce bu uyar›lar›
dikkatli bir flekilde okuman›z› önemle rica ederiz.
UYARILAR
Genel Güvenlik
• Bu ürün yetiflkinler taraf›ndan kullan›lmak üzere
tasarlanm›flt›r. Çocuklar›n ürünün çevresinde
oynamas›na ya da ürünün kontrol dü¤melerini
kar›flt›rmalar›na izin vermeyiniz.
• Güvenli¤iniz için ürünün teknik özelliklerini
de¤ifltirmeyiniz ya da üründe herhangi bir
de¤ifliklik yapmay›n›z.
• Üründe temizlik ya da bak›m ifllemi yaparken
mutlaka ürünü kapat›n›z ve fiflini çekiniz.
• Ürün a¤›rd›r. Tafl›rken dikkatli tafl›y›n›z.
• Buzluktan ç›kart›ld›ktan sonra hemen tüketilen
buz parçalar› so¤uk yan›¤›na neden
olabilmektedir.
Servis/Onar›m
• Ürünün montaj› s›ras›nda flebeke ba¤lant›s›n› ve
gerekli di¤er elektrik ifllerini mutlaka ehliyetli bir
elektrikçiye ya da bu konuda yeterli bilgi sahibi
olan bir kifliye yapt›r›n›z.
• Bu ürünün montaj›, bak›m› yetkili Servis
Merkezleri taraf›ndan yap›lmal› ve sadece orijinal
yedek parça kullan›lmal›d›r.
• Ürünü hiçbir flekilde kendiniz onarmaya
çal›flmay›n›z. Deneyimsiz kifliler taraf›ndan
gerçeklefltirilen onar›mlar kaza ve yaralanmalar
ile üründe daha ciddi ar›zalar meydana
gelmesine neden olabilir. Mahalli servis
merkezine danıflınız ve her zaman orijinal yedek
parça kullanılmasında ısrar ediniz.
Kullan›m
• Ev buzdolaplar› ve dondurucular› sadece
tüketime haz›r g›da maddelerinin saklanmas›
amac›na yönelik olarak tasarlanm›flt›r.
• Ürünün en verimli flekilde çal›flt›¤› ortam
s›cakl›klar›; +18°C ila +43°C aras› (T s›n›f›);
+18°C ila +38°C aras› (ST s›n›f›); +16°C ila
+32°C aras› (N s›n›f›); ve +10°C ila +32°C
aras›d›r (SN s›n›f›);. Ürününüzün s›n›f› teknik
de¤erler plakas›nda yer almaktad›r
Uyar›: bulundu¤unuz bölgedeki ortam
s›cakl›¤›n›n ürünün s›n›f›na uygun olmamas›
halinde, afla¤›daki talimatlara uyulmas›
gerekmektedir: ortam s›cakl›¤›n›n asgari
seviyenin alt›na düflmesi durumunda dondurucu
bölmenin g›da saklama s›cakl›¤› garanti
edilememektedir; bu nedenle bu tür durumlarda
saklanan g›da maddelerinin bir an önce
tüketilmesi önerilmektedir.
• Ayr›ca ortam ›s›s› 10°C-nin alt›na düfltü¤ünde
so¤utucu bölüm performans› düfler veya uzun
süre otomatikte kalabilir. Bu bir ar›za de¤ildir.
• Dondurulmufl g›dalar çözüldükten sonra tekrar
dondurulmamal›d›r.
• Üreticinin saklama konusundaki önerilerine
tamamen uyulmal›d›r. Lütfen ilgili talimatlara
bak›n›z.
• Ürünün iç kaplamas› so¤utucu gaz›n dolaflt›¤›
kanallardan oluflmaktad›r. Bu kanallar›n
delinmesi halinde ürün onar›lamayacak
derecede hasar görecek ve içindeki g›dalar da
bozulacakt›r. Kar ve buzlar› kaz›mak için
KESK‹N UÇLU ALETLER KULLANMAYINIZ.
Karlar› kaz›mak için ürün ile birlikte verilen
raspay› kullan›n›z. Kat› buzlar› hiçbir flekilde
zorlayarak ç›kartmay›n›z. Kat› buzlar› eritmek
için buzdolab›n› çözdürünüz. Çözdürme
konusundaki talimatlara bak›n›z.
• Dondurucu bölmesine gazl› içecek koymay›n›z,
patlayarak buzdolab›na hasar verebilirler.
Montaj
• Üründe çal›flma s›ras›nda ›s›nan parçalar
bulunmaktad›r. Daima yeterli havaland›rma
sa¤lay›n›z, aksi taktirde bu parçalar ar›zalanabilir
ve saklanan g›dalar›n bozulmas›na neden
olabilir. Montaj talimatlar›na bak›n›z.
• Ürünün elektrik kablosunun üstüne
oturmad›¤›ndan emin olunuz.
Önemlidir: Elektrik kablosunun hasar görmesi
durumunda, üreticiden ya da yetkili servisten
temin edilebilecek orijinal kablo ile
de¤ifltirilmelidir.
• Is›nan parçalar a盤a bakmamal›d›r. Ürünün
arkas›n› duvara vermeye özen gösteriniz.
• Ürünün yatay olarak tafl›nmas› halinde
kompresör ya¤›n›n so¤utucu devresine akmas›
mümkündür. Ya¤›n tekrar kompresöre dönmesini
sa¤lamak amac› ile ürünü çal›flt›rmadan önce en
az iki saat beklemenizi öneririz.
Geri dönüflümlü ka¤›da bas›lm›flt›r.
17
Dondurucu hakk›nda pratik bilgiler
Dondurma iflleminden en iyi verimi alabilmek için
afla¤›daki hususlara dikkat etmenizi öneririz:
• 24 saat içerisinde dondurulabilecek azami g›da
miktar› teknik de¤erler plakas›nda belirtilmifltir.
• Dondurma ifllemi 24 saat sürmektedir. Bu süre
içerisinde dondurucuya baflka bir g›da
konulmamal›d›r.
• Dondurmak istedi¤iniz g›da maddeleri kaliteli,
taze ve iyice temizlenmifl olmal›d›r.
• G›da maddelerinin h›zl› bir flekilde ve tamamen
donmas›n› sa¤lamak ve sadece gereken miktar›
çözdürebilmek için küçük porsiyonlar halinde
dondurunuz.
• G›da maddelerini hava almayacak flekilde
alüminyum folyo ya da plastik torbalara sar›n›z.
• Taze, donmam›fl g›dalar›n donmufl g›dalara
temas ederek bunlar›n ›s›s›n› artt›rmas›n›
engelleyiniz.
• Ya¤s›z g›da maddeleri ya¤l› g›da maddelerine
k›yasla daha iyi ve uzun bir flekilde
saklanabilmektedir. ; tuz g›dan›n saklama
ömrünü azaltmaktad›r.
PRAT‹K VE YARARLI B‹LG‹LER
So¤utucu hakk›nda pratik bilgiler
Yararl› pratik bilgiler:
Et (her türlü): plastik torba ile sar›lmal› ve sebze
çekmecesinin üst k›sm›nda bulunan cam rafa
yerlefltirilmelidir.
Bu flekilde saklanan g›dalar güvenlik aç›s›ndan
en fazla bir ya da iki gün içerisinde tüketilmelidir.
Piflmifl g›dalar, yemekler vb.: üstleri örtülmek
suretiyle herhangi bir rafta saklanabilir.
Meyve ve sebzeler: iyice y›kanarak kendileri için
ayr›lm›fl özel çekmecelere yerlefltirilmelidir.
Tereya¤› ve peynir: özel hava geçirmez kaplarda
saklanmal› ya da alüminyum folyo veya plastik
torbalara sar›larak hava almalar› mümkün
oldu¤unca engellenmelidir.
Süt flifleleri: mutlaka kapal› olmal› ve kap›daki flifle
raf›nda saklanmal›d›r.
Paketli olmayan muz, patates, so¤an ve
sar›msak buzdolab›nda saklanmamal›d›r.
Dondurulmufl g›dalar›n saklanmas›
hakk›nda pratik bilgiler
Bu üründen en iyi verimi alabilmek için:
• Dondurulmufl olarak sat›lan g›da maddelerinin
sat›c› taraf›ndan uygun flekilde dondurulmufl
oldu¤undan emin olunuz.
• Dondurulmufl olarak sat›lan g›da maddelerinin
mümkün oldu¤u kadar k›sa bir süre içerisinde
dondurucuya konulmas›n› sa¤lay›n›z.
• Dondurucu bölmenin kapa¤›n› çok s›k açmay›n›z
ve gerekti¤inden uzun süre aç›k b›rakmay›n›z.
• Çözülmüfl g›dalar çabuk bozulur ve tekrar
dondurulamaz.
• Dondurulmufl gıda üreticisinin belirtti¤i saklama
sürelerini geçirmeyiniz.
• Buzluktan ç›kart›ld›ktan sonra hemen tüketilen
buz parçalar› deride so¤uk yan›¤›na neden
olabilmektedir
• saklama süresini belirleyebilmek amac› ile
paketlerin üstüne dondurma tarihini yazman›z›
öneririz.
• Çekmecelerin üzerindeki semboller dondurulmufl
farklı gıda tiplerini gösterir.
Sayılar, dondurulmufl gıda tiplerine uygun
saklama sürelerini ay cinsinden belirtir. Belirtilen
saklama sürelerinin üst ve alt de¤erlerinin
geçerlili¤i, gıdaların kalitesine ve dondurulmadan
önce geçirildikleri ifllemlere ba¤lıdır.
• Dondurucu bölmesine gazl› içecek
koymay›n›z, patlayarak buzdolab›na hasar
verebilirler.

13
‹Ç‹NDEK‹LER
Uyar›lar 12
Kullan›m 14
Kontrol paneli 14
‹ç bölümün temizlenmesi 14
Dondurucunun kullan›lmas› - Çal›flt›rma 14
S›cakl›k ayar› 14
H›zl› dondurma 14
S›cakl›k ikaz lambas› 15
Taze g›dalar›n dondurulmas› 15
Dondurulmufl g›dalar›n saklanmas› 15
Çözdürme (Defroster) 15
Buz yap›lmas› 15
So¤uk hava toplayıcıları 15
So¤utucunun kullan›lmas›-Çal›flt›rma 15
S›cakl›k ayar› 15
Taze g›dalar›n so¤utulmas› 16
Ç›kart›labilen raflar 16
Kap› raflar›n›n yerlefltirilmesi 16
Pratik ve yararl› bilgiler 17
So¤utucu hakk›nda pratik bilgiler 17
Dondurucu hakk›nda pratik bilgiler 17
Dondurulmufl g›dalar›n saklanmas›
hakk›nda pratik bilgiler 17
Bak›m 18
Periyodik temizlik 18
Ürünün çal›flt›r›lmad›¤› dönemler 18
‹ç ayd›nlatma lambas› 18
Eritme 18
Müflteri hizmetleri ve yedek parça 19
Montaj 20
Yerlefltirilmesi 20
Arka takozlar 20
Elektrik ba¤lant›lar› 20
Kap› aç›l›fl yönünün de¤ifltirilmesi 21
Çevre Korumas›
Bu ürünün so¤utucu devresinde ya da yal›t›m
malzemesinde ozon tabakas›na zarar verecek
gazlar bulunmamaktad›r. Ürün normal çöplerle
birlikte at›lmamal›d›r. So¤utma ünitesine
özellikle arka bölümde ›s› dönüfltürücüsünün
(kondanser) bulundu¤u bölgeye hasar
vermeyiniz. Bu ürünün at›labilece¤i çöp
sahalar›n› belediye yetkililerinden
ö¤renebilirsiniz. Bu üründe kullan›lan iflaretli
malzemeler geri dönüflümlüdür.
16
Kap›n›n aç›lma s›kl›¤›
Saklanan g›da miktar›
Buzdolab›n›n yeri
Genellikle orta ayarlar en uygun ayarlard›r
So¤utucuyu kapatmak için termostat dü¤mesini «
■»
konumuna getiriniz.
Önemlidir
Ortam s›cakl›¤›n›n yüksek olmas› ya da
buzdolab›n›n dolu olmas› ve en düflük
s›cakl›klara ayarl› olmas› halinde, sürekli olarak
çal›flarak arkas›ndaki duvarda karlanma
yapabilir. Bu durumda otomatik eritme
fonksiyonunun devreye girmesi ve daha düflük
bir enerji tüketimi elde edilebilmesi için dü¤me
daha yüksek bir s›cakl›¤a getirilmelidir.
Kap› raflar›n›n yerlefltirilmesi
Kap raflar› farkl› ebatlardaki g›da paketlerinin
saklanmas›na olanak sa¤lamak amac› ile farkl›
yüksekliklere ayarlanabilmektedir.
Bu raflar› afla¤›daki flekilde ayarlayabilirsiniz:
Raf› ok yönünde tercihen yukar›ya do¤ru kald›rarak
serbest kalmas›n› sa¤lay›n›z, daha sonra istedi¤iniz
konuma getiriniz.
PR249
D040
Ç›kart›labilen raflar
Buzdolab›n›n iç duvarlar›nda raflar›n istenilen
flekilde yerlefltirilmesine olanak sa¤layan k›zaklar
bulunmaktad›r.
Taze g›dalar›n so¤utulmas›
En iyi verimi almak için:
• buzdolab›nda s›cak g›da ya da buharlaflan s›v›
saklamay›n›z;
• özellikle keskin kokulu g›dalar sar›larak ya da
üzerleri örtülerek konulmal›d›r.
• G›dalar› hava sirkülasyonu sa¤layacak flekilde
yerlefltiriniz.

14
‹ç bölümün temizlenmesi
Ürünü ilk kez kullanmaya bafllamadan önce iç
bölümü ve iç bölümdeki tüm aksesuarlar› ›l›k su ve
do¤al sabun ile y›kayarak yeni kokusunu gideriniz ve
iyice kurulay›n›z.
Deterjan ya da afl›nd›r›c› toz sabun
kullanmay›n›z, bunlar yüzeye zarar verirler.
DONDURUCUNUN KULLANILMASI
Dondurucu bölme, taze g›dalar›n
dondurulmas›na, dondurulmufl g›dalar›n
saklanmas›na ve buz yap›lmas›na uygun
oldu¤unu belirten iflaretlerini
tafl›maktad›r.
Çal›flt›rma
Elektrik kablosunu en yakındaki duvar prizine takınız
(derin dondurucunun elektrik beslentisinin
baflladı¤ını belirten (D) fonksiyon gösterge lambası
yanacaktır).
Termostat dü¤mesini (E) sa¤a do¤ru çevirerek orta
bir ayara getiriniz (sıcaklık ikaz lambası (A)
yanacaktır).
Derin dondurucuyu kapatmak için termostat
dü¤mesini «
■» konumuna getiriniz.
So¤utucu bölüm çalıflmaya devam edecektir.
S›cakl›k ayar›
S›cakl›k otomatik olarak ayarlanmaktad›r ve
termostat dü¤mesi düflük ayarlara getirilerek
art›r›labilmekte (daha sıcak) ya da yüksek ayarlara
getirilerek azalt›labilmektedir (daha so¤uk).
Ancak kesin ayar› belirlerken buzdolab›n›n içindeki
s›cakl›¤›n afla¤›daki etkenlere ba¤l› oldu¤u hat›rdan
ç›kart›lmamal›d›r:
• Oda s›cakl›¤›
• Kap›n›n aç›lma s›kl›¤›
• Saklanan g›da miktar›
• Buzdolab›n›n yeri
Genellikle orta ayarlar en uygun ayarlard›r.
Önemlidir
Ortam s›cakl›¤›n›n yüksek olmas› ya da
buzdolab›n›n dolu olmas› ve en düflük
s›cakl›klara ayarl› olmas› halinde, sürekli olarak
çal›flarak arkas›ndaki duvarda karlanma
yapabilir. Bu durumda otomatik eritme
fonksiyonunun devreye girmesi ve daha düflük
bir enerji tüketimi elde edilebilmesi için dü¤me
daha yüksek bir s›cakl›¤a getirilmelidir.
Hızlı dondurma fonksiyonu
Hızlı dondurma fonksiyonunu devreye sokmak için
(B) hızlı dondurma dü¤mesine basınız. Bu durumda
hızlı dondurma gösterge lambası (C) yanacaktır.
KULLANIM
Kontrol Paneli
A. ‹kaz lambası
B. Hızlı dondurma dü¤mesi
C. SUPER çalıfltırma kontrol lambası
D. Gösterge lambası (dondurucu)
E. Termostat dü¤mesi (dondurucu)
F. Gösterge lambası (buzdolabı)
G. Termostat dü¤mesi (buzdolabı)
minmax
A
B
CD
E
ONSUPERALARM
minmax
ON
FG
15
S›cakl›k ikaz lambas› (A)
Dondurucu bölmenin s›cakl›¤› g›dalar›n yeterince
uzun süreli saklanmas›n› tehlikeye düflürecek belirli
bir seviyenin üstüne ç›kt›¤›nda, s›cakl›k ikaz lambas›
otomatik olarak yanacakt›r.
Dondurucu bölme ilk kez çal›flt›r›ld›¤›nda s›cakl›k ikaz
lambas›n›n k›sa bir süre yan›k kalmas› normaldir.
Dondurulmufl g›dalar›n saklanabilece¤i optimum
s›cakl›¤a ulafl›l›ncaya kadar yan›k kalacakt›r.
Taze g›dalar›n dondurulmas›
4 y›ld›zl› dondurucu bölme dondurulmufl
olarak sat›n al›nan g›dalar›n uzun süreli saklanmas› ve
taze g›dalar›n dondurulmas› ifllemleri için uygundur.
Dondurulmufl olarak sat›lan ürünlerde üreticinin paket
üzerinde belirtti¤i saklama sürelerini aflmay›n›z.
Dondurucuyu h›zl› dondurma konumuna getiriniz.
Yeni çal›flt›r›lm›flsa taze g›dalar› dondurucuya
yerlefltirmeden önce en az 3 saat bekleyiniz.
Dondurucunun bir süredir çal›flmakta olmas› halinde
dondurma iflleminden daha iyi sonuç almak için,
gıdaları dondurucu bölmeye yerlefltirmeden en az
24 saat önce ilgili dü¤meye basınız.
Normal koflullar alt›nda taze g›dalar›n dondurulmas›
için termostat dü¤mesinin normal konumdan baflka
bir konuma getirilmesi gerekmemektedir.
Dondurma iflleminden en iyi sonuçlar›n al›nmas› için
afla¤›da yer alan önemli hususlara dikkat edilmesi
gerekmektedir:
Dondurulacak g›dalar› dondurucu bölmenin en
so¤uk k›sm› olan üst sepete yerlefltiriniz.
24 saat içerisinde dondurulabilecek azami g›da
miktar› teknik de¤erler plakas›nda belirtilmifltir.
Önemlidir
Dondurucu bölmesine gazl› içecek koymay›n›z,
patlayarak buzdolab›na hasar verebilirler.
Buzluktan ç›kart›ld›ktan sonra hemen tüketilen buz
parçalar› deride so¤uk yan›¤›na neden
olabilmektedir.
Dondurulmufl g›dalar›n çözüldükten sonra çabuk
bozulabilece¤inizi hat›r›n›zdan ç›kartmay›n›z.
Dondurulmufl g›dalar›n saklanmas›
‹lk kez çal›flt›r›rken ya da bir süre kullan›lmam›fl
olmas› halinde g›dalar› dondurucu bölmeye
yerlefltirmeden önce ürünü en so¤uk konumda en az
iki saat çal›flt›r›n›z, daha sonra termostat dü¤mesini
normal çal›flt›rma konumuna getiriniz.
Bu üründen en iyi verimi almak için:
Büyük miktarlarda g›da saklayaca¤›n›z zaman tüm
çekmeceleri ve sepetleri ç›kartarak g›dalar› so¤utma
raflar›na yerlefltiriniz.
Üst bölümün yan taraf›nda yer alan yük s›n›rlar›n›
aflmamaya özen gösteriniz (baz› modellerde)
Önemlidir
Dondurucu bölmede g›da varken elektri¤in
kesilmesi halinde dondurucu bölmenin kapa¤›n›
açmay›n›z. Elektrik kesintisinin k›sa süreli
olmas› (6-8 saate kadar) ve dondurucu bölmenin
dolu olmas› halinde bölmedeki dondurulmufl
g›dalar kesintiden etkilenmeyecektir, aksi
taktirde dondurucu bölmede bulunan g›dalar›n
mümkün oldu¤unca çabuk tüketilmesi
önerilmektedir (dondurulmufl g›dalar›n ›s›s›n›n
artmas› güvenli saklama süresini k›saltmaktad›r).
Çözdürme (Defroster)
Derin dondurulmufl ya da dondurulmufl g›dalar
kullan›lmadan önce, bu ifllem için gerekli süreye
ba¤l› olarak so¤utucu bölmede ya da oda
s›cakl›¤›nda çözdürülebilir.
Küçük parçalar›n dondurucu bölmeden ç›kart›ld›ktan
sonra do¤rudan, donmufl halde piflirilmeleri de
mümkündür: bu durumda piflirme ifllemi daha uzun
sürecektir.
Buz yap›lmas›
Üründe buz yap›m›nda kullan›lmak üzere bir ya da
daha fazla buz dondurma kab› bulunmaktad›r. Bu
kaplar› su ile doldurduktan sonra dondurucu
bölmeye yerlefltiriniz.
Kapları dondurucu bölmeden çıkartmak
amacıyla metal gereçler kullanmayınız.
So¤uk hava toplayıcıları
Derin dondurucuda iki adet so¤uk hava toplayıcısı
bulunmaktadır; bunlar, elektrik kesilmesi veya arıza
durumunda gıdaların saklanabilece¤i süreyi uzatır.
So¤uk hava toplayıcıları üst çekmeceye
yerlefltirilmelidirler.
SO⁄UTUCUNUN KULLANILMASI
Çal›flt›rma
So¤utucu bölmenin içindeki s›cakl›k termostat (F) ile
ayarlanmaktad›r.
S›cakl›k ayar›
S›cakl›k otomatik olarak ayarlanmaktad›r ve
termostat dü¤mesi düflük ayarlara getirilerek
art›r›labilmekte (daha sıcak) ya da yüksek ayarlara
getirilerek azalt›labilmektedir (daha so¤uk).
Ancak kesin ayar› belirlerken buzdolab›n›n içindeki
s›cakl›¤›n afla¤›daki etkenlere ba¤l› oldu¤u hat›rdan
ç›kart›lmamal›d›r:
Oda s›cakl›¤›
-
 1
1
-
 2
2
-
 3
3
-
 4
4
-
 5
5
-
 6
6
-
 7
7
-
 8
8
-
 9
9
-
 10
10
-
 11
11
-
 12
12
-
 13
13
-
 14
14


Electrolux ER8126B Kullanım kılavuzu
- Kategori
- Kombi buzdolapları
- Tip
- Kullanım kılavuzu
diğer dillerde
- English: Electrolux ER8126B User manual
İlgili makaleler
-
Electrolux ERN31300 Kullanım kılavuzu
-
Electrolux ER8625D Kullanım kılavuzu
-
-
-
-
-
AEG Electrolux ERN3121 Kullanım kılavuzu
-
-
-
AEG Electrolux ERN3122 Kullanım kılavuzu
Diğer belgeler
-
Whirlpool WQ9 E1L El kitabı
-
Küppersbusch FK2545.0i Kullanım kılavuzu
-
Zanussi ZI922/9T Kullanım kılavuzu
-
Samsung SR-L629EVS Kullanım kılavuzu
-
Whirlpool RZAA 1 (TK) Kullanici rehberi
-
-
Hotpoint RZAA 1 (TK) Kullanici rehberi
-
-
-
Samsung SR-L629EV Kullanım kılavuzu