
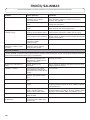
WQ9 E1L, WQ9 B1L,
6WM591NIHAS and
WQ70900SXX
W11211074C

2
English REFRIGERATOR USER INSTRUCTIONS ........................................... 3
Italiano ISTRUZIONI PER L’USO DEL FRIGORIFERO .................................. 27
Français canadien INSTRUCTIONS D’UTILISATION DU RÉFRIGÉRATEUR ................ 51
Русский РУКОВОДСТВО ПОЛЬЗОВАТЕЛЯ ХОЛОДИЛЬНИКА ................ 75
Polski INSTRUKCJA OBS£UGI CH£ODZIARKI ........................................ 103
Română INSTRUCȚIUNI DE UTILIZARE A FRIGIDERULUI ......................... 127
Türkçe BUZDOLABI KULLANIM TALİMATLARI ......................................... 151
Nederlands GEBRUIKSAANWIJZING KOEL-VRIESCOMBINATIE ................... 175
Svenska BRUKSANVISNING FÖR KYLSKÅP ............................................... 199
Dansk BRUGERVEJLEDNING TIL KØLE-/FRYSESKABET ...................... 223
Norsk BRUKSANVISNING FOR KJØLESKAP ........................................... 247
Português INSTRUÇÕES DE UTILIZAÇÃO DO FRIGORÍFICO ....................... 271
Български ИНСТРУКЦИИ ЗА ПОТРЕБИТЕЛИТЕ НА ХЛАДИЛНИКА ......... 295
Hrvatski KORISNIÈKE UPUTE HLADNJAKA ............................................... 321
Èesky NÁVOD K POUŽITÍ CHLADNIÈKY .................................................. 345
Eesti keeles KÜLMIKU KASUTUSJUHEND ........................................................ 369
Ελληνικά ΟΔΗΓΙΕΣ ΧΡΗΣΗΣ ΨΥΓΕΙΟΥ .......................................................... 393
Magyar HÛTÕSZEKRÉNY HASZNÁLATI UTASÍTÁSA ................................ 417
Latviešu LEDUSSKAPJA LIETOŠANAS INSTRUKCIJA ............................... 441
Lietuvių k. ŠALDYTUVO NAUDOJIMO INSTRUKCIJA .................................... 465
Slovenèina POKYNY PRE POUŽÍVATE¼A CHLADNIÈKY ................................ 489
Slovenšèina NAVODILA ZA UPORABO HLADILNIKA ........................................ 513
Español INSTRUCCIONES PARA EL USUARIO DEL REFRIGERADOR ..... 537
561...............................................................................................ﺔﺟﻼﺛﻟا مادﺧﺗﺳا تﺎﻣﯾﻠﻌﺗ ﺔﯾﺑرﻌﻟا

3
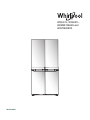
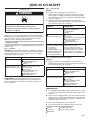
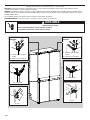
FRENCH DOOR BOTTOM MOUNT REFRIGERATOR
USE AND CARE GUIDE
Table of Contents
REFRIGERATOR SAFETY ..............................................................4
Proper Disposal of Your Old Refrigerator .......................................7
PARTS AND FEATURES ................................................................8
INSTALLATION INSTRUCTIONS ...................................................9
Getting Started .................................................................................9
Unpack the Refrigerator ..................................................................9
Location Requirements ..................................................................10
Electrical Requirements .................................................................10
Remove and Replace Refrigerator Doors .....................................12
Remove and Replace Freezer/Flexi Freeze Door ..........................14
Refrigerator Levelling .....................................................................15
Using the Controls .........................................................................16
Lighting the Refrigerator ................................................................17
REFRIGERATOR USE ..................................................................18
Opening and Closing Doors ..........................................................18
Food Storage .................................................................................18
SHELVES, BINS AND DRAWERS ................................................19
Freezer Storage Compartments ....................................................20
Audio Reference ............................................................................20
Accessories ....................................................................................20
Assistance or Service ....................................................................20
REFRIGERATOR CARE ...............................................................21
Cleaning .........................................................................................21
Lights ..............................................................................................22
Holiday and Moving Care ..............................................................22
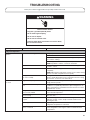
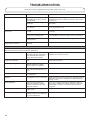
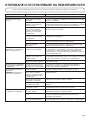
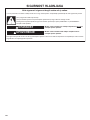
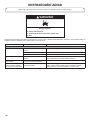
TROUBLESHOOTING ..................................................................23

4
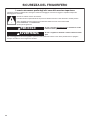
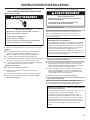
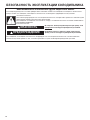
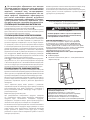
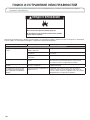
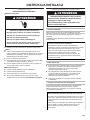
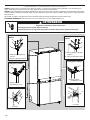
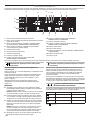
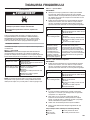
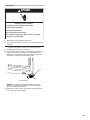
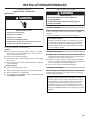
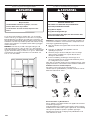
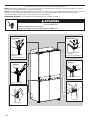
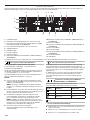
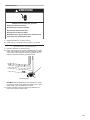
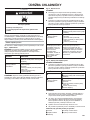
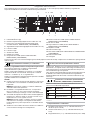
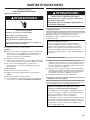
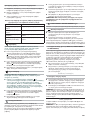
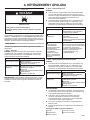
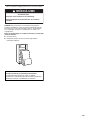
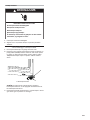
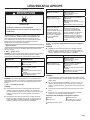
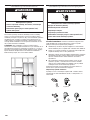
REFRIGERATOR SAFETY
Your safety and the safety of others are very important.
All safety messages will tell you what the potential hazard is, tell you how to reduce the chance of injury, and tell you what can
happen if the instructions are not followed.
We have provided many important safety messages in this manual and on your appliance. Always read and obey all safety
messages.
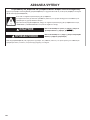
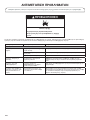
This is the safety alert symbol.
This symbol alerts you to potential hazards that can kill or hurt you and others.
All safety messages will follow the safety alert symbol and either the word “DANGER” or “WARNING.”
These words mean:
You can be killed or seriously injured if you don't immediately
follow instructions.
You
can be killed or seriously injured if you don't
follow
instructions.
DANGER
WARNING

5
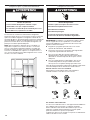
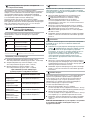
SAFETY INSTRUCTIONS
Before using the appliance, read these safety
instructions. Keep them nearby for future reference.
These instructions and the appliance itself provide
important safety warnings, to be observed at all
times. The manufacturer declines any liability for
failure to observe these safety instructions, for
inappropriate use of the appliance or incorrect
setting of controls.
Very young children (0-3 years) should be kept
away from the appliance. Young children (3-8
years) should be kept away from the appliance
unless continuously supervised. Children from 8
years old and above and persons with reduced
physical, sensory or mental capabilities or lack of
experience and knowledge can use this appliance
only if they are supervised or have been given
instructions on safe use and understand the
hazards involved. Children must not play with the
appliance. Cleaning and user maintenance must
not be carried out by children without supervision
.
PERMITTED USE
CAUTION: The appliance is not intended to
be operated by means of an external switching
device, such as a timer, or separate remote
controlled system.
This appliance is intended to be used in
household and similar applications such as: sta
kitchen areas in shops, o ces and other working
environments; farm houses; by clients in hotels,
motels, bed & breakfast and other residential
environments.
This appliance is not for professional use. Do
not use the appliance outdoors.
The appliance is designed for operation in places
where the ambient temperature comes within
the following ranges, according to the climatic
class given on the rating plate. The appliance may
not work properly if it is left for a long time at a
temperature outside the speci ed range.
Climatic Class Amb. T. (°C)
SN: From 10 to 32 °C; N: From 16 to 32 °C
ST: From 16 to 38 °C; T: From 16 to 43 °C
This appliance does not contain CFCs. The
refrigerant circuit contains R600a (HC). Appliances
with Isobutane (R600a): isobutane is a natural gas
without environmental impact, but is ammable.
Therefore, make sure the refrigerant circuit pipes
are not damaged, especially when emptying the
refrigerant circuit.
WARNING: Do not damage the appliance
refrigerant circuit pipes.
WARNING: Keep ventilation openings, in the
appliance enclosure or in the built-in structure,
clear of obstruction
.
IMPORTANT TO BE READ AND
OBSERVED
WARNING: Do not use mechanical, electric or
chemical means other than those recommended
by the Manufacturer to speed up the defrost
process.
WARNING: Do not use or place electrical
devices inside the appliance compartments if
they are not of the type expressly authorised by
the Manufacturer.
WARNING: Ice makers and/or water dispensers
not directly connected to the water supply must
be lled with potable water only.
WARNING: Automatic ice-makers and/or water
dispensers must be connected to a water supply
that delivers potable water only, with mains water
pressure between 0.17 and 0.81 MPa (1.7 and
8.1bar).
Do not store explosive substances such as
aerosol cans with a ammable propellant in this
appliance.
Do not swallow the contents (non-toxic) of the
ice packs (provided with some models). Do not
eat ice cubes or ice lollies immediately after taking
them out of the freezer since they may cause cold
burns.
For products designed to use an air lter inside
an accessible fan cover, the lter must always be in
position when the refrigerator is in function.
Do not store glass containers with liquids in the
freezer compartment since they may break. Do
not obstruct the fan (if included) with food items.
After placing the food check that the door of the
compartments closes properly, especially the
freezer door.
Damaged gaskets must be replaced as soon as
possible.
Use the refrigerator compartment only for
storing fresh food and the freezer compartment
only for storing frozen food, freezing fresh food
and making ice cubes.
Avoid storing unwrapped food in
direct contact with internal surfaces of
the refrigerator or freezer compartments.
Appliances could have special compartments
(Fresh Food Compartment, Zero Degree Box, etc.).
Unless speci ed in the speci c booklet of product,
they can be removed, maintaining equivalent
performances.
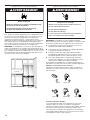
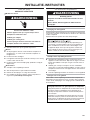
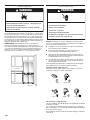
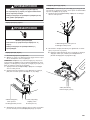
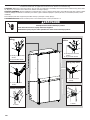
INSTALLATION
The appliance must be handled and installed by
two or more persons- risk of injury. Use protective
gloves to unpack and install- risk of cuts.
Installation, including water supply (if any) and
electrical connections, and repairs must be carried
out by a quali ed technician. Do not repair or
replace any part of the appliance unless speci cally
stated in the user manual. Keep children away
from the installation site.

6
After unpacking the appliance, make sure that it has
not been damaged during transport. In the event
of problems, contact the dealer or your nearest
After-sales Service. Once installed, packaging
waste (plastic, styrofoam parts etc.) must be stored
out of reach of children - risk of su ocation. The
appliance must be disconnected from the power
supply before any installation operation - risk of
electric shock. During installation, make sure the
appliance does not damage the power cable - risk
of re or electric shock. Only activate the appliance
when the installation has been completed.
Be careful not to damage the oors (e.g. parquet)
when moving the appliance. Install the appliance
on a oor or support strong enough to take its
weight and in a place suitable for its size and use.
Make sure the appliance is not near a heat source
and that the four feet are stable and resting on
the oor, adjusting them as required, and check
that the appliance is perfectly level using a spirit
level. Wait at least two hours before switching the
appliance on, to ensure that the refrigerant circuit
is fully e cient.
To guarantee adequate ventilation, leave a
space on both sides and above the appliance. The
distance between the rear of the appliance and
the wall behind the appliance should be 50mm,
to avoid access to hot surfaces. A reduction of this
space will increase the Energy consumption of
product.
WARNING: To avoid a hazard due to instability,
positioning or xing of the appliance must be done
in accordance with the manufacturer instructions.
It is forbidden to place the refrigerator in such
way that the metal hose of gas stove, metal gas or
water pipes, or electrical wires are in contact with
the refrigerator back wall (condenser coil).
If it is necessary to replace the doors, please
contact the Technical Assistance Center.
ELECTRICAL WARNINGS
It must be possible to disconnect the appliance
from the power supply by unplugging it if plug
is accessible, or by a multi-pole switch installed
upstream of the socket in accordance with the
wiring rules and the appliance must be earthed
in conformity with national electrical safety
standards.
Do not use extension leads, multiple sockets
or adapters. The electrical components must not
be accessible to the user after installation. Do not
use the appliance when you are wet or barefoot.
Do not operate this appliance if it has a damaged
power cable or plug, if it is not working properly,
or if it has been damaged or dropped.
If the supply cord is damaged, it must be replaced
with an identical one by the manufacturer, its
service agent or similarly quali ed persons in
order to avoid a hazard- risk of electric shock.
WARNING: When positioning the appliance,
ensure the supply cord is not trapped or damaged.
WARNING: Do not locate multiple portable
socket-outlets or portable power supplies at the
rear of the appliance
.
CLEANING AND MAINTENANCE
WARNING: Ensure that the appliance is switched
o and disconnected from the power supply
before performing any maintenance operation;
never use steam cleaning equipment - risk of
electric shock.
Do not use abrasive or harsh cleaners such as
window sprays, scouring cleansers, ammable
uids, cleaning waxes, concentrated detergents,
bleaches or cleansers containing petroleum
products on plastic parts, interior and door liners
or gaskets. Do not use paper towels, scouring
pads, or other harsh cleaning tools.
DISPOSAL OF PACKAGING MATERIALS
The packaging material is 100% recyclable and is marked with the
recycle symbol
.
The various parts of the packaging must therefore be disposed of
responsibly and in full compliance with local authority regulations
governing waste disposal.
DISPOSAL OF HOUSEHOLD APPLIANCES
This appliance is manufactured with recyclable or reusable materials.
Dispose of it in accordance with local waste disposal regulations.
For further information on the treatment, recovery and recycling of
household electrical appliances, contact your local authority, the
collection service for household waste or the store where you purchased
the appliance. This appliance is marked in compliance with European
Directive 2012/19/EU, Waste Electrical and Electronic Equipment (WEEE).
By ensuring this product is disposed of correctly, you will help prevent
negative consequences for the environment and human health.
The symbol
on the product or on the accompanying documentation
indicates that it should not be treated as domestic waste but must be
taken to an appropriate collection center for the recycling of electrical
and electronic equipment.
ENERGY SAVING TIPS
Install the appliance in a dry, well ventilated room far away from any heat
source (eg. radiator, cooker, etc.) and in a place not exposed directly to
the sun. If required, use an insulating plate.
To guarantee adequate ventilation follow installation instructions.
Insu cient ventilation at the back of the product increases energy
consumption and decreases cooling e ciency.
Frequent door opening might cause an increase in Energy Consumption.
The internal temperature of the appliance and the Energy Consumption
may be a ected also by the ambient temperature, as well as location of
the appliance. Temperature setting should take into consideration these
factors.
Reduce door opening to a minimum.
When thawing frozen food, place in the refrigerator. The low temperature
of the frozen products cools the food in the refrigerator. Allow warm food
and drinks to cool down before placing in the appliance.
Positioning of the shelves in the refrigerator has no impact on the
e cient usage of energy. Food should be placed on the shelves in such
way to ensure proper air circulation (food should not touch each other
and distance between food and rear wall should be kept).
You can increase storage capacity of frozen food by removing baskets
and, if present, Stop Frost shelf.
Do not worry about noises coming from the compressor which are
described as normal noises in this product's Quick Guide.

7
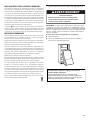
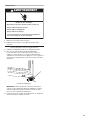
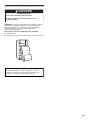
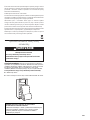
Proper Disposal of Your Old
Refrigerator
IMPORTANT: Child entrapment and suffocation are not problems
of the past. Scrapped or abandoned refrigerators are still
dangerous—even if they will sit for “just a few days.” If you are
getting rid of your old refrigerator, please follow these instructions
to help avoid accidents.
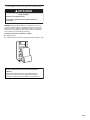
Before You Throw Away Your Old Refrigerator or Freezer:
■ Take off the doors.
■ Leave the shelves in place so that children cannot easily climb
inside.
WARNING
Suffocation Hazard
Remove doors from your old refrigerator.
Failure to do so can result in death or brain damage.
Important information to know about disposal of
refrigerants:
Dispose of refrigerator in accordance with Federal and Local
regulations. Refrigerants must be evacuated by a licensed,
refrigerant technician in accordance with established
procedures.

8
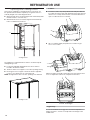
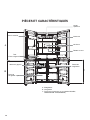
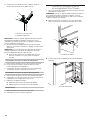
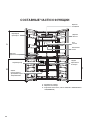
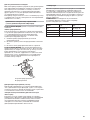
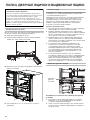
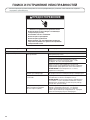
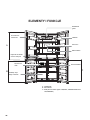
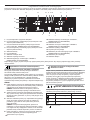
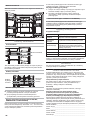
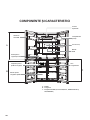
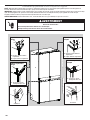
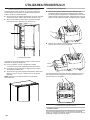
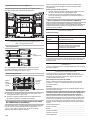
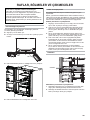
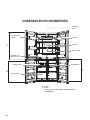
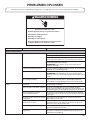
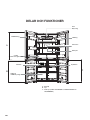
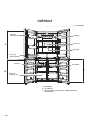
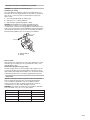
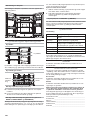
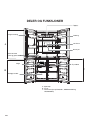
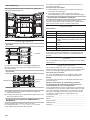
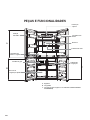
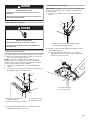
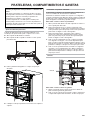
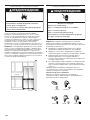
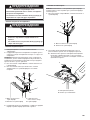
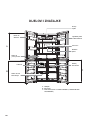
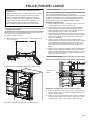
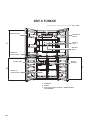
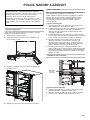
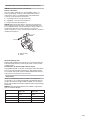
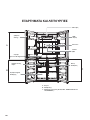
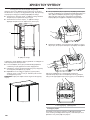
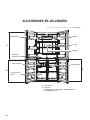
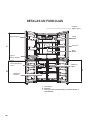
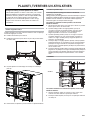
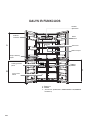
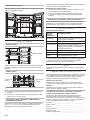
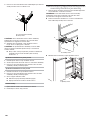
PARTS AND FEATURES
Hinged seal
A
B
C
Balcony
Top Light
6th Sense
Glass Shelf
A . Refrigerator
B . Freezer
C . Flexi Freeze (only with WQ9 B1L, 6WM591NIHAS and
WQ70900SXX)
Crisper
“Fruits and Vegetables”
Ice maker
Freezer Tray
Fast Freeze
Drawers

9
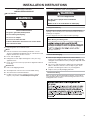
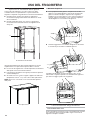
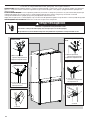
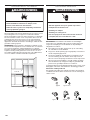
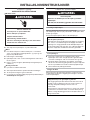
INSTALLATION INSTRUCTIONS
Getting Started
INSTALLATION CHECKLIST
Electrical Power
■ Plug refrigerator into a earthed socket.
Doors
■ If doors need to be removed during installation, see the
“Remove and Replace Refrigerator Doors” and “Remove and
Replace Freezer Door Fronts” sections.
■ Doors seal completely.
■ Refrigerator is level. Adjust leveling feet so they are snug
against the oor.
■ Doors are even across the top. (Use door alignment feature if
necessary).
Final Checks
■ Remove all shipping material.
■ Set temperature controls to the recommended setting.
■ Save instructions and other literature.
■ In order to receive a more complete assistance, please
register your product on www.whirlpool.eu/register.
Unpack the Refrigerator
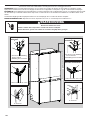
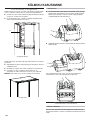
Refrigerator Delivery
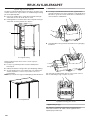
A minimum door opening of 838 mm (33") is required. If door
opening is 914 mm (36") or less, then removal of doors, drawer
and hinges is required.
Cart the refrigerator from the side for all door openings.
Remove the Packaging
■ Remove tape and glue residues from surfaces before
turning on the refrigerator. Rub a small amount of liquid dish
detergent over the adhesive with your ngers. Wipe with warm
water and dry.
■ Do not use sharp instruments, rubbing alcohol, ammable
uids, or abrasive cleaners to remove tape or glue. These
products can damage the surface of your refrigerator.
■ Dispose of/recycle all packaging materials.
Clean Before Using
After you remove all of the packaging materials, clean inside of
your refrigerator before using it. See cleaning instructions in the
“Refrigerator Care” section.
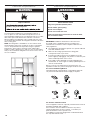
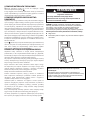
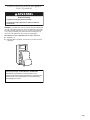
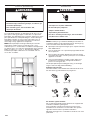
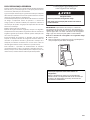
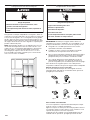
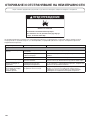
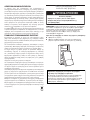
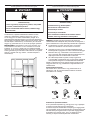
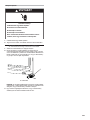
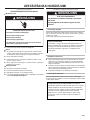
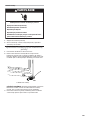
WARNING
Electrical Shock Hazard
Plug into a grounded (earthed) outlet.
Do not remove ground prong.
Do not use an adapter.
Do not use an extension cord.
Failure to follow these instructions can result in death,
fire, or electrical shock.
WARNING
Excessive Weight Hazard
Use two or more people to move and install
refrigerator.
Failure to do so can result in back or other injury.
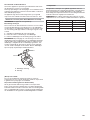
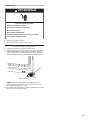
When Moving Your Refrigerator:
Your refrigerator is heavy. When moving the refrigerator for
the refrigerator straight out when moving it. Do not wiggle or
damage could occur.

10
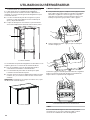
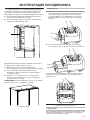
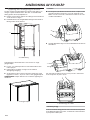
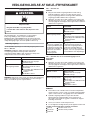
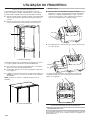
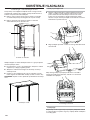
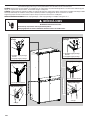
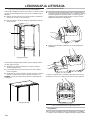
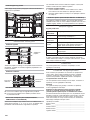
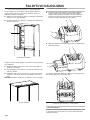
Location Requirements
To ensure proper ventilation for your refrigerator, allow for a
1.25 cm space on each side and at the top. Allow for a 5 cm
space behind the refrigerator. If your refrigerator has an ice maker,
allow extra space at the back for the water line connections.
When installing your refrigerator next to a xed wall, leave a 9.5
cm minimum space between the refrigerator and wall to allow the
door to swing open.
NOTE: This refrigerator is intended for use in a location where
the temperature ranges from a minimum of 10°C to a maximum
of 43°C. The preferred room temperature range for optimum
performance, which reduces electricity usage and provides
superior cooling, is between 15°C and 32°C. It is recommended
that you do not install the refrigerator near a heat source, such as
an oven or radiator.
Electrical Requirements
IMPORTANT: Installation and electrical connection must
be carried out by a quali ed technician according to the
manufacturer’s instructions and in compliance with the local
safety regulations.
■ The refrigerator is designed to operate on a separate 220-240
Volt, 10 A, 50/60 Hz circuit.
■ Make sure the voltage speci ed on the rating plate
corresponds to that of your home.
■ It must be possible to disconnect the appliance from the
power supply by unplugging it or by means of a main two pole
switch installed upstream of the socket.
■ If the supply cord is damaged, it must be replaced by the
manufacturer, its service agent or similarly quali ed persons in
order to avoid a hazard.
Before you move your refrigerator into its nal location, it is
important to make sure you have the proper electrical connection:
Recommended Earthing Method
220-240 Volt 50 Hz, 220 Volt 60 Hz, or 230/240 Volt 50 Hz AC
only 10 A fused and earthed electrical supply is required.
For Australia and New Zealand:
Your new appliance has been especially manufactured to meet all
Australian Standards and Conditions.
Some notations in the installation instructions may refer to
electrical requirements in other countries, so we draw your
particular attention to these speci c notes.
Your appliance needs to be plugged into a 230/240 Volt 50 Hz
AC only 10 A earthed socket.
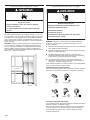
WARNING
Explosion Hazard
gasoline, away from refrigerator.
1.25 cm
9.5 cm
WARNING
Electrical Shock Hazard
Plug into a grounded (earthed) outlet.
Do not remove ground prong.
Do not use an adapter.
Do not use an extension cord.
Failure to follow these instructions can result in death,
fire, or electrical shock.
Type B
Type E and F
Type I
Type M
Type G

11
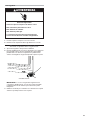
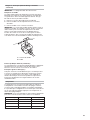
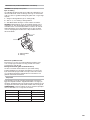
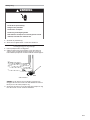
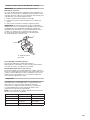
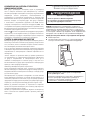
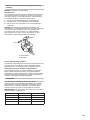
Electrical Requirements (Great Britain and Ireland only)
IMPORTANT: This refrigerator must be earthed.
Fuse Replacement
If the main lead of this refrigerator is tted with a BS1363A,
13 A fused plug, to replace a fuse in this type plug use an A.S.T.A.
approved fuse to BS 1362 type and proceed as follows:
1. Remove the fuse cover (A) and fuse (B).
2. Fit replacement 13 A fuse into the fuse cover.
3. Reinsert both the fuse and its cover into the plug.
IMPORTANT: The fuse cover must be re tted when changing a
fuse. If fuse cover is lost, the plug must not be used until a correct
replacement cover is tted. A correct replacement is identi ed by
the colour insert or colour “word” embossed on the base of the
plug. Replacement fuse covers are available at your local
electrical shop.
For the Republic of Ireland (only):
The information given in respect of Great Britain will frequently
apply, but a third type of plug and socket is also used, the 2-pin,
side earth type.
Socket/Plug (valid for both countries):
If the tted plug is not suitable for your socket, please contact
After-sales Service for further instruction. Please do not
attempt to change the plug yourself. This procedure needs
to be carried out by a quali ed technician in compliance with
the manufacturer’s instructions and current standard safety
regulations.
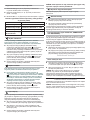
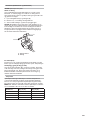
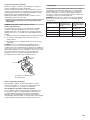
Temperature
This refrigerator is designed for operation in places where the
temperature comes within the following ranges, according to
climatic class shown on the rating plate. The refrigerator may not
work properly if it is left for a long time at a temperature outside
the speci ed range.
NOTE: It is recommended that you do not install the refrigerator
near a heat source, such as an oven or radiator.
Climatic Class Amb. T. (°C) Amb. T. (°F)
SN From 10 to 32 From 50 to 90
N From 16 to 32 From 61 to 90
ST From 16 to 38 From 61 to 100
T From 16 to 43 From 61 to 110
A
A. Fuse cover
B. Fuse
B

12
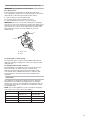
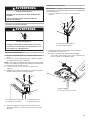
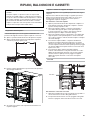
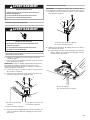
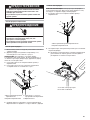
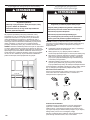
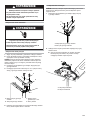
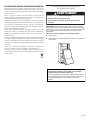
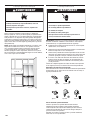
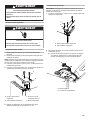
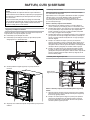
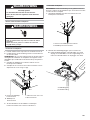
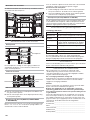
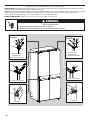
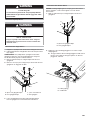
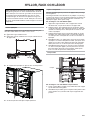
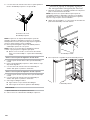
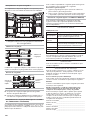
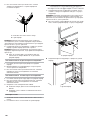
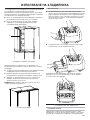
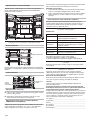
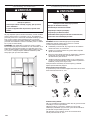
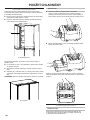
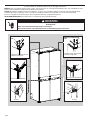
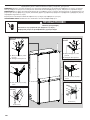
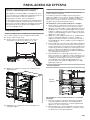
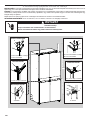
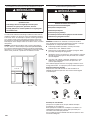
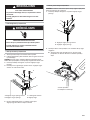
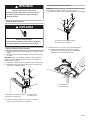
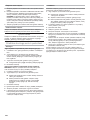
Remove and Replace Refrigerator Doors
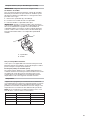
NOTE: Measure the width of your door opening to see whether or not you need to remove refrigerator doors to move refrigerator into
your home. If door removal is necessary, see the following instructions.
IMPORTANT: If refrigerator was previously installed and you are moving it out of the home, turn refrigerator control off before you begin
removing the doors. Unplug refrigerator or disconnect power. Remove food and adjustable door or utility bins from doors.
Gather required tools and read all instructions before removing doors.
TOOLS NEEDED: 6 mm socket wrench, 5 mm socket wrench and #2 Phillips screwdriver.
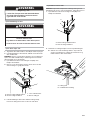
WARNING
Electrical Shock Hazard
Disconnect power before removing doors.
Failure to do so can result in death or electrical shock.
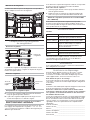
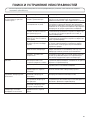
A
Top Left Hinge
Middle Left Hinge
Top Left Hinge Cover
Top Right Hinge Cover
A. 5 mm socket screws
A. Hinge
A. Hinge
A. Top Hinge Cover screws
B. Top Hinge Cover
A. Top Hinge Cover screws
B. Top Hinge Cover
Top Right Hinge
Middle Right Hinge
A. 5 mm socket screws
A
A
A
B
A
B
A

13
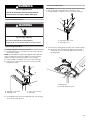
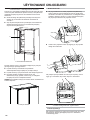
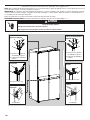
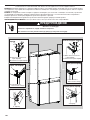
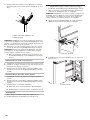
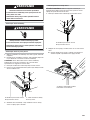
Remove Refrigerator Doors
Remove Right-Hand Door
1. Unplug refrigerator or disconnect power.
2. Keep refrigerator doors closed until you are ready to lift them
free from the cabinet.
NOTE: Provide additional support for refrigerator door while the
hinges are being removed. Do not depend on the door gasket
magnets to hold the door in place while you are working.
3. Using a Phillips screwdriver, remove cover from top hinge.
4. Using 5 mm socket wrench, remove four screws from top
hinge and set aside.
5. Lift refrigerator door from the middle hinge pin. The top hinge
will come away with the door.
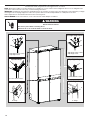
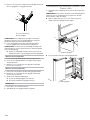
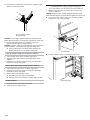
Remove Left-Hand Door
IMPORTANT: The wiring for UI run through left-hand door hinge,
so they must be disconnected before removing the door.
1. Using a Phillips screwdriver, remove cover from top hinge.
2. Disconnect two wiring plugs located on top of the door hinge.
■ Grasp each side of wiring plugs. With your left thumb,
press down to release the catch and pull the sections of
the plugs apart.
WARNING
Excessive Weight Hazard
Use two or more people to lift the refrigerator door.
Failure to do so can result in back or other injury.
WARNING
Electrical Shock Hazard
Disconnect power before removing doors.
Failure to do so can result in death or electrical shock.
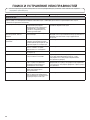
C
A. Top hinge cover screw
B. Top hinge cover
C. 5 mm socket screws
D. Top hinge
A
B
D
A. Top hinge cover screw
B. Top hinge cover
A
B
A. Wiring Plug
B. Ground (earth) connector
A
B

14
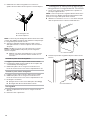
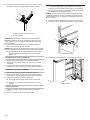
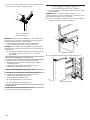
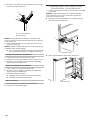
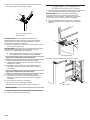
3. Using 5 mm socket wrench, remove four internal screws from
top hinge and set aside.
NOTE: Provide additional support for refrigerator door while
hinges are being removed. Do not depend on the door gasket
magnets to hold the door in place while you are working.
4. Lift refrigerator door from bottom hinge pin. The top hinge will
come away with door.
NOTE: It may not be necessary to remove bottom hinges and
brake feet assemblies to move the refrigerator through a doorway.
■ Only if necessary, use 6 mm socket wrench and #2 Phillips
screwdriver to remove middle hinge.
Replace Right-Hand Refrigerator Door
1. Set right-hand door onto middle hinge pin.
2. Insert top hinge pin into open hole in top of refrigerator door.
3. Using four 5 mm socket screws, fasten hinge to cabinet. Do
not tighten screws completely.
Replace Left-Hand Refrigerator Door
1. Set left-hand door onto middle hinge pin.
2. Using four 5 mm socket screws, fasten hinge to cabinet. Do
not tighten screws completely.
3. Reconnect electrical wiring.
■ Push together two sections of wiring plug.
■ Reconnect earth wire to hinge screw.
Final Steps
1. Completely tighten eight 5 mm socket screws.
2. Replace top hinge covers.
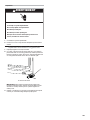
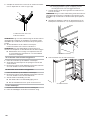
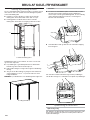
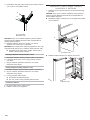
Remove and Replace Freezer/Flexi
Freeze Door
1. Keep freezer doors closed until you are ready to lift them free
from cabinet.
NOTE: Provide additional support for freezer door while hinges
are being removed. Do not depend on door gasket magnets to
hold door in place while you are working.
■ Using a #2 Phillips screwdriver and 6 mm socket wrench to
remove middle hinge from cabinet.
■ Lift freezer door from the bottom hinge pin.
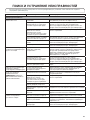
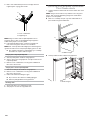
A. 5 mm socket screws
B. Top Hinge
A
B
A. Middle hinge
A
A. Bottom hinge
A

15
Final Steps
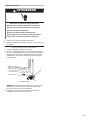
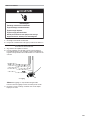
1. Plug into an grounded (earthed) socket.
2. Return all removable parts and food to the drawers.
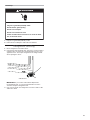
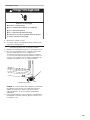
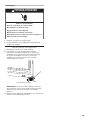
Refrigerator Levelling
1. Move refrigerator to its nal location.
2. Using hand, rotate the brake feet. Turn them counterclockwise
until the rollers are off the oor and both brake feet are snug
against the oor. This keeps refrigerator from rolling forward
when opening the doors.
IMPORTANT: If you need to make further adjustments
involving brake feet, you must turn both brake feet same
amount to keep the refrigerator level.
3. Use a level to make sure refrigerator is level from side to side
and front to back.
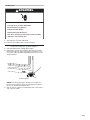
WARNING
Electrical Shock Hazard
Plug into a grounded (earthed) outlet.
Do not remove ground prong.
Do not use an adapter.
Do not use an extension cord.
Failure to follow these instructions can result in death,
fire, or electrical shock.
A
A. Brake feet

16
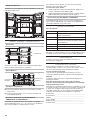
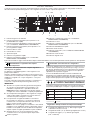
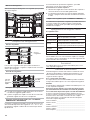
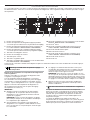
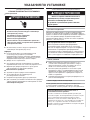
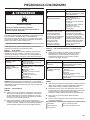
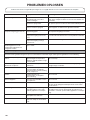
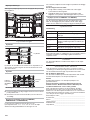
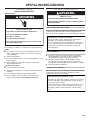
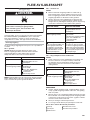
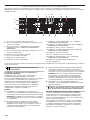
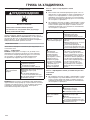
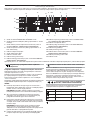
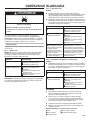
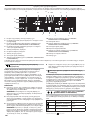
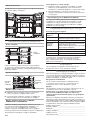
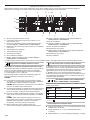
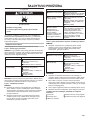
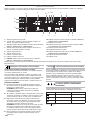
Using the Controls
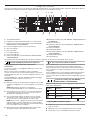
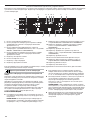
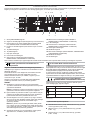
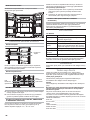
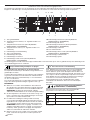
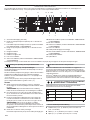
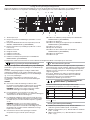
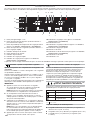
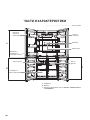
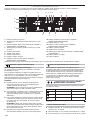
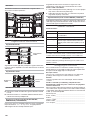
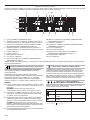
The touch-activated controls are located on the left hand refrigerator door. The control panel includes information about various buttons
and indicators. Refrigerator and freezer temperature indicator shows last temperature set point.
1. Sound ON/OFF Button
2. Refrigerator Temperature Button (hold 3 sec for Fast Cool)
3. Flexi Freeze Preset Temperature Button (only with WQ9 B1L,
6WM591NIHAS and WQ70900SXX)
4. Freezer Temp Button (hold 3 sec for Fast Freeze)
5. Key Lock Indicator
6. Key Lock Button
7. Door Open Indicator
8. Fast Freeze Indicator
9. Soft Freeze Indicator (only with WQ9 B1L, 6WM591NIHAS
and WQ70900SXX)
10. Mid Freeze Indicator (only with WQ9 B1L, 6WM591NIHAS and
WQ70900SXX)
11. 6th Sense Indicator
12. Hard Freeze Indicator (only with WQ9 B1L, 6WM591NIHAS
and WQ70900SXX)
13. Fast Cool Indicator
14. Holiday Mode Button
15. Demo Mode Indicator (only with WQ9 B1L, 6WM591NIHAS
and WQ70900SXX)
16. Holiday Mode Indicator
17. Sound Indicator
The Control Panel will automatically turn off after one minute of inactivity. To turn on the control panel, press any key.
Viewing and Adjusting Temperature Set Points
Adjusting Refrigerator and Freezer Compartment
Temperature:
For your convenience, your refrigerator and freezer controls are
preset at the factory.
When you rst install your refrigerator, make sure that the
controls are still set to the recommended set points. The factory
recommended set points are
3°C for the refrigerator and -18°C for
the freezer.
Pressing Refrigerator or Freezer Temperature button will toggle
through temperature set points in Celsius (°C).
IMPORTANT:
■ Wait 24 hours before you put food into refrigerator. If you add
food before refrigerator has cooled completely, your food may
spoil.
NOTE: Adjusting the set points to a colder-than
recommended setting will not cool compartments any faster.
■ If the temperature is too warm or too cold in the refrigerator
or freezer, rst check the air vents to be sure they are not
blocked before adjusting the controls.
■ The recommended settings should be correct for normal
household use. The controls are set correctly when milk or
juice is as cold as you like and when ice cream is rm.
NOTE: Areas such as a garage, basement or porch may have
higher humidity or extreme temperatures. You may need to
adjust the temperature away from the recommended settings
to accommodate for these conditions.
■ Wait at least 24 hours between adjustments. Recheck the
temperatures before other adjustments are made.
6
th
Sense Fresh Lock and Freeze Control
The 6
th
SENSE Fresh Lock sensor ensures precise and consistent
temperature control to preserve fresh food for longer, in the
most natural way. Once a temperature variation is detected, the
sensor activates a compressor that quickly restores the original
temperature.
The 6
th
SENSE Freeze sensor minimizes temperature uctuations
in freezer thanks to an innovative temperature management
system. Freezer burns are reduced to preserving quality and color
of food.
Flexi Freeze Setting (only with WQ9 B1L,
6WM591NIHAS and WQ70900SXX)
Flexi Freeze function allows you to toggle preset temperature for
Flexi freeze compartment.
Symbol Function Temperature
Traditional freezer -18°C
Mild freezer -12°C
Soft freezer -7°C
* To activate/deactivate Coolest setting (-20°C), press Flexi Freeze Preset Temperature Button for 3 seconds.
Adjusting Multi Temperature Setting
■ Traditional freezer (-18°C): Food already frozen and fresh food
(max 12 months)
■ Mild freezer (-12°C): Food already frozen (max 1 month)
■ Soft freezer (-7°C): Food already frozen (max 1 week)
15
5
1
2
3
4
6
7
8
13
9
10
11
16
17
12
14

17
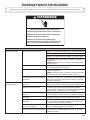
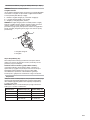
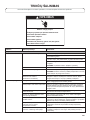
When adjusting temperature set points, use the following
chart as a guide:
CONDITION TEMPERATURE ADJUSTMENT
Refrigerator too cold Refrigerator setting 1° higher
Refrigerator too warm Refrigerator setting 1° lower
Freezer too cold Freezer setting 1° higher
Freezer too warm/
too little ice
Freezer setting 1° lower
Fast Cool
The Fast Cool feature assists with periods of high refrigerator use,
full grocery loads, or temporarily warm room temperatures.
■ To turn on the Fast Cool feature, press and hold the
Refrigerator Temperature button
for 3 seconds. When
feature is activated, the Fast Cool icon will be illuminated. The
Fast Cool feature will remain on for 2 hours unless manually
turned off.
■ To manually turn off the Fast Cool feature, press and hold the
Refrigerator Temperature button
for 3 seconds. The Fast
Cool icon will turn off when feature is not activated.
■ Adjusting refrigerator temperature will automatically turn off
the Fast Cool feature.
Fast Freeze
The amount of fresh food (in kg) that can be frozen in 24 hours is
indicated on the appliance rating plate.
■ Press Freezer Temperature button for 3 seconds (until the
Fast Freeze Indicator lights up), 24 hours before placing fresh
food in the freezer. After placing fresh food in the freezer, 24
hours on Fast Freeze function is generally suf cient; After 50
hrs the fast freeze function automatically deactivates.
■ To manually turn off the Fast Freeze feature, press and hold
the Freezer Temperature button
for 3 seconds. The Fast
Freeze icon will turn off.
■ Adjusting the freezer temperature will automatically turn off
the Fast Freeze feature.
Holiday Mode
This mode is designed to avoid your appliance from wasting
energy during times when it's not in regular use (when you are in
holiday for example).
By selecting this function the temperature of refrigerator
compartment (RC) will automatically be set to the warmest set
point.
■ To use the Holiday mode, press mode button until Holiday
mode indicator is lit on the display.
■ To exit the Holiday mode, press the mode button until no
mode icon is lit on the display.
■ Adjusting the refrigerator temperature will automatically turn
off the Holiday Mode feature.
IMPORTANT: If this mode is selected then all food and drinks
must be removed from refrigerator compartment.
Sound ON-OFF
Press button to activate/deactivate Sound Feedback.
Key Lock
■ Press and hold the Lock button for 3 seconds to activate lock
feature.
■ To deactivate lock, press and hold the Lock button for 3
seconds.
The lock feature will ignore all interaction with control panel until
the user unlocks the control panel. This feature is meant to avoid
unintentional changing of settings.
Demo Mode (only with WQ9 B1L, 6WM591NIHAS and
WQ70900SXX)
This mode is used when refrigerator is on display in a retail shop
or if you want to turn the cooling off and deactivate all other
functions (except interior lighting).
Demo mode can be used when going on extended holiday.
See the “Holiday and Moving Care” section for proper steps on
leaving your refrigerator in this mode for long periods of time.
■ If you turn on Demo mode, the “Demo” icon will light up on
the display.
■ Enter or exit Demo mode by pressing and holding the Sound
On or Off button and the Lock button simultaneously for 3
seconds.
Additional features
Door Open Alarm
■ The Door Open Alarm feature sounds an alarm and blinks the
“Door Open” icon
when any of the four doors is open for 2
minutes or more.
■ The alarm will repeat every 5 minutes. Close all doors to turn
it off.
NOTE: To mute audible alarm while keeping the doors open,
such as while cleaning inside of refrigerator, touch any button on
control panel. The alarm sound will be temporarily turned off, but
the Door Open icon will still be displayed on the control panel.
Lighting the Refrigerator
The refrigerator has an interior light that comes on any time door
is opened.
NOTE: The light is LED which does not need to be replaced. If the
LED does not illuminate when the door is opened, call service to
replace light.

18
REFRIGERATOR USE
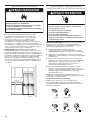
Opening and Closing Doors
There are two refrigerator compartment doors. The doors can
be opened and closed either separately or together. There is a
vertically hinged seal on left refrigerator door.
■ When left-side door is opened, hinged seal automatically folds
inward so that it is out of the way.
■ When both doors are closed, the hinged seal automatically
forms a seal between two doors.
The refrigerator compartment door switch is located in top left
and right hinge cover.
■ For Freezer and Multi Temperature Zone, door switch is
located in the bottom mullion.
■ The door switch uses magnet to sense door opening/closing.
■ Ensure there are no magnet or electronic devices (Speaker,
Coolvox
®
etc.) within 7.62 cm of the hinge cap.
NOTE: The light will not turn on if door opening is not detected.
Ice Maker
■ To make ice, ll ice tray with puri ed water and place Manual
Ice maker into Freezer top shelf. Allow time till ice gets formed
and once ice is ready, turn the knobs in clockwise direction to
eject ice cubes into the ice container.
■ Lift ice container slightly and pullout ice container to get
access to ice cubes.
Manual ice maker assembly can be taken out of the freezer when
ice is not required to make more compartment in freezer.
Food Storage
Egg Storage
It is recommended to store eggs at a consistent temperature to
keep its freshness, so best is to keep them in the fridge on the
middle shelf.
A. Hinged seal
A
A
A. Hinge cover

19
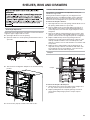
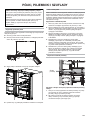
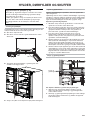
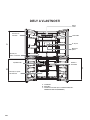
SHELVES, BINS AND DRAWERS
Shelf Height Adjustment
Shelf height can be adjusted by changing its location from bottom
support to upper support and vice versa.
■ Open right side door to its full opening.
■ Open left side door to its full opening and then lift the door to
open 180°.
■ Take shelf out of refrigerator and place it to desired mounting
position.
■ Ensure shelf is properly seated on the shelf mounts.
Shelves and Shelf Frames
The shelves in your refrigerator are adjustable to meet your
individual storage needs.
Storing similar food items together in your refrigerator and
adjusting the shelves to t different heights of items will make
nding the exact item you want easier. It will also reduce the
amount of time the refrigerator door is open and save energy.
To remove and replace shelves:
1. Open right side door to its full opening and left side door to its
full opening and lift left door to open 180°.
2. Remove middle shelf or top shelf by lifting it up and out of
shelf supports. Then pull the shelf forward and tilt down to
a vertical position. Turn shelf at an angle and pull out of the
refrigerator.
3. Remove the bottom shelf by lifting it up and out of the shelf
supports. Then pull the shelf forward and tilt up to a vertical
position. Turn the shelf at an angle and pull out of refrigerator.
4. Replace middle and top shelves by putting shelf in the
refrigerator at an angle with shelf front down. Lift front of the
shelf up and slide in until the rear of shelf drops into shelf
supports. Lower the front of shelf and make sure that the shelf
is in position.
5. Replace bottom shelf by putting shelf in refrigerator at an
angle with shelf up. Lift front of shelf down and slide in until
rear shelf drops into the shelf supports. Lower front of the
shelf and make sure that shelf is in position.
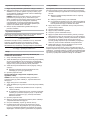
Crispers
To remove and replace the Crispers:
1. Grasp handle of the Crisper and slide Crisper straight out to
the stop. Lift the Crisper off the bottom guide.
2. Replace/putting back the Crisper by placing it on bottom
Crisper guide and pushing it past the Crisper stop into
position.
180°
130°
Crisper

20
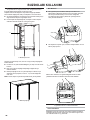
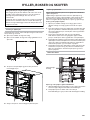
Refrigerator Balconies
The balcony on your refrigerator door are adjustable to meet your
individual storage needs.
Freezer Storage Compartments
Freezer Tray
Freezer tray is useful to easily access frequently used products,
freeze or simply store leftovers or small items.
Freezer Drawers
Fast Freeze compartment
■ Fast Freezer drawers allows you to conveniently store big
volume items.
■ Fast Freeze option allows you to store all your frozen food
safely and transparently.
Flexi Freeze Compartment (only with WQ9 B1L,
6WM591NIHAS and WQ70900SXX)
Flexi Freeze Compartment allows you to select one of three
freezer temperature levels: -7°C, -12°C and -18°C to provide the
best storing conditions for different types of food.
For maximum freezer capacity, you may remove the freezer
drawer to expose the freezer shelf.
To remove the upper drawer:
1. Grasp handle of the drawer and slide drawer straight out to
the stop. Lift drawer off the bottom guide.
2. Replace/putting back drawer by placing it on bottom drawer
guide and pushing it past drawer stop into position.
Freezer Shelf (only with WQ9 E1L and WQ9 B1L)
To maximize freezer capacity, you may remove mid drawer to
expose freezer shelf beneath. You can then store upper drawer
and load food directly on top of the shelf.
Audio Reference
Tone Assignment
Tone Name Usage Examples
Power On Cooling system is turned on every time the
product is powered on.
Key Press User presses a valid button.
Invalid (Error) User presses two or more valid buttons at the
same time. Count-down interruption for press-
and-hold buttons.
Engage Acknowledgement of entry into any mode.
Disengage Acknowledgement of exit from any mode.
Alert Door Ajar alert.
This table is for quick reference only. See corresponding sections
for details. In case of inconsistency, section details will prevail.
Accessories
To order accessories, contact the dealer from whom you
purchased your refrigerator.
Assistance or Service
Before calling for assistance or service, please check the
“Troubleshooting” section. It may save you the cost of a service
call. If you still need help, follow the instructions below.
If you need replacement parts
To locate factory-speci ed replacement parts in your area,
contact the dealer from whom you purchased your refrigerator.
Warranty
Contact the dealer from whom you purchased refrigerator for
warranty information.
Keep this book and your sales slip together for future
reference. You must provide proof of purchase or installation
date for in-warranty service.
Write down the following information about your appliance to help
you obtain assistance or service if you ever need it. You will need
to know your complete model number and serial number. You
can nd this information on the model and serial number label,
located on the inside wall of the refrigerator compartment.
Dealer name______________________________________________
Serial number_____________________________________________
Address__________________________________________________
Phone number____________________________________________
Model number____________________________________________
Purchase date_____________________________________________
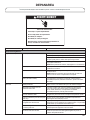
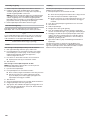
Freezer Tray
Fast Freeze
Drawers
Flexi Freeze
Drawers
Sayfa yükleniyor...
Sayfa yükleniyor...
Sayfa yükleniyor...
Sayfa yükleniyor...
Sayfa yükleniyor...
Sayfa yükleniyor...
Sayfa yükleniyor...
Sayfa yükleniyor...
Sayfa yükleniyor...
Sayfa yükleniyor...
Sayfa yükleniyor...
Sayfa yükleniyor...
Sayfa yükleniyor...
Sayfa yükleniyor...
Sayfa yükleniyor...
Sayfa yükleniyor...
Sayfa yükleniyor...
Sayfa yükleniyor...
Sayfa yükleniyor...
Sayfa yükleniyor...
Sayfa yükleniyor...
Sayfa yükleniyor...
Sayfa yükleniyor...
Sayfa yükleniyor...
Sayfa yükleniyor...
Sayfa yükleniyor...
Sayfa yükleniyor...
Sayfa yükleniyor...
Sayfa yükleniyor...
Sayfa yükleniyor...
Sayfa yükleniyor...
Sayfa yükleniyor...
Sayfa yükleniyor...
Sayfa yükleniyor...
Sayfa yükleniyor...
Sayfa yükleniyor...
Sayfa yükleniyor...
Sayfa yükleniyor...
Sayfa yükleniyor...
Sayfa yükleniyor...
Sayfa yükleniyor...
Sayfa yükleniyor...
Sayfa yükleniyor...
Sayfa yükleniyor...
Sayfa yükleniyor...
Sayfa yükleniyor...
Sayfa yükleniyor...
Sayfa yükleniyor...
Sayfa yükleniyor...
Sayfa yükleniyor...
Sayfa yükleniyor...
Sayfa yükleniyor...
Sayfa yükleniyor...
Sayfa yükleniyor...
Sayfa yükleniyor...
Sayfa yükleniyor...
Sayfa yükleniyor...
Sayfa yükleniyor...
Sayfa yükleniyor...
Sayfa yükleniyor...
Sayfa yükleniyor...
Sayfa yükleniyor...
Sayfa yükleniyor...
Sayfa yükleniyor...
Sayfa yükleniyor...
Sayfa yükleniyor...
Sayfa yükleniyor...
Sayfa yükleniyor...
Sayfa yükleniyor...
Sayfa yükleniyor...
Sayfa yükleniyor...
Sayfa yükleniyor...
Sayfa yükleniyor...
Sayfa yükleniyor...
Sayfa yükleniyor...
Sayfa yükleniyor...
Sayfa yükleniyor...
Sayfa yükleniyor...
Sayfa yükleniyor...
Sayfa yükleniyor...
Sayfa yükleniyor...
Sayfa yükleniyor...
Sayfa yükleniyor...
Sayfa yükleniyor...
Sayfa yükleniyor...
Sayfa yükleniyor...
Sayfa yükleniyor...
Sayfa yükleniyor...
Sayfa yükleniyor...
Sayfa yükleniyor...
Sayfa yükleniyor...
Sayfa yükleniyor...
Sayfa yükleniyor...
Sayfa yükleniyor...
Sayfa yükleniyor...
Sayfa yükleniyor...
Sayfa yükleniyor...
Sayfa yükleniyor...
Sayfa yükleniyor...
Sayfa yükleniyor...
Sayfa yükleniyor...
Sayfa yükleniyor...
Sayfa yükleniyor...
Sayfa yükleniyor...
Sayfa yükleniyor...
Sayfa yükleniyor...
Sayfa yükleniyor...
Sayfa yükleniyor...
Sayfa yükleniyor...
Sayfa yükleniyor...
Sayfa yükleniyor...
Sayfa yükleniyor...
Sayfa yükleniyor...
Sayfa yükleniyor...
Sayfa yükleniyor...
Sayfa yükleniyor...
Sayfa yükleniyor...
Sayfa yükleniyor...
Sayfa yükleniyor...
Sayfa yükleniyor...
Sayfa yükleniyor...
Sayfa yükleniyor...
Sayfa yükleniyor...
Sayfa yükleniyor...
Sayfa yükleniyor...
Sayfa yükleniyor...
Sayfa yükleniyor...
Sayfa yükleniyor...
Sayfa yükleniyor...
Sayfa yükleniyor...
Sayfa yükleniyor...
Sayfa yükleniyor...
Sayfa yükleniyor...
Sayfa yükleniyor...
Sayfa yükleniyor...
Sayfa yükleniyor...
Sayfa yükleniyor...
Sayfa yükleniyor...
Sayfa yükleniyor...
Sayfa yükleniyor...
Sayfa yükleniyor...
Sayfa yükleniyor...
Sayfa yükleniyor...
Sayfa yükleniyor...
Sayfa yükleniyor...
Sayfa yükleniyor...
Sayfa yükleniyor...
Sayfa yükleniyor...
Sayfa yükleniyor...
Sayfa yükleniyor...
Sayfa yükleniyor...
Sayfa yükleniyor...
Sayfa yükleniyor...
Sayfa yükleniyor...
Sayfa yükleniyor...
Sayfa yükleniyor...
Sayfa yükleniyor...
Sayfa yükleniyor...
Sayfa yükleniyor...
Sayfa yükleniyor...
Sayfa yükleniyor...
Sayfa yükleniyor...
Sayfa yükleniyor...
Sayfa yükleniyor...
Sayfa yükleniyor...
Sayfa yükleniyor...
Sayfa yükleniyor...
Sayfa yükleniyor...
Sayfa yükleniyor...
Sayfa yükleniyor...
Sayfa yükleniyor...
Sayfa yükleniyor...
Sayfa yükleniyor...
Sayfa yükleniyor...
Sayfa yükleniyor...
Sayfa yükleniyor...
Sayfa yükleniyor...
Sayfa yükleniyor...
Sayfa yükleniyor...
Sayfa yükleniyor...
Sayfa yükleniyor...
Sayfa yükleniyor...
Sayfa yükleniyor...
Sayfa yükleniyor...
Sayfa yükleniyor...
Sayfa yükleniyor...
Sayfa yükleniyor...
Sayfa yükleniyor...
Sayfa yükleniyor...
Sayfa yükleniyor...
Sayfa yükleniyor...
Sayfa yükleniyor...
Sayfa yükleniyor...
Sayfa yükleniyor...
Sayfa yükleniyor...
Sayfa yükleniyor...
Sayfa yükleniyor...
Sayfa yükleniyor...
Sayfa yükleniyor...
Sayfa yükleniyor...
Sayfa yükleniyor...
Sayfa yükleniyor...
Sayfa yükleniyor...
Sayfa yükleniyor...
Sayfa yükleniyor...
Sayfa yükleniyor...
Sayfa yükleniyor...
Sayfa yükleniyor...
Sayfa yükleniyor...
Sayfa yükleniyor...
Sayfa yükleniyor...
Sayfa yükleniyor...
Sayfa yükleniyor...
Sayfa yükleniyor...
Sayfa yükleniyor...
Sayfa yükleniyor...
Sayfa yükleniyor...
Sayfa yükleniyor...
Sayfa yükleniyor...
Sayfa yükleniyor...
Sayfa yükleniyor...
Sayfa yükleniyor...
Sayfa yükleniyor...
Sayfa yükleniyor...
Sayfa yükleniyor...
Sayfa yükleniyor...
Sayfa yükleniyor...
Sayfa yükleniyor...
Sayfa yükleniyor...
Sayfa yükleniyor...
Sayfa yükleniyor...
Sayfa yükleniyor...
Sayfa yükleniyor...
Sayfa yükleniyor...
Sayfa yükleniyor...
Sayfa yükleniyor...
Sayfa yükleniyor...
Sayfa yükleniyor...
Sayfa yükleniyor...
Sayfa yükleniyor...
Sayfa yükleniyor...
Sayfa yükleniyor...
Sayfa yükleniyor...
Sayfa yükleniyor...
Sayfa yükleniyor...
Sayfa yükleniyor...
Sayfa yükleniyor...
Sayfa yükleniyor...
Sayfa yükleniyor...
Sayfa yükleniyor...
Sayfa yükleniyor...
Sayfa yükleniyor...
Sayfa yükleniyor...
Sayfa yükleniyor...
Sayfa yükleniyor...
Sayfa yükleniyor...
Sayfa yükleniyor...
Sayfa yükleniyor...
Sayfa yükleniyor...
Sayfa yükleniyor...
Sayfa yükleniyor...
Sayfa yükleniyor...
Sayfa yükleniyor...
Sayfa yükleniyor...
Sayfa yükleniyor...
Sayfa yükleniyor...
Sayfa yükleniyor...
Sayfa yükleniyor...
Sayfa yükleniyor...
Sayfa yükleniyor...
Sayfa yükleniyor...
Sayfa yükleniyor...
Sayfa yükleniyor...
Sayfa yükleniyor...
Sayfa yükleniyor...
Sayfa yükleniyor...
Sayfa yükleniyor...
Sayfa yükleniyor...
Sayfa yükleniyor...
Sayfa yükleniyor...
Sayfa yükleniyor...
Sayfa yükleniyor...
Sayfa yükleniyor...
Sayfa yükleniyor...
Sayfa yükleniyor...
Sayfa yükleniyor...
Sayfa yükleniyor...
Sayfa yükleniyor...
Sayfa yükleniyor...
Sayfa yükleniyor...
Sayfa yükleniyor...
Sayfa yükleniyor...
Sayfa yükleniyor...
Sayfa yükleniyor...
Sayfa yükleniyor...
Sayfa yükleniyor...
Sayfa yükleniyor...
Sayfa yükleniyor...
Sayfa yükleniyor...
Sayfa yükleniyor...
Sayfa yükleniyor...
Sayfa yükleniyor...
Sayfa yükleniyor...
Sayfa yükleniyor...
Sayfa yükleniyor...
Sayfa yükleniyor...
Sayfa yükleniyor...
Sayfa yükleniyor...
Sayfa yükleniyor...
Sayfa yükleniyor...
Sayfa yükleniyor...
Sayfa yükleniyor...
Sayfa yükleniyor...
Sayfa yükleniyor...
Sayfa yükleniyor...
Sayfa yükleniyor...
Sayfa yükleniyor...
Sayfa yükleniyor...
Sayfa yükleniyor...
Sayfa yükleniyor...
Sayfa yükleniyor...
Sayfa yükleniyor...
Sayfa yükleniyor...
Sayfa yükleniyor...
Sayfa yükleniyor...
Sayfa yükleniyor...
Sayfa yükleniyor...
Sayfa yükleniyor...
Sayfa yükleniyor...
Sayfa yükleniyor...
Sayfa yükleniyor...
Sayfa yükleniyor...
Sayfa yükleniyor...
Sayfa yükleniyor...
Sayfa yükleniyor...
Sayfa yükleniyor...
Sayfa yükleniyor...
Sayfa yükleniyor...
Sayfa yükleniyor...
Sayfa yükleniyor...
Sayfa yükleniyor...
Sayfa yükleniyor...
Sayfa yükleniyor...
Sayfa yükleniyor...
Sayfa yükleniyor...
Sayfa yükleniyor...
Sayfa yükleniyor...
Sayfa yükleniyor...
Sayfa yükleniyor...
Sayfa yükleniyor...
Sayfa yükleniyor...
Sayfa yükleniyor...
Sayfa yükleniyor...
Sayfa yükleniyor...
Sayfa yükleniyor...
Sayfa yükleniyor...
Sayfa yükleniyor...
Sayfa yükleniyor...
Sayfa yükleniyor...
Sayfa yükleniyor...
Sayfa yükleniyor...
Sayfa yükleniyor...
Sayfa yükleniyor...
Sayfa yükleniyor...
Sayfa yükleniyor...
Sayfa yükleniyor...
Sayfa yükleniyor...
Sayfa yükleniyor...
Sayfa yükleniyor...
Sayfa yükleniyor...
Sayfa yükleniyor...
Sayfa yükleniyor...
Sayfa yükleniyor...
Sayfa yükleniyor...
Sayfa yükleniyor...
Sayfa yükleniyor...
Sayfa yükleniyor...
Sayfa yükleniyor...
Sayfa yükleniyor...
Sayfa yükleniyor...
Sayfa yükleniyor...
Sayfa yükleniyor...
Sayfa yükleniyor...
Sayfa yükleniyor...
Sayfa yükleniyor...
Sayfa yükleniyor...
Sayfa yükleniyor...
Sayfa yükleniyor...
Sayfa yükleniyor...
Sayfa yükleniyor...
Sayfa yükleniyor...
Sayfa yükleniyor...
Sayfa yükleniyor...
Sayfa yükleniyor...
Sayfa yükleniyor...
Sayfa yükleniyor...
Sayfa yükleniyor...
Sayfa yükleniyor...
Sayfa yükleniyor...
Sayfa yükleniyor...
Sayfa yükleniyor...
Sayfa yükleniyor...
Sayfa yükleniyor...
Sayfa yükleniyor...
Sayfa yükleniyor...
Sayfa yükleniyor...
Sayfa yükleniyor...
Sayfa yükleniyor...
Sayfa yükleniyor...
Sayfa yükleniyor...
Sayfa yükleniyor...
Sayfa yükleniyor...
Sayfa yükleniyor...
Sayfa yükleniyor...
Sayfa yükleniyor...
Sayfa yükleniyor...
Sayfa yükleniyor...
Sayfa yükleniyor...
Sayfa yükleniyor...
Sayfa yükleniyor...
Sayfa yükleniyor...
Sayfa yükleniyor...
Sayfa yükleniyor...
Sayfa yükleniyor...
Sayfa yükleniyor...
Sayfa yükleniyor...
Sayfa yükleniyor...
Sayfa yükleniyor...
Sayfa yükleniyor...
Sayfa yükleniyor...
Sayfa yükleniyor...
Sayfa yükleniyor...
Sayfa yükleniyor...
Sayfa yükleniyor...
Sayfa yükleniyor...
Sayfa yükleniyor...
Sayfa yükleniyor...
Sayfa yükleniyor...
Sayfa yükleniyor...
Sayfa yükleniyor...
Sayfa yükleniyor...
Sayfa yükleniyor...
Sayfa yükleniyor...
Sayfa yükleniyor...
Sayfa yükleniyor...
Sayfa yükleniyor...
Sayfa yükleniyor...
Sayfa yükleniyor...
Sayfa yükleniyor...
Sayfa yükleniyor...
Sayfa yükleniyor...
Sayfa yükleniyor...
Sayfa yükleniyor...
Sayfa yükleniyor...
Sayfa yükleniyor...
Sayfa yükleniyor...
Sayfa yükleniyor...
Sayfa yükleniyor...
Sayfa yükleniyor...
Sayfa yükleniyor...
Sayfa yükleniyor...
Sayfa yükleniyor...
Sayfa yükleniyor...
Sayfa yükleniyor...
Sayfa yükleniyor...
Sayfa yükleniyor...
Sayfa yükleniyor...
Sayfa yükleniyor...
Sayfa yükleniyor...
Sayfa yükleniyor...
Sayfa yükleniyor...
Sayfa yükleniyor...
Sayfa yükleniyor...
Sayfa yükleniyor...
Sayfa yükleniyor...
Sayfa yükleniyor...
Sayfa yükleniyor...
Sayfa yükleniyor...
Sayfa yükleniyor...
Sayfa yükleniyor...
Sayfa yükleniyor...
Sayfa yükleniyor...
Sayfa yükleniyor...
Sayfa yükleniyor...
Sayfa yükleniyor...
Sayfa yükleniyor...
Sayfa yükleniyor...
Sayfa yükleniyor...
Sayfa yükleniyor...
Sayfa yükleniyor...
Sayfa yükleniyor...
Sayfa yükleniyor...
Sayfa yükleniyor...
Sayfa yükleniyor...
Sayfa yükleniyor...
Sayfa yükleniyor...
Sayfa yükleniyor...
Sayfa yükleniyor...
Sayfa yükleniyor...
Sayfa yükleniyor...
Sayfa yükleniyor...
Sayfa yükleniyor...
Sayfa yükleniyor...
Sayfa yükleniyor...
Sayfa yükleniyor...
Sayfa yükleniyor...
Sayfa yükleniyor...
Sayfa yükleniyor...
Sayfa yükleniyor...
Sayfa yükleniyor...
Sayfa yükleniyor...
Sayfa yükleniyor...
Sayfa yükleniyor...
Sayfa yükleniyor...
Sayfa yükleniyor...
Sayfa yükleniyor...
Sayfa yükleniyor...
Sayfa yükleniyor...
Sayfa yükleniyor...
Sayfa yükleniyor...
Sayfa yükleniyor...
Sayfa yükleniyor...
Sayfa yükleniyor...
Sayfa yükleniyor...
Sayfa yükleniyor...
Sayfa yükleniyor...
Sayfa yükleniyor...
Sayfa yükleniyor...
Sayfa yükleniyor...
Sayfa yükleniyor...
Sayfa yükleniyor...
Sayfa yükleniyor...
Sayfa yükleniyor...
Sayfa yükleniyor...
Sayfa yükleniyor...
Sayfa yükleniyor...
Sayfa yükleniyor...
Sayfa yükleniyor...
Sayfa yükleniyor...
Sayfa yükleniyor...
Sayfa yükleniyor...
Sayfa yükleniyor...
Sayfa yükleniyor...
Sayfa yükleniyor...
Sayfa yükleniyor...
Sayfa yükleniyor...
Sayfa yükleniyor...
Sayfa yükleniyor...
Sayfa yükleniyor...
Sayfa yükleniyor...
Sayfa yükleniyor...
Sayfa yükleniyor...
Sayfa yükleniyor...
Sayfa yükleniyor...
Sayfa yükleniyor...
Sayfa yükleniyor...
Sayfa yükleniyor...
Sayfa yükleniyor...
Sayfa yükleniyor...
Sayfa yükleniyor...
Sayfa yükleniyor...
Sayfa yükleniyor...
Sayfa yükleniyor...
Sayfa yükleniyor...
-
 1
1
-
 2
2
-
 3
3
-
 4
4
-
 5
5
-
 6
6
-
 7
7
-
 8
8
-
 9
9
-
 10
10
-
 11
11
-
 12
12
-
 13
13
-
 14
14
-
 15
15
-
 16
16
-
 17
17
-
 18
18
-
 19
19
-
 20
20
-
 21
21
-
 22
22
-
 23
23
-
 24
24
-
 25
25
-
 26
26
-
 27
27
-
 28
28
-
 29
29
-
 30
30
-
 31
31
-
 32
32
-
 33
33
-
 34
34
-
 35
35
-
 36
36
-
 37
37
-
 38
38
-
 39
39
-
 40
40
-
 41
41
-
 42
42
-
 43
43
-
 44
44
-
 45
45
-
 46
46
-
 47
47
-
 48
48
-
 49
49
-
 50
50
-
 51
51
-
 52
52
-
 53
53
-
 54
54
-
 55
55
-
 56
56
-
 57
57
-
 58
58
-
 59
59
-
 60
60
-
 61
61
-
 62
62
-
 63
63
-
 64
64
-
 65
65
-
 66
66
-
 67
67
-
 68
68
-
 69
69
-
 70
70
-
 71
71
-
 72
72
-
 73
73
-
 74
74
-
 75
75
-
 76
76
-
 77
77
-
 78
78
-
 79
79
-
 80
80
-
 81
81
-
 82
82
-
 83
83
-
 84
84
-
 85
85
-
 86
86
-
 87
87
-
 88
88
-
 89
89
-
 90
90
-
 91
91
-
 92
92
-
 93
93
-
 94
94
-
 95
95
-
 96
96
-
 97
97
-
 98
98
-
 99
99
-
 100
100
-
 101
101
-
 102
102
-
 103
103
-
 104
104
-
 105
105
-
 106
106
-
 107
107
-
 108
108
-
 109
109
-
 110
110
-
 111
111
-
 112
112
-
 113
113
-
 114
114
-
 115
115
-
 116
116
-
 117
117
-
 118
118
-
 119
119
-
 120
120
-
 121
121
-
 122
122
-
 123
123
-
 124
124
-
 125
125
-
 126
126
-
 127
127
-
 128
128
-
 129
129
-
 130
130
-
 131
131
-
 132
132
-
 133
133
-
 134
134
-
 135
135
-
 136
136
-
 137
137
-
 138
138
-
 139
139
-
 140
140
-
 141
141
-
 142
142
-
 143
143
-
 144
144
-
 145
145
-
 146
146
-
 147
147
-
 148
148
-
 149
149
-
 150
150
-
 151
151
-
 152
152
-
 153
153
-
 154
154
-
 155
155
-
 156
156
-
 157
157
-
 158
158
-
 159
159
-
 160
160
-
 161
161
-
 162
162
-
 163
163
-
 164
164
-
 165
165
-
 166
166
-
 167
167
-
 168
168
-
 169
169
-
 170
170
-
 171
171
-
 172
172
-
 173
173
-
 174
174
-
 175
175
-
 176
176
-
 177
177
-
 178
178
-
 179
179
-
 180
180
-
 181
181
-
 182
182
-
 183
183
-
 184
184
-
 185
185
-
 186
186
-
 187
187
-
 188
188
-
 189
189
-
 190
190
-
 191
191
-
 192
192
-
 193
193
-
 194
194
-
 195
195
-
 196
196
-
 197
197
-
 198
198
-
 199
199
-
 200
200
-
 201
201
-
 202
202
-
 203
203
-
 204
204
-
 205
205
-
 206
206
-
 207
207
-
 208
208
-
 209
209
-
 210
210
-
 211
211
-
 212
212
-
 213
213
-
 214
214
-
 215
215
-
 216
216
-
 217
217
-
 218
218
-
 219
219
-
 220
220
-
 221
221
-
 222
222
-
 223
223
-
 224
224
-
 225
225
-
 226
226
-
 227
227
-
 228
228
-
 229
229
-
 230
230
-
 231
231
-
 232
232
-
 233
233
-
 234
234
-
 235
235
-
 236
236
-
 237
237
-
 238
238
-
 239
239
-
 240
240
-
 241
241
-
 242
242
-
 243
243
-
 244
244
-
 245
245
-
 246
246
-
 247
247
-
 248
248
-
 249
249
-
 250
250
-
 251
251
-
 252
252
-
 253
253
-
 254
254
-
 255
255
-
 256
256
-
 257
257
-
 258
258
-
 259
259
-
 260
260
-
 261
261
-
 262
262
-
 263
263
-
 264
264
-
 265
265
-
 266
266
-
 267
267
-
 268
268
-
 269
269
-
 270
270
-
 271
271
-
 272
272
-
 273
273
-
 274
274
-
 275
275
-
 276
276
-
 277
277
-
 278
278
-
 279
279
-
 280
280
-
 281
281
-
 282
282
-
 283
283
-
 284
284
-
 285
285
-
 286
286
-
 287
287
-
 288
288
-
 289
289
-
 290
290
-
 291
291
-
 292
292
-
 293
293
-
 294
294
-
 295
295
-
 296
296
-
 297
297
-
 298
298
-
 299
299
-
 300
300
-
 301
301
-
 302
302
-
 303
303
-
 304
304
-
 305
305
-
 306
306
-
 307
307
-
 308
308
-
 309
309
-
 310
310
-
 311
311
-
 312
312
-
 313
313
-
 314
314
-
 315
315
-
 316
316
-
 317
317
-
 318
318
-
 319
319
-
 320
320
-
 321
321
-
 322
322
-
 323
323
-
 324
324
-
 325
325
-
 326
326
-
 327
327
-
 328
328
-
 329
329
-
 330
330
-
 331
331
-
 332
332
-
 333
333
-
 334
334
-
 335
335
-
 336
336
-
 337
337
-
 338
338
-
 339
339
-
 340
340
-
 341
341
-
 342
342
-
 343
343
-
 344
344
-
 345
345
-
 346
346
-
 347
347
-
 348
348
-
 349
349
-
 350
350
-
 351
351
-
 352
352
-
 353
353
-
 354
354
-
 355
355
-
 356
356
-
 357
357
-
 358
358
-
 359
359
-
 360
360
-
 361
361
-
 362
362
-
 363
363
-
 364
364
-
 365
365
-
 366
366
-
 367
367
-
 368
368
-
 369
369
-
 370
370
-
 371
371
-
 372
372
-
 373
373
-
 374
374
-
 375
375
-
 376
376
-
 377
377
-
 378
378
-
 379
379
-
 380
380
-
 381
381
-
 382
382
-
 383
383
-
 384
384
-
 385
385
-
 386
386
-
 387
387
-
 388
388
-
 389
389
-
 390
390
-
 391
391
-
 392
392
-
 393
393
-
 394
394
-
 395
395
-
 396
396
-
 397
397
-
 398
398
-
 399
399
-
 400
400
-
 401
401
-
 402
402
-
 403
403
-
 404
404
-
 405
405
-
 406
406
-
 407
407
-
 408
408
-
 409
409
-
 410
410
-
 411
411
-
 412
412
-
 413
413
-
 414
414
-
 415
415
-
 416
416
-
 417
417
-
 418
418
-
 419
419
-
 420
420
-
 421
421
-
 422
422
-
 423
423
-
 424
424
-
 425
425
-
 426
426
-
 427
427
-
 428
428
-
 429
429
-
 430
430
-
 431
431
-
 432
432
-
 433
433
-
 434
434
-
 435
435
-
 436
436
-
 437
437
-
 438
438
-
 439
439
-
 440
440
-
 441
441
-
 442
442
-
 443
443
-
 444
444
-
 445
445
-
 446
446
-
 447
447
-
 448
448
-
 449
449
-
 450
450
-
 451
451
-
 452
452
-
 453
453
-
 454
454
-
 455
455
-
 456
456
-
 457
457
-
 458
458
-
 459
459
-
 460
460
-
 461
461
-
 462
462
-
 463
463
-
 464
464
-
 465
465
-
 466
466
-
 467
467
-
 468
468
-
 469
469
-
 470
470
-
 471
471
-
 472
472
-
 473
473
-
 474
474
-
 475
475
-
 476
476
-
 477
477
-
 478
478
-
 479
479
-
 480
480
-
 481
481
-
 482
482
-
 483
483
-
 484
484
-
 485
485
-
 486
486
-
 487
487
-
 488
488
-
 489
489
-
 490
490
-
 491
491
-
 492
492
-
 493
493
-
 494
494
-
 495
495
-
 496
496
-
 497
497
-
 498
498
-
 499
499
-
 500
500
-
 501
501
-
 502
502
-
 503
503
-
 504
504
-
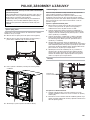 505
505
-
 506
506
-
 507
507
-
 508
508
-
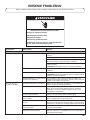 509
509
-
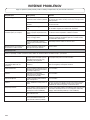 510
510
-
 511
511
-
 512
512
-
 513
513
-
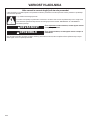 514
514
-
 515
515
-
 516
516
-
 517
517
-
 518
518
-
 519
519
-
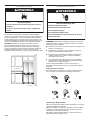 520
520
-
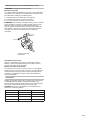 521
521
-
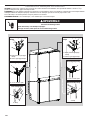 522
522
-
 523
523
-
 524
524
-
 525
525
-
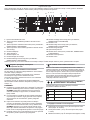 526
526
-
 527
527
-
 528
528
-
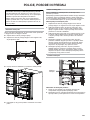 529
529
-
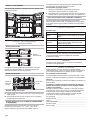 530
530
-
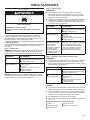 531
531
-
 532
532
-
 533
533
-
 534
534
-
 535
535
-
 536
536
-
 537
537
-
 538
538
-
 539
539
-
 540
540
-
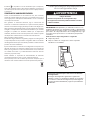 541
541
-
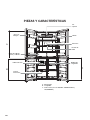 542
542
-
 543
543
-
 544
544
-
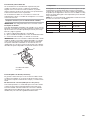 545
545
-
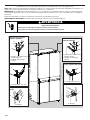 546
546
-
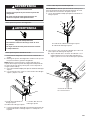 547
547
-
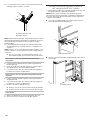 548
548
-
 549
549
-
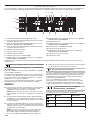 550
550
-
 551
551
-
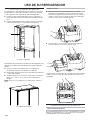 552
552
-
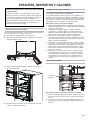 553
553
-
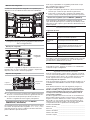 554
554
-
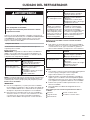 555
555
-
 556
556
-
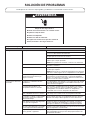 557
557
-
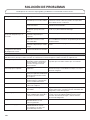 558
558
-
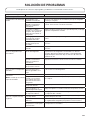 559
559
-
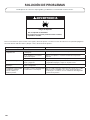 560
560
-
 561
561
-
 562
562
-
 563
563
-
 564
564
-
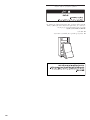 565
565
-
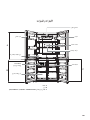 566
566
-
 567
567
-
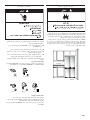 568
568
-
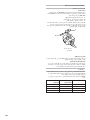 569
569
-
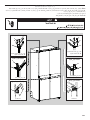 570
570
-
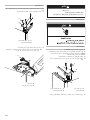 571
571
-
 572
572
-
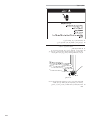 573
573
-
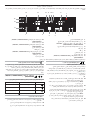 574
574
-
 575
575
-
 576
576
-
 577
577
-
 578
578
-
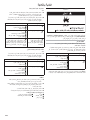 579
579
-
 580
580
-
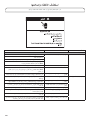 581
581
-
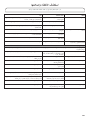 582
582
-
 583
583
-
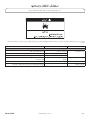 584
584


diğer dillerde
- eesti: Whirlpool WQ9 E1L Omaniku manuaal
- slovenčina: Whirlpool WQ9 E1L Návod na obsluhu
- español: Whirlpool WQ9 E1L El manual del propietario
- français: Whirlpool WQ9 E1L Le manuel du propriétaire
- italiano: Whirlpool WQ9 E1L Manuale del proprietario
- svenska: Whirlpool WQ9 E1L Bruksanvisning
- čeština: Whirlpool WQ9 E1L Návod k obsluze
- polski: Whirlpool WQ9 E1L Instrukcja obsługi
- português: Whirlpool WQ9 E1L Manual do proprietário
- English: Whirlpool WQ9 E1L Owner's manual
- dansk: Whirlpool WQ9 E1L Brugervejledning
- русский: Whirlpool WQ9 E1L Инструкция по применению
- Nederlands: Whirlpool WQ9 E1L de handleiding
- română: Whirlpool WQ9 E1L Manualul proprietarului
İlgili makaleler
Diğer belgeler
-
Zanussi ZK23/10X Kullanım kılavuzu
-
Aeg-Electrolux S75428DT Kullanım kılavuzu
-
Electrolux END42293X Kullanım kılavuzu
-
Electrolux EN3481AOX Kullanım kılavuzu
-
-
VESTEL Smart NFY 600 X Kullanım kılavuzu
-
-
Electrolux ER8625D Kullanım kılavuzu
-
Groupe Brandt UM1010 El kitabı
-
ABB M Mini Contactor, Mini Contactor Relay Yükleme Rehberi