Samsung UE40N5000AU Kullanım kılavuzu
- Kategori
- LCD TV'ler
- Tip
- Kullanım kılavuzu

Thank you for purchasing this Samsung product.
To receive more complete service, please register your product at www.samsung.com
Model Serial No.
USER MANUAL
5 SERIES

Before Reading This User Manual
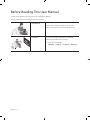
This TV comes with this user manual and an embedded e-Manual.
Before reading this user manual, review the following:
User Manual
Read this provided user manual to see information
about product safety, installation, accessories,
initial configuration, and product specifications.
e-Manual
For more information about this TV, read the
e-Manual embedded in the product.
To open the e-Manual,
MENUmSupporte-ManualENTERE
On the website, you can download the user manual and see its contents on your PC or mobile device.
English
English - 2

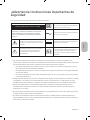
Warning! Important Safety Instructions
Please read the Safety Instructions before using your TV.
CAUTION Class II product: This symbol indicates
that a safety connection to electrical earth
(ground) is not required.
RISK OF ELECTRIC SHOCK. DO NOT OPEN.
CAUTION: TO REDUCE THE RISK OF ELECTRIC SHOCK, DO
NOT REMOVE COVER (OR BACK). THERE ARE NO USER
SERVICEABLE PARTS INSIDE. REFER ALL SERVICING TO
QUALIFIED PERSONNEL.
AC voltage: Rated voltage marked with this
symbol is AC voltage.
This symbol indicates that high voltage is
present inside. It is dangerous to make any
kind of contact with any internal part of this
product.
DC voltage: Rated voltage marked with this
symbol is DC voltage.
This symbol indicates that this product has
included important literature concerning
operation and maintenance.
Caution. Consult instructions for use: This
symbol instructs the user to consult the
user manual for further safety related
information.
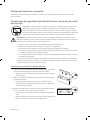
The slots and openings in the cabinet and in the back or bottom are provided for necessary ventilation. To
ensure reliable operation of this apparatus and to protect it from overheating, these slots and openings
must never be blocked or covered.
– Do not place this apparatus in a confined space, such as a bookcase or built-in cabinet, unless proper
ventilation is provided.
– Do not place this apparatus near or over a radiator or heat register, or where it is exposed to direct
sunlight.
– Do not place vessels (vases etc.) containing water on this apparatus, as this can result in a fire or
electric shock.
Do not expose this apparatus to rain or place it near water (near a bathtub, washbowl, kitchen sink, or
laundry tub, in a wet basement, or near a swimming pool, etc.). If this apparatus accidentally gets wet,
unplug it and contact an authorised dealer immediately.
This apparatus uses batteries. In your community, there might be environmental regulations that require
you to dispose of these batteries properly. Please contact your local authorities for disposal or recycling
information.
Do not overload wall outlets, extension cords, or adaptors beyond their capacity, since this can result in fire
or electric shock.
Power-supply cords should be placed so that they are not likely to be walked on or pinched by items placed
upon or against them. Pay particular attention to cords at the plug end, at wall outlets, and at the point
where they exit from the appliance.
English - 3
English

To protect this apparatus from a lightning storm, or when left unattended and unused for long periods of
time, unplug it from the wall outlet and disconnect the antenna or cable system. This will prevent damage
to the set due to lightning and power line surges.
Before connecting the AC power cord to the DC adaptor outlet, make sure that the voltage designation of
the DC adaptor corresponds to the local electrical supply.
Never insert anything metallic into the open parts of this apparatus. This may cause a danger of electric
shock.
To avoid electric shock, never touch the inside of this apparatus. Only a qualified technician should open
this apparatus.
Be sure to plug in the power cord until it is firmly seated. When unplugging the power cord from a wall
outlet, always pull on the power cord's plug. Never unplug it by pulling on the power cord. Do not touch the
power cord with wet hands.
If this apparatus does not operate normally - in particular, if there are any unusual sounds or smells coming
from it - unplug it immediately and contact an authorised dealer or service centre.
Be sure to pull the power plug out of the outlet if the TV is to remain unused or if you are to leave the house
for an extended period of time (especially when children, elderly, or disabled people will be left alone in the
house).
– Accumulated dust can cause an electric shock, an electric leakage, or a fire by causing the power cord
to generate sparks and heat or by causing the insulation to deteriorate.
Be sure to contact an authorised Samsung service centre for information if you intend to install your TV in
a location with heavy dust, high or low temperatures, high humidity, chemical substances, or where it will
operate 24 hours a day such as in an airport, a train station, etc. Failure to do so may lead to serious damage
to your TV.
Use only a properly grounded plug and wall outlet.
– An improper ground may cause electric shock or equipment damage. (Class l Equipment only.)
To turn off this apparatus completely, disconnect it from the wall outlet. To ensure you can unplug this
apparatus quickly if necessary, make sure that the wall outlet and power plug are readily accessible.
Store the accessories (batteries, etc.) in a location safely out of the reach of children.
Do not drop or strike the product. If the product is damaged, disconnect the power cord and contact a
Samsung service centre.
To clean this apparatus, unplug the power cord from the wall outlet and wipe the product with a soft, dry
cloth. Do not use any chemicals such as wax, benzene, alcohol, thinners, insecticide, aerial fresheners,
lubricants, or detergents. These chemicals can damage the appearance of the TV or erase the printing on
the product.
Do not expose this apparatus to dripping or splashing.
Do not dispose of batteries in a fire.
Do not short-circuit, disassemble, or overheat the batteries.
There is danger of an explosion if you replace the batteries used in the remote with the wrong type of
battery. Replace only with the same or equivalent type.
* Figures and illustrations in this User Manual are provided for reference only and may differ from the actual
product appearance. Product design and specifications may change without notice.
CIS languages (Russian, Ukrainian, Kazakhs) are not available for this product, since this is manufactured for
customers in EU region.
English - 4

English - 5
English
Before Reading This User Manual ---------------------------------------------------------------------------- 2
Warning! Important Safety Instructions
---------------------------------------------------------------------------- 3
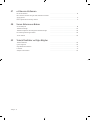
01 What's in the Box?
02 TV Installation
Mounting the TV on a wall ---------------------------------------------------------------------------- 8
Providing proper ventilation for your TV
---------------------------------------------------------------------------- 9
Attaching the TV to the Stand
---------------------------------------------------------------------------- 10
Safety Precaution: Securing the TV to the wall to
prevent falling
---------------------------------------------------------------------------- 10
03 The Remote Control
About the Buttons on the Remote Control ---------------------------------------------------------------------------- 11
Installing batteries into the remote control
(Battery size: AAA)
---------------------------------------------------------------------------- 12
04 Running the Initial Setup
Using the TV Controller ---------------------------------------------------------------------------- 13
05 Changing the Input Source
Source ---------------------------------------------------------------------------- 14
How to use Edit Name
---------------------------------------------------------------------------- 14
Information
---------------------------------------------------------------------------- 14
06 Connecting the “CI or CI+ Card” via COMMON INTERFACE slot
Using the “CI or CI+ Card” ---------------------------------------------------------------------------- 15
Contents

07 How to use the e-Manual
Screen Display ---------------------------------------------------------------------------- 16
How to toggle between an e-Manual topic and the
corresponding OSD menu(s).
---------------------------------------------------------------------------- 17
How to search for a topic on the index page
---------------------------------------------------------------------------- 17
08 Troubleshooting and Maintenance
Troubleshooting ---------------------------------------------------------------------------- 18
Teletext Feature
---------------------------------------------------------------------------- 23
The teletext pages are organised according to six
categories
---------------------------------------------------------------------------- 24
Anti-theft Kensington Lock
---------------------------------------------------------------------------- 24
Caring for the TV
---------------------------------------------------------------------------- 25
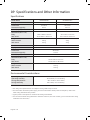
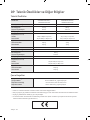
09 Specifications and Other Information
Specifications ---------------------------------------------------------------------------- 26
Environmental Considerations
---------------------------------------------------------------------------- 26
Decreasing power consumption
---------------------------------------------------------------------------- 27
Licences
---------------------------------------------------------------------------- 27
Adaptor information
---------------------------------------------------------------------------- 32
English - 6

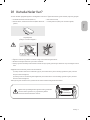
01 What's in the Box?
Make sure the following items are included with your TV. If any items are missing, contact your dealer.
Remote Control & Batteries (AAA x 2)
Warranty Card / Regulatory Guide (Not available in
some locations)
User Manual
TV Power Cable (Depending on the country and
model)
Power Adapter
(Depending on the country and model)
The items’ colours and shapes may vary depending on the models.
Cables not included can be purchased separately.
Check for any accessories hidden behind or in the packing materials when opening the box.
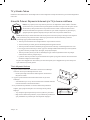
An administration fee may be charged in the following situations:
(a) An engineer is called out at your request, but it is found that the product has no defect (i.e., where the
user manual has not been read).
(b) You bring the unit to a repair centre, but it is found that the product has no defect (i.e., where the user
manual has not been read).
You will be informed of the administration fee amount before a technician visits.
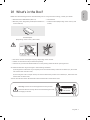
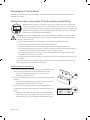
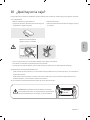
Warning: Screens can be damaged from direct pressure
when handled incorrectly. We recommend lifting the TV at
the edges, as shown.
Do Not Touch
This Screen!
English - 7
English

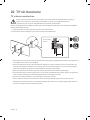
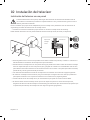
02 TV Installation
Mounting the TV on a wall
If you mount this TV on a wall, follow the instructions exactly as set out by the manufacturer. Unless
it is correctly mounted, the TV may slide or fall and cause serious injury to a child or adult and
serious damage to the TV.
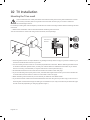
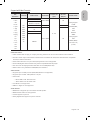
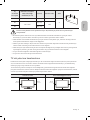
For models providing wall mount adapters, install them as shown in the figure below before installing the wall
mount kit.
Refer to the installation manual included with the Samsung wall mount kit.
You can mount the TV on the wall using a wall mount kit (sold separately).
TV
Wall mount
Bracket
C
Samsung Electronics is not responsible for any damage to the product or injury to yourself or others if you
choose to install the wall mount on your own.
You can install your wall mount on a solid wall perpendicular to the floor. Before attaching the wall mount
to surfaces other than plaster board, contact your nearest dealer for additional information. If you install
the TV on a ceiling or slanted wall, it may fall and result in severe personal injury.
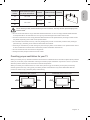
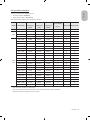
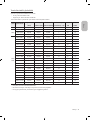
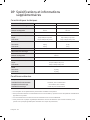
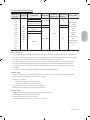
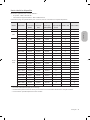
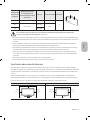
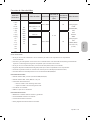
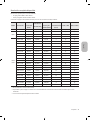
Standard dimensions for wall mount kits are shown in the table on the next page.
If you are installing a third-party wall mount, note that the length of the screws you can use to attach the
TV to the wall mount is shown in column C in the table on the next page.
When installing a wall mount kit, we recommend you fasten all four VESA screws.
If you want to install a wall mount kit that attaches to the wall using two top screws only, be sure to use a
Samsung wall mount kit that supports this type of installation. (You may not be able to purchase this type
of wall mount kit, depending on the geographical region.)
English - 8

TV size in
inches
VESA screw hole specs
(A * B) in millimetres
C (mm) Standard Screw Quantity
32 100 x 100 26.0-28.0 M4
440
200 x 200
25.7-27.7
M8
49 25.5-27.5
Do not install your wall mount kit while your TV is turned on. This may result in personal injury from
electric shock.
Do not use screws that are longer than the standard dimension or do not comply with the VESA standard
screw specifications. Screws that are too long may cause damage to the inside of the TV set.
For wall mounts that do not comply with the VESA standard screw specifications, the length of the screws
may differ depending on the wall mount specifications.
Do not fasten the screws too firmly. This may damage the product or cause the product to fall, leading to
personal injury. Samsung is not liable for these kinds of accidents.
Samsung is not liable for product damage or personal injury when a non-VESA or non-specified wall mount
is used or when the consumer fails to follow the product installation instructions.
Do not mount the TV at more than a 15 degree tilt.
Always have two people mount the TV onto a wall.
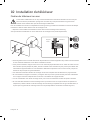
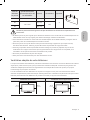
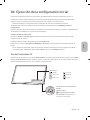
Providing proper ventilation for your TV
When you install your TV, maintain a distance of at least 10 cm between the TV and other objects (walls, cabinet
sides, etc.) to ensure proper ventilation. Failing to maintain proper ventilation may result in a fire or a problem
with the product caused by an increase in its internal temperature.
When you install your TV with a stand or a wall mount, we strongly recommend you use parts provided by
Samsung Electronics only. Using parts provided by another manufacturer may cause difficulties with the
product or result in injury caused by the product falling.
Installation with a stand Installation with a wall mount
10 cm
10 cm10 cm
10 cm10 cm
10 cm
10 cm
English - 9
English

Attaching the TV to the Stand
Make sure you have all the accessories shown, and that you assemble the stand following the provided
assembly instructions.
Safety Precaution: Securing the TV to the wall to prevent falling
Caution: Pulling, pushing, or climbing on the TV may cause the TV to fall. In particular,
ensure your children do not hang on or destabilise the TV. This action may cause the TV
to tip over, causing serious injuries or death. Follow all safety precautions provided in the
Safety Flyer included with your TV. For added stability and safety, you can purchase and
install the anti-fall device as described below.
WARNING: Never place a television set in an unstable location. The television set may fall, causing
serious personal injury or death. Many injuries, particularly to children, can be avoided by taking
simple precautions such as
Using cabinets or stands recommended by the manufacturer of the television set.
Only using furniture that can safely support the television set.
Ensuring the television set is not overhanging the edge of the supporting furniture.
Not placing the television set on tall furniture (for example, cupboards or bookcases) without
anchoring both the furniture and the television set to a suitable support.
Not placing the television set on cloth or other materials that may be located between the
television set and supporting furniture.
Educating children about the dangers of climbing on furniture to reach the television set or its
controls.
If you are retaining and relocating the television set that you are replacing with this new set, you
should apply the same precautions to the old set.
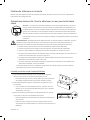
Preventing the TV from falling
1. Using the appropriate screws, firmly fasten a set of brackets to the
wall. Confirm that the screws are firmly attached to the wall.
– You may need additional material such as wall anchors
depending on the type of wall.
2. Using the appropriately sized screws, firmly fasten a set of brackets
to the TV.
– For the screw specifications, refer to the standard screw part in
the table under "Mounting the TV on a wall".
3. Connect the brackets fixed to the TV and the brackets fixed to
the wall with a durable, heavy-duty string, and then tie the string
tightly.
– Install the TV near the wall so that it does not fall backwards.
– Connect the string so that the brackets fixed to the wall are at
the same height as or lower than the brackets fixed to the TV.
English - 10

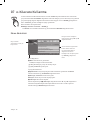
03 The Remote Control
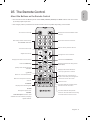
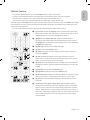
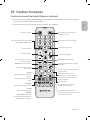
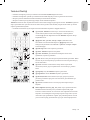
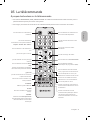
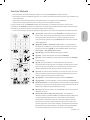
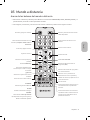
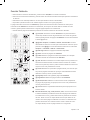
About the Buttons on the Remote Control
This remote control has Braille points on the Power, Channel, Volume, and Enter buttons and can be used
by visually impaired persons.
The images, buttons, and functions of the remote control may differ depending on the model.
Alternately selects Teletext mode,
Full > Double > Mix > Off.
Turns the sound on/off.
Displays the main on-screen menu.
Views the Media Play.
Adjusts the volume.
Quickly select frequently used
functions.
Returns to the previous menu or
channel.
E (Enter)
Selects or runs a focused item.
E-MANUAL
Displays the e-Manual guide.
PIC SIZE
Changes the picture size.
AD/SUBT.
Audio Description selection. (Not
available in some locations) / Displays
digital subtitles.
Turns the TV on and off.
Displays and selects available video
sources.
Gives direct access to channels.
Returns to the previous channel.
Changes the current channel.
Launches the Channel List.
Displays the Electronic Programme
Guide (EPG).
Displays information about the
current programme or content.
Moves the cursor, selects the on-
screen menu items, and changes the
values seen on the TV's menu.
Exits the menu.
Use these buttons with specific
features. Use these buttons according
to the directions on the TV screen.
Use these buttons according to the
directions on the TV screen.
English - 11
English

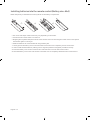
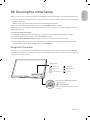
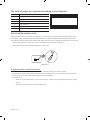
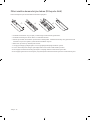
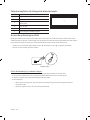
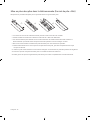
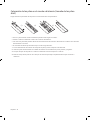
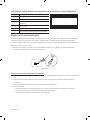
Installing batteries into the remote control (Battery size: AAA)
Match the polarity of the batteries to the symbols on the battery compartment.
1
3
2
The colour and shape of the remote may vary depending on the model.
Use the remote control within 7 m of the TV.
Bright lights may affect the performance of the remote control. Avoid using the remote control near special
fluorescent lights or neon signs.
Alkaline batteries are recommended for longer battery life.
1. Gently pull on the battery cover's notch and then remove the cover completely once it comes loose.
2. Insert 2 AAA alkaline batteries, making sure to align the positive and negative polarities correctly.
3. Place the battery cover on the remote control and insert the cover into the remote control.
4. Slide the battery cover in the order shown so that the cover is completely attached to the remote control.
English - 12

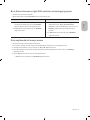
04 Running the Initial Setup
When you turn on your TV for the first time, it immediately starts the Initial Setup. The Initial Setup allows you
to configure the basic settings for the TV to operate, such as broadcast reception, channel search, and network
connection, at one time.
Before starting the Initial Setup, be sure to connect external devices first.
You can also start the Initial Setup using the TV's menu (MENUm > System > Setup).
Follow the instructions displayed on the Initial Setup screen and configure the TV's basic settings to suit your
viewing environment.
If You Want to Reset This Feature...
Select SystemSetup (Initial Setup). Enter your 4 digit PIN number. The default PIN number is “0000”.
If you want to change the PIN number, use the Change PIN function.
You should do Setup (MENUmSystem) again at home even though you did in shop already.
If you forget the PIN code, press the remote control buttons in the following sequence in Standby mode,
which resets the PIN to “0000”: MUTE824POWER (on)
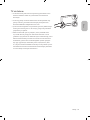
Using the TV Controller
You can turn on the TV with the TV Controller button at the bottom of the TV, and then use the Control menu.
The Control menu appears when the TV Controller is pressed while the TV is On. For more information about its
usage, refer to the figure below.
Control menu
: Power off
: Volume Up
: Channel Up : Volume Down
: Channel Down : Source
TV Controller / Remote control sensor
Press: Move
Press & Hold: Select
The TV Controller is placed at the bottom
of the TV.
English - 13
English

05 Changing the Input Source
Source
Use to select TV or other external input sources such as DVD / Blu-ray players / cable box / STB satellite
receiver connected to the TV.
1. Press the SOURCE button on your remote.
2. Select a desired external input source.
How to use Edit Name
In the Source, press the TOOLS button, and then you can set an external input sources name you want.
Information
You can see detailed information about the connected external device.
English - 14

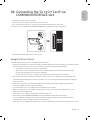
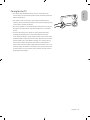
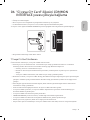
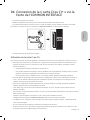
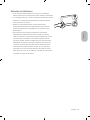
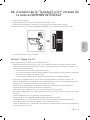
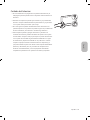
06 Connecting the “CI or CI+ Card” via
COMMON INTERFACE slot
Depending on the country and model.
Turn the TV off to connect or disconnect a “CI or CI+ Card”.
The TV Viewing Card (“CI or CI+ Card”) may not supported depending on the model.
Connect the “CI or CI+ Card” to the COMMON INTERFACE slot as shown in the image below.
The image may differ depending on the model.
Using the “CI or CI+ Card”
To watch paid channels, the “CI or CI+ CARD” must be inserted.
Samsung TV follow up CI+ 1.3 standard. When TV product display the pop-up message, it may happen due to
CI+ 1.3 Version inconsistency. If you have a problem, please contact Samsung Call Centre.
– Your Samsung TV conforms to the CI+ 1.3 standards.
– Where a CI+ Common Interface module is incompatible with this device then please remove the
module and contact the CI+ operator for assistance.
– If you don’t insert the “CI or CI+ CARD”, some channels will display the pop-up message.
The pairing information containing a telephone number, the “CI or CI+ CARD” ID, the Host ID, and other
information will be displayed in about 2~3 minutes. If an error message is displayed, please contact your
service provider.
When the configuration of channel information has finished, the message “Updating Completed” is
displayed, indicating the channel list is updated.
– You must obtain a “CI or CI+ CARD” from a local cable service provider.
– When removing the “CI or CI+ CARD”, carefully pull it out with your hands since dropping the “CI or CI+
CARD” may cause damage to it.
– Insert the “CI or CI+ CARD” in the direction marked on the card.
– The location of the COMMON INTERFACE slot may be different depending on the model.
– “CI or CI+ CARD” is not supported in some countries and regions; check with your authorised dealer.
– If you have any problems, please contact a service provider.
– Insert the “CI or CI+ CARD” that supports the current aerial settings. If not, the screen may not look normal.
English - 15
English

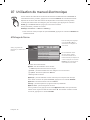
07 How to use the e-Manual
E-MANUAL
You can find instructions about your TV’s features in the e-Manual in your TV. To use, press the
E-MANUAL button on your remote. Move the cursor using the up/down/right/left buttons to
highlight a category, then a topic, and then press the ENTERE button. The e-Manual displays
the page you want to see.
You can also access it through the menu:
MENUmSupporte-ManualENTERE
To return to the e-Manual main menu, press the E-MANUAL button on the remote.
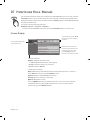
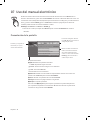
Screen Display
Operation Buttons
} Index: Displays the index screen.
Index available depending on the language.
E Enter: Selects a category or sub-menu.
e Exit: Exit the e-Manual.
<Viewing the Contents>
a Try now: Displays the OSD menu that corresponds to the topic. To return to
the e-Manual screen, press the E-MANUAL button.
b Home: Moves to the e-Manual home screen.
L Page: Moves to previous or next page.
{ Zoom: Magnifies a screen.
Press the { (Zoom) button to magnify the screen. You can scroll through the
magnified screen by using the u or d buttons. To return to the screen to
normal size, press the RETURN button.
Basic Features
} Index E Enter e Exit
Currently displayed video,
TV Programme, etc.
The category list. Press l or r
button to select the category
you want.
Displays the sub-menu list.
Use the arrow buttons on your
remote to move the cursor.
Press ENTERE button to
select the sub-menu you want.
Changing the Preset Picture Mode
Adjusting Picture Settings
Changing the Picture Options
Changing the Preset Sound Mode
Adjusting Sound Settings
English - 16

How to toggle between an e-Manual topic and the corresponding OSD
menu(s).
This function is not enabled in some menus.
You cannot use the Try now function if the menu is not activated.
Method 1 Method 2
1. If you want to use the menu that corresponds
to an e-Manual topic, press the red button to
select Try now.
2. To return to the e-Manual screen, press the
E-MANUAL button.
1. Press the ENTERE button when a topic is
displayed. “Are you sure?” appears. Select Yes,
and then press the ENTERE button. The OSD
window appears.
2. To return to the e-Manual screen, press the
E-MANUAL button.
How to search for a topic on the index page
This function may not be supported depending on the language.
1. If you want to search a keyword, press the blue button to select Index.
2. Press the l or r button to select a character order you want.
3. Press the u or d button to select a keyword you want to see, and then press the ENTERE button.
4. You can view the corresponding e-Manual instruction screen.
– To close the Index screen, press the RETURN button.
English - 17
English

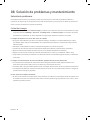
08 Troubleshooting and Maintenance
Troubleshooting
If the TV seems to have a problem, first try this list of possible problems and solutions. If none of these
troubleshooting tips apply, visit “www.samsung.com”, then click on Support, or call Samsung customer service
centre.
Picture Quality
First of all, please perform the Picture Test and confirm that your TV is properly displaying test image.
(go to MENUm - Support - Self Diagnosis - Picture Test) If the test image is properly displayed, the poor
picture may caused by the source or signal.
The TV image does not look as good as it did in the store.
If you have an analogue cable box or satellite box, upgrade to a digital cable box or satellite box. Use HDMI
or Component cables to deliver HD (high definition) picture quality.
Cable/Satellite subscribers: Try digital stations from the channel line up.
Aerial connection: Try HD stations after performing Auto tuning.
Many HD channels are up scaled from SD (Standard Definition) contents.
Adjust the cable box or satellite box video output resolution to 1080i or 720p.
Make sure you are watching the TV at the minimum recommended distance based on the size and definition
of the signal.
The picture is distorted: macro block, small block, dots, pixelisation error.
Compression of video contents may cause picture distortion especially in fast moving pictures such as
sports and action movies.
Low signal level or bad quality can cause picture distortion. This is not a TV issue.
Mobile phones used close to the TV (cca up to 1m) may cause noise in picture on analogue and digital TV.
Colour is wrong or missing.
If you’re using a component connection, make sure the component cables are connected to the correct
jacks. Incorrect or loose connections may cause colour problems or a blank screen.
English - 18

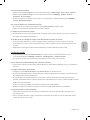
There is poor colour or brightness.
Adjust the Picture options in the TV menu. (go to Picture Mode / Colour / Brightness / Sharpness)
Adjust Energy Saving option in the TV menu. (go to MENUm - System - Eco Solution - Energy Saving)
Try resetting the picture to view the default picture settings. (go to MENUm - Picture - Reset Picture)
There is a dotted line on the edge of the screen.
If the picture size is set to Screen Fit, change it to .
Change the cable box or satellite box resolution.
The picture is black and white.
If you are using an AV composite input, connect the video cable (yellow) to the Green jack of component
input 1 on the TV.
When changing channels, the picture freezes or is distorted or delayed.
If connected with a cable box or satellite box, please try to reset the cable box or satellite box. Reconnect
the AC cord and wait until the cable box or satellite box reboots. It may take up to 20 minutes.
Set the output resolution of the cable box or satellite box to 1080i or 720p.
Sound Quality
First of all, please perform the Sound Test to confirm that your TV audio is properly operating. (go to
MENUm - Support - Self Diagnosis - Sound Test)
If the audio is ok, the sound problem may be caused by the source or signal.
There is no sound or the sound is too low at maximum volume.
Please check the volume of the device (cable box or satellite box, DVD, Blu-ray etc) connected to your TV.
The picture is good but there is no sound.
Set the Sound Output option to TV Speaker in the sound menu.
If you are using an external device, make sure the audio cables are connected to the correct audio input
jacks on the TV.
If you are using an external device, check the device’s audio output option (ex. you may need to change your
cable box's or satellite box's audio option to HDMI when you have a HDMI connected to your TV).
If you are using a DVI to HDMI cable, a separate audio cable is required.
Reboot the connected device by reconnecting the device’s power cable.
The speakers are making an inappropriate noise.
Check the cable connections. Make sure a video cable is not connected to an audio input.
For aerial or cable connections, check the signal strength. Low signal level may cause sound distortion.
English - 19
English

No Picture, No Video
The TV will not turn on.
Make sure the AC power cord is securely plugged in to the wall outlet and the TV.
Make sure the wall outlet is working.
Try pressing the POWER ( ) button at the bottom of the TV to make sure the problem is not the remote. If
the TV turns on, refer to “The remote control does not work”.
The TV turns off automatically.
Ensure the Sleep Timer is set to Off in the Time menu.
If your PC is connected to the TV, check your PC power settings.
Make sure the AC power cord is plugged in securely to the wall outlet and the TV.
No Signal Power Off turns off the TV if no signal has been received by the TV for a specified period time.
Auto Power Off turns off the TV if there has been no user input in four hours.
There is no picture/video.
Check cable connections (remove and reconnect all cables connected to the TV and external devices).
Set your external device’s (cable box or satellite box, DVD, Blu-ray etc) video outputs to match the
connections to the TV input. For example, if an external device’s output is HDMI, it should be connected to
an HDMI input on the TV.
Make sure your connected devices are powered on.
Be sure to select the TV’s correct source by pressing the SOURCE button on the remote control.
Reboot the connected device by reconnecting the device’s power cable.
Aerial (Air/Cable) Connection (Cable: depending on the country)
The TV is not receiving all channels.
Make sure the Aerial cable is connected securely.
Please try Setup (Initial setup) to add available channels to the channel list. Go to MENUm - System -
Setup (Initial setup) and wait for all available channels to be stored.
Verify the Aerial is positioned correctly.
The picture is distorted: macro block, small block, dots, pixelisation error.
Compression of video contents may cause picture distortion, especially on fast moving pictures such as
sports and action movies.
A low signal can cause picture distortion. This is not a TV issue.
English - 20
Sayfa yükleniyor...
Sayfa yükleniyor...
Sayfa yükleniyor...
Sayfa yükleniyor...
Sayfa yükleniyor...
Sayfa yükleniyor...
Sayfa yükleniyor...
Sayfa yükleniyor...
Sayfa yükleniyor...
Sayfa yükleniyor...
Sayfa yükleniyor...
Sayfa yükleniyor...
Sayfa yükleniyor...
Sayfa yükleniyor...
Sayfa yükleniyor...
Sayfa yükleniyor...
Sayfa yükleniyor...
Sayfa yükleniyor...
Sayfa yükleniyor...
Sayfa yükleniyor...
Sayfa yükleniyor...
Sayfa yükleniyor...
Sayfa yükleniyor...
Sayfa yükleniyor...
Sayfa yükleniyor...
Sayfa yükleniyor...
Sayfa yükleniyor...
Sayfa yükleniyor...
Sayfa yükleniyor...
Sayfa yükleniyor...
Sayfa yükleniyor...
Sayfa yükleniyor...
Sayfa yükleniyor...
Sayfa yükleniyor...
Sayfa yükleniyor...
Sayfa yükleniyor...
Sayfa yükleniyor...
Sayfa yükleniyor...
Sayfa yükleniyor...
Sayfa yükleniyor...
Sayfa yükleniyor...
Sayfa yükleniyor...
Sayfa yükleniyor...
Sayfa yükleniyor...
Sayfa yükleniyor...
Sayfa yükleniyor...
Sayfa yükleniyor...
Sayfa yükleniyor...
Sayfa yükleniyor...
Sayfa yükleniyor...
Sayfa yükleniyor...
Sayfa yükleniyor...
Sayfa yükleniyor...
Sayfa yükleniyor...
Sayfa yükleniyor...
Sayfa yükleniyor...
Sayfa yükleniyor...
Sayfa yükleniyor...
Sayfa yükleniyor...
Sayfa yükleniyor...
Sayfa yükleniyor...
Sayfa yükleniyor...
Sayfa yükleniyor...
Sayfa yükleniyor...
Sayfa yükleniyor...
Sayfa yükleniyor...
Sayfa yükleniyor...
Sayfa yükleniyor...
Sayfa yükleniyor...
Sayfa yükleniyor...
Sayfa yükleniyor...
Sayfa yükleniyor...
Sayfa yükleniyor...
Sayfa yükleniyor...
Sayfa yükleniyor...
Sayfa yükleniyor...
Sayfa yükleniyor...
Sayfa yükleniyor...
Sayfa yükleniyor...
Sayfa yükleniyor...
Sayfa yükleniyor...
Sayfa yükleniyor...
Sayfa yükleniyor...
Sayfa yükleniyor...
Sayfa yükleniyor...
Sayfa yükleniyor...
Sayfa yükleniyor...
Sayfa yükleniyor...
Sayfa yükleniyor...
Sayfa yükleniyor...
Sayfa yükleniyor...
Sayfa yükleniyor...
Sayfa yükleniyor...
Sayfa yükleniyor...
Sayfa yükleniyor...
Sayfa yükleniyor...
Sayfa yükleniyor...
Sayfa yükleniyor...
Sayfa yükleniyor...
Sayfa yükleniyor...
Sayfa yükleniyor...
Sayfa yükleniyor...
Sayfa yükleniyor...
Sayfa yükleniyor...
Sayfa yükleniyor...
Sayfa yükleniyor...
Sayfa yükleniyor...
Sayfa yükleniyor...
Sayfa yükleniyor...
Sayfa yükleniyor...
Sayfa yükleniyor...
Sayfa yükleniyor...
-
 1
1
-
 2
2
-
 3
3
-
 4
4
-
 5
5
-
 6
6
-
 7
7
-
 8
8
-
 9
9
-
 10
10
-
 11
11
-
 12
12
-
 13
13
-
 14
14
-
 15
15
-
 16
16
-
 17
17
-
 18
18
-
 19
19
-
 20
20
-
 21
21
-
 22
22
-
 23
23
-
 24
24
-
 25
25
-
 26
26
-
 27
27
-
 28
28
-
 29
29
-
 30
30
-
 31
31
-
 32
32
-
 33
33
-
 34
34
-
 35
35
-
 36
36
-
 37
37
-
 38
38
-
 39
39
-
 40
40
-
 41
41
-
 42
42
-
 43
43
-
 44
44
-
 45
45
-
 46
46
-
 47
47
-
 48
48
-
 49
49
-
 50
50
-
 51
51
-
 52
52
-
 53
53
-
 54
54
-
 55
55
-
 56
56
-
 57
57
-
 58
58
-
 59
59
-
 60
60
-
 61
61
-
 62
62
-
 63
63
-
 64
64
-
 65
65
-
 66
66
-
 67
67
-
 68
68
-
 69
69
-
 70
70
-
 71
71
-
 72
72
-
 73
73
-
 74
74
-
 75
75
-
 76
76
-
 77
77
-
 78
78
-
 79
79
-
 80
80
-
 81
81
-
 82
82
-
 83
83
-
 84
84
-
 85
85
-
 86
86
-
 87
87
-
 88
88
-
 89
89
-
 90
90
-
 91
91
-
 92
92
-
 93
93
-
 94
94
-
 95
95
-
 96
96
-
 97
97
-
 98
98
-
 99
99
-
 100
100
-
 101
101
-
 102
102
-
 103
103
-
 104
104
-
 105
105
-
 106
106
-
 107
107
-
 108
108
-
 109
109
-
 110
110
-
 111
111
-
 112
112
-
 113
113
-
 114
114
-
 115
115
-
 116
116
-
 117
117
-
 118
118
-
 119
119
-
 120
120
-
 121
121
-
 122
122
-
 123
123
-
 124
124
-
 125
125
-
 126
126
-
 127
127
-
 128
128
-
 129
129
-
 130
130
-
 131
131
-
 132
132


Samsung UE40N5000AU Kullanım kılavuzu
- Kategori
- LCD TV'ler
- Tip
- Kullanım kılavuzu
diğer dillerde
- español: Samsung UE40N5000AU Manual de usuario
- français: Samsung UE40N5000AU Manuel utilisateur
- English: Samsung UE40N5000AU User manual
İlgili makaleler
-
Samsung UE40M5000AU Kullanım kılavuzu
-
Samsung UE40H4200AW Kullanım kılavuzu
-
Samsung PS43F4500AW Hızlı başlangıç Kılavuzu
-
Samsung T28D310EW Kullanım kılavuzu
-
Samsung LE32D550K1W Hızlı başlangıç Kılavuzu
-
Samsung UE40D5800VW Hızlı başlangıç Kılavuzu
-
Samsung LE32D450G1W Hızlı başlangıç Kılavuzu
-
Samsung LE40D503F7W Hızlı başlangıç Kılavuzu
-
Samsung UE22D5000NW Hızlı başlangıç Kılavuzu