
ITA LY
MADE IN
LIVIMN-SI
W
A
R
R
A
N
T
Y
•
G
A
R
A
N
T
I
E
•
G
A
R
A
N
Z
I
A
•
G
A
R
A
N
T
I
A
•
G
A
R
A
N
T
I
E
•
G
A
R
A
N
T
I
E
•
Y
E
A
R
S
•
A
N
S
•
A
N
N
I
•
A
Ñ
O
S
•
A
N
O
•
J
A
H
R
E
•
3
è un marchio registrato di
Label Habitat SaS - 10 rue Léo Lagrange - 27950 Saint Marcel - France
FG00907M07 - ver. 1 - 07/2017
207 75
163
≥
3
0
m
m
1
2
1
2
3
A
D
B
E
C
F
A
B
A
B
C

FG00907M07 - ver. 1 - 07/2017
ITALIANO
Descrizione
Kit da incasso.
Installazione
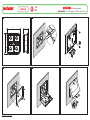
Installare la scatola da incasso a filo muro utilizzando il paramalta
in dotazione.
La scatola deve essere installata ad una altezza adeguata all’utente.
Installata la scatola d’incasso, prima di installare il videocitofono,
eseguire l’operazione indicata in figura B.
Rimuovere la cornice dal videocitofono togliendo le 4 viti (figura C
punto A) e montare la guida acustica utilizzando le due viti in dota-
zione (figura C punto B).
Fissare il telaio D evitando di stringere eccessivamente le viti ed
eettuare i collegamenti E. Assicurarsi che il dispositivo di bloc-
caggio sia spostato verso sinistra (posizione aperta). Una volta
eettuati i collegamenti agganciare il videocitofono e fissarlo spo-
stando il dispositivo di bloccaggio verso destra (F punto C).
Il prodotto è conforme alle direttive di riferimento vigenti.
Dismissione e smaltimento. Non disperdere nell’ambiente l’imballaggio e il
dispositivo alla fine del ciclo di vita, ma smaltirli seguendo le norme vigenti nel
paese di utilizzo del prodotto. I componenti riciclabili riportano simbolo e sigla
del materiale.
I DATI E LE INFORMAZIONI INDICATE IN QUESTO MANUALE SONO DA RITENERSI
SUSCETTIBILI DI MODIFICA IN QUALSIASI MOMENTO E SENZA OBBLIGO DI PRE-
AVVISO. LE MISURE, SE NON DIVERSAMENTE INDICATO, SONO IN MILLIMETRI.
PORTUGUÊS
Descrição
Kit de embutir.
Instalação
Instale a caixa de embutir nivelada com a parede, utilizando a prote-
ção de argamassa fornecida.
A caixa tem de ser instalada a uma altura adequada ao utilizador.
Instalada a caixa de embutir, antes de instalar o vídeo porteiro, rea-
lize a operação ilustrada na figura B.
Remova a moldura do vídeo porteiro removendo os 4 parafusos (fi-
gura C ponto 1) e monte a guia acústica, utilizando os dois para-
fusos fornecidos (figura C ponto B). Fixe a estrutura D evitando
apertar demasiado os parafusos e faça as ligações E.
Certifique-se de que o dispositivo de bloqueio fica desviado para
a esquerda (posição aberta). Após ter terminado as ligações encaixe
o vídeo porteiro e fixe-o deslocando o dispositivo de bloqueio para
a direita (F ponto 3).
O produto respeita as diretivas de referência vigentes.
Eliminação e desmantelamento. Não deixe no ambiente a embalagem e o dis-
positivo no final do seu ciclo de vida, mas os elimine segundo as normas vigentes
no país em que o produto é utilizado. Os componentes recicláveis apresentam
símbolo e sigla do material.
OS DADOS E AS INFORMAÇÕES INDICADAS NESTE MANUAL DEVEM SER CONSI-
DERADOS SUSCETÍVEIS DE ALTERAÇÕES A QUALQUER MOMENTO E SEM OBRI-
GAÇÃO DE PRÉVIO AVISO. SE NÃO INDICADAS DIVERSAMENTE, AS MEDIDAS
ESTÃO EXPRESSAS EM MILÍMETROS.
DEUTSCH
Beschreibung
Kit für die Unterputzmontage.
Mounting
Das Unterputzgehäuse mithilfe der beiliegenden Schutzabdeckung
wandbündig installieren. Das Unterputzgehäuse muss auf einer für
den Nutzer angemessenen Höhe montiert werden.
Nach Einbau des Unterputzgehäuses erst die Video-Innenstation in-
stallieren und dann den in Abbildung B gezeigten Vorgang ausfüh-
ren. Den Rahmen von der Video-Innenstation durch Entfernen der 4
Schrauben abnehmen (Abbildung C Punkt A) und die akustische
Schiene mithilfe der beiden beiliegenden Schrauben montieren (Ab-
bildung C Punkt B).
Den Rahmen D befestigen, ohne die Schrauben dabei zu fest anzu-
ziehen, und die Anschlüsse vornehmen E.
Vergewissern, dass die Blockiervorrichtung nach links geschoben
ist (oene Position). Nachdem die Anschlüsse vorgenommen wur-
den, die Video-Innenstation einhängen und durch Verschieben der
Blockiervorrichtung nach rechts befestigen (F Punkt C).
Das Produkt entspricht den geltenden Bezugsnormen.
Abbau und Entsorgung. Verpackung und Gerät am Ende des Lebenszyklus nicht
in die Umwelt gelangen lassen, sondern entsprechend den im Verwendungsland
gültigen Vorschriften entsorgen. Die wiederverwertbaren Bestandteile, sind mit
einem Symbol und dem Material-Kürzel gekennzeichnet.
DIE IN DIESER ANLEITUNG ENTHALTENEN ANGABEN UND INFORMATIONEN
KÖNNEN JEDERZEIT UND OHNE VORANKÜNDIGUNG GEÄNDERT WERDEN. ALLE
MASSANGABEN IN MM - SOFERN NICHT ANDERS ANGEGEBEN.
ESPAÑOL
Descripción
Kit de empotrar.
Instalación
Instale la caja de empotrar a ras de la pared utilizando la tapa de
protección contra argamasa incluida.
La caja debe instalarse a una altura adecuada para el usuario.
Una vez instalada la caja de empotrar, y antes de instalar el vi-
deoportero, realice la operación que se indica en la figura B.
Quite el marco del videoportero extrayendo los 4 tornillos (figura C
punto A) y monte la guía acústica utilizando los dos tornillos inclui-
dos (figura C punto B). Fije el armazón D sin apretar demasiado
los tornillos y realice las conexiones E.
Asegúrese de que el dispositivo de bloqueo esté desplazado hacia
la izquierda (posición abierta). Una vez realizadas las conexiones,
enganche el videoportero y fíjelo desplazando el dispositivo de blo-
queo hacia la derecha (F punto 3).
El producto es conforme a las Directivas pertinentes vigentes.
Puesta fuera de servicio y eliminación. No tirar al medio ambiente el embalaje
ni el dispositivo llegado al final de su vida útil, sino eliminarlos con arreglo a las
normas vigentes en el país donde se utiliza el producto. Los componentes recicla-
bles llevan el símbolo y el acrónimo del material.
LOS DATOS Y LAS INFORMACIONES QUE FIGURAN EN ESTE MANUAL SON SUSCEP-
TIBLES DE MODIFICACIÓN EN CUALQUIER MOMENTO SIN OBLIGACIÓN DE PREVIO
AVISO. LAS MEDIDAS, SALVO INDICACIÓN CONTRARIA, SON EN MILÍMETROS.
ENGLISH
Description
Kit for recessed installation.
Installation
Install the recessed box flush with wall using the mortar guard sup-
plied.
The box must be installed at an appropriate height for the user.
Once the recessed box is installed, before installing the video entry
phone, carry out the operation shown in figure B.
Remove the back-box from the video entry phone by taking out the
4 screws (figure C point A) and fit on the acoustic strip using the
two screws provided (figure C point B).
Attach the back-box D, taking care not to over-tighten the screws,
and make the connections E.
Make sure that the blocking device is moved to the left (open posi-
tion). Once the connections are made, hook on the video entry phone
and fix it by moving the blocking device to the right (F point C).
The product complies with the applicable reference directives.
Dismantling and disposal. Dispose of the packaging and the device properly
at the end of its life cycle, according to the regulations in force in the country
where the product is used. The recyclable components bear the symbol and code
for the material.
THE DATA AND INFORMATION PROVIDED IN THIS MANUAL ARE SUBJECT TO
CHANGE AT ANY TIME WITHOUT PRIOR NOTICE. MEASUREMENTS, UNLESS
OTHERWISE INDICATED, ARE IN MILLIMETRES.
FRANÇAIS
Description
Kit à encastrement.
Installation
Installer le boîtier à encastrement au ras du mur en utilisant la
plaque de protection contre le plâtre/ciment fournie.
Le boîtier doit être installé à une hauteur adéquate pour l’usager.
Une fois le boîtier à encastrement installé et avant d’installer le por-
tier vidéo, eectuer l’opération indiquée à la figure B.
Retirer le cadre du portier vidéo en enlevant les 4 vis (figure C
point 1) et monter le guide sonore en utilisant les deux vis fournies
(figure C point B). Fixer le cadre D en évitant de trop serrer les
vis et eectuer les branchements E.
Veiller à ce que le dispositif de blocage soit déplacé vers la gauche
(position ouverte). Une fois les branchements eectués, accrocher
le portier vidéo et le fixer en déplaçant le dispositif de blocage vers
la droite (F point 3).
Le produit est conforme aux directives de référence en vigueur.
Mise au rebut et élimination. Ne pas jeter l’emballage et le dispositif dans la
nature au terme du cycle de vie de ce dernier, mais les éliminer selon les normes
en vigueur dans le pays où le produit est utilisé. Le symbole et le sigle du matériau
figurent sur les composants recyclables.
LES DONNÉES ET LES INFORMATIONS CONTENUES DANS CE MANUEL SONT
SUSCEPTIBLES DE SUBIR DES MODIFICATIONS À TOUT MOMENT ET SANS
AUCUN PRÉAVIS. LES DIMENSIONS SONT EXPRIMÉES EN MILLIMÈTRES, SAUF
INDICATION CONTRAIRE.
TÜRKÇE
Açıklama
Gömme Kiti.
Kurulum
Beraberinde verilen kapağı kullanarak gömme kutuyu monte ediniz.
Kutu, kullanıcı için uygun bir yüksekliğe monte edilmelidir.
Gömme kutu kurulduktan sonra ve görüntülü diafonu monte etme-
den önce şekil B’de gösterilen işlemi yapınız.
4 vidasını (şekil C nokta A) sökerek görüntülü diafon cihazını çer-
çevesinden çıkarınız ve verilen iki vidayı (şekil C nokta B) kullana-
rak akustik kılavuzu monte ediniz.
Vidaları aşırı bir biçimde sıkmaktan kaçınarak çerçeveyi D sabit-
leyiniz ve bağlantıları E yapınız. Sabitleme aparatının sola doğru
kaydırılmış (açık pozisyonda) olduğundan emin olunuz. Bağlantılar
yapıldıktan sonra görüntülü diafon cihazını yerine takınız ve sabitle-
me aparatını sağa doğru kaydırarak (F nokta C) cihazı sabitleyiniz.
Ürün, yürürlükteki referans yönetmeliklere uygundur.
Servis dışı bırakma ve bertaraf etme Ambalaj malzemesini ve ömrü sonunda
cihazı çevreye atmayınız, ürünün kullanıldığı ülkedeki yürürlükteki mevzuatlara
göre bertaraf ediniz. Geri dönüştürülebilir bileşenlerde malzemenin sembolü ve
işareti gösterilmektedir.
BU KILAVUZDA YER ALAN VERİ VE BİLGİLERİN HABER VERİLMEKSİZİN HERHANGİ
BİR ZAMANDA DEĞİŞİKLİĞE UĞRAYABİLECEĞİ VARSAYILMAKTADIR. ÖLÇÜLER,
AKSİ SÖYLENMEDİKÇE MİLİMETRE CİNSİNDENDİR.
-
 1
1
-
 2
2


diğer dillerde
- français: CAME 840XC-0010 Guide d'installation
- italiano: CAME 840XC-0010 Guida d'installazione
- Deutsch: CAME 840XC-0010 Installationsanleitung
- português: CAME 840XC-0010 Guia de instalação
İlgili makaleler
Diğer belgeler
-
Comelit 6741W Mini Hands-free Kullanma talimatları
-
-
-
-
-
-
-
Comelit 1456 Technical Manual
-
Comelit 6702W El kitabı
-
 Hach AV9000 Kullanım kılavuzu
