Chicco Eletta El kitabı
- Kategori
- Araba koltukları
- Tip
- El kitabı
Bu kılavuz aynı zamanda aşağıdakiler için de uygundur:

Istruzioni d’uso•
Instructions for use•
Notice d‘instructions•
Gebrauchsanleitung•
Instrucciones de uso•
Instruções de utilização•
Gebruiksaanwijzing•
Οδηγίες χρήσης•
Инструкция по использованию•
Bruksanvisning•
Οδηγιες χρησης•
Navodila za uporabo•
Návod k použití•
Návod na použitie•
Инструкции за употреба•
Használati utasítás•
Instrucţiuni de folosire•
Instrukcja sposobu użycia•
Kullanım bilgileri•
K•
使用說明
ELETTA
gr. 0+/1
(0-18kg)
ARTSANA S.p.A. - Via Saldarini Catelli, 1 - 22070 Grandate (CO) - Italy
Tel. (+39) 031 382 111 - Fax (+39) 031 382 400 - www.chicco.com
93540.L.1 46 79218 000 000
9
12
6
3
A
E
C
D
G
B
F
1A
4
7
1B
10A-B
2
5
8
11
•
composit chicco con trapping sul pallino rosso
logo chicco con trapping sul pallino rosso
logo chicco senza trapping sul pallino rosso
rosso:
pantone 186 C
blu:
pantone 2747 C
composit chicco con trapping sul pallino rosso
logo chicco con trapping sul pallino rosso
logo chicco senza trapping sul pallino rosso
rosso:
pantone 186 C
blu:
pantone 2747 C

16
13
19
22
14
17
20
23
15
18
21
24
28
25
31
34
26
29
32
35
27A-B
30
33
NOTE

Istruzioni d’uso Pag. 2-5
Instructions for use Pag. 6-9
Mode d’emploi Pag. 10-13
Gebrauchsanleitung Pag. 14-17
Instrucciones de uso Pag. 18-21
Instruções de utilização Pag. 22-25
Gebruiksaanwijzing Pag. 26-29
Οδηγίες χρήσης Pag. 30-34
Инструкция по использованию Pag. 35-39
Bruksanvisning Pag. 40-43
Upute Za Uporabu Pag. 44-47
Navodila Za Uporabo Pag. 48-51
Návod K Použití Pag. 52-55
Návod K Použitiu Pag. 56-59
Инструкции за употреба Pag. 60-64
Használati Utasítás Pag. 65-68
Instrucţiuni de folosire Pag. 69-72
Instrukcja sposobu użycia Pag. 73-76
Kullanım bilgileri Pag. 77-80
Pag. 81-84
使用說明 Pag. 85-87
I
GB
F
D
E
P
NL
GR
HR
RUS
SLO
CS
SK
BG
H
R
PL
TR
SA
C
S

2
3
Istruzioni d’uso
IMPORTANTISSIMO: DA LEGGERE SUBITO
• Per il montaggio e l’installazione del prodotto
seguire scrupolosamente le istruzioni. Evitare
che qualcuno utilizzi il prodotto senza aver letto
le istruzioni.
• Conservare questo manuale per utilizzi futuri.
• Ogni paese prevede leggi e regolamenti diversi in
materia di sicurezza per il trasporto dei bambini
in auto. Per questo è consigliabile contattare le
autorità locali per avere maggiori informazioni.
ATTENZIONE! In base alle statistiche sugli •
incidenti, generalmente i sedili posteriori del
veicolo sono più sicuri di quello anteriore: si
consiglia pertanto di installare il Seggiolino sui
sedili posteriori. In particolare il sedile più sicuro
è quello centrale posteriore, se dotato di cintura
a 3 punti.
• ATTENZIONE! GRAVE PERICOLO! In Gruppo
0+ (0-13 kg) non utilizzare mai questo Seggioli-
no su un sedile anteriore dotato di airbag fron-
tale. E’ possibile installare il Seggiolino sul sedile
anteriore soltanto se l’airbag frontale è stato di-
sattivato: vericare con la casa automobilistica
o sul manuale d’istruzioni dell’auto la possibilità
di disinserire l’airbag.
• Si raccomanda che tutti i passeggeri occupanti
siano informati della modalità di sgancio del
bambino in caso di emergenza.
• In Gruppo 1 (9-18 kg) se il Seggiolino viene posi-
zionato sul sedile anteriore con l’airbag frontale
attivato, per maggiore sicurezza si raccomanda
di arretrare il più possibile il sedile compatibil-
mente con la presenza di altri passeggeri sul
sedile posteriore.
• Non utilizzare mai questo Seggiolino su sedili ri-
volti lateralmente o opposti al senso di marcia.
• Installare il Seggiolino solo su sedili corretta-
mente ssati alla struttura dell’auto e rivolti nel
senso di marcia. Fare attenzione a non lasciare
sedili auto pieghevoli o rotanti non ben aggan-
ciati, in caso di incidente potrebbero costituire
un pericolo.
• Prestare attenzione a come si installa il Seggiolino
in auto in modo da evitare che un sedile mobile o
la portiera possano interferire con esso.
• Non allacciare mai il Seggiolino su un sedile auto
dotato di una cintura solo addominale (a due punti).
• Nessun Seggiolino può garantire la totale si-
curezza del bambino in caso d’incidente, ma
l’utilizzo di questo prodotto riduce il rischio di
lesioni gravi o di morte.
• Il rischio di seri danni al bambino, non solo in
caso d’incidente, ma anche in altre circostan-
ze (per es. brusche frenate, ecc.) aumenta se
le indicazioni riportate in questo manuale non
vengono seguite in modo scrupoloso: vericare
sempre che il Seggiolino sia agganciato corret-
tamente al sedile.
• Nel caso in cui il Seggiolino fosse danneggiato,
deformato o fortemente usurato, questo deve
essere sostituito, potrebbe aver perso le carat-
teristiche originali di sicurezza.
• Non effettuare modiche o aggiunte al prodot-
to senza l’approvazione del costruttore.
• Non installare accessori, parti di ricambio e
componenti non forniti dal costruttore.
• Non lasciare mai il bambino incustodito nel Seggioli-
no per nessun motivo.
• Non lasciare mai il Seggiolino sul sedile dell’au-
to non agganciato, potrebbe urtare e ferire i
passeggeri.
• Non interporre nulla, che non sia un accessorio
approvato per il prodotto, né tra il sedile auto
e il seggiolino, né tra il seggiolino e il bambino:
in caso di incidente il Seggiolino potrebbe non
funzionare correttamente.
• Nel caso in cui l’auto venisse lasciata sotto il
sole diretto si consiglia di coprire il Seggiolino.
• In seguito ad un incidente anche lieve il Seggioli-
no può subire danni non sempre visibili a occhio
nudo: è pertanto necessario sostituirlo.
• Non utilizzare Seggiolini di seconda mano:
potrebbero avere subito danni strutturali non
visibili a occhio nudo, ma compromettenti la
sicurezza del prodotto.
• La società Artsana declina ogni responsabilità
per un uso improprio del prodotto.
• La fodera può essere sostituita esclusivamente
con una approvata dal costruttore, poichè co-
stituisce una parte integrante del Seggiolino
auto. Il Seggiolino auto non deve essere mai
usato senza la fodera, per non compromettere
la sicurezza del bambino.
• Controllare che il nastro della cintura non risulti
attorcigliato ed evitare che quest’ultimo o parti
del Seggiolino vengano pizzicate tra le portiere
o sfreghino contro punti taglienti. Qualora la
cintura presenti tagli o slacciature è necessario
sostituirla.
• Vericare che non vengano trasportati, in par-
ticolare sul ripiano posteriore all’interno del
veicolo, oggetti o bagagli che non siano stati
ssati o posizionati in maniera sicura: in caso
di incidente o brusca frenata potrebbero ferire
i passeggeri.
• Assicurarsi che tutti i passeggeri della vettura uti-
lizzino la propria cintura di sicurezza sia per la pro-
pria sicurezza sia perché durante il viaggio, in caso
di incidente o brusca frenata, potrebbero ferire il
bambino.
• In caso di lunghi viaggi fate delle soste frequenti. Il
bambino si stanca molto facilmente. Per nessuna
ragione estrarre il bambino dal Seggiolino auto
mentre l’auto è in movimento. Se il bambino ha
bisogno di attenzione, è necessario trovare un po-
sto sicuro e accostare.
• Neonati prematuri nati con meno di 37 setti-
I

2
3
mane di gestazione possono essere a rischio nel
Seggiolino. Tali neonati possono avere difcoltà
respiratorie mentre sono seduti nel Seggiolino
auto. Consigliamo quindi di rivolgervi al vostro
medico o al personale dell’ospedale afnché
possano valutare il vostro bambino e racco-
mandare il Seggiolino auto adatto prima di la-
sciare l’ospedale.
ISTRUZIONI D’USO
INDICE:
• DESCRIZIONE COMPONENTI
• CARATTERISTICHE DEL PRODOTTO
• LIMITAZIONI E REQUISITI D’USO RELATIVE AL
PRODOTTO E AL SEDILE AUTO
• INSTALLAZIONE IN AUTO DEL SEGGIOLINO Gr.
0+ (0-13 kg)
• INSTALLAZIONE IN AUTO DEL SEGGIOLINO Gr.
1 (9-18 kg)
• REGOLAZIONE DELLA POSIZIONE DELLE CIN-
TURE
• ALLOGGIAMENTO DEL BAMBINO NEL SEG-
GIOLINO
• PULIZIA E MANUTENZIONE
DESCRIZIONE COMPONENTI
Fig. 1 (Fronte)
A. fodera
B. asole per la regolazione in altezza delle cinture
C. spallacci
D. cinture del seggiolino
E. bbia
F. Tasca di copertura del pulsante di regolazione
delle cinture
G. nastro di regolazione delle cinture
H. cuscino riduttore
Fig. 2 (Profilo)
I. seduta
J. base
K. maniglia di reclinazione
L. Guide per il passaggio della parte addominale
della cintura auto a 3 punti (solo installazione
in Gr. 0+)
M. Guide per il passaggio della parte addominale del-
la cintura a 3 punti (solo installazione in Gr. 1)
N. Morsetti bloccanti per la parte diagonale della
cintura auto a 3 punti (solo installazione in Gr. 1)
O. Guida di passaggio del ramo diagonale della
cintura auto (entrambe le installazioni)
P. Piastra di ssaggio delle cinture (vedi anche Fig. 22)
CARATTERISTICHE DEL PRODOTTO
• Questo Seggiolino è omologato “Gruppo 0+/1”,
per il trasporto di bambini dalla nascita no a 18
kg di peso (da 0 a 3 anni circa), nel rispetto del
regolamento europeo ECE R44/04.
• L’omologazione è di tipo “Universal”, quindi il
Seggiolino può essere utilizzato su qualsiasi
modello di automobile. ATTENZIONE! “Univer-
sal” signica che è compatibile con la maggior
parte, ma non con tutti i sedili auto.
AVVISO IMPORTANTE
1. Questo è un dispositivo di ritenuta bambini “Uni-
versale”, omologato secondo Regolamento ECE
R44/04 e compatibile con la maggior parte, ma non
tutti, i sedili auto.
2. La perfetta compatibilità è più facilmente otteni-
bile nei casi in cui il costruttore del veicolo dichiara
nel manuale veicolare che il veicolo prevede l’instal-
lazione di dispositivi di ritenuta bambini “Universali”
per la fascia d’età in questione.
3. Questo dispositivo di ritenuta è stato classicato
“Universale” secondo criteri di omologazione più
severi rispetto a modelli precedenti che non dispon-
gono del presente avviso.
4. Adatto per l’impiego nei veicoli dotati di cintura di
sicurezza a 3 punti, statica o con arrotolatore, omo-
logata in base al Regolamento UN/ECE N°16 o altri
standard equivalenti.
5. In caso di dubbio, contattare il produttore del di-
spositivo di ritenuta oppure il rivenditore.
LIMITAZIONI E REQUISITI D’USO RELATIVI
AL PRODOTTO E AL SEDILE AUTO
ATTENZIONE! Rispettare scrupolosamente le se-
guenti limitazioni e requisiti d’uso relativi al prodot-
to e al sedile auto: in caso contrario non è garantita
la sicurezza.
• Questo Seggiolino è omologato per l’utilizzo con
bambini di peso esclusivamente tra 0 e 18 kg (dalla
nascita no a 3 anni circa).
• Il sedile dell’auto deve essere dotato di cintura di
sicurezza a 3 punti, statica o con arrotolatore, omo-
logata in base al Regolamento UNI/ECE N°16 o altri
standard equivalenti (Fig. 3).
• ATTENZIONE! Non installare mai il seggiolino
con la cintura dell’auto a due punti di ancorag-
gio (Fig. 4).
• Il Seggiolino può essere installato sul sedile
anteriore lato passeggero o su uno qualsiasi dei
sedili posteriori. Non utilizzare mai questo Seg-
giolino su sedili rivolti lateralmente o opposti al
senso di marcia (Fig. 5).
• Il prodotto è destinato esclusivamente a un uso
come Seggiolino per auto e non all’utilizzo in casa.
INSTALLAZIONE IN AUTO DEL
SEGGIOLINO Gr. 0+ (0-13 kg)
ATTENZIONE! Quando utilizzato in Gr. 0+ (da 0 a
13 kg), installare sempre in senso contrario di mar-
cia. Se il sedile anteriore dell’auto è dotato di airbag,
disattivare l’airbag prima di installare il Seggiolino.
Pericolo di morte o di lesioni gravi.
ATTENZIONE! I punti attraverso i quali far passare
la cintura per l’installazione in Gr. 0+ (0-13 kg) sono
evidenziati in AZZURRO.
ATTENZIONE! Non utilizzare mai il cuscino riduttore
se il bambino ha un peso superiore ai 6 kg.

4
5
Fig. 6 – Attraverso la maniglia K, regolare il Seggioli-
no nella posizione di massima reclinazione.
Fig. 7 – Posizionare il Seggiolino sul sedile in senso
contrario di marcia.
Fig. 8 – Far passare la cintura di sicurezza a 3 pun-
ti dell’auto tra la seduta e la base del Seggiolino e
agganciarla alla bbia del sedile, facendone passare
la parte addominale attraverso le apposite guide az-
zurre L, poste nella parte posteriore dello schienale
del Seggiolino.
Fig. 9 – Tendere il più possibile la parte addominale
della cintura e farla passare all’interno dell’apposita
guida O posta dallo stesso lato di chi sta compiendo
l’installazione.
Fig. 10 – Vericare la correttezza dell’installazione,
che la cintura sia ben tesa e che il Seggiolino sia fer-
mamente ssato e aderente al sedile. Se così non fos-
se, ripetere l’operazione di installazione dall’inizio.
ATTENZIONE! Vericare sempre che la cintura sia di-
stribuita uniformemente in tutti i punti e non presenti
attorcigliamenti.
ATTENZIONE! Non far passare MAI la cintura
dell’auto in posizioni diverse da quelle indicate.
INSTALLAZIONE IN AUTO
DEL SEGGIOLINO Gr. 1 (9-18 kg)
ATTENZIONE! Quando utilizzato in gr. 1 (da 9 a 18
kg), installare sempre in senso di marcia.
Se il Seggiolino viene posizionato sul sedile ante-
riore, per maggiore sicurezza si raccomanda di arre-
trare il più possibile il sedile compatibilmente con
la presenza di altri passeggeri sul sedile posteriore e
di regolarne lo schienale nella posizione più verticale
possibile.
Se l’auto è dotata di regolatore dell’altezza della
cintura ssare questo nella posizione più bassa.
Vericare poi che il regolatore della cintura risulti
in posizione arretrata (o al massimo allineata) allo
schienale del sedile dell’auto.
ATTENZIONE! I punti attraverso i quali far passare la
cintura per l’installazione in Gr. 1 (9-18 kg) sono evi-
denziati in ROSSO.
Attraverso la maniglia K, regolare il Seggiolino nella
posizione di massima reclinazione (Fig. 6).
Fig. 11 – Posizionare il Seggiolino sul sedile prescelto
per l’installazione in senso di marcia.
Fig. 12 – Impugnare la cintura di sicurezza a 3 punti
dell’auto e farla passare tra la base e la seduta, ag-
ganciandola sul lato opposto.
Fig. 13 – Far passare il ramo orizzontale della cintura
(porzione addominale) al di sotto dei due appositi
passaggi-cintura M di colore rosso.
Fig. 14 – Tendere il più possibile la cintura impugnan-
dola dalla parte diagonale (toracica).
Fig. 15 – Premere con un dito il pulsante posto sul
morsetto bloccante N posto sul lato di chi compie
l’installazione e farvi passare all’interno il ramo dia-
gonale della cintura. Rilasciare poi il pulsante che
ritorna automaticamente in posizione di blocco.
Tendere nuovamente il più possibile la cintura.
Fig. 16 – Far passare la parte superiore della cintura
diagonale all’interno della guida O.
Fig. 17 – Tendere nuovamente il più possibile la cin-
tura facendo aderire bene il Seggiolino al sedile, se
necessario salendo con un ginocchio sul Seggiolino.
Fig. 18 – Vericare la correttezza dell’installazione, che
la cintura sia ben tesa e che il Seggiolino sia ferma-
mente ssato e aderente al sedile. Se così non fosse,
ripetere l’operazione di installazione dall’inizio.
ATTENZIONE! Vericare sempre che la cintura sia
distribuita uniformemente in tutti i punti e non pre-
senti attorcigliamenti.
ATTENZIONE! Non far passare MAI la cintura
dell’auto in posizioni diverse da quelle indicate.
REGOLAZIONE DELLA POSIZIONE DELLE CIN-
TURE
ATTENZIONE! Le cinture devono sempre essere
adattate alla crescita del bambino.
Fig. 19 - Per una corretta regolazione, le cinture de-
vono uscire dallo schienale all’altezza delle spalle del
bambino.
Per eseguire la regolazione, operare come di seguito
illustrato:
Attraverso la maniglia K, regolare il Seggiolino nella
posizione di massima reclinazione (Fig. 6).
Fig. 20 – All’interno dell’apposita tasca F premere il
pulsante di regolazione delle cinture e contempora-
neamente impugnare le 2 cinture D del seggiolino al
di sotto degli spallacci e tirare verso di sé, in modo
da allentarle.
Fig. 21 - Sganciare la cintura di sicurezza, premendo
il pulsante rosso della bbia.
Fig. 22 - Slare i due lembi delle cinture dalla piastra
di ssaggio P posta dietro allo schienale.
Fig. 23 - Tirare dal davanti le cinture in modo da s-
larle dallo schienale e dagli spallacci.
Fig. 24 – Rimuovere gli spallacci estraendone, ruo-
tandole, le piastrine di ssaggio dalle rispettive asole
dello schienale.
Fig. 25 – Reintrodurre le piastrine dei due spallac-
ci all’interno della rispettiva asola dello schienale
all’altezza desiderata.
Fig. 26 – Agganciare le due linguette nella bbia per
vericare più facilmente il corretto orientamento del
nastro delle cinture.
Fig. 27 - Inlare i due lembi delle cinture prima attra-
verso gli spallacci e poi nelle asole dello schienale e
nelle pastrine di ssaggio degli spallacci.
Fig. 28 - Inlare nuovamente i due lembi delle cin-
ture nella piastra.
Fig. 29 - Vericare che sia la piastra sia i lembi delle
cinture si presentino come illustrato in gura.
ATTENZIONE! Vericare che le cinture non risultino
attorcigliate.
ALLOGGIAMENTO DEL
BAMBINO NEL SEGGIOLINO
Allentare e sganciare le cinture del Seggiolino esat-

4
5
tamente come illustrato all’interno del paragrafo
“REGOLAZIONE DELL’ALTEZZA DELLE CINTURE”,
Fig. 20 e 21.
Fig. 30 – Far sedere il bambino sul seggiolino.
ATTENZIONE! Vericare sempre che il bambino sia
seduto con il corpo ben aderente allo schienale del
Seggiolino e con lo spartigambe posizionato corret-
tamente.
Fig. 31 – Prendere le cinture e unire le due linguette
della bbia.
Fig. 32 – Spingere con decisione le due linguette
della bbia unite tra loro all’interno della bbia
no a sentire un “click” ben udibile. Per garantirne
la sicurezza, le due linguette della bbia sono state
progettate in modo da impedire di agganciarne una
sola o una alla volta.
Fig. 33 - Per effettuare il tensionamento delle cin-
ture del Seggiolino, tirare il nastro di regolazione G
delle cinture no a farle aderire bene al corpo del
bambino.
ATTENZIONE! Le cinture devono risultare ben tese
e aderenti al bambino, ma non troppo: all’altezza
delle spalle deve essere possibile inlare un dito tra
cintura e bambino.
ATTENZIONE! Vericare che le cinture non risultino
attorcigliate.
PULIZIA E MANUTENZIONE
Le operazioni di pulizia e manutenzione devono es-
sere effettuate solo da un adulto.
PULIZIA DELLA FODERA
La fodera del Seggiolino è completamente sfodera-
bile e lavabile a mano o in lavatrice a 30°C. Per il
lavaggio seguire le istruzioni riportate sull’etichetta
del rivestimento contenente i seguenti simboli per
il lavaggio:
Lavaggio in lavatrice a 30°C
Lavare a mano in acqua fredda
Non candeggiare
Non lavare a secco
Non asciugare meccanicamente
Non stirare
Non usare mai detergenti abrasivi o solventi. Non cen-
trifugare la fodera e lasciarla asciugare senza strizzarla.
Per togliere la fodera è necessario prima slare le cin-
ture, operazione per la quale si rimanda al precedente
paragrafo “REGOLAZIONE DELL’ALTEZZA DELLE CIN-
TURE”, nei punti descritti da Fig. 20 a Fig. 23: Una volta
ultimata la rimozione delle cinture dallo schienale:
Fig. 34 - rimuovere la fodera dalla seduta del Seg-
giolino slando gli spallacci e i due rami cintura dalle
rispettive asole poste nella fodera stessa.
Per rimontare la fodera e le cinture è necessario:
Fig. 35 - riposizionare la fodera sulla seduta del
Seggiolino facendo passare i due rami cinture del
Seggiolino all’interno delle rispettive asole poste nel
punto corrispondente della fodera.
Successivamente ripetere esattamente le operazioni
descritte da Fig. 26 a Fig. 29 all’interno del paragrafo
“REGOLAZIONE DELL’ALTEZZA DELLE CINTURE”.
ATTENZIONE! Vericare che le cinture non risultino
attorcigliate.
PULIZIA DELLE PARTI PLASTICHE E DI METALLO
Per la pulizia delle parti in plastica o in metallo ver-
niciato utilizzare solamente un panno umido. Non
utilizzare mai detergenti abrasivi o solventi. Le parti
mobili del Seggiolino non devono essere in alcun
modo lubricate.
CONTROLLO DELL’INTEGRITA’ DEI COMPONENTI
Si raccomanda di vericare regolarmente l’integrità
e lo stato di usura dei seguenti componenti:
• Fodera: vericare che non fuoriescano imbotti-
ture o che non ci sia rilascio di parti di esse. Veri-
care lo stato delle cuciture che devono essere
sempre integre.
• Cinture: vericare che non ci sia un anomalo
sbramento della trama tessile con evidente
riduzione dello spessore in corrispondenza del
nastro di regolazione, dello spartigambe, sui
rami spalle e nella zona della piastra di regola-
zione delle cinture.
• Plastiche: vericare lo stato di usura di tutte le par-
ti in plastica che non devono presentare evidenti
segni di danneggiamento o di scolorimento.
ATTENZIONE! Nel caso in cui il Seggiolino risultasse
deformato o fortemente usurato deve essere sosti-
tuito: potrebbe aver perso le caratteristiche originali
di sicurezza.
CONSERVAZIONE DEL PRODOTTO
Quando non installato sull’auto si raccomanda di
conservare il Seggiolino in un posto asciutto, lonta-
no da fonti di calore e al riparo da polvere, umidità e
luce solare diretta.
SMALTIMENTO DEL PRODOTTO
Raggiunto il limite di utilizzo previsto per il Seggioli-
no, interrompere l’uso dello stesso e depositarlo tra
i riuti. Per motivi di rispetto dell’ambiente, separare
i diversi tipi di riuti secondo quanto previsto dalla
normativa vigente nel proprio Paese.
PER ULTERIORI INFORMAZIONI
Artsana S. P. A. - Servizio Clienti
Via Saldarini Catelli, 1
22070 GRANDATE – Como – Italia
Telefono: 800-188 898 - www.chicco.com
40°C

6
7
Instructions for use
VERY IMPORTANT: TO BE
READ IMMEDIATELY
• lease follow carefully these instructions on how
to assemble and t the product. The product
must not be used by anybody who has not read
these instructions.
• Keep this instruction booklet for future use.
• Each country has different safety laws and regu-
lations for the transportation of children in cars.
For this reason, it is recommended that you
should contact your local authority for further
information.
WARNING! According to car accident statistics, •
the rear seats of a car are generally safer than
the front seat: it is therefore recommended to
t the Child Car Seat into the rear seats of the
car. In particular, the central rear seat is the sa-
fest, if it is tted with a 3-point safety belt.
• WARNING! DANGER! For Group 0+ (from 0 up
to 13 kg): Never t this Child Car Seat into a front
seat equipped with front airbag. Fit the Child Car
Seat into the front seat only if the frontal airbag
has been deactivated: check with the car manu-
facturer, or in the car instructions manual, whe-
ther the airbag can be deactivated.
• Ensure that all the passengers of the vehicle
know how to release the child from the Child
Car Seat in case of emergency.
• Use for group 1 (from 9 up to 18 kg): If the Child
Car Seat is tted in the front seat of the car with
the frontal airbag deactivated, it is recommen-
ded to push the seat back as much as possible,
bearing in mind the comfort of the passenger
sitting in the seat directly behind it.
• Never use this Child Car Seat on side-facing or
rear-facing car seats.
• Fit the Child Car Seat only in front-facing seats
that are correctly secured in the car. Never lea-
ve folding or rotating car seats unsecured, they
may be a source of danger in the event of an
accident.
• Pay attention when tting the Child Car Seat
into the car to avoid that a mobile car seat or
car door may interfere with it.
• Never t the Child Car Seat into a car seat if it
is only equipped with a (2-point) lap belt.
• No Child Car Seat can guarantee the total sa-
fety of your child in the event of an accident,
but the use of this product reduces the risk of
serious injuries or death.
• The risk of serious injuries to the child increa-
ses, not only in the case of accidents, but also in
other circumstances (i.e.: sudden braking, etc.)
if these instructions are not followed carefully:
always check that the Child Car Seat is secured
correctly to the car seat.
• If the Child Car Seat is damaged, deformed or
worn out, it must be replaced: it may no longer
comply with the original safety standards.
• This product must not be modied in any way,
unless the modication is approved by the ma-
nufacturer.
• Do not t any accessories, spare parts or com-
ponents not supplied or approved by the manu-
facturer.
• Never leave the child unattended in the Child
Car Seat for any reason.
• Never leave the Child Car Seat unsecured in the
car seat, it may hurt or injure the passengers.
• Do not insert anything between the car seat
and the child car seat, or between the child car
seat and the child, unless it is an accessory ap-
proved by the manufacturer: in case of accident
the Child Car Seat may not operate correctly.
• In case the car is left under direct sunlight, it is
recommended to cover the Child Car Seat.
• An accident, even a minor incident, may cause
damage to the Child Car Seat, which is not visi-
ble to the naked eye: it is therefore necessary to
replace the Child Car Seat.
• Do not use second-hand Child Car Seats: they
may have suffered structural damage not visi-
ble to the naked eye, which could compromise
the safety of the product.
• Artsana declines all responsibility for any inap-
propriate use of the product.
• The fabric cover can be replaced only with ano-
ther fabric cover approved by the manufacturer,
as it is an integral part of the Child Car Seat. For
your child’s safety, the Child Car Seat must ne-
ver be used without fabric cover.
• Check that the safety harness strap is not twisted
to avoid that the strap or any parts of the Child
Car Seat remain trapped between the car doors,
or rub against cutting edges. If the safety harness
is cut or frayed, it must be replaced.
• Do not transport loose or unsecured objects or
baggage on the back shelf of the vehicle: in the
event of an accident or sudden braking, they
may injure the passengers.
• Ensure that all the car passengers fasten their seat
belt, for their own safety and because, during the
journey, they may injure the child in the event of
an accident or sudden braking of the car.
• On long journeys, it is recommended to make
frequent stops: children tire very easily. Do not
remove the child from the Child Car Seat while
travelling. If the child needs attention, it is ne-
cessary to stop the car in a safe place.
• Premature babies, born after less than 37 weeks
of pregnancy, may be at risk in the Child Car
Seat. These newborn babies may have brea-
thing difculties when seated in the Child Car
Seat. We recommend to consult your doctor, or
the hospital’s staff, to have a medical opinion
on your child, and whether it can be carried in
the Child Car Seat when leaving the hospital.
GB

6
7
INSTRUCTIONS FOR USE
CONTENTS:
• DESCRIPTION OF COMPONENTS
• PRODUCT CHARACTERISTICS
• PRODUCT AND CAR SEAT USE RESTRICTIONS
AND REQUIREMENTS
• HOW TO FIT THE CHILD CAR SEAT INTO THE
CAR FOR GROUP 0+ (FROM 0 UP TO 13 kg)
• HOW TO FIT THE CHILD CAR SEAT INTO THE
CAR FOR GROUP 1+ (FROM 9 UP TO 18 kg)
• HOW TO ADJUST THE SAFETY HARNESS
• SEATING THE CHILD IN THE CHILD CAR SEAT
• CLEANING AND MAINTENANCE
DESCRIPTION OF COMPONENTS
Diag. 1 (Front)
A. Fabric cover
B. Holes for adjusting the height of the safety harness
C. Shoulder straps
D. Child car seat safety harness
E. Buckle
F. Restraint harness adjustment button compart-
ment cover
G. Strap for adjusting the safety harness
H. Insert pillow
Diag. 2 (Profile)
I. Seat
J. Base
K. Reclining handle
L. Guides for inserting the lap section of the
3-point car safety belt (only for tting the Child
Car Seat for Group 0+)
M. Guides for inserting the lap section of the
3-point car safety belt (only for tting the Child
Car Seat for Group 1)
N. Locking clamps for diagonal section of the
3-point car safety belt (only for tting the Child
Car Seat for Group 1)
O. Guide for inserting the diagonal section of the
car safety belt (for both groups)
P. Plate for locking the belts (see also Diag. 22)
PRODUCT CHARACTERISTICS
• This Child Car Seat is approved for “Group
0+/1”, for the transport of children from birth up
to 18 Kg of weight, and conforms to European
norm ECE R 44/04.
• This Child Car Seat has been classied as “Uni-
versal”, and can therefore be tted into any car
model. WARNING! “Universal” means that it
ts most, but not all, car seats.
IMPORTANT WARNING
1. This is a «Universal“ child restraint. It is approved
to Regulation No. 44.04 series of amendments, for
general use in vehicles, and it will t most, but not
all car seats.
2. A correct t is likely if the vehicle manufacturer
has declared that the vehicle is capable of accepting
a “Universal” child restraint for this age group.
3. This child restraint has been classied as “Uni-
versal” under more stringent conditions than those
that were applied to earlier designs not displaying
this notice.
4. Only suitable if the vehicle is tted with a 3-point
static or 3-point retractor safety belt approved to
UN/ECE Regulation No. 16, or other equivalent
standards.
5. If in doubt, consult either the child restraint ma-
nufacturer or the retailer.
PRODUCT AND CAR SEAT USE RESTRICTIONS
AND REQUIREMENTS
WARNING! Please read carefully the following pro-
duct and car seat use restrictions and requirements.
Failure to comply with these instructions may affect
the safety of your child.
• This Child Car Seat is approved for use only for
children between 0 and 18 kg of weight (from
birth up to 3 years of age, approximately).
• The car seat must be tted with a 3-point sta-
tic or 3-point retractor safety belt, approved to
UNI/ECE No. 16 regulation or other equivalent
standards (Diag. 3).
• WARNING! Never t the Child Car Seat to a
seat that is only equipped with a 2-point safety
belt (Diag. 4).
• The Child Car Seat may be tted into the front
passenger seat or any rear seat. Never use this
Child Car Seat on side-facing or rear-facing car
seats (Diag. 5).
• This product is expressly intended to be used only
as a Child Car Seat; it should not be used indoors.
HOW TO FIT THE CHILD CAR SEAT INTO THE
CAR FOR GROUP 0+ (From 0 up to 13 kg)
WARNING! When it is used for Group 0+ (from 0
up to 13 kg), always t the Child Car Seat in a re-
arward-facing direction. If the front seat of the car
is equipped with an airbag, deactivate the airbag
before tting the Child Car Seat. Danger of death or
serious injuries.
WARNING! The points through which the safety belt
must pass for tting for Group 0+ (from 0 up to 13
kg) are highlighted in LIGHT BLUE.
WARNING! Never use the insert pillow if the child
weighs over 6 kg.
Diag. 6 – Adjust the Child Car Seat to the most recli-
ned position with the handle K.
Diag. 7 – Position the Child Car Seat on the car seat
in a rearward-facing position.
Diag. 8 – Insert the 3-point safety belt of the car
between the seat and the base of the Child Car Seat,
passing the lap section through the appropriate
light blue guides L, located at the rear of the Child
Car Seat backrest; then fasten the safety belt to the
buckle of the seat.
Diag. 9 – Tension the lap section of the belt as much
as possible, and insert it inside the appropriate guide

8
9
O, located on the same side where you are tting
the Child Car Seat.
Diag. 10 – Check that the Child Car Seat is tightly
and correctly tted into the car seat, and that the
safety belt is well tensioned. If the Child Car Seat is
not tightly and safely tted into the car seat, repeat
the installation.
WARNING! Always check that all parts of the safety
belt are well tensioned and that it is not twisted.
WARNING! NEVER use the safety belt in positions
other than those indicated in these instructions.
HOW TO FIT THE CHILD CAR SEAT INTO THE
CAR FOR GROUP 1 (From 9 up to 18 kg)
WARNING! When it is used for Group 1 (from 9 up
to 18 kg), always t the Child Car Seat in a forward-
facing direction.
If the Child Car Seat is tted in the front seat of the
car, it is recommended to push the seat back as
much as possible, bearing in mind the comfort of the
passenger sitting in the seat directly behind it, and to
adjust the backrest in the most vertical position.
If the car is equipped with a safety belt height adju-
ster, x it in the lowest position. Then check that the
car seat safety belt adjuster is either in a backward
position with respect to the backrest of the car seat
(or at least aligned to it).
WARNING! The points through which the safety belt
must pass for tting for Group 1 (from 9 up to 18 kg)
are highlighted in RED.
Adjust the Child Car Seat to the most reclined posi-
tion (Diag. 6), with the handle K.
Diag. 11 – Position the Child Car Seat on the selected
car seat in the forward-facing position.
Diag. 12 – Hold the 3-point safety belt of the car and
insert it between the base and seat; then fasten it to
the opposite side.
Diag. 13 – Pass the horizontal section of the safety
belt (lap section) under the two red belt guides M.
Diag. 14 – Tension the safety belt as much as pos-
sible, holding it from the diagonal section (thoracic
section).
Diag. 15 – Press the button located on the locking
clamp N, located on the side where you are tting
the child car seat; then insert the diagonal section
of the belt into the clamp. Release the button, which
will automatically return to the lock position. Ten-
sion the safety belt as much as possible.
Diag. 16 – Insert the upper part of the diagonal belt
inside the guide O.
Diag. 17 – Tension the belt as much as possible, ensu-
ring that the Child Car Seat adheres correctly to the car
seat. If necessary, carry out this operation exercising
some pressure on the Child Car Seat with your knee.
Diag. 18 – Check that the Child Car Seat is tightly
and correctly tted into the car seat, and that the
safety belt is well tensioned. If the Child Car Seat is
not tightly and safely tted into the car seat, repeat
the installation.
WARNING! Always check that all parts of the safety
belt are well tensioned and that it is not twisted.
WARNING! NEVER use the safety belt in positions
other than those indicated in these instructions.
HOW TO ADJUST THE SAFETY HARNESS
WARNING! The safety harness must always be adju-
sted to suit the child’s growth.
Diag. 19 – To adjust the safety harness correctly,
the straps must come out from the backrest, at the
height of the child’s shoulders.
Adjust the safety harness as illustrated below:
Adjust the Child Car Seat to the most reclined posi-
tion with the handle K (Diag. 6).
Diag. 20 – Press the harness adjustment button
found inside its compartment F and, at the same
time, take hold of the two child car seat harness
straps D, below the shoulder straps, and pull them
towards you to slacken them.
Diag. 21 – Unfasten the safety harness, pressing the
red button on the buckle.
Diag. 22 - Remove the two harness straps from the
locking plate P, located on the rear of the backrest.
Diag. 23 – Pull the harness straps from the front
to remove them from the backrest and shoulder
straps.
Diag. 24 – Remove the shoulder straps, turning and
removing the locking plates from the respective ho-
les on the backrest.
Diag. 25 – Reinsert the plates of the shoulder straps
at the desired height, inside the respective holes on
the backrest.
Diag. 26 – Lock the two tabs into the buckle. This will
help you to check that the harness strap is inserted
in the correct position.
Diag. 27 – First insert the two harness straps through
the shoulder straps; then insert them into the holes
located on the backrest and into the locking plates
of the shoulder straps.
Diag. 28 – Reinsert the two harness straps into the
plate.
Diag. 29 - Check that both the plate and harness
straps are positioned as shown in the diagram.
WARNING! Check that the harness is not twisted.
SEATING THE CHILD IN THE CHILD CAR SEAT
Loosen and unfasten the harness of the Child Car
Seat, as illustrated in the “HOW TO ADJUST THE
HEIGHT OF THE SAFETY HARNESS” paragraph,
Diag. 20 and 21.
Diag. 30 – Sit the child in the Child Car Seat.
WARNING! Always check that the child is sitting
with its back correctly placed against the backrest
of the Child Car Seat, and that the crotch strap is in
the correct position.
Diag. 31 – Take the harness and join the two buckle
tabs.
Diag. 32 – Firmly push the two joined buckle tabs
inside the buckle, until a “click” is heard. To ensure
maximum safety, the two buckle tabs have been de-
signed so as to prevent the locking of a single tab, or
one tab at a time.

8
9
Diag. 33 – To tension the safety harness of the Child
Car Seat, pull the adjustment strap G of the harness,
until the harness straps adhere to the child’s body
correctly.
WARNING! Do not over-tighten the harnesses: If
you can insert one nger between the harness and
your child’s shoulders, it means that it is tightened
correctly.
WARNING! Check that the harness is not twisted.
CLEANING AND MAINTENANCE
All cleaning and maintenance operations must only
be carried out by an adult.
HOW TO CLEAN THE FABRIC COVER
The fabric cover of the Child Car Seat can be removed
and cleaned by hand or in a washing machine at 30°C.
Please refer to the following care label symbols for in-
structions on how to clean the fabric cover:
Never use abrasive detergents or solvents. Do not
spin the fabric cover, let it dry without wringing. To
remove the fabric cover, it is rst necessary to re-
move the safety harness. To carry out this operation,
see the points described from Diag. 20 to Diag. 23 in
the “HOW TO ADJUST THE HEIGHT OF THE SAFETY
HARNESS” paragraph:
Once the safety harness has been removed from the
backrest:
Diag. 34 – Take off the fabric cover from the seat of
the Child Car Seat, removing the shoulder straps and
the two harness straps from the respective holes,
located on the fabric cover.
To replace the fabric cover and harness straps, pro-
ceed as follows:
Diag. 35 – Fit the fabric cover on the seat of the Child
Car Seat, inserting the two harness straps inside
the respective holes, located on the corresponding
points of the fabric cover.
Then carry out the operations described from
Diag. 26 to Diag. 29, in the “HOW TO ADJUST THE
HEIGHT OF THE SAFETY HARNESS” paragraph.
WARNING! Check that the harness is not twisted.
HOW TO CLEAN THE
PLASTIC OR METAL PARTS
Clean the plastic and coated metal parts only with
a damp cloth. Never use abrasive detergents or sol-
vents.
The movable parts of the Child Car Seat must not
be lubricated.
Clean in a washing machine at 30°C
Wash by hand
Do not bleach
Do not dry clean
Do not tumble dry
Do not iron
CHECKING THE CONDITION
OF THE COMPONENTS
It is recommended to check regularly the condition
of the following components to ensure that they are
not damaged or worn out:
• Fabric cover: Check that the padding does not
come out from the seams. Check the condition
of the seams: they must always be intact and
undamaged.
• Harness: Check that the fabric weft is not fra-
yed or the harness strap worn out in the parts
corresponding to the adjustment strap, crotch,
shoulders and harness adjustment plate.
• Plastic parts: Check that the plastic parts are
not worn out, damaged or faded.
CAUTION! If the Child Car Seat is deformed or worn
out, it must be replaced: it may no longer comply
with the original safety standards.
STORING THE PRODUCT
When it is not tted into the car, it is recommended
to store the Child Car Seat in a dry place, away from
sources of heat and to protect it from dust, humidity
and direct sunlight.
PRODUCT DISPOSAL
When the Child Car Seat no longer complies with the
original safety standards, stop its use and dispose of
it at an appropriate collection point. Dispose of the
product as laid down in the environmental norms in
force in the Country of use.
FOR FURTHER INFORMATION,
PLEASE CONTACT:
Chicco UK Ltd
Prospect Close
Lowmoor Road Business Park
Kirkby in Asheld
Nottinghamshire NG17 7LF
Customer Services Helpline Tel: 01623 750870
(ofce hours only)
www.chicco.com
40°C

10
11
Notice d‘instructions
TRES IMPORTANT : A LIRE IMMEDIATEMENT
• Pour le montage et l’installation du siège-auto,
suivre scrupuleusement les instructions. Lire
attentivement et intégralement la notice avant
d’utiliser le produit.
• Conserver cette notice d’instructions pour tou-
te utilisation ultérieure.
• Chaque pays a des lois et des règlements diffé-
rents en matière de sécurité pour le transport
des enfants en voiture. Par conséquent, il est
conseillé de contacter les autorités locales pour
plus d’informations.
ATTENTION ! Les statistiques sur les accidents •
montrent qu’en général les sièges arrière des vé-
hicules sont plus sûrs que le siège avant : nous
conseillons donc d’installer le siège-auto sur l’un
des sièges arrière. Le plus sûr est le siège arrière
central, s’il est muni d’une ceinture à 3 points.
• ATTENTION ! DANGER ! Pour le Groupe 0+
(0-13 kg) ne jamais utiliser ce siège-auto sur un
siège avant muni d’un airbag passager. On peut
installer le siège-auto sur le siège avant après
avoir désactivé l’airbag : vérier auprès du fabri-
cant automobile ou sur le manuel du véhicule
s’il est possible de désactiver l’airbag.
• Nous recommandons d’informer tous les pas-
sagers du véhicule sur la façon de détacher le
siège-auto en cas d’urgence.
• Pour le Groupe 1 (9-18 kg), si le siège-auto est
installé sur le siège avant avec l’airbag activé,
nous recommandons, pour plus de sécurité, de
reculer le siège de la voiture sans gêner les pas-
sagers du siège arrière.
• Ne jamais utiliser ce siège-auto sur des sièges
tournés sur le côté ou dos à la route.
• Installer le siège-auto uniquement sur des siè-
ges correctement xés à la structure de la voi-
ture et tournés face à la route. Attention à ne
pas laisser les sièges de la voiture pliés, tournés
sur le côté ou encore mal accrochés car, en cas
d’accident, ils pourraient constituer une source
de danger.
• Veiller à installer le siège-auto dans la voiture
en évitant qu’un siège mal xé ou qu’une por-
tière n’interfèrent avec le siège-auto.
• Ne jamais xer le siège-auto sur un siège de
voiture muni uniquement d’une ceinture abdo-
minale (à deux points).
• Aucun siège-auto ne peut garantir la sécurité
totale de l’enfant en cas d’accident, toutefois
l’utilisation de ce produit réduit le risque de
blessures graves mortelle.
• Le risque de blessures graves pour l’enfant, pas
seulement en cas d’accident, mais aussi dans
d’autres circonstances (ex. coups de frein brus-
ques, etc.), si on ne suit pas scrupuleusement
les instructions de ce manuel : toujours s’assu-
rer que le siège-auto est correctement xé au
siège du véhicule.
• Si le siège-auto est endommagé, déformé ou
fortement usé, il faut le changer car il pourrait
avoir perdu ses caractéristiques de sécurité
d’origine.
• Ne pas faire de modications sur le produit sans
l’approbation préalable du fabricant.
• Ne pas intégrer d’accessoires, de pièces de rechan-
ge et d’éléments non fournis par le fabricant.
• Ne jamais laisser l’enfant sans surveillance
dans le siège-auto.
• Ne jamais laisser le siège-auto détaché du siège
de la voiture car il pourrait heurter et blesser les
passagers.
• Ne rien mettre, excepté un accessoire approuvé
pour le produit, entre le siège du véhicule et le
siège auto, ni entre le siège-auto et l’enfant : en
cas d’accident, le siège-auto Siège Auto pourrait
ne pas fonctionner correctement.
• Si on doit laisser la voiture exposée au soleil,
nous conseillons de couvrir le siège-auto.
• A la suite d’un accident, même léger, le siège-
auto pourrait avoir subi des dommages invisi-
bles à l’œil nu : il faut donc le remplacer.
• Ne pas utiliser de siège-auto d’occasion : ils
pourraient avoir subi des dommages structu-
raux invisibles à l’œil nu susceptibles de com-
promettre la sécurité du produit.
• La société Artsana décline toute responsabilité
en cas de mauvaise utilisation du siège-auto.
• On ne peut remplacer la housse du siège-auto
que par une housse approuvée par le fabricant
car elle fait partie intégrante du siège-auto. Ne
jamais utiliser le siège-auto sans sa housse pour
ne pas compromettre la sécurité de l’enfant.
• S’assurer que le harnais de sécurité n’est pas en-
tortillée et ne pas laisser ce dernier ou des par-
ties du siège-auto se coincer dans les portières
ou frotter contre des arêtes tranchantes. Si les
harnais présente des coupures ou s’efloche, il
faut la remplacer.
• Ne pas transporter, en particulier sur la plage
arrière de la voiture, d’objets ou de bagages qui
n’avaient pas été attachés ou positionnés de fa-
çon sûre: en cas d’accident ou de coup de frein
brusque, les passagers pourraient être blessés.
• S’assurer que tous les passagers de la voiture
mettent leur ceinture de sécurité : en cas d’acci-
dent ou de coup de frein brusque, ils pourraient
blesser l’enfant.
• Pour les longs voyages, il faut s’arrêter fré-
quemment. L’enfant se fatigue très facilement.
Ne jamais retirer l’enfant du siège-auto lorsque
le véhicule est en marche. Si l’enfant a besoin
d’attentions, trouver un endroit sûr et s’arrêter
sur le bas-côté.
• Il ne vaut mieux pas installer les nouveau-nés
prématurés de moins de 37 semaines de ges-
tation sur un siège-auto. Ces enfants peuvent
F

10
11
avoir des difcultés respiratoires une fois instal-
lés sur le siège-auto. Nous conseillons donc de
demander un avis médical quant au siège-auto
le mieux adapté au transport de votre enfant.
MODE D’EMPLOI
INDEX :
• DESCRIPTION DES ELEMENTS
• CARACTERISTIQUES DU PRODUIT
• LIMITATIONS ET CONDITIONS D’EMPLOI LIEES
AU SIEGE-AUTO ET AU SIEGE DE LA VOITURE
• INSTALLATION DANS LA VOITURE DU SIEGE-
AUTO GR. 0+ (0-13 KG)
• INSTALLATION DANS LA VOITURE DU SIEGE-
AUTO GR. 1 (9-18 KG)
• REGLAGE DE LA POSITION DES HARNAIS
• INSTALLATION DE L’ENFANT DANS LE SIEGE-
AUTO
• NETTOYAGE ET ENTRETIEN
DESCRIPTION DES ELEMENTS
Fig. 1 (Vue de face)
A. housse
B. fentes pour le réglage en hauteur des harnais
C. couvre-harnais
D. harnais du siège-auto
E. boucle
F. Poche de protection du bouton de réglage des
ceintures
G. courroie de réglage des harnais
H. coussin réducteur
Fig. 2 (De prol)
I. assise
J. base
K. poignée d’inclinaison
L. guides de passage de la ceinture abdominale
à 3 points de la voiture (installation en Gr. 0+
seulement)
M. guides de passage de la ceinture abdominale à 3
points de la voiture (installation en Gr. 1 seulement)
N. pinces de blocage pour la ceinture diagonale à 3
points de la voiture (installation en Gr. 1 seule-
ment)
O. guide de passage de la ceinture diagonale de la
voiture (dans les deux installations)
P. plaque de xation des harnais du siège-auto (cf.
aussi Fig. 22)
CARACTERISTIQUES DU PRODUIT
• Cesiège-autohomologué“Groupe0+/1”,pour
letransportdesenfantsdelanaissanceàun
poidsde18kg(de0à3ansenviron),confor-
mémentàlanormeeuropéenneECER44/04.
• L’homologationestdutype“Universel”,cequi
permetd’utiliserlesiège-autosurn’importe
quelmodèledevoiture.ATTENTION!“Universel”
signiequ’ilestcompatibleaveclaplupartdes
siègesdevoituremaispasavectous.
AVIS IMPORTANT
1. Il s’agit d’un dispositif de retenue “Universel” pour
enfant, homologué selon le Règlement ECE R44/04
et compatible avec la plupart des sièges de voiture,
mais pas avec tous.
2. Pour s’assurer de la compatibilité du siège-auto et
du véhicule, vérier dans le manuel de ce dernier la
présence de l’indication « Universels » pour la tran-
che d’âge en question.
3. Ce dispositif de retenue a été classé “Universel”
selon les critères d’homologation les plus sévères
par rapport à des critères précédents qui ne dispo-
sent pas de cet avis.
4. Uniquement adapté aux véhicules munis de cein-
tures de sécurité à 3 points, statiques ou à enrou-
leurs, homologué conformément à la norme UN/
ECE N°16 ou à d’autres normes équivalentes.
5. En cas de doute, contacter le fabricant du siège-
auto ou le revendeur.
LIMITATIONS ET CONDITIONS D’EMPLOI LIEES AU
SIEGE-AUTO ET AU SIEGE DE LA VOITURE
ATTENTION ! Suivre scrupuleusement les limitations
et conditions d’emploi suivantes concernant le siè-
ge-auto et le siège de voiture : dans le cas contraire,
la sécurité n’est plus pas garantie.
• Ce siège-auto est homologué pour des enfants
de la naissance à un poids de 18 kg (de la nais-
sance à 3 ans).
• Le siège de la voiture doit être muni d’une ceinture
de sécurité à trois points, statique ou à enrouleur,
homologuée conformément à la norme UNI/ECE
N°16 ou à d’autres normes équivalentes (Fig. 3).
• ATTENTION ! Ne jamais installer le siège-auto
avec une ceinture de sécurité à deux points
d’ancrage (Fig. 4).
• On peut installer le siège-auto sur le siège avant
côté passager ou sur un siège arrière. Ne jamais
utiliser ce siège-auto sur des sièges tournés sur
le côté ou dos à la route (Fig. 5).
• Ce produit doit servir uniquement de siège-auto
et ne pas être utilisé à la maison.
INSTALLATION EN VOITURE
DU SIEGE-AUTO GR. 0+ (0-13 KG)
ATTENTION ! Quand on utilise le siège-auto pour
le Gr. 0+ (de 0 à 13 kg), toujours l’installer dos à la
route. Si le siège avant de la voiture est muni d’un
airbag, désactiver celui-ci avant d’installer le siège-
auto. Danger de mort ou de blessures graves.
ATTENTION ! Les points à travers lesquels on doit
faire passer la ceinture pour l’installation en Gr. 0+
(0-13 kg) sont indiqués en BLEU CIEL.
ATTENTION ! ne pas utiliser de coussin réducteur si
l’enfant pèse plus de 6 kg.
Fig. 6 – A l’aide de la poignée K, incliner le siège-auto
au maximum.
Fig. 7 –Installer le siège-auto sur le siège de la voiture
dos à la route.
Fig. 8 – Faire passer la ceinture de sécurité à 3 points

12
13
entre l’assise et la base du siège-auto et l’accrocher
à la boucle du siège de la voiture, en en faisant passer
la partie abdominale à travers les guides bleu ciel L
prévues à cet effet qui se trouvent dans la partie ar-
rière du dossier du siège-auto.
Fig. 9 – Tendre la ceinture abdominale au maximum
et la faire passer à travers le guide O prévue à cet
effet qui se trouve du même côté que la personne
qui effectue l’installation.
Fig. 10 – S’assurer que l’installation est correcte, que
la ceinture est bien tendue et que le siège-auto est
solidement xé et adhère bien au siège de la voi-
ture. Dans le cas contraire, recommencer l’opération
d’installation.
ATTENTION ! Toujours s’assurer que la ceinture de
sécurité est correctement tendue et ne soit pas en-
tortillée.
ATTENTION ! Ne JAMAIS faire passer la ceinture de
sécurité ailleurs qu’aux points indiqués.
INSTALLATION EN VOITURE
DU SIEGE-AUTO GR. 1 (9-18 KG)
ATTENTION ! Quand on l’utilise pour le Gr. 1 (de 9 à
18 kg), toujours l’installer face à la route. Si on met le
siège-auto sur le siège avant de la voiture, pour plus
de sécurité nous recommandons de reculer ce siège
le plus possible sans gêner les, passagers sur le siège
arrière, et mettre le dossier le plus vertical possible.
Si la voiture est munie d’un réglage de hauteur de la
ceinture, choisir la position la plus basse. S’assurer
ensuite que le régulateur de la ceinture se trouve
derrière le dossier de la voiture (ou tout au plus ali-
gné avec le dossier).
ATTENTION ! les points à travers lesquels on doit
faire passer la ceinture pour l’installation du siège-
auto en Gr. 1 (9-18 kg) sont indiqués en ROUGE.
ATTENTION ! ne jamais utiliser de coussin réducteur
si l’enfant pèse plus de 6 kg.
A l’aide de la poignée K, régler le siège-auto à l’incli-
naison maximum (Fig. 6).
Fig. 11 – Installer le siège-auto sur le siège de la voi-
ture face à la route.
Fig. 12 – Faire passer la ceinture de sécurité à 3 points
entre l’assise et la base du siège-auto et l’accrocher
au côté opposé.
Fig. 13 – Faire passer la ceinture horizontale (partie
abdominale) en dessous des deux guides-ceintures
M de couleur rouge prévus à cet effet.
Fig. 14 – Tendre la ceinture le plus possible en la ti-
rant par la ceinture diagonale (partie thoracique).
Fig. 15 – Appuyer d’un doigt sur le bouton situé sur la
pince de blocage N qui se trouve du côté de la per-
sonne qui effectue l’installation et y faire passer à
l’intérieur la ceinture courroie diagonale. Relâcher le
bouton, qui se bloque automatiquement. Retendre
la ceinture le plus possible.
Fig. 16 – Faire passer la ceinture diagonale à l’inté-
rieur du guide O.
Fig. 17 – Retendre la ceinture le plus possible en fai-
sant bien adhérer le siège-auto au siège de la voiture.
Fig. 18 – S’assurer que l’installation est correcte, que
la ceinture est bien tendue et que le siège-auto est
correctement xé et adhère bien au siège de la voi-
ture. Dans le cas contraire, recommencer l’opération
d’installation du début.
ATTENTION ! Toujours s’assurer que la ceinture de
sécurité est correctement tendue et ne soit pas en-
tortillée.
ATTENTION ! Ne JAMAIS faire passer la ceinture de
sécurité de la voiture ailleurs qu’aux points indiqués.
REGLAGE DE LA POSITION
DES HARNAIS DE SECURITE
ATTENTION ! Les harnais de sécurité doivent tou-
jours être adaptées à la taille de l’enfant.
Fig. 19 - Pour régler correctement les harnais, il faut
les extraire du dossier et les régler au niveau des
épaules de l’enfant.
Pour le réglage, procéder comme illustré ci-dessous:
A l’aide de la poignée K, régler le siège-auto à l’incli-
naison maximum (Fig. 6).
Fig. 20 – À l’intérieur de la poche F, appuyer sur le bou-
ton de réglage des ceintures et, simultanément, saisir
les 2 ceintures D du siège auto au-dessous des épau-
lières et tirer vers soi de manière à les desserrer.
Fig. 21 - Détacher les harnais de sécurité en appuyant
sur le bouton rouge de la boucle.
Fig. 22 –Retirer les deux extrémités des harnais de la
plaque de xation P située derrière le dossier.
Fig. 23 - Tirer sur les harnais par devant pour les re-
tirer du dossier.
Fig. 24 – Extraire les harnais en faisant passer les pla-
quettes de xation par les fentes du dossier.
Fig. 25 –Remettre les plaquettes des deux harnais à
l’intérieur des fentes du dossier à la hauteur désirée.
Fig. 26 –Insérer les deux crochets dans la boucle pour
s’assurer de la bonne l’orientation du harnais.
Fig. 27 - Enler les deux extrémités des harnais dans
les couvre- harnais puis dans les fentes du dossier.
Fig. 28 - Remettre les deux extrémités des harnais
dans la plaque de xation P.
Fig. 29 - S’assurer que la plaque et les extrémités des
harnais sont positionnés comme illustré sur l’image.
ATTENTION ! S’assurer que les harnais ne soient pas
entortillées.
INSTALLATION DE L’ENFANT
DANS LE SIEGE-AUTO
Détendre et décrocher les harnais du siège-auto
exactement comme illustré au paragraphe “REGLA-
GE DE LA HAUTEUR DES HARNAIS DE SECURITE”,
Fig. 20 et 21.
Fig. 30 –Installer l’enfant dans le siège-auto.
ATTENTION ! Toujours s’assurer que l’enfant est bien
assis avec le corps qui adhère bien au dossier du siè-
ge-auto et avec l’entrejambe correctement placé.
Fig. 31 – Prendre les harnais et joindre les deux cro-
chets de la boucle.
Fig. 32 – Pousser fortement les deux crochets à
l’intérieur de la boucle jusqu’à ce qu’on entende

12
13
clairement le déclic. Pour des raisons de sécurité,
les deux crochets ne peuvent s’accrocher que simul-
tanément.
Fig. 33 - Pour tendre les harnais du siège-auto, tirer
sur la courroie de réglage G des harnais jusqu’à ce
que celles-ci adhèrent bien au corps de l’enfant.
ATTENTION ! Les harnais doivent être bien tendus
y compris au niveau des épaules et adhérer doivent
protéger à l’enfant: on doit pouvoir faire passer un
doigt entre les harnais et l’enfant.
ATTENTION ! S’assurer que les harnais ne soient pas
entortillés.
NETTOYAGE ET ENTRETIEN
Les opérations de nettoyage et d’entretien doivent
être effectuées uniquement par un adulte.
NETTOYAGE DE LA HOUSSE
La housse du siège-auto est complètement amo-
vible et lavable à la main ou en machine à 30°C.
Pour le lavage, suivre les instructions de l’étiquette
de la housse illustrées par les symboles de lavage
suivants :
Lavage en machine à 30°C
Lavage à la main
Ne pas blanchir
Ne pas laver à sec
Ne pas utilliser de sèche-linge
Ne pas repasser repasser repasser
Ne jamais utiliser de détergent abrasifs ou de sol-
vants. Ne pas essorer la housse et la laisser sécher
sans l’essorer.
Pour enlever la housse, commencer par retirer les
harnais en se référant au paragraphe précédent “RE-
GLAGE DE LA HAUTEUR DES HARNAIS DE SECU-
RITE ” (cf. Fig. 20 à Fig. 23) :
Une fois le démontage des harnais du dossier ter-
miné :
Fig. 34 - enlever la housse de l’assise du siège-auto
en retirant les couvre-harnais et les harnais du dos-
sier.
Pour remonter la housse et les harnais :
Fig. 35 - remettre la housse en place sur l’assise du
siège-auto en faisant passer les harnais du siège-
auto par leurs fentes respectives au point correspon-
dant de la housse.
Répéter ensuite exactement les opérations décrites
pour les Fig. 26 à Fig. 29 au paragraphe “REGLAGE
DE LA HAUTEUR DES HARNAIS DE SECURITE ”.
ATTENTION ! S’assurer que les harnais ne soient pas
entortillées.
NETTOYAGE DES PARTIES EN
PLASTIQUE ET METALLIQUES
Pour nettoyer les parties en plastique et métalliques
peintes, utiliser uniquement un chiffon humide. Ne
jamais utiliser de détersifs abrasifs ou de solvants.
Ne jamais lubrier les parties mobiles du siège-
auto.
CONTROLE DE L’INTEGRITE DES ELEMENTS
Nous recommandons de vérier fréquemment l’in-
tégrité et l’état d’usure des éléments suivants :
• Housse:s’assurerquelerembourragenesorte
pasouquedespartiesdelahoussenesese
détachentpas.Contrôlerl’étatdesharnais,qui
doiventtoujoursêtre.
• Harnais:s’assurerquelesharnaisnes’elo-
chentàaucunendroit:auniveaudel’entre-
jambe,desépaules,dudossier,delaplaquede
xation…).
• Piècesenplastique:contrôlerl’étatd’usurede
touteslespartiesenplastique,quinedoivent
pasmontrerdesignesdedommageoudedé-
coloration.
ATTENTION ! Si le siège-auto apparaît déformé ou
fortement usé, le remplacer : il pourrait avoir perdu
ses caractéristiques de sécurité d’origine.
CONSERVATION DU PRODUIT
Quand il n’est pas installé dans la voiture, nous re-
commandons de ranger le siège-auto dans un en-
droit sec, loin des sources de chaleur et à l’abri de
la poussière, de l’humidité et de la lumière directe
du soleil.
ELIMINATION DU PRODUIT
Quand on atteint la limite d’utilisation prévue pour
le siège-auto, il faut cesser de s’en servir et le jeter.
An de respecter l’environnement, séparer les diffé-
rents types de déchets conformément aux normes
en vigueur dans le pays.
POUR PLUS D’INFORMATIONS :
CHICCO PUERICULTURE DE FRANCE S.A.S
17-19 avenue de la Métallurgie
93210 Saint-Denis La Plaine
N° Indigo : 0 820 87 00 41
www.chicco.fr
40°C

14
15
Gebrauchsanleitung
SEHR WICHTIG: BITTE SOFORT LESEN
• Befolgen Sie für Montage und Installation des
Produktes gewissenhaft die Anweisungen. Vor
der Verwendung des Produkts sollte stets die Ge-
brauchsanleitung gelesen und die Anweisungen
befolgt werden.
• Bewahren Sie diese Anleitung für späteres Nach-
schlagen auf.
• In jedem Land sind hinsichtlich der Sicherheit
andere Gesetze und Regelungen für den Kinder-
transport im Auto vorgesehen. Aus diesem Grund
wird empfohlen, für weitere Informationen mit
den örtlichen Behörden Kontakt aufzunehmen.
WARNUNG! Nach den Unfallstatistiken sind die •
hinteren Fahrzeugsitze im Allgemeinen sicherer
als der vordere. Deshalb sind sie für die Montage
des Kinderautositzes vorzuziehen. Insbesondere
ist der sicherste Sitz der in der Mitte hinten, wenn
er mit einem Dreipunktgurt versehen ist.
• WARNUNG! SEHR GEFÄHRLICH! Verwenden Sie
in Gruppe 0+ (0-13 kg) niemals diesen Kinderau-
tositz auf einem Vordersitz mit Frontal-Airbag.
Der Kinderautositz kann auf dem Vordersitz nur
installiert werden, wenn der Frontal-Airbag deak-
tiviert wurde: Prüfen Sie mit dem Autohersteller
oder in der Gebrauchsanleitung des Autos die
Möglichkeit einer Deaktivierung des Airbags.
• Wir empfehlen, alle Fahrgäste darüber in Kenntnis
zu setzen, wie das Kind im Notfall abgeschnallt
werden muss.
• Wird in Gruppe 1 (9-18 kg) der Kinderautositz auf
dem Vordersitz mit dem aktivierten Frontal-Air-
bag positioniert, wird für eine größere Sicherheit
empfohlen, den Fahrzeugsitz so weit zurückzu-
stellen, wie es mit den anderen Insassen auf dem
Rücksitz vereinbar ist.
• Verwenden Sie diesen Kinderautositz niemals auf
Autositzen, die seitlich oder entgegen der Fahr-
richtung ausgerichtet sind.
• Installieren Sie den Kinderautositz nur auf Au-
tositzen, die korrekt mit der Fahrzeugkarosserie
xiert und in Fahrtrichtung sind. Achten Sie bitte
darauf, dass verstellbare oder drehbare Fahrzeug-
sitze korrekt xiert sind. Bei einem Unfall könnten
sie eine Gefahr darstellen.
• Achten Sie darauf, den Kinderautositz so zu ins-
tallieren, dass eine Beeinträchtigung seiner Posi-
tion durch einen anderen beweglichen Sitz oder
durch die Fahrzeugtür vermieden wird.
• Befestigen Sie den Kinderautositz niemals auf
einem Autositz, der nur mit einem Beckengurt
(Zweipunktgurt) ausgestattet ist.
• Kein Kinderautositz kann bei einem Unfall die
totale Sicherheit des Kindes gewährleisten, aber
die Verwendung dieses Produktes reduziert das
Verletzungs- oder Todesrisiko des Kindes.
• Das Risiko ernsthafter Schäden des Kindes steigt,
nicht nur im Falle eines Unfalls, sondern auch un-
ter anderen Umständen (z. B. scharfes Bremsen
usw.), wenn die in diesem Handbuch angege-
benen Anweisungen nicht gewissenhaft befolgt
werden. Prüfen Sie immer, ob der Kinderautositz
korrekt am Fahrzeugsitz xiert ist.
• Bei Beschädigung, Verformung oder starker Ab-
nutzung muss der Kinderautositz ersetzt werden:
Die ursprünglichen Sicherheitseigenschaften
könnten nicht mehr gewährleistet sein.
• Nehmen Sie am Produkt keinerlei Veränderung
oder Zusatzteile ohne Zustimmung des Herstel-
lers vor.
• Bringen Sie ausschließlich die vom Hersteller vor-
gesehenen keine nicht vom Hersteller gelieferten
Zubehör-, Ersatzteile oder Komponenten an.
• Lassen Sie das Kind im Kinderautositz niemals
ohne Aufsicht.
• Lassen Sie niemals den Kinderautositz auf dem
Autositz unbefestigt. Er könnte die Passagiere
stoßen und verletzen.
• Legen Sie keine Gegenstände, außer für das Pro-
dukt genehmigte Zubehörteile, weder zwischen
den Fahrzeugsitz und den Kinderautositz noch
zwischen den Kinderautositz und das Kind: Bei
einem Unfall könnte der Autositz dadurch nicht
mehr korrekt funktionieren.
• Sollte das Auto in direktem Sonnenlicht stehen
gelassen werden, wird empfohlen, den Kinderau-
tositz abzudecken.
• Nach einem auch nur leichten Unfall kann der
Kinderautositz Beschädigungen haben, die mit
bloßem Auge nicht zu erkennen sind: Daher muss
er auf jeden Fall ersetzt werden.
• Verwenden Sie bitte keine Secondhand-Kinder-
autositze: Sie könnten extrem gefährliche struk-
turelle Schäden haben, die mit bloßem Auge
nicht zu erkennen sind, aber die Sicherheit des
Produktes beeinträchtigen.
• Die Gesellschaft Artsana übernimmt bei unsach-
gemäßer Verwendung dieses Produktes keine
Haftung.
• Der Bezug kann ausschließlich durch einen vom
Hersteller genehmigten ersetzt werden, da er
einen ergänzenden Teil des Kinderautositzes dar-
stellt. Der Kinderautositz darf niemals ohne Be-
zug benutzt werden, um nicht die Sicherheit des
Kindes zu beeinträchtigen.
• Kontrollieren Sie, dass das Gurtband nicht ver-
dreht ist und vermeiden Sie, dass das Gurtband
oder Teile des Kinderautositzes in der Autotür
eingeklemmt sind oder an scharfen Stellen
scheuern. Sollte der Gurt Risse zeigen oder aus-
gefranst sein, ersetzen Sie ihn bitte sofort durch
einen neuen.
• Achten Sie darauf, dass sich im Fahrzeug, vor al-
lem auf der Hutablage, keine Gegenstände oder
Gepäckstücke benden, die nicht sicher xiert
oder positioniert sind: Sie könnten bei einem Un-
fall oder scharfem Bremsen Insassen verletzen.
Alle Gegenstände im Auto sollten in geeigneter
Weise gesichert werden.
• Achten Sie darauf, dass alle Insassen zu ihrer eige-
nen Sicherheit im Fahrzeug angeschnallt sind. Ein
D

14
15
Insasse, der nicht mit dem Sicherheitsgurt ange-
schnallt ist, kann bei einem Unfall oder scharfem
Bremsen eine Gefahr für das Kind im Kinderauto-
sitz darstellen.
• Machen Sie während einer langen Autofahrt
öfters Pause: Das Kind ermüdet sehr schnell.
Nehmen Sie das Kind auf keinen Fall während der
Fahrt aus dem Autositz. Wenn das Kind Ihre Auf-
merksamkeit braucht, dann halten Sie an einem
geeigneten Platz an.
• Der Transport frühgeborener Babys, die früher
als in der 37 Schwangerschaftswoche geboren
wurden, kann im Kinderautositz mit Gefahr ver-
bunden sein. Diese Neugeborenen können At-
mungsschwierigkeiten bekommen, während sie im
Kinderautositz sitzen. Wir empfehlen Ihnen daher,
sich an Ihren Arzt oder an das Krankenhausperso-
nal zu wenden, damit diese Ihr Kind beurteilen und
den entsprechenden Kinderautositz empfehlen
können, bevor Sie das Krankenhaus verlassen.
GEBRAUCHSANLEITUNG
INHALTSVERZEICHNIS:
• BESCHREIBUNG DER KOMPONENTEN
• PRODUKTEIGENSCHAFTEN
• VERWENDUNGSBESCHRÄNKUNGEN UND
-ANFORDERUNGEN DES PRODUKTES UND DES
FAHRZEUGSITZES
• INSTALLATION IM AUTO DES KINDERAUTOSIT-
ZES Gr. 0+ (0-13 kg)
• INSTALLATION IM AUTO DES KINDERAUTOSIT-
ZES Gr. 1 (9-18 kg)
• EINSTELLUNG DER GURTPOSITION
• HINEINSETZEN DES KINDES IN DEN KINDER-
AUTOSITZ
• REINIGUNG UND WARTUNG
BESCHREIBUNG DER KOMPONENTEN
Abb. 1 (Vorderseite)
A. Bezug
B. Schlitze für die Höheneinstellung der Gurte
C. Schulterpolster
D. Gurte des Kinderautositzes
E. Gurtschloss
F. Abdecktasche der Einstelltaste für die Gurte
G. Verstellband der Gurte
H. Sitzverkleinerer
Abb. 2 (Seitenansicht)
I. Sitzäche
J. Basis
K. Verstellgriff der Rückenlehne
L. Gurtführungen des Beckengurts des Dreipunkt-
Autogurtes (nur Installation in Gr. 0+)
M. Gurtführungen des Beckengurts des Dreipunkt-
Autogurtes (nur Installation in Gr. 1)
N. Gurtblockierklemmen des diagonalen Gurtverlaufs
des Dreipunkt-Autogurtes (nur Installation in Gr. 1)
O. Gurtblockierklemme des diagonalen Gurtverlaufs
des Autogurtes (beide Installationen)
P. Befestigungsplatte der Sicherheitsgurte (siehe
auch Abb. 22)
PRODUKTEIGENSCHAFTEN
• Dieser Kinderautositz ist für die „Gruppe 0+/1“ für
den Transport im Auto für Kinder ab der Geburt
bis 18 kg Körpergewicht (zwischen 0 bis ca. 3 Jah-
ren) unter Einhaltung der europäischen Regelung
ECE R44/04 zugelassen.
• Die Zulassung ist „universal“. Daher kann der Kin-
derautositz für jeden Fahrzeugtyp verwendet wer-
den. WARNUNG! „Universal“ bedeutet, dass er auf
die meisten, aber nicht auf alle PKW-Sitze passt.
WICHTIGER HINWEIS
1. Dies ist eine „Universal“- Rückhalteeinrichtung für
Kinder. Sie ist nach der Regelung Nr. 44, Änderungsse-
rie 04 zugelassen und passt auf die meisten, aber nicht
auf alle PKW-Sitze.
2. Der ordnungsgemäße Sitz der Einrichtung kann vo-
rausgesetzt werden, wenn der Fahrzeughersteller im
Fahrzeughandbuch erklärt, dass das Fahrzeug für den
Einbau einer „Universal“-Rückhalteeinrichtung für
Kinder der jeweiligen Altersgruppe geeignet ist.
3. Diese Rückhalteeinrichtung für Kinder wurde nach
strengeren Bedingungen in die Klasse „Universal“ ein-
gestuft als die früheren Ausführungen, die diese Auf-
schrift nicht tragen.
4. Geeignet, wenn das genehmigte Fahrzeug mit
Dreipunkt-, Statik- oder Retraktor-Sicherheitsgurten
ausgerüstet ist, die nach ECE-Regelung Nr. 16 oder an-
deren vergleichbaren Normen zugelassen sind.
5. Sollten Zweifel bestehen, kann der Hersteller der
Rückhalteeinrichtung für Kinder oder der Fachhändler
befragt werden.
VERWENDUNGSBESCHRÄNKUNGEN UND
-ANFORDERUNGEN DES PRODUKTES UND DES
FAHRZEUGSITZES
WARNUNG! Halten Sie gewissenhaft folgende Ver-
wendungsbeschränkungen und -anforderungen des
Produktes und des Fahrzeugsitzes ein: andernfalls ist
die Sicherheit nicht garantiert.
• Dieser Kinderautositz ist ausschließlich für die
Verwendung mit Kindern mit einem Körperge-
wicht zwischen 0 und 18 kg (ab der Geburt bis ca.
3 Jahren) zugelassen.
• Der Fahrzeugsitz muss mit Dreipunkt-, Statik- oder
Retraktor-Sicherheitsgurten, die nach UNI/ECE-
Regelung Nr. 16 oder anderen vergleichbaren Nor-
men zugelassen sind (Abb. 3), ausgerüstet sein.
• WARNUNG! Den Kinderautositz niemals mit einem
Zweipunkt-Beckengurt installieren (Abb. 4).
• Der Kinderautositz kann auf dem Beifahrersitz
oder auf jedem Rücksitz installiert werden. Ver-
wenden Sie diesen Kinderautositz niemals auf
Autositzen, die seitlich oder entgegen der Fahr-
richtung ausgerichtet sind (Abb. 5).
• Das Produkt ist ausschließlich für den Gebrauch
als Kinderautositz und nicht für die Verwendung
im Haus bestimmt.
INSTALLATION IM AUTO DES
KINDERAUTOSITZES Gr. 0+ (0-13 kg)
WARNUNG! Wenn er in Gr. 0+ (von 0 bis 13 kg) ver-

16
17
wendet wird, stets entgegen der Fahrtrichtung ins-
tallieren. Wenn der Beifahrersitz des Fahrzeugs mit
einem Airbag ausgerüstet ist, den Airbag deaktivieren,
bevor der Kinderautositz installiert wird. Lebensgefahr
oder Gefahr schwerer Verletzungen!
WARNUNG! Die Führungen, an denen der Gurt für die
Installation in Gr. 0+ (0-13 kg) durchgezogen werden
muss, sind HELLBLAU gekennzeichnet.
WARNUNG! Bei Kindern mit einem Körpergewicht
über 6 kg niemals den Sitzverkleinerer verwenden.
Abb. 6 – Die Rückenlehne des Kinderautositzes kann
vollständig zurück geklappt werden, indem der Griff K
betätigt wird.
Abb. 7 – Den Kinderautositz auf dem Fahrzeugsitz ent-
gegen die Fahrtrichtung positionieren.
Abb. 8 – Ziehen Sie den Dreipunktsicherheitsgurt des Fahr-
zeugs zwischen Sitz und Kinderautositzbasis durch und
schließen Sie diesen an das Gurtschloss des Fahrzeugsitzes
an, indem Sie den Beckengurt durch die entsprechenden
hellblauen Führungen L ziehen, die sich an der Rückseite
der Rückenlehne des Kinderautositzes benden.
Abb. 9 – Spannen Sie so stark wie möglich den Be-
ckengurt und ziehen Sie ihn durch die entsprechende
Führung O, die auf der Seite der Person liegt, welche
die Installation vornimmt, durch.
Abb. 10 – Überprüfen Sie die korrekte Ausführung
der Installation, ob der Gurt gut gespannt ist und ob
der Kinderautositz gut xiert ist und am Fahrzeugsitz
anliegt. Sollte dies nicht der Fall sein, wiederholen Sie
den Installationsvorgang von Anfang an.
WARNUNG! Prüfen Sie stets, ob der Gurt in allen Be-
reichen gut gespannt und nicht verdreht ist.
WARNUNG! Ziehen Sie den Fahrzeuggurt NIEMALS
an anderen Stellen als den angegebenen durch.
INSTALLATION IM AUTO
DES KINDERAUTOSITZES Gr. 1 (9-18 kg)
WARNUNG! Wenn er in Gr. 1 (von 9 bis 18 kg) verwen-
det wird, stets in Fahrtrichtung installieren.
Wird der Kinderautositz auf dem Vordersitz positio-
niert, wird für eine größere Sicherheit empfohlen, den
Fahrzeugsitz so weit zurückzustellen, wie es mit den
anderen Insassen auf dem Rücksitz vereinbar ist und die
Rückenlehne so senkrecht wie möglich zu stellen.
Wenn das Auto mit einer Höhenreglervorrichtung für
den Gurt ausgestattet ist, muss diese in der niedrigsten
Position xiert sein. Prüfen Sie, ob der Gurtregler sich in
zurückgestellter (oder maximal gleichgerichteter) Posi-
tion zur Rückenlehne des Fahrzeugsitzes bendet.
WARNUNG! Die Führungen, an denen der Gurt für die
Installation in Gr. 1 (9-18 kg) durchgezogen werden
muss, sind ROT gekennzeichnet.
Die Rückenlehne des Kinderautositzes kann vollstän-
dig zurück geklappt werden, indem der Griff K betätigt
wird (Abb. 6).
Abb. 11 – Den Kinderautositz auf dem für die Instal-
lation in Fahrtrichtung ausgewählten Fahrzeugsitz
positionieren.
Abb. 12 – Greifen Sie den Dreipunktsicherheitsgurt des
Fahrzeugs und ziehen Sie ihn zwischen der Basis und
dem Sitz durch und haken Sie ihn dann an der entge-
gen gesetzten Seite ein.
Abb. 13 – Ziehen Sie den Beckengurt unter den beiden
Gurtdurchgängen M, in Rot gekennzeichnet, durch.
Abb. 14 – Spannen Sie den Gurt so weit wie möglich,
indem Sie ihn am diagonalen Teil (Brustgurt) greifen.
Abb. 15 – Drücken Sie mit einem Finger auf die Taste
an der Blockierklemme N an der Seite dessen, der die
Installation vornimmt und ziehen Sie innen den Brust-
gurt durch. Lassen Sie die Taste los, die automatisch in
die Blockierposition zurückkehrt. Spannen Sie erneut
den Gurt, soweit wie möglich.
Abb. 16 – Ziehen Sie den oberen Teil des Brustgurts
durch die Führung O.
Abb. 17 – Spannen Sie erneut so weit wie möglich den
Gurt, wobei Sie den Kinderautositz so nahe wie mög-
lich an den Fahrzeugsitz anlegen, wenn nötig, stützen
Sie sich mit einem Knie auf den Kinderautositz.
Abb. 18 – Überprüfen Sie die korrekte Ausführung
der Installation, ob der Gurt gut gespannt ist und ob
der Kinderautositz gut xiert ist und am Fahrzeugsitz
anliegt. Sollte dies nicht der Fall sein, wiederholen Sie
den Installationsvorgang von Anfang an.
WARNUNG! Prüfen Sie stets, ob der Gurt in allen Be-
reichen gut gespannt und nicht verdreht ist.
WARNUNG! Ziehen Sie den Fahrzeuggurt NIEMALS
an anderen Stellen als den angegebenen durch.
VERSTELLUNG DER GURTPOSITION
WARNUNG! Die Gurte müssen stets an das Wachs-
tum des Kindes angepasst werden.
Abb. 19 – Die Gurte sind dann korrekt eingestellt,
wenn diese in Höhe der Schultern des Kindes aus der
Rückenlehne austreten.
Für die Verstellung gehen Sie vor, wie gezeigt:
Die Rückenlehne des Kinderautositzes kann vollstän-
dig zurück geklappt werden, indem der Griff K betätigt
wird (Abb. 6).
Abb. 20 – Im Inneren der speziellen Tasche F die Ein-
stelltaste der Gurte drücken und gleichzeitig die 2
Gurte D des Kindersitzes unter den Schultergurten
greifen und zu sich ziehen, um sie zu lockern.
Abb. 21 – Den Sicherheitsgurt öffnen, indem Sie auf
die rote Gurtschlosstaste drücken.
Abb. 22 – Die beiden Gurtenden aus der Befestigungs-
platte P hinter der Rückenlehne ziehen.
Abb. 23 – Ziehen Sie von vorne an den Gurten, so dass
sie aus der Rückenlehne und aus den Schultergurten
gezogen werden.
Abb. 24 – Die Schultergurte herausnehmen, indem die
Befestigungsplatten durch Drehen aus den entsprechen-
den Schlitzen der Rückenlehne herausgezogen werden.
Abb. 25 – Die Platten der beiden Schultergurte wieder
auf der gewünschten Höhe in den entsprechenden
Schlitz der Rückenlehne einsetzen.
Abb. 26 – Die beiden Zungen in das Gurtschloss ein-
setzen, um leichter die korrekte Ausrichtung des Gurt-
bandes zu prüfen.
Abb. 27 – Die beiden Gurtenden zuerst durch die Schul-
tergurte und dann durch die Schlitze der Rückenlehne
und die Befestigungsplatten der Schultergurte ziehen.
Abb. 28 – Erneut die beiden Gurtenden durch die Plat-
te ziehen.
Abb. 29 – Prüfen Sie, dass die Platte und die Gurten-

16
17
den so liegen, wie in der Abbildung gezeigt.
WARNUNG! Prüfen Sie, dass die Gurte nicht verdreht sind.
HINEINSETZEN DES KINDES
IN DEN KINDERAUTOSITZ
Die Gurte des Kinderautositzes genauso lockern und
öffnen, wie unter dem Punkt „VERSTELLUNG DER
GURTHÖHE“, Abb. 20 und 21 gezeigt.
Abb. 30 – Das Kind in den Kinderautositz setzen.
WARNUNG! Prüfen Sie stets, ob das Kind mit dem
Körper gut an der Rückenlehne des Kinderautositzes
anliegt und der Mittelsteg korrekt positioniert ist.
Abb. 31 – Nehmen Sie die Gurte und verbinden Sie die
beiden Gurtzungen.
Abb. 32 – Drücken Sie die beiden miteinander verbun-
denen Gurtzungen in das Innere des Schlosses, bis Sie
ein gut wahrnehmbares „Klick“ hören. Für die Sicher-
heitsgarantie wurden die Gurtzungen so entwickelt,
dass das Einhaken einer einzigen Zunge oder einer
Zunge nach der anderen verhindert wird.
Abb. 33 – Zum Spannen der Gurte des Kinderautosit-
zes ziehen Sie das Regulierband G der Gurte, bis es gut
am Körper des Kindes anliegt.
WARNUNG! Die Gurte müssen gut gespannt sein und
an dem Kind anliegen, aber nicht zu sehr: Sie müssen
in Schulterhöhe einen Finger zwischen Gurt und Kind
schieben können.
WARNUNG! Prüfen Sie, dass die Gurte nicht verdreht sind.
REINIGUNG UND WARTUNG
Die Reinigungs- und Wartungsarbeiten dürfen nur von
einem Erwachsenen vorgenommen werden.
REINIGUNG DES BEZUGS
Der Bezug des Kinderautositzes kann vollständig ab-
gezogen und von Hand oder in der Maschine bei 30°C
gewaschen werden. Für die Reinigung befolgen Sie
bitte die Anleitung auf dem Pege-Etikett mit folgen-
den Waschsymbolen:
Waschmaschine bei 30°C
Handwäsche
Nicht bleichen
Nicht trocken reinigen
Nicht im Trockner trocknen
Nicht bügeln
Niemals Scheuer- oder Lösungsmittel verwenden. Den Be-
zug nicht schleudern und ihn ohne Auswringen trocknen.
Zum Abnehmen des Bezugs müssen zuerst die Gurte
herausgezogen werden. Für diesen Arbeitsvorgang
wird auf den vorhergehenden Punkt „VERSTELLUNG
DER GURTHÖHE“ verwiesen, in den von Abb. 20 bis
Abb. 23 beschriebenen Punkten.
Ist das Herausnehmen der Gurte aus der Rückenlehne
abgeschlossen:
Abb. 34 – nehmen Sie den Bezug von der Sitzäche des
Kinderautositzes ab und ziehen die Schultergurte und
die beiden Gurtabzweigungen aus den entsprechen-
den Schlitzen im Bezug.
Zum Wiederaufziehen des Bezugs und der Gurte muss:
Abb. 35 – der Bezug wieder auf die Sitzäche des
Kinderautositzes gezogen werden, wobei man den
Becken- und Brustgurt des Kinderautositzes an der
entsprechenden Stelle des Bezugs durch die jeweiligen
Schlitze zieht.
Anschließend wiederholen Sie genau die Arbeitsgän-
ge, die von Abb. 26 bis Abb. 29 unter dem Punkt „VER-
STELLUNG DER GURTHÖHE“ beschrieben sind.
WARNUNG! Prüfen Sie, dass die Gurte nicht verdreht sind.
REINIGUNG DER KUNSTSTOFF-
UND METALLTEILE
Für die Reinigung der Kunststoff- oder lackierten Me-
tallteile darf nur ein feuchtes Tuch verwendet werden.
Niemals Scheuer- oder Lösungsmittel verwenden.
Die beweglichen Teile des Kinderautositzes dürfen kei-
nesfalls geschmiert werden.
KONTROLLE DER KOMPONENTEN
AUF UNVERSEHRTHEIT
Es wird empfohlen, folgende Komponenten regelmä-
ßig auf ihre Unversehrtheit und den Verschleißzustand
zu prüfen:
• Bezug: Prüfen Sie, dass die Polsterung oder Teile
davon nicht heraustreten. Den Zustand der Näh-
te prüfen, die stets unversehrt sein müssen.
• Gurte: Prüfen Sie, dass der Stoff nicht mit einer
deutlich reduzierten Stärke in Höhe des Ver-
stellbandes, des Mittelstegs, an den Schulter-
abzweigungen und im Bereich der Einstellplatte
der Gurte anomal verschlissen ist.
• Kunststoffe: Den Zustand aller Kunststoffteile
prüfen, die keine deutlichen Zeichen von Beschä-
digung oder Abbleichung aufweisen dürfen.
WARNUNG! Bei starker Verformung oder Abnutzung
muss der Kinderautositz ersetzt werden: Die ursprüng-
lichen Sicherheitseigenschaften könnten nicht mehr
gewährleistet sein.
AUFBEWAHRUNG DES PRODUKTES
Ist der Kinderautositz nicht im Auto, wird empfohlen,
ihn an einem trockenen Ort, von Wärmequellen und
vor Staub, Feuchtigkeit und direktem Sonnenlicht ge-
schützt, aufzubewahren.
ENTSORGEN DES PRODUKTES
Ist die für den Kinderautositz vorgesehene Gebrauchs-
grenze erreicht, entsorgen Sie ihn. Aus Umweltschutz-
gründen müssen die verschiedenen Einzelteile des
Kinderautositzes getrennt und die Entsorgungsbe-
stimmungen des jeweiligen Landes befolgt werden.
FÜR WEITERE INFORMATIONEN:
CHICCO Babyausstattung GmbH
Postfach 2086
D – 63120 Dietzenbach
www.chicco.com
40°C

18
19
Instrucciones de uso
MUY IMPORTANTE: LEER EN PRIMER LUGAR
• Para el montaje y la instalación del producto
siga cuidadosamente las instrucciones. No
permita que nadie utilice el producto sin haber
leído las instrucciones.
• Conserve este manual para futuras consultas.
• Cada país establece leyes y reglamentos dife-
rentes en materia de seguridad para el transpor-
te de niños en automóvil. Por ello, es aconseja-
ble contactar con las autoridades locales para
obtener mayor información al respecto.
¡ATENCIÓN! Es preferible instalar la silla en el •
asiento trasero del vehículo ya que según las
estadísticas sobre accidentes es más seguro que
el delantero. En particular el asiento más seguro
es el central trasero, si el vehículo tiene cinturón
de 3 puntos de anclaje.
• ¡ATENCIÓN! ¡GRAVE PELIGRO! En el Grupo
0+ (0-13 kg) no utilizar nunca esta Silla en un
asiento delantero dotado de airbag frontal.
Solamente se puede instalar la Silla sobre el
asiento delantero si se desactiva el airbag fron-
tal: comprobar con el fabricante o en el manual
de instrucciones del vehículo la posibilidad de
desactivar el airbag.
• Se aconseja que todos los pasajeros que ocupen
el vehículo sepan como desenganchar al niño en
caso de emergencia.
• En el Grupo 1 (9-18 kg) si se coloca la silla en el
asiento delantero con el airbag frontal activado,
para una mayor seguridad se aconseja despla-
zarlo el máximo posible hacia atrás, siempre
que lo permita la presencia de otros pasajeros
en el asiento trasero.
• No utilice nunca esta silla en asientos girados
lateralmente ni orientados en sentido contrario
a la marcha.
• Instale la silla solamente sobre asientos co-
rrectamente jados a la estructura del vehículo
y orientados en el sentido de marcha. Preste
atención a no dejar asientos de auto pleglables
plegables o giratorios sin enganchar bien, en
caso de accidente podrían constituir peligro.
• Preste atención al instalar la silla en el vehícu-
lo para evitar que un asiento móvil o la puerta
puedan interferir con la misma.
• No instale nunca la silla sobre un asiento de
vehículo dotado solamente de cinturón abdo-
minal (de dos puntos).
• Ninguna silla infantil para automóvil puede ga-
rantizar la seguridad total del niño en caso de
accidente, pero la utilización de este producto
reduce el riesgo del niño de muerte o lesiones.
• Si no se siguen al pie de la letra las instruccio-
nes de este manual, aumenta el riesgo de daños
graves para el niño, no sólo en caso de acciden-
te, sino también en otras situaciones (por ejem-
plo, frenadas bruscas, etc): compruebe siempre
que la silla esté correctamente enganchada en
el asiento.
• En caso de que la silla estuviese dañada, defor-
mada o muy desgastada, debe ser sustituida:
podría haber perdido las características origina-
les de seguridad.
• No modique ni incorpore partes adicionales al
producto sin la expresa aprobación del fabricante.
• No instale accesorios, recambios ni componen-
tes no provistos por el fabricante.
• No deje nunca al niño sin vigilancia en la silla de
auto.
• No deje nunca la silla sobre el asiento del vehí-
culo sin enganchar: podría golpear y herir a los
pasajeros.
• No coloque nada, a no ser que sea un accesorio
aprobado para el producto, entre el asiento del
vehículo y la silla, ni entre la silla y el niño. En
caso de accidente la silla podría no funcionar
correctamente.
• Si se deja el vehículo expuesto al sol, se aconse-
ja cubrir la sillita.
• Como resultado de un accidente de cualquier
tipo, la sillita podría haber sufrido daños no visi-
bles. En ese caso es necesario reemplazarla.
• No utilice sillas de segunda mano. Su estructura
podría haber sufrido daños no visibles que po-
drían comprometer la seguridad del producto.
• La sociedad ARTSANA no asume responsabili-
dad alguna por el uso inadecuado del producto.
• La funda sólo puede cambiarse por otra apro-
bada por el fabricante, ya que constituye parte
integrante de la silla de auto. Para no compro-
meter la seguridad del niño, no utilizar nunca la
silla de auto sin la funda.
• Compruebe que el cinturón de seguridad no esté
retorcido y evite que el mismo o cualquier parte
de la silla queden enganchados con la puerta, o
bien que rocen contra puntas salientes. En caso
de que el cinturón esté roto o deslachado es
necesario cambiarlo.
• Asegurarse de que no se transportan objetos sin
jarlos, sobre todo en la parte trasera: en caso
de accidente o frenada brusca podrían golpear y
herir a los pasajeros.
• Asegurarse de que todos los pasajeros del vehí-
culo usen el cinturón de seguridad, por su pro-
pia seguridad, pero también porque durante el
viaje podrían golpear al niño.
• Durante los viajes largos se aconseja realizar fre-
cuentes paradas, el niño se cansa muy fácilmen-
te. No sacar por ninguna razón al niño de la silla
de auto mientras el vehículo esté en movimien-
to. Si el bebé necesita atenciones, es necesario
detener el vehículo en un lugar seguro.
• Los recién nacidos prematuros con menos de 37
semanas de gestación pueden correr riesgo en
la silla de auto, ya que pueden sufrir dicultades
respiratorias mientras estén sentados en ella.
E
Sayfa yükleniyor...
Sayfa yükleniyor...
Sayfa yükleniyor...
Sayfa yükleniyor...
Sayfa yükleniyor...
Sayfa yükleniyor...
Sayfa yükleniyor...
Sayfa yükleniyor...
Sayfa yükleniyor...
Sayfa yükleniyor...
Sayfa yükleniyor...
Sayfa yükleniyor...
Sayfa yükleniyor...
Sayfa yükleniyor...
Sayfa yükleniyor...
Sayfa yükleniyor...
Sayfa yükleniyor...
Sayfa yükleniyor...
Sayfa yükleniyor...
Sayfa yükleniyor...
Sayfa yükleniyor...
Sayfa yükleniyor...
Sayfa yükleniyor...
Sayfa yükleniyor...
Sayfa yükleniyor...
Sayfa yükleniyor...
Sayfa yükleniyor...
Sayfa yükleniyor...
Sayfa yükleniyor...
Sayfa yükleniyor...
Sayfa yükleniyor...
Sayfa yükleniyor...
Sayfa yükleniyor...
Sayfa yükleniyor...
Sayfa yükleniyor...
Sayfa yükleniyor...
Sayfa yükleniyor...
Sayfa yükleniyor...
Sayfa yükleniyor...
Sayfa yükleniyor...
Sayfa yükleniyor...
Sayfa yükleniyor...
Sayfa yükleniyor...
Sayfa yükleniyor...
Sayfa yükleniyor...
Sayfa yükleniyor...
Sayfa yükleniyor...
Sayfa yükleniyor...
Sayfa yükleniyor...
Sayfa yükleniyor...
Sayfa yükleniyor...
Sayfa yükleniyor...
Sayfa yükleniyor...
Sayfa yükleniyor...
Sayfa yükleniyor...
Sayfa yükleniyor...
Sayfa yükleniyor...
Sayfa yükleniyor...
Sayfa yükleniyor...
Sayfa yükleniyor...
Sayfa yükleniyor...
Sayfa yükleniyor...
Sayfa yükleniyor...
Sayfa yükleniyor...
Sayfa yükleniyor...
Sayfa yükleniyor...
Sayfa yükleniyor...
Sayfa yükleniyor...
Sayfa yükleniyor...
Sayfa yükleniyor...
-
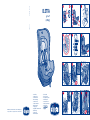 1
1
-
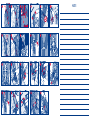 2
2
-
 3
3
-
 4
4
-
 5
5
-
 6
6
-
 7
7
-
 8
8
-
 9
9
-
 10
10
-
 11
11
-
 12
12
-
 13
13
-
 14
14
-
 15
15
-
 16
16
-
 17
17
-
 18
18
-
 19
19
-
 20
20
-
 21
21
-
 22
22
-
 23
23
-
 24
24
-
 25
25
-
 26
26
-
 27
27
-
 28
28
-
 29
29
-
 30
30
-
 31
31
-
 32
32
-
 33
33
-
 34
34
-
 35
35
-
 36
36
-
 37
37
-
 38
38
-
 39
39
-
 40
40
-
 41
41
-
 42
42
-
 43
43
-
 44
44
-
 45
45
-
 46
46
-
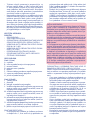 47
47
-
 48
48
-
 49
49
-
 50
50
-
 51
51
-
 52
52
-
 53
53
-
 54
54
-
 55
55
-
 56
56
-
 57
57
-
 58
58
-
 59
59
-
 60
60
-
 61
61
-
 62
62
-
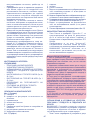 63
63
-
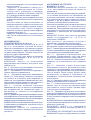 64
64
-
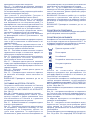 65
65
-
 66
66
-
 67
67
-
 68
68
-
 69
69
-
 70
70
-
 71
71
-
 72
72
-
 73
73
-
 74
74
-
 75
75
-
 76
76
-
 77
77
-
 78
78
-
 79
79
-
 80
80
-
 81
81
-
 82
82
-
 83
83
-
 84
84
-
 85
85
-
 86
86
-
 87
87
-
 88
88
-
 89
89
-
 90
90


Chicco Eletta El kitabı
- Kategori
- Araba koltukları
- Tip
- El kitabı
- Bu kılavuz aynı zamanda aşağıdakiler için de uygundur:
diğer dillerde
- slovenčina: Chicco Eletta Návod na obsluhu
- español: Chicco Eletta El manual del propietario
- français: Chicco Eletta Le manuel du propriétaire
- italiano: Chicco Eletta Manuale del proprietario
- svenska: Chicco Eletta Bruksanvisning
- čeština: Chicco Eletta Návod k obsluze
- polski: Chicco Eletta Instrukcja obsługi
- Deutsch: Chicco Eletta Bedienungsanleitung
- português: Chicco Eletta Manual do proprietário
- English: Chicco Eletta Owner's manual
- русский: Chicco Eletta Инструкция по применению
- Nederlands: Chicco Eletta de handleiding
- română: Chicco Eletta Manualul proprietarului
İlgili makaleler
Diğer belgeler
-
mothercare Chicco_Car Seat AUTO-FIX FAST ΜΕ ΒΑΣΗ Kullanici rehberi
-
mothercare Chicco_Car Seat UNICO Kullanici rehberi
-
 KikkaBoo JAZZY Kullanım kılavuzu
-
-
 KikkaBoo STARK Kullanma talimatları
-
 KikkaBoo FELIX Kullanım kılavuzu
-
Brevi Presto Smart Silverline El kitabı


