
F
D
GB
E
Quick Guide
Kurzanleitung
Notice d’utilisation
Instrucciones breves
Краткое руководство
Istruzioni brevi
Beknopte bedieningsinstructies
Σύντομες οδηγίες
Krótka instrukcja obsługi
Rövid útmutató
Stručný návod
Stručný návod
Instruções resumidas
Kısa kullanımkılavuzu
Instrucțiuni scurte
Snabbguide
Lyhyt ohje
Kort vejledning
Kortveiledning
Digital Hi-Fi Tuner
Digital-HiFi-Tuner
RUS
PL
P
I
H
TR
FIN
NL
CZ
RO
DK
GR
SK
S
N
00054251
00054252
(DIT2105SBT)
QUICK GUIDE
KURZANLEITUNG

Further information and features areavailable on/
WeitereInformationen und Features nden Sie hier
www.hama.com -> 00054251
www.hama.com -> 00054252
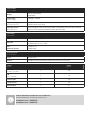
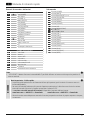
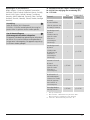
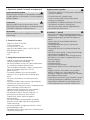
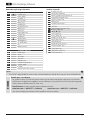
Technical Data
Technische Daten
Display 2.8" (7.11cm) Color TFT
320x240 px
Power Supply
Stromversorgung 100-240 V~50/60 Hz
Supported Languages
Unterstützte Sprachen
English, German, Danish, Dutch, Finnish, French, Italian, Norwegian, Polish, Portuguese, Spanish,
Swedish, Turkish, Czech, Slovak
Packaging Content
Verpackungsinhalt
Hama DIT2105SBT,Power Cord, Remote GB-RC001, 2x AAA Batteries, Quick Start Manual, Telescope
Antenna Coaxial, WiFi Antenna, Bluetooth Antenna, RCAAudio Cable
Connectivity
Konnektivität
WiFi 2.4GHz (b/g/n) /5GHz (a/n)
Bluetooth Receiver (RX): 4.2, class 1, A2DP,AVRCP
Transmitter (TX): 5.0, class 2, A2DP
USB
(FAT32 File System)
Charge: 5V/1A
Playback: MP3
Audio Connectors
Audio Anschlüsse
Inputs AUX In 3.5mm
Outputs Headphone 3.5mm, Digital Optical, Digital Coaxial, RCAL/R, Line Out 3.5mm
Sources
Quellen
Presets
Favoriten
DAB/DAB+
(174.928 -239.2 MHz)
ü30
FM
(87.5 -108 MHz) ü30
Internet Radio ü30
Spotify Connect ü10
Amazon Music ü8

1 3 12
13
182225 24
2 4 6 9 111517
2119 26 2023
14
16
5 7 8 10
A
B

1
3
4
6
8
10
9
12
14
16
18
2
5
7
11
13
15
17
19


8
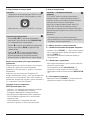
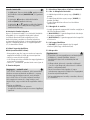
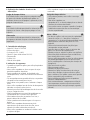
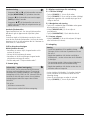
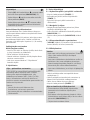
Spotify Connect
GUse your phone, tablet or computer as aremote
control for Spotify.Gotospotify.com/connect to learn how.
DVerwende dein Smartphone, Tablet oder deinen
Computer als Fernbedienung für Spotify.Auf spotify.com/
connect erfährst du mehr.
FUtilisez votretéléphone, votretablette ou votre
ordinateur comme une télécommande pour contrôler
Spotify.Accédez àspotify.com/connect pour en savoir plus.
EUsa tu teléfono, tu tablet otucomputadoracomo
control remoto de Spotify.Paramás información, entraa
spotify.com/connect.
IUsa il tuo cellulare, tablet ocomputer come
telecomando remoto per Spotify.Vai su spotify.com/
connect per scoprirecome.
NGebruik je telefoon, tablet of computer als een
afstandsbediening voor Spotify.Ganaar spotify.com/
connect om te leren hoe je dat doet
JΧρησιμοποίησε το τηλέφωνο,το τάμπλετ ήτον
υπολογιστή σουωςτηλεχειριστήριο για το Spotify.Πήγαινε
στο spotify.com/connect για να μάθεις πώς.
PWykorzystuj telefon, tablet lub komputer jako pilota,
aby sterowaćaplikacjąSpotify.Wejdźna spotify.com/
connect, aby dowiedziećsię,jak to zrobić.

9
Spotify Connect
HHasználd atelefont, táblagépet vagy számítógépet
aSpotify távirányítójaként. További tudnivalókat aspotify.
com/connect oldalon olvashatsz.
CHudbu ze Spotify můžeš ovládat na dálku přes
telefon, tablet nebo počítač.Nastránce spotify.com/
connect najdeš, jak na to.
OUsa oteu telemóvel, tablet ou computador como
comando do Spotify.Vai aspotify.com/connect para
saberes como
TTelefon, tablet veya bilgisayarınıSpotify için uzaktan
kumanda olarak kullan. Nasılyapacağınıöğrenmek için
spotify.com/connect adresine
SAnvänd din telefon, surfplatta eller dator som
fjärrkontroll för Spotify.Gåtill spotify.com/connect för att
ta reda på hur.
LKäytä puhelinta, tablettia tai tietokonetta Spotifyn
kaukosäätimenä. Katso tarkemmat tiedot osoitteesta
spotify.com/connect.
KBrug din telefon, tablet eller computer som
fjernbetjening til Spotify.Gåtil spotify.com/connect for at
nde ud af,hvordan du gør.
VBruk telefonen, nettbrettet eller datamaskinen som
en fjernkontroll for Spotify.Gåtil spotify.com/connect for å
lærehvordan.

2
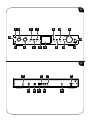
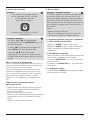
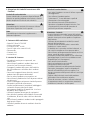
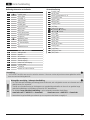
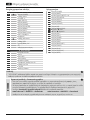
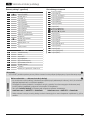
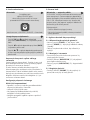
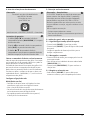
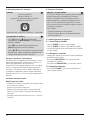
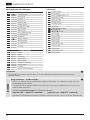
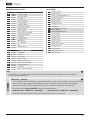
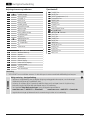
GQuick Reference Guide
Controls and Displays
A: Radio Front
1[POWER] Button
2AUX-In Socket
3[VOLUME] +/-
4[PRESET] Wheel
5[MODE] Button
6[ALARM] Button
7[EQUALIZER] Button
8[MENU] Button
9[INFO] Button
10 [BACK] Button
11 IR Sensor
12 [Navigation]
13 Headphone Socket
14 USB connection
15 2.8" Colour Display
16 LED
17 Brightness Sensor
B: Radio Rear
18 Mains Power Supply
19 Antenna*
20 WiFi Antenna
21 Optical OUT
22 Coaxial OUT
23 Stereo Chinch l/R out
24 Line OUT (3.5mm)
25 BT Antenna
26 Auto Dimmer Switch
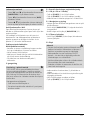
Note
*"DIT2105SBT" has achangeable antenna. Youcan use an active or passive antenna equipped with acoaxial
connection.
!
Important information -Quick-reference guide
•This quick-reference guide contains the most important basic information, such as safety instructions and the steps
necessary to operate the product.
•To help protect the environmental and conserve valuable rawmaterials, Hama does not issue aprinted manual and
instead makes this available exclusively as aPDF download.
•The full text
of the
manual is available at the following internet address:
www.hama.com -> 00054251 -> Downloads www.hama.com -> 00054252 -> Downloads
•Save the manual on your computer for reference and print them out if possible.
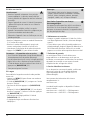
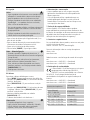
Remote Control
1[POWER] Button
2[MUTE] Button
3[PRESET] Direct Button (1-4)
4[EQUALIZER] Button
5[PRESET] List Button
6[MENU] Button
7[SOURCE] Button
8[OK] Button
9
[NAVIGATION] Button
▲Up ▼Down
◄Left ►Right
10 [VOL-] Button
11 [VOL+] Button
12 [HOME] Button
13 [BACK] Button
14 [INFO] Button
15 [BACKLIGHT] Button
16 [PAUSE] Button
17 [PLAY] Button
18 [PREVIOUS] Button
19 [NEXT] Button

3
1. Explanation of Warning Symbols and Notes
Risk of electric shock
This symbol indicates arisk of electric shock from
touching product parts carrying hazardous voltage.
Warning
This symbol is used to indicate safety instructions or to
draw your attention to specichazards and risks.
Note
This symbol is used to indicate additional information or
important notes.
2. Package Contents
•Digital-HiFi-Tuner DIT2105SBT
•Telescopic antenna
•2x Antenna (1x BT;1xWi)
•RCAcable (for stereo L/R RCAoutput)
•Remote control
•2x AAA batteries
•Quick guide
3. Safety Instructions
•The product is intended for private, non-commercial use
only.
•Do not use the product in areas in which electronic
products arenot permitted.
•Protect the product from dirt, moistureand overheating
and use it in dry rooms only.
•As with all electrical products, this device should be kept
out of the reach of children.
•Do not drop the product and do not expose it to any
major shocks.
•Do not operate the product outside the power limits
specied in the technical data.
•Keep the packaging material out of the reach of children
due to the risk of suffocation.
•Dispose of packaging material immediately in
accordance with the locally applicable regulations.
•Do not modify the device in any way.Doing so voids the
warranty.
•Use the product only for the intended purpose.
•Do not use the product in the immediate vicinity of
heaters, other heat sources or in direct sunlight.
•Do not use the product in adamp environment and
avoid splashing water.
•Only use the article under moderate climatic conditions.
Risk of electric shock
•Do not open the device or continue to operate it if it
becomes damaged.
•Do not use the product if the
AC adapter,the adapter cable or the mains cable are
damaged.
•Do not attempt to service or repair the product
yourself.Leave any and all service work to qualied
experts.
Warning –Batteries
•When inserting batteries, note the correct polarity (+
and -markings) and insert the batteries accordingly.
Failuretodosocould result in the batteries leaking or
exploding.
•Only use batteries (or rechargeable batteries) that
match the specied type.
•Beforeyou insert the batteries, clean the battery
contacts and the polar contacts.
•Do not allow children to change batteries without
supervision.
•Do not mix old and new batteries, or batteries of
different types or from different manufacturers.
•Remove the batteries from products that arenot being
used for an extended period (unless these arebeing
kept ready for an emergency).
•Do not short-circuit batteries.
•Do not charge batteries.
•Do not burn batteries.
•Keep batteries out of the reach of children.
•Never open, damage or swallow batteries or allow
them to enter the environment. They can contain toxic,
environmentally harmful heavy metals.
•Remove spent batteries from the product and dispose
of them without delay.
•Avoid storing, charging or using the device in extreme
temperatures and extremely low atmospheric pressure
(for example, at high altitudes).
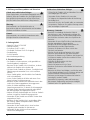
4. Before First Use
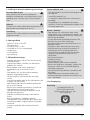
Note
Adetailed description of the
UNDOK app and all of its
functions can be found in our
UNDOK guide at:
www.hama.com ->00054251, 00054252 ->Downloads

4
Notes on use
•The [OK] button and ►on the remote control
correspond to the [NAVIGATION]button (12) on the
front of the radio.
•The ◄button on the remote control corresponds to
the [BACK]button on the front of the radio
•The ▲▼buttons on the remote control correspond
to turning the navigation controller to the left and
right on the front of the radio.
Preparing the remote control for use
Open the cover on the battery compartment. This can
be found on the back of the remote control and can be
opened by sliding in the direction indicated.
The extent of delivery includes two AAA batteries which
must be inserted into the battery compartment for the
remote control to work. When inserting the batteries,
ensurethat they areinserted with the correct polarity.
The relevant polarity (+ /-)ismarked inside the battery
compartment.
Setting up anetwork connection
WLAN (wireless network)
•Ensurethat the router is switched on, is functioning
correctly and that thereisaconnection to the internet.
•Activate the WLAN function of your router.
•Follow your router‘s operating instructions as regards the
correct functioning of the WLAN connection.
•Then proceed directly as described under section 5
‚Getting started‘.
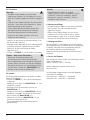
5. Getting Started
Note -optimising reception
"DIT2105SBT" has an antenna connection for external
antennas with acoaxial connection. Asuitable telescopic
antenna that allows DAB, DAB+ and FM reception is
included in the extent of delivery.Alternatively,you
can use an active or passive antenna to improve the
reception or to adapt it to your requirements.
Please note:
•Always pull the antenna out completely.
•We recommend you adjust the antenna vertically to
ensureoptimal reception.
5.1 General Notes on Use
5.1.1 Switch On /Off /Standby
•Press [POWER](1) to switch on the radio.
•Press [POWER](1) to switch the radio on (Standby).
•To completely switch off the device, disconnect it from
the power supply.
5.1.2 Navigation and Control
•After pressing ashortcut button, navigate through the
menu items using.
•Select the individual menu items by turning
[NAVIGATION](12).
•Conrm the selection by pressing [NAVIGATION](12).
5.1.3 Volume Adjustment
•Turn the volume up (right) or down (left) by turning
[VOLUME](3) accordingly.
5.2 Switching ON
Warning
•Only operate the product from asocket that has been
approved for the device. The socket must be installed
close to the product and must be easily accessible.
•Disconnect the product from the power supply using
the On/Off switch –ifthis is not available, unplug the
power cordfromthe socket.
•If using amulti-socket power strip, make surethat the
total power consumption of all connected devices does
not exceed the power strip's maximum throughput
rating.
•If you will not be using the product for aprolonged
period, disconnect it from mains power.
•Connect the power supply to the mains connection (1) on
the back of the radio.
•Connect the network cable to aproperly installed and
easily accessible network socket.
•Wait until the radio has initialised fully.
•Press [POWER](1) to switch on the radio.
Note –switching on for the rst time
•The Setup Wizardstarts up automatically when the
radio is turned on for the rst time.
•The language can be set during commissioning. To
do this, use the rotary control to select the required
language and conrm your choice by pressing
[NAVIGATION](12).
•Youcan skip the wizard.

5
5.3 Language
To change radio's menu language, proceed as follows:
•Press [MENU](8) to access the Settings menu.
•Use [NAVIGATION](12) to navigate to the "Settings"
menu item.
•Conrm the selection by pressing [NAVIGATION](12).
•Use [NAVIGATION](12) to navigate to the "Language"
menu item. Conrm the selection by pressing
[NAVIGATION](12).
•Use [NAVIGATION](12) to select your preferred system
language.
•The language setting currently selected is marked with
an asterisk (*).
Note
•The following languages areavailable:
English, German, Danish, Dutch, Finnish, French,
Italian, Norwegian, Polish, Portuguese, Spanish,
Swedish,Turkish, Czech and Slovak.
6. Care and Maintenance
•Only clean this product with aslightly damp, lint-free
cloth and do not use aggressive cleaning agents.
•If you do not plan to use the product for aprolonged
period, turn off the device and disconnect it from the
power supply.Storeitinaclean, dry place away from
direct sunlight.
7. Warranty Disclaimer
Hama GmbH &CoKGassumes no liability and provides no
warranty for damage resulting from improper installation/
mounting, improper use of the product or from failureto
observe the operating instructions and/or safety notes.
8. Service and Support
Please contact Hama Product Consulting if you have any
questions about this product.
Hotline: +49 9091 502-115 (German/English)
Further support information can be found here:
www.hama.com
The full text of the manual is available at the following
internet address:
www.hama.com -> 00054251 -> Downloads
www.hama.com -> 00054252 -> Downloads
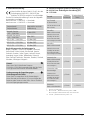
9. Declaration of Conformity
Hama GmbH &CoKGhereby declares that the
radio equipment type [00054251, 00054252] is in
compliance with Directive 2014/53/EU.The full
text of the EU declaration of conformity is available at the
following internet address:
www.hama.com -> 00054251 -> Downloads
www.hama.com -> 00054252 -> Downloads
Frequency band(s) Maximum radio-frequency
power transmitted
Bluetooth Receiver
2.402 –2.480GHz 6.5 dBm(EIRP)
Bluetooth Transmitter
2.402 –2.480 GHz 4dBm (EIRP)
WiFi: 2.400 –2.480 GHz 15.5dBm (EIRP)
WiFi: 5.150 –5.350 GHz 16.5dBm (EIRP)
WiFi: 5.470 –5.725 GHz 16.5dBm (EIRP)
Restrictions or Requirements in
Belgium, Bulgaria, Czech Republic, Denmark, Germany,
Estonia, Ireland, Greece, Spain, France, Croatia, Italy,
Cyprus, Latvia, Lithuania, Luxembourg, Hungary,Malta,
the Netherlands, Austria, Poland, Portugal, Romania,
Slovenia, Slovakia, Finland, Sweden, United Kingdom
Note
If channels 36-64 (channels of frequency
5150 MHz -5350 MHz) areused, the device may only be
used in closed rooms.
To limit exposuretoelectromagnetic elds
This device is intended for use at adistance of at least
20 cm from the body of the user or persons nearby.This
device must not be worn or carried on the body.
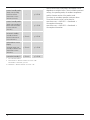
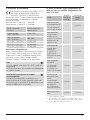
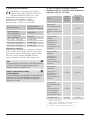
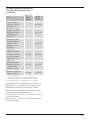
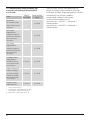
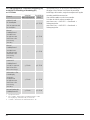
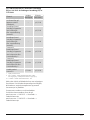
10. Consumption information according to directive
(EU) No. 801/2013 amending the directive (EC) No.
1275/2008
Status Duration of
trigger time
Energy
consumption
off-mode
0/I mains switch
(only on devices with 0/I
mains switch)
–≤0.50 W

6
manual standby mode
(Ready state (Standby)
on devices without
information or status
indicator (manual)*)
–≤0.50 W
manual standby mode
(Ready state (standby) on
devices with information
or status indicator
(manual)*)
–≤1.00 W
automatic standby
(Standby on devices
without information or
status indicator**)
≤20 min ≤0.50 W
information or status
display
(Automatic ready state
(Standby) on devices with
information or status
indicator**)
≤20 min ≤1.00 W
networked standby*** ≤20 min ≤2.00 W
*Press the Power button
** Not networked -"Maintain network connection -NO".
Not available in FM mode, if present.
*** Networked -"Maintain network connection -YES"
Please note that the actual power consumption can be
dependent on multiple factors. These include the personal
settings, the operating mode, the ambient temperature
and the rmwareversion of the product used.
The values set out above represent maximum values.
The actual reference values can be found at:
www.hama.com -> 00054251 -> Downloads ->
Consumption information
www.hama.com -> 00054252 -> Downloads ->
Consumption information

7
DSchnellstartanleitung
Bedienungselemente und Anzeigen
A: Radio Frontseite
1[POWER]-Taste
2AUX-In Buchse
3[VOLUME] +/-
4[PRESET] Rad
5[MODE]-Taste
6[ALARM]-Taste
7[EQUALIZER] Taste
8[MENU]-Taste
9[INFO] Taste
10 [BACK] (Zurück)-Taste
11 Infrarotempfänger
12 [Navigation]
13 Kopfhörer Buchse
14 USB-Anschluss
15 2.8" Farbdisplay
16 LED
17 Helligkeitssensor
B: Radio Rückseite
18 Netzzuleitung
19 Antenne*
20 WiFi-Antenne
21 Optischer Ausgang
22 Coaxial Ausgang
23 Stereo Cinch L/R Ausgang
24 Line-OUT (3.5mm)
25 BT Antenne
26 Auto Dimmerschalter
Hinweis
*"DIT2105SBT" verfügt über eine wechselbareAntenne. Sie können eine aktive oder passive Antenne verwenden,
welche über einen Koaxial-Anschluss verfügt.
!
Wichtiger Hinweis -Kurzanleitung
•Dies ist eine Kurzanleitung,die Siemit den wichtigsten Basis-Informationenwie Sicherheitshinweisenund der
Inbetriebnahme IhresProduktesversorgt.
•Aus Gründen desUmweltschutzesund der Einsparung wertvollerRohstoffeverzichtet dieFirma Hamaauf eine
gedruckte Langanleitung und bietet diese ausschließlich alsPDF-Download an.
•Die vollständige Langanleitung istunter der folgendenInternetadresse verfügbar:
www.hama.com->00054251 -> Downloads www.hama.com -> 00054252 -> Downloads
•SpeichernSie dieLanganleitungzum Nachschlagenauf Ihrem Computer und druckenSie diese nach Möglichkeitaus.
Fernbedienung
1[POWER]-Taste
2[MUTE]-Taste
3[PRESET]-Direkttasten (1-4)
4[EQUALIZER]-Taste
5[PRESET]-Listenansichttaste
6[MENU]-Taste
7[SOURCE]-Taste
8[OK]-Taste
9
[NAVIGATIONS]-Tasten
▲Hoch▼Runter
◄Links ►Rechts
10 [VOL-]-Taste
11 [VOL+]-Taste
12 [HOME]-Taste
13 [BACK]-Taste
14 [INFO]-Taste
15 [BACKLIGHT]-Taste
16 [PAUSE]-Taste
17 [PLAY]-Taste
18 [PREVIOUS]-Taste
19 [NEXT]-Taste

8
1. Erklärung von Warnsymbolen und Hinweisen
Gefahr eines elektrischen Schlages
Dieses Symbol weist auf eine Berührungsgefahr mit nicht
isolierten Teilen des Produktes hin, die möglicherweise
eine gefährliche Spannung von solcher Höhe führen,
dass die Gefahr eines elektrischen Schlags besteht.
Warnung
Wirdverwendet, um Sicherheitshinweise zu
kennzeichnen oder um Aufmerksamkeit auf besondere
Gefahren und Risiken zu lenken.
Hinweis
Wirdverwendet, um zusätzlich Informationen oder
wichtige Hinweise zu kennzeichnen.
2. Packungsinhalt
•Digital-HiFi-Tuner DIT2105SBT
•Teleskop Antenne
•2x Antenne (1x BT;1xWi)
•Cinchkabel (für Stereo Cinch L/R Ausgang)
•Fernbedienung
•2x AAA Batterien
•diese Bedienungsanleitung
3. Sicherheitshinweise
•Das Produkt ist für den privaten, nicht-gewerblichen
Haushaltsgebrauch vorgesehen.
•Benutzen Sie das Produkt nicht in Bereichen, in denen
elektronische Produkte nicht erlaubt sind.
•Schützen Sie das Produkt vor Schmutz, Feuchtigkeit und
Überhitzung und verwenden Sie es nur in trockenen
Räumen.
•Dieses Produkt gehört, wie alle elektrischen Produkte,
nicht in Kinderhände!
•Lassen Sie das Produkt nicht fallen und setzen Sie es
keinen heftigen Erschütterungen aus.
•Betreiben Sie das Produkt nicht außerhalb seiner in den
technischen Daten angegebenen Leistungsgrenzen.
•Halten Sie Kinder unbedingt von dem
Verpackungsmaterial fern, es besteht Erstickungsgefahr.
•Entsorgen Sie das Verpackungsmaterial sofort gemäß
den örtlich gültigen Entsorgungsvorschriften.
•Nehmen Sie keine Veränderungen am Gerät vor.Dadurch
verlieren sie jegliche Gewährleistungsansprüche.
•Verwenden Sie das Produkt ausschließlich für den dazu
vorgesehenen Zweck.
•Betreiben Sie das Produkt nicht in unmittelbarer Nähe
der Heizung, anderer Hitzequellen oder in direkter
Sonneneinstrahlung.
•Verwenden Sie das Produkt nicht in einer feuchten
Umgebung und vermeiden Sie Spritzwasser.
•Verwenden Sie den Artikel nur unter moderaten
klimatischen Bedingungen.
Gefahr eines elektrischen Schlages
•Öffnen Sie das Produkt nicht und betreiben Sie es bei
Beschädigungen nicht weiter.
•Verwenden Sie das Produkt nicht, wenn der
AC-Adapter,das Adapterkabel oder die Netzleitung
beschädigt sind.
•Versuchen Sie nicht, das Produkt selbst zu warten oder
zu reparieren. Überlassen Sie jegliche Wartungs-arbeit
dem zuständigen Fachpersonal.
Warnung –Batterien
•Beachten Sie unbedingt die korrekte Polarität
(Beschriftung +und -) der Batterien und legen Sie
diese entsprechend ein. Bei Nichtbeachtung besteht
die Gefahr des Auslaufens oder einer Explosion der
Batterien.
•Verwenden Sie ausschließlich Akkus (oder Batterien),
die dem angegebenen Typentsprechen.
•Reinigen Sie vor dem Einlegen der Batterien die
Batteriekontakte und die Gegenkontakte.
•Gestatten Sie Kindern nicht ohne Aufsicht das
Wechseln von Batterien.
•Mischen Sie alte und neue Batterien nicht, sowie
Batterien unterschiedlichen Typs oder Herstellers.
•Entfernen Sie Batterien aus Produkten, die längereZeit
nicht benutzt werden (außer diese werden für einen
Notfallbereit gehalten).
•Schließen Sie die Batterien nicht kurz.
•Laden Sie Batterien nicht.
•Werfen Sie Batterien nicht ins Feuer.
•Bewahren Sie Batterien außerhalb der Reichweite von
Kindern auf.
•Batterien nie öffnen, beschädigen, verschlucken oder
in die Umwelt gelangen lassen. Sie können giftige und
umweltschädliche Schwermetalle enthalten.
•Entfernen und entsorgen Sie verbrauchte Batterien
unverzüglich aus dem Produkt.
•Vermeiden Sie Lagerung, Laden und Benutzung
bei extremen Temperaturen und extrem niedrigem
Luftdruck (wie z.B. in großen Höhen).

9
4. Vor der Inbetriebnahme
Hinweis
Eine ausführliche Beschreibung der
UNDOK-App und des vollen
Funktionsumfangs nden Sie in unserem
UNDOK-Guide unter:
www.hama.com ->00054251, 00054252 ->Downloads
Bedienungshinweise
•Die Taste [OK]sowie ►auf der Fernbedienung
entspricht der Taste [NAVIGATION](12) auf der
Frontseite des Radios.
•Die Taste ◄auf der Fernbedienung entspricht der
Taste [BACK]auf der Frontseite des Radios
•Die Tasten ▲▼auf der Fernbedienung
entsprechen dem Drehen nach links und rechts des
Navigationsreglers auf der Front des Radios.
Fernbedienung in Betrieb nehmen
Öffnen Sie die Abdeckung des Batteriefachs. Diese bendet
sich auf der Rückseite der Fernbedienung und kann
durch Schieben in die gekennzeichnete Richtung geöffnet
werden.
Zum Lieferumfang gehören zwei AAA-Batterien, welche
Sie für die Inbetriebnahme in das Batteriefach einlegen
müssen. Achten Sie beim Einlegen darauf,dass die
Batterien mit der richtigen Polarität eingelegt werden.
Die vorgegebene Polarität (+ /-)ist im Batteriefach
gekennzeichnet.
Netzwerkverbindung einrichten
WLAN (kabelloses Netzwerk)
•Stellen Sie sicher,dass der Router eingeschaltet ist,
korrekt funktioniert und Verbindung zum Internet
besteht.
•Aktivieren Sie die WLAN Funktion ihres Routers.
•Beachten Sie bezüglich einer korrekten Funktion der
WLAN-Verbindung die Bedienungsanleitung ihres
Routers.
•Gehen Sie dann wie unter Pkt. 5„Inbetriebnahme“
beschrieben weiter vor.
5. Inbetriebnahme
Hinweis –optimaler Empfang
"DIT2105SBT" verfügt über einen Antennenanschluss
für externe Antennen mit Coaxial-Anschluss. Im
Lieferumfang ist bereits eine passende Teleskopantenne
enthalten, welche Ihnen den Empfang über DAB,
DAB+ und FM ermöglicht. Alternativ können Sie
eine aktive oder passive Antenne verwenden, um
die Empfangsleistung zu verbessern oder Ihren
Anforderungen anzupassen.
Beachten Sie:
•Ziehen Sie die Antenne immer vollständig aus.
•Für einen optimalen Empfang empfehlen wir die
Antenne vertikal auszurichten.
5.1 Allgemeine Hinweise zur Bedienung
5.1.1 Ein- /Ausschalten/ Standby
•Drücken Sie [POWER](1), um das Radio einzuschalten.
•Drücken Sie [POWER](1), um das Radio auszuschalten
(Standby).
•Trennen Sie das Gerät von der Stromversorgung, um es
vollständig auszuschalten.
5.1.2 Navigation und Steuerung
•Navigieren Sie nach Druck auf eine Kurzwahltaste durch
die angebotenen Menüpunkte.
•Durch Drehen von [NAVIGATION](12) wählen Sie
einzelne Menüpunkte aus.
•Durch Drücken von [NAVIGATION](12) bestätigen Sie
die Auswahl.
5.1.3 Lautstärke anpassen
•Durch Drehen von [VOLUME](3) wirddie Lautstärke
erhöht (rechts) oder reduziert (links).

10
5.2 Einschalten
Warnung
•Betreiben Sie das Produkt nur an einer dafür
zugelassenen Steckdose. Die Steckdose muss in der
Nähe des Produktes angebracht und leicht zugänglich
sein.
•Trennen Sie das Produkt mittels des Ein-/Ausschalters
vom Netz –wenn dieser nicht vorhanden ist, ziehen
Sie die Netzleitung aus der Steckdose.
•Achten Sie bei Mehrfachsteckdosen darauf,dass
die angeschlossenen Verbraucher die zulässige
Gesamtleistungsaufnahme nicht überschreiten.
•Trennen Sie das Produkt vom Netz, wenn Sie es
längereZeit nicht benutzen.
•Schließen Sie das Netzteil an der Netzzuleitung (1) auf
der Rückseite des Radios an.
•Verbinden Sie das Netzkabel mit einer ordnungsgemäß
installierten und leicht zugänglichen Netzsteckdose.
•Warten Sie, bis die Initialisierung des Radios
abgeschlossen ist.
•Drücken Sie [POWER](1), um das Radio einzuschalten.
Hinweis –beim ersten Einschalten
•Beim ersten Start wirdautomatisch der
Einrichtungsassistent (Setup Wizard) gestartet.
•Bei Erstinbetriebnahme kann die Sprache eingestellt
werden. Wählen Sie hierfür mit Hilfe des Drehreglers
die gewünschte Sprache aus und bestätigen Sie Ihre
Auswahl durch Drücken von [NAVIGATION](12).
•Sie können den Assistenten überspringen.
5.3 Sprache
Um die eingestellte Menüsprache des Radios zu ändern,
gehen Sie wie folgt vor:
•Drücken Sie [MENU](8), um in das Einstellungsmenü
zu gelangen.
•Navigieren Sie mit Hilfe von [NAVIGATION](12) zum
Menüpunkt „Settings“.
•Bestätigen Sie die Auswahl durch Drücken von
[NAVIGATION](12).
•Navigieren Sie mit Hilfe von [NAVIGATION](12) zum
Menüpunkt „Language“. Bestätigen Sie die Auswahl
durch Drücken von [NAVIGATION](12).
•Wählen Sie mit Hilfe von [NAVIGATION](12) Ihre
gewünschte Systemsprache aus.
•Die aktuell gewählte Spracheinstellung wirdmit *
gekennzeichnet.
Hinweis
•Folgende Sprachen stehen zur Auswahl:
Englisch, Deutsch, Dänisch, Holländisch, Finnisch,
Französisch, Italienisch, Norwegisch, Polnisch,
Portugiesisch, Spanisch, Schwedisch, Türkisch,
Slowakisch und Tschechisch
6. Wartung und Pflege
•Reinigen Sie dieses Produkt nur mit einem fusselfreien,
leicht feuchten Tuch und verwenden Sie keine
aggressiven Reiniger.
•Sollten Sie das Produkt längereZeit nicht nutzen,
schalten Sie das Gerät aus und trennen es von der
Stromversorgung. Lagern Sie es an einem sauberen,
trockenen Ort ohne direkte Sonneneinstrahlung.
7. Haftungsausschluss
Die Hama GmbH &CoKGübernimmt keinerlei Haftung
oder Gewährleistung für Schäden, die aus unsachgemäßer
Installation, Montage und unsachgemäßem Gebrauch
des Produktes oder einer Nichtbeachtung der
Bedienungsanleitung und/oder der Sicherheitshinweise
resultieren.
8. Service und Support
Bitte wenden Sie sich bei Fragen zum Produkt gerne an die
Hama-Produktberatung.
Hotline: +49 9091 502-115 (Deu/Eng)
WeitereSupportinformationen nden sie hier:
www.hama.com
Die vollständige Langanleitung ist unter der folgenden
Internetadresse verfügbar:
www.hama.com -> 00054251 -> Downloads
www.hama.com -> 00054252 -> Downloads

11
9. Konformitätserklärung
Hiermit erklärt die Hama GmbH &CoKG, dass der
Funkanlagentyp [00054251, 00054252] der
Richtlinie 2014/53/EU entspricht. Der vollständige
Text der EU-Konformitätserklärung ist unter der folgenden
Internetadresse verfügbar:
www.hama.com -> 00054251 -> Downloads
www.hama.com -> 00054252 -> Downloads
Frequenzband/
Frequenzbänder
Abgestrahlte maximale
Sendeleistung
Bluetooth Receiver
2.402 –2.480 GHz 6.5dBm (EIRP)
Bluetooth Transmitter
2.402 –2.480GHz 4dBm (EIRP)
WiFi: 2.400 –2.480 GHz 15.5 dBm(EIRP)
WiFi: 5.150 –5.350 GHz 16.5 dBm(EIRP)
WiFi: 5.470 –5.725 GHz 16.5 dBm (EIRP)
Beschränkungen oder Anforderungen in
Belgien, Bulgarien, Tschechische Republik, Dänemark,
Deutschland, Estland, Irland, Griechenland, Spanien,
Frankreich, Kroatien, Italien, Zypern, Lettland, Litauen,
Luxemburg, Ungarn, Malta, Niederlande, Österreich,
Polen, Portugal, Rumänien, Slowenien, Slowakei, Finnland,
Schweden, Vereinigtes Königreich
Hinweis
Wenn Kanal 36-64 (Kanäle der Frequenz
5150 MHz -5350 MHz) verwendet wird, darf das Gerät
nur in geschlossenen Räumen verwendet werden.
Zur Begrenzung der Exposition gegen
elektromagnetische Felder
Dieses Gerät ist vorgesehen für die Verwendung in
einem Abstand von mindestens 20 cm zum Körper des
Benutzers oder Personen in der Nähe. Dieses Gerät darf
nicht am Körper getragen werden.
10. Verbrauchsangaben gemäß Verordnung (EU)
Nr.801/2013 zur Änderung der Verordnung (EC)
Nr.1275/2008
Zustand Zeitdauer
Auslösezeit
Energieverbrauch
(Watt)
Aus-Zustand
0/I Netzschalter
(nur bei Geräten mit 0/I
Netz-Schalter)
–≤0.50 W
Manueller
Bereitschaftszustand
(Bereitschaftszustand
(Standby) bei Geräten
ohne Information oder
Statusanzeige (manuell)*)
–≤0.50 W
Manueller
Bereitschaftszustand
(Bereitschaftszustand
(Standby) bei Geräten
mit Information oder
Statusanzeige (manuell)*)
–≤1.00 W
Automatischer
Bereitschaftszustand
(Standby bei Geräten
ohne Information oder
Statusanzeige**)
≤20 min ≤0.50 W
Information oder
Statusanzeige
(Automatischer
Bereitschaftszustand
(Standby) bei Geräten
mit Information oder
Statusanzeige**)
≤20 min ≤1.00 W
Vernetzter
Bereitschaftsbetrieb*** ≤20 min ≤2.00 W
*Drücken der Power-Taste
** Nicht vernetzt -„Netzwerkverbindung halten -NEIN“.
Nicht verfügbar im Betriebsmodus FM, sofern vorhanden.
*** Vernetzt -„Netzwerkverbindung halten -JA“

12
Bitte beachten Sie, dass die tatsächliche
Leistungsaufnahme von mehreren Faktoren abhängig
sein kann. Dazu gehören die persönlichen Einstellungen,
der Betriebsmodus, die Umgebungstemperatur und die
verwendete Firmwareversion des Produktes.
Die oben genannten Werte stellen Maximalwerte dar.
Die tatsächlichen Referenzwerte nden Sie unter:
www.hama.com -> 00054251 -> Downloads ->
Verbrauchsangaben
www.hama.com -> 00054252 -> Downloads ->
Verbrauchsangaben

13
FGuide de démarrage rapide
Éléments de commande et d'affichage
A: Radio Face avant
1Touche [POWER]
2Prise AUX IN
3[VOLUME] +/-
4Molette [PRESET]
5Touche [MODE]
6Touche [ALARM]
7Touche [EQUALIZER]
8Touche [MENU]
9Touche [INFO]
10 Touche [BACK] (retour)
11 Récepteur infrarouge
12 [Navigation]
13 Prise casque
14 Connexion USB
15 Écran couleur 2.8"
16 LED
17 Capteur de luminosité
B: Face arrière
18 Alimentation
19 Antenne*
20 Antenne Wi-Fi
21 Sortie optique
22 Sortie coaxiale
23 Sortie stéréo RCAL/R
24 Prise LINE OUT
25 BT Antenne
26 Variateur automatique de luminosité
Remarque
*"DIT2105SBT" dispose d’une antenne remplaçable. Vous pouvez utiliser une antenne active ou passive dotée d’une
connexion coaxiale.
!
Remarque importante -Guide rapide
•ceci est un guide rapide qui vous fournit les informations de base les plus importantes relatives aux consignes de
sécurité et àlamise en service de votreproduit.
•Pour des raisons de protection de l’environnement et de préservation de précieuses matières premières, la société
Hama renonce àl’impression d’un mode d’emploi complet et met celui-ci àdisposition exclusivement sous forme de
chier PDF.
•Le mode d’emploi complet est disponible àl’adresse Internet suivante :
www.hama.com -> 00054251 -> Téléchargements www.hama.com -> 00054252 -> Téléchargements
•Sauvegardez ce mode d’emploi complet pour le consulter sur votreordinateur et imprimez-le si nécessaire.
Télécommande
1Touche [POWER]
2Touche [MUTE]
3Touches Directes [PRESET] (1-4)
4Touche [EQUALIZER]
5Touche [PRESET]
6Touche [MENU]
7Touche [SOURCE]
8Touche [OK]
9
Touche [NAVIGATIONS]
▲Haut ▼Bas
◄Reculer ►Avancer
10 Touche [VOL-]
11 Touche [VOL+]
12 Touche [HOME]
13 Touche [BACK]
14 Touche [INFO]
15 Touche [BACKLIGHT]
16 Touche [PAUSE]
17 Touche [PLAY]
18 Touche [PREVIOUS]
19 Touche [NEXT]

14
1. Explication des symboles d’avertissement et des
remarques
Risque d’électrocution
Ce symbole indique un risque de contact avec des
parties non isolées du produit susceptibles de conduire
un courant électrique capable de provoquer une
électrocution.
Avertissement
Ce symbole est utilisé pour indiquer des consignes de
sécurité ou pour attirer votreattention sur des dangers et
risques particuliers.
Remarque
Ce symbole est utilisé pour indiquer des informations
supplémentaires ou des remarques importantes.
2. Contenu de l’emballage
•Digital-HiFi-Tuner DIT2105SBT
•Antenne télescopique
•2x Antenne (1x BT;1xWi)
•Câble RCA(pour sortie stéréo RCAL/R)
•Télécommande
•2piles LR03/AAA
•Notice d’utilisation
3. Consignes de sécurité
•Ce produit est destiné àunusage privé et non
commercial.
•N’utilisez pas le produit dans des zones où les produits
électroniques ne sont pas autorisés.
•Protégez le produit de toute saleté, humidité, surchauffe
et utilisez-le uniquement dans des locaux secs.
•Cet appareil, comme tout appareil électrique, doit être
gardé hors de portée des enfants !
•Protégez le produit des secousses violentes et évitez tout
choc ou toute chute.
•N’utilisez pas le produit en dehors des limites
de puissance indiquées dans les caractéristiques
techniques.
•Tenez les emballages d’appareils hors de portée des
enfants, risque d’étouffement.
•Recyclez les matériaux d’emballage conformément aux
prescriptions locales en vigueur.
•N’apportez aucune modication àl’appareil. Toute
modication vous ferait perdrevos droits de garantie.
•L’emploi du produit est exclusivement réservé àsa
fonction prévue.
•N’utilisez pas l’appareil àproximité immédiate d’un
chauffage, d’autres sources de chaleur ou àlalumière
directe du soleil.
•N’utilisez pas l’appareil dans un environnement humide
et évitez les projections d’eau.
•Utilisez l’article dans des conditions climatiques
modérées uniquement.
Risque d’électrocution
•Ne tentez pas d’ouvrir le produit en cas de
détérioration et cessez de l’utiliser.
•N’utilisez pas l’appareil si
l’adaptateur secteur,lecâble de l’adaptateur ou le
cordon d’alimentation est endommagé.
•Ne tentez pas de réparer l’appareil vous-même ni
d’effectuer des travaux d’entretien. Déléguez les
travaux d’entretien àdes techniciens qualiés.
Avertissement –Piles
•Respectez impérativement la polarité des piles
(indications +et-)lors de leur insertion dans le boîtier.
Risques d’écoulement et d’explosion des piles si tel
n’est pas le cas.
•Utilisez exclusivement des batteries (ou des piles) du
type indiqué.
•Avant d’insérer les piles, nettoyez-en les contacts, ainsi
que les contacts d’accouplement.
•N’autorisez pas des enfants àremplacerles piles d’un
appareil sans surveillance.
•N’utilisez pas simultanément des piles usagées et des
piles neuves ou des piles de différents types.
•Retirez les piles des produits que vous ne comptez pas
utiliser pendant un certain temps (à l’exception de ceux
qui peuvent êtreutilisés en cas d’urgence).
•Ne court-circuitez pas les piles.
•Ne tentez pas de recharger les piles.
•Ne jetez pas de piles au feu.
•Conservez les piles hors de portée des enfants.
•Ne tentez pas d’ouvrir les piles, faites attention àne
pas les endommager,les jeter dans l’environnement
et àceque des jeunes enfants ne les avalent pas. Les
piles sont susceptibles de contenir des métaux lourds
toxiques et nocifs pour l’environnement.
•Retirez les piles usagées immédiatement du produit et
mettez-les au rebut immédiatement.
•Évitez de stocker,charger et utiliser le produit
àdes températures extrêmes et àune pression
atmosphérique extrêmement basse (à haute altitude,
par exemple).
Sayfa yükleniyor...
Sayfa yükleniyor...
Sayfa yükleniyor...
Sayfa yükleniyor...
Sayfa yükleniyor...
Sayfa yükleniyor...
Sayfa yükleniyor...
Sayfa yükleniyor...
Sayfa yükleniyor...
Sayfa yükleniyor...
Sayfa yükleniyor...
Sayfa yükleniyor...
Sayfa yükleniyor...
Sayfa yükleniyor...
Sayfa yükleniyor...
Sayfa yükleniyor...
Sayfa yükleniyor...
Sayfa yükleniyor...
Sayfa yükleniyor...
Sayfa yükleniyor...
Sayfa yükleniyor...
Sayfa yükleniyor...
Sayfa yükleniyor...
Sayfa yükleniyor...
Sayfa yükleniyor...
Sayfa yükleniyor...
Sayfa yükleniyor...
Sayfa yükleniyor...
Sayfa yükleniyor...
Sayfa yükleniyor...
Sayfa yükleniyor...
Sayfa yükleniyor...
Sayfa yükleniyor...
Sayfa yükleniyor...
Sayfa yükleniyor...
Sayfa yükleniyor...
Sayfa yükleniyor...
Sayfa yükleniyor...
Sayfa yükleniyor...
Sayfa yükleniyor...
Sayfa yükleniyor...
Sayfa yükleniyor...
Sayfa yükleniyor...
Sayfa yükleniyor...
Sayfa yükleniyor...
Sayfa yükleniyor...
Sayfa yükleniyor...
Sayfa yükleniyor...
Sayfa yükleniyor...
Sayfa yükleniyor...
Sayfa yükleniyor...
Sayfa yükleniyor...
Sayfa yükleniyor...
Sayfa yükleniyor...
Sayfa yükleniyor...
Sayfa yükleniyor...
Sayfa yükleniyor...
Sayfa yükleniyor...
Sayfa yükleniyor...
Sayfa yükleniyor...
Sayfa yükleniyor...
Sayfa yükleniyor...
Sayfa yükleniyor...
Sayfa yükleniyor...
Sayfa yükleniyor...
Sayfa yükleniyor...
Sayfa yükleniyor...
Sayfa yükleniyor...
Sayfa yükleniyor...
Sayfa yükleniyor...
Sayfa yükleniyor...
Sayfa yükleniyor...
Sayfa yükleniyor...
Sayfa yükleniyor...
Sayfa yükleniyor...
Sayfa yükleniyor...
Sayfa yükleniyor...
Sayfa yükleniyor...
Sayfa yükleniyor...
Sayfa yükleniyor...
Sayfa yükleniyor...
Sayfa yükleniyor...
Sayfa yükleniyor...
Sayfa yükleniyor...
Sayfa yükleniyor...
Sayfa yükleniyor...
Sayfa yükleniyor...
Sayfa yükleniyor...
Sayfa yükleniyor...
Sayfa yükleniyor...
Sayfa yükleniyor...
Sayfa yükleniyor...
Sayfa yükleniyor...
Sayfa yükleniyor...
-
 1
1
-
 2
2
-
 3
3
-
 4
4
-
 5
5
-
 6
6
-
 7
7
-
 8
8
-
 9
9
-
 10
10
-
 11
11
-
 12
12
-
 13
13
-
 14
14
-
 15
15
-
 16
16
-
 17
17
-
 18
18
-
 19
19
-
 20
20
-
 21
21
-
 22
22
-
 23
23
-
 24
24
-
 25
25
-
 26
26
-
 27
27
-
 28
28
-
 29
29
-
 30
30
-
 31
31
-
 32
32
-
 33
33
-
 34
34
-
 35
35
-
 36
36
-
 37
37
-
 38
38
-
 39
39
-
 40
40
-
 41
41
-
 42
42
-
 43
43
-
 44
44
-
 45
45
-
 46
46
-
 47
47
-
 48
48
-
 49
49
-
 50
50
-
 51
51
-
 52
52
-
 53
53
-
 54
54
-
 55
55
-
 56
56
-
 57
57
-
 58
58
-
 59
59
-
 60
60
-
 61
61
-
 62
62
-
 63
63
-
 64
64
-
 65
65
-
 66
66
-
 67
67
-
 68
68
-
 69
69
-
 70
70
-
 71
71
-
 72
72
-
 73
73
-
 74
74
-
 75
75
-
 76
76
-
 77
77
-
 78
78
-
 79
79
-
 80
80
-
 81
81
-
 82
82
-
 83
83
-
 84
84
-
 85
85
-
 86
86
-
 87
87
-
 88
88
-
 89
89
-
 90
90
-
 91
91
-
 92
92
-
 93
93
-
 94
94
-
 95
95
-
 96
96
-
 97
97
-
 98
98
-
 99
99
-
 100
100
-
 101
101
-
 102
102
-
 103
103
-
 104
104
-
 105
105
-
 106
106
-
 107
107
-
 108
108
-
 109
109
-
 110
110
-
 111
111
-
 112
112
-
 113
113
-
 114
114


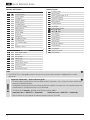
diğer dillerde
- slovenčina: Hama DIT2105SBT Užívateľská príručka
- français: Hama DIT2105SBT Mode d'emploi
- polski: Hama DIT2105SBT instrukcja
- português: Hama DIT2105SBT Guia de usuario
- dansk: Hama DIT2105SBT Brugervejledning
- română: Hama DIT2105SBT Manualul utilizatorului