
DA
IT
ES
PT
EL
TR
AR
FA
FR
EN
DE
NL
ES
PT
IT
TR
EL
DA
FI
NO
SV
AR
FA

E
D
C
I
G*
F*
H*
A
B
E
D
C
I
G
H
G*
H*
A
B
G
F
G*
F*

1
2
3
4
1
2
2
1
3
1
2
1
2
2
1
1
3
2
2
2
1
2
3
1
4
2
1

FR
1
• Lisez attentivement le mode d’emploi
avant la première utilisation de votre
appareil : une utilisation non conforme
au mode d’emploi dégagerait le
fabricant de toute responsabilité.
• Cet appareil n’est pas prévu pour être
utilisé par des personnes (y compris les
enfants) dont les capacités physiques,
sensorielles ou mentales sont réduites
ou des personnes dénuées
d’expérience ou de connaissance, sauf
si elles ont pu bénéficier, par
l’intermédiaire d’une personne
responsable de leur sécurité, d’une
surveillance ou d’instructions préalables
concernant l’utilisation de l’appareil. Il
convient de surveiller les enfants pour
s’assurer qu’ils ne jouent pas avec
l’appareil.
• L’appareil est conçu pour fonctionner
uniquement en courant alternatif.
Vérifiez que la tension d’alimentation
indiquée sur la plaque signalétique de
l’appareil correspond bien à celle de
votre installation électrique.
• Ce produit est exclusivement destiné à
un usage domestique. Le fabricant
décline toute responsabilité et se
réserve le droit de résilier la garantie en
cas d’utilisation commerciale ou
inadptée, ou de non-respect des
consignes.
• Pensez à débrancher l’appareil de
l’alimentation, si vous devez le laisser
sans surveillance, avant de placer ou
d’enlever les accessoires ou avant de le
nettoyer. Ne tirez jamais sur le cordon
pour débrancher l’appareil.
• N’utilisez pas votre appareil s’il ne
fonctionne pas correctement, s’il a été
endommagé ou si le câble
d’alimentation ou la fiche sont
endommagés. Afin d’éviter tout danger,
faites-les obligatoirement remplacer par
un centre service agréé (voir liste dans
le livret service).
• Toute intervention autre que le
nettoyage et l’entretien usuel par le
client doit être effectuée par un centre
service agréé.
• Ne mettez pas l’appareil, le câble
d’alimentation ou la fiche dans du
liquide.
• Ne laissez pas le câble d’alimentation à
portée de mains des enfants, être à
proximité ou en contact avec les parties
chaudes de l’appareil, près d’une
source de chaleur ou sur un angle vif.
• Pour votre sécurité, ne pas utiliser
d’accessoires ou de pièces de
rechange, autres que ceux fournis par
les centres de service après-vente
agréés.
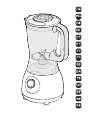
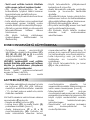
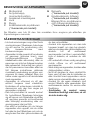
A
B
C
D
E
F
Bloc moteur
Bouton marche/arrêt/pulse
Bol blender gradué
Couvercle
Bouchon doseur
Bloc lames moulin à épices
(*Accessoire selon modèle)
G
H
I
Bloc râpe
(*Accessoire selon modèle)
Bloc lames moulin à fines
herbes
(*Accessoire selon modèle)
Bol râpe, moulin à épices et
moulin à fines herbes
(*Accessoire selon modèle)
Les accessoires contenus dans le modèle que vous venez d’acheter, sont
représentés sur l’étiquette sur le dessus de l’emballage.
DESCRIPTION DE L’APPAREIL
CONSIGNES DE SECURITE

2
•
Les lames sont très coupantes :
manipulez-les avec précaution pour
ne pas vous blesser.
• N’utilisez jamais le blender ou ses
accessoires sans ingrédients et ne
versez jamais de liquides bouillants
dans le bol.
• Utilisez toujours le bol blender avec son
couvercle (
D
).
• Versez toujours les ingrédients liquides
en premier dans le bol avant d’ajouter
des ingrédients solides, sans dépasser le
niveau maximal.
• Ne placez jamais vos doigts ou tout
autre objet dans le blender pendant le
fonctionnement de l’appareil.
• Ne pas utiliser les bols comme récipients
(congélation, cuisson, stérilisation).
• N’utilisez pas le blender plus de 3
minutes en marche continue.
• Placez le blender sur un plan de travail
stable, résistant à la chaleur, propre et
sec.
• Ne laissez pas pendre vos cheveux, un
foulard, une cravate etc. au dessus du
bol ou de ses accessoires pendant le
fonctionnement de l’appareil.
• N’utilisez pas le blender en plein air.
• N’enlevez pas le couvercle (
D
) avant
l’arrêt complet des lames.
• N’utilisez jamais cet appareil pour
mélanger ou mixer d’autres éléments
que des ingrédients alimentaires.
• Avant la première utilisation, nettoyer
tous les accessoires (
C
),(
D
), (
E
),
(
F
),(
G
),(
H
),(I) à l’eau chaude
savonneuse, mais pas le bloc
moteur (
A
).
ATTENTION : Les lames des couteaux
sont extrêmement aiguisées,
maniez-les avec précaution lors de
l’utilisation ou du nettoyage de
l’appareil et lorsque vous videz le
bol.
• Assurez-vous que tout emballage
soit retiré avant le fonctionnement
de l’appareil.
• Remarque importante : Mettre le
sélecteur de vitesse (
B
) sur «0» avant
de placer le bol blender ou les
accessoires sur le bloc moteur.
• L’appareil démarre uniquement si le
bol ou l’accessoire est bien positionné
et verrouillé sur son corps.
•
Ne faites pas fonctionner le blender si
le couvercle (D) n’est pas en place.
• Placez tous les ingrédients à mixer
dans le bol (
C
) après les avoir coupés
en dés sans dépasser le niveau
maximal indiqué sur le bol (1 L), pour
les mélanges épais commencez de
préférence par les liquides.
Vous pouvez ajouter des ingrédients
en cours de fonctionnement par
l'orifice du bouchon doseur (E).
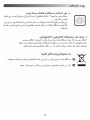
• Versez les ingrédients dans le bol (C)
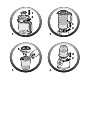
• Verrouillez le couvercle (D) et placez le
bouchon (E) dans son logement situé
sur le couvercle (fig 1).
• Placez l'ensemble (C+D+E) sur le bloc
moteur (A). Deux positions du bol sont
possibles : poignée à droite ou à
gauche du bloc moteur.
Tournez ensuite le bol blender d'un
quart de tour vers la gauche (fig 2).
• Le moulin à épices* vous permet de
moudre en quelques secondes
différentes épices : graines de
coriandre, poivre...
N'utilisez pas ce moulin pour des
préparations liquides (jus de fruits…)
• La râpe* vous permet de réduire en
poudre la noix de coco, la noix de
muscade…
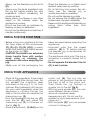
AVANT LA PREMIERE UTILISATION
UTILISATION DE L’APPAREIL

3
• Le moulin à fines herbes* vous permet
de hacher en quelques secondes, en
utilisant la fonction pulse, des
ingrédients tels que des oignons, de
l’ail, de la viande (coupée en
morceaux), des fruits secs, de réaliser
de la chapelure (biscottes). N’utilisez
pas le Moulin à fines herbes pour des
préparations liquides (jus de fruits…).
• Ces accessoires sont équipés d'un bol
(I)* qui interdit l'accès aux lames
pendant leur utilisation.
1-
Retournez le bol (I)* et versez-y les
ingrédients.
2-
Positionnez le bloc lames en alignant les
fentes du bloc lames avec les pattes du
bol (I) (fig 3). Verrouillez l'accessoire en
tournant le bloc lames d'un quart de
tour dans le sens inverse des aiguilles
d'une montre (fig 3).
Attention si l'accessoire est mal
verrouillé des fuites risquent de se
produire.
3-
Retournez l'accessoire assemblé (F)*,
(G)* ou (H)* positionnez-le sur le
bloc moteur (A).
4-
Tournez ensuite l'accessoire assemblé
(F)*, (G)* ou (H)*d'un quart de tour
vers la gauche (fig 4).
5-
Branchez l'appareil et mettez le
bouton M/A (B) sur la position "1" ou
donnez quelques impulsions sur la
position "pulse". Tenir le bol (I)*
pendant le fonctionnement.
Pour arrêter le blender, ramenez le
bouton M/A (B) sur la position “0”.
6-
Déverrouillez l'accessoire en le
tournant d'un quart de tour dans le
sens inverse des aiguilles d'une
montre. Retirez l'accessoire assemblé
(F)*, (G)* ou (H)* du bloc moteur.
Retournez-le sur le plan de travail
avant de déverrouiller le bloc lames
(F)*, (G)* ou (H)* du bol (I)*en
procédant à l'inverse de la mise en
place. Vous pouvez alors récupérer la
préparation dans le bol.
La couleur du bol peut s'altérer suite
au mixage avec certains ingrédients
très durs (clous de girofle, cannelle...).
*selon modèle
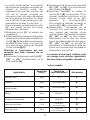
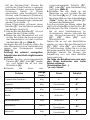
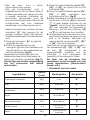
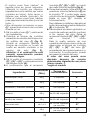
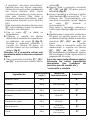
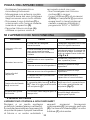
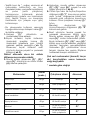
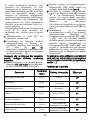
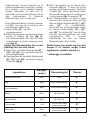
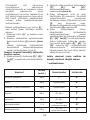
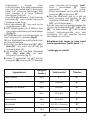
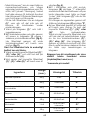
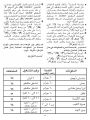
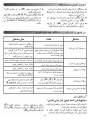
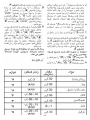
Ingrédients
Quantités
(max.)
Temps de
fonctionnement
Accessoire
Abricots secs 60 g 3 s
H*
Oignons 60 g par impulsions
H*
Amandes / noisettes
décortiquées
60 g par impulsions
H*
Poivre 60 g 45 à 60 s
F*
Graines de coriandre 40 g 45 à 60 s
F*
Noix de muscade 1 à 3
15 à 20 s
par impulsions
G*
Noix de coco 40 g
15 à 20 s
par impulsions
G*

4
• Débranchez l’appareil et retirez les
accessoires.
• Manipulez-les avec précaution, les
lames du bol blender et des
accessoires sont coupantes.
• Enlevez le bol (
C
) et rincez-le sous
l’eau courante ainsi que son
couvercle (
D
).
• Pour nettoyer le bloc moteur (
A
),
utilisez un chiffon humide. Séchez-le
soigneusement.
• Ne plongez jamais le bloc moteur
(
A
) sous l’eau courante.
• Le bol (
C
) et les accessoires (
F, G,
H
) ainsi que le bol (I) peuvent être
nettoyés au lave-vaisselle dans le
panier supérieur avec le
programme «ECO» ou «PEU SALE».
NETTOYAGE DE L’APPAREIL
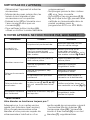
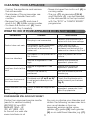
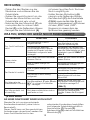
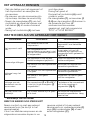
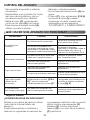
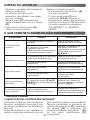
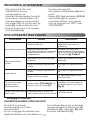
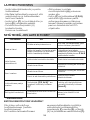
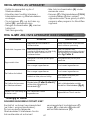
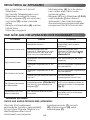
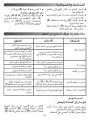
SI VOTRE APPAREIL NE FONCTIONNE PAS, QUE FAIRE ?
Problèmes Causes Solutions
Le produit ne
fonctionne pas.
La prise n'est pas branchée.
Branchez l'appareil sur une
prise de même voltage.
Le bol ou l'accessoire assemblé
n'est pas correctement
positionné ou verrouillé sur le
bloc moteur.
Vérifiez que le bol ou les
accessoires sont bien
positionnés et verrouillés sur le
bloc moteur suivant
fig. 2 ou 4
Vibrations excessives.
Le produit n'est pas posé sur
une surface plane.
Placez le produit sur une
surface plane.
Volume d'ingrédients trop
important.
Réduisez la quantité
d'ingrédients traités.
Fuite par le couvercle
du bol.
Volume d'ingrédients trop
important.
Réduisez la quantité
d'ingrédients traités.
Le couvercle n'est pas bien
positionné.
Verrouillez correctement le
couvercle sur le bol blender.
Fuite par le bas des
accessoires.
Le bloc lames (
F ou G ou H
)
*
est mal verrouillé dans le bol
(I)*
Vérifiez que le bloc lames est
bien verrouillé sur le bol (fig. 3)
Le couteau ne tourne
pas facilement.
Morceaux d'aliments trop gros
ou trop durs.
Réduisez la taille ou la quantité
d'ingrédients traités.
Ajoutez du liquide.
*selon modèle
Votre blender ne fonctionne toujours pas ?
Adressez-vous à un centre service
agréé (voir liste dans livret service).
Vous pouvez personnaliser votre
blender et vous procurer auprès de
votre revendeur habituel ou d’un
centre agréé les accessoires suivants
: l’accessoire Moulin à épices (
F
),
l’accessoire râpe (G), l’accessoire
moulin à fines herbes (H) ou un bol
blender (C) supplémentaire.

5
RECYCLAGE
• Elimination des matériaux d’emballage et de l’appareil.
L'emballage comprend exclusivement des matériaux sans
danger pour l'environnement, pouvant être jetés conformément
aux dispositions de recyclage en vigueur.
Pour la mise au rebut de l'appareil, se renseigner auprès du
service approprié de votre commune.
• Produits électroniques ou produits électriques en fin de vie :
Votre appareil est prévu pour fonctionner durant de longues années. Toutefois, le
jour où vous envisagez de le remplacer, ne le jetez pas dans votre poubelle ou
dans une décharge mais apportez-le au point de collecte mis en place par votre
commune (ou dans une déchetterie le cas échéant).
Participons à la protection de l’environnement !
Votre appareil contient de nombreux matériaux valorisables ou
recyclables.
Confiez celui-ci dans un point de collecte pour que son
traitement soit effectué.

EN
6
A
B
C
D
E
F
Motor unit
On/off/pulse button
Graduated blender jug
Lid
Measuring cup
Spice grinder blade unit
(*depending on model)
G
H
I
Grater unit
(*depending on model)
Herb grinder blade unit
(*depending on model)
Grater, spice grinder and herb
grinder bowl
(*depending on model)
The accessories contained in the model you have bought are represented on the
label located on the top of the packaging.
DESCRIPTION
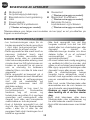
SAFETY INSTRUCTIONS
• Read the instructions for use carefully
before using your appliance for the first
time: the manufacturer shall accept no
liability in the event of any use that does
not comply with the instructions.
• This appliance is not designed to be
used by persons (including children)
with reduced physical, sensorial or
mental capacities, or by people with no
prior knowledge or experience, except
where they have benefited from
supervision or previous instructions
relating to the use of the appliance, from
a person responsible for their safety.
Children should not be allowed to play
with the appliance.
• It is designed to work with alternating
current only. Please check that the
supply voltage indicated on the name
plate of the appliance corresponds to
your electrical installation.
• This product has been designed for
domestic use only. The manufacturer
accepts no responsibility, and the
guarantee will not apply, for any
commercial use, inappropriate use or
failure to comply with the instructions.
• Be sure to unplug the appliance if you
must leave it unattended, before
inserting or removing accessories or
before cleaning it. Never pull on the
power cord to unplug the appliance.
• Do not use your appliance if it does not
operate correctly, if it has been
damaged or if the power cord or plug
is damaged. To maintain safety, these
parts must be replaced by an approved
service centre (see list in the service
booklet).
• Any maintenance other than routine
cleaning and upkeep by customers
must be carried out by an approved
service centre.
• Do not immerse the appliance, cord or
plug in liquid.
• The power cord must be kept out of the
reach of children and must not be
placed near or come into contact with
the hot parts of the appliance, sources
of heat or sharp corners.
• For your safety, only use accessories and
spare parts that correspond to your
appliance, sold by an approved after-
sales service centre.
•
The blades are very sharp: handle
them with caution to avoid injury.
• Never use the blender or its accessories
without ingredients and never pour
boiling liquids into the jug. Only use
liquids or foods at simmering
temperature or below.

7
• Always use the blender jug with its lid
(
D
).
• Always pour the liquid ingredients into
the jug first, before adding the solid
ingredients, without exceeding the
maximum level.
• Never place your fingers or any other
object in the blender when the
appliance is running.
• Do not use the bowls as containers for
freezing, cooking or sterilisation.
• Do not use the blender for more than 3
minutes continuously.
• Place the blender on a stable, heat-
resistant, clean and dry worktop.
• Do not let long hair, scarves, ties, etc.
hang over the blender jug or
accessories when in operation.
• Do not use the blender in outside.
• Do not remove the lid (
D
) before the
blades have stopped completely.
• Never use this appliance for blending or
mixing items other than food
ingredients.
• Before using your appliance for the
first time, clean all the accessories
(
C
),(
D
), (
E
), (
F
),(
G
),(
H
)(I), in warm
water and washing-up liquid except
for the motor unit (
A
).
CAUTION: The blades are extremely
sharp; handle them with caution
when using or cleaning the
appliance and when emptying the
jug.
• Make sure all the packaging has
been removed before operating the
appliance.
• Important note: Turn the speed
selector (
B
) to “0” before placing
the blender jug or accessories on
the motor unit.
• The appliance starts only if the jug or
accessory is correctly locked on its
body.
•
Do not operate the blender if the lid
(D) is not in place.
• Place all the ingredients to be mixed
in the jug (C) after dicing them. Do
not exceed the maximum level
indicated on the jug (1 L), for thick
mixtures. Start preferably with liquids.
You can add ingredients when the
appliance is running through the
hole in the lid when you remove the
measuring cup (E).
• Pour the ingredients into the jug (C)
• Lock the lid (D) and place the
measuring cup (
E
) in its recess on
the lid (fig 1).
• Place the assembly (C+D+E) on the
motor unit (A). The jug can be
placed in two positions: handle on
the right or left of the motor unit.
Then rotate the jug through a
quarter turn to the left (fig 2).
• With the spice grinder (F)*, you can
grind different spices in a few
seconds: coriander seeds,
peppercorns, etc. Do not use this
grinder for liquid preparations (fruit
juices, etc.)
• With the grater (G)* you can powder
coconut, nutmeg, etc.
USING FOR THE FIRST TIME
USING YOUR APPLIANCE

8
• With the herb grinder (H)*, you can
chop ingredients like onions, garlic,
meat (cut into pieces) and dry fruits in
a few seconds and make crumbs
(rusk) by using the pulse function. Do
not use the herb grinder for liquid
preparations (fruit juices, etc.)
• These accessories are equipped with
a bowl (I)* that prevents access to the
blades during use.
1-
Invert the bowl (I)*and place the
ingredients into it.
2-
Position the blade unit by aligning the
slots on the blade unit with the tabs
on the bowl (I) (fig 3). Lock the
accessory by rotating the blade unit
through a quarter turn in the
anticlockwise direction (fig 3).
Caution: leaks can occur if the
accessory is not locked correctly.
3-
Rotate the assembly accessory (F)*,
(G)* or (H)* and position it on the
motor unit (A).
4-
Then turn the assembled accessory
(F)*, (G)* or (H)* through a quarter
turn to the left (fig 4) to lock onto the
motor unit (A)..
5-
Plug in the appliance and turn the
On/Off button (B) to position "1" or
apply a few pulses on the "pulse"
position. Hold the bowl (I)* when
the appliance is running. To stop the
blender, turn the On/Off button (B)
to “0”.
6-
Unlock the accessory by rotating it
through a quarter turn in the
anticlockwise direction. Remove the
assembled accessory (F)*, (G)* or
(H)* from the motor unit.Turn it over
on the worktop before unlocking
the blade unit (F)*, (G)* or (H)*
from the bowl (I)* in the reverse
order of the assembly. You can then
empty the preparation in the bowl.
The colour of the bowl may change
after blending certain very hard
ingredients (cloves, cinnamon, etc.).
*depending on model
Ingredients
Quantity
(max.)
Operating time Accessory
Dried apricots 60g 3sec
H*
Onions cut into pieces 60g In pulses
H*
Shelled almonds / hazelnuts 60g In pulses
H*
Peppercorns 60g 45 to 60 sec
F*
Coriander seeds 40g 45 to 60 sec
F*
Nutmeg 1 to3
15 to 20 sec
In pulses
G*
Coconut shelled 40g
15 to 20 sec
In pulses
G*

9
• Unplug the appliance and remove
the accessories.
• The blades of the accessories are
very sharp. Handle them with
caution.
• Remove the jug (
C
) and rinse it
and its lid (
D
) under running water.
• To clean the motor unit (
A
), use a
moist cloth. Dry it carefully.
• Never immerse the motor unit (
A
) in
running water.
• The jug (
C
) accessories (
F, G, H
)
and the bowl (I) can be cleaned
in the dishwasher in the top basket
with the "ECO" or "LIGHTLY SOILED"
programme.
CLEANING YOUR APPLIANCE
WHAT TO DO IF YOUR APPLIANCE DOES NOT WORK
PROBLEMS CAUSES SOLUTIONS
Product does not work
The plug is not connected
Connect the appliance to a
socket with the same voltage
The blender jug or assembled
accessory is not correctly
positioned or locked on the
motor unit.
Check that the jug or
accessories are correctly
positioned and locked on the
motor unit as shown in Fig. 2 or 4
Excessive vibrations
The product is not placed on a
flat surface
Place the product on a flat
surface
Volume of ingredients is too
high
Reduce the quantity of
ingredients processed
Leak from the lid of the
bowl
Volume of ingredients is too
high
Reduce the quantity of
ingredients processed
The lid is not correctly
positioned
Lock the lid correctly on the
blender jug
Leak from the base of
the accessories
The blade unit (
F or G or H
)
*
is not locked correctly in the
bowl (
I
)
*
Check that the blade unit is
locked correctly on the bowl
(
fig. 3
)
The blade does not turn
easily
Pieces of food too large or too
hard
Reduce the size or quantity of
ingredients processed Add
liquid if appropriate
*depending on model
YOUR BLENDER STILL DOES NOT WORK?
Contact an approved service centre
(see list in service booklet).
HELPLINE: UK and ROI
0845 602 1454 – UK
(01) 677 4003 – ROI
or consult our web site:
www.moulinex.co.uk
You can customise your blender and
obtain the following accessories from
your usual dealer or from an
approved service centre: spice
grinder (
F
), grater (G), herb grinder
(H) or an additional blender jug (C).

10
RECYCLING
• Disposal of the appliance and its packaging materials.
The packaging is comprised exclusively of materials that present
no danger for the environment and which may therefore be
disposed of in accordance with the recycling measures in force
in your area. For disposing of the appliance itself, please contact
the appropriate service of your local authority.
• End of life electrical and electronic products.
Your appliance is expected to last for many years. However, when the time comes
to replace it, do not throw it in the bin or in a dump, but take it to the recycling
centre in your town (or to a waste reception centre where applicable).
Think of the environment!
Your appliance contains valuable materials which can be
recovered or recycled.
Leave it at a local civic waste collection point.

DE
11
• Lesen Sie die Bedienungsanleitung vor
der ersten Inbetriebnahme des Gerätes
aufmerksam durch: Bei
unsachgemäßem Gebrauch entgegen
der Bedienungsanleitung übernimmt
der Hersteller keine Haftung.
• Dieses Gerät ist nicht zur Handhabung
durch Personen (einschließlich Kindern)
mit eingeschränkten körperlichen,
sensorischen oder geistigen Fähigkeiten
oder durch Personen mit mangelnder
Erfahrung bzw. mangelnden
Kenntnissen vorgesehen, es sei denn mit
Unterstützung und unter Beobachtung
einer Person, die für ihre Sicherheit
verantwortlich ist und die vorab
Anweisungen zur Handhabung des
Gerätes gegeben hat. Kinder müssen
beaufsichtigt werden, um
sicherzustellen, dass sie nicht mit dem
Gerät spielen.
• Das Gerät ist ausschließlich für den
Betrieb mit Wechselstrom ausgelegt.
Bitte stellen Sie sicher, dass die
Netzspannung mit der auf dem
Typenschild des Gerätes angegebenen
Spannung übereinstimmt.
• Dieses Gerät ist ausschließlich für den
Hausgebrauch bestimmt. Der Hersteller
übernimmt weder Garantie noch
Haftung für den Fall einer gewerblichen,
unsachgemäßen oder nicht den
Angaben der Bedienungsanleitung
entsprechenden Nutzung des Gerätes.
• Ziehen Sie den Netzstecker heraus,
wenn Sie das Gerät unbeaufsichtigt
lassen, jeweils vor dem Einsetzen und
Herausnehmen des Zubehörs und vor
jeder Reinigung. Ziehen Sie den
Netzstecker des Gerätes nicht am Kabel
aus der Steckdose heraus.
• Benutzen Sie das Gerät nicht, wenn es
nicht richtig funktioniert, wenn es
beschädigt wurde oder wenn das
Stromkabel oder der Stecker beschädigt
sind. Aus Sicherheitsgründen dürfen
diese Teile nur in einer autorisierten
Kundendienstwerkstatt ausgetauscht
werden (siehe Liste im Serviceheft).
• Alle Eingriffe, die über die Reinigung und
die normale Pflege durch den Kunden
hinausgehen, müssen von einer
autorisierten Kundendienstwerkstatt
ausgeführt werden.
• Tauchen Sie das Gerät, das Stromkabel
oder den Stecker nicht in Wasser oder
sonstige Flüssigkeiten.
• Lassen Sie das Stromkabel niemals in
die Reichweite von Kindern, in die
Nähe von oder in Berührung mit sich
drehende Geräteteilen, einer
Wärmequelle oder einer scharfen
Kante kommen.
• Verwenden Sie zu Ihrer eigenen
Sicherheit nur für Ihr Gerät geeignete,
bei einem autorisierten Kundendienst
erworbene Zubehör- und Ersatzteile.
A
B
C
D
E
F
Motorblock
Ein/Aus/Pulse-Taste
Mixaufsatz mit Messskala
Deckel
Dosierdeckel
Messerblock Gewürzmühle
(*Zubehör je nach Modell)
G
H
I
Messerblock Raspel
(*Zubehör je nach Modell)
Messerblock Kräutermühle
(*Zubehör je nach Modell)
Behälter für Raspel,
Gewürzmühle und
Kräutermühle
(*Zubehör je nach Modell)
Die zu dem von Ihnen erworbenen Modell gehörigen Zubehörteile sind auf dem
Etikett auf der Oberseite der Verpackung angegeben.
BESCHREIBUNG DES GERÄTES
SICHERHEITSHINWEISE

12
•
Die Messer sind sehr scharf: Gehen Sie
vorsichtig damit um, damit Sie sich
nicht verletzen.
• Nehmen Sie den Mixer oder seine
Zubehörteile nicht leer in Betrieb und
geben Sie niemals kochende
Flüssigkeiten in den Mixaufsatz.
• Benutzen Sie den Mixaufsatz immer mit
seinem Deckel
(D)
.
• Geben Sie immer zuerst die flüssigen
Zutaten in den Mixaufsatz, bevor Sie die
festen Zutaten dazugeben, ohne dabei
den maximalen Füllstand zu
überschreiten.
• Geben Sie niemals Ihre Finger oder
sonstige Gegenstände in den Mixer,
wenn dieser in Betrieb ist.
• Benutzen Sie die Mixaufsätze nicht als
Behälter zum Tiefgefrieren, Kochen oder
Sterilisieren.
• Lassen Sie den Mixer nicht länger als 3
Minuten ununterbrochen laufen.
• Verwenden Sie Ihr Gerät nur auf einer
stabilen, hitzebeständigen, sauberen
und trockenen Arbeitsfläche.
• Lassen Sie lange Haare, Schals,
Krawatten usw. während des Betriebs
nicht über den Mixaufsatz oder seine
Zubehörteile hängen.
• Verwenden Sie das Gerät nicht im
Freien.
• Entfernen Sie den Deckel
(D)
erst nach
komplettem Stillstand der Messer.
• Benutzen Sie das Gerät ausschließlich
zum Mischen und Mixen von
Nahrungsmitteln und keinerlei sonstigen
Dingen. Vorsicht im Umgang mit heißen
Speisen.
• Reinigen Sie vor dem ersten
Gebrauch alle Zubehörteile (C), (D),
(E), (F), (G), (H), (I) mit heißem
Seifenwasser, mit Ausnahme des
Motorblocks (A).
ACHTUNG: Die Messerklingen sind
extrem scharf; gehen Sie beim
Gebrauch und bei der Reinigung des
Gerätes sowie beim Leeren des
Mixaufsatzes sehr vorsichtig damit um.
Stellen Sie sicher, dass vor
Inbetriebnahme des Gerätes die
gesamte Verpackung entfernt wurde.
• Wichtiger Hinweis: Stellen Sie den
Geschwindigkeitsregler (B) auf „0“,
bevor Sie den Mixaufsatz oder die
Zubehörteile auf dem Motorblock
anordnen.
• Das Gerät kann nur dann in Betrieb
gesetzt werden, wenn der Mixaufsatz
oder die Zubehörteile richtig auf
dem Gehäuse verriegelt wurden.
• Schalten Sie den Mixer nicht ohne
aufgesetzten Deckel (D) ein.
• Schneiden Sie die zu mixenden
Zutaten in Würfel und geben Sie sie in
den Mixaufsatz (C), ohne dabei den
auf dem Behälter angegebenen,
maximalen Füllstand (1 l) zu
überschreiten. Beginnen Sie bei
dickflüssigen Zubereitungen
vorzugsweise mit den Flüssigkeiten.
Sie können während der Zubereitung
weitere Zutaten über die Öffnung des
Dosierverschlusses (E) beimengen.
• Geben Sie die Zutaten in den
Mixaufsatz (C).
• Verriegeln Sie den Deckel (D) und
setzen Sie den Verschluss (E) in die
Aussparung auf dem Deckel (Abb. 1).
• Setzen Sie die gesamte Einheit
(C+D+E) auf den Motorblock (A). Zwei
Mixaufsatz-Positionen sind möglich:
Haltegriff rechts oder links vom
Motorblock.
Drehen Sie den Aufsatz eine viertel
Drehung nach links.
• Mit der Gewürzmühle* können Sie in
wenigen Sekunden verschiedenste
Gewürze mahlen: Koriander-,
Pfefferkörner… Diese Mühle darf nicht
für flüssige Zubereitungen verwendet
werden (Fruchtsäfte, ...).
• Die Raspel* dient zum Reiben von
Kokosnuss, Muskatnuss, ...
INBETRIEBNAHME
GEBRAUCH

13
• Mit der Kräutermühle* können Sie
mithilfe der Pulse-Funktion in wenigen
Sekunden Zutaten, wie etwa Zwiebel,
Knoblauch, Fleisch (in Stücke
geschnitten) oder Trockenobst klein
hacken oder Paniermehl (Zwieback)
zubereiten. Die Kräutermühle darf nicht
für flüssige Zubereitungen verwendet
werden (Fruchtsäfte, ...).
• Diese Zubehörteile umfassen einen
Behälter (I)*, der die Messer während
des Betriebs abschirmt.
1- Drehen Sie den Behälter (I)* um und
geben Sie die Zutaten hinein.
2- Setzen Sie den Messerblock auf und
richten Sie dabei die Aussparungen
des Messerblocks mit den Laschen
des Behälters (I) aus (Abb. 3).
Verriegeln Sie das Zubehör, indem Sie
den Messerblock eine Vierteldrehung
gegen den Uhrzeigersinn drehen
(Abb. 3).
Achtung! Bei schlecht verriegeltem
Zubehör kann der Inhalt möglicherweise
austreten.
3- Drehen Sie das zusammengesetzte
Zubehör (F)*, (G)* oder (H)* wieder
um und setzen Sie es auf den
Motorblock (A).
4- Drehen Sie dann das
zusammengesetzte Zubehör (F)*,
(G)* oder (H)* eine Vierteldrehung
nach links (Abb. 4).
5- Schließen Sie das Gerät an die
Steckdose an und schalten Sie die
Ein/Aus-Taste (B) auf „1“ oder schalten
Sie einige Male auf den Intervallbetrieb
„Pulse“. Halten Sie den Behälter (I)*
während des Betriebes fest.
Zum Ausschalten des Mixers stellen Sie
die Ein/Aus-Taste (B) auf die Position „0“.
6- Entriegeln Sie das Zubehör, indem
Sie es eine Vierteldrehung im
Uhrzeigersinn drehen. Nehmen Sie
das zusammengesetzte Zubehör
(F)*, (G)* oder (H)* vom
Motorblock ab.
Drehen Sie es auf der Arbeitsfläche
wieder um, bevor Sie den Messerblock
(F)*, (G)* oder (H)* vom Behälter
(I)*abschrauben, indem Sie ihn in die
entgegengesetzte Richtung wie beim
Verriegeln drehen. Sie können die
Zubereitung nun aus dem Behälter
herausnehmen.
Die Farbe des Behälters kann sich nach
dem Mixen bestimmter, sehr harter
Zutaten verändern
(Gewürznelken, Zimt, ...).
*je nach Modell
Zutaten
Menge
(max.)
Dauer Zubehör
Getrocknete Aprikosen 60g 3 s
H*
Zwiebeln 60g Pulse-Betrieb
H*
Mandeln /Haselnüsse ohne
Schale
60g Pulse-Betrieb
H*
Pfeffer 60g 45 bis 60 s
F*
Korianderkörner 40g 45 bis 60 s
F*
Muskatnuss 1 bis 3
15 bis 20 s im
Pulse-Betrieb
G*
Kokosnuss 40g
15 bis 20 s im
Pulse-Betrieb
G*

14
• Ziehen Sie den Stecker aus der
Steckdose und entfernen Sie die
Zubehörteile.
• Gehen Sie vorsichtig damit um, die
Messer des Mixaufsatzes und der
Zubehörteile sind sehr scharf.
• Nehmen Sie den Mixaufsatz (C) ab
und spülen Sie ihn mitsamt dem
Deckel (D) unter fließendem Wasser.
• Reinigen Sie den Motorblock (A)
mit einem feuchten Tuch. Trocknen
Sie ihn sorgfältig ab.
• Halten Sie den Motorblock (A)
niemals unter fließendes Wasser.
• Der Mixaufsatz (C), die Zubehörteile
(F, G, H) sowie der Behälter (I) sind
spülmaschinengeeignet und können
mit dem „SPAR“- oder „KURZ“-
Programm im oberen Korb der
Spülmaschine gereinigt werden.
REINIGUNG
WAS TUN, WENN IHR GERÄT NICHT FUNKTIONIERT?
PROBLEME URSACHEN LÖSUNGEN
Das Gerät funktioniert
nicht.
Der Netzstecker ist nicht
angeschlossen.
Schließen Sie das Gerät an
eine Steckdose mit der
gleichen Spannung an.
Der Mixaufsatz oder das
zusammengesetzte Zubehör
wurde nicht korrekt auf den
Motorblock aufgesetzt oder
verriegelt.
Kontrollieren Sie Position und
Verriegelung des Mixaufsatzes
oder der Zubehörteile auf dem
Motorblock gemäß Abb. 2
oder 4
Extrem starke
Vibrationen
Das Gerät steht nicht auf einer
ebenen Fläche.
Stellen Sie das Gerät auf eine
ebene Fläche.
Eine zu große Menge an
Zutaten
Verringern Sie die Menge der
verarbeiteten Zutaten.
Der Deckel ist undicht.
Eine zu große Menge an
Zutaten
Verringern Sie die Menge der
verarbeiteten Zutaten.
Der Deckel ist nicht richtig
aufgesetzt.
Verriegeln Sie den Deckel
ordnungsgemäß auf dem
Mixaufsatz.
Die Unterseite der
Zubehörteile ist undicht.
Der Messerblock (F oder G oder
H )* ist schlecht im Behälter
(I)* verriegelt.
Stellen Sie sicher, dass der
Messerblock ordnungsgemäß
im Behälter verriegelt ist.
(Abb. 3)
Das Messer dreht sich
schwerfällig.
Die Lebensmittelstücke sind zu
groß oder zu hart.
Verringern Sie die Größe oder
Menge der verarbeiteten
Zutaten. Geben Sie Flüssigkeit
hinzu.
*je nach Modell
IHR MIXER FUNKTIONIERT IMMER NOCH NICHT?
Wenden Sie sich an eine autorisierte
Kundendienstwerkstatt (siehe Liste im
Serviceheft).
Dieses Gerät kann auf Ihre persönlichen
Anforderungen abgestimmt werden. Bei
Ihrem Fachhändler und in den
autorisierten Kundendienstwerkstätten
sind folgende Zubehörteile erhältlich:
Gewürzmühle
(F), Raspel (G),
Kräutermühle
(H) oder ein zusätzlicher
Mixaufsatz
(C).

15
RECYCLING
• Entsorgung des Gerätes und der Verpackungsmaterialien
Die Verpackung besteht ausschließlich aus umweltfreundlichen
Materialien, die nach den gültigen Recycling-Bestimmungen
entsorgt werden können. Für die Entsorgung des Gerätes selbst
informieren Sie sich bitte bei den zuständigen Stellen Ihrer
Gemeinde.
• Entsorgung elektrischer und elektronischer Geräte
Ihr Gerät ist für den langjährigen Gebrauch ausgelegt. Wenn es jedoch Zeit ist, es
zu ersetzen, werfen Sie es nicht einfach in den Mülleimer oder auf eine Müllkippe,
sondern bringen Sie es zu einem Recycling-Zentrum in Ihrer Stadt (oder, wenn
verfügbar, zu einer Müllannahmestelle).
Denken Sie an den Schutz der Umwelt!
Ihr Gerät enthält wertvolle Rohstoffe, die wieder verwertet oder
recycelt werden können.
Geben Sie Ihr Gerät deshalb bitte bei einer Sammelstelle Ihrer
Stadt oder Gemeinde ab.

16
• Lees deze gebruiksaanwijzing
zorgvuldig voordat u het apparaat in
gebruik neemt: indien het apparaat niet
in overeenstemming met de
gebruiksaanwijzing wordt gebruikt,
vervalt de aansprakelijkheid van de
fabrikant.
• Dit apparaat is niet bedoeld om zonder
hulp of toezicht te worden gebruikt door
kinderen of andere personen indien
hun fysieke, zintuiglijke of mentale
vermogen hen niet in staat stelt dit
apparaat op een veilige wijze te
gebruiken, tenzij zij van tevoren
instructies hebben ontvangen
betreffende het gebruik van dit
apparaat van een verantwoordelijke
persoon. Er moet toezicht zijn op
kinderen zodat zij niet met het apparaat
kunnen spelen.
• Het apparaat is uitsluitend ontworpen
voor gebruik met wisselstroom.
Controleer of de netspanning die
vermeld staat op het typeplaatje van
uw apparaat overeenkomt met die van
het elektriciteitsnet.
• Dit apparaat is uitsluitend bestemd
voor huishoudelijk gebruik bestemd. De
fabrikant stelt zich niet aansprakelijk en
de garantie vervalt bij bedrijfsmatig
gebruik, onjuist gebruik of niet-naleving
van de gebruiksaanwijzing.
• Haal de stekker altijd uit het stopcontact
wanneer u het apparaat zonder
toezicht achterlaat, voordat u
accessoires monteert of verwijdert en
vóór reiniging. Trek niet aan het netsnoer
om de stekker van het apparaat uit het
stopcontact te halen.
• Gebruik het apparaat niet als het niet
goed werkt of beschadigd is of als het
netsnoer of de stekker beschadigd is.
Laat deze onderdelen vervangen door
een erkend servicecentrum (zie de lijst
in het serviceboekje) om zeker te zijn
van een veilige werking.
• Elk ander onderhoud dan reiniging en
het normale onderhoud door de klant
moet door een erkend servicecentrum
gebeuren.
• Dompel het apparaat, het netsnoer of
de stekker niet onder in vloeistof.
• Laat het netsnoer niet binnen
handbereik van kinderen hangen en
laat het niet in de buurt liggen van of in
aanraking komen met warme
onderdelen van het apparaat,
warmtebronnen of scherpe hoeken.
• Gebruik voor uw veiligheid alleen de
voor uw apparaat bedoelde
accessoires en reserveonderdelen, die
u bij een erkend servicecentrum kunt
verkrijgen.
A
B
C
D
E
F
Motorblok
Aan-/uit-/impuls-knop
Mengbeker met maatverdeling
Deksel
Doseerdop
Specerijenmaler
(*afhankelijk van het model)
G
H
I
Rasp
(*afhankelijk van het model)
Kruidenmaler
(*afhankelijk van het model)
Mengkom van de rasp,
specerijenmaler en
kruidenmaler
(*afhankelijk van het model)
De bijgeleverde accessoires van het zojuist door u aangekochte model worden
op het etiket boven op de verpakking weergegeven.
BESCHRIJVING
VEILIGHEIDSVOORSCHRIFTEN
NL

17
•
De messen zijn vlijmscherp; hanteer ze
voorzichtig om verwondingen te
vermijden.
• Gebruik de blender of de bijbehorende
accessoires nooit zonder ingrediënten
en giet nooit kokende vloeistof in de
mengbeker.
• Gebruik de mengbeker altijd met het
bijbehorende deksel (
D
).
• Giet de vloeibare ingrediënten altijd als
eerste in de mengbeker, en voeg dan
pas de vaste ingrediënten toe, zonder
het maximumniveau te overschrijden.
• Stop nooit uw vingers of enig ander
voorwerp in de blender wanneer het
apparaat in werking is.
• Gebruik de mengkommen niet voor
invriezen, koken of steriliseren.
• Gebruik de blender niet gedurende
meer dan 3 minuten aan één stuk door.
• Plaats de blender op een stabiel,
hittebestendig, schoon en droog
werkvlak.
• Laat geen lange haren, sjaals,
stropdassen enzovoort boven de
mengbeker of accessoires hangen
wanneer het apparaat in werking is.
• Gebruik de blender niet buitenshuis.
• Verwijder het deksel nooit (
D
) voordat
het mes volledig tot stilstand is
gekomen.
• Gebruik dit apparaat uitsluitend voor
het mengen of mixen van
voedingswaren.
• Reinig alle accessoires (
C
),(
D
), (
E
),
(
F
),(
G
),(
H
),(I), in een warm sopje,
behalve het motorblok (
A
) voordat u
het apparaat voor het eerst gebruikt.
VOORZICHTIG: De messen zijn
vlijmscherp; hanteer ze voorzichtig
wanneer u het apparaat gebruikt of
reinigt en wanneer u de mengbeker
leegt.
• Zorg ervoor dat al het
verpakkingsmateriaal is verwijderd
voordat u het apparaat gebruikt.
• Belangrijke opmerking: Draai de
snelheidskeuzeschakelaar (
B
) naar
"0" voordat u de mengbeker of
accessoires op het motorblok plaatst.
• Het apparaat kan pas worden gestart
wanneer de mengbeker of het
accessoire op de juiste wijze op de
romp van het apparaat is vergrendeld.
•
Gebruik de blender niet zonder deksel
(D).
• Snijd de ingrediënten klein en doe ze
in de mengbeker (
C
). Voor dikke
mengsels mag u het op de mengkom
aangegeven maximumniveau (1 L)
niet overschrijden. Begin bij voorkeur
met de vloeibare ingrediënten.
U kunt ingrediënten toevoegen
wanneer het apparaat in werking is
door het gat in de doseerdop (E).
• Giet de ingrediënten in de mengbeker
(C)
• Vergrendel het deksel (D) en plaats
de doseerdop (E) in de uitsparing in
het deksel (fig 1).
• Plaats het geheel (C+D+E) op het
motorblok (A). De mengbeker kan op
twee manieren op het motorblok
worden gezet: met de handgreep
naar rechts of met de handgreep naar
links.
Draai daarna de mengbeker een
kwartslag naar links (fig. 2)
• Met de specerijenmaler* kunt u in
enkele seconden verschillende
specerijen hakken: korianderzaadjes,
peper, enz. Gebruik deze maler niet
voor vloeibare bereidingen
(vruchtensappen, enz.)
VOOR HET EERSTE GEBRUIK
WERKEN MET HET APPARAAT
Sayfa yükleniyor...
Sayfa yükleniyor...
Sayfa yükleniyor...
Sayfa yükleniyor...
Sayfa yükleniyor...
Sayfa yükleniyor...
Sayfa yükleniyor...
Sayfa yükleniyor...
Sayfa yükleniyor...
Sayfa yükleniyor...
Sayfa yükleniyor...
Sayfa yükleniyor...
Sayfa yükleniyor...
Sayfa yükleniyor...
Sayfa yükleniyor...
Sayfa yükleniyor...
Sayfa yükleniyor...
Sayfa yükleniyor...
Sayfa yükleniyor...
Sayfa yükleniyor...
Sayfa yükleniyor...
Sayfa yükleniyor...
Sayfa yükleniyor...
Sayfa yükleniyor...
Sayfa yükleniyor...
Sayfa yükleniyor...
Sayfa yükleniyor...
Sayfa yükleniyor...
Sayfa yükleniyor...
Sayfa yükleniyor...
Sayfa yükleniyor...
Sayfa yükleniyor...
Sayfa yükleniyor...
Sayfa yükleniyor...
Sayfa yükleniyor...
Sayfa yükleniyor...
Sayfa yükleniyor...
Sayfa yükleniyor...
Sayfa yükleniyor...
Sayfa yükleniyor...
Sayfa yükleniyor...
Sayfa yükleniyor...
Sayfa yükleniyor...
Sayfa yükleniyor...
Sayfa yükleniyor...
Sayfa yükleniyor...
Sayfa yükleniyor...
Sayfa yükleniyor...
Sayfa yükleniyor...
Sayfa yükleniyor...
Sayfa yükleniyor...
Sayfa yükleniyor...
Sayfa yükleniyor...
Sayfa yükleniyor...
Sayfa yükleniyor...
Sayfa yükleniyor...
Sayfa yükleniyor...
Sayfa yükleniyor...
Sayfa yükleniyor...
Sayfa yükleniyor...
Sayfa yükleniyor...
Sayfa yükleniyor...
Sayfa yükleniyor...
Sayfa yükleniyor...
Sayfa yükleniyor...
Sayfa yükleniyor...
-
 1
1
-
 2
2
-
 3
3
-
 4
4
-
 5
5
-
 6
6
-
 7
7
-
 8
8
-
 9
9
-
 10
10
-
 11
11
-
 12
12
-
 13
13
-
 14
14
-
 15
15
-
 16
16
-
 17
17
-
 18
18
-
 19
19
-
 20
20
-
 21
21
-
 22
22
-
 23
23
-
 24
24
-
 25
25
-
 26
26
-
 27
27
-
 28
28
-
 29
29
-
 30
30
-
 31
31
-
 32
32
-
 33
33
-
 34
34
-
 35
35
-
 36
36
-
 37
37
-
 38
38
-
 39
39
-
 40
40
-
 41
41
-
 42
42
-
 43
43
-
 44
44
-
 45
45
-
 46
46
-
 47
47
-
 48
48
-
 49
49
-
 50
50
-
 51
51
-
 52
52
-
 53
53
-
 54
54
-
 55
55
-
 56
56
-
 57
57
-
 58
58
-
 59
59
-
 60
60
-
 61
61
-
 62
62
-
 63
63
-
 64
64
-
 65
65
-
 66
66
-
 67
67
-
 68
68
-
 69
69
-
 70
70
-
 71
71
-
 72
72
-
 73
73
-
 74
74
-
 75
75
-
 76
76
-
 77
77
-
 78
78
-
 79
79
-
 80
80
-
 81
81
-
 82
82
-
 83
83
-
 84
84
-
 85
85
-
 86
86


Moulinex LM2211BA Kullanım kılavuzu
- Kategori
- Karıştırıcılar
- Tip
- Kullanım kılavuzu
diğer dillerde
- français: Moulinex LM2211BA Manuel utilisateur
- italiano: Moulinex LM2211BA Manuale utente
- svenska: Moulinex LM2211BA Användarmanual
- Deutsch: Moulinex LM2211BA Benutzerhandbuch
- português: Moulinex LM2211BA Manual do usuário
- dansk: Moulinex LM2211BA Brugermanual
- Nederlands: Moulinex LM2211BA Handleiding