Electrolux ESF63012W Kullanım kılavuzu
- Kategori
- Bulaşık makineleri
- Tip
- Kullanım kılavuzu

user manual
kullanma kılavuzu
Dishwasher
Bulaşık Makinesi
ESF63012

Electrolux. Thinking of you.
Share more of our thinking at www.electrolux.com
CONTENTS
Safety information 2
Product description 4
Control panel 5
Use of the appliance 6
Setting the water softener 6
Use of dishwasher salt 7
Use of detergent and rinse aid 8
Loading cutlery and dishes 9
Setting and starting a washing programme
10
Washing programmes 11
Care and cleaning 12
What to do if… 13
Technical data 15
Environment concerns 15
Installation 15
Subject to change without notice
SAFETY INFORMATION
Before the installation and use, read this
manual carefully:
• For your safety and the safety of your
property.
• To help the environment.
• For the correct operation of the appli-
ance.
Always keep these instructions with the ap-
pliance also if you move or give it to a differ-
ent person.
The manufacturer is not responsible if an in-
correct installation and use causes dam-
age.
CHILDREN AND VULNERABLE
PERSONS SAFETY
• Do not let persons, children included,
with reduced physical sensory, reduced
mental functions or lack of experience
and knowledge to use the appliance.
They must have supervision or instruction
for the operation of the appliance by a
person who is responsible for their safety.
• Children must get supervision to make
sure that they do not play with the appli-
ance.
• Keep all packaging away from children.
There is the risk of suffocation or injury.
• Keep all detergents in a safe area. Do not
let the children touch the detergents.
• Keep children and pets away from the
appliance when the door is open.
GENERAL SAFETY
• Do not change the specifications of this
appliance. There is the risk of injury and
damage to the appliance.
• Obey the safety instructions from the de-
tergent manufacturer to prevent burns to
eyes, mouth and throat.
• Do not drink the water from the appli-
ance. Particles of detergent can stay in
your appliance.
• Do not keep the appliance door open
without supervision. This to prevent injury
and to fall on an open door.
• Do not sit or stand on the open door.
USE
• The appliance is only for domestic use.
Do not use the appliance for other uses
to prevent injury to persons and damage
to property.
• Only use the appliance to clean accesso-
ries that are applicable for dishwashers.
• Do not put flammable products or items
that are wet with flammable products in,
near or on the appliance. Risk of explo-
sion or fire.
• Put the knives and all items with sharp
points in the cutlery basket with their
points down. If not, put in a horizontal
position in the upper basket or in the
knife basket. (Not all models have the
knife basket).
• Use only specified products for dish-
washers (detergent, salt, rinse aid).
2 electrolux

• Types of salt that are not specified for
dishwashers can cause damage to the
water softener.
• Fill the appliance with salt before you
start a washing programme. Remaining
salt in the appliance can cause corrosion
or make a hole in the bottom of the appli-
ance.
• Do not fill the rinse aid dispenser with
other products than the rinse aid, (dish-
washer cleaning agent, liquid detergent).
This can cause damage to the appliance.
• Make sure that the spray arms can move
freely before you start a washing pro-
gramme.
• The appliance can release hot steam if
you open the door while a washing pro-
gramme operates. There is a risk of skin
burns.
•Do not remove the dishes from the appli-
ance until the washing programme is
completed.
CARE AND CLEANING
• Before you clean the appliance, deacti-
vate it and disconnect the mains plug
from the mains socket.
• Do not use flammable products or prod-
ucts that can cause corrosion.
• Do not use the appliance without the fil-
ters. Make sure that the installation of the
filters is correct. An incorrect installation
causes unsatisfactory washing results
and damage to the appliance.
• Do not use spray water or steam to clean
the appliance. Risk of electrical shock
and damage to the appliance.
INSTALLATION
• Make sure that the appliance is not dam-
aged. Do not install or connect a dam-
aged appliance, contact the supplier.
• Remove all packaging before you install
and use the appliance.
• Only a qualified person must do the elec-
trical connection, the plumbing and the
installation of the appliance. This to pre-
vent the risks of structural damage or in-
jury.
• Make sure that the mains plug is discon-
nected from the mains socket during in-
stallation.
• Do not drill into the sides of the appliance
to prevent damage to hydraulic compo-
nents and electrical components.
FROST PRECAUTIONS
• Do not install the appliance where the
temperature is less than 0 °C.
• The manufacturer is not responsible for
frost damage.
WATER CONNECTION
• Use new hoses to connect the appliance
to the water supply. Do not use used ho-
ses.
• Do not connect the appliance to new
pipes or pipes not used for a long time.
Let the water flow for some minutes, then
connect the inlet hose.
• Make sure not to squash or cause dam-
age to the water hoses when you install
the appliance.
• Make sure that the water couplings are
tight to prevent a water leakage.
• The first time you use the appliance,
make sure that the hoses do not have
water leaks.
ELECTRICAL CONNECTION
• The appliance must be earthed.
• Make sure that the electrical information
on the rating plate agrees with the power
supply.
• Always use a correctly installed shock-
proof socket.
• Do not use multiple plugs and extension
cables. There is a risk of fire.
• Do not replace or change the mains ca-
ble. Contact the service centre.
• Make sure not to squash or cause dam-
age to the mains plug and cable behind
the appliance.
• Make sure that there is access to the
mains plug after the installation.
• Do not pull the mains cable to disconnect
the appliance. Always pull the mains
plug.
SERVICE CENTRE
• Only a qualified person can repair or work
on the appliance. Contact the service
centre.
• Use only original spare parts.
electrolux 3

TO DISCARD THE APPLIANCE
• To prevent the risk of injury or damage:
– Disconnect the mains plug from the
mains socket.
– Cut off the mains cable and discard it.
– Remove the door catch. This prevents
children or pets to be closed in the ap-
pliance. There is a risk of suffocation.
– Discard the appliance at the local
waste disposal centre.
Warning! The dishwasher
detergents are dangerous and can
cause corrosion !
• If an accident occurs with these de-
tergents, contact immediately a
physician.
• If the detergent gets into the mouth,
contact immediately a physician.
• If the detergent gets into the eyes,
contact immediately a physician and
clean the eyes with water.
• Keep dishwasher detergents in a
safe area and out of children touch.
• Do not keep the appliance door
open when there is detergent in the
detergent dispenser.
• Fill the detergent dispenser only be-
fore you start a washing programme.
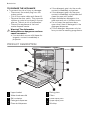
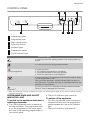
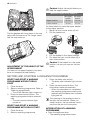
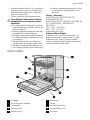
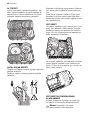
PRODUCT DESCRIPTION
1
Upper basket
2
Water hardness dial
3
Salt container
4
Detergent dispenser
5
Rinse aid dispenser
6
Rating plate
7
Filters
8
Lower spray arm
9
Upper spray arm
10
Worktop
4 electrolux

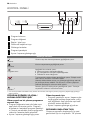
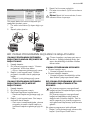
CONTROL PANEL
7
6
5
1
2
3
4
1
Programme guide
2
Programme knob
3
Start/cancel button
4
Delay start button
5
Indicator lights
6
Programme marker
7
On/off indicator light
Indicator lights
Wash
It comes on when the washing phase or the rinsing phase op-
erates.
Dry
It comes on when the drying phase operates.
End-of-programme
It comes on when:
• The washing programme is completed.
• You adjust the level of the water softener.
• There is a malfunction of the appliance.
Salt
1)
It comes on when it is necessary to fill the salt container. Refer
to 'Use of dishwasher salt'.
After you fill the container, the salt indicator light can stay on
for some hours. This does not have an unwanted effect on the
operation of the appliance.
Rinse aid
1)
It comes on when it is necessary to fill the rinse aid container.
Refer to 'Use of detergent and rinse aid'.
1) When the salt and/or rinse aid containers are empty, the related indicator lights do not come on while a washing
programme operates.
PROGRAMME KNOB AND ON/OFF
INDICATOR LIGHT
To switch on the appliance and select a
washing programme:
• Turn the programme knob clockwise or
counterclockwise. The programme mark-
er on the programme knob must agree
with one of the washing programmes on
the control panel.
• The on/off indicator light comes on.
To switch off the appliance:
– Turn the programme knob clockwise or
counterclockwise until the programme
marker agrees with the on/off indicator
light.
– The on/off indicator light goes off.
electrolux 5

DELAY START BUTTON
Press this button to delay the start of the
washing programme of three hours. Refer
to 'Setting and starting a washing pro-
gramme'.
USE OF THE APPLIANCE
1. Be sure that the set level of the water
softener agrees with the water hard-
ness in your area. If not, adjust the wa-
ter softener.
2. Fill the salt container with dishwasher
salt.
3. Fill the rinse aid dispenser with rinse
aid.
4. Load cutlery and dishes into the appli-
ance.
5. Set the correct washing programme for
the type of load and soil.
6. Fill the detergent dispenser with the
correct quantity of detergent.
7. Start the washing programme.
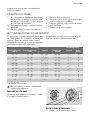
SETTING THE WATER SOFTENER
The water softener removes minerals and
salts from the water supply. These minerals
and salts can cause damage to the appli-
ance.
Adjust the level of the water softener if this
does not agree with the water hardness in
your area.
Contact your local water authority to know
the water hardness in your area.
Water hardness
Water hardness ad-
justment
German degrees
(°dH)
French degrees
(TH°)
mmol/l Clarke de-
grees
manually elec-
troni-
cally
51 - 70 91 - 125 9,1 - 12,5 64 - 88
2
1)
10
43 - 50 76 - 90 7,6 - 9,0 53 - 63
2
1)
9
37 - 42 65 - 75 6,5 - 7,5 46 - 52
2
1)
8
29 - 36 51 - 64 5,1 - 6,4 36 - 45
2
1)
7
23 - 28 40 - 50 4,0 - 5,0 28 - 35
2
1)
6
19 - 22 33 - 39 3,3 - 3,9 23 - 27
2
1)
5
1)
15 - 18 26 - 32 2,6 - 3,2 18 - 22 1 4
11 - 14 19 - 25 1,9 - 2,5 13 - 17 1 3
4 - 10 7 - 18 0,7 - 1,8 5 - 12 1 2
< 4 < 7 < 0,7 < 5
1
2)
1
2)
1) Factory position.
2) Do not use salt at this level.
You must adjust the water softener
manually and electronically.
MANUAL ADJUSTMENT
Turn the water hardness dial to the position
1 or 2 (refer to the table).
6 electrolux

ELECTRONIC ADJUSTMENT
1. Press and hold the start/cancel button.
2. Turn the programme knob clockwise
until the programme marker agrees
with the first available washing pro-
gramme on the control panel.
3. Release the start/cancel button when
the on/off and the start/cancel indicator
lights start to flash.
4. At the same time, the end-of-pro-
gramme indicator light starts to flash.
The number of flashes shows the cur-
rent adjustment.
Example: 5 flashes / pause / 5 flashes
= level 5.
5. Press the start/cancel button to change
the adjustment. Each time you press
the start/cancel button, the adjustment
goes to the subsequent level.
6. Switch off the appliance to keep the
operation.
If the water softener is set electronically
to the level 1, the salt indicator light
stays off.
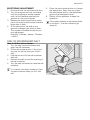
USE OF DISHWASHER SALT
How to fill the salt container:
1. Turn the cap counterclockwise and
open the salt container.
2. Fill the salt container with 1 litre of wa-
ter (only for the first time you fill with
salt).
3. Use the funnel to fill the salt container
with salt.
4. Remove the salt around the opening of
the salt container.
5. Turn the cap clockwise to close the salt
container.
It is correct that water comes out from
the salt container when you fill it with
salt.
electrolux 7

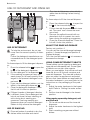
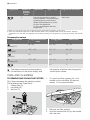
USE OF DETERGENT AND RINSE AID
8
2
4
5
6
1
7
3
USE OF DETERGENT
To help the environment, do not use
more than the correct quantity of deter-
gent.
Follow the detergent manufacturer rec-
ommendations on the detergent pack-
aging.
Do these steps to fill the detergent dispens-
er:
1.
Press the release button
2
to open the
lid
8
of the detergent dispenser.
2.
Put the detergent in the dispenser
3
.
3. If the washing programme has a pre-
wash phase, put a small quantity of de-
tergent in the prewash detergent com-
partment
1
.
4. If you use the detergent tablets, put the
tablet in the detergent dispenser
3
.
5. Close the detergent dispenser. Press
the lid until it locks into position.
Different brands of detergent dissolve
in different times. Some detergent tab-
lets do not have the best cleaning re-
sults during short washing pro-
grammes. Use long washing pro-
grammes when you use the detergent
tablets to fully remove the detergent.
USE OF RINSE AID
Rinse aid makes it possible to dry the
dishes without streaks and stains.
The rinse aid dispenser automatically
adds rinse aid during the last rinsing
phase.
Do these steps to fill the rinse aid dispens-
er:
1.
Press the release button
5
to open the
lid
7
of the rinse aid dispenser.
2.
Fill the rinse aid dispenser
4
with rinse
aid. The mark 'max' shows the maxi-
mum level.
3. Remove the spilled rinse aid with an
absorbent cloth to prevent too much
foam during the washing programme.
4. Close the rinse aid dispenser. Press the
lid until it locks into position.
ADJUST THE RINSE AID DOSAGE
Factory set: position 4.
You can set the rinse aid dosage between
position 1 (lowest dosage) and position 6
(highest dosage).
Turn the rinse aid selector
6
to increase or
decrease the dosage.
USING COMBI DETERGENT TABLETS
These tablets contain agents as detergent,
rinse aid and dishwasher salt. Some types
of tablets can contain other agents.
When you use tablets, that contain salt and
rinse aid, do not fill the salt container and
rinse aid dispenser. The rinse aid indicator
stays on when the appliance is activated.
Be sure that these tablets are applicable for
the water hardness in your area (refer to the
instructions on the packaging of the prod-
ucts).
1. Adjust the water hardness to the lowest
level. Refer to 'Setting the water soften-
er'.
2. Set the rinse aid dosage to the lowest
position.
Using again separately detergent, salt
and rinse aid
1. Fill the salt container and the rinse aid
dispenser.
2. Adjust the water hardness to the highest
level.
3. Start a washing programme without
dishes.
8 electrolux

4. When the washing programme is com-
pleted, adjust the water softener to the
water hardness in your area.
5. Adjust the quantity of rinse aid.
LOADING CUTLERY AND DISHES
HINTS AND TIPS
• Do not put in the appliance items that
can absorb water (sponges, household
cloths).
• Remove the remaining food from the
items.
• Make soft the remaining burned food on
the items.
• Put hollow items (cups, glasses and
pans) with the opening down.
• Make sure that water does not collect in
containers or in bowls.
• Make sure that cutlery and dishes do not
bond together.
• Make sure that the glasses do not touch
other glasses.
• Put small items in the cutlery basket.
•Mix the spoons with other cutlery to pre-
vent them to bond together.
• When you put the items in the baskets,
make sure that the water can touch all
surfaces.
• Put light items in the upper basket. Make
sure that the items do not move.
• Water droplets can collect on plastic
items and non-stick pans.
LOWER BASKET
Put the saucepans, lids, plates, salad bowls
and cutlery in the lower basket. Arrange the
service dishes and large lids around the
edge of the basket.
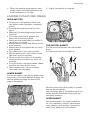
THE CUTLERY BASKET
Put the forks and spoons with the handles
down.
Put the knives with the handles up.
Mix the spoons with other cutlery to prevent
them to bond together.
Use the cutlery grid. If the dimensions of the
cutlery prevent use of the cutlery grid, you
can easily remove it.
UPPER BASKET
The upper basket is for plates (maximum
24 cm in diameter), saucers, salad bowls,
cups, glasses, pots and lids. Arrange the
items to let water touch all surfaces.
electrolux 9

Put the glasses with long stems in the cup
racks with the stems up. For longer items,
fold the cup racks up.
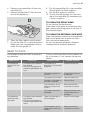
ADJUSTMENT OF THE HEIGHT OF THE
UPPER BASKET
You can put the upper basket in two posi-
tions to increase the load flexibility.
Caution! Adjust the height before you
load the upper basket.
Maximum height of the dishes in:
the upper
basket
the lower
basket
Higher position 20 cm 31 cm
Lower position 24 cm 27 cm
Do these steps to move the upper basket
to the higher position:
1. Move the front runner stops (A) out.
2. Pull the basket out.
3. Put the basket in the upper position.
4. Put back the front runner stops (A) in
their initial position.
Caution! If the basket is in the upper
position, do not put cups on the cup
racks.
SETTING AND STARTING A WASHING PROGRAMME
SELECT AND START A WASHING
PROGRAMME WITHOUT DELAY
START
1. Close the door.
2. Select a washing programme. Refer to
'Washing programmes'.
– The on/off indicator light comes on.
3. Press the start/cancel button. The
washing programme starts automati-
cally.
– The start/cancel indicator light
comes on.
SELECT AND START A WASHING
PROGRAMME WITH DELAY START
1. Close the door.
2. Select a washing programme.
3. Press the delay start button.
– The delay start indicator light comes
on.
4. Press the start/cancel button. The
countdown starts automatically.
– When the countdown is completed,
the washing programme starts auto-
matically and the delay start indicator
light goes off.
The opening of the appliance door in-
terrupts the countdown. When you
close the door, the countdown contin-
ues from the point of interruption.
INTERRUPTION OF A WASHING
PROGRAMME
• Open the appliance door.
– The washing programme stops.
10 electrolux

• Close the appliance door.
– The washing programme continues
from the point of interruption.
HOW TO CANCEL A WASHING
PROGRAMME OR A DELAY START
If a washing programme or a delay
start has not started, you can change
the selection.
When a washing programme or a delay
start are in progress, it is not possible
to change the selection. It is necessary
to cancel the washing programme or
the delay start to make a new selec-
tion.
How to cancel a washing programme
1. Press and hold the start/cancel button
until the start/cancel indicator light goes
off.
2. Make sure that there is detergent in the
detergent dispenser before you start a
new washing programme.
How to cancel a delay start
1. Press and hold the start/cancel button
until the start/cancel and the delay start
indicator lights go off.
2. Press the start/cancel button to start
the washing programme.
AT THE END OF THE WASHING
PROGRAMME
• The appliance stops automatically.
• The end-of-programme indicator light is
on.
1. Switch off the appliance.
2. Open the appliance door.
3. For better drying results, keep the door
ajar for some minutes.
REMOVE THE ITEMS FROM THE
BASKETS
• Let the dishes become cold before you
remove them from the appliance. Hot
dishes can be easily damaged.
• First remove the items from the lower
basket, then from the upper basket.
• There can be water on the sides and on
the door of the appliance. Stainless steel
becomes cool more quickly than the
dishes.
WASHING PROGRAMMES
Programme Position of
the pro-
gramme
knob
Type of soil Type of load Programme description
Intensive 70°
A Heavy soil Crockery, cutlery,
pots and pans
Prewash
Wash 70 °C
2 middle rinses
Last rinse
Dry
Normal 65°
B Normal soil Crockery and cut-
lery
Prewash
Wash 65 °C
2 middle rinses
Last rinse
Dry
Quick 60°
1)
C Normal or
light soil
Crockery and cut-
lery
Wash 60 °C
Rinse
Economy 50°
2)
D Normal soil Crockery and cut-
lery
Prewash
Wash 50°C
1 middle rinse
Last rinse
Dry
electrolux 11

Programme Position of
the pro-
gramme
knob
Type of soil Type of load Programme description
Rinse
E Use this programme to quickly
rinse the dishes. This prevents the
remaining food to bond on the
dishes and bad odours to come
out from the appliance.
Do not use detergent with this
programme.
1 cold rinse
1) When you have a light load, this programme gives good washing results in a short time.
2) This is the standard programme for test institutes (refer to the supplied leaflet for test information). With this
programme you have the most efficient use of water and energy consumption for crockery and cutlery with normal
soil.
Consumption values
Programme Programme time (mi-
nute)
Energy (kWh) Water (litre)
Intensive 70°
85 - 95 1,8 - 2,0 22 - 25
Normal 65°
105 - 115 1,5 - 1,7 23 - 25
Quick 60°
30 0,9 9
Economy 50°
130 - 140 1,0 - 1,2 14 - 16
Rinse
12 0,1 5
The water pressure and temperature,
the variations of the mains supply and
the quantity of dishes can change the
consumption values.
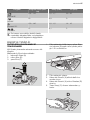
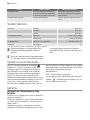
CARE AND CLEANING
TO REMOVE AND CLEAN THE FILTERS
Dirty filters decrease the washing results.
The appliance has three filters:
1. coarse filter (A)
2. microfilter (B)
3. flat filter (C)
A
B
C
A
B
C
1. To unlock the filter system, turn the
handle on the microfilter (B) approxi-
mately 1/4 counterclockwise.
2. Remove the filter system.
3. Hold the coarse filter (A) by the handle
with the hole.
12 electrolux

4. Remove the coarse filter (A) from the
microfilter (B).
5. Remove the flat filter (C) from the bot-
tom of the appliance.
D
6. Clean the filters below running water.
7. Put the flat filter (C) to its initial position.
Make sure that it assembles correctly
under the two guides (D).
8. Put the coarse filter (A) in the microfilter
(B) and push the filters together.
9. Put the filter system in position.
10. To lock the filter system, turn the han-
dle on the microfilter (B) clockwise until
it locks in position.
TO CLEAN THE SPRAY ARMS
Do not remove the spray arms.
If the holes in the spray arms become clog-
ged, remove remaining parts of soil with a
thin pointed object.
TO CLEAN THE EXTERNAL SURFACES
Clean the external surfaces of the appliance
and control panel with a moist soft cloth.
Only use neutral detergents.
Do not use abrasive products, abrasive
cleaning pads or solvents (acetone).
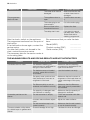
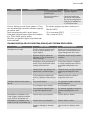
WHAT TO DO IF…
The appliance does not start or stops dur-
ing operation.
First try to find a solution to the problem (re-
fer to the chart). If not, contact the service
centre.
Malfunction Fault code Possible cause Possible solution
The appliance
does not fill with
water.
• The start/cancel indicator
light flashes.
• The end-of-programme
indicator light flashes one
time.
The water tap is
blocked or is furred with
limescale.
Clean the water tap.
The water pressure is
too low.
Contact your local wa-
ter authority.
The water tap is closed. Open the water tap.
The filter in the water in-
let hose is blocked.
Clean the filter.
The connection of the
water inlet hose is not
correct.
Make sure that the
connection is correct.
The water inlet hose is
damaged.
Make sure that the wa-
ter inlet hose has no
damages.
The appliance
does not drain
the water.
• The start/cancel indicator
light flashes. .
• The end-of-programme
indicator light flashes two
times.
There is a blockage in
the sink spigot.
Clean the sink spigot.
The connection of the
water drain hose is not
correct.
Make sure that the
connection is correct.
electrolux 13

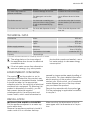
Malfunction Fault code Possible cause Possible solution
The water drain hose is
damaged.
Make sure that the wa-
ter drain hose has no
damages.
The programme
does not start.
The appliance door is
open.
Close the door correct-
ly.
The mains plug is not
connected in.
Put in the mains plug.
Blow out fuse in the
household fuse box.
Replace the fuse.
The delay start is set. If you want to cancel
the delay start, refer to
'Select and start a
washing programme'.
After the check, switch on the appliance.
The programme continues from the point of
interruption.
If the malfunction shows again, contact the
service centre.
For other fault codes, not showed in the
chart, contact the service centre.
The necessary data for the service centre is
on the rating plate.
We recommend that you write the data
here:
Model (MOD.) ....................
Product number (PNC) ....................
Serial number (S.N.) ....................
THE WASHING RESULTS AND DRYING RESULTS ARE NOT SATISFACTORY
Problem Possible cause Possible solution
The dishes are not clean. The selected washing pro-
gramme was not applicable for
the type of load and soil.
Make sure that the washing
programme is applicable for the
type of load and soil.
The baskets were not loaded
correctly, water did not touch
all surfaces.
Load the baskets correctly.
The spray arms could not turn
freely because of incorrect ar-
rangement of the load.
Make sure that an incorrect ar-
rangement of the load does not
cause a blockage of the spray
arms.
The filters are dirty or not as-
sembled and installed correctly.
Make sure that the filters are
clean and correctly assembled
and installed.
The quantity of detergent was
not sufficient or missing.
Make sure that the quantity of
detergent is sufficient.
Limescale particles on the
dishes.
The salt container is empty. Fill the salt container with dish-
washer salt.
Incorrect water softener adjust-
ment
Adjust the water softener.
The salt container cap is not
closed correctly.
Make sure that the salt contain-
er cap is closed correctly.
There are streaks, milky stains,
or a bluish layer on glasses and
dishes.
Rinse aid dosage is too high. Decrease the rinse aid dosage.
14 electrolux

Problem Possible cause Possible solution
Dry water drop stains on
glasses and dishes.
Rinse aid dosage is too low. Increase the rinse aid dosage.
The detergent can be the
cause.
Use a different brand of deter-
gent.
The dishes are wet. You have set a washing pro-
gramme without drying phase
or with a decreased drying
phase.
Let the door stay ajar for some
minutes before you remove the
dishes.
The dishes are wet and dull. The rinse aid dispenser is emp-
ty.
Fill the rinse aid dispenser with
rinse aid.
TECHNICAL DATA
Dimensions Width 600 mm
Height 850 mm
Depth 610 mm
Water supply pressure Minimum 0.5 bar (0.05 MPa)
Maximum 8 bar (0.8 MPa)
Water supply
1)
Cold water or hot water maximum 60 °C
Capacity Place settings 12
1) Connect the water inlet hose to a water tap with a 3/4'' thread.
The rating plate on the inner edge of
the appliance door shows the electrical
connection data.
If the hot water comes from alternative
sources of energy, (e.g. solar panels,
photovoltaic panels and aeolian), use a
hot water supply to decrease energy
consumption.
ENVIRONMENT CONCERNS
The symbol on the product or on its
packaging indicates that this product may
not be treated as household waste. Instead
it should be taken to the appropriate
collection point for the recycling of electrical
and electronic equipment. By ensuring this
product is disposed of correctly, you will
help prevent potential negative
consequences for the environment and
human health, which could otherwise be
caused by inappropriate waste handling of
this product. For more detailed information
about recycling of this product, please
contact your local council, your household
waste disposal service or the shop where
you purchased the product.
Recycle the materials with the symbol
.
Put the packaging in applicable containers
to recycle it.
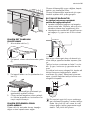
INSTALLATION
INSTALLATION UNDER A COUNTER
Put the appliance adjacent to a water tap
and a water drain.
Remove the appliance worktop to install it
under a sink unit or a kitchen worktop.
Make sure that the dimensions of the re-
cess agree with the dimensions in the pic-
ture.
electrolux 15

HOW TO REMOVE THE APPLIANCE
WORKTOP
1. Remove the rear screws (1).
2. Pull the worktop from the behind of the
appliance (2).
3. Lift the worktop and move it from the
front slots (3).
4. Use the adjustable feet to adjust the
level of the appliance.
5. Install the appliance under the kitchen
worktop. Do not squash or bend the
water hoses during the installation.
TO ADJUST THE LEVEL OF THE
APPLIANCE
A correct level of the appliance lets the door
to close and seal correctly.
If the level of the appliance is not correct,
the door catches on the sides of the cabi-
net.
Loosen or tighten the adjustable feet to ad-
just the level of the appliance.
WATER DRAIN CONNECTION
Connect the water drain hose to:
• The sink spigot and attach it under the
work surface. This prevents that the
waste water from the sink goes back into
the appliance.
• A stand pipe with vent-hole. The internal
diameter must be minimum 40 mm.
max 85 cm
min 40 cm
max 400 cm
Remove the sink plug when the appliance
drains the water to prevent that the water
goes back into the appliance.
The drain hose extension must not be lon-
ger than 2 m. The internal diameter must
not be smaller than the diameter of the
hose.
If you connect the water drain hose to a
trap spigot under the sink, remove the plas-
tic membrane (A). If you do not remove the
membrane, remaining food can cause a
blockage in the drain hose spigot
A safety device impedes the dirty water
to go back into the appliance. If, the
spigot of the sink has a 'non-return
valve', this can cause the appliance to
drain incorrectly. Remove the non-re-
turn valve.
16 electrolux

Electrolux. Thinking of you.
Düşüncelerinizi www.electrolux.com.tr adresinden bizimle
daha fazla paylaşın
İÇİNDEKİLER
Güvenlik bilgileri 17
Ürün tanımı 19
Kontrol Paneli 20
Cihazın kullanımı 21
Su yumuşatıcının ayarlanması 21
Bulaşık makinesi tuzunun kullanımı 22
Deterjan ve parlatıcı kullanımı 22
Çatal-bıçaklar ve tabakların yerleştirilmesi
23
Bir yıkama programının seçilmesi ve
başlatılması 25
Yıkama programları 26
Bakım ve temizlik 27
Servisi aramadan önce 28
Teknik veriler 30
Çevreyle ilgili bilgiler 30
Montaj 30
Önceden haber verilmeksizin değişiklik yapma hakkı saklıdır.
GÜVENLİK BİLGİLERİ
Kurulum ve kullanım öncesinde bu kılavuzu
dikkatlice okuyun:
• Kendi emniyetiniz ve mal güvenliğiniz için.
•Çevreye katkıda bulunmak için.
•Cihazın doğru bir şekilde kullanılması için.
Bu kılavuzu, makineyi başka bir yere taşı-
manız veya farklı bir kişiye vermeniz duru-
munda da daima beraberinde bulundurun.
Üretici, hatalı kurulum ve kullanım sonucu
ortaya çıkan hasarlardan sorumlu değildir.
ÇOCUKLARIN VE SAVUNMASIZ
KIŞILERIN EMNIYETI
• Fiziksel, duyusal ve mental kapasiteleri
düşük veya makinenin kullanımı hakkında
deneyimi ve bilgisi olmayan kişiler (çocuk-
lar dahil) bu cihazı kullanmamalıdır. Bu ki-
şiler makineyi, güvenliklerinden sorumlu
olan bir kişinin denetimi altında veya ciha-
zın kullanımı hakkında bu kişi tarafından
bilgilendirilmek kaydıyla kullanabilir.
• Çocuklar, cihazla oynamamaları için de-
netim altında tutulmalı
dır.
• Tüm ambalaj malzemelerini çocuklardan
uzak tutun. Nefes alamama veya yaralan-
ma riski vardır.
•Tüm deterjanları emniyetli bir yerde sakla-
yın. Çocukların deterjanlara dokunmasına
izin vermeyin.
• Kapak açıkken, çocukları ve evcil hayvan-
ları makineden uzak tutun.
GENEL GÜVENLIK
• Bu makinenin teknik özelliklerini değiştir-
meyin. Yaralanma ve makineye zarar ver-
me riski vardır.
•Gözde, ağızda ve boğazda yanıkları önle-
mek için deterjan üreticisinin emniyet tali-
matlarına göre hareket edin.
• Makinedeki suyu içmeyin. Makinenizde
deterjan partikülleri kalabilir.
• Makinenin kapağını başında bulunma-
dığınız zamanlarda açık bırakmayın. Bu,
yaralanmayı ve açık bir kapak üzerine
düşmeyi önlemek içindir.
•Açık kapak üzerine oturmayın veya bas-
mayın.
KULLANILDIĞI IŞLEMLER
• Bu makine, sadece ev içi kullanım içindir.
Kişilerin yaralanması
na ve mal zararına
engel olmak için makineyi başka amaçlar-
la kullanmayın.
•Bu cihazı sadece bulaşık makinesinde yı-
kanabilir aksesuarları temizlemek için kul-
lanın.
•Cihazın içine, üzerine veya yakınına yanıcı
ürünler ya da yanıcı ürünlerle ıslanmış eş-
yalar koymayın. Patlama veya yangın ris-
ki.
•Bıçakları ve sivri uçlu eşyaların tümünü,
sivri uçları aşağı gelecek şekilde çatal-bı-
çak sepetine koyun. Bu şekilde koyamı-
yorsanız, yatay bir şekilde üst sepete ve-
electrolux 17

ya bıçak sepetine koyun. (Modellerin tü-
münde bıçak sepeti bulunmaz).
• Sadece bulaşık makinelerine özel ürünleri
(deterjan, tuz ve parlatıcı) kullanın.
•Bulaşık makinelerine uygun olmayan tuz
tipleri su yumuşatıcının zarar görmesine
neden olabilir.
•Bir yıkama programını başlatmadan önce
cihaza tuz koyun. Cihazda kalan tuz pas-
lanmaya neden olabilir veya cihazın altın-
da bir delik açabilir.
•Parlatıcı gözüne parlatıcı dışında madde-
ler (örneğin; bulaşık makinesi temizleme
maddesi, sıvı deterjan) koymayın. Bu du-
rum cihazın zarar görmesine neden olabi-
lir.
•Bir yıkama programını başlatmadan önce,
püskürtme kollarının rahatça hareket ede-
bildiğinden emin olun.
•Bir yıkama programı çalış
ırken kapağı
açarsanız cihazdan sıcak buhar çıkışı ola-
bilir. Cilt yanıkları riski vardır.
•Yıkama programı tamamlanana kadar ci-
hazdan bulaşıkları çıkarmayın.
BAKIM VE TEMIZLIK
•Cihazı temizlemeden önce, kapatın ve
elektrik fişini prizden çekin.
•Yanıcı ürünler veya korozyona neden ola-
bilen ürünler kullanmayın.
•Cihazı filtreler olmadan kullanmayın. Filtre-
lerin doğru monte edildiğinden emin olun.
Yanlış bir montaj işlemi, tatmin edici ol-
mayan yıkama sonuçlarına ve cihazın za-
rar görmesine neden olur.
•Cihazı temizlemek için su spreyi veya bu-
har kullanmayın. Elektrik çarpması ve ci-
hazın zarar görme riski vardır.
MONTAJ
•Cihazın zarar görmediğinden emin olun.
Hasarlı bir cihazı
monte etmeyin veya
bağlamayın, tedarikçi ile temas kurun.
•Cihazı monte etmeden ve kullanmadan
önce tüm ambalajı çıkartın.
•Cihazın elektrik bağlantısını, tesisatını ve
montajını sadece kalifiye bir kişi yapmalı-
dır. Bunun amacı yapısal hasar veya yara-
lanma riskinin ortadan kaldırılmasıdır.
•Montaj sırasında elektrik fişinin prizden
çekili olduğundan emin olun.
• Hidrolik bileşenlerin ve elektrikli bileşenle-
rin zarar görmesini önlemek için, cihazın
yanlarında delik açmayın.
DONMAYA KARŞI ÖNLEMLER
•Cihazı, sıcaklığı 0 °C'den daha az olan
yerlere monte etmeyin.
• Üretici firma donma nedeniyle oluşan za-
rarlardan sorumlu değildir.
SU BAĞLANTISI
•Cihazı su beslemesine bağlamak için yeni
hortumlar kullanın. Eski hortumları kullan-
mayın.
•Cihazı yeni borulara veya uzun süre kulla-
nılmamış olan borulara bağlamayın. Suyu
birkaç dakika akıttıktan sonra giriş hortu-
munu bağlayın.
•Cihazın montajını yaparken su hortumları-
nı ezmemeye veya zarar vermemeye dik-
kat edin.
• Su kaçağı olmaması için, su bağlantıları-
nın sıkı olduğundan emin olun.
•Cihazı ilk kez kullanırken, hortumlarda su
kaçağı olmadığından emin olun.
ELEKTRIK BAĞLANTISI
• Cihaz topraklanmalıdır.
• Veri etiketindeki elektriksel verilerin elek-
trik beslemesine uygun olduğundan emin
olun.
•Her zaman doğru monte edilmi
ş, darbele-
re dayanıklı bir priz kullanın.
•Priz çoğaltıcıları ve uzatma kablolarını kul-
lanmayın. Yangın riski vardır.
• Elektrik kablosunu yenilemeyin veya
değiştirmeyin. Servis merkezini arayın.
•Cihazın arkasındaki elektrik fişini ve kablo-
sunu ezmemeye veya zarar vermemeye
dikkat edin.
• Montajdan sonra elektrik fişine erişilebil-
diğinden emin olun.
•Cihazın fişini prizden çıkarmak için elektrik
kablosunu çekmeyin. Her zaman fişten
tutarak çekin.
SERVIS MERKEZI
• Sadece yetkili bir kişi cihaz üzerinde ona-
rım veya çalışma yapabilir. Servis merke-
zini arayın.
• Sadece orijinal yedek parçalar kullanın.
CIHAZIN ISKARTAYA ÇIKARILMASI
• Yaralanma veya hasar riskini ortadan kal-
dırmak için:
– Elektrik fişini prizden çekin.
– Elektrik kablosunu kesin ve atın.
18 electrolux

– Kapak mandalını sökün. Bu, çocukların
veya evcil hayvanların cihaz içinde ka-
palı kalmalarına engel olur. Boğulma
riski söz konusudur.
–Cihazı yerel atık imha merkezine atın.
Uyarı Bulaşık deterjanları tehlikeli
maddelerdir ve korozyona neden
olabilirler!
• Bu deterjanlarla herhangi bir kazanın
meydana gelmesi halinde, hemen bir
doktora danışın.
• Deterjan ağzınıza bulaşırsa, vakit kay-
betmeden bir doktora danışın.
• Deterjan gözlerinize bulaşırsa, derhal
bir doktora danışın ve gözlerinizi suy-
la temizleyin.
•Bulaşık deterjanlarını çocukların eri-
şemeyeceği, güvenli bir yerde tutun.
• Deterjan çekmecesinde deterjan var-
ken cihazın kapağını açık bırakmayın.
• Deterjan çekmecesini ancak bir yıka-
ma programını başlatmadan önce
doldurun.
Üretici / İhracatçı :
ELECTROLUX HOME PRODUCTS
CORPORATION NV.
RAKETSTRAAT 40 / RUE DE LA FUSEE 40
B-1130 BRUSSEL / BRUXELLES
BELGIUM
TEL: +32 2 716 26 00
FAX: +32 2 716 26 01
www.electrolux.com
Kullanım Ömrü Bilgisi :
Kullanım ömrü küçük ev aletlerinde 7 yıl,
diğer beyaz e
şya ürünlerinde ise 10 yıldır.
Kullanım ömrü, üretici ve/veya ithalatçı
firmanın cihazınızla ilgili yedek parça temini
ve bakım süresini ifade eder.
ÜRÜN TANIMI
1
Üst sepet
2
Su sertliği ayar düğmesi
3
Tuz haznesi
4
Deterjan gözü
5
Parlatıcı gözü
6
Bilgi etiketi
7
Filtreler
8
Alt püskürtme kolu
9
Üst püskürtme kolu
10
Üst tabla
electrolux 19

KONTROL PANELİ
7
6
5
1
2
3
4
1
Program kılavuzu
2
Program düğmesi
3
Başlat / iptal tuşu
4
Gecikmeli başlatma tuşu
5
Gösterge lambaları
6
Program işaretleyici
7
Açma / kapama gösterge ışığı
Gösterge lambaları
Yıkama
Yıkama veya durulama aşamasına geçildiğinde yanar.
Kurutma
Kurutma aşamasına geçildiğinde yanar.
Program sonu
Aşağıdaki durumlarda yanar:
•Yıkama programı tamamlandığında.
•Su yumuşatı cının seviyesini ayarladığınızda.
• Cihazda bir arıza olduğunda.
Tuz
1)
Tuz haznesinin doldurulması gerektiğinde yanar. 'Bulaşık maki-
nesi tuzunun kullanımı' bölümüne bakın.
Hazneyi doldurduktan sonra, tuz gösterge ışığı birkaç saat da-
ha yanmaya devam edebilir. Bu durumun, cihazın çalışması
üzerinde herhangi bir olumsuz etkisi yoktur.
Parlatıcı
1)
Parlatıcı gözünün doldurulması gerektiğinde yanar. 'Deterjan
ve parlatıcı kullanımı' bölümüne bakın.
1) Tuz ve/veya parlatıcı haznelerinin boş olması durumunda, herhangi bir yıkama programı çalışırken ilgili gösterge
ışıkları yanmaz.
PROGRAM DÜĞMESI VE AÇMA /
KAPAMA GÖSTERGE IŞIĞI
Cihazı açmak ve bir yıkama programını
seçmek için:
• Program düğmesini saat yönünde veya
saat yönünün tersine çevirin. Program
düğmesinin üzerindeki program işaretleyi-
ci, kontrol panelindeki yıkama programla-
rından bir tanesine denk gelmelidir.
• Açma / kapama gösterge ışığı yanar.
Cihazı kapamak için:
–Program işaretleyici açma / kapama gös-
terge ışığıyla karşılaşıncaya kadar, prog-
ram düğmesini saat yönünde veya saat
yönünün tersine döndürün.
– Açma / kapama gösterge ışığı söner.
GECIKMELI BAŞLATMA TUŞU
Yıkama programının başlangıcını üç saat
geciktirmek için bu tuşa basın. 'Bir yıkama
20 electrolux
Sayfa yükleniyor...
Sayfa yükleniyor...
Sayfa yükleniyor...
Sayfa yükleniyor...
Sayfa yükleniyor...
Sayfa yükleniyor...
Sayfa yükleniyor...
Sayfa yükleniyor...
Sayfa yükleniyor...
Sayfa yükleniyor...
Sayfa yükleniyor...
Sayfa yükleniyor...
-
 1
1
-
 2
2
-
 3
3
-
 4
4
-
 5
5
-
 6
6
-
 7
7
-
 8
8
-
 9
9
-
 10
10
-
 11
11
-
 12
12
-
 13
13
-
 14
14
-
 15
15
-
 16
16
-
 17
17
-
 18
18
-
 19
19
-
 20
20
-
 21
21
-
 22
22
-
 23
23
-
 24
24
-
 25
25
-
 26
26
-
 27
27
-
 28
28
-
 29
29
-
 30
30
-
 31
31
-
 32
32


Electrolux ESF63012W Kullanım kılavuzu
- Kategori
- Bulaşık makineleri
- Tip
- Kullanım kılavuzu
diğer dillerde
- English: Electrolux ESF63012W User manual
İlgili makaleler
-
Electrolux ESL63010 Kullanım kılavuzu
-
Electrolux ESL64010 Kullanım kılavuzu
-
-
-
-
Electrolux ESF6210LOX Kullanım kılavuzu
-
-
-