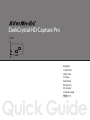
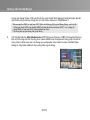
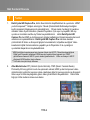
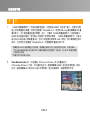
Avermedia C027 Hızlı başlangıç Kılavuzu
- Tip
- Hızlı başlangıç Kılavuzu

C027
Quick Guide
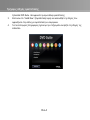
DarkCrystal HD Capture Pro
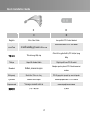
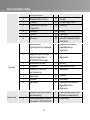
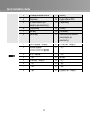
English
ภาษาไทย
Việt nam
Türkçe
Română
Ελληνική
Русский
Украинский
繁體中文


European Community Compliance Statement
Class B
This product is herewith confirmed to comply with the requirements set out in the Council Directives on
the Approximation of the laws of the Member States relating to Electromagnetic Compatibility Directive
2004/108/EC.
Disclaimer
All the screen shots in this documentation are only example images. The images may vary depending on the product and
software version. Information presented in this documentation has been carefully checked for reliability; however, no
responsibility is assumed for inaccuracies. The information contained in this documentation is subject to change without
notice.
Copyright
©2010 by AVerMedia Technologies, Inc. All rights reserved.
No part of this document may be reproduced or transmitted in any form, or by any means without the prior written
permission of AVerMedia Technologies Inc. AVerMedia Technologies Inc. reserves the right to modify its models,
including their characteristics, specifications, accessories and any other information stated herein without notice. The
official printout of any information shall prevail should there be any discrepancy between the information contained herein
and the information contained in that printout.
"AVerMedia" is a trademark (or registered trademark) of AVerMedia Technologies, Inc. Other trademarks used herein for
description purpose only belong to each of their companies.
The mark of crossed-out wheeled bin indicates that this product must not be disposed of with your other
household waste. Instead, you need to dispose of the waste equipment by handing it over to a designated
collection point for the recycling of waste electrical and electronic equipment. For more information about
where to drop off your waste equipment for recycling, please contact your household waste disposal service or the
shop where you purchased the product.
№ РОСС TW.AB71.B05309
Срок действия с
12.07.2010 по 11.07.2011
Москва
AB71

IMPORTANT SAFETY INSTRUCTIONS
Read Instructions - Read all the safety and operating instructions before connecting and operating your TV tuner to help
ensure your own personal safety and to protect your product from potential damage.
Retain Instructions - Retain all the safety and operating instructions for future reference.
Heed Warnings - Adhere to all warnings on the product and the operating instructions.
Grounding - For continued protection against risk of electric shock and fire, this accessory should be installed/connected
only to the products, such as a computer, equipped with a three-wire grounding plug, a plug having a third (grounding) pin.
This plug will only fit into a grounding-type power outlet. This is a safety feature. If you are unable to insert the plug into the
outlet, contact your electrician to replace the obsolete outlet. Do not defeat the safety purpose of the grounding-type plug.
Lightning - For added protection and to prevent damage due to lightning and power-line surges, unplug the host system,
such as a computer, from the wall power outlet and disconnect the antenna or cable system. Unplug the host system from
the wall power outlet when left unattended or unused for long periods of time.
Never insert anything metallic into the TV tuner openings. Doing so may create the danger of electric shock.
Power Lines - An outside antenna system should not be located in the vicinity of overhead power lines or other light or
power circuits, or where it can fall into such power lines or circuits.
Antenna Installation - When installing an outside antenna system, extreme care should be taken to prevent it from
touching such power lines or circuits, as contact with them may be fatal.
Outdoor Antenna Grounding - If an outside antenna is connected to the product, ensure that the antenna system is
grounded so as to provide some protection against voltage surges and built up static charges. Article 810.21 of the
National Electric Code, ANSI/NFPA No.70, provides information with regard to proper grounding of the mast and
supporting structure, grounding of the lead-in wire to the antenna discharge unit, size of grounding conductors, location of
antenna-discharge unit, connection of grounding electrodes, and requirements for the grounding electrode.
(for CATV system installer) This reminder is provided to call the CATV systems installer's attention to Section
820.93 of the National Electric Code, ANSI/NFPA 70:2005 (for US/Canada) and/or EN60728-11:2005 standard
(for Europe), which provide guidelines for proper grounding and, in particular, specify that the coaxial cable
shield shall be connected to the grounding system of the building, as close to the point of cable entry as
practical.

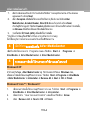
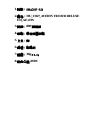
Quick Installation Guide
1
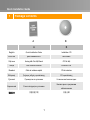
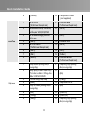
1 Package Contents
A B
A B
English Quick Installation Guide Installation CD
ภาษาไทย คูมือการติดตั้งอยางเร็ว ซีดีการติดตั้ง
Việt nam Hướng dẫn Cài đặt Nhanh CD Cài đặt
Türkçe Hızlı Kurulum Kılavuzu Kurulum CD’si
Română Ghid de instalare rapidă CD de instalare
Ελληνική Γρήγορος οδηγός εγκατάστασης CD εγκατάστασης
Русский Руководство по установке Установочный компакт-диск
Украинский Стисла інструкція з установки
Компакт-диск з програмним
забезпеченням
繁體中文
快速安裝手冊 安裝光碟

Quick Installation Guide
2
C D
C D
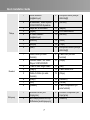
English All-in-One Cable Low profile PCI-E short bracket
ภาษาไทย สายเชื่อมตอสัญญาณแบบ All-in-one
เครื่องหมายวงเล็บ PCI-E โปรไฟลต่ํา
Việt nam
Tất cả trong--Một cáp
Chân hỗ trợ gắn thiết bị PCI ở hiện trạng
thấp
Türkçe Hepsi Bir Arada Kablo Düşük profil kısa PCI-E soketi
Română Кабел „всичко в едно
Adaptor pentru placa PCI-E de dimensiuni
reduse
Ελληνική Καλώδιο Όλοι σε ένας PCI-E χαμηλού προφίλ με κοντό λαμάκι
Русский Кабель Все-в-один Низкопрофильная PCI-E планка
Украинский Универсальный кабель низькопрофільна планка
繁體中文
多合一轉接線 短鐵條

Quick Installation Guide
3
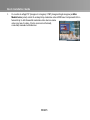
2 Hardware Installation
Installating the device
Slot
English
1. Turn off and unplug the PC.
2. Remove the cover.
3. Insert the device into an empty PCI-E expansion slot on the
motherboard.
4. Replace the cover back.
ภาษาไทย
1. ปดเครื่องพีซี
2. ถอดฝาครอบออก
3. เสียบการดรับสัญญาณทีวีลงในชองขยายอุปกรณ PCI ที่วางอยู บนเมนบอรด
4.
ปดฝาครอบกลับเขาที่
Việt nam
1. Tắt PC.
2. Tháo vỏ máy.
3. Cắm card ðiều chỉnh vào rãnh cắm mở rộng PCI-E trong thân máy.
4. Lắp vỏ máy trở lại.
Türkçe
1. Bilgisayarı kapatın ve bağlantısını kesin.

Quick Installation Guide
4
2. Kapağı çıkartın.
3. Cihazı, anakartın üzerinde boş olan bir PCI-E genişleme yuvasına takın.
4. Kapağı yerine takın.
Română
1. Opriţi calculatorul.
2. Scoateţi panoul lateral al carcasei.
3. Introduceţi placa tuner într-un slot PCI liber de pe placa de bază.
4. Puneţi la loc panoul lateral al carcasei.
Ελληνική
1. Σβήστε τον υπολογιστή.
2. Αφαιρέστε το καπάκι.
3. Τοποθετήστε την κάρτα τηλεόρασης σε μία άδεια θύρα επέκτασης PCI
στη μητρική.
4. Τοποθετήστε ξανά το καπάκι.
Русский
1. Выключите питание компьютера и отсоедините его от сети.
2. Снимите корпусную крышку с системного блока.
3. Установите плату устройства в пустой слот расширения PCI-E на
материнской плате.
4. Установите корпусную крышку на системный блок.
Украинский
1. Вимкніть комп'ютер.
2. Зніміть кришку корпуса.
3. Вставте карту тюнера у вільний PCI слот на материнській платі.
4. Поставте кришку корпуса на місце.
繁體中文
1. 電腦關機。
2. 移除電腦外殼。
3. 將擷取卡插到主機板上 PCI-E 插槽。
4. 重新裝回電腦外殼。

Quick Installation Guide
5
Making the Connections
English
1 HDMI Cable
(not supplied)
9 Composite Cable
(not supplied)
2 Camcorder/ Video Game/
VCR/VCD/DVD Player
10 (Red)
3
All-in-One Cable
11
(White)
4 (Black) 12 RCA Audio Cable
5 S-Video Cable
(not supplied)
13 (Red)
6 (Red) 14 (Blue)
7
(White)
15
(Green)

Quick Installation Guide
6
8 (Yellow) 16 Component Cable
(not supplied)
ภาษาไทย
1 สาย HDMI
(ไมไดรวมมากับอุปกรณ)
9 สายคอมโพสิต
(ไมไดรวมมากับอุปกรณ)
2 เครื่องบันทึกวิดีโอ/ วิดีโอเกม/
เครื่องเลน VCR/VCD/DVD
10 (สีขาว)
3
สายเชื่อมตอสัญญาณแบบ
All-in-one
11 (สีฟา)
4
(สีขาว)
12
สายเสียง RCA
5
สาย S-Video
(ไมไดรวมมากับอุปกรณ)
13 (สีขาว)
6
(สีขาว)
14
(สีฟา)
7 (สีฟา) 15 (สีเขียว)
8 (สีเขียว) 16 สายคอมโพเนนต
(ไมไดรวมมากับอุปกรณ)
Việt nam
1 Cáp HDMI (không được
cung cấp)
9 Cáp tổng hợp (không
được cung cấp)
2 Máy quay vi-đê-ô xách tay /
Trò chơi vi-đê-ô / Cổng cho
đầu VCR/VCD/DVD
10
(Đỏ)
3 Tất cả trong--Một cáp 11 (Trắng)
4
(Đen)
12
Cáp Audio RCA
5 Cáp S-Video (không được
cung cấp)
13 (Đỏ)
6
(Đỏ)
14
(Xanh lơ)
7 (Trắng) 15
(Xanh lục)
8 (Vàng) 16 Cáp tổng hợp (không
được cung cấp)

Quick Installation Guide
7
Türkçe
1 HDMI Kablosu
(sağlanmıyor)
9 Kompozit Kablo (kutuya
dahil değil)
2 El kamerası / Video Oyunu /
VCR/VCD/DVD Oynatıcısı
10 (Kırmızı)
3
Hepsi Bir Arada Kablo
11
(Beyaz)
4 (Siyah) 12 RCA Ses Kablosu
5 S-Video Kablosu
(sağlanmıyor)
13 (Kırmızı)
6 (Kırmızı) 14 (Mavi)
7
(Beyaz)
15
(Yeşil)
8 (Sarı) 16 Komponent Kablo (kutuya
dahil değil)
Română
1 Cablu HDMI (nu este
furnizat)
9 Cablu mixt (nu este
furnizat)
2 Cameră video / Joc video /
Player VCR/VCD/DVD
10 (Roşu)
3
Toate in unul singur cablu
11
(Alb)
4 (Negru) 12 Cablu audio RCA
5 Cablu S-Video (nu este
furnizat)
13 (Roşu)
6 (Roşu) 14 (Albastru)
7
(Alb)
15
(Verde)
8 (Galben) 16 Cablu componentă (nu
este furnizat)
Ελληνική
1 Καλώδιο HDMI (δεν
παρέχεται)
9 Καλώδιο Composite (δεν
παρέχεται)
2 Βιντεοκάμερα/Βιντεοπαιγνί
δι/Συσκευή αναπαραγωγής
10 (Κόκκινο)

Quick Installation Guide
8
VCR/VCD/DVD
3 Καλώδιο Όλοι σε ένας 11 (Λευκό)
4
(Μαύρο)
12
Καλώδιο ήχου RCA
5 Καλώδιο S-Video (δεν
παρέχεται)
13 (Κόκκινο)
6
(Κόκκινο)
14
(Μπλε)
7 (Λευκό) 15 (Πράσινο)
8 (Κίτρινο) 16 Καλώδιο Component (δεν
παρέχεται)
Русский
1 HDMI-кабель
(приобретается отдельно)
9 Композитный кабель
(приобретается
отдельно)
2 Цифровой фотоаппарат/
Игровая приставка /
VCR/VCD/DVD-плеер
10
(Красный)
3 Кабель Все-в-один 11
(Белый)
4
(Черный)
12
Аудиокабель RCA
5 Кабель S-Video (не
поставляется)
13 (Красный)
6
(Красный)
14
(Синий)
7 (Белый) 15
(Зеленый)
8 (Желтый) 16 Компонентный кабель
(приобретается
отдельно)
Украинский
1 Кабель HDMI (не входить
до комплекту)
9 Композитний кабель (не
входить до комплекту)
2 Камкордер/Відео іграшка/
Програвач VCR/VCD/DVD
10 (Червоний)

Quick Installation Guide
9
3
Универсальный кабель
11
(Білий)
4 (Чорний) 12 Аудіо кабель RCA
5 S-Video кабель (не
входить до комплекту)
13 (Червоний)
6 (Червоний) 14 (Синій)
7
(Білий)
15
(Зелений)
8 (Жовтий) 16 Компонентний кабель
(не входить до
комплекту)
繁體中文
1 HDMI 連接線(未隨附) 9 AV 端子線(未隨附)
2 錄影機/遊戲機/
VCR/VCD/DVD 播放機
10 (紅)
3 多合一轉接線 11 (白)
4 (黑) 12 音源線
5 S 端子線(未隨附) 13 (紅)
6 (紅) 14 (藍)
7 (白) 15 (綠)
8 (黃) 16 色差端子線(未隨附)

Quick Installation Guide
ENG-1
3
Installing Drivers and the Software Utility
After the device is installed properly, turn on the computer. The system will automatically detect
the new device. Simply skip the wizard, and insert the accompanying installation CD to install
the driver and software utility.
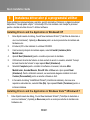
Installing Drivers and the Application in Windows® XP
1. The “Found New Hardware Wizard” dialog box will appear. Just click Cancel to skip the
Wizard installation procedures.
2. Place the installation CD into the CD-ROM drive.
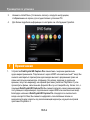
3. When the installation main screen appears, choose Install AVer MediaCenter.
4. Click Next to continue the installation process.
5. Read the license agreement and if you agree to the terms select “I accept the terms of
the license agreement” and then click Next.
6. Choose Complete to install all the necessary software, including AVer MediaCenter,
Acrobat Reader, DirectX 9.0c and Drivers. Then click Next. For advanced users, it is
recommended to choose Custom to select the software you want. To choose a different
destination folder, click Browse.
7. In the “InstallShield Wizard” dialog box, if you are instructed to restart your computer,
select Yes. Then click Finish to complete the installation.
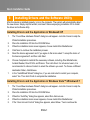
Installing Drivers and the Application in Windows Vista™/ Windows® 7
1. The “Found New Hardware Wizard” dialog box will appear. Just click Cancel to skip the
Wizard installation procedures.
2. Place the installation CD into the CD-ROM drive.
3. When the “AutoPlay” dialog box appears, select Run Autorun.exe.
4. When the installation main screen appears, choose Install AVer MediaCenter.
5. If the “User Account Control” dialog box appears, select Allow / Yes to continue the

Quick Installation Guide
ENG-2
process.
6. Click Next to continue the installation process.
7. Read the license agreement and if you agree to the terms, select “I accept the terms of
the license agreement” and then click Next.
8. Choose Complete to install all the necessary software, including AVer MediaCenter,
Acrobat Reader, DirectX 9.0c and Driver. Then click Next. For advanced users, it is
recommended that you choose Custom to select the software you want. To choose a
different destination folder, click Browse.
9. Then click Finish to complete the installation.
*If DirectX 9.0c or above is not installed in your system, usually the installation CD will automatically install it
during the process of installation. Make sure your system has DirectX 9.0c or above installed so that the
software utility can function properly.
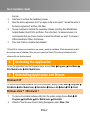
4
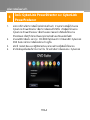
Activating the Application
To run the application from the Programs menu, choose Start Programs AVerMedia
AVer MediaCenter
AVer MediaCenter.
5
Uninstalling Application and Drivers
Windows® XP
To remove the installed software utility from the system, simply choose Start Programs
AVerMedia AVer MediaCenter Uninstaller Remove All Next OK Finish.
Windows Vista™ / Windows® 7
1. To remove the installed software utility from the system, simply choose Start All
Programs
AVerMedia AVer MediaCenter Uninstaller.
2. When the “User Account Control” dialog box appears, select Allow / Yes.

Quick Installation Guide
ENG-3
3. Select Remove All Next OK Finish.
6
Installing CyberLink PowerDirector and
CyberLink PowerProducer
1. After you have completed installing the driver, you can install CyberLink PowerDirector
to edit the video or install CyberLink PowerProducer to make movie disc. installation of
PhotoNow! allows you to automatically or manually adjust images.
2. Eject the installation CD from your CD-ROM drive and insert the CyberLink DVD Suite
CD. The installation main screen will appear.
3. Click on the Install Now and follow the on screen instruction to install the softwares.
4. For more detailed information regarding editing please refer to the CyberLink instruction.

Quick Installation Guide
ENG-4
7
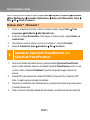
Note
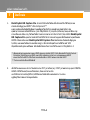
1. DarkCrystal HD Capture Pro is compatible with all range of Audio-Video Receivers. Via
HDMI* or Component** Inputs, you can enjoy High-Definition Multimedia right on your
desktop computer. For example without any delays in real time, you can Play Video
Games Consoles (such as PlayStation 3); enjoy watching Blu-ray movies through Blu-ray
players. Even more, with DarkCrystal HD Capture Pro, you can record your home videos
from Personal Camera connected via HDMI or Component connector. DarkCrystal HD
Capture Pro equipped with standard definition S-Video and Composite inputs so you can
transfer your favorite VCR Video Tapes in Digital Format or record your success in
winning Video Games from PlayStation 3.
* To preview HDMI source with HDCP (High-Bandwidth Digital Content Protection) encryption, a
copy-protection scheme of HDMI specification, your HDMI display devices must be HDCP
compliant. Please note that HDMI contents with HDCP encryption cannot be recorded.
** Copyrighted content cannot be recorded.
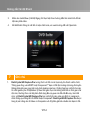
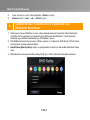
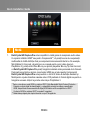
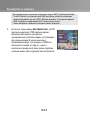
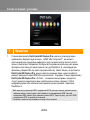
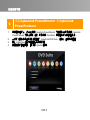
2. With AVer MediaCenter PIP (Picture-In-Picture) /
PBP (Picture-By-Picture) display mode you can
simultaneously enjoy HDMI or Component video in
one window and in the other window watch video from
composite video or S-video sources. For more
information, please refer to the user’s manual.

คูมือการติดตั้งอยางเร็ว
THA-1
3
ติดตั้งไดรเวอรและโปรแกรมดูทีวี
หลังจากที่ติดตั้งอุปกรณอยางเหมาะสมแลว ใหเปดเครื่องคอมพิวเตอร
ระบบจะตรวจพบอุปกรณใหมโดยอัตโนมัติ
การติดตั้งไดรเวอรและ
แอพพลิเคชั่น
ใน Windows® XP
1. กลองโตตอบ “Found New Hardware Wizard” จะปรากฏขึ้น ใหเลือก Cancel (ยกเลิก)
เพื่อยกเลิกกระบวนการติดตั้งของตัวชวยการติดตั้ง.
2. ใสแผนซีดีการติดตั้งลงในไดรฟ CD-ROM.
3. เมื่อหนาตางติดตั้งโปรแกรมแสดงขึ้นมา ใหเลือก Install AVer MediaCenter.
4. กด Next เพื่อเขาสูขั้นตอนติดตั้งตอไป.
5. เมื่ออานขอตกลงเสร็จแลว ถาทานเห็นดวยใหเลือก “I accept the terms of the license
agreement” แลวกด Next.
6. เลือก Complete เพื่อติดตั้งโปรแกรมที่จําเปนตางๆ ซึ่งประกอบไปดวย AVer
MediaCenter, Acrobat Reader, DirectX 9.0c และไดรเวอร แลวกด Next,
สําหรับผูที่ชํานาญแลว ใหเลือก Custom เพื่อเลือกเฉพาะโปรแกรมที่ทานตองการจะติดตั้ง,
กด Browse เพื่อเปลี่ยนโฟลเดอรที่จะติดตั้งโปรแกรม.
7. ในหนาตาง “Install Shield Wizard” ถ าทานไดรับคําแนะนําใหรีสตารทเครื่องใหม ใหกด
Yes. จากนั้นเลือกที่ Finish (เสร็จ) เพื่อเสร็จสิ้นการติดตั้ง.
การติดตั้งไดรเวอรและ
แอพพลิเคชั่น
ใน Windows
Vista™/ Windows
7
1. กลองโตตอบ “Found New Hardware Wizard” จะปรากฏขึ้น ใหเลือก Cancel (ยกเลิก)
เพื่อยกเลิกกระบวนการติดตั้งของตัวชวยการติดตั้ง
2. ใสแผนซีดีการติดตั้งลงในไดรฟ CD-ROM
3. เมื่อหนาตาง “AutoPlay” แสดงขึ้นมา ใหเลือก Run Autorun.exe
4. เมื่อหนาตางติดตั้งโปรแกรมแสดงขึ้นมา ใหเลือก Install AVer MediaCenter
5. ถาหนาตาง “User Account Control” แสดงขึ้นมา ใหเลือก Allow เพื่อดําเนินการตอไป
6. กด
Next
เพื่อเขาสูขั้นตอนติดตั้งตอไป

คูมือการติดตั้งอยางเร็ว
THA-2
7. เมื่ออานขอตกลงเสร็จแลว ถาทานเห็นดวยใหเลือก “I accept the terms of the license
agreement” แลวกด Next
8. เลือก Complete เพื่อติดตั้งโปรแกรมที่จําเปนตางๆ ซึ่งประกอบไปดวย AVer
MediaCenter, Acrobat Reader, DirectX 9.0c และไดรเวอร แลวกด Next,
สําหรับผูที่ชํานาญแลว ใหเลือก Custom เพื่อเลือกเฉพาะโปรแกรมที่ทานตองการจะติดตั้ง,
กด Browse เพื่อเปลี่ยนโฟลเดอรที่จะติดตั้งโปรแกรม
9. จากนั้นเลือกที่ Finish (เสร็จ) เพื่อเสร็จสิ้นการติดตั้ง
* ฟงกชั่นการเปดเครื่องPCดวยรีโมท อาจถูกปดการทํางานอยู
ทั้งนี้ขึ้นอยูกับการตั้งคาบนเมนบอรดในเครื่องPCของทาน
4
เปดใชงาน
แอพพลิเคชั่น
AVer MediaCenter
เพื่อที่จะเปดโปรแกรมจาก Programs menu ใหเลือก Start Programs
AVerMedia AVer MediaCenter AVer MediaCenter.
5
การถอนการติดตั้งโปรแกรมการใชงานและไดรเวอร
Windows® XP
ถาทานอยูในโหมด AVer Media Center อยู ใหทานออกมาที่โหมด Windows กอน,
เพื่อถอนการติดตั้งโปรแกรมดูทีวีออกจากระบบ ใหเลือก Start Programs AVerMedia
AVer MediaCenter Uninstaller Remove All Next OK Finish.
Windows® Vista™ / Windows® 7
1. เพื่อถอนการติดตั้งโปรแกรมดูทีวีออกจากระบบ ใหเลือก Start Programs
AVerMedia AVer MediaCenter Uninstaller.
2. เมื่อหนาตาง “User Account Control” แสดงขึ้นมาใหเลือก Allow
3. เลือก Remove All Next OK Finish

คูมือการติดตั้งอยางเร็ว
THA-3
6
ติดตั้ง CyberLink PowerDirector และ CyberLink
PowerProducer
1. หลังจากที่ทานไดทําการติดตั้งไดรฟเวอรเสร็จแลว ทานสามารถติดตั้งโปรแกรม
CyberLink PowerDirector เพื่อทําการตัดตอแกไขวิดีโอ หรือติดตั้งโปรแกรม
CyberLink PowerProducer เพื่อสรางแผนภาพยนตร หรือติดตั้งโปรแกรม
PhotoNow! เพื่อทําใหทานปรับแตงรูปภาพดวยตัวเองหรือแบบอัตโนมัติ
2. นําแผนซีดีการติดตั้ง ออกจาก CD-ROM ไดรฟและทําการใสแผนซีดี CyberLink
DVD Suite หนาจอการติดตั้งหลักจะปรากฏขึ้น
3. คลิกที่ Install Now และปฏิบัติตามคําแนะนําบนหนาจอเพื่อติดตั้งโปรแกรม
4. สําหรับขอมูลเพิ่มเติมเกี่ยวกับการแกไข โปรดอางอิงจากขั้นตอนของ CyberLink
Sayfa yükleniyor...
Sayfa yükleniyor...
Sayfa yükleniyor...
Sayfa yükleniyor...
Sayfa yükleniyor...
Sayfa yükleniyor...
Sayfa yükleniyor...
Sayfa yükleniyor...
Sayfa yükleniyor...
Sayfa yükleniyor...
Sayfa yükleniyor...
Sayfa yükleniyor...
Sayfa yükleniyor...
Sayfa yükleniyor...
Sayfa yükleniyor...
Sayfa yükleniyor...
Sayfa yükleniyor...
Sayfa yükleniyor...
Sayfa yükleniyor...
Sayfa yükleniyor...
Sayfa yükleniyor...
Sayfa yükleniyor...
Sayfa yükleniyor...
Sayfa yükleniyor...
Sayfa yükleniyor...
Sayfa yükleniyor...
Sayfa yükleniyor...
Sayfa yükleniyor...
Sayfa yükleniyor...
Sayfa yükleniyor...
Sayfa yükleniyor...
Sayfa yükleniyor...
Sayfa yükleniyor...
Sayfa yükleniyor...
Sayfa yükleniyor...
Sayfa yükleniyor...
Sayfa yükleniyor...
-
 1
1
-
 2
2
-
 3
3
-
 4
4
-
 5
5
-
 6
6
-
 7
7
-
 8
8
-
 9
9
-
 10
10
-
 11
11
-
 12
12
-
 13
13
-
 14
14
-
 15
15
-
 16
16
-
 17
17
-
 18
18
-
 19
19
-
 20
20
-
 21
21
-
 22
22
-
 23
23
-
 24
24
-
 25
25
-
 26
26
-
 27
27
-
 28
28
-
 29
29
-
 30
30
-
 31
31
-
 32
32
-
 33
33
-
 34
34
-
 35
35
-
 36
36
-
 37
37
-
 38
38
-
 39
39
-
 40
40
-
 41
41
-
 42
42
-
 43
43
-
 44
44
-
 45
45
-
 46
46
-
 47
47
-
 48
48
-
 49
49
-
 50
50
-
 51
51
-
 52
52
-
 53
53
-
 54
54
-
 55
55
-
 56
56
-
 57
57


Avermedia C027 Hızlı başlangıç Kılavuzu
- Tip
- Hızlı başlangıç Kılavuzu
diğer dillerde
İlgili makaleler
-
Avermedia CO39 Kullanım kılavuzu
-
Avermedia DVD EZMaker 7 C039 Hızlı başlangıç Kılavuzu
-
-
Avermedia GC573 Hızlı başlangıç Kılavuzu
-
-
-