
TripodDolly
Professional Foldable Aluminium
Tripod Dolly
62cm Working Diameter • 30kg Load Capacity • Easy Carry Handle

TripodDolly is a universal folding dolly with 3" Wheels. It features a 30kg load capacity and can be
used with all standard tripods. It can conveniently be folded up to a compact 24" x 7" for
transport and has a carry handle. The 3" wheels have "step on brakes" that lock and unlock their
rolling and swivel movement..
Introduction
• TripodDolly
• Carry Case
• User Guide
Packaging Contents
• Maximum Working Diameter:
• Minimum Working Diameter:
• Folded Length: 53cm
• Wheel Diameter:7.5cm
• Load Capacity: 30kg
• Weight: 3.24kg
Specifications
Features
• Quick-Release Plate: The quick release plate is the quickest way to mount or unmount and
align your camera to the tripod head.
• Carrying Case with Shoulder Strap: Carry this tripod anywhere easily using the provided carry
case
• Step on Wheel Locks: This gives you the freedom to shoot, without any slips at the crucial
moments, and it gives you even more control when everything’s locked down.
• Heavy Duty: Supports up to 30kg of tripod, camera, and accessories.
• Portable: Folds away for ultimate portability which make it the perfect video dolly for
challenging outdoor shoots.
• Carrying Case with Shoulder Strap: Carry this tripod anywhere easily using the provided carry
case
94cm
62cm

Precautions
Please read all safety instructions and warnings thoroughly before using this product. Improper
use of this product may result in damage to this or attached products.
1. Do not disassemble the product or attempt to fix it.
2. Do not attempt to replace any part of this product.
3. Do not store or use the product in a high temperature environment, including intense sunlight
or heat.

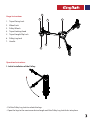
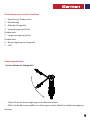
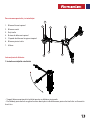
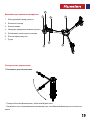
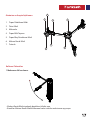
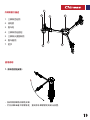
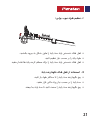
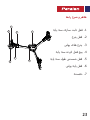
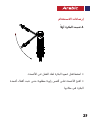
1. Tripod Fixing Lock
2. Wheel Lock
3. Pulley Wheels
4. Tripod Locking Knob
5. Tripod Length Flip Lock
6. Pulleg Leg Lock
7. Handle
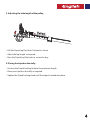
Usage Instructions
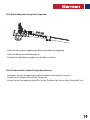
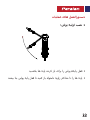
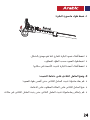
1. Initial installation of the Pulley:
• Pull the Pulley Leg Lock to unlock the legs.
• Open the legs to the maximum desired angle until the Pulley Leg Lock locks into place.
Operation Instructions
1
2
7
5
6
4
3

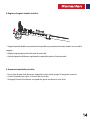
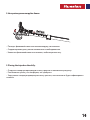
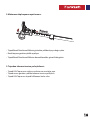
2. Adjusting the tube length of the pulley:
• Pull the Tripod Leg Flip Locks Outward as shown.
• Adjust the leg length as required.
• Press the Tripod Leg Flip Locks to secure the legs.
3. Placing the tripod on the dolly:.
• Unscrew the Tripod Locking Knob to the maximum length.
• Place your tripod on the dolly as required.
• Tighten the Tripod Locking Knob until the tripod is locked into place.
P
u
l
l o
u
t

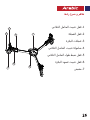
1. Traba para fijación del trípode
2. Traba de rueda
3. Ruedas de polea
4. Pomo de fijación del trípode
5. Traba del mecanismo de bloqueo de
longitud del trípode
6. Traba de pata de polea
7. Manija
Apariencia y descripción de la interface
1. Instalación inicial de la polea:
• Tire de la Traba de pata de polea para destrabar las patas.
• Abra las patas hasta el ángulo máximo deseado hasta que la Traba de pata de polea encaje en
su lugar.
Instrucciones de uso
1
2
7
5
6
4
3

2. Ajuste de la longitud del tubo de la polea:
• Tire hacia afuera las Trabas del mecanismo de bloqueo de longitud del trípode, como se muestra.
• Ajuste del largo de pata según se requiera.
• Presione las Trabas del mecanismo de bloqueo de longitud del trípode para asegurar las patas.
3. Colocación del trípode en la plataforma móvil:
• Desatornille el Pomo de fijación del trípode a la longitud máxima.
• Coloque su trípode en la plataforma móvil según se requiera.
• Ajuste el Pomo de fijación del trípode hasta que el trípode se trabe en posición.
P
u
l
l o
u
t

1. Fermeture de Fixation du Trépied
2. Blocage des Roues
3. Roues à Poulie
4. Bouton de Verrouillage du Trépied
5. Fermeture Longueur du Trépied
6. Verrou Retirage du Pied
7. Poignée
Apparence et Description d’Interface
1. Installation initiale de la Poulie :
• Tirez sur le Verrou du Pied de La Poulie pour débloquer les pieds.
• Ecartez les pieds à l’angle désiré maximal jusqu'à ce que le verrouillage du pied de poulie se
verrouille à sa place.
Mode d’emploi
1
2
7
5
6
4
3

2. Ajuste de la longitud del tubo de la polea:
• Tire hacia afuera las Trabas del mecanismo de bloqueo de longitud del trípode, como se muestra.
• Ajuste del largo de pata según se requiera.
• Presione las Trabas del mecanismo de bloqueo de longitud del trípode para asegurar las patas.
3. Placez le trépied sur le chariot :
• Dévissez le bouton de blocage du trépied à la longueur maximale.
• Placez votre trépied sur le chariot comme souhaité.
• Serrez le Bouton de Verrouillage de Trépied jusqu’à ce que le trépied soit fixé à sa place.
P
u
l
l o
u
t

1. Sperre für das Dreibeinstativ
2. Radsicherung
3. Räder des Fahrgestells
4. Verriegelungsknopf für das
Dreibeinstativ
5. Längenverriegelung für das
Dreibeinstativ
6. Beinverriegelung am Fahrgestell
7. Griff
Beschreibung von Aussehen & Interface
1. Erstinstallation des Fahrgestells:
• Ziehen Sie an der Beinverriegelung, um die Beine zu lockern.
• Öffnen Sie die Beine zum größten von Ihnen gewünschten Winkel, bis die Beinverriegelung
einrastet.
Bedienungsanleitung

2. Die Röhrenlänge des Fahrgestells anpassen:
• Ziehen Sie die Längenverriegelung der Beine nach außen, wie angezeigt.
• Stellen Sie die gewünschte Beinlänge ein.
• Drücken Sie auf die Beinverriegelung, um die Beine zu sichern.
3. Das Dreibeinstativ auf dem Fahrgestell platzieren:
• Schrauben Sie den Verriegelungsknopf am Dreibeinstativ möglichst weit los.
• Stellen Sie Ihr Dreibeinstativ auf das Fahrgestell.
• Ziehen Sie den Verriegelungsknopf fest, bis das Dreibeinstativ fest auf dem Fahrgestell sitzt.
P
ul
l o
u
t

1. Travão de fixação do tripé
2. Travão da roda
3. Rodas da polia
4. Botão de travamento do tripé
5. Travão rotativo do comprimento do tripé
6. Travão da perna da polia
7. Manípulo
Aparência e descrição da interface
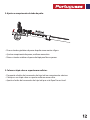
1. instalação inicial da polia:
• Puxe o travão da perna da polia para desbloquear as pernas.
• Abrir as pernas para o ângulo máximo desejado até que o travão da perna da polia encaixe
no lugar.
Instruções de utilização
1
2
7
5
6
4
3

2. Ajustar o comprimento do tubo da polia:
• Puxe os travões giratórios da perna da polia como mostra a figura.
• Ajuste o comprimento da perna, conforme necessário.
• Prima os travões rotativos da perna do tripé para fixar as pernas.
3. Colocar o tripé sobre o suporte com rodízios:
• Desaperte o botão de travamento do tripé até ao comprimento máximo.
• Coloque o seu tripé sobre o suporte conforme necessário.
• Aperte o botão de travamento do tripé até que este fique fixo no local.
P
u
l
l o
u
t

1. Instalarea inițială a troliului
• Trageți blocarea piciorului troliului pentru a debloca picioarele.
• Deschideți picioarele în unghiul maxim dorit până când blocarea piciorului troliului se fixează în
locul său.
Instrucțiuni de folosire
1
2
7
5
6
4
3
1. Blocare fixare trepied
2. Blocare roată
3. Roți troliu
4. Buton de blocare trepied
5. Clapetă de blocare lungime trepied
6. Blocare picior troliu
7. Mâner
Descrierea aspectului și a interfeței:

P
u
l
l o
u
t
2. Reglarea lungimii tubului troliului:
• Trageți clapetele de blocare a picioarelor trepiedului spre partea exterioară, după cum se arată în
imagine.
• Reglați lungimea piciorului în funcție de necesități.
• Apăsați clapetele de blocare a picioarelor trepiedului pentru a fixa picioarele.
3. Așezarea trepiedului pe troliu:
• Deșurubați butonul de blocare a trepiedului până când ajunge la lungimea maximă.
• Așezați trepiedul pe troliu, în funcție de necesități.
• Strângeți butonul de blocare a trepiedului, până când acesta este fixat.

1. Фиксирующий запор треноги
2. Колесный стопор
3. Колеса шкива
4. Запорная вращаемая кнопка треноги
5. Флажковый замок длины штатива
6. Блочный фиксатор ног
7. Ручка
Внешний вид и описание интерфейса
1. Начальная установка шкива:
• Потянуть блочный фиксатор ног, чтобы освободить ноги.
• Растягивать ноги на максимальный желаемый угол, пока блочный фиксатор ног не станет на
место.
Инструкция по применению
1
2
7
5
6
4
3

P
u
l
l o
u
t
2. Настройка длины патрубка блока:
• Потянуть флажковый замок ноги штатива наружу, как показано.
• Скорректировать длину ноги в соответствии с необходимостью.
• Нажать на флажковый замок ноги штатива, чтобы закрепить ногу.
3. Placing the tripod on the dolly:
• Открутить запорную вращаемую кнопку треноги на максимальную длину.
• Расположить треногу на платформе, как требуется.
• Закручивать запорную вращаемую кнопку треноги, пока штатив не будет зафиксирован
на месте.

1. Tripod Sabitleme Kilidi
2. Teker Kilidi
3. Makaralar
4. Tripod Kilit Topuzu
5. Tripod Boy Döndürme Kilidi
6. Makara Bacak Kilidi
7. Tutacak
Görünüm ve Arayüz Açıklaması
1. Makaranın ilk kurulumu:
• Makara Bacak Kilidini çekerek bacakların kilidini açın.
• Bacakları Makara Bacak Kilidi kilitlenene kadar istenilen maksimum açıya açın.
Kullanım Talimatları
1
2
7
5
6
4
3

2. Makaranın tüp boyunun ayarlanması:
• Tripod Bacak Döndürme Kilitlerini gösterilen şekilde dışarıya doğru çekin.
• Bacak boyunu gereken şekilde ayarlayın.
• Tripod Bacak Döndürme Kilitlerine basarak bacakları güvenli hale getirin.
3. Tripodun takozun üzerine yerleştirilmesi:
• Tripod Kilit Topuzunun vidasını maksimum uzunluğa açın.
• Tripodunuzu gereken şekilde takozun üzerine yerleştirin.
• Tripod Kilit Topuzunu tripod kilitlenene kadar sıkın.
Pu
l
l o
u
t

1. 三脚架固定锁
2. 滚轮锁
3. 推车轮
4. 三脚架锁定旋钮
5. 三脚架长度翻转锁
6. 推车腿锁
7. 把手
外观和接口描述
1. 滑车的初始安装:
•
•
使用说明
1
2
7
5
6
4
3
Sayfa yükleniyor...
Sayfa yükleniyor...
Sayfa yükleniyor...
Sayfa yükleniyor...
Sayfa yükleniyor...
Sayfa yükleniyor...
Sayfa yükleniyor...
Sayfa yükleniyor...
-
 1
1
-
 2
2
-
 3
3
-
 4
4
-
 5
5
-
 6
6
-
 7
7
-
 8
8
-
 9
9
-
 10
10
-
 11
11
-
 12
12
-
 13
13
-
 14
14
-
 15
15
-
 16
16
-
 17
17
-
 18
18
-
 19
19
-
 20
20
-
 21
21
-
 22
22
-
 23
23
-
 24
24
-
 25
25
-
 26
26
-
 27
27
-
 28
28


