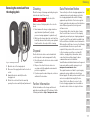
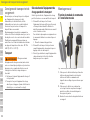
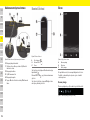
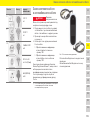
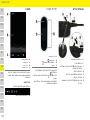
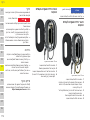
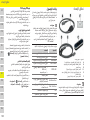
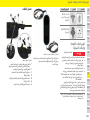
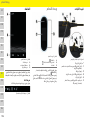
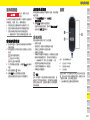
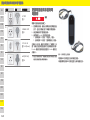
Porsche Mobile Charger Connect Kullanma talimatları
- Tip
- Kullanma talimatları

Porsche Mobile Charger Connect
01_BA_Umschlag_rdw.fm Seite 0 Mittwoch, 28. August 2019 9:02 09
9Y0.012.003-ROW

US
Porsche Mobile Charger Connect
Operating Manual ................................ 1
FC
Porsche Mobile Charger Connect
Manuel technique ..............................20
ESM
Porsche Mobile Charger Connect
Manual de instrucciones ..................39
PTB
Porsche Mobile Charger Connect
Manual de operação ......................... 58
TR
Porsche Mobile Charger Connect
Kullanım Kılavuzu...............................78
RU
Porsche Mobile Charger Connect
Руководство по эксплуатации.....98
UK
Porsche Mobile Charger Connect
Посібник з експлуатації .............. 118
VIE
Porsche Mobile Charger Connect
+ѭӟQJGүQYұQKjQK.............. 138
HE
Porsche Mobile Charger Connect
xxxxxxxxxxx.................................... 158
AR
Porsche Mobile Charger Connect
xxxxxxxxx........................................ 178
JPN
Porsche Mobile Charger Connect
xxxxxxxxxx...................................... 198
KOR
Porsche Mobile Charger Connect
xxxxxxxxxx...................................... 216
CHS
Porsche Mobile Charger Connect
xxxxxxxx .......................................... 236
CHT
Porsche Mobile Charger Connect
xxxxxxxx
.......................................... 253
THA
Porsche Mobile Charger Connect
I
........................................................... 272
֡ፕ֩
ঀဥ୰ྶ
ʤʬʲʴʤʪʩʸʣʮ
¼n¤º°µ¦Äoµ
ᐇհЙы
6SUDFK9HU]B%HGLHQB52:IP6HLWH0LWWZRFK$XJXVW

1
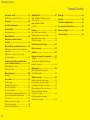
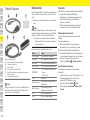
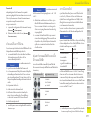
Table of Contents
English USA
Safety Instructions........................................................ 3
Grounding instructions..................................................... 4
Intended Purpose ...........................................................4
Key to Pictograms .........................................................5
Items Supplied ................................................................5
Access data......................................................................... 6
Operating Instructions ..................................................6
Vehicle Charge Ports and Vehicle Plugs ...................7
Selecting a Supply Cable ..............................................7
Supply cables for industrial electrical outlets............ 7
Supply cables for domestic electrical outlets............ 7
Changing Supply Cables and Vehicle Cables ...........8
Disconnecting cables ....................................................... 8
Securing cables.................................................................. 9
Control Unit .....................................................................9
Display .................................................................................. 9
Getting Started ............................................................ 10
Language and country....................................................10
Data transmission............................................................10
Software updates ............................................................10
Selecting a network ........................................................10
User profiles (pairing Porsche ID)...............................11
Hotspot...............................................................................11
Device protection ............................................................11
Finishing the setup process..........................................11
Web Application ..........................................................11
Calling up the web application via the hotspot.......12
Calling up the web application via WiFi ....................12
Charging ........................................................................12
Vehicle charge port.........................................................12
Starting charging.............................................................12
Pausing charging.............................................................13
Stopping charging...........................................................13
Charging Current Limiting .........................................13
Charging Times ...........................................................13
Malfunctions ................................................................14
Moving and Storage Instructions ............................15
Transport ...........................................................................15
Securing the charger during transport......................15
Basic Wall Mount ........................................................16
Attaching the control unit to
the basic wall mount ......................................................16
Charging Dock .............................................................16
Opening the charging dock...........................................16
Closing the charging dock ............................................16
Locking the charging dock............................................16
Unlocking the charging dock .......................................16
Attaching the control unit to the charging dock ....16
Removing the control unit from
the charging dock............................................................17
Cleaning ........................................................................17
Disposal .........................................................................17
Further Information ....................................................17
Data Protection Notice ..............................................17
Technical Data .............................................................18
Index ..............................................................................19
<BB%HGB52:B86ERRN6HLWH'LHQVWDJ$XJXVW
Adapt charging current..................................................11
Connect energy manager ..............................................11

2
US
FC
ESM
PTB
TR
RU
UK
VIE
HE
AR
JPN
KOR
CHS
CHT
THA
Porsche, the Porsche Crest, Panamera,
Cayenne and Taycan are registered trademarks
of Dr. Ing. h.c. F. Porsche AG.
Printed in Germany.
Reprinting, even of excerpts, or duplication of
any type is only permissible with the written
authorization of Dr. Ing. h.c. F. Porsche AG.
© Dr. Ing. h.c. F. Porsche AG
Porscheplatz 1
70435 Stuttgart
Germany
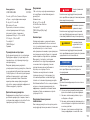
Operating Manual
SAVE THESE INSTRUCTIONS: Always keep this
Operating Manual and please hand it over to the new
owner if you sell your charger.
Due to different requirements in various countries,
the information in the thumb index tabs of this
manual will be different. To ensure that you are
reading the thumb index tab that applies to your
country, compare the article number of the charger
shown in the “Technical Data” section with the article
number on the identification plate on the charger.
Further instructions
For information on fitting the basic wall mount,
the charging dock and for the electrical installation
of the Porsche charger, please refer to the
Installation Manual.
Suggestions
Do you have any questions, suggestions or ideas
regarding your vehicle or this manual?
Please write to us:
Dr. Ing. h.c. F. Porsche AG
Vertrieb Customer Relations
Porscheplatz 1
70435 Stuttgart
Germany
Equipment
Because our vehicles undergo continuous
development, equipment and specifications may not
be as illustrated or described by Porsche in this
manual. Items of equipment are sometimes optional
or vary depending on the country in which the vehicle
is sold. For information on retrofitting options, please
contact an authorized Porsche dealer.
Owing to the different legal requirements in
individual countries, the equipment in your vehicle
may vary from that described in this manual.
If your Porsche is fitted with any equipment not
described in this manual, your authorized Porsche
dealer will be glad to provide information regarding
correct operation and care of the items concerned.
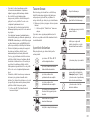
Warnings and symbols
Different types of warnings and symbols are used in
this manual.
b Conditions that must be met in order to use a
function.
e Instruction that you must follow.
1. If an instruction comprises several steps, these
are numbered.
f Indicates where you can find more information on
a topic.
Article number Time of printing
9Y0.012.003-ROW 07/2019
DANGER
Serious injury or death
Failure to observe warnings in the “Danger” category
will result in serious injury or death.
WARNING
Possible serious injury or
death
Failure to observe warnings in the “Warning”
category can result in serious injury or death.
CAUTION
Possible moderate or
minor injury
Failure to observe warnings in the “Caution” category
can result in moderate or minor injuries.
NOTICE
Failure to observe warnings in the “Notice” category
can result in damage.
Information
Additional information is indicated by “Information”.
<BB%HGB52:B86ERRN6HLWH'LHQVWDJ$XJXVW

3
Safety Instructions
US
FC
ESM
PTB
TR
RU
UK
VIE
HE
AR
JPN
KOR
CHS
CHT
THA
Safety Instructions
NOTE: This equipment has been tested and found
to comply with the limits for a Class B digital device,
pursuant to Part 15 of the FCC Rules. These limits are
designed to provide reasonable protection against
harmful interference in a residential installation. This
equipment generates, uses, and can radiate radio
frequency energy and, if not installed and used in
accordance with the instructions, may cause harmful
interference to radio communications. However,
there is no guarantee that interference will not occur
in a particular installation.
DANGER
Electric shock, short
circuit, fire, explosion
Use of a damaged or incorrect charger and
a damaged or incorrect electrical socket, improper
use of the charger or failure to observe the safety
instructions can cause short circuits, electric shocks,
explosions, fires or burns.
e Only use accessories, e.g. supply and vehicle
cables, that have been approved and supplied
by Porsche.
e Do not use a damaged and/or soiled charger.
Check the cable and plug connection for damage
and soiling before use.
e Only connect the charger to properly installed and
undamaged electrical sockets and fault-free
electrical installations.
e Do not use extension cables, cable reels, multiple
sockets or (travel) adapters.
e Disconnect the charger from the power grid
during thunderstorms.
e Do not modify or repair any of the electrical
components.
e Only get experts to correct faults and carry out
repairs on the charger.
DANGER
Electric shock, fire
Incorrectly installed electrical sockets can cause
electric shock or fire when the high-voltage battery is
charged using the vehicle charge port.
e Power supply testing and installation and initial
operation of the electrical socket for the charger
may only be carried out by a qualified electrician.
The qualified electrician is fully responsible for
compliance with the relevant standards and
regulations. Porsche recommends that you use a
certified Porsche service partner.
e The charger should only be operated in properly
earthed power supply systems. Operation in non-
earthed systems (e.g. IT networks) is not
possible.
e The cross-section of the power cable for the
electrical socket is defined in accordance with the
wire length and the locally applicable regulations
and standards.
e To ensure uninterrupted charging, we
recommend that you only use electrical sockets
that are connected via a separately fused electric
circuit for charging.
e The charger is designed for use in the private and
semi-public sector, e.g. on private property or in
company car parks. In some countries, e.g. in Italy
and New Zealand
1)
, mode 2 charging is
prohibited in the public sector and in public areas.
e Unauthorized persons (e.g. playing children) or
animals must not have access to the charger or
the vehicle during unsupervised charging.
e Please read the safety instructions in the
Installation Manual and the Owner’s Manual.
1) Time of printing. Further information is available from
your authorized Porsche dealer or your local electricity
supplier.
DANGER
Electric shock, fire
Incorrect handling of the plug contacts can lead to
electric shock or fire.
e Do not touch the contacts on the vehicle charge
port and charger.
e Do not insert any objects into the vehicle charge
port or charger.
e Protect electrical sockets and plug connections
from moisture, water and other liquids.
WARNING
Flammable or explosive
vapors
Components of the charger can cause sparks and
ignite flammable or explosive vapors.
e To reduce the risk of explosion, particularly in
garages, make sure that the control unit is
located at least 19.7 in. (50 cm) above the floor
during charging.
e Do not install the charger in potentially explosive
areas.
<BB%HGB52:B86ERRN6HLWH'LHQVWDJ$XJXVW

4
Intended Purpose
US
FC
ESM
PTB
TR
RU
UK
VIE
HE
AR
JPN
KOR
CHS
CHT
THA
If this equipment does cause harmful interference to
radio or television reception, which can be
determined by turning the equipment off and on, the
user is encouraged to try to correct the interference
by one or more of the following measures:
– Re-orient or relocate the receiving antenna.
– Increase the separation between the equipment
and receiver.
– Before installation, check that the necessary
power for charging a vehicle can be continuously
provided by the currently available domestic in-
stallation. Protect the domestic installation with
an energy management system, if necessary.
– If you are unsure about the electrical domestic
installation, have it checked by a qualified
electrician. Porsche recommends that you use a
certified Porsche service partner.
– If you intend to use the charger with a
photovoltaic system, contact an authorized
Porsche dealer.
– In order to fully exploit the performance of the
charger and to ensure fast vehicle charging, use
either NEMA electrical sockets with the highest
possible current rating appropriate for the power
plug or industrial electrical outlets according to
IEC 60309.
– On delivery, the charging current is automatically
limited to prevent overheating of the electrical
installation. Get a qualified electrician to
commission the charger and set the charging
current limit as required for the domestic
installation.
f Refer to chapter “Charging Current Limiting”
on page 13.
Grounding instructions
Charger must be grounded.
If it should malfunction or break down, grounding
provides a path of least resistance for electric current
to reduce the risk of electric shock.
The charger is equipped with a cord with an
equipment-grounding conductor and a grounding
plug. The plug must be plugged into an appropriate
outlet that is properly installed and grounded in
accordance with all local codes and ordinances.
Intended Purpose
Charger with integrated control and protection for
mode 2 charging for vehicles with high-voltage
battery that meet the generally applicable standards
and directives for electric vehicles.
e Always use the appropriate device version for the
regional power grid.
f Refer to chapter “Technical Data” on page 18.
The charger may only be used as a combined unit
consisting of supply cable, control unit and vehicle
cable.
WARNING
Electric shock, short
circuit
Improper connection of the equipment-grounding
conductor may result in a risk of electric shock.
e Check with a qualified electrician or serviceman if
you are in doubt as to whether the product is
properly grounded.
e Do not modify the plug provided with the product
- if it will not fit the outlet, have a proper outlet
installed by a qualified electrician.
<BB%HGB52:B86ERRN6HLWH'LHQVWDJ$XJXVW
– When installing the new electrical socket, select
an industrial electrical outlet with the highest
possible power available (adapted to the domes-
tic electrical installation) and have it commis-
sioned by a qualified electrician. Porsche recom-
mends that you use a certified Porsche service
partner.
– Where technically possible and legally
permissible, the electrical installation must be
dimensioned in such a way that the maximum
nominal power of the electrical socket used is
available for charging the vehicle.
recommendations in order to ensure uninterrupted
charging with the charger:
– When charging the high-voltage battery via the
domestic electrical outlet/industrial electrical
outlet, the electrical installation may be loaded to
its maximum capacity. Porsche recommends that
you have the electrical installations used for
charging checked regularly by a qualified
electrician. Ask a qualified electrician which
inspection intervals are appropriate for your
installation. Porsche recommends that you use a
certified Porsche service partner.
from all persons.
Observe the following instructions and
requirements, the device must be installed to
provide a separation distance of at least 20 cm
To comply with FCC RF exposure compliance
– Consult the dealer or an experienced radio/TV
Changes or modifications not expressly approved
by the manufacturer could void the user’s authority
to operate the equipment under FCC rules.
– Connect the equipment into an outlet on a circuit
different from that to which the receiver is
connected.
technician for help.

5
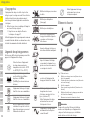
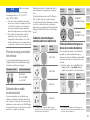
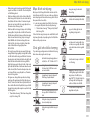
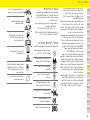
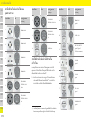
Key to Pictograms
US
FC
ESM
PTB
TR
RU
UK
VIE
HE
AR
JPN
KOR
CHS
CHT
THA
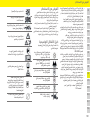
Key to Pictograms
Depending on the country, various pictograms may
be attached to the charger.
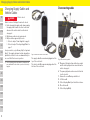
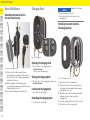
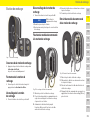
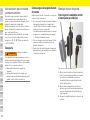
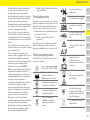
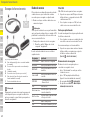
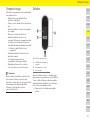
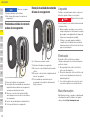
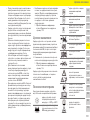
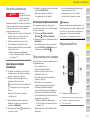
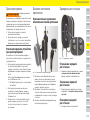
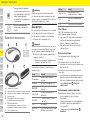
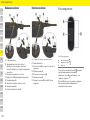
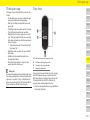
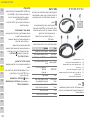
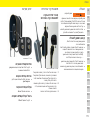
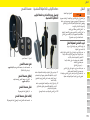
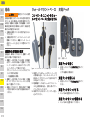
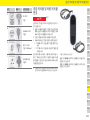
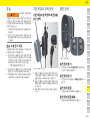
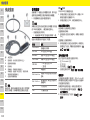
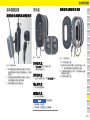
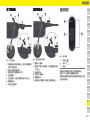
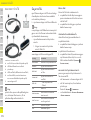
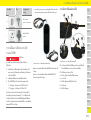
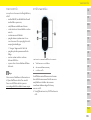
Items Supplied
Fig. 1: Items supplied
Operate the charger within a
temperature range from –22 °F to
+122 °F (–30 °C to +50 °C).
The charger should not be
operated at altitudes of more than
16,404 ft. (5,000 m) above sea
level.
The charger is equipped with
a non-switched ground lead.
The charger is equipped with
a switched ground lead.
Dispose of the charger in
compliance with all applicable
disposal regulations.
Do not use extension cables or
cable reels.
Do not use (travel) adapters.
Do not use multi-outlet power
strips.
Do not use a charger with faulty
electronics or connecting lines.
Risk of electric shock due to
improper use
Observe the operating instructions
provided, particularly the warnings
and safety instructions.
The surface of the charger can
become very hot.
Do not operate the charger in
non-earthed power grids
(e.g. IT networks). Only operate
the charger in earthed power grids.
The charger requires an alternating
current power supply.
Only operate the charger in single-
phase networks.
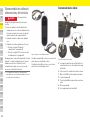
A Supply cable (pluggable to control unit)
B Power plug for connecting to the power grid
C Control unit
D Vehicle plug (connector plug for the vehicle)
E Vehicle cable (country-specific: either removable or
secured to the control unit)
F
Letter containing access data
Information
Optional components: Various wall mounts are
available for the charger in the different countries,
e.g. the basic wall mount or the charging dock.
<BB%HGB52:B86ERRN6HLWH'LHQVWDJ$XJXVW

6
Operating Instructions
US
FC
ESM
PTB
TR
RU
UK
VIE
HE
AR
JPN
KOR
CHS
CHT
THA
Access data
A letter containing access data, which contains all
the data you need for the charger and the web
application, is supplied with your device.
e Keep the letter containing access data in a safe
place.
The letter containing access data contains the
following data:
PIN and PUK
The PIN and PUK are used for unlocking the charger.
e If you lose or forget a PIN you set yourself,
unlock the charger by entering the PUK and set
a new PIN.
e If you lose or forget the PUK, contact your
authorized Porsche dealer.
Password for web application
The password is used for logging into the web
application.
When using the initial password:
e If you lose or forget the initial password, contact
your authorized Porsche dealer.
When using a password you set yourself:
e If you lose or forget a password you set yourself,
reset the charger to factory settings and re-
activate the initial password (SETTINGS >
FACTORY SETTINGS).
Serial number of the charger
The serial number of the charger can be found in the
following places:
– After “Serial number” in the letter containing
access data
– After “SN” on the identification plate (on the back
of the control unit)
– On the charger: SETTINGS > INFORMATION
– In the web application: SETTINGS > MAINTENANCE >
DEVICE INFORMATION
Porsche ID
When the charger is paired to your Porsche ID,
information about the charger and the charging
processes can be displayed in My Porsche and in
the Porsche Connect app.
If you will no longer be using the charger,
e.g. if you sell it:
1. Unpair the charger from your Porsche ID
(SETTINGS > USER PROFILE).
2. Reset the charger to factory settings
(SETTINGS > FACTORY SETTINGS).
Operating Instructions
In some countries, the relevant authorities must be
notified when you connect electric vehicle charging
equipment.
e Check obligation to notify the authorities and
legal requirements for operation before
connecting charging equipment.
Information
If you lose the access data that is valid upon delivery
of your device, e.g. the preset PIN and the initial
password, please contact your authorized Porsche
dealer.
– Have the serial number of the charger ready.
f Refer to chapter “Serial number of the
charger” on page 6.
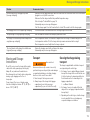
Designation Meaning
Serial number Serial number of the charger
WIFI MAC MAC address of WiFi interface
GRID MAC
MAC address of domestic
PLC interface
Vehicle MAC
MAC address of vehicle
PLC interface
SSID: WiFi
– SSID of WiFi access point
– Host name
PSK Network key
Web Home User
Initial password for Home user
web application
Web Tech User
Initial password for Customer
service web application
PIN Personal ID number
PUK Personal unlocking key
NOTICE
Damage to the charger
e Always place the charger on a solid surface when
charging.
e Porsche recommends that you use the charger in
the basic wall mount or in the charging dock.
1)
e Do not immerse or submerge the charger in water.
e Protect the charger from snow and ice.
e Handle the charger with care and protect it from
potential damage due to being driven over,
dropped, pulled, bent or crushed.
e Do not open the charger housing.
1) In Switzerland, the charger may only be used in the basic
wall mount or in the charging dock.
<BB%HGB52:B86ERRN6HLWH'LHQVWDJ$XJXVW

7
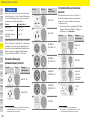
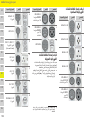
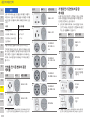
Vehicle Charge Ports and Vehicle Plugs
US
FC
ESM
PTB
TR
RU
UK
VIE
HE
AR
JPN
KOR
CHS
CHT
THA
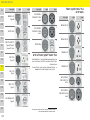
Vehicle Charge Ports and
Vehicle Plugs
Different vehicle charge ports A and vehicle plugs B
are available depending on country-specific vehicle
equipment.
Selecting a Supply Cable
For regular charging with optimum charge speed, use
only the supply cables listed below. The maximum
achievable charging power is up to 9.6 kW
(depending on equipment variant, power grid/house
connection and on-board charger).
When driving abroad, always carry the appropriate
supply cable for the country you are visiting with you.
The vehicle cable can be 8.2 or 24.6 ft. (2.5 or
7.5 meters) long, depending on the situation.
The total length of the supply cable, control unit
and vehicle cable is limited in some countries, e.g. to
16.4 ft. (5 m) in Switzerland and to 24.6 ft. (7.5 m) in
Israel and the USA
1)
.
Supply cables for industrial
electrical outlets
Supply cables for domestic
electrical outlets
If there is no industrial electrical outlet available, the
supply cables listed below can also be used for
charging at a reduced charging power.
e In some countries, e.g. in Abu Dhabi, Israel,
Singapore and India
2)
, charging using domestic
electrical outlets is prohibited.
NOTICE
Damage to the charger
The charger must only be operated within
a temperature range from –22 °F to +122 °F
(–30 °C to +50 °C).
e To prevent overheating during operation, avoid
continuous exposure of the charger to direct
sunlight. If the charger overheats, charging will be
interrupted automatically until the temperature
has returned to the normal range.
e If the charger is too hot or too cold, let it return
slowly to the operating temperature range and do
not actively cool it down or heat it, e.g. by cooling
it down with cold water or heating it with a
hairdryer.
Connection and plug Standard and designation
IEC 62196-2/
SAE-J1772-2009
Type 1 UL/IEC
1) Time of printing. Further information is available from
your authorized Porsche dealer or your local electricity
supplier.
Electrical
socket
Plug Standard and
designation
NEMA 14-30
NEMA 14-50
NEMA 6-30
NEMA 6-50
IEC 60309-2
CEE 400 V/16 A 6 h
IEC 60309-2
CEE 400 V/32 A 6 h
2) Time of printing. Further information is available from
your authorized Porsche dealer or your local electricity
supplier.
Electrical
socket
Plug Standard and
designation
NEMA 5-15
Type B
Electrical
socket
Plug Standard and
designation
<BB%HGB52:B86ERRN6HLWH'LHQVWDJ$XJXVW

8
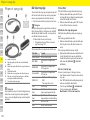
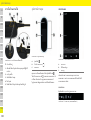
Changing Supply Cables and Vehicle Cables
US
FC
ESM
PTB
TR
RU
UK
VIE
HE
AR
JPN
KOR
CHS
CHT
THA
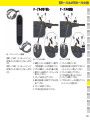
Changing Supply Cables and
Vehicle Cables
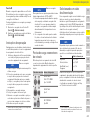
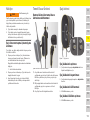
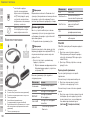
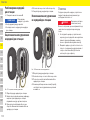
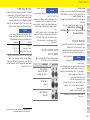
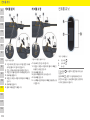
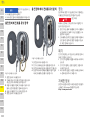
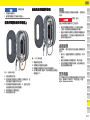
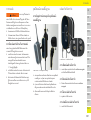
Fig. 2: Connections on the control unit
The supply cable A is removed and plugged in at the
top of the control unit.
The vehicle cable B is removed and plugged in at the
bottom of the control unit.
Disconnecting cables
Fig. 3: Disconnecting cables
b Charging of the high-voltage battery has ended
and the vehicle plug has been removed from the
vehicle charge port.
b The power plug has been disconnected from the
electrical socket.
1. Remove the screw C using a suitable tool.
2. Lift the lever A.
3. Pull out the plug B until you feel initial resistance.
4. Close the lever A.
5. Pull out the plug B fully.
DANGER
Electric shock
Risk of serious or fatal injury from electric shock.
e Before changing the supply cable, always unplug
the supply cable from the electrical socket and
disconnect the vehicle cable from the vehicle
charge port.
e Only change cables in a dry environment.
e Only use cables approved by Porsche.
f Refer to chapter “Items Supplied” on page 5.
f Refer to chapter “Selecting a Supply Cable” on
page 7.
In some countries, e.g. in Norway, Italy, Portugal and
Spain
1)
, the supply cable must only be changed by a
qualified electrician. Porsche recommends that you
use a certified Porsche service partner.
1) Time of printing. Further information is available from
your authorized Porsche dealer or your local electricity
supplier.
<BB%HGB52:B86ERRN6HLWH'LHQVWDJ$XJXVW

9
Control Unit
US
FC
ESM
PTB
TR
RU
UK
VIE
HE
AR
JPN
KOR
CHS
CHT
THA
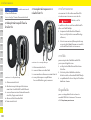
Securing cables
Fig. 4: Securing cables
b The lever A is closed.
1. Insert the plug B into the control unit until you
feel initial resistance.
2. Lift the lever A.
3. Push in the plug B fully.
4. Close the lever A.
5. Secure the plug B to the control unit using
screw C.
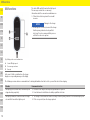
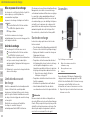
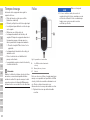
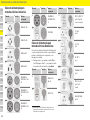
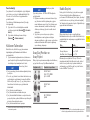
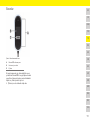
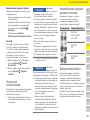
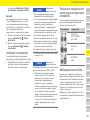
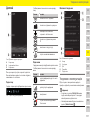
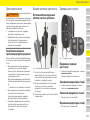
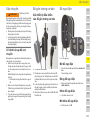
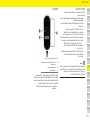
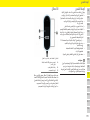
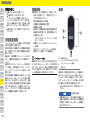
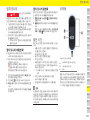
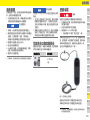
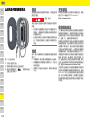
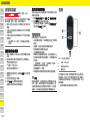
Control Unit
Fig. 5: Control unit
The charger can be switched on and off using the
Power button A .
The status LEDs B show the status of the charger.
Communication with the charger takes place via the
display C. It shows information and error messages.
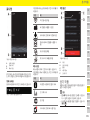
Display
Fig. 6: Charger display
A brightness sensor controls the brightness of
the display. The brightness adjusts automatically to
the ambient lighting conditions.
Status bar
Various symbols can be displayed in the status bar.
Fig. 7: Status bar (sample display)
A Power button
B Status LEDs
C Display
A Status bar
B Information area
C Menu bar
<BB%HGB52:B86ERRN6HLWH'LHQVWDJ$XJXVW

10
Getting Started
US
FC
ESM
PTB
TR
RU
UK
VIE
HE
AR
JPN
KOR
CHS
CHT
THA
The following overview shows the meaning of the
status bar symbols.
Menu bar
Various symbols can be displayed in the menu bar.
The following overview shows the meaning of the
symbols in the menu bar.
.
Operating options
Fig. 8: Operating options
Getting Started
Configure the following settings before starting to
use the charger for the first time.
Language and country
1. Select a language from the list. Confirm your
selection.
2. Select a country from the list.
3. Confirm the selected language and country.
Data transmission
e Read and confirm instructions for transmitting
data.
Software updates
e Select and confirm option for automatic software
update.
On: The charger checks whether software
updates are available and installs them
automatically.
Off: The charger checks whether software
updates are available and displays a corre-
sponding message. The software update can
then be started manually.
Selecting a network
Select the option for connecting to a home network.
The option can be skipped with SKIP. No connection
to a home network is established in this case.
When the charger is connected to an existing
home network, enhanced functions and information
will be available. The connection can be established
via WiFi or a Powerline Communication Network
(PLC network).
If a home network is not available, a hotspot can be
configured on the charger.
Symbol Meaning
WiFi connection available
Server connection available
Software update downloading
Connection to PLC network available
Hotspot activated
Grounding monitor deactivated
Symbol Meaning
Display information about the current
charging process
Display charging history
Configure settings
A software update is available
A Back
B Up/Down
C Activity
D Details
E Skip
Information
– Options marked SKIP can be skipped. A setting is
not configured in this case.
– Settings can always be changed on the display
(SETTINGS ).
<BB%HGB52:B86ERRN6HLWH'LHQVWDJ$XJXVW

11
Web Application
US
FC
ESM
PTB
TR
RU
UK
VIE
HE
AR
JPN
KOR
CHS
CHT
THA
Connection via WiFi
1. Select the WIFI option.
2. Select the home network from the list of detected
WiFi networks.
3. Enter and confirm the password.
Connection via PLC pairing button
1. Select the PLC PAIRING BUTTON option.
2. Start the connection setup process on the PLC
adapter. Confirm by pressing OK on the charger.
Once the setup is connected, confirm with
CONNECT.
The connection to the PLC network is
established.
If a connection to the PLC network is established,
the symbol will be displayed in the status bar.
Connection via PLC security code
A device on which the control software for the PLC
network is installed must be used for this method.
1. To establish a connection to a PLC network using
the security code, select PLC SECURITY CODE.
The security code appears on the display.
2. Enter the security code in the relevant menu of
the control software for the PLC network in order
to integrate the charger into the PLC network.
The connection to the PLC network is
established.
If a connection to the PLC network is established, the
symbol will be displayed in the status bar.
User profiles (pairing Porsche ID)
When the charger is paired to your Porsche ID,
information about the charger and the charging
processes can be displayed in My Porsche and in the
Porsche Connect app.
To pair the charger with your Porsche ID:
e Call up the web site specified on the display on
the charger in the browser on your device and
enter the user code.
– or –
e Scan the QR code displayed on the charger. You
can scan the QR code in the following ways:
– Using the Porsche Connect app (My Account
> Charging cables & devices > Scan QR code).
– Using the camera on your device (iOS 11 or
higher, different for Android).
– Using an app for scanning QR codes.
When the charger has been paired successfully,
the installation assistant moves on to the next
step.
Connect energy manager
If an energy manager is available, it is possible to
establish a connection to it. The energy manager then
assumes control of the charging process.
e For instructions for connecting, refer to the
operating instructions for the energy manager.
If there is no energy manager available, the vehicle
will be charged at the charging current entered on
the charger (SETTINGS > ADAPT CHARGING CURRENT).
f Refer to chapter “Adapt the charging current” on
page 11.
Hotspot
If it is not possible to integrate into a home network,
the charger can activate a hotspot, thereby
establishing a connection to the web application on
the charger.
e To activate a hotspot, click on A
CTIVATE HOTSPOT.
Once a hotspot has been activated, the symbol
will appear in the status bar.
The maximum permitted charging current for the
charger can be set here if there is no energy manager
available in the home network.
The displayed maximum value is determined by the
types of cable that are connected.
e Set the charging current to the maximum value
available in the power grid used for the charger.
Use P
LUS and MINUS to do this.
f Refer to chapter “Charging Current Limiting” on
page 13.
Device protection
To prevent an unauthorized vehicle from being
connected to the charger, a PIN prompt can be
configured.
1. To activate the PIN prompt, select ON.
2. Enter a 4-digit PIN and confirm.
3. Enter the PIN again and confirm it.
Activation of the PIN prompt is confirmed.
Finishing the setup process
e Check the settings you entered using SUMMARY
and complete the installation.
Web Application
Further configuration options and detailed
information about the previous charging processes
can be displayed using a web application, which is
specific to each charger.
<BB%HGB52:B86ERRN6HLWH'LHQVWDJ$XJXVW
Adapt charging current

12
Charging
US
FC
ESM
PTB
TR
RU
UK
VIE
HE
AR
JPN
KOR
CHS
CHT
THA
Calling up the web application via
the hotspot
The web application can be called up using a device
(PC, tablet or smartphone) via a hotspot set up by the
charger.
To set up a hotspot:
f Refer to chapter “Hotspot” on page 11.
e To call up the web application while a hotspot is
active, enter the following IP address in the
browser’s address line: 192.168.0.1
Calling up the web application
via WiFi
The web application can be called up in the browser
on a device (PC, tablet or smartphone) that is logged
into the same home network as the charger.
e Enter the current IP address of the charger in
the browser’s address line. You will find
the current IP address under SETTINGS >
NETWORK INFORMATION.
– or –
e Enter the host name of the charger in the
browser’s address line. You will find the host
name in the letter containing access data.
Charging
Vehicle charge port
For information on connecting and disconnecting the
vehicle cable to and from the vehicle charge port and
for the charging and connection status at the vehicle
charge port:
f see Owner’s Manual.
Starting charging
1. Insert the power plug into the electrical socket.
2. Insert the vehicle plug into the vehicle charge
port.
For information on connecting the vehicle
cable to the vehicle charge port:
f see Owner’s Manual.
Following a successful self-test and when the
connection is established, the status LEDs light
up white.
3. Charging starts automatically.
4. After a few minutes, the display switches to
standby mode.
The vehicle starts charging.
Information
– Depending on which browser you are using,
the web application will not open immediately,
but information about the browser’s security
settings will be displayed first.
the device’s operating system.
DANGER
Electric shock, fire
Risk of serious or fatal injury due to fire or electric
shock.
e Always observe the specified sequence for the
charging process.
e Do not disconnect the vehicle cable from the
vehicle charge port during the charging process.
e End the charging process before disconnecting
the vehicle cable from the vehicle charge port.
e Do not disconnect the charger from the electrical
socket during the charging process.
Errors are shown on the display and are indicated by
red status LEDs. The error message, the cause and
a remedial measure will be displayed.
f Refer to chapter “Malfunctions” on page 14.
Power button lights up white.
Status LEDs light up white.
The display switches on.
Power button lights up white.
Status LEDs pulsate white.
Power button lights up white.
Status LEDs pulsate green.
Information
– Charging is controlled by the vehicle. The
charging process can only be stopped at the
vehicle.
– The charge status is shown on the display
provided the charger is not in standby mode.
The display can be switched on again by pressing
the Power button .
– A high-temperature switch-off feature prevents
overheating while charging.
<BB%HGB52:B86ERRN6HLWH'LHQVWDJ$XJXVW
– How you will need to enter the network key
for calling up the web application depends on

13
Charging Current Limiting
US
FC
ESM
PTB
TR
RU
UK
VIE
HE
AR
JPN
KOR
CHS
CHT
THA
Pausing charging
Charging is controlled by the vehicle and may
occasionally be paused, e.g. in order to optimize
power consumption.
When charging is paused, this will be indicated on the
control unit:
The vehicle starts charging again automatically. The
charging process can be stopped at the vehicle.
Stopping charging
b Charging was completed successfully.
e Disconnect the vehicle plug from the vehicle
charge port.
Charging Current Limiting
The control unit detects the voltage and the available
current automatically.
The power to be used for charging can be set using
charging current limiting. The last charging current
set is saved.
On delivery, the charging current is automatically
limited to 50 % to prevent overheating of the
electrical installation.
If the charger is connected to an energy manager, the
energy manager limits the charging current in
accordance with the values set in the energy
manager.
The maximum available charging current can also be
reduced by other consumers in the home network,
e.g. by an electric heater or water heater.
The charging power must never be set higher than
the maximum available power of the electrical circuit
used. If you are unsure about this, contact a qualified
electrician.
Charging Times
The charging duration can vary depending on the
following factors:
– Electrical socket used (domestic electrical outlet
or industrial electrical outlet)
– Country-specific power grid voltage and current
– Settings for limiting the charging current on the
charger
– Fluctuations in the grid voltage
– Ambient temperature of vehicle and charger.
Charging times can be longer at temperatures at
the upper and lower extremes of the permitted
ambient temperature.
f Refer to chapter “Technical Data” on page 18.
– Temperature of the high-voltage battery and
control unit
– Passenger compartment precooling/heating
activated
– Current-carrying capacity of the power plug and
vehicle plug
Power button lights up white.
Status LEDs flash blue.
The display switches on.
Power button lights up white.
Status LEDs light up green.
The display switches on and shows information
about the completed charging process. After a
few minutes, the charger switches to standby
mode.
Information
Due to different national power grid systems, various
cable variants are available. This may result in the full
charging power not being available. Further
information is available from your authorized Porsche
dealer.
<BB%HGB52:B86ERRN6HLWH'LHQVWDJ$XJXVW

14
Malfunctions
US
FC
ESM
PTB
TR
RU
UK
VIE
HE
AR
JPN
KOR
CHS
CHT
THA
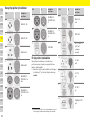
Malfunctions
Fig. 9: Display in the event of malfunctions
In the event of faults or malfunctions, the charger
displays a corresponding message on the display.
The status LEDs and the Power button light up red.
The message contains the error message,
information about the cause and a remedial measure.
e Follow the instructions given in the remedial
measure.
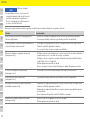
The following overview contains recommendations for dealing with malfunctions that restrict or prevent the vehicle from charging.
A Status LEDs light up red
B Error message and cause
C Remedy
NOTICE
Damage to the charger
e If a fault persists or recurs, disconnect the charger
from the power grid and contact a qualified
electrician. Porsche recommends that you use a
certified Porsche service partner.
Situation Recommended action
The display (screen, status LEDs, Power button) has
stopped working completely.
e Disconnect the charger from the power grid and have it replaced.
e Have the domestic installation checked by a qualified electrician.
The display is blank, the status LEDs do not change
color and the Power button lights up red.
e The charger is overheated. Disconnect the charger from the power grid and let it cool down slowly by itself.
e If the error persists, have the charger replaced.
<BB%HGB52:B86ERRN6HLWH'LHQVWDJ$XJXVW

15
Moving and Storage Instructions
US
FC
ESM
PTB
TR
RU
UK
VIE
HE
AR
JPN
KOR
CHS
CHT
THA
Moving and Storage
Instructions
Do not lift, carry or move the charger by the supply
cable, vehicle cable, power plug or vehicle plug.
Always lift, carry and move the whole device.
Do not damage the control unit, cables or plugs when
moving, e.g. by dragging over the floor or
sharp edges.
Proper storage: Store in a cool dry place away
from direct sunlight: not below –22 °F (–30 °C) or
above +122 °F (+50 °C).
Transport Securing the charger during
transport
The charger is supplied with or without a transport
case, depending on the vehicle type.
e If a transport case is supplied: Always stow and
transport the charger in the case. Attach the case
to the front and rear tie-down rings with hooks.
For information on the tie-down rings in the
luggage compartment:
f see Owner’s Manual.
e If a transport case is not supplied: Stow the
charger in the rear luggage compartment while
transporting it.
e Depending on the vehicle type, stow the charger
in such a way that it does not endanger any
occupants in dangerous situations.
Restricted operation or charging not possible
(message on display).
e Make sure that the supply and vehicle cables are connected to the control unit on the correct side and are
plugged in correctly at the connections.
e Make sure that the charger is within the permitted temperature range.
Refer to chapter “Technical Data” on page 18.
e Acknowledge any error message that appears.
e Start the charger again. Press the Power button for at least 10 seconds to start the charger again.
The charging current is too low (message on display). e The home network is overloaded. Switch off other high-usage electrical loads.
The grid voltage is too high (message on display). e Have the domestic installation checked by a qualified electrician.
The charger is not within the permitted temperature
range (message on display).
e Device temperature switch-off: Avoid direct sunlight and let the charger cool down slowly by itself.
e Low-temperature switch-off: Let the charger heat up in a warm environment before using it.
e Device temperature sensor faulty: Have the charger replaced.
The circuit breaker in the domestic installation was
triggered (message on display).
e Reduce the charging current in the settings on the charger.
e Acknowledge any error message that appears.
Situation Recommended action
WARNING
Unsecured load
An unsecured, incorrectly secured or incorrectly
positioned charger can slip out of place and endanger
occupants when braking, accelerating, changing
direction or in the event of an accident.
e Never transport the charger unsecured.
e Always transport the charger in the luggage
compartment, never in the passenger
compartment (e.g. on or in front of the seats).
<BB%HGB52:B86ERRN6HLWH'LHQVWDJ$XJXVW

16
Basic Wall Mount
US
FC
ESM
PTB
TR
RU
UK
VIE
HE
AR
JPN
KOR
CHS
CHT
THA
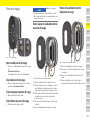
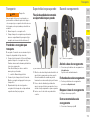
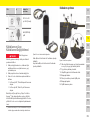
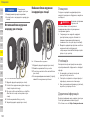
Basic Wall Mount
Attaching the control unit to
the basic wall mount
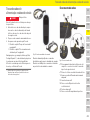
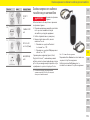
Fig. 10: Attaching control unit
1. Guide the vehicle cable through the lower
opening in the basic wall mount, fit the bottom of
the control unit on the locking lug and engage it
by pushing it to the rear.
2. Guide the supply cable through the upper
opening in the basic wall mount and lock the snap
ring by pushing it to the left.
3. Insert the vehicle plug into the plug holder.
Charging Dock
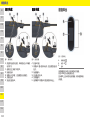
Fig. 11: Charging dock
Opening the charging dock
e Press the door of the charging dock in
direction of arrow.
The door opens automatically.
Closing the charging dock
e Close the door of the charging dock and press in
direction of arrow.
Locking the charging dock
e Turn the lock to position A.
Unlocking the charging dock
e Turn the lock to position B.
Attaching the control unit to
the charging dock
Fig. 12: Attaching control unit
1. Open the door of the charging dock.
2. Position the bottom of the control unit in the
locking lugs of the charging dock and engage
by pushing it to the rear.
3. Guide the vehicle cable through the opening A
and wrap any excess cable around the
charging dock.
4. Insert the supply cable into the electrical socket.
5. Close the door of the charging dock.
NOTICE
Damage to the charger
e Always keep the door closed.
e Do not place objects on the door or on the
charging dock.
<BB%HGB52:B86ERRN6HLWH'LHQVWDJ$XJXVW

17
Cleaning
US
FC
ESM
PTB
TR
RU
UK
VIE
HE
AR
JPN
KOR
CHS
CHT
THA
Removing the control unit from
the charging dock
Fig. 13: Removing control unit
1. Open the door of the charging dock.
2. Disconnect the supply cable from the electrical
socket.
3. Unwind the vehicle cable fully from the
charging dock.
4. Detach the control unit from the mount by
pressing the release switch (arrow) and remove it.
Cleaning
Check the charger for damage and soiling at regular
intervals and clean it if necessary.
Disposal
Electrical/electronic devices can be handed in at
a collection point or waste management facility.
e Do not throw electrical/electronic devices in with
household waste.
e Dispose of electrical/electronic devices in
accordance with the applicable environmental
protection regulations.
e If you have questions about disposal, contact an
authorized Porsche dealer.
Further Information
Further information on the charger and the web
application is available under “E-Performance” at the
following web address: https://www.porsche.com
Data Protection Notice
To ensure that your Porsche charging equipment can
communicate properly and is always up-to-date,
the charging equipment will send the following
equipment-specific data to Porsche in encrypted
form at regular intervals and process this data there:
device ID, brand, generation, device type and
software version.
If you would also like to have the option of using
other Porsche Connect services for the charging
equipment, you must pair your charging equipment
to your Porsche ID account, which is available from
the Porsche Connect distributor in selected markets.
While using Porsche Connect services, the following
personal data and other device-specific data
required for the provision of the services is sent
to Porsche and processed there: customer ID,
statistics, charging history information, status,
connection status and time stamp for when
communication was last established.
You will find more detailed information on the general
terms and conditions and the privacy policy at
www.porsche.com/connect-store.
The regular transmission of data for your charging
equipment can incur additional costs with your
Internet supplier. The data you have saved at Porsche
can be irrevocably deleted using My Porsche.
Some of the Porsche Connect services for the
Porsche charging equipment are not available in
all countries due to technical or legal restrictions.
DANGER
Electric shock, fire
Risk of serious or fatal injury due to fire or electric
shock.
e Never immerse the charger or plugs in water or
spray them directly with water (e.g. high-
pressure cleaning equipment or garden hoses).
e Only clean the charger when the control unit has
been fully disconnected from the power grid and
from the vehicle. Use a dry cloth for cleaning.
<BB%HGB52:B86ERRN6HLWH'LHQVWDJ$XJXVW

18
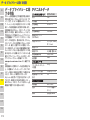
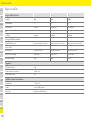
Technical Data
US
FC
ESM
PTB
TR
RU
UK
VIE
HE
AR
JPN
KOR
CHS
CHT
THA
Technical Data
Electrical data 9Y0.971.675.BL
Power 9.6 kW
Rated current 40 A
Power grid voltage 120/240 V~
Phases 1
Power grid frequency 50 Hz/60 Hz
Overvoltage category
(IEC 60664)
II
Integrated residual current
device
Type A (AC: 20 mA)
+ DC: 56 mA
Protection class I
Degree of protection Enclosure 3R (IP55)
Transmission frequency
bands
2.4 GHz, 5 GHz
Transmission power 20 dBm
Mechanical data
Weight of control unit 2.54 kg
Length of vehicle cable 8.2 ft. or 24.6 ft.
(2.5 m or 7.5 m)
Length of supply cable 2.95 ft. (0.9 m)
Ambient and storage conditions
Ambient temperature –22 °F to +122 °F
(–30 °C to +50 °C)
Humidity 5 % – 95 % non-
condensing
Altitude max. 16,404 ft.
(5,000 m) above
sea level
<BB%HGB52:B86ERRN6HLWH'LHQVWDJ$XJXVW
Sayfa yükleniyor...
Sayfa yükleniyor...
Sayfa yükleniyor...
Sayfa yükleniyor...
Sayfa yükleniyor...
Sayfa yükleniyor...
Sayfa yükleniyor...
Sayfa yükleniyor...
Sayfa yükleniyor...
Sayfa yükleniyor...
Sayfa yükleniyor...
Sayfa yükleniyor...
Sayfa yükleniyor...
Sayfa yükleniyor...
Sayfa yükleniyor...
Sayfa yükleniyor...
Sayfa yükleniyor...
Sayfa yükleniyor...
Sayfa yükleniyor...
Sayfa yükleniyor...
Sayfa yükleniyor...
Sayfa yükleniyor...
Sayfa yükleniyor...
Sayfa yükleniyor...
Sayfa yükleniyor...
Sayfa yükleniyor...
Sayfa yükleniyor...
Sayfa yükleniyor...
Sayfa yükleniyor...
Sayfa yükleniyor...
Sayfa yükleniyor...
Sayfa yükleniyor...
Sayfa yükleniyor...
Sayfa yükleniyor...
Sayfa yükleniyor...
Sayfa yükleniyor...
Sayfa yükleniyor...
Sayfa yükleniyor...
Sayfa yükleniyor...
Sayfa yükleniyor...
Sayfa yükleniyor...
Sayfa yükleniyor...
Sayfa yükleniyor...
Sayfa yükleniyor...
Sayfa yükleniyor...
Sayfa yükleniyor...
Sayfa yükleniyor...
Sayfa yükleniyor...
Sayfa yükleniyor...
Sayfa yükleniyor...
Sayfa yükleniyor...
Sayfa yükleniyor...
Sayfa yükleniyor...
Sayfa yükleniyor...
Sayfa yükleniyor...
Sayfa yükleniyor...
Sayfa yükleniyor...
Sayfa yükleniyor...
Sayfa yükleniyor...
Sayfa yükleniyor...
Sayfa yükleniyor...
Sayfa yükleniyor...
Sayfa yükleniyor...
Sayfa yükleniyor...
Sayfa yükleniyor...
Sayfa yükleniyor...
Sayfa yükleniyor...
Sayfa yükleniyor...
Sayfa yükleniyor...
Sayfa yükleniyor...
Sayfa yükleniyor...
Sayfa yükleniyor...
Sayfa yükleniyor...
Sayfa yükleniyor...
Sayfa yükleniyor...
Sayfa yükleniyor...
Sayfa yükleniyor...
Sayfa yükleniyor...
Sayfa yükleniyor...
Sayfa yükleniyor...
Sayfa yükleniyor...
Sayfa yükleniyor...
Sayfa yükleniyor...
Sayfa yükleniyor...
Sayfa yükleniyor...
Sayfa yükleniyor...
Sayfa yükleniyor...
Sayfa yükleniyor...
Sayfa yükleniyor...
Sayfa yükleniyor...
Sayfa yükleniyor...
Sayfa yükleniyor...
Sayfa yükleniyor...
Sayfa yükleniyor...
Sayfa yükleniyor...
Sayfa yükleniyor...
Sayfa yükleniyor...
Sayfa yükleniyor...
Sayfa yükleniyor...
Sayfa yükleniyor...
Sayfa yükleniyor...
Sayfa yükleniyor...
Sayfa yükleniyor...
Sayfa yükleniyor...
Sayfa yükleniyor...
Sayfa yükleniyor...
Sayfa yükleniyor...
Sayfa yükleniyor...
Sayfa yükleniyor...
Sayfa yükleniyor...
Sayfa yükleniyor...
Sayfa yükleniyor...
Sayfa yükleniyor...
Sayfa yükleniyor...
Sayfa yükleniyor...
Sayfa yükleniyor...
Sayfa yükleniyor...
Sayfa yükleniyor...
Sayfa yükleniyor...
Sayfa yükleniyor...
Sayfa yükleniyor...
Sayfa yükleniyor...
Sayfa yükleniyor...
Sayfa yükleniyor...
Sayfa yükleniyor...
Sayfa yükleniyor...
Sayfa yükleniyor...
Sayfa yükleniyor...
Sayfa yükleniyor...
Sayfa yükleniyor...
Sayfa yükleniyor...
Sayfa yükleniyor...
Sayfa yükleniyor...
Sayfa yükleniyor...
Sayfa yükleniyor...
Sayfa yükleniyor...
Sayfa yükleniyor...
Sayfa yükleniyor...
Sayfa yükleniyor...
Sayfa yükleniyor...
Sayfa yükleniyor...
Sayfa yükleniyor...
Sayfa yükleniyor...
Sayfa yükleniyor...
Sayfa yükleniyor...
Sayfa yükleniyor...
Sayfa yükleniyor...
Sayfa yükleniyor...
Sayfa yükleniyor...
Sayfa yükleniyor...
Sayfa yükleniyor...
Sayfa yükleniyor...
Sayfa yükleniyor...
Sayfa yükleniyor...
Sayfa yükleniyor...
Sayfa yükleniyor...
Sayfa yükleniyor...
Sayfa yükleniyor...
Sayfa yükleniyor...
Sayfa yükleniyor...
Sayfa yükleniyor...
Sayfa yükleniyor...
Sayfa yükleniyor...
Sayfa yükleniyor...
Sayfa yükleniyor...
Sayfa yükleniyor...
Sayfa yükleniyor...
Sayfa yükleniyor...
Sayfa yükleniyor...
Sayfa yükleniyor...
Sayfa yükleniyor...
Sayfa yükleniyor...
Sayfa yükleniyor...
Sayfa yükleniyor...
Sayfa yükleniyor...
Sayfa yükleniyor...
Sayfa yükleniyor...
Sayfa yükleniyor...
Sayfa yükleniyor...
Sayfa yükleniyor...
Sayfa yükleniyor...
Sayfa yükleniyor...
Sayfa yükleniyor...
Sayfa yükleniyor...
Sayfa yükleniyor...
Sayfa yükleniyor...
Sayfa yükleniyor...
Sayfa yükleniyor...
Sayfa yükleniyor...
Sayfa yükleniyor...
Sayfa yükleniyor...
Sayfa yükleniyor...
Sayfa yükleniyor...
Sayfa yükleniyor...
Sayfa yükleniyor...
Sayfa yükleniyor...
Sayfa yükleniyor...
Sayfa yükleniyor...
Sayfa yükleniyor...
Sayfa yükleniyor...
Sayfa yükleniyor...
Sayfa yükleniyor...
Sayfa yükleniyor...
Sayfa yükleniyor...
Sayfa yükleniyor...
Sayfa yükleniyor...
Sayfa yükleniyor...
Sayfa yükleniyor...
Sayfa yükleniyor...
Sayfa yükleniyor...
Sayfa yükleniyor...
Sayfa yükleniyor...
Sayfa yükleniyor...
Sayfa yükleniyor...
Sayfa yükleniyor...
Sayfa yükleniyor...
Sayfa yükleniyor...
Sayfa yükleniyor...
Sayfa yükleniyor...
Sayfa yükleniyor...
Sayfa yükleniyor...
Sayfa yükleniyor...
Sayfa yükleniyor...
Sayfa yükleniyor...
Sayfa yükleniyor...
Sayfa yükleniyor...
Sayfa yükleniyor...
Sayfa yükleniyor...
Sayfa yükleniyor...
Sayfa yükleniyor...
Sayfa yükleniyor...
Sayfa yükleniyor...
Sayfa yükleniyor...
Sayfa yükleniyor...
Sayfa yükleniyor...
Sayfa yükleniyor...
Sayfa yükleniyor...
Sayfa yükleniyor...
Sayfa yükleniyor...
Sayfa yükleniyor...
Sayfa yükleniyor...
Sayfa yükleniyor...
Sayfa yükleniyor...
Sayfa yükleniyor...
Sayfa yükleniyor...
Sayfa yükleniyor...
Sayfa yükleniyor...
Sayfa yükleniyor...
Sayfa yükleniyor...
Sayfa yükleniyor...
Sayfa yükleniyor...
Sayfa yükleniyor...
Sayfa yükleniyor...
Sayfa yükleniyor...
Sayfa yükleniyor...
Sayfa yükleniyor...
Sayfa yükleniyor...
Sayfa yükleniyor...
Sayfa yükleniyor...
Sayfa yükleniyor...
Sayfa yükleniyor...
Sayfa yükleniyor...
Sayfa yükleniyor...
Sayfa yükleniyor...
Sayfa yükleniyor...
Sayfa yükleniyor...
Sayfa yükleniyor...
Sayfa yükleniyor...
Sayfa yükleniyor...
Sayfa yükleniyor...
Sayfa yükleniyor...
Sayfa yükleniyor...
Sayfa yükleniyor...
-
 1
1
-
 2
2
-
 3
3
-
 4
4
-
 5
5
-
 6
6
-
 7
7
-
 8
8
-
 9
9
-
 10
10
-
 11
11
-
 12
12
-
 13
13
-
 14
14
-
 15
15
-
 16
16
-
 17
17
-
 18
18
-
 19
19
-
 20
20
-
 21
21
-
 22
22
-
 23
23
-
 24
24
-
 25
25
-
 26
26
-
 27
27
-
 28
28
-
 29
29
-
 30
30
-
 31
31
-
 32
32
-
 33
33
-
 34
34
-
 35
35
-
 36
36
-
 37
37
-
 38
38
-
 39
39
-
 40
40
-
 41
41
-
 42
42
-
 43
43
-
 44
44
-
 45
45
-
 46
46
-
 47
47
-
 48
48
-
 49
49
-
 50
50
-
 51
51
-
 52
52
-
 53
53
-
 54
54
-
 55
55
-
 56
56
-
 57
57
-
 58
58
-
 59
59
-
 60
60
-
 61
61
-
 62
62
-
 63
63
-
 64
64
-
 65
65
-
 66
66
-
 67
67
-
 68
68
-
 69
69
-
 70
70
-
 71
71
-
 72
72
-
 73
73
-
 74
74
-
 75
75
-
 76
76
-
 77
77
-
 78
78
-
 79
79
-
 80
80
-
 81
81
-
 82
82
-
 83
83
-
 84
84
-
 85
85
-
 86
86
-
 87
87
-
 88
88
-
 89
89
-
 90
90
-
 91
91
-
 92
92
-
 93
93
-
 94
94
-
 95
95
-
 96
96
-
 97
97
-
 98
98
-
 99
99
-
 100
100
-
 101
101
-
 102
102
-
 103
103
-
 104
104
-
 105
105
-
 106
106
-
 107
107
-
 108
108
-
 109
109
-
 110
110
-
 111
111
-
 112
112
-
 113
113
-
 114
114
-
 115
115
-
 116
116
-
 117
117
-
 118
118
-
 119
119
-
 120
120
-
 121
121
-
 122
122
-
 123
123
-
 124
124
-
 125
125
-
 126
126
-
 127
127
-
 128
128
-
 129
129
-
 130
130
-
 131
131
-
 132
132
-
 133
133
-
 134
134
-
 135
135
-
 136
136
-
 137
137
-
 138
138
-
 139
139
-
 140
140
-
 141
141
-
 142
142
-
 143
143
-
 144
144
-
 145
145
-
 146
146
-
 147
147
-
 148
148
-
 149
149
-
 150
150
-
 151
151
-
 152
152
-
 153
153
-
 154
154
-
 155
155
-
 156
156
-
 157
157
-
 158
158
-
 159
159
-
 160
160
-
 161
161
-
 162
162
-
 163
163
-
 164
164
-
 165
165
-
 166
166
-
 167
167
-
 168
168
-
 169
169
-
 170
170
-
 171
171
-
 172
172
-
 173
173
-
 174
174
-
 175
175
-
 176
176
-
 177
177
-
 178
178
-
 179
179
-
 180
180
-
 181
181
-
 182
182
-
 183
183
-
 184
184
-
 185
185
-
 186
186
-
 187
187
-
 188
188
-
 189
189
-
 190
190
-
 191
191
-
 192
192
-
 193
193
-
 194
194
-
 195
195
-
 196
196
-
 197
197
-
 198
198
-
 199
199
-
 200
200
-
 201
201
-
 202
202
-
 203
203
-
 204
204
-
 205
205
-
 206
206
-
 207
207
-
 208
208
-
 209
209
-
 210
210
-
 211
211
-
 212
212
-
 213
213
-
 214
214
-
 215
215
-
 216
216
-
 217
217
-
 218
218
-
 219
219
-
 220
220
-
 221
221
-
 222
222
-
 223
223
-
 224
224
-
 225
225
-
 226
226
-
 227
227
-
 228
228
-
 229
229
-
 230
230
-
 231
231
-
 232
232
-
 233
233
-
 234
234
-
 235
235
-
 236
236
-
 237
237
-
 238
238
-
 239
239
-
 240
240
-
 241
241
-
 242
242
-
 243
243
-
 244
244
-
 245
245
-
 246
246
-
 247
247
-
 248
248
-
 249
249
-
 250
250
-
 251
251
-
 252
252
-
 253
253
-
 254
254
-
 255
255
-
 256
256
-
 257
257
-
 258
258
-
 259
259
-
 260
260
-
 261
261
-
 262
262
-
 263
263
-
 264
264
-
 265
265
-
 266
266
-
 267
267
-
 268
268
-
 269
269
-
 270
270
-
 271
271
-
 272
272
-
 273
273
-
 274
274
-
 275
275
-
 276
276
-
 277
277
-
 278
278
-
 279
279
-
 280
280
-
 281
281
-
 282
282
-
 283
283
-
 284
284
-
 285
285
-
 286
286
-
 287
287
-
 288
288
-
 289
289
-
 290
290
-
 291
291
-
 292
292
-
 293
293


Porsche Mobile Charger Connect Kullanma talimatları
- Tip
- Kullanma talimatları
diğer dillerde
- español: Porsche Mobile Charger Connect Instrucciones de operación
- français: Porsche Mobile Charger Connect Mode d'emploi
- Deutsch: Porsche Mobile Charger Connect Bedienungsanleitung
- português: Porsche Mobile Charger Connect Instruções de operação
- English: Porsche Mobile Charger Connect Operating instructions
- русский: Porsche Mobile Charger Connect Инструкция по эксплуатации
İlgili makaleler
Diğer belgeler
-
LaCie Mobile Hard Drive Design by F.A. Porsche El kitabı
-
-
CONCORD ULTIMAX,MV El kitabı
-
mothercare gemm™ El kitabı
-
Bosch GSR 18V-ECFC2(5.0Ahバッテリー2個、充電器、アダプター2種類、キャリングケース[L-BOXX136]付) Kullanım kılavuzu
-
Joie C1220BAMND220 Kullanım kılavuzu
-
-
Bosch GIM 60L Kullanım kılavuzu
-
-