
01
EN
USER MANUAL
KULLANIM KILAVUZU
BENUTZERHANDBUCH
32 Curved Gaming Monitor
A32 V1.2


EN
USER
MANUAL
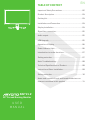
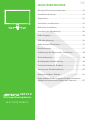
TABLE OF CONTENT
Important Safety Precautions ...............................................02
Product Description .................................................................03
Packing list .................................................................................03
Installation and Connection ...................................................03
Display installation ...................................................................03
Signal line connection .............................................................05
Audio output...............................................................................05
USB Upgrade ..............................................................................05
Operation of Display .................................................................06
Power indicator light ................................................................06
Introduction to rocker functions ...........................................07
Safety protection ......................................................................07
Basic Troubleshooting .............................................................08
Technical Specifications of Product.....................................08
Instruction of Base Installation .............................................09
Safety protection ......................................................................10
Name and content of toxic and harmful substance or
element contained in this product .......................................11
32 Curved Gaming Monitor
A32 V1.2

02
EN
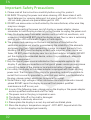
Important Safety Precautions
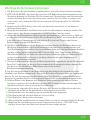
1. Please read all the instructions carefully before using this product.
2. BE SURE TO unplug the power cord when cleaning LCD. Never clean it with
liquid detergent or spraying detergent, but wipe it with wet soft cloth. If it is
still not clean, please use special detergent for LCD.
3. DO NOT use accessories not authorized by the manufacturer, other wise they
may incur danger.
4. When disconnecting the power cord of display or power adapter, always
remember to hold the plug instead of puling the wire to unplug the power cord.
5. Keep the display away from water sources such as bath tub, washbasin, sink
or washing machine.DO NOT place the display on wet floor or near a swimming
pool, or press LCD surface with fingers or hard objects.
6. The grooves and openings on the back and bottom of the shell are for
ventilation purpose and also for guaranteeing the reliability of the elements
and preventing them from overheating; in order to prevent the vents from
blocking; DO NOT place the display on bed, sofa, carpet or other similar sur
faces; DO NOT place the display near to or on heat radiator or heater; DO NOT
put the display into embedded device, unless it is provided with adequate
ventilating equipment.
7. Only the type of power source indicated on the nameplate applies to this
display. If you have any questions on the type of power source you use, please
consult the dealer of the display or local administration of power supply.
8. For safety, the display or the power adapter is equipped with three-pin plug
power cord. The third pin of this plug is for grounding, and only applicable to
socket that is correctly grounded. In case that your socket is not available for
the plug, please contact electrician to replace the socket.
9. Since there is high voltage or other risks when the shell is opened or moved,
please DO NOT repair the display by yourself, but request qualified
maintenance staff to carry out.
10. In one of the following cases, please unplug the display or the power adapter
and ask qualified maintenance staff for help:
A. The power cord or the plug is impaired or worn.
B. The display falls off or the shell is damaged.
C. The display is obviously abnormal.
11. Please place the display in a cool, dry and well ventilated place.
12. Store the display in temperature range of -10°C~60°C, beyond which the
display may be damaged permanently.

03
EN
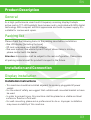
General
Packing list
Display installation
As a high-performance smart multi-frequency scanning display,it adopts
active-matrix TFT-LED backlight liquid screen and is controlled with MCU digital
technology. With compact and thin appearance and build-in power supply, it is
suitable for narrow work space.
Please check the following items in the packing case before installation:
• One LCD display (including the base)
• DP cord, one power cord, one AC adaptor
• One user manual, One warranty card If any of above items is missing,
please contact with the dealer.
Attention: Accessories shall be subject to the real configuration. Please keep
all packing materials well for product transport in the future.
Installation instructions
• This machine should be installed adjacent to an easily pluggable AC power
socket.
• For the sake of safety, we suggest that suitable wall-mounted bracket or base
be used.
• In order to prevent injury, this machine shall be placed on a stable and level
surface or fixed on a firm wall.
• For wall-mounting, please ask a professional to do so. Improper installation
may cause instability of this machine.
Product Description
Installation and Connection

04
EN
• DO NOT place this machine in places with mechanical vibration.
• DO NOT place this machine in places where insects are accessible.
• DO NOT install this machine directly opposite to air-conditioner, otherwise its
inner panel may bedewed and cause failure.
• DO NOT place this machine in places with strong electromagnetic field,
otherwise it may be interfered by the electromagnetic wave and get damaged.
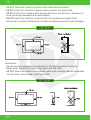
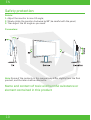
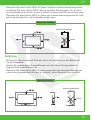
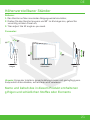
Ventilation
• Please reserve some place as indicated in the figure around the display.
• Never cover the vents or insert any object into the shell.
• DO NOT place this machine in confined space such as book case or embedded
closet, unless such space is well ventilated.

05
EN
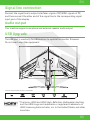
Signal line connection
Audio output
USB Upgrade
Connect the signal line to output interfaces signal of DP/HDMI signals of PC,
and then connect the other end of the signal line to the corresponding signal
input port of the display.
This machine supports earphone and external speaker audio output.
The USB port is used only for USB devices to update the monitor firmware.
Do not insert any other equipment.
* The terms HDMI and HDMI High-Definition Multimedia Interface,
and the HDMI Logo are trademarks or registered trademarks of
HDMI Licensing Administrator, Inc. in the United States and other
countries.
Freesync Supported and G-Sync Compatible

06
EN
Congratulations on becoming an user of this notebook, the finely designed
notebook. You will have a delightful and professional experience in using this
exquisite notebook. We are proud to tell users that this notebook is thoroughly
tested and certified by our reputation for unsurpassed dependability and
customer satisfaction.
Operation of Display
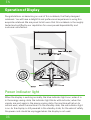
Power indicator light
When the display is working normally, the blue indicator light is on; when it is
in the energy saving state, the indicator light blinks with red color; when the
signals are sent again in the energy saving state, the machine will return to
normal work; when the machine is in the standby state, the red indicator light
is on. As the display is still powered in the standby state, for the sake of safety,
the power cord should be unplugged when the display is not used.

07
EN
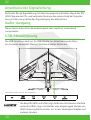
Introduction to rocker functions
Safety protection
Initial state:
When the video signals of PC exceeds the frequency range of the display, the
horizontal and field synchronizing signals will be shut down to protect the
display. Then, you have to set the PC output frequency to an acceptable range
so as to make the display work normally.
Enter the function menu:

08
EN
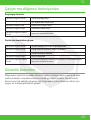
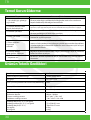
Basic Troubleshooting
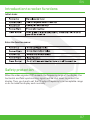
Technical Specifications of Product

09
EN
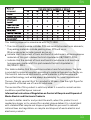
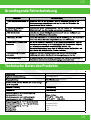
Power supply management system
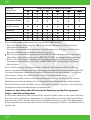
Remarks: All technical specifications in this manual and external packages are
subject to change without further notice. In case that there is subtle difference
between this manual and practical operation, please follow practical operation.
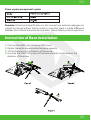
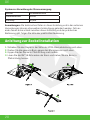
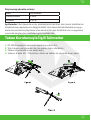
1. Push up the slider near the base VESA cover;
2. Rotate the entire base counterclockwise upwards;
3. Tilt the base aut in the direction of the arrow;
4. Unscrew the 3 M4 *16 screws of the base and pull out the base in the
direction of the arrow.
Instruction of Base Installation

10
EN
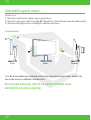
Rotate:
1. Adjust the monitor to max tilt angle;
2. Slowly rotate the monitor clockwise by 90°,be careful with the panel;
3. Then adjust the tilt angle as you need.
Parameters:
Note: Some of the contents in this manual may differ slightly from the final
product, and the later shall be referred to.
Safety protection
Name and content of toxic and harmful substance or
element contained in this product

11
EN
This table is prepared in accordance with SJ/T11364.
*: The circuit board module includes PCB and constitutive electronic elements;
The packing materials include packing case, EPS and so on;
Other accessories include manual and so on;
: Indicate that the content of toxic and harmful substance in all homogeneous
materials of this part is below the limit stipulated in GB/T26572-2011.
×: Indicate that the content of toxic and harmful substance in at least one
homogeneous material of this part exceeds the limit stipulated in
GB/T26572-2011.
This table indicates that this machine contains harmful substance. The data
is provided by material suppliers according to material type and verified by us.
The harmful substance contained in some materials is irreplaceable with
present technology, and we are always endeavoring to make improvement.
The eco-friendly service life of this product is 10 years. See the right figure for
the symbol of limited use of harmful substance.
The service life of this product is valid only when it is used in normal service
conditions specified byuser manual.
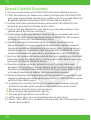
Informative Instruction of Regulation on Control of Recycle and Disposal of
Waste Electric and Electronic Products
In order to better care for and protect the earth, when this product is not
needed any longer or its service life is ended, please deliver it to a local plant
with statecertified recycle and disposal qualification pursuant to relevant
national laws and regulations on recycle and disposal of waste electric and
electronic products.

DE
12
DE
INHALTSVERZEICHNIS
Wichtige Sicherheitsvorkehrungen ......................................13
Produktbeschreibung ..............................................................14
Allgemeines ................................................................................14
Installation und Anschluss .....................................................14
Bildschirm-Installation ...........................................................14
Anschluss der Signalleitung ...................................................16
Audio-Ausgang ..........................................................................16
USB-Aktualisierung ..................................................................16
Bedienung des Bildschirms ....................................................17
Betriebsanzeige ........................................................................17
Einführung in die Kippschalter-Funktionen .......................18
Sicherheitsschutz .....................................................................18
Grundlegende Fehlerbehebung .............................................19
Technische Daten des Produkts ............................................19
Anleitung zur Sockelinstallation ...........................................20
Höhenverstellbarer Ständer ...................................................21
Name und Gehalt des in diesem Produkt enthaltenen
giftigen und schädlichen Stoffes oder Elements ..............22
BENUTZERHANDBUCH
32 Curved Gaming Monitor
A32 V1.2

DE
13
Wichtige Sicherheitsvorkehrungen
1. Pl1. Bitte lesen Sie alle Hinweise sorgfältig durch, bevor Sie dieses Produkt verwenden.
2. STELLEN SIE SICHER, dass beim Reinigen des LCD-Bildschirms das Netzkabel aus der
Steckdose gezogen ist. Reinigen Sie ihn niemals mit Flüssigreiniger oder Sprühreiniger,
sondern wischen Sie ihn mit einem feuchten, weichen Tuch ab. Sollte er immer noch
nicht sauber sein, verwenden Sie bitte ein spezielles Reinigungsmittel für LCD-Bild
schirme.
3. Verwenden Sie KEIN Zubehör, das nicht vom Hersteller autorisiert ist, da dieses zu
Gefahren führen kann.
4. Wenn Sie das Netzkabel des Bildschirms oder des Netzadapters abziehen, denken Sie
immer daran, den Stecker festzuhalten, anstatt nur das Kabel zu ziehen.
5. Halten Sie den Bildschirm von Wasserquellen wie Badewanne, Waschbecken, Spülbeck
en oder Waschmaschine fern. Stellen Sie den Bildschirm NICHT auf nassen Boden oder
in die Nähe eines Swimmingpools und drücken Sie nicht mit Fingern oder harten
Gegenständen auf die LCD-Oberfläche.
6. Die Rillen und Öffnungen auf der Rückseite und dem Boden des Gehäuses dienen der
Belüftung und auch dazu, die Funktionsfähigkeit der Bauteile zu gewährleisten und
ihre Überhitzung zu verhindern. Um zu verhindern, dass die Lüftungsöffnungen blockiert
werden; stellen Sie den Bildschirm NICHT auf ein Bett, Sofa, Teppich oder ähnliche
Oberflächen NICHT in die Nähe von oder auf einen Heizkörper oder eine Heizung NICHT
in eine eingebettete Vorrichtung, es sei denn, diese ist mit einer angemessenen
Belüftungseinrichtung versehen.
7. Für diesen Bildschirm gilt nur der auf dem Typenschild angegebene Typ der Stromquelle.
Wenn Sie Fragen zum Typ der von Ihnen verwendeten Stromquelle haben, wenden Sie
sich bitte an den Händler des Bildschirms oder an die örtliche
Stromversorgungsverwaltung.
8. Aus Sicherheitsgründen ist der Bildschirm oder das Netzteil mit einem dreipoligen
Netzkabel mit Stecker ausgestattet. Der dritte Stift dieses Steckers dient der Erdung und
gilt nur für eine korrekt geerdete Steckdose. Falls Ihre Steckdose für den Stecker nicht
geeignet ist, wenden Sie sich bitte an einen Elektriker, um die Steckdose auszutauschen.
9. Da beim Öffnen oder Bewegen des Gehäuses Hochspannung oder andere Risiken
bestehen, reparieren Sie den Bildschirm bitte NICHT selbst, sondern beauftragen Sie
qualifiziertes Servicepersonal mit der Durchführung.
10. In einem der folgenden Fälle ziehen Sie bitte den Stecker des Bildschirms oder des
Netzteils ab und bitten Sie qualifiziertes Servicepersonal um Hilfe:
A. Das Netzkabel oder der Netzstecker ist beschädigt oder abgenutzt.
B. Das Display fällt ab oder das Gehäuse ist beschädigt.
C. Das Display ist offensichtlich abnormal.
11. Bitte stellen Sie den Bildschirm an einem kühlen, trockenen und gut belüfteten Ort auf.
12. Bewahren Sie den Bildschirm in einem Temperaturbereich von -10°C~60°C auf,
darüber hinaus kann der Bildschirm dauerhaft beschädigt werden.

DE
14
Allgemeines
Lieferumfang
Bildschirm-Installation
Als hochleistungsfähiger intelligenter Multi-Frequenz-Scanning-Bildschirm
verwendet er einen Aktiv- Matrix-TFT-Display mit LED-Hintergrundbeleuchtung
und wird mit digitaler MCU-Technologie gesteuert. Mit seinem kompakten
und dünnen Erscheinungsbild und dem eingebauten Netzteil eignet es sich
besonders für enge Arbeitsbereiche.
Bitte überprüfen Sie vor der Installation die folgenden Positionen im
Versandkarton:
• Ein LCD-Bildschirm (einschließlich des Sockels)
• DP Kabel, ein Netzkabel, ein Netzadapter
• Eine Bedienungsanleitung, eine Garantiekarte Sollte einer der oben genannten
Artikel fehlen, wenden Sie sich bitte an den Händler.
Achtung: Das Zubehör unterliegt der tatsächlichen Ausstattung. Bitte
bewahren Sie alle Verpackungsmaterialien für einen späteren Transport gut auf.
Installation instructions
• Dieses Gerät sollte neben einer leicht steckbaren Wechselstrom-Steckdose
installiert werden.
• Aus Sicherheitsgründen empfehlen wir die Verwendung eines geeigneten
Wandhalters oder Sockels.
• Um Verletzungen zu vermeiden, sollte dieses Gerät auf eine stabile und ebene
Fläche gestellt oder an einer festen Wand befestigt werden.
• Für die Wandmontage wenden Sie sich bitte an einen Fachmann. Eine unsa
chgemäße Installation kann zur Instabilität dieses Geräts führen.
• Platzieren Sie dieses Gerät NICHT an Orten mit mechanischen Schwingungen.
Produktbeschreibung
Installation und Anschluss

DE
15
• Platzieren Sie dieses Gerät NICHT an Orten, an denen Insekten eindringen können.
• Installieren Sie dieses Gerät NICHT direkt gegenüber Klimaanlagen, da sonst die
Innenverkleidung des Geräts verstopft werden und einen Ausfall verursachen kann.
• Platzieren Sie dieses Gerät NICHT an Orten mit starkem elektromagnetischen Feld,
weil es dadurch gestört und beschädigt werden kann.
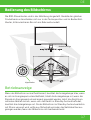
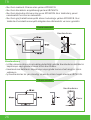
Belüftung
• Bitte planen Sie ausreichend Platz ein, wie in der Abbildung um den Bildschirm
herum angegeben.
• Decken Sie niemals die Lüftungsöffnungen ab oder führen Sie irgendwelche
Gegenstände in das Gehäuse ein.
• Platzieren Sie dieses Gerät NICHT in einem engen Bereich wie einem Bücherregal
oder einem eingebetteten Schrank, es sei denn, dieser Bereich ist gut belüftet.
Montiert an der Wand
Montiert auf Sockel
Wand
Wand
Belüftung blockieren
Belüftung blockieren

DE
16
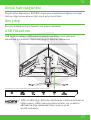
Anschluss der Signalleitung
Audio-Ausgang
USB-Aktualisierung
Verbinden Sie die Signalleitung mit dem Ausgangsschnittstellen-Signal der DP/
HDMI-Signale des PCs, und verbinden Sie dann das andere Ende der Signallei-
tung mit dem entsprechenden Signaleingang des Bildschirms.
Dieses Gerät unterstützt die Audioausgabe über Kopfhörer und externe
Lautsprecher.
Der USB-Anschluss wird nur für USB-Geräte zur Aktualisierung der Moni-
tor-Firmware verwendet Stecken Sie keine anderen Geräte ein.
* Die Begriffe HDMI und HDMI High-Definition Multimedia Interface
sowie das HDMI-Logo sind Marken oder eingetragene Marken von
HDMI Licensing Administrator, Inc. in den Vereinigten Staaten und
anderen Ländern.
Unterstützt Freesync und ist G-Sync-kompatibel

DE
17
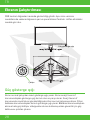
Die OSD-Steuertasten sind in der Abbildung dargestellt. Modelle der gleichen
Produktserie unterscheiden sich nur in der Tastenposition und im Bedienfeld-
Muster, bitte orientieren Sie sich am Gebrauchsmodell.
Bedienung des Bildschirms
Betriebsanzeige
Wenn der Bildschirm normal funktioniert, leuchtet die Anzeigelampe blau; wenn
er sich im Energiesparzustand befindet, blinkt die Anzeigelampe rot; wenn die
Signale im Energiesparzustand erneut gesendet werden, kehrt das Gerät zum
normalen Betrieb zurück; wenn sich das Gerät im Standby-Zustand befindet,
leuchtet die Anzeigelampe rot. Da der Bildschirm im Standby-Zustand weiterhin
mit Strom versorgt wird, sollte aus Sicherheitsgründen das Netzkabel heraus-
gezogen werden, wenn der Bildschirm nicht verwendet wird.
Betriebsanzeige
Kippschalter

DE
18
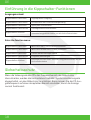
Einführung in die Kippschalter-Funktionen
Sicherheitsschutz
Ausgangszustand:
Kippschalter nach oben
Kippschalter nach unten
Kippschalter nach links
Kippschalter nach rechts
Kippschalter drücken
Kippschalter nach oben
Kippschalter nach unten
Kippschalter nach links
Kippschalter nach rechts
Kippschalter drücken
Signalquellen-Eingang
Schnelltaste zur Lautstärkeanpassung
Spiel plus Schnelltaste
Voreingestellte Schnelltaste
Kurz drücken, um das Menü zu starten/anzuzeigen, drücken und 3
Sekunden lang gedrückt halten, um das Gerät auszuschalten
Wert nach oben verschieben/einstellen
Wert nach unten verschieben/einstellen
Zurück zum vorherigen Menü
Eingeben/Bestätigen
Bestätigen/Drücken und 3 Sekunden lang gedrückt halten, um das
Gerät auszuschalten
Wenn die Videosignale des PCs den Frequenzbereich des Bildschirms
überschreiten, werden die Horizontalund Halbbild-Synchronisationssignale
abgeschaltet, um den Bildschirm zu schützen. Dann müssen Sie die PC-Aus-
gabefrequenz auf einen akzeptablen Bereich einstellen, damit die Anzeige
normal funktioniert.
Enter the function menu:
Sayfa yükleniyor ...
Sayfa yükleniyor ...
Sayfa yükleniyor ...
Sayfa yükleniyor ...
Sayfa yükleniyor ...
Sayfa yükleniyor ...
Sayfa yükleniyor ...
Sayfa yükleniyor ...
Sayfa yükleniyor ...
Sayfa yükleniyor ...
Sayfa yükleniyor ...
Sayfa yükleniyor ...
Sayfa yükleniyor ...
Sayfa yükleniyor ...
Sayfa yükleniyor ...
Sayfa yükleniyor ...
-
 1
1
-
 2
2
-
 3
3
-
 4
4
-
 5
5
-
 6
6
-
 7
7
-
 8
8
-
 9
9
-
 10
10
-
 11
11
-
 12
12
-
 13
13
-
 14
14
-
 15
15
-
 16
16
-
 17
17
-
 18
18
-
 19
19
-
 20
20
-
 21
21
-
 22
22
-
 23
23
-
 24
24
-
 25
25
-
 26
26
-
 27
27
-
 28
28
-
 29
29
-
 30
30
-
 31
31
-
 32
32
-
 33
33
-
 34
34
-
 35
35
-
 36
36


Diğer dillerde
- Deutsch: Monster Aryond A32 V1.2 Benutzerhandbuch
- English: Monster Aryond A32 V1.2 User manual