ZTE Blade BLADE L3 Hızlı başlangıç Kılavuzu
- Tip
- Hızlı başlangıç Kılavuzu

1

2

1
ZTE Blade L3
WCDMA/GSM Mobile Phone
Quick Start Guide ....................................... 2
ZTE Blade L3
Téléphone portable WCDMA/GSM
Guide de démarrage rapide...................... 22
ZTE Blade L3
WCDMA-/GSM-Mobiltelefon
Kurzanleitung............................................ 43
ZTE Blade L3
WCDMA/GSM Cep Telefonu
Hızlı Başlangıç Kılavuzu ........................... 65
ZTE Blade L3
Teléfono móvil WCDMA/GSM
Guía de inicio rápido................................. 86
ZTE Blade L3
WCDMA-/GSM-mobiele telefoon
Snelstartgids ........................................... 108
ZTE Blade L3
Telefono cellulare WCDMA/GSM
Guida rapida ........................................... 129
ZTE Blade L3
Telemóvel WCDMA/GSM
Manual de Início Rápido ......................... 150
ZTE Blade L3
Κινητό Τηλέφωνο WCDMA/GSM
Οδηγός Γρήγορης Εκκίνησης ................. 171

2
ZTE Blade L3
WCDMA/GSM Mobile Phone
Quick Start Guide

3
LEGAL INFORMATION
Copyright © 2015 ZTE CORPORATION.
All rights reserved.
No part of this publication may be quoted,
reproduced, translated or used in any form
or by any means, electronic or mechanical,
including photocopying and microlm,
without the prior written permission of ZTE
Corporation.
Notice
ZTE Corporation reserves the right to make
modications on print errors or update
specications in this guide without prior
notice.
We offer self-service for our smart terminal
device users. Please visit the ZTE ofcial
website (at www.ztedevice.com) for more
information on self-service and supported
product models. Information on the website
takes precedence.
Visit http://www.ztedevice.com to download
the user manual. Just click Support >
Manuals from the home page and then
select your location, product type, and name
to search for related support information.
Disclaimer
ZTE Corporation expressly disclaims any
liability for faults and damages caused by
unauthorized modications of the software.
Images and screenshots used in this guide

4
may differ from the actual product. Content
in this guide may differ from the actual
product or software.
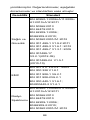
Trademarks
ZTE and the ZTE logos are trademarks of
ZTE Corporation.
Google and Android are trademarks of
Google, Inc.
The Bluetooth
®
trademark and logos are
owned by the Bluetooth SIG, Inc. and any
use of such trademarks by ZTE Corporation
is under license.
microSDHC Logo is a trademark of
SD-3C, LLC.
Manufactured under license from Dolby
Laboratories. Dolby and the double-D
symbol are trademarks of Dolby
Laboratories.
Other trademarks and trade names are the
property of their respective owners.
Version No. : R1.0
Edition Time : 2015.02

5
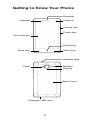
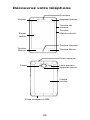
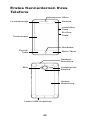
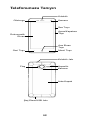
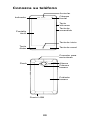
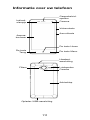
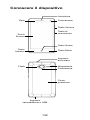
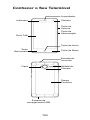
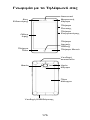
Getting to Know Your Phone
Earpiece
Camera
Volume Key
Power Key
Home Key
Menu KeyBack Key
Touch Screen
Indicator
SpeakerFlash
Headset Jack
Camera
Back Cover
Charging/ USB Jack

6
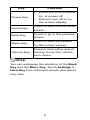
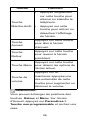
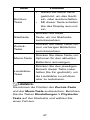
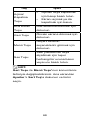
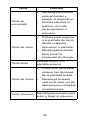
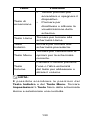
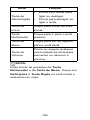
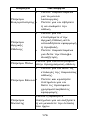
Key Function
Power Key
• Press and hold to power
on, or power off.
• Press to turn off or on
the screen display.
Home Key
Touch to return to the home
screen.
Back Key
Touch to go to the previous
screen.
Menu Key
Touch to view the options
for the current screen.
Volume Key
Press or hold either end of
the key to turn the volume
up or down.
NOTE:
You can exchange the positions of the Back
Key and the Menu Key. Touch Settings >
Hard Key from the home screen and select
one case.

7
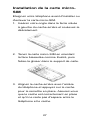
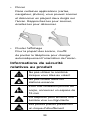
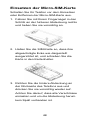
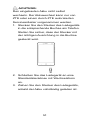
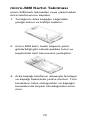
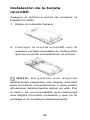
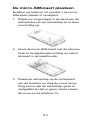
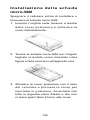
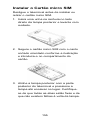
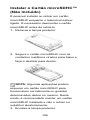
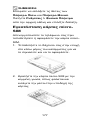
Installing the micro-SIM Card
Power off your phone before installing or
removing the micro-SIM card.
1. Insert your ngernail into the slot at
the right of the back cover and lift it up
gently.
2. Hold the micro-SIM card with the cut
corner oriented as shown and slip it into
the card holder.
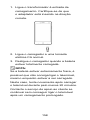
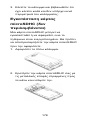
3. Align the back cover with the back of
the phone and press the cover back into
place. Ensure that all the tabs are secure
and there are no gaps around the cover.

8
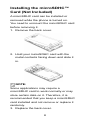
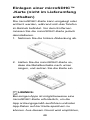
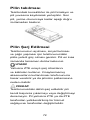
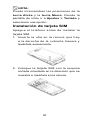
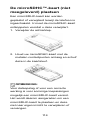
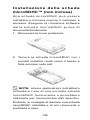
Installing the microSDHC™
Card (Not Included)
A microSDHC card can be installed or
removed while the phone is turned on.
You need to unmount the microSDHC card
before removing it.
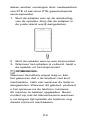
1. Remove the back cover.
2. Hold your microSDHC card with the
metal contacts facing down and slide it
in.
NOTE:
Some applications may require a
microSDHC card to work normally or may
store certain data on it. Therefore, it is
recommended that you keep a microSDHC
card installed and not remove or replace it
randomly.
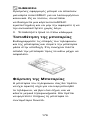
3. Replace the back cover.

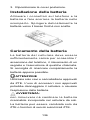
9
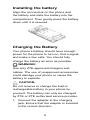
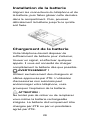
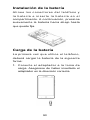
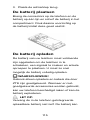
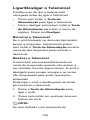
Installing the battery
Align the connectors on the phone and
the battery and slide the battery into the
compartment. Then gently press the battery
down until it is secured.
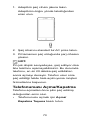
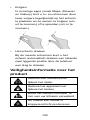
Charging the Battery
Your phone’s battery should have enough
power for the phone to turn on, nd a signal,
and make a few calls. You should fully
charge the battery as soon as possible.
WARNING!
Use only ZTE-approved chargers and
cables. The use of unapproved accessories
could damage your phone or cause the
battery to explode.
CAUTION:
Do not remove or change the built-in
rechargeable battery in your phone by
yourself. The battery can only be changed
by ZTE or ZTE authorised service provider.
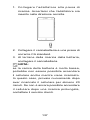
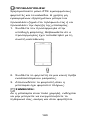
1. Connect the adapter to the charging
jack. Ensure that the adapter is inserted
in the correct direction.

10
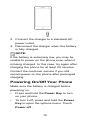
2. Connect the charger to a standard AC
power outlet.
3. Disconnect the charger when the battery
is fully charged.
NOTE:
If the battery is extremely low, you may be
unable to power on the phone even when it
is being charged. In this case, try again after
charging the phone for at least 20 minutes.
Contact the customer service if you still
cannot power on the phone after prolonged
charging.
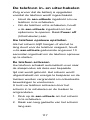
Powering On/Off Your Phone
Make sure the battery is charged before
powering on.
• Press and hold the Power Key to turn
on your phone.
• To turn it off, press and hold the Power
Key to open the options menu. Touch
Power off .

11
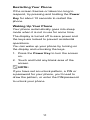
Restarting Your Phone
If the screen freezes or takes too long to
respond, try pressing and holding the Power
Key for about 10 seconds to restart the
phone.
Waking Up Your Phone
Your phone automatically goes into sleep
mode when it is not in use for some time.
The display is turned off to save power and
the keys are locked to prevent accidental
operations.
You can wake up your phone by turning on
the display and unlocking the keys.
1. Press the Power Key to turn the screen
on.
2. Touch and hold any blank area of the
screen.
NOTE:
If you have set an unlock pattern, a PIN or
a password for your phone, you’ll need to
draw the pattern, or enter the PIN/password
to unlock your phone.

12
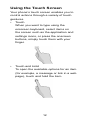
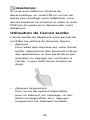
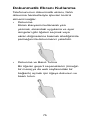
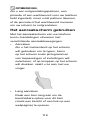
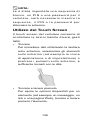
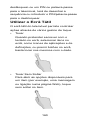
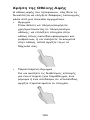
Using the Touch Screen
Your phone’s touch screen enables you to
control actions through a variety of touch
gestures.
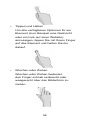
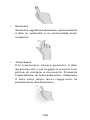
• Touch
When you want to type using the
onscreen keyboard, select items on
the screen such as the application and
settings icons, or press the onscreen
buttons, simply touch them with your
nger.
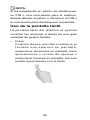
• Touch and Hold
To open the available options for an item
(for example, a message or link in a web
page), touch and hold the item.

13
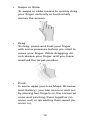
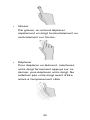
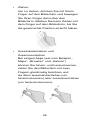
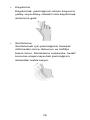
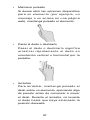
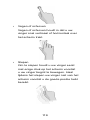
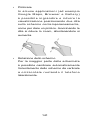
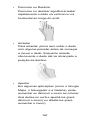
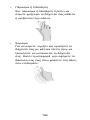
• Swipe or Slide
To swipe or slide means to quickly drag
your nger vertically or horizontally
across the screen.
• Drag
To drag, press and hold your nger
with some pressure before you start to
move your nger. While dragging, do
not release your nger until you have
reached the target position.
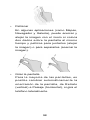
• Pinch
In some apps (such as Maps, Browser,
and Gallery), you can zoom in and out
by placing two ngers on the screen at
once and pinching them together (to
zoom out) or spreading them apart (to
zoom in).

14
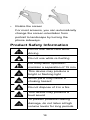
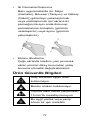
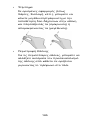
• Rotate the screen
For most screens, you can automatically
change the screen orientation from
portrait to landscape by turning the
phone sideways.
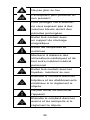
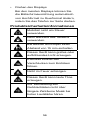
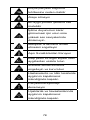
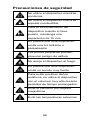
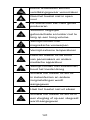
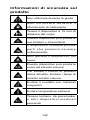
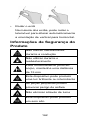
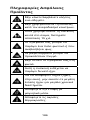
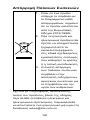
Product Safety Information
Do not use hand-held while
driving
Do not use while re-fuelling
For body-worn operation
maintain a separation of 15 mm
This device may produce a
bright or ashing light
Small parts may cause a
choking hazard
Do not dispose of it in a re
This device may produce a
loud sound
To prevent possible hearing
damage, do not listen at high
volume levels for long periods.

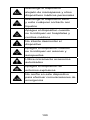
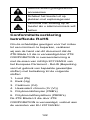
15
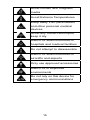
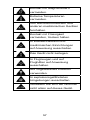
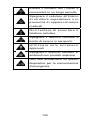
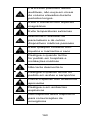
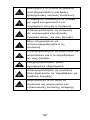
Avoid contact with magnetic
media
Avoid Extreme Temperatures
Keep away from pacemakers
and other personal medical
devices
Avoid any contact with liquid,
keep it dry
Switch off when instructed in
hospitals and medical facilities
Do not attempt to disassemble
Switch off when instructed in
aircrafts and airports
Only use approved accessories
Switch off in explosive
environments
Do not rely on this device for
emergency communications

16
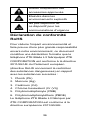
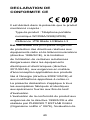
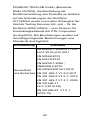
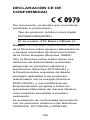
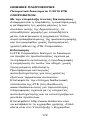
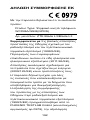
Declaration of RoHS
Compliance
To minimize the environmental impacts
and take more responsibilities to the earth
we live on, this document shall serve as a
formal declaration that the ZTE Blade L3
manufactured by ZTE CORPORATION is in
compliance with the Directive 2011/65/EU of
the European Parliament - RoHS (Restriction
of Hazardous Substances) with respect to
the following substances:
1. Lead (Pb)
2. Mercury (Hg)
3. Cadmium (Cd)
4. Hexavalent Chromium (Cr (VI))
5. Polybrominated biphenyls (PBBs)
6. Polybrominated diphenyl ethers (PBDEs)
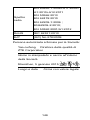
The ZTE Blade L3 manufactured by ZTE
CORPORATION, meets the requirements of
EU 2011/65/EU.
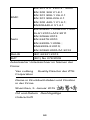
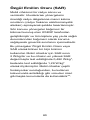
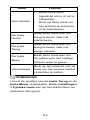
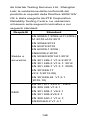
Specic Absorption Rate (SAR)
Your mobile device is a radio transmitter
and receiver. It is designed not to exceed
the limits for exposure to radio waves
recommended by international guidelines.

17
These guidelines were developed by the
independent scientic organization ICNIRP
and include safety margins designed
to assure the protection of all persons,
regardless of age and health.
The guidelines use a unit of measurement
known as Specic Absorption Rate, or
SAR. The SAR limit for mobile devices is
2 W/kg and the highest SAR value for this
device when tested at the head was 0.482
W/Kg*, and when tested at the body was
1.29W/Kg*. As mobile devices offer a range
of functions, they can be used in other
positions, such as on the body as described
in this user guide**.
As SAR is measured utilizing the device’s
highest transmitting power, the actual SAR
of this device while operating is typically
below that indicated above. This is due to
automatic changes to the power level of the
device to ensure it only uses the minimum
power required to communicate with the
network.
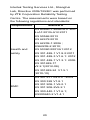
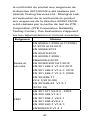
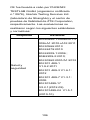
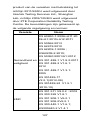
* The tests are carried out in accordance
with EN 50566, EN 62479, EN 62209-1, EN
62209-2, EN 50360.
** Please see body worn operation.

18
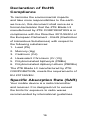
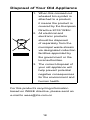
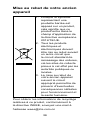
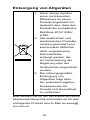
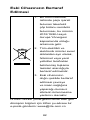
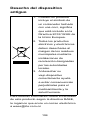
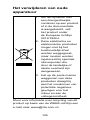
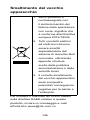
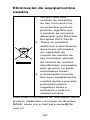
Disposal of Your Old Appliance
1. When this crossed-out
wheeled bin symbol is
attached to a product,
it means the product is
covered by the European
Directive 2012/19/EU.
2. All electrical and
electronic products
should be disposed
of separately from the
municipal waste stream
via designated collection
facilities appointed by
the government or the
local authorities.
3. The correct disposal of
your old appliance will
help prevent potential
negative consequences
for the environment and
human health.
For this product’s recycling information
based on WEEE directive, please send an
e-mail to [email protected]
Sayfa yükleniyor...
Sayfa yükleniyor...
Sayfa yükleniyor...
Sayfa yükleniyor...
Sayfa yükleniyor...
Sayfa yükleniyor...
Sayfa yükleniyor...
Sayfa yükleniyor...
Sayfa yükleniyor...
Sayfa yükleniyor...
Sayfa yükleniyor...
Sayfa yükleniyor...
Sayfa yükleniyor...
Sayfa yükleniyor...
Sayfa yükleniyor...
Sayfa yükleniyor...
Sayfa yükleniyor...
Sayfa yükleniyor...
Sayfa yükleniyor...
Sayfa yükleniyor...
Sayfa yükleniyor...
Sayfa yükleniyor...
Sayfa yükleniyor...
Sayfa yükleniyor...
Sayfa yükleniyor...
Sayfa yükleniyor...
Sayfa yükleniyor...
Sayfa yükleniyor...
Sayfa yükleniyor...
Sayfa yükleniyor...
Sayfa yükleniyor...
Sayfa yükleniyor...
Sayfa yükleniyor...
Sayfa yükleniyor...
Sayfa yükleniyor...
Sayfa yükleniyor...
Sayfa yükleniyor...
Sayfa yükleniyor...
Sayfa yükleniyor...
Sayfa yükleniyor...
Sayfa yükleniyor...
Sayfa yükleniyor...
Sayfa yükleniyor...
Sayfa yükleniyor...
Sayfa yükleniyor...
Sayfa yükleniyor...
Sayfa yükleniyor...
Sayfa yükleniyor...
Sayfa yükleniyor...
Sayfa yükleniyor...
Sayfa yükleniyor...
Sayfa yükleniyor...
Sayfa yükleniyor...
Sayfa yükleniyor...
Sayfa yükleniyor...
Sayfa yükleniyor...
Sayfa yükleniyor...
Sayfa yükleniyor...
Sayfa yükleniyor...
Sayfa yükleniyor...
Sayfa yükleniyor...
Sayfa yükleniyor...
Sayfa yükleniyor...
Sayfa yükleniyor...
Sayfa yükleniyor...
Sayfa yükleniyor...
Sayfa yükleniyor...
Sayfa yükleniyor...
Sayfa yükleniyor...
Sayfa yükleniyor...
Sayfa yükleniyor...
Sayfa yükleniyor...
Sayfa yükleniyor...
Sayfa yükleniyor...
Sayfa yükleniyor...
Sayfa yükleniyor...
Sayfa yükleniyor...
Sayfa yükleniyor...
Sayfa yükleniyor...
Sayfa yükleniyor...
Sayfa yükleniyor...
Sayfa yükleniyor...
Sayfa yükleniyor...
Sayfa yükleniyor...
Sayfa yükleniyor...
Sayfa yükleniyor...
Sayfa yükleniyor...
Sayfa yükleniyor...
Sayfa yükleniyor...
Sayfa yükleniyor...
Sayfa yükleniyor...
Sayfa yükleniyor...
Sayfa yükleniyor...
Sayfa yükleniyor...
Sayfa yükleniyor...
Sayfa yükleniyor...
Sayfa yükleniyor...
Sayfa yükleniyor...
Sayfa yükleniyor...
Sayfa yükleniyor...
Sayfa yükleniyor...
Sayfa yükleniyor...
Sayfa yükleniyor...
Sayfa yükleniyor...
Sayfa yükleniyor...
Sayfa yükleniyor...
Sayfa yükleniyor...
Sayfa yükleniyor...
Sayfa yükleniyor...
Sayfa yükleniyor...
Sayfa yükleniyor...
Sayfa yükleniyor...
Sayfa yükleniyor...
Sayfa yükleniyor...
Sayfa yükleniyor...
Sayfa yükleniyor...
Sayfa yükleniyor...
Sayfa yükleniyor...
Sayfa yükleniyor...
Sayfa yükleniyor...
Sayfa yükleniyor...
Sayfa yükleniyor...
Sayfa yükleniyor...
Sayfa yükleniyor...
Sayfa yükleniyor...
Sayfa yükleniyor...
Sayfa yükleniyor...
Sayfa yükleniyor...
Sayfa yükleniyor...
Sayfa yükleniyor...
Sayfa yükleniyor...
Sayfa yükleniyor...
Sayfa yükleniyor...
Sayfa yükleniyor...
Sayfa yükleniyor...
Sayfa yükleniyor...
Sayfa yükleniyor...
Sayfa yükleniyor...
Sayfa yükleniyor...
Sayfa yükleniyor...
Sayfa yükleniyor...
Sayfa yükleniyor...
Sayfa yükleniyor...
Sayfa yükleniyor...
Sayfa yükleniyor...
Sayfa yükleniyor...
Sayfa yükleniyor...
Sayfa yükleniyor...
Sayfa yükleniyor...
Sayfa yükleniyor...
Sayfa yükleniyor...
Sayfa yükleniyor...
Sayfa yükleniyor...
Sayfa yükleniyor...
Sayfa yükleniyor...
Sayfa yükleniyor...
Sayfa yükleniyor...
Sayfa yükleniyor...
Sayfa yükleniyor...
Sayfa yükleniyor...
Sayfa yükleniyor...
Sayfa yükleniyor...
Sayfa yükleniyor...
Sayfa yükleniyor...
Sayfa yükleniyor...
Sayfa yükleniyor...
Sayfa yükleniyor...
Sayfa yükleniyor...
Sayfa yükleniyor...
Sayfa yükleniyor...
Sayfa yükleniyor...
Sayfa yükleniyor...
Sayfa yükleniyor...
Sayfa yükleniyor...
Sayfa yükleniyor...
Sayfa yükleniyor...
Sayfa yükleniyor...
Sayfa yükleniyor...
-
 1
1
-
 2
2
-
 3
3
-
 4
4
-
 5
5
-
 6
6
-
 7
7
-
 8
8
-
 9
9
-
 10
10
-
 11
11
-
 12
12
-
 13
13
-
 14
14
-
 15
15
-
 16
16
-
 17
17
-
 18
18
-
 19
19
-
 20
20
-
 21
21
-
 22
22
-
 23
23
-
 24
24
-
 25
25
-
 26
26
-
 27
27
-
 28
28
-
 29
29
-
 30
30
-
 31
31
-
 32
32
-
 33
33
-
 34
34
-
 35
35
-
 36
36
-
 37
37
-
 38
38
-
 39
39
-
 40
40
-
 41
41
-
 42
42
-
 43
43
-
 44
44
-
 45
45
-
 46
46
-
 47
47
-
 48
48
-
 49
49
-
 50
50
-
 51
51
-
 52
52
-
 53
53
-
 54
54
-
 55
55
-
 56
56
-
 57
57
-
 58
58
-
 59
59
-
 60
60
-
 61
61
-
 62
62
-
 63
63
-
 64
64
-
 65
65
-
 66
66
-
 67
67
-
 68
68
-
 69
69
-
 70
70
-
 71
71
-
 72
72
-
 73
73
-
 74
74
-
 75
75
-
 76
76
-
 77
77
-
 78
78
-
 79
79
-
 80
80
-
 81
81
-
 82
82
-
 83
83
-
 84
84
-
 85
85
-
 86
86
-
 87
87
-
 88
88
-
 89
89
-
 90
90
-
 91
91
-
 92
92
-
 93
93
-
 94
94
-
 95
95
-
 96
96
-
 97
97
-
 98
98
-
 99
99
-
 100
100
-
 101
101
-
 102
102
-
 103
103
-
 104
104
-
 105
105
-
 106
106
-
 107
107
-
 108
108
-
 109
109
-
 110
110
-
 111
111
-
 112
112
-
 113
113
-
 114
114
-
 115
115
-
 116
116
-
 117
117
-
 118
118
-
 119
119
-
 120
120
-
 121
121
-
 122
122
-
 123
123
-
 124
124
-
 125
125
-
 126
126
-
 127
127
-
 128
128
-
 129
129
-
 130
130
-
 131
131
-
 132
132
-
 133
133
-
 134
134
-
 135
135
-
 136
136
-
 137
137
-
 138
138
-
 139
139
-
 140
140
-
 141
141
-
 142
142
-
 143
143
-
 144
144
-
 145
145
-
 146
146
-
 147
147
-
 148
148
-
 149
149
-
 150
150
-
 151
151
-
 152
152
-
 153
153
-
 154
154
-
 155
155
-
 156
156
-
 157
157
-
 158
158
-
 159
159
-
 160
160
-
 161
161
-
 162
162
-
 163
163
-
 164
164
-
 165
165
-
 166
166
-
 167
167
-
 168
168
-
 169
169
-
 170
170
-
 171
171
-
 172
172
-
 173
173
-
 174
174
-
 175
175
-
 176
176
-
 177
177
-
 178
178
-
 179
179
-
 180
180
-
 181
181
-
 182
182
-
 183
183
-
 184
184
-
 185
185
-
 186
186
-
 187
187
-
 188
188
-
 189
189
-
 190
190
-
 191
191
-
 192
192
-
 193
193
-
 194
194
-
 195
195
-
 196
196
-
 197
197
-
 198
198


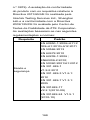
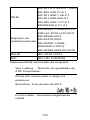
ZTE Blade BLADE L3 Hızlı başlangıç Kılavuzu
- Tip
- Hızlı başlangıç Kılavuzu
diğer dillerde
- español: ZTE Blade BLADE L3 Guía de inicio rápido
- français: ZTE Blade BLADE L3 Guide de démarrage rapide
- italiano: ZTE Blade BLADE L3 Guida Rapida
- Deutsch: ZTE Blade BLADE L3 Schnellstartanleitung
- português: ZTE Blade BLADE L3 Guia rápido
- Nederlands: ZTE Blade BLADE L3 Snelstartgids
İlgili makaleler

Diğer belgeler
-
ZTE Blade L5 Plus Hızlı başlangıç Kılavuzu
-
ZTE Kis3 max Kullanım kılavuzu
-
-
ZTE BLADE L2 Kullanım kılavuzu
-
-
ZTE BLADE Q Maxi Kullanım kılavuzu
-
ZTE BLADE G Kullanım kılavuzu
-
-
ZTE BLADE Q MIni Kullanım kılavuzu
-
ZTE BLADE III Kullanım kılavuzu