Tefal P2500700 Kullanım kılavuzu
- Kategori
- Düdüklü tencereler
- Tip
- Kullanım kılavuzu

www.tefal.com
EN
TR
ES
PT
EL
AR
FA
User's Guide - Kullanım Kılavuzu - Guía del usuario
Manual de instruções - Οδηγός χρήσης
œ∞Oq «ùß∑FLU‰ - œß∑u¸«∞FLq ØU¸°d

A
B
H
J
N
O
C
D
E
F
G
I
K
L
M

Fig 1 Fig 2 Fig 3
CLICK
Fig 4 Fig 5
1
3
2
3
Fig 6
Fig 7 Fig 8 Fig 9
Fig 10 Fig 11 Fig 12
Fig 13 Fig 14

1
Important safety information
For your safety, this appliance complies with applicable standards and regulations:
- Pressure vessel directive
- Materials in contact with food
• This appliance is designed for domestic use.
• Take time to read all of the instructions and always refer back to the “User's Guide”.
• Just like for any other cooking appliance, always pay close attention to it, especially during
use in the presence of children.
• Never place your pressure cooker in a hot oven.
• Always be very careful when moving your pressure cooker under pressure. Never touch hot sur-
faces. Use the handles and knobs. Use gloves where necessary.
• Never use your pressure cooker for any purpose other than the one it was designed for.
• Your pressure cooker cooks under pressure. Scalding injuries may result from unsuitable use.
Always make sure that the pressure cooker is properly closed before starting to use it. Refer
to the “Closing” heading.
• Always make sure that the operating valve is in the open (pressure released) position before
attempting to open your pressure cooker.
• Never force your pressure cooker open. Always make sure that the pressure inside it has drop-
ped. Refer to the “Safety” heading.
• Never use your pressure cooker without any liquid in it for this will seriously damage it. Always
make sure that there is enough liquid in it during cooking.
• Use heat source(s) that are compatible with your pressure cooker, in line with the instruc-
tions for use.
• Never fill your pressure cooker more than two-thirds full (the maximum mark).
• For food that expands during cooking, like rice or dried vegetables or fruit sauces, ... never fill
your pressure cooker more than half full.
• After cooking meat with a superficial outer skin (e.g. tongue…) that may expand with the
pressure, never stab the meat while the skin looks swollen under pressure for you may be scal-
ded. We recommend that you pierce the meat before cooking.
• For paste-like food (e.g. split peas, rhubarb…), the pressure cooker should be slightly shaken
prior to opening to ensure that these foods do not spray out.
• Always make sure that the operating and safety valves are not blocked before use. Refer to
the “Before cooking” heading.
• Never use your pressure cooker to deep fry using oil under pressure.
• Never take any action on the safety systems other than that which is described in the ins-
tructions for cleaning and maintenance.
• Only use TEFAL genuine spares designed for your model of appliance. This especially means
only using a model cooker body and lid.
• Alcohol vapour is inflammable. Bring alcohol to the boil some two minutes before putting the
lid on. Watch over your appliance when making alcohol based recipes.
• Never use your pressure cooker to store acid or salty foods prior to and after cooking for this
may damage your pressure cooker body.
Keep these instructions

2
EN
TR
ES
PT
EL
AR
FA
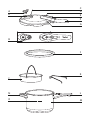
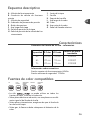
A - Operating valve
B - Operating valve seat
C - Safety valve
D - Pressure indicator
E - Opening button
F - Long lid handle
G - Lid positioning mark
H - Operating valve positioning mark
I - Lid seal
J - Steaming basket
K - Steaming basket support
L - Long pressure cooker body handle
M- Pressure cooker body
N - Short pressure cooker handle
O - Maximum filling mark
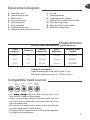
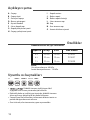
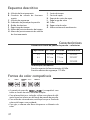
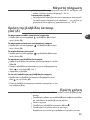
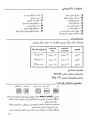
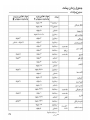
Characteristics
Pressure cooker base diameter - model references
Standards information:
Upper operating pressure limit: 80 kPa (12 psi).
Maximum safety pressure limit: 170 kPa (25 psi).
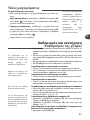
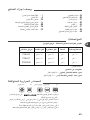
Compatible heat sources
• The pressure cooker can be used on all
heat sources, except on Aga cookers.
• When using an electric hob or induction, make sure that
the size of the hot plate does not exceed the size of the
pressure cooker base.
• On a ceramic or halogen hob, always make sure that the
pressure cooker base is clean and dry.
• On a gas hob, the flame should not lick past the diameter
of the pressure cooker base.
Total
capacity*
Capacity
Cooker
diameter
Base
diameter
Stainless steel
model
4.8 L 4 L 22 cm 19 cm P25042
7.0 L 6 L 22 cm 19 cm P25007
7.8 L 7 L 22 cm 19 cm P25008
GAS SOLID
HOTPLATE
CERAMIC
or
HALOGEN
INDUCTION
ELECTRIC
HOTPLATE
Description diagram
* : Product capacity with the lid in position.

3
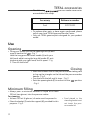
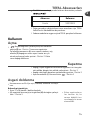
TEFAL accessories
• The following pressure cooker accessories
are available from shops:
• To replace other parts or have repairs performed, please
call on your local TEFAL Approved Service Centre.
• Only use TEFAL genuine parts designed for your product
model.
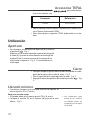
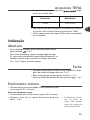
Use
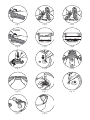
Opening
• Using your thumb, pull on the opening knob (E) and
move it back to the - Fig 1
Hold the long pressure cooker handle (L) with your
left hand, while turning the long lid handle (F) anti-
clockwise with your right hand, until it opens - Fig
2.
Then lift the lid off.
Closing
• Place the lid down flat on the pressure cooker taking care
to line up the triangles on the lid and the pressure cooker
handle - Fig 3
• Turn the lid to the left until it stops - Fig 3
• Push the opening knob (E) to move it to the position
- Fig 4
Minimum filling
• Always pour a minimum amount of liquid of at least
250 ml (two glasses) into the pressure cooker.
For steaming
• At least 75O ml (6 glasses) of water must be poured in.
• Place the basket (J) onto the support (K) provided for this
purpose - Fig 5
Accessory Reference number
Seal X2010003
• Food placed in the
steaming basket must
not touch the pres-
sure cooker lid.

4
EN
TR
ES
PT
EL
AR
FA
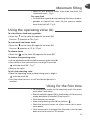
Maximum filling
• Never fill your pressure cooker more than two-thirds full
(maximum mark)
- Fig 6
For some food
• For food that expands during cooking, like rice or dried ve-
getables or stewed fruit...never fill your pressure cooker
more than half full
- Fig 6
Using the operating valve (A)
To cook delicate food and vegetables
• Move the on the valve (A) opposite the mark (H).
Pressure operates at 7lb (7 psi).
To cook meat and frozen foods
• Move the on the valve (A) opposite the mark (H).
Pressure operates at 12 lb (12 psi)
To release steam
• Move the on the valve (A) opposite the mark (H).
To remove the operating valve
• Let the appliance cool down before removing the valve (A).
• Press down on the valve and turn it to align its position
with the mark (H)
- Fig 7
• Remove the valve.
To refit the operating valve
• Place the operating valve in place taking care to align it
with the mark (H).
• Press the valve then turn it until the desired position is
reached.
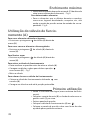
Using for the first time
• Fill the pressure cooker to the two-thirds mark (the maxi-
mum mark) with water.
• Place the basket support (K) in the bottom of the pressure
cooker and place the basket (J) on top of it.
• Close the pressure cooker.
• Move the operating valve (A) to position .
• Place the pressure cooker on a heat source set to maxi-
mum power.
• Once steam starts to escape from the valve, turn the heat
down and set a timer for 20 minutes.

5
• Once the 20 minutes are up, turn off the heat.
• Turn the operating valve (A) to position
• Once the pressure indicator (D) drops back: your pressure coo-
ker is no longer under pressure.
• Open the pressure cooker.
• Rinse the pressure cooker with water and dry it.
• Note: The presence of stains on the inside of the pressure
cooker base has no effect on the quality of the metal. This
is simply a scale deposit. To remove these deposits, you
can use a scouring pad and some diluted vinegar.
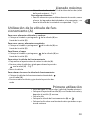
Before cooking
• Before each use of the pressure cooker, always remove the
valve (A) (Refer to the “Using the operating valve” heading)
and visually check that the operating valve seat (B) is not
blocked. If necessary, clean it with a toothpick
- Fig 8
• Check that the safety valve (C) can move: Refer to the
“Cleaning and maintenance” heading.
• Fit the operating valve (A) and select the position or
.
• Always make sure that the pressure cooker is properly clo-
sed before starting to heat it. The opening button (E) must
be in the position.
• Place the pressure cooker on a heat source set to maxi-
mum power.
During cooking
• Once the operating valve (A) starts to continually release
steam and a regular hissing sound can be heard, cooking has
started. Reduce the heat setting.
• Set a timer for the cooking time stated in your recipe.
• Once the cooking time is up, turn off the heat.

6
EN
TR
ES
PT
EL
AR
FA
Finishing cooking
To release the steam
• Once the heat is turned off, you have two options:
• Slow pressure release: gradually turn the operating valve
(A) to the position. Make sure that the cooker is posi-
tioned so that the steam is directed away from you. Once
the pressure indicator (D) drops down: your pressure coo-
ker is no longer under pressure. This is used for stews, ve-
getables, meat joints and fish dishes.
•
Fast pressure release: place your pressure cooker under
cold running water, directing the flow onto the metal part
of the lid. Once the pressure indicator (D) drops down:
your pressure cooker is no longer under pressure. Turn the
operating valve (A) to the position. This is used for
soups, rice, pasta, milk puddings, egg custards, cake and
pudding mixes, recipes containing rice or pasta and re-
cipes with a high liquid content. If in doubt, use the fast
pressure release method.
• Now you can open it.
Cleaning and maintenance
Cleaning the pressure cooker
• For best appliance operation, be sure to follow these clea-
ning and maintenance recommendations every time the
pressure cooker is used.
• Always wash the pressure cooker after use with warm
water with a little washing up liquid added. Do the same
for the basket.
• Never use bleach or chlorine products.
• Never overheat the pressure cooker body when it is empty.
To clean the inside of the pressure cooker
• Clean it with a scouring pad and washing up liquid.
• If the inside of the stainless steel cooker shows iridescent re-
flections, clean it with vinegar.
To clean the outside of the pressure cooker
• Clean it with a sponge and washing up liquid.
To clean the lid
• Wash the lid under a gentle stream of running warm water
using a sponge and washing up liquid.
To clean the lid seal
• After using the pressure cooker, always clean the seal (I)
and its groove.
• To refit the seal, refer to the drawings
- Fig 9 - 10
To clean the operating valve (A)
• Remove the operating valve (A): Refer to the “Using the
operating valve” heading.
• Clean the operating valve (A) under running tap water
-
Fig 11
If food or liquid starts to
spray out from from the
valve while you are re-
leasing the steam, turn it
back to position and
switch off the heat, wait
a few minutes and then
gradually turn the opera-
ting valve to the po-
sition, making sure
nothing else spurts out.
You can wash the pres-
sure cooker body and
the basket in a dishwa-
sher.
Never wash the lid in a
dishwasher.
For a longer pressure
cooker life: do not over-
heat your pressure coo-
ker pan when it is
empty.
Browning and scrat-
ching that may appear
following long periods
of use are normal and
will not affect the per-
formance of the pres-
sure cooker

7
To clean the operating valve seat located in the lid
• Remove the valve (A).
• Visually inspect the seat and the steam release pipe in
daylight to make sure that it is round and clear. If neces-
sary, clean it with a Toothpick - Fig 8
To clean the safety valve (C)
• Clean the part of the safety valve located inside the lid by
placing it under running water.
• Check that it works properly by lightly pressing on the plun-
ger which should move without difficulty - Fig 12
To replace your pressure cooker seal
• Replace your pressure cooker seal every year.
• Replace your pressure cooker seal if it shows any signs of
splitting or damage.
• Always use a TEFAL genuine seal that matches your model
of pressure cooker.
To store your pressure cooker
• Turn the lid over and place it on the pressure cooker body.
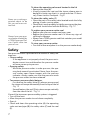
Safety
Your pressure cooker is provided with a number of safety me-
chanisms:
• Closure safety:
- If the appliance is not properly closed, the pressure in-
dicator cannot rise and therefore the pressure cooker
will never come up to pressure.
• Opening safety:
- While the pressure cooker is under pressure, the ope-
ning knob cannot be activated. Never force the pres-
sure cooker open. Never tamper with the pressure
indicator. Always make sure that the pressure inside
the pressure cooker has been released.
• Two excess pressure safety features:
- First feature: the safety valve (C) releases pressure and
the steam will escape horizontally from the top of the lid
- Fig 13
- Second feature: the seal (I) lets steam escape vertically
from the side of the lid - Fig 14
If one of the two excess pressure safety systems is triggered:
• Turn off the heat.
• Allow the pressure cooker to cool down completely.
• Open it.
• Check and clean the operating valve (A), the operating
valve seat and pipe (B), the safety valve (C) and the seal
(I).
Never use a cutting or
pointed object to do
this, you can use a cot-
ton bud.
Always have your pres-
sure cooker checked by
a TEFAL Approved Ser-
vice Centre after ten
years of use.

8
EN
TR
ES
PT
EL
AR
FA
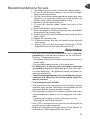
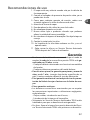
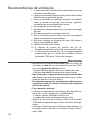
Recommendations for use
1 - The steam is very hot when it leaves the operating valve.
2 - As soon as the pressure indicator rises, you can no longer
open your pressure cooker.
3 - Just like for any other cooking appliance, always pay close
attention to it, especially during use in the presence of
children. Never leave unattended whilst in use.
4 - Beware of the horizontal steam jet.
5 - To move the pressure cooker, always use both of the
handles.
6 - Never leave food in your pressure cooker.
7 - Never use bleach or chlorine products for they could affect
the quality of the stainless steel.
8 - Never wash the lid in the dishwasher. Never leave the lid to
soak in water.
9 - Replace the seal every year.
10 - A pressure cooker may only be cleaned when cold and
when empty.
11 - Always have your pressure cooker checked by a TEFAL
Approved Service Centre after ten years of use.
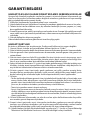
Guarantee
•Your new TEFAL pressure cooker comes with a ten-year
guarantee for use under the conditions set out in these ins-
tructions. This guarantee covers:
- Any defects relating to the metal structure of the pressure
cooker body,
- Any premature deterioration of the metal base.
• For other parts, a one year parts and labour guarantee
is provided (except where applicable law in your own coun-
try states otherwise). This guarantee covers any defects or
manufacturing faults.
• The contractual guarantee cover is provided only on pre-
sentation of a valid proof of purchase which shows the
date of purchase.
• The guarantee cover excludes:
• The normal life of the seal, pressure control valve or locking
indicator seal is limited. These parts are excluded from the
guarantee and will require periodic renewal.
•Any damage consecutive to a failure to follow the major
recommendations made or due to negligent use, espe-
cially:
- Dropping, falls, bangs or knocks, placing in an oven…
- Washing the lid in the dishwasher.
•Only TEFAL Approved Service Centres are authorised to
provide service under guarantee.
•Please call the Helpline number below for the address of
your nearest TEFAL Approved Service Centre.

9
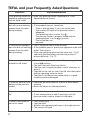
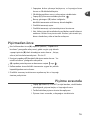
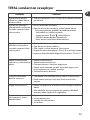
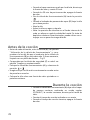
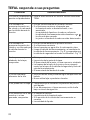
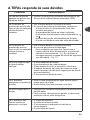
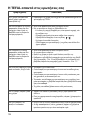
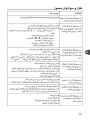
TEFAL and your Frequently Asked Questions
Problems Recommendations
If the pressure cooker has
heated up under pressure
with no liquid inside:
• Have your pressure cooker inspected by a TEFAL
Approved Service Centre.
If the pressure indicator
did not rise and nothing
escapes from the valve
during cooking:
• This is normal for the first few minutes.
• If the problem persists, check that:
- There is enough heat, if not, turn up the heat.
- The amount of liquid in the pressure cooker is
adequate.
- The operating valve is set to or .
- The pressure cooker is properly closed and the
opening button is in the position.
- The lid seal has not
perished.
If the pressure indicator
has risen but still nothing
escapes from the valve
during cooking:
• This is normal for the first few minutes.
• If the problem persists, place your appliance under cold
water. Then open it.
• Clean the operating valve and the valve seat -
Fig 8
and check that the safety valve can be pushed in
without difficulty -
Fig 12.
If steam escapes from
around the lid, check:
• That the lid is properly closed and the opening button is
in the position.
• The seal is correctly fitted into the lid.
• That the seal is in good condition, and if necessary, re-
place it.
• That the lid, the seal, its seat in the lid, the safety valve
and the operating valve are clean.
• That the rim of the pressure cooker body is in good
condition and not damaged.
If food has burnt on the
bottom of the pressure
cooker:
• Leave the pressure cooker to soak for a while before
washing.
• Never use bleach or chlorine products.
If you cannot open the
lid:
• Check that the pressure indicator is down.
• If not: release pressure and if necessary cool the
pressure cooker under a stream of cold water.
If food is not cooked or
has burnt, check:
• The cooking time.
• The heat level.
• Whether the operating valve was in the right position.
• The amount of liquid.

10
EN
TR
ES
PT
EL
AR
FA
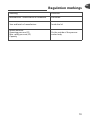
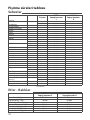
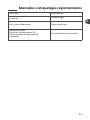
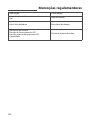
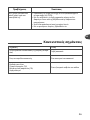
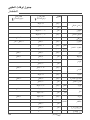
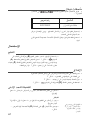
Regulation markings
Marking Location
Manufacturer's identification or trademark Lid handle
Year and batch of manufacture Inside the lid
Model reference
Operating pressure (PF)
Max. safety pressure (PS)
Capacity
On the outside of the pressure
cooker body

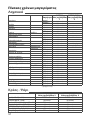
11
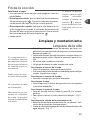
Preparation
Cooking
FRESH PRODUCE
Valve position
1
FROZEN PRODUCE
Valve position
2
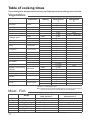
Steam = cooked in the steam basket
Immersion = cooked directly in water
RICE : never fill more than half full including liquid as rice froths and boils up during
cooking. Use 225 g rice and 1.75 litre water from a boiling kettle.
Meat - Fish
Artichoke Whole
- steam
18 min.
- immersion
15 min.
Asparagus - immersion
5 min.
Beetroot, red Peel after cooking - steam
20-30 min
depending on size
Broccoli Florets - steam
3 min. 3 min.
Brussels sprouts - steam
7 min. 5 min. - immersion
Cabbage, green
sliced - steam
6 min.
leaves - steam
7 min.
Carrots sliced - steam
7 min. 5 min.
Cauliflower Florets - immersion
3 min. 4 min.
Celery 5-cm pieces
- steam
6 min.
- immersion
10 min.
Courgettes 2.5-cm slices
- steam
6
1/2
min. 9 min
- immersion
2 min.
Endives - steam
12 min.
Green beans Whole or sliced - steam
8 min. 9 min.
Green lentils
(dried pulses)
- immersion
10 min.
Leek 5-cm slices - steam
2
1/2
min.
Mushrooms
sliced - steam
1 min. 5 min.
whole - immersion
1
1/2
min.
Peas - steam
1
1/2
min. 4 min.
Potatoes (such as King
Edwards)
quartered
- steam
12 min.
- immersion
6 min.
Pumpkin (mashed) pieces - immersion
8 min.
Rice
(Long grain white)
see note below
- immersion
7 min.
Spinach
- steam
5 min. 8 min.
- immersion
3 min.
Split peas
(dried pulses)
- immersion
14 min.
Turnips 2.5-cm cubes
- steam
7 min.
- immersion
6 min.
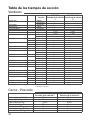
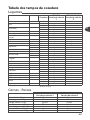
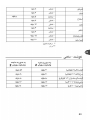
Table of cooking times
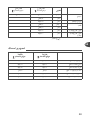
These cooking times are approximate and may need slight adjustment according to personal taste.
Vegetables
Weight
FRESH PRODUCE
Valve position 2
FROZEN PRODUCE
Valve position 2
Beef 1 kg (topside) 40 min (medium)* 1 hr (medium)*
Chicken 1.2 kg (whole) 27 min Do not cook from frozen
Lamb 1.3 kg (half leg) 50 min (medium)* 1hr 10 min (1 kg half leg - medium)*
Monkfish 0.6 kg (fillets) 4 min 6 min
Pork 1 kg (leg joint) 35 min Do not cook from frozen
Salmon 0.6 kg (4 steaks) 6 min 8 min
Tuna 0.6 kg (4 steaks) 7 min 9 min
* Cook for an additional 5 minutes for well done meat.

12
EN
TR
ES
PT
EL
AR
FA
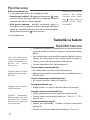
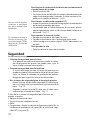
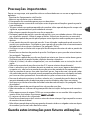
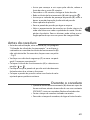
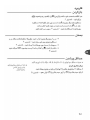
Güvenliğiniz için
Güvenliğiniz için bu ürün geçerli kural ve yönetmeliklere uygundur :
- Basınç altındaki Donanımlar Yönergesi
- Besinlerle temas eden malzemeler
• Bu ürün ev içinde kullanılmak üzere tasarlanmıştır.
•
Tüm talimatları okumak için zaman ayırınız ve her zaman « Kullanım Kılavuzu »na başvu-
runuz.
•
Tüm pişirme ürünlerinde olduğu gibi, düdüklü tencerenizi, özellikle çocukların yanında,
sürekli gözlem altında kullanınız.
•
Düdüklü tencereyi ısıtılmış fırına koymayınız.
•
Basınç altındaki düdüklü tencerenizi bir yerden bir yere dikkatle götürünüz. Sıcak kısımlara
dokunmayınız. Tutacak ve düğmeleri kullanınız. Gerekirse eldiven kullanınız.
•
Düdüklü tencerenizi kullanım amacı dışında bir amaçla kullanmayınız.
•
Düdüklü tencereniz basınç altında pişirmektedir. Uygunsuz kullanımdan dolayı haşlanma
yaralanmaları meydana gelebilir. Düdüklü tencerenizi kullanmadan önce iyice ka-
patıldığından emin olunuz. “Kapatma” paragrafını okuyunuz.
•
Düdüklü tencerenizi açmadan önce, supabın basınçsız konumda olduğundan emin olu-
nuz.
•
Düdüklü tencerenizi hiçbir zaman zorla açmayınız. İç basıncın iyice azalmış olduğundan
emin olunuz. Bakınız “güvenlik” paragrafı.
•
Düdüklü tencerenizi hiçbir zaman içinde sıvı olmadan kullanmayınız, bu ciddi zarar verir.
Pişme sırasında yeterince sıvı olduğundan emin olunuz.
•
Kullanım talimatlarına uygun ısı kaynakları kullanınız.
•
Düdüklü tencerenizi 2/3’ den fazla doldurmayınız (azami doldurma işareti).
•
Pirinç, kurutulmuş sebzeler, veya kompostolar gibi pişirme sırasında genleşen besinler için,
…düdüklü tencerenizin kapasitesinin yarısından fazlasını doldurmayınız.
•
Basıncın etkisi altında şişme riski bulunan derileri olan etleri (örneğin sığır dili) pişirdikten
sonra, deri şişkin göründüğü sürece eti delmeyiniz ; çıkabilecek buharla yanma tehlikesi
vardır. Eti pişirmeden önce delmenizi tavsiye ederiz.
•
Hamurumsu gıdalarda (kırık bezelye, ravent...), bu gıdaların içeride saçılmaması için aç-
madan evvel düdüklü tencereyi hafifçe sallayınız.
•
Her kullanımdan önce supapların tıkalı olmadığını kontrol ediniz. “Pişirmeden önce” para-
grafını okuyunuz.
•
Düdüklü tencerenizi basınç altında yağla kızartmak için kullanmayınız.
•
Temizlik ve bakım talimatları dışında güvenlik sistemlerine müdahalede bulunmayınız.
•
Sadece modelinize uygun TEFAL parçalarını kullanınız. Özellikle SECURE 5’e uygun bir
tencere ve kapak kullanınız.
•
Alkol buharı tutuşur. Kapağı kapatmadan evvel yaklaşık 2 dakika kaynatınız. Alkollü tari-
fler kullanırken düdüklü tencerenizi dikkatle kullanınız.
•
Tencerenizin kabını pişirmeden evvel ve sonra düdüklü tencerenizi asitli veya tuzlu be-
sinler saklamak için kullanmayınız.
Bu talimatları saklayınız

13
A
- Supap
B
- Supap tüpü
C
- Emniyet supapı
D
- Basınç göstergesi
E -
Açma mandalı
F -
Uzun kapak sapı
G - Kapak yerleştirme işareti
H
- Supap yerleştirme işareti
I
- Kapak contası
J
- Buhar sepeti
K
- Buhar sepeti desteği
L
- Uzun tencere sapı
M
-Kap
N
- Kısa tencere sapı
O - Azami doldurma işareti
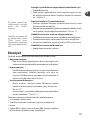
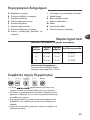
Özellikler
Düdüklü tencere alt çapı -referanslar
Kural :
Üst çalışma basıncı : 80 kPa.
Azami emniyet basıncı : 170 kPa.
Uyumlu ısı kaynakları
•
Düdüklü tencere indüksiyon dahil
aşağıdaki tüm ısıtma yöntemleriyle kullanılır
•
Elektrikli plaka ve indüksiyon üzerinde, düdüklü tencere
altına eşit veya daha küçük bir plaka kullanınız.
•
Seramik cam ile kullanırken, tencerenin dibinin temiz ve
parlak olduğundan emin olunuz.
•
Gaz üstünde, alev tencerenin çapını aşmamalıdır.
Kapasite Ø Kap Ø Alt Inox modeli
4 L 22 cm 19 cm P25042
6 L 22 cm 19 cm P25007
7 L 22 cm 19 cm P25008
GAZ PLAKA
ELEKTRİKLİ
SERAMİKCAM
HALOJEN
INDÜKSIYON
SPİRAL
ELEKTRİK
Açıklayıcı şema

14
EN
TR
ES
PT
EL
AR
FA
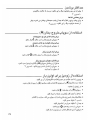
TEFAL Aksesuarları
•
Düdüklü tencerenin piyasada bulunan aksesuarları şunlardır
:
•
Diğer parçaların değiştirilmesi veya onarılması için TEFAL
Yetkili Servis Merkezlerine başvurunuz.
•
Sadece modelinize uygun orijinal TEFAL parçaları kullanınız.
Kullanım
Açma
•
Başparmağınızın yardımıyla açma mandalını
çekiniz
(E)
ve
- Resim 1
konumuna getiriniz.
Sol elinizle tencerenin
(L)
uzun sapını tutarken, sağ
elinizle
(F)
kapağının uzun sapını saatin ters yö-
nünde açılıncaya kadar çevirini -
Resim
2. Daha
sonra kapağı kaldırınız.
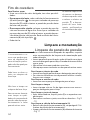
Kapatma
• Kapağı, kapak üçgenleri ile tencere üçgenleri üst üste gele-
cek şekilde, düzgün bir şekilde yerleştiriniz
- Resim 3
• Kapağı sola doğru dayanma yerine kadar çeviriniz
- Resim 3
• Açma mandalını (E) konuma itiniz - Resim 4
Asgari doldurma
•
Her zaman en az 25 cl’ye eşit (2 bardak) miktarda sıvı koyu-
nuz.
Buharda pişirmek için
•
En az 75 cl (6 bardak ) doldurulmalıdır.
•
(J) sepetinizi bu amaç için öngörülen (K) desteğine yerleşti-
riniz.
- Resim 5
Aksesuar Referans
Conta X2010003
•
Buhar sepetine konu-
lan besinler hiç bir
zaman düdüklü ten-
cere kapağı ile temas
etmemelidir.

15
Azami doldurma
•
Düdüklü tencerenizi hiç bir zaman tencerenin 2/3’ünden
fazla doldurmayınız (maksimum doldurma işareti) -
Resim 6
Bazı besinlerde
•
Pişirme sırasında genleşen besinler için, örneğin pirinç, ku-
rutulmuş sebzeler veya kompostolar…, düdüklü tencereni-
zin kapasitesinin yarısından fazlasını doldurmayınız -
Resim 6
Supapın kullanımı (A)
Hassas besinler ve sebzeleri pişirmek için
•
Supap (A) piktogramını (H) işaretine karşı getiriniz.
Etler ve donmuş gıdaları pişirmek için
•
Supap (A) piktogramını (H) işaretine karşı getiriniz.
Buharı çıkarmak için
•
Supap (A) piktogramını (H) işaretine karşı getiriniz.
Supabı çıkarmak için
•
Supabı
(A)
çıkarmadan önce tencerenin soğumasını be-
kleyiniz.
•
Supap üzerine bastırınız ve (H) işareti aynı konuma getir-
mek için çeviriniz
- Resim 7
•
Supabı çekiniz.
Supabı tekrar yerine koymak için
•
Supabı
(H)
işareti ile aynı konuma getiriniz.
•
Supaba bastırınız ve istediğiniz
konuma kadar çeviriniz.
İlk Kullanım
•
Tencerenin 2/3’üne kadar su doldurunuz. (azami doldurma
işareti)
•
Sepet desteğini (K) kabın dibine yerleştirip, üzerine de se-
peti (J) yerleştiriniz.
•
Düdüklütencerenin kapağını kapatınız
•
Supabı (A) üzerine yerleştiriniz .
•
Düdüklü tencereyi azami sıcaklığa ayarlanmış bir ısı
kaynağına yerleştiriniz.

16
EN
TR
ES
PT
EL
AR
FA
•
Supaptan buhar çıkmaya başlayınca, ısı kaynağını biraz
kısınız ve 20 dakika bekleyiniz.
•
20 dakika geçtikten sonra, ısı kaynağını söndürünüz.
•
Supap (A)’yı konumuna kadar çeviriniz .
•
Basınç göstergesi (D) tekrar indiğinde :
düdüklü tencereniz artık basınç altında değildir.
•
Düdüklü tencereyi açınız.
•
Düdüklü tencereyi suyla temizleyiniz ve kurutunuz.
•
Not : Kabın içten alt tarafında oluşan lekeler, metal kalitesini
azaltmaz. Bunlar kireç tortusudur. Bunları yok etmek için,
biraz sulandırılmış sirke ve bez ile ovalayınız.
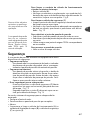
Pişirmeden önce
•
Her kullanımdan önce (A) supabını çekiniz (“Supabın kul-
lanılması” paragrafını okuyunuz), gözle ve gün ışığı altında
supap tüpünün (B) tıkalı olmadığına emin olunuz. , ihtiyaç
olursa, bir kürdanla temizleyiniz
- Resim 8
•
Emniyet supabının
(C)
hareketli olduğuna emin olunuz : “te-
mizlik ve bakım ” paragrafını okuyunuz.
•
(A) supabını yerine koyunuz ve konumunu seçiniz veya .
•
Kullanmadan önce düdüklü tencerenin uygun bir şekilde
kapatıldığından emin olunuz.
•
Düdüklü tencereyi maksimuma ayarlanmış bir ısı kaynağı
üzerine yerleştiriniz.
Pişirme sırasında
•
Supap (A) düzenli (PSCHHHT) sesiyle beraber, sürekli buhar
çıkardığında, pişirme başlar, ısı kaynağını kısınız.
•
Tarifte belirtilen pişirme süresini hesaplayınız.
•
Pişirme süresi sonunda, ısı kaynağını söndürünüz.

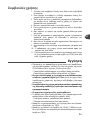
17
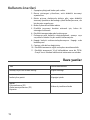
Pişirme sonu
Buharı boşaltmak için
•
Isı kaynağı söndürülünce, iki seçeneğiniz vardır :
•
Yavaş basınç azaltma :
(A) supabını konumuna kadar
çeviriniz. Basınç göstergesi (D) tekrar indiğinde : düdüklü
tencereniz artık basınç altında değildir.
•
Hızlı basınç azaltma :
düdüklü tencerenizi soğuk su
musluğunun altına yerleştiriniz. Basınç göstergesi (D) tekrar
indiğinde : düdüklü tencereniz artık basınç altında değildir.
(A) supabını konumuna kadar çeviriniz.
•
Artık açabilirsiniz.
Temizlik ve bakım
Düdüklü tencere
• Tencerenizin görevini iyi yapabilmesi için her kullanımdan
sonra bu temizlik ve bakım önerilerini uygulamaya dikkat
ediniz.
• Her kullanımdan sonra düdüklü tencereyi bulaşık sabunu
katılmış ılık suyla yıkayınız. Aynı şekilde sepeti de yıkayınız.
• Çamaşır suyu veya klorlu ürünler kullanmayınız.
• Tencere kabınız boş iken fazla ısıtmayınız.
Tencere kabını temizlemek için
• Bir ovalama bezi ve bulaşık sabunuyla yıkayınız.
• Eğer, paslanmaz çelik tencere kabınızın içinde lekeler varsa,
sirkeyle siliniz.
Tencere kabının dışını temizlemek için
• Bir sünger ve bulaşık sabunu ile yıkayınız.
kapağı temizlemek için
• Kapağı ılık bir su, sünger ve bulaşık sabunu ile yıkayınız.
Kapağın contasını temizlemek için
• Her pişirmeden sonra, conta ve yerini temizleyiniz (I).
• Contayı tekrar yerine yerleştirmek için,
- Resim 9 - 10’a
başvurunuz.
Supabı temizlemek için (A)
• Supabı geri çekiniz(A) : “Supabın kullanımı paragrafını
okuyunuz”.
• Musluk suyu altında supabı
(A)
temizleyiniz - Resim 11
Basınç düşürme sırasında
anormal bir buhar
fışkırması olursa, selek-
törü , daha yavaş bir
şekilde basıncı tekrar
düşürünüz.
Tencere kabını ve sepeti
bulaşık makinesine koya-
bilirsiniz.
Kapağı bulaşık makine-
sine koymayınız.
Düdüklü tencerenizin
kalitesini daha uzun süre
korumak için: tencere
kabınızı boş durumda
aşırı ısıtmayınız.
Uzun bir kullanımdan
sonra oluşan kararma ve
çizgiler normaldir, uy-
gunsuz bir durum
oluşturmaz.
Sayfa yükleniyor...
Sayfa yükleniyor...
Sayfa yükleniyor...
Sayfa yükleniyor...
Sayfa yükleniyor...
Sayfa yükleniyor...
Sayfa yükleniyor...
Sayfa yükleniyor...
Sayfa yükleniyor...
Sayfa yükleniyor...
Sayfa yükleniyor...
Sayfa yükleniyor...
Sayfa yükleniyor...
Sayfa yükleniyor...
Sayfa yükleniyor...
Sayfa yükleniyor...
Sayfa yükleniyor...
Sayfa yükleniyor...
Sayfa yükleniyor...
Sayfa yükleniyor...
Sayfa yükleniyor...
Sayfa yükleniyor...
Sayfa yükleniyor...
Sayfa yükleniyor...
Sayfa yükleniyor...
Sayfa yükleniyor...
Sayfa yükleniyor...
Sayfa yükleniyor...
Sayfa yükleniyor...
Sayfa yükleniyor...
Sayfa yükleniyor...
Sayfa yükleniyor...
Sayfa yükleniyor...
Sayfa yükleniyor...
Sayfa yükleniyor...
Sayfa yükleniyor...
Sayfa yükleniyor...
Sayfa yükleniyor...
Sayfa yükleniyor...
Sayfa yükleniyor...
Sayfa yükleniyor...
Sayfa yükleniyor...
Sayfa yükleniyor...
Sayfa yükleniyor...
Sayfa yükleniyor...
Sayfa yükleniyor...
Sayfa yükleniyor...
Sayfa yükleniyor...
Sayfa yükleniyor...
Sayfa yükleniyor...
Sayfa yükleniyor...
Sayfa yükleniyor...
Sayfa yükleniyor...
Sayfa yükleniyor...
Sayfa yükleniyor...
Sayfa yükleniyor...
Sayfa yükleniyor...
Sayfa yükleniyor...
Sayfa yükleniyor...
Sayfa yükleniyor...
Sayfa yükleniyor...
Sayfa yükleniyor...
Sayfa yükleniyor...
Sayfa yükleniyor...
-
 1
1
-
 2
2
-
 3
3
-
 4
4
-
 5
5
-
 6
6
-
 7
7
-
 8
8
-
 9
9
-
 10
10
-
 11
11
-
 12
12
-
 13
13
-
 14
14
-
 15
15
-
 16
16
-
 17
17
-
 18
18
-
 19
19
-
 20
20
-
 21
21
-
 22
22
-
 23
23
-
 24
24
-
 25
25
-
 26
26
-
 27
27
-
 28
28
-
 29
29
-
 30
30
-
 31
31
-
 32
32
-
 33
33
-
 34
34
-
 35
35
-
 36
36
-
 37
37
-
 38
38
-
 39
39
-
 40
40
-
 41
41
-
 42
42
-
 43
43
-
 44
44
-
 45
45
-
 46
46
-
 47
47
-
 48
48
-
 49
49
-
 50
50
-
 51
51
-
 52
52
-
 53
53
-
 54
54
-
 55
55
-
 56
56
-
 57
57
-
 58
58
-
 59
59
-
 60
60
-
 61
61
-
 62
62
-
 63
63
-
 64
64
-
 65
65
-
 66
66
-
 67
67
-
 68
68
-
 69
69
-
 70
70
-
 71
71
-
 72
72
-
 73
73
-
 74
74
-
 75
75
-
 76
76
-
 77
77
-
 78
78
-
 79
79
-
 80
80
-
 81
81
-
 82
82
-
 83
83
-
 84
84


Tefal P2500700 Kullanım kılavuzu
- Kategori
- Düdüklü tencereler
- Tip
- Kullanım kılavuzu
diğer dillerde
- español: Tefal P2500700 Manual de usuario
- português: Tefal P2500700 Manual do usuário