

1/12
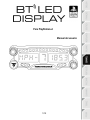
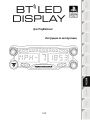
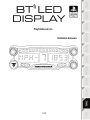
For PlayStation®4
User Manual

2/12
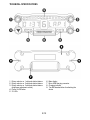
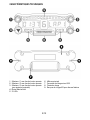
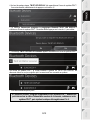
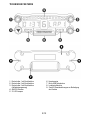
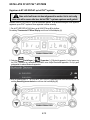
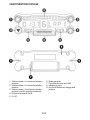
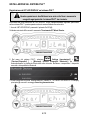
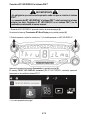
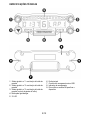
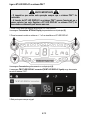
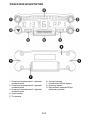
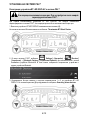
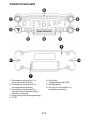
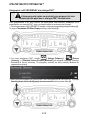
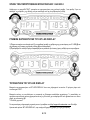
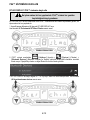
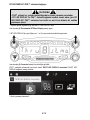
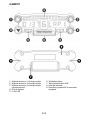
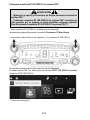
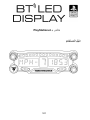
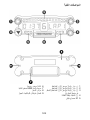
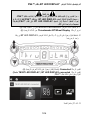
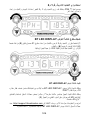
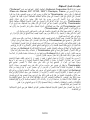
TECHNICAL SPECIFICATIONS
1 Rotary selector no. 1 with push-button feature
2 Rotary selector no. 2 with push-button feature
3 Rotary selector no. 3 with push-button feature
(brightness adjustment control)
4 Power On/Off button
5 21 LEDs
6 Main display
7 Micro USB charging connector
8 Charging indicator
9 Two M3 threaded holes for attaching the
device

3/12
WARNING
Before using this product, please read this manual carefully and save it for later reference.
Warning – Electrical shock
* Keep the product in a dry location and do not expose it to dust or sunlight.
* Do not twist or pull on the connectors and cables.
* Do not spill any liquid on the product or its connectors.
* Do not short-circuit the product.
* Never dismantle the product; do not throw it onto a fire and do not expose it to high temperatures.
* Do not open up the device: there are no user-serviceable parts inside. Any repairs must be carried
out by the manufacturer, its authorized representative or a qualified technician.
Warning – Internal battery
- Fully charge the BT LED DISPLAY before use.
- Do not disassemble the device; this would void its warranty.
- Protect your device from shocks and impacts.
- This device should not be used by children below the age of 14 without an adult’s supervision.
THRUSTMASTER® DISCLAIMS ANY LIABILITY IN THE EVENT OF NON-COMPLIANCE WITH
THESE INSTRUCTIONS.
WARNING: AN EXPLOSION MAY OCCUR IF THE BATTERY IS REPLACED WITH AN
INCORRECT TYPE OF BATTERY.
FOLLOW INSTRUCTIONS REGARDING THE DISPOSAL OF BATTERIES.
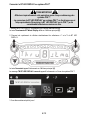
CHARGING THE BT LED DISPLAY’S BATTERY
Using a micro USB cable (such as the USB cable supplied with the PS4™ system), connect the BT
LED DISPLAY to one of the PS4™ system’s free USB ports.
The charging connector (7) is located at the back of the BT LED DISPLAY.
The charging indicator (8) lights up in red when the device is charging, and turns off when it is fully
charged.
COMPATIBILITY WITH PS4™ GAMES
A list of PS4™ games compatible with the BT LED DISPLAY is available at http://support.thrustmaster.com.
Select Racing wheels / BT LED DISPLAY / Games settings.
This list will regularly be expanded with the release of new PS4™ games compatible with the BT
LED DISPLAY.

4/12
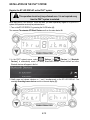
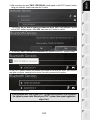
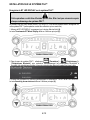
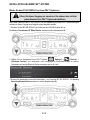
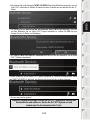
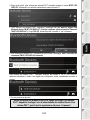
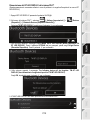
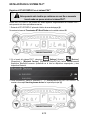
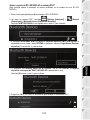
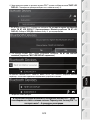
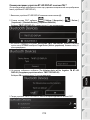
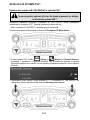
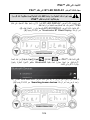
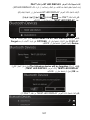
INSTALLATION ON THE PS4™ SYSTEM
Register the BT LED DISPLAY on the PS4™ system
This operation should only be performed once. It is not required every
time the PS4™ system is restarted.
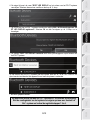
When using the BT LED DISPLAY for the first time, you must imperatively register it on your PS4™
system; this operation must only be performed once.
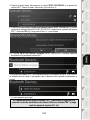
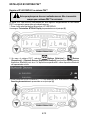
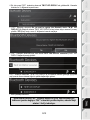
1. Turn on the BT LED DISPLAY by pressing the On/Off button (4).
The message Thrustmaster BT Wheel Display scrolls on the main display (6).
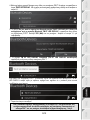
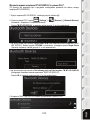
2. In the PS4™ system’s menu, select [ Settings ] > [ Devices ] > [ Bluetooth
Devices ] to automatically search for nearby Bluetooth® devices. Paired devices and other
Bluetooth devices will appear in the list.
3. Briefly press and release selectors no. 1 and 2 simultaneously on the BT LED DISPLAY. The
message Searching known devices scrolls on the main display (6).

5/12
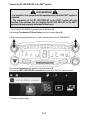
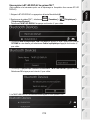
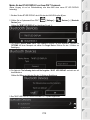
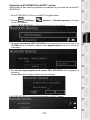
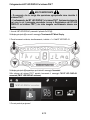
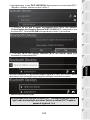
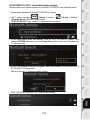
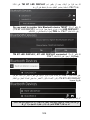
4. After some time, the name TM BT LED DISPLAY should appear on the PS4™ system’s screen.
Using your controller, select it and press the s button.
5. The message Do you want to register this Bluetooth device TM BT LED DISPLAY? appears
on the PS4™ system’s screen. Select YES, then press the s button to confirm.
6. The message TM BT LED DISPLAY connected briefly appears on the PS4™ system’s screen.
On the PS4™ system’s screen, the indicator light located to the left of the TM BT LED DISPLAY
now lights up in green, meaning that the device is correctly connected to the system.
7. You are now ready to play!
If the operation fails, turn off your PS4™ system and disconnect, then reconnect
the system’s power cable. Restart your PS4™ system, then repeat registration
steps 1 to 6.

6/12
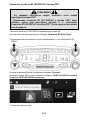
Connect the BT LED DISPLAY to the PS4™ system
VERY IMPORTANT
- It is imperative that you perform this operation every time the PS4™ system is
restarted.
- The connection of the BT LED DISPLAY to the PS4™ system will only
function if the previous step (i.e. Register the BT LED DISPLAY on the PS4™
system) has been properly performed at least once.
1. Turn on the BT LED DISPLAY by pressing the On/Off button (4).
The message Thrustmaster BT Wheel Display scrolls on the main display (6).
2. Briefly press and release selectors no. 1 and 2 simultaneously on the BT LED DISPLAY.
The message Connected briefly appears on the main display (6).
The message TM BT LED DISPLAY connected briefly appears on the PS4™ system’s screen.
3. You are now ready to play!

7/12
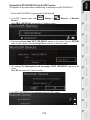
Unregister the BT LED DISPLAY from the PS4™ system
(This operation is only required when troubleshooting, or purchasing a new BT LED DISPLAY.)
1. Turn off the BT LED DISPLAY by pressing the On/Off button (4).
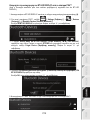
2. In the PS4™ system’s menu, select [ Settings ] > [ Devices ] > [ Bluetooth
Devices ].
Select TM BT LED DISPLAY, then press the s button to confirm.
3. The message Device Name TM BT LED DISPLAY appears on the screen. Press the OPTIONS
button on your controller, then select Forget Device. Press the s button to confirm.
4. The message The following device will be forgotten: TM BT LED DISPLAY appears on the
screen.
Select OK, then press the s button to confirm.
5. The TM BT LED DISPLAY is now unregistered from your PS4™ system.

8/12
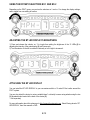
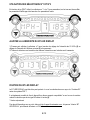
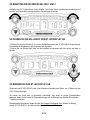
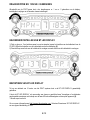
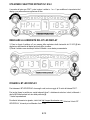
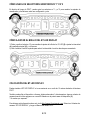
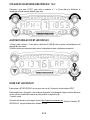
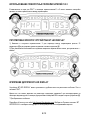
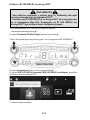
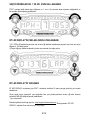
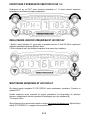
USING THE ROTARY SELECTORS NO.1 AND NO.2
Depending on the PS4™ game, you can turn the selectors no.1 and no. 2 to change the display settings,
and to toggle from one setting to another.
ADJUSTING THE BT LED DISPLAY’S BRIGHTNESS
1) Press and release the selector no. 3 to toggle from setting the brightness of the 21 LEDs (5) to
adjusting the intensity of the main display (6), and conversely.
2) Turn the selector to the left to reduce the intensity or to the right to increase it.
ATTACHING THE BT LED DISPLAY
You can install the BT LED DISPLAY at your convenience within a 10 metre/33 foot radius around the
PS4™ system.
You can also attach the device to various suitable items* or directly to some racing wheels using the two
M3 threaded holes located at the back of the device (9).
* Sold separately
For more information about this, please go to http://support.thrustmaster.com. Select Racing wheels / BT
LED DISPLAY, then User manual or FAQ.

9/12
UPDATING THE BT LED DISPLAY’S FIRMWARE
Both firmware (general firmware and Bluetooth firmware) included in the BT LED DISPLAY can be
updated with more recent versions, featuring product improvements.
To display your BT LED DISPLAY’s firmware versions and update them if required: on a PC, access
http://support.thrustmaster.com, select Racing wheels / BT LED DISPLAY, then select Firmware and
follow the instructions and the download and installation procedure.
HELP, FAQ AND HINTS
Access http://support.thrustmaster.com. Select Racing wheels / BT LED DISPLAY, then User
manual or FAQ.

10/12
CONSUMER WARRANTY INFORMATION
Worldwide, Guillemot Corporation S.A., whose registered office is located at Place du Granier, B.P.
97143, 35571 Chantepie, France (hereinafter “Guillemot”) warrants to the consumer that this
Thrustmaster product shall be free from defects in materials and workmanship, for a warranty period
which corresponds to the time limit to bring an action for conformity with respect to this product. In
the countries of the European Union, this corresponds to a period of two (2) years from delivery of
the Thrustmaster product. In other countries, the warranty period corresponds to the time limit to
bring an action for conformity with respect to the Thrustmaster product according to applicable laws
of the country in which the consumer was domiciled on the date of purchase of the Thrustmaster
product (if no such action exists in the corresponding country, then the warranty period shall be one
(1) year from the original date of purchase of the Thrustmaster product).
Notwithstanding the above, rechargeable batteries are covered by a warranty period of six (6)
months from the date of original purchase.
Should the product appear to be defective during the warranty period, immediately contact
Technical Support, who will indicate the procedure to follow. If the defect is confirmed, the product
must be returned to its place of purchase (or any other location indicated by Technical Support).
Within the context of this warranty, the consumer’s defective product shall, at Technical Support’s
option, be either replaced or returned to working order. If, during the warranty period, the
Thrustmaster product is subject to such reconditioning, any period of at least seven (7) days during
which the product is out of use shall be added to the remaining warranty period (this period runs
from the date of the consumer’s request for intervention or from the date on which the product in
question is made available for reconditioning, if the date on which the product is made available for
reconditioning is subsequent to the date of the request for intervention). If permitted under
applicable law, the full liability of Guillemot and its subsidiaries (including for consequential
damages) is limited to the return to working order or the replacement of the Thrustmaster product. If
permitted under applicable law, Guillemot disclaims all warranties of merchantability or fitness for a
particular purpose.
This warranty shall not apply: (1) if the product has been modified, opened, altered, or has suffered
damage as a result of inappropriate or abusive use, negligence, an accident, normal wear, or any
other cause unrelated to a material or manufacturing defect (including, but not limited to, combining
the Thrustmaster product with any unsuitable element, including in particular power supplies,
rechargeable batteries, chargers, or any other elements not supplied by Guillemot for this product);
(2) if the product has been used for any use other than home use, including for professional or
commercial purposes (game rooms, training, competitions, for example); (3) in the event of failure to
comply with the instructions provided by Technical Support; (4) to software, said software being
subject to a specific warranty; (5) to consumables (elements to be replaced over the product’s
lifespan: disposable batteries, audio headset or headphone ear pads, for example); (6) to
accessories (cables, cases, pouches, bags, wrist-straps, for example); (7) if the product was sold at
public auction.
This warranty is nontransferable.
The consumer’s legal rights with respect to laws applicable to the sale of consumer goods in his or
her country are not affected by this warranty.

11/12
Additional warranty provisions
During the warranty period, Guillemot shall not provide, in principle, any spare parts, as Technical
Support is the only party authorized to open and/or recondition any Thrustmaster product (with the
exception of any reconditioning procedures which Technical Support may request that the
consumer carry out, by way of written instructions – for example, due to the simplicity and the lack
of confidentiality of the reconditioning process – and by providing the consumer with the required
spare part(s), where applicable).
Given its innovation cycles and in order to protect its know-how and trade secrets, Guillemot shall
not provide, in principle, any reconditioning notification or spare parts for any Thrustmaster product
whose warranty period has expired.
Liability
If permitted under applicable law, Guillemot Corporation S.A. (hereinafter “Guillemot”) and its
subsidiaries disclaim all liability for any damages caused by one or more of the following: (1) the
product has been modified, opened or altered; (2) failure to comply with assembly instructions; (3)
inappropriate or abusive use, negligence, an accident (an impact, for example); (4) normal wear; (5)
the use of the product for any use other than home use, including for professional or commercial
purposes (game rooms, training, competitions, for example). If permitted under applicable law,
Guillemot and its subsidiaries disclaim all liability for any damages unrelated to a material or
manufacturing defect with respect to the product (including, but not limited to, any damages caused
directly or indirectly by any software, or by combining the Thrustmaster product with any unsuitable
element, including in particular power supplies, rechargeable batteries, chargers, or any other
elements not supplied by Guillemot for this product).
TECHNICAL SUPPORT
https://support.thrustmaster.com

12/12
STATEMENT OF COMPLIANCE WITH EU REGULATIONS
Guillemot Corporation S.A. hereby declares that the device BT LED DISPLAY complies with the main
requirements and other relevant clauses of Directive 2014/53/UE (RED). The compliance statement
can be viewed at the following site:
http://www.thrustmaster.com/certificates/BT_Led_Display/Doc-BT_Led_Display.pdf
Frequency Band: 2402-2480MHz, RF MAX power: <10dBm
COPYRIGHT
© 2021 Guillemot Corporation S.A. All rights reserved. Thrustmaster® is a registered trademark of
Guillemot Corporation S.A.
Licensed for sale in Europe, Africa, Middle East, Russia, India and Oceania. For use exclusively with
PlayStation®4.
All other trademarks and brand names are hereby acknowledged and are property of their respective
owners. Illustrations not binding. Contents, designs and specifications are subject to change without
notice and may vary from one country to another. Made in China.
Manufactured and distributed by Guillemot Corporation S.A.
ENVIRONMENTAL PROTECTION RECOMMENDATION
In the European Union and Turkey: At the end of its working life, this product should
not be disposed of with standard household waste, but rather dropped off at a
collection point for the disposal of Waste Electrical and Electronic Equipment
(WEEE) for recycling.
This is confirmed by the symbol found on the product, user manual or packaging.
Depending on their characteristics, the materials may be recycled. Through
recycling and other forms of processing Waste Electrical and Electronic Equipment,
you can make a significant contribution towards helping to protect the environment.
Please contact your local authorities for information on the collection point nearest you.
For all other countries: Please adhere to local recycling laws for electrical and electronic equipment.
Retain this information. Colours and decorations may vary.
Plastic fasteners and adhesives should be removed from the product before it is used.
www.thrustmaster.com
*Applicable to EU, UK and Turkey only
*
*

1/12
Pour PlayStation®4
Manuel de l’utilisateur

2/12
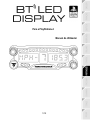
CARACTÉRISTIQUES TECHNIQUES
1 Sélecteur n°1 avec fonction bouton poussoir
2 Sélecteur n°2 avec fonction bouton poussoir
3 Sélecteur n°3 avec fonction bouton poussoir
(pour ajuster la luminosité)
4 Bouton Marche/Arrêt
5 21 LEDs
6 Afficheur principal
7 Connecteur de charge micro-USB
8 Témoin de charge
9 Deux pas de vis type M3 pour diverses fixations

3/12
AVERTISSEMENTS
Avant d’utiliser ce produit, lisez attentivement cette documentation et conservez-la pour pouvoir la
consulter ultérieurement.
Avertissement – Choc électrique
* Conservez le produit dans un endroit sec et ne l’exposez ni à la poussière ni au soleil.
* Ne tordez pas et ne tirez pas sur les connecteurs et câbles.
* Ne renversez pas de liquide sur le produit et ses connecteurs.
* Ne mettez pas le produit en court-circuit.
* Ne démontez jamais le produit, ne le jetez pas au feu et ne l’exposez pas à des températures
élevées.
* N’ouvrez pas l’appareil. L’appareil ne contient pas de pièces réparables par l'utilisateur. Confiez
toute réparation au fabricant, à une agence spécifiée ou un technicien qualifié.
Avertissement – Batterie Interne
- Avant d’utiliser le BT LED DISPLAY, effectuez une charge complète.
- Ne désassemblez pas le produit ; cela annulerait sa garantie.
- Protégez votre produit contre les chocs et les impacts.
- Ce produit ne doit pas être utilisé par un enfant de moins de 14 ans sans la supervision d'un
adulte.
THRUSTMASTER® DECLINE TOUTE RESPONSABILITE EN CAS DE NON-RESPECT DE CES
CONSIGNES.
ATTENTION : RISQUE D’EXPLOSION SI LA BATTERIE EST REMPLACÉE PAR UN TYPE DE
BATTERIE INCORRECT.
SUIVEZ LES INSTRUCTIONS CONCERNANT LA MISE AU REBUT DES BATTERIES.
RECHARGER LA BATTERIE DU BT LED DISPLAY
A l’aide d’un câble micro-USB (celui fourni avec votre système PS4™, par exemple), branchez le
BT LED DISPLAY sur l’un des ports USB disponibles sur votre système PS4™.
Le connecteur de charge (7) est situé à l’arrière du BT LED DISPLAY.
Le témoin de charge (8) s’allume en rouge lors du chargement et s’éteint lorsque la charge est
pleine.
COMPATIBILITE DANS LES JEUX PS4™
La liste des jeux PS4™ compatibles avec le BT LED DISPLAY est disponible sur
http://support.thrustmaster.com. Sélectionnez Volants / BT LED DISPLAY puis Paramètres de jeux.
Cette liste s’étoffera régulièrement avec l’arrivée des nouveaux jeux PS4™ compatibles avec le BT
LED DISPLAY.

4/12
INSTALLATION SUR LE SYSTÈME PS4™
Enregistrer le BT LED DISPLAY sur le système PS4™
Cette opération ne doit être effectuée qu'une fois. Elle n'est pas nécessaire après
chaque redémarrage du système PS4™.
La première fois que vous utilisez votre BT LED DISPLAY, vous devez impérativement l'enregistrer sur
votre système PS4™ (cette opération ne doit être effectuée qu’une seule fois).
1. Allumez le BT LED DISPLAY en appuyant sur le bouton Marche/Arrêt (4).
Le texte Thrustmaster BT Wheel Display défile sur l’afficheur principal (6).
2. Dans le menu du système PS4™, sélectionnez [ Paramètres ] > [ Périphériques ] >
[ Périphériques Bluetooth ] pour rechercher automatiquement les périphériques Bluetooth® à
proximité. Les périphériques couplés et les autres périphériques Bluetooth apparaîtront dans la liste.
3. Pressez très rapidement et relâchez simultanément les sélecteurs n°1 et n°2 du BT LED DISPLAY.
Le texte Searching known devices défile sur l’afficheur principal (6).

5/12
4. Au bout de quelque temps, TM BT LED DISPLAY doit apparaître sur l’écran du système PS4™.
Avec votre manette, sélectionnez-le et appuyez sur la touche s.
5. Le message Voulez-vous enregistrer le périphérique Bluetooth TM BT LED DISPLAY ?
s’affiche sur l’écran du système PS4™. Choisissez OUI et appuyez sur la touche s pour valider.
6. Le message TM BT LED DISPLAY connecté apparaît brièvement sur l’écran du système PS4™.
Sur l’écran du système PS4™, le voyant lumineux à gauche de TM BT LED DISPLAY est
désormais allumé en vert pour signifier que l’accessoire est bien connecté au système.
7. Vous êtes maintenant prêt à jouer !
Si l’opération échoue : éteignez complètement votre système PS4™, débranchez
puis rebranchez le câble d’alimentation secteur de la console, redémarrez votre
système PS4™, puis répétez les étapes d'enregistrement 1 à 6.

6/12
Connecter le BT LED DISPLAY au système PS4™
TRES IMPORTANT
- Effectuez impérativement cette opération après chaque redémarrage du
système PS4™.
- La connexion du BT LED DISPLAY au système PS4™ ne fonctionne que si
l’étape précédente (Enregistrer le BT LED DISPLAY sur le PS4™) a été
correctement effectuée au moins une fois.
1. Allumez le BT LED DISPLAY en appuyant sur le bouton Marche/arrêt (4).
Le texte Thrustmaster BT Wheel Display défile sur l’afficheur principal (6).
2. Pressez très rapidement et relâchez simultanément les sélecteurs n°1 et n°2 du BT LED
DISPLAY.
Le texte Connected apparaît brièvement sur l’afficheur principal (6).
Le message TM BT LED DISPLAY connecté apparaît brièvement sur l’écran du système PS4™.
3. Vous êtes maintenant prêt à jouer !

7/12
Désenregistrer le BT LED DISPLAY du système PS4™
(Cette opération n'est nécessaire qu'en cas de dépannage ou d’acquisition d’un nouveau BT LED
DISPLAY)
1. Eteignez le BT LED DISPLAY en appuyant sur le bouton Marche/Arrêt (4).
2. Dans le menu du système PS4™, sélectionnez [ Paramètres ] > [ Périphériques ] >
[ Périphériques Bluetooth ].
Sélectionnez TM BT LED DISPLAY et appuyez sur la touche s pour valider.
3. Le message Nom du périphérique TM BT LED DISPLAY apparaît à l’écran. Appuyez sur la touche
OPTIONS de votre manette, puis sélectionnez Oublier le périphérique. Appuyez sur la touche s
pour valider.
4. Le message Le périphérique ci-dessous va être oublié : TM BT LED DISPLAY apparaît à l’écran.
Sélectionnez OK et appuyez sur la touche s pour valider.
5. Le TM BT LED DISPLAY est désormais désenregistré de votre système PS4™.
Sayfa yükleniyor...
Sayfa yükleniyor...
Sayfa yükleniyor...
Sayfa yükleniyor...
Sayfa yükleniyor...
Sayfa yükleniyor...
Sayfa yükleniyor...
Sayfa yükleniyor...
Sayfa yükleniyor...
Sayfa yükleniyor...
Sayfa yükleniyor...
Sayfa yükleniyor...
Sayfa yükleniyor...
Sayfa yükleniyor...
Sayfa yükleniyor...
Sayfa yükleniyor...
Sayfa yükleniyor...
Sayfa yükleniyor...
Sayfa yükleniyor...
Sayfa yükleniyor...
Sayfa yükleniyor...
Sayfa yükleniyor...
Sayfa yükleniyor...
Sayfa yükleniyor...
Sayfa yükleniyor...
Sayfa yükleniyor...
Sayfa yükleniyor...
Sayfa yükleniyor...
Sayfa yükleniyor...
Sayfa yükleniyor...
Sayfa yükleniyor...
Sayfa yükleniyor...
Sayfa yükleniyor...
Sayfa yükleniyor...
Sayfa yükleniyor...
Sayfa yükleniyor...
Sayfa yükleniyor...
Sayfa yükleniyor...
Sayfa yükleniyor...
Sayfa yükleniyor...
Sayfa yükleniyor...
Sayfa yükleniyor...
Sayfa yükleniyor...
Sayfa yükleniyor...
Sayfa yükleniyor...
Sayfa yükleniyor...
Sayfa yükleniyor...
Sayfa yükleniyor...
Sayfa yükleniyor...
Sayfa yükleniyor...
Sayfa yükleniyor...
Sayfa yükleniyor...
Sayfa yükleniyor...
Sayfa yükleniyor...
Sayfa yükleniyor...
Sayfa yükleniyor...
Sayfa yükleniyor...
Sayfa yükleniyor...
Sayfa yükleniyor...
Sayfa yükleniyor...
Sayfa yükleniyor...
Sayfa yükleniyor...
Sayfa yükleniyor...
Sayfa yükleniyor...
Sayfa yükleniyor...
Sayfa yükleniyor...
Sayfa yükleniyor...
Sayfa yükleniyor...
Sayfa yükleniyor...
Sayfa yükleniyor...
Sayfa yükleniyor...
Sayfa yükleniyor...
Sayfa yükleniyor...
Sayfa yükleniyor...
Sayfa yükleniyor...
Sayfa yükleniyor...
Sayfa yükleniyor...
Sayfa yükleniyor...
Sayfa yükleniyor...
Sayfa yükleniyor...
Sayfa yükleniyor...
Sayfa yükleniyor...
Sayfa yükleniyor...
Sayfa yükleniyor...
Sayfa yükleniyor...
Sayfa yükleniyor...
Sayfa yükleniyor...
Sayfa yükleniyor...
Sayfa yükleniyor...
Sayfa yükleniyor...
Sayfa yükleniyor...
Sayfa yükleniyor...
Sayfa yükleniyor...
Sayfa yükleniyor...
Sayfa yükleniyor...
Sayfa yükleniyor...
Sayfa yükleniyor...
Sayfa yükleniyor...
Sayfa yükleniyor...
Sayfa yükleniyor...
Sayfa yükleniyor...
Sayfa yükleniyor...
Sayfa yükleniyor...
Sayfa yükleniyor...
Sayfa yükleniyor...
Sayfa yükleniyor...
Sayfa yükleniyor...
Sayfa yükleniyor...
Sayfa yükleniyor...
Sayfa yükleniyor...
Sayfa yükleniyor...
Sayfa yükleniyor...
Sayfa yükleniyor...
Sayfa yükleniyor...
Sayfa yükleniyor...
Sayfa yükleniyor...
Sayfa yükleniyor...
Sayfa yükleniyor...
Sayfa yükleniyor...
Sayfa yükleniyor...
Sayfa yükleniyor...
Sayfa yükleniyor...
Sayfa yükleniyor...
Sayfa yükleniyor...
Sayfa yükleniyor...
-
 1
1
-
 2
2
-
 3
3
-
 4
4
-
 5
5
-
 6
6
-
 7
7
-
 8
8
-
 9
9
-
 10
10
-
 11
11
-
 12
12
-
 13
13
-
 14
14
-
 15
15
-
 16
16
-
 17
17
-
 18
18
-
 19
19
-
 20
20
-
 21
21
-
 22
22
-
 23
23
-
 24
24
-
 25
25
-
 26
26
-
 27
27
-
 28
28
-
 29
29
-
 30
30
-
 31
31
-
 32
32
-
 33
33
-
 34
34
-
 35
35
-
 36
36
-
 37
37
-
 38
38
-
 39
39
-
 40
40
-
 41
41
-
 42
42
-
 43
43
-
 44
44
-
 45
45
-
 46
46
-
 47
47
-
 48
48
-
 49
49
-
 50
50
-
 51
51
-
 52
52
-
 53
53
-
 54
54
-
 55
55
-
 56
56
-
 57
57
-
 58
58
-
 59
59
-
 60
60
-
 61
61
-
 62
62
-
 63
63
-
 64
64
-
 65
65
-
 66
66
-
 67
67
-
 68
68
-
 69
69
-
 70
70
-
 71
71
-
 72
72
-
 73
73
-
 74
74
-
 75
75
-
 76
76
-
 77
77
-
 78
78
-
 79
79
-
 80
80
-
 81
81
-
 82
82
-
 83
83
-
 84
84
-
 85
85
-
 86
86
-
 87
87
-
 88
88
-
 89
89
-
 90
90
-
 91
91
-
 92
92
-
 93
93
-
 94
94
-
 95
95
-
 96
96
-
 97
97
-
 98
98
-
 99
99
-
 100
100
-
 101
101
-
 102
102
-
 103
103
-
 104
104
-
 105
105
-
 106
106
-
 107
107
-
 108
108
-
 109
109
-
 110
110
-
 111
111
-
 112
112
-
 113
113
-
 114
114
-
 115
115
-
 116
116
-
 117
117
-
 118
118
-
 119
119
-
 120
120
-
 121
121
-
 122
122
-
 123
123
-
 124
124
-
 125
125
-
 126
126
-
 127
127
-
 128
128
-
 129
129
-
 130
130
-
 131
131
-
 132
132
-
 133
133
-
 134
134
-
 135
135
-
 136
136
-
 137
137
-
 138
138
-
 139
139
-
 140
140
-
 141
141
-
 142
142
-
 143
143
-
 144
144
-
 145
145


Thrustmaster 4160709 Kullanım kılavuzu
- Tip
- Kullanım kılavuzu
- Bu kılavuz aynı zamanda aşağıdakiler için de uygundur:
diğer dillerde
- français: Thrustmaster 4160709 Manuel utilisateur
- italiano: Thrustmaster 4160709 Manuale utente
- polski: Thrustmaster 4160709 Instrukcja obsługi
- Deutsch: Thrustmaster 4160709 Benutzerhandbuch
- português: Thrustmaster 4160709 Manual do usuário
İlgili makaleler
-
Thrustmaster T150 RS Volant Racing Retour de Force Kullanım kılavuzu
-
Thrustmaster 2969097 2961061 Kullanım kılavuzu
-
-
-
-
Thrustmaster 4160652 4168055 4160653 4169082 4160654 4160655 4160660 4160662 4160663 Kullanım kılavuzu
-
-
-