HP LASERJET 3015 ALL-IN-ONE PRINTER Hızlı başlangıç Kılavuzu
- Tip
- Hızlı başlangıç Kılavuzu

start
‛“ ‚“
početak
start
başlat
hp LaserJet 3015

Copyright Information
© 2003 Copyright Hewlett-Packard Development Company, L.P.
Reproduction, adaptation or translation without prior written permission
is prohibited, except as allowed under the copyright laws.
The information contained in this document is subject to change
without notice.
The only warranties for HP products and services are set forth in the
express warranty statements accompanying such products and
services. Nothing herein should be construed as constituting an
additional warranty. HP shall not be liable for technical or editorial
errors or omissions contained herein.
Part number: Q2669-90925
Edition 1, 10/2003
FCC Regulations
This equipment has been tested and found to comply with the limits for
a Class B digital device, pursuant to Part 15 of the FCC rules. These
limits are designed to provide reasonable protection against harmful
interference in a residential installation. This equipment generates,
uses, and can radiate radio frequency energy. If this equipment is not
installed and used in accordance with the instructions, it may cause
harmful interference to radio communications. However, there is no
guarantee that interference will not occur in a particular installation. If
this equipment does cause harmful interference to radio or television
reception, which can be determined by turning the equipment off and
on, the user is encouraged to try to correct the interference by one or
more of the following measures:
Reorient or relocate the receiving antenna.
Increase separation between equipment and receiver.
Connect equipment to an outlet on a circuit different from that to which
the receiver is located.
Consult your dealer or an experienced radio/TV technician.
Any changes or modifications to the printer that are not expressly
approved by HP could void the user's authority to operate this
equipment.
Use of a shielded interface cable is required to comply with the Class B
limits of Part 15 of FCC rules.
This equipment complies with FCC rules, Part 68. On the back of this
equipment is a label that contains, among other information, the FCC
registration number and ringer equivalence number (REN) for this
equipment. If requested, this information must be provided to the
telephone company. The REN is used to determine the quantity of
devices which may be connected to the telephone line. Excessive
RENs on the telephone line may result in the devices not ringing in
response to an incoming call. In most, but not all, areas, the sum of the
RENs should not exceed five (5.0). To be certain of the number of
devices that may be connected to the line, as determined by the total
RENs, contact the telephone company to determine the maximum REN
for the calling area.
This equipment uses the following USOC jacks: RJ11C.
An FCC-compliant telephone cord and modular plug is provided with
this equipment. This equipment is designed to be connected to the
telephone network or premises wiring using a compatible modular jack
which is Part 68 compliant. This equipment cannot be used on
telephone company-provided coin service. Connection to Party Line
Service is subject to state tariffs. If this equipment causes harm to the
telephone network, the telephone company will notify you in advance
that temporary discontinuance of service may be required. If advance
notice is not practical, the telephone company will notify the customer
as soon as possible. Also, you will be advised of your right to file a
complaint with the FCC if you believe it is necessary. The telephone
company may make changes in its facilities, equipment, operations, or
procedures that could affect the operation of the equipment. If this
happens, the telephone company will provide advance notice in order
for you to make the necessary modifications in order to maintain
uninterrupted service. If trouble is experienced with this equipment,
please see the numbers in the front of this manual for repair and (or)
warranty information. If the trouble is causing harm to the telephone
network, the telephone company may request you remove the
equipment from the network until the problem is resolved. The following
repairs can be done by the customer: Replace any original equipment
that came with the device. This includes the print cartridge, the
supports for trays and bins, the power cord, and the telephone cord. It
is recommended that the customer install an AC surge arrestor in the
AC outlet to which this device is connected. This is to avoid damage to
the equipment caused by local lightning strikes and other electrical
surges.
See the electronic User Guide for more regulatory information.
Trademark Credits
Microsoft®, Windows®, and Windows NT® are U.S. registered
trademarks of Microsoft Corporation. All other devices mentioned
herein may be trademarks of their respective companies.
Hewlett-Packard Development Company, L.P.
20555 S.H. 249
Houston, TX 77070
1

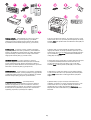
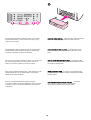
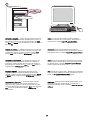
Device configuration. The HP LaserJet 3015 all-in-one comes
with a 150-sheet media input tray, a 10-sheet priority input tray, and
a 30-sheet automatic document feeder (ADF) input tray.
Konfiguracija uređaja. HP LaserJet 3015 all-in-one isporučuje se
s ulaznom ladicom za 150-listova medija, prioritetnom ulaznom
ladicom za 10-listova te ulaznom ladicom uređaja za automatsko
ulaganje dokumenata za 30-listova (ADF).
Configuraţia echipamentului. Imprimanta multifuncţională HP
LaserJet 3015 all-in-one este dotată cu o tavă de alimentare pentru
150 de coli, o tavă de alimentare cu prioritate pentru 10 coli şi un
alimentator automat de documente pentru 30 de coli (ADF).
Aygıt yapılandırması. HP LaserJet 3015 all-in-one; 150 yapraklık
bir ortam giriş tepsisi, 10 yapraklık öncelikli giriş tepsisi ve 30
yapraklık otomatik belge besleyici (ADF) giriş tepsisiyle birlikte gelir.
Конфигурация на устройството. HP LaserJet 3015 all-in-one е
придружен от входна тава за 150 листа, входна тава за
приоритетно подаване за 10 листа и автоматично подаващо
устройство за 30 листа.
The HP LaserJet 3015 all-in-one also includes parallel and
universal serial bus (USB) interface ports, fax interface ports, and
32 megabytes (MB) of random-access memory (RAM).
HP LaserJet 3015 all-in-one također uključuje priključke sučelja za
paralelne i univerzalne serijske sabirnice (USB), priključke sučelja
za faks te 32 megabajta (MB) memorije s izravnim pristupom (RAM).
Imprimanta multifuncţională HP LaserJet 3015 all-in-one este
dotată cu porturi de interfaţă USB şi paralel, porturi de interfaţă
pentru fax şi 32 MB RAM.
HP LaserJet 3015 all-in-one ayrıca paralel ve evrensel seri veri yolu
(USB) arabirim bağlantı noktaları, faks arabirim bağlantı noktaları
ve 32 megabayt (MB) rasgele erişimli bellek (RAM) içerir.
HP LaserJet 3015 all-in-one също така включва паралелни и
USB портове, портове за факс, както и 32 мегабайта (MB)
памет с произволен достъп (RAM).
2
English Hrvatski Română Türkçe БЪлгарски

Prepare the location. Place the device on a sturdy, level surface
in a well-ventilated area. Make sure that there is enough space
around the device so that the air vents are not blocked.
Priprema lokacije. Postavite uređaj na čvrstu, ravnu površinu na
dobro provjetrenom mjestu. Provjerite da oko uređaja ima dovoljno
mjesta tako da otvori za zrak nisu blokirani.
Pregătiţi locul de amplasare. Aşezaţi echipamentul pe o
suprafaţă solidă, plană, într-o zonă bine ventilată. Asiguraţi-vă că
există suficient spaţiu în jurul echipamentului, pentru a nu bloca
orificiile de ventilaţie.
Aygıtın yerini hazırlayın. Aygıtı, iyi havalandırılan bir alanda,
sağlam ve düz bir zemin üzerine yerleştirin. Aygıtın çevresinde
havalandırma deliklerinin kapanmamasını sağlayacak kadar boş
alan olduğundan emin olun.
Подгответе мястото. Поставете устройството върху
стабилна, хоризонтална повърхност на добре проветрявано
място. Погрижете се около устройството да има достатъчно
място, така че вентилационните отвори да не са запушени.
Regulate the environment. Do not place the device in direct
sunlight or in an area that has abrupt temperature and humidity
changes. The recommended ranges are 15 degrees to 32.5
degrees C (59 degrees to 90.5 degrees F) and 10 percent to 80
percent relative humidity.
Regulacija okoline. Uređaj nemojte stavljati na izravnu sunčevu
svjetlost ili u područje s naglim promjenama temperature i vlage.
Preporučeni rasponi su od 15 stupnjeva do 32,5 stupnjeva C (59
stupnjeva do 90,5 stupnjeva F) i 10 posto do 80 posto relativne
vlažnosti.
Verificaţi condiţiile de mediu. Nu expuneţi echipamentul la
acţiunea directă a razelor solare sau la variaţii bruşte ale
temperaturii sau umidităţii. Limitele recomandate sunt de 15 - 32,5
grade Celsius (59 - 90,5 grade Fahrenheit) şi o umiditate relativă de
10 - 80%.
Ortamı düzenleyin. Aygıtı, doğrudan güneş ışığına maruz
kalacağı veya ortam sıcaklığında ve neminde ani değişikliklerin
olacağı bir yere yerleştirmeyin. 15 C ile 32,5 C (59 F - 90,5 F)
arasında ısı ve yüzde 10 ile yüzde 80 arasında bağıl nem oranı
önerilir.
Регулиране на околната среда. Не поставяйте устройството
на пряка слънчева светлина или на място, на което има резки
промени на температурата и влажността. Препоръчваните
диапазони са от 15 градуса до 32,5 градуса C (от 59 до 90,5
градуса F) и от 10 до 80 процента относителна влажност.
3
БЪлгарски Türkçe Română Hrvatski English

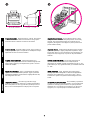
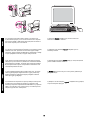
Package contents. 1)print cartridge; 2)power cord; 3)Start
Guide and support flyer; 4)media input tray; 5)CD-ROMs
containing the device software and the electronic User Guide;
6)automatic document feeder (ADF) input tray; 7)Fax Guide;
Sadržaj paketa. 1)spremnik s tintom; 2)kabel za napajanje;
3)upute za početak rada i letak s podrškom; 4)ulazna ladica za
medije; 5)CD-ROMovi koji sadrže softver za uređaj i elektronske
upute za korištenje; 6)ulazna ladica za uređaj za automatsko
ulaganje dokumenata (ADF); 7)priručnik za faks;
Conţinutul pachetului. 1)cartuş de tipărire; 2)cablu de
alimentare; 3)ghid cu noţiunile de bază şi broşura de asistenţă;
4)tavă de alimentare pentru hârtie 5)CD-ROM cu software-ul
pentru produs şi Ghidul utilizatorului în format electronic; 6)tavă de
alimentare cu documente (ADF) 7)ghid pentru fax;
Paketin içindekiler. 1)yazıcı kartuşu; 2)güç kablosu; 3)Başlangıç
Kılavuzu ve destek broşürü; 4)ortam giriş tepsisi; 5)aygıt yazılımını
ve elektronik Kullanım Kılavuzu'nu içeren CD-ROM'lar; 6)otomatik
doküman besleyici (ADF) giriş tepsisi; 7)Faks Kılavuzu;
Съдържание на опаковката. 1)печатаща касета;
2)захранващ кабел; 3)Ръководство за начало на работа и
листовка за поддръжка; 4)тава за поставяне на носители;
5)Компактдискове със софтуер за устройството и електронно
Ръководство за потребителя; 6)входна тава с автоматично
подаващо устройство; 7)Ръководство за факса;
8)fax cord; 9)ADF output support; 10)output bin support; 11)HP
LaserJet 3015 all-in-one; 12)control-panel faceplate (if not already
installed). Note: The parallel cable and USB device cable (A/B) are
not included.
8)kabel za faks; 9)vanjska podloška za uređaj za automatsko
ulaganje dokumenata; 10)vanjski podložak za spremnik; 11)HP
LaserJet 3015 all-in-one; 12)prednja ploča upravljačke ploče (ako
nije već instalirana). Napomena: Paralelni kabel i USB kabel za
uređaj (A/B) nisu uključeni.
8)cablu pentru fax; 9)suport ADF; 10)suport pentru tava de ieşire;
11)imprimanta multifuncţională HP LaserJet 3015 all-in-one;
12)placa panoului de control (în cazul în care nu este deja
instalată). Notă: Cablurile paralel şi USB (A/B) nu sunt incluse.
8)faks kablosu; 9)ADF çıkış desteği; 10)çıkış bölmesi desteği;
11)HP LaserJet 3015 all-in-one; 12)kontrol paneli levhası (takılı
değilse). Not: Paralel kablo ve USB aygıtı kablosu (A/B) dahil
değildir.
8)факсов кабел; 9)опора на изхода на автоматичното
подаващо устройство; 10)опора на изходната касета; 11)HP
LaserJet 3015 all-in-one; 12)лицева табелка на панела за
управление (ако не е вече инсталирана). Забележка:
Паралелният кабел и USB кабела за устройство (A/B) не са
включени.
4

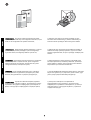
Documentation. The device includes the following documents:
1)Start Guide, for initial setup and configuration instructions; 2)Fax
Guide, for fax configuration and operation instructions;
Dokumentacija. Uređaj uključuje sljedeće dokumente: 1)upute za
početak rada, za početno postavljanje i upute za konfiguraciju;
2)priručnik za faks, za konfiguraciju faksa te upute za rad;
Documentaţie. Echipamentul este livrat împreună cu următoarele
documente: 1)Ghid cu noţiunile de bază, pentru configurarea
iniţială şi instrucţiuni de configurare; 2)Ghid pentru fax, pentru
configurarea faxului şi instrucţiuni de operare;
Dokümanlar. Aygıt aşağıdaki dokümanları içerir: 1)Başlangıç
Kılavuzu, ilk kurulum ve yapılandırma yönergeleri için; 2)Faks
Kılavuzu, faks yapılandırması ve çalıştırma yönergeleri için;
Документация. Устройството включва следните документи:
1)Ръководство за начало на работа, за първоначално пускане
в действие и инструкции за конфигурация; 2)Ръководство за
факса, за инструкции по конфигуриране и операции с факса;
3)electronic User Guide on the device CD-ROMs, for extra
information and troubleshooting; 4)Toolbox software Help, for
instructions about operating the device through the software.
3)elektronske upute za korisnike na CD-ROMovima uređaja, za
dodatne informacije i rješavanje problema; 4)pomoć za softver
Skupina programskih alata, za upute o upravljanju uređajem preko
softvera.
3)Ghidul utilizatorului în format electronic pe CD-ROM, pentru
informaţii suplimentare şi remedierea problemelor; 4)Asistenţă
pentru software-ul Toolbox, pentru instrucţiuni privind utilizarea
echipamentului prin intermediul calculatorului.
3)aygıt CD-ROM'larındaki elektronik Kullanım Kılavuzu, daha fazla
bilgi ve sorun giderme için; 4)Araç Kutusu yazılım Yardımı, aygıtı
yazılım yoluyla çalıştırma hakkındaki yönergeler için.
3)електронно Ръководство за потребителя на
компактдисковете към устройството, за допълнителна
информация и отстраняване на неизправности; 4)помощ за
софтуера Toolbox, за инструкции за работа с устройството
посредством софтуера.
5
БЪлгарски Türkçe Română Hrvatski English

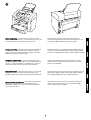
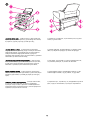
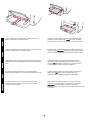
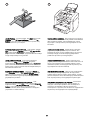
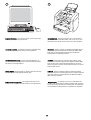
Locate the device parts. 1)ADF input tray; 2)ADF media lever;
3)control panel; 4)ADF output bin; 5)print-cartridge-door release;
6)output bin; 7)priority input tray; 8)media input tray;
Lociranje dijelova uređaja. 1)ulazna ladica za automatsko
ulaganje dokumenata; 2)srednja poluga za uređaj za automatsko
ulaganje dokumenata; 3)upravljačka ploča; 4)izlazna ladica za
uređaj za automatsko ulaganje dokumenata; 5)poluga za
otpuštanje vrata spremnika s tintom; 6)izlazna ladica; 7)prioritetna
ulazna ladica; 8)ulazna ladica za medije;
Localizarea componentelor echipamentului. 1)tavă de intrare
ADF; 2)selector ADF; 3)panou de control; 4)tavă de ieşire ADF;
5)uşiţă pentru cartuşul de tipărire; 6)tavă de ieşire; 7)tavă de
alimentare cu prioritate; 8)tavă de alimentare pentru hârtie;
Aygıtın parçalarını tanıma. 1)ADF giriş tepsisi; 2)ADF ortam
kolu; 3)kontrol paneli; 4)ADF çıkış bölmesi; 5)yazıcı kartuş kapısı
mandalı; 6)çıkış bölmesi; 7)öncelikli giriş tepsisi; 8)ortam giriş
tepsisi;
Намерете частите на устройството. 1)входна тава на АПУ;
2)лостче на носители на АПУ; 3)панел за управление;
4)изходно гнездо на АПУ; 5)вратичка за освобождаване на
печатащата касета; 6)изходна касета; 7)тава за приоритетно
подаване; 8)входна тава за носители;
9)parallel port; 10)USB port; 11)fax interface ports; 12)power
switch; 13)power socket.
9)paralelni priključak; 10)USB priključak; 11)priključci sučelja
faksa; 12)sklopka za napajanje; 13)utičnica za napajanje.
9)port paralel; 10)port USB; 11)porturi de interfaţă pentru fax;
12)comutator pornit/oprit; 13)conector de alimentare.
9)paralel bağlantı noktası; 10)USB bağlantı noktası; 11)faks
arabirim bağlantı noktaları; 12)güç anahtarı; 13)güç soketi.
9)паралелен порт; 10)USB порт; 11)интерфейсни портове за
факс; 12)бутон за включване; 13)гнездо на захранването.
6

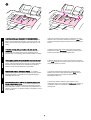
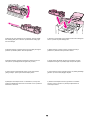
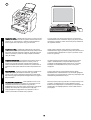
Install the control-panel faceplate (if not already installed).
1)Remove the adhesive backing from the faceplate. 2)Align the
bottom of the faceplate with the bottom of the control panel, and
make sure that the slot in the faceplate aligns with the key on the
device.
Instaliranje prednje ploče upravljačke ploče (ako nije već
instalirana). 1)Uklonite ljepljivu traku s naličja prednje ploče.
2)Poravnajte dno prednje ploče s dnom upravljačke ploče te
provjerite da je utor na prednjoj ploči poravnat s ključem na uređaju.
Instalaţi placa panoului de control (dacă nu este instalată deja).
1)Îndepărtaţi stratul de protecţie adeziv de pe placa panoului de
control. 2)Aliniaţi partea inferioară a plăcuţei cu partea inferioară a
panoului de control, asigurându-vă că lamela de pe plăcuţă se
aliniază cu fanta corespunzătoare de pe imprimantă.
Kontrol paneli levhasını takın (takılı değilse). 1)Levhadan
yapışkanlı yüzeyi çıkartın. 2)Levhanın alt kısmını kontrol panelinin
alt kısmıyla hizalayın ve levhadaki yuvanın aygıttaki düğmeyle
hizalandığından emin olun.
Инсталирайте лицевата табелка на панела за управление
(ако не е инсталирана вече). 1)Отстранете подложката на
лепнещата част на лицевата табелка. 2)Подравнете долния
край на лицевата табелка с този на панела за управление и се
уверете, че прорезът на лицевата табелка е подравнен с ключа
на устройството.
3)Press the faceplate from the bottom up toward the top of the
faceplate until it is completely attached to the device. Note: Make
sure that the faceplate is aligned correctly and is not pressing any
buttons.
3)Pritisnite prednju ploču odozdo prema gore dok nije sasvim
pričvršćena na uređaj. Napomena: Provjerite je li prednja ploča
ispravno poravnata te da ne pritišće nijedan gumb.
3)Apăsaţi plăcuţa de jos în sus până când aceasta se fixează în
locaş. Notă: Asiguraţi-vă că plăcuţa panoului de control este corect
aliniată şi nu apasă nici un buton.
3)Aygıta tam olarak takılana kadar levhayı aşağı kısmından
başlayıp yukarı kısmına doğru giderek bastırın. Not: Levhanın
doğru hizalandığından ve herhangi bir düğmenin basılı
kalmadığından emin olun.
3)Натиснете лицевата табелка отдолу нагоре, за да я
прикрепите изцяло към устройството. Забележка: Уверете се,
че лицевата табелка е подравнена правилно и не затиска
никои бутони.
7
БЪлгарски Türkçe Română Hrvatski English

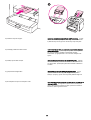
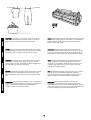
The control panel includes the following controls: 1)fax controls;
2)alphanumeric buttons; 3)menu and cancel controls; 4)copy
controls; 5)scan controls.
Upravljačka ploča uključuje sljedeće kontrole: 1)kontrole za faks;
2)alfanumeričke gumbe; 3)kontrole za izbornik i poništavanje;
4)kontrole za kopiranje; 5)kontrole za skeniranje.
Panoul de control include următoarele controale: 1)comenzi pentru
fax; 2)butoane alfanumerice; 3)comenzi pentru meniu şi de
anulare; 4)comenzi de copiere; 5)comenzi de scanare.
Kontrol paneli aşağıdaki kontrolleri içerir: 1)faks denetimleri; 2)alfa
sayısal düğmeler; 3)menü ve iptal denetimleri; 4)kopyalama
denetimleri; 5)tarama denetimleri.
Панелът за управление включва следните контроли:
1)контроли на факса; 2)буквено-цифрови бутони; 3)контроли
за менюто и отказ; 4)контроли на копирането; 5)контроли за
сканирането.
Install the media input tray. 1)Slide the tray in until it fits securely.
2)Remove any shipping tape inside and outside of the tray.
Instaliranje ulazne ladice za medije. 1)Gurajte ladice dok ne
škljocne na mjesto. 2)Uklonite svu zaštitnu traku unutar i izvan
ladice.
Instalaţi tava de alimentare pentru hârtie. 1)Glisaţi tava până
când aceasta se fixează în locaş. 2)Îndepărtaţi benzile protectoare
din interiorul şi exteriorul tăvii.
Ortam giriş tepsisini takın. 1)Yerine tam oturana kadar tepsiyi
içeri doğru kaydırın. 2)Tepsinin içindeki ve dışındaki tüm ambalaj
bantlarını çıkarın.
Инсталирайте входната тава за носители. 1)Плъзнете
тавата, докато се закрепи здраво. 2)Премахнете
транспортните лепенки отвън и вътре в тавата.
8

3)Open the top of the media input tray. 4)Slide out the media
guides. 5)Pull out the long-media support.
3)Otvorite poklopac ulazne ladice za medije. 4)Izvucite vodilice za
medije. 5)Izvucite potporu za dugačke medije.
3)Deschideţi partea superioară a tăvii de alimentare. 4)Depărtaţi
ghidajele pentru hârtie. 5)Extindeţi suportul pentru hârtie de format
mare.
3)Ortam giriş tepsisinin üstünü açın. 4)Ortam kılavuzlarını
kaydırarak yanlara doğru açın. 5)Uzun ortam desteğini dışarı çekin.
3)Отворете горната част на входната тава за носители.
4)Плъзнете навън водачите за носители. 5)Издърпайте
опората за дълги носители.
6)Place the media in the tray, and then adjust the media guides
until they are flush with the media. Note: Do not fan the media
before placing it in the tray. 7)Close the top of the media input tray.
6)Stavite medij u ladicu te zatim podesite vodilice za medij dok ih
medij ne prekrije. Napomena: Nemojte rastresati medij prije nego
ga stavite u ladicu. 7)Zatvorite poklopac ulazne ladice za medije.
6)Introduceţi hârtia sau suportul de tipărire dorit în tava de
alimentare şi ajustaţi ghidajele până când acestea ating topul
introdus. Notă: Nu răsfoiţi topul înainte de a-l introduce în tavă.
7)Închideţi partea superioară a tăvii de alimentare.
6)Ortamı tepsiye yerleştirin ve ortam kılavuzlarını ortamla aynı
hizaya getirin. Not: Ortamı tepsiye yerleştirmeden önce
havalandırmayın. 7)Ortam giriş tepsisinin üstünü kapatın.
6)Поставете носителите в тавата, а след това нагласете
водачите за носители, докато се подравнят по носителите.
Забележка: Не разлиствайте носителите, преди да ги
поставите в тавата. 7)Затворете горната част на входната тава
за носители.
9
БЪлгарски Türkçe Română Hrvatski English

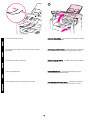
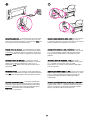
8)Install the output bin support.
8)Instalirajte podložak za izlaznu ladicu.
8)Instalaţi suportul tăvii de ieşire.
8)Çıkış bölmesi desteğini takın.
8)Инсталирайте опората на изходната тава.
Install the automatic document feeder (ADF) input tray. 1)Align
the two tabs on the input tray with the two grooves in the ADF lid.
2)Slide the tray into the grooves until the tray snaps into place.
Instaliranje ulazne ladice za dokument za automatsko ulaganje
dokumenata (ADF). 1)Poravnajte dva jezičca na ulaznoj ladici s
dva utora na poklopcu uređaja za automatsko ulaganje
dokumenata. 2)Ugurajte ladicu u utore sve dok ne škljocne na
mjesto.
Instalaţi alimentatorul automat de documente (ADF). 1)Aliniaţi
cele două lamele de pe tava de alimentare cu cele două fante de
pe capacul ADF. 2)Glisaţi tava până când aceasta se fixează cu
un declic.
Otomatik belge besleyici (ADF) giriş tepsisini takın. 1)Giriş
tepsisinin üzerindeki iki tırnağı ADF kapağındaki iki çentikle
hizalayın. 2)Tepsiyi, yerine oturuncaya dek çentiklere doğru itin.
Инсталирайте входната тава на автоматичното устройство за
подаване (АПУ). 1)Подравнете двете езичета на входната
тава с двата прореза в капака на АПУ. 2)Плъзнете тавата в
каналите, докато щракне на място.
10

3)Install the ADF output support.
3)Instalirajte izlaznu podlogu za uređaj za automatsko ulaganje
dokumenata.
3)Instalaţi suportul tăvii de ieşire ADF.
3)ADF çıkış desteğini takın.
3)Инсталирайте опората на изходната тава на АПУ.
Install the print cartridge. 1)Press the print-cartridge-door release
to open the print-cartridge door.
Instaliranje spremnika s tintom. 1)Pritisnite polugu za otpuštanje
vrata spremnika s tintom za otvaranje vrata spremnika s tintom.
Instalaţi cartuşul de tipărire. 1)Apăsaţi uşiţa cartuşului de tipărire
pentru a o deschide.
Yazıcı kartuşunu takın. 1)Yazıcı kartuş kapağını açmak için
yazıcı kartuş kapağı mandalına bastırın.
Инсталирайте печатащата касета. 1)Натиснете вратичката
за освобождаване на печатащата касета, за да се отвори.
11
БЪлгарски Türkçe Română Hrvatski English

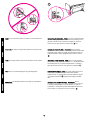
2)Remove the print cartridge from its packaging, and then shake
the cartridge gently five or six times. 3)Remove the sealing tape
from the cartridge.
2)Uklonite spremnik s tintom iz kutije te ga pet ili šest puta lagano
protresite. 3)Uklonite pečatnu traku sa spremnika.
2)Extrageţi cartuşul de tipărire din ambalaj şi scuturaţi-l uşor de
cinci-şase ori. 3)Dezlipiţi banda de sigilare de pe cartuş.
2)Yazıcı kartuşunu ambalajından çıkarın ve beş veya altı kere
yavaşça sallayın. 3)Koruyucu bandı kartuştan çıkarın.
2)Извадете печатащата касета от опаковката й, а след това
разклатете внимателно касетата пет или шест пъти. 3)Свалете
лепенката от касетата.
4)Hold the print cartridge by the handle and insert the cartridge as
shown. 5)Close the print-cartridge door.
4)Držite spremnik s tintom za ručicu i umetnite ga kako je
prikazano. 5)Zatvorite vrata spremnika s tintom.
4)Ţineţi cartuşul de tipărire de mâner şi introduceţi-l conform
indicaţiilor din imagine. 5)Închideţi uşiţa cartuşului de tipărire.
4)Yazıcı kartuşunu tutma yerinden kavrayın ve şekilde gösterildiği
gibi takın. 5)Yazıcı kartuş kapağını kapatın.
4)Хванете печатащата касета за дръжката и поставете
касетата, както е показано. 5)Затворете вратичката на
печатащата касета.
12

CAUTION: If toner gets on your clothing, wipe the toner off with a
clean cloth, wash the items in cold water, and air dry. Using hot
water or heat from a dryer will set the toner in the fabric.
OPREZ: Ako toner dospije na vašu odjeću, obrišite ga sa čistom
krpom, operite odjeću u hladnoj vodi te osušite na zraku. Korištenje
tople vode ili vrućine iz sušilice rublja upit će toner u tkaninu.
ATENŢIE: Dacă hainele dvs. intră în contact cu tonerul, ştergeţi
locul murdar cu o cârpă curată, spălaţi-l cu apă rece şi lăsaţi
articolul respectiv la uscat. Apa fierbinte şi căldura degajată de un
eventual uscător vor fixa tonerul în ţesătură.
DİKKAT: Giysilerinize toner bulaşırsa temiz bir bezle silin, giysinizi
soğuk suyla yıkayın ve havalandırarak kurutun. Sıcak su veya
kurutma makinesinin ısısı tonerin kumaşa nüfuz etmesine neden
olur.
ВНИМАНИЕ: Ако по дрехите ви попадне тонер, го избършете с
чиста кърпа, изперете дрехата в студена вода и я изсушете на
въздух. Ако използвате гореща вода или нагряване от
сушилня, тонерът ще проникне в тъканта.
Note: Hewlett-Packard Company cannot recommend using non-HP
print cartridges, whether they are new, refilled, or remanufactured.
Because they are not HP products, HP cannot influence their
design or control their quality.
Napomena: Hewlett-Packard Company ne može preporučiti
korištenje spremnika s tintom koji nisu HP, bilo da su novi, punjeni
ili ponovno proizvedeni. Budući da nisu HP-ovi proizvodi, HP ne
može utjecati na njihovo oblikovanje niti nadzirati njihovu kvalitetu.
Notă: Compania Hewlett-Packard nu recomandă utilizarea altor
cartuşe de tipărire în afara celor fabricate de HP, fie ele noi,
reumplute sau recondiţionate. Deoarece aceste cartuşe nu sunt
produse de HP, compania HP nu poate controla procesul de
producţie şi nici calitatea acestora.
Not: Hewlett-Packard Company, HP'ye ait olmayan yeni, yeniden
doldurulmuş veya yeniden üretilmiş kartuşların kullanımını
önermez. Bunlar HP ürünleri olmadıklarından, HP bu ürünlerin
tasarımını etkileyemez ve kalite düzeylerini denetleyemez.
Забележка: Hewlett-Packard Company не препоръчва
използването на печатащи касети, непроизведени от HP -
независимо дали са нови, пълнени или възстановени. Тъй като
това не са продукти на HP, HP не е в състояние да влияе върху
тяхната конструкция и да контролира качеството им.
13
БЪлгарски Türkçe Română Hrvatski English

Connect the power cord. 1)Connect the power cord to the power
socket on the back of the device. 2)Connect the other end of the
power cord to a grounded alternating current (AC) outlet. Note: Use
only the power cord that came with the device.
Spajanje kabela za napajanje. 1)Priključite kabel za napajanje
na utičnicu na stražnjoj strani uređaja. 2)Spojite drugi kraj kabela
za napajanje s uzemljenom utičnicom s izmjeničnom strujom (AC).
Napomena: Koristite samo kabel za napajanje koji se isporučuje s
uređajem.
Conectarea cablului de alimentare. 1)Introduceţi cablul de
alimentare în conectorul din spatele echipamentului. 2)Conectaţi
celălalt capăt al cablului de alimentare la o priză de c.a. cu
împământare. Notă: Utilizaţi numai cablul de alimentare livrat cu
echipamentul.
Güç kablosunu takın. 1)Güç kablosunu aygıtın arkasındaki güç
yuvasına takın. 2)Güç kablosunun diğer ucunu elektrik prizine (AC)
takın. Not: Yalnızca aygıtla birlikte verilen güç kablosunu kullanın.
Свържете захранващия кабел. 1)Свържете захранващия
кабел към гнездото за захранване на гърба на устройството.
2)Свържете другия край на захранващия кабел към заземен
контакт на променливотоковата електроснабдителна мрежа.
Забележка: Използвайте само захранващия кабел,
предоставен с устройството.
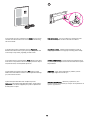
Connect a printer cable to the device. Note: If you are using the
device as a standalone fax machine or copier, go to step 13.
1)Locate the cable ports on the back of the device. 2)Connect the
parallel or USB device cable (A/B) to the correct port.
Spajanje kabela pisača na uređaj. Napomena: Ako uređaj
koristite kao samostalni faks uređaj ili kopirni uređaj, idite na korak
13. 1)Locirajte priključke za kabel na stražnjoj strani uređaja.
2)Spojite paralelni ili USB kabel za uređaj (A/B) na ispravni
priključak.
Conectarea cablului de imprimantă. Notă: Dacă utilizaţi
echipamentul ca fax sau copiator de sine stătător, treceţi la pasul
13. 1)Localizaţi conectorii pentru cabluri, în spatele
echipamentului. 2)Conectaţi un cablu paralel sau USB (A/B) la
portul corespunzător.
Aygıta bir yazıcı kablosu bağlayın. Not: Aygıtı tek başına bir faks
makinesi veya fotokopi makinesi olarak kullanıyorsanız, 13. adıma
geçin. 1)Aygıtın arkasındaki kablo bağlantı yuvalarını bulun.
2)Paralel veya USB aygıt kablosunu (A/B) doğru bağlantı
noktasına takın.
Свържете принтерен кабел към устройството. Забележка:
Ако използвате уреда като самостоятелен факс или копир,
преминете към стъпка 13. 1)Намерете кабелните портове на
гърба на устройството. 2)Свържете паралелния или USB
кабел за устройство (A/B) към съответния порт.
14

Note: Do not connect the cable to a computer or the network at this
time.
Napomena: Za sada još nemojte kabel spajati na računalo ili mrežu.
Notă: Nu conectaţi cablul la reţea sau la calculator în acest moment.
Not: Kabloyu bu aşamada bilgisayara veya ağa bağlamayın.
Забележка: Не свързвайте кабела към компютър или мрежата
на този етап.
Connect to a telephone line. Note: If you are not using the device
fax functionality, go to step 14. 1)Locate the fax interface ports on
the back of the device. 2)Connect the included fax cord to the
device "line" port (the port that is marked with a
icon).
Spajanje na telefonsku liniju. Napomena: Ako ne koristite
funkciju faksa, idite na korak 14. 1)Locirajte priključke sučelja faksa
na stražnjoj strani uređaja. 2)Spojite isporučeni kabel za faks na
priključak uređaja s "linijom" (priključak koji je označen s ikonom
).
Conectarea la linia telefonică. Notă: Dacă nu doriţi să utilizaţi
echipamentul ca fax, deplasaţi-vă la pasul 14. 1)Localizaţi porturile
de interfaţă pentru fax, în spatele echipamentului. 2)Conectaţi
cablul de fax inclus la portul "Linie" (marcat cu pictograma
).
Telefon hattına bağlayın. Not: Faks işlevini kullanmıyorsanız 14.
adıma gidin. 1)Aygıtın arkasındaki faks arabirim bağlantı
noktalarını bulun. 2)Aygıtla birlikte verilen faks kablosunu aygıtın
"hat" bağlantı noktasına (
simgesi bulunan bağlantı noktası)
takın.
Свържете към телефонна линия. Забележка: Ако не
използвате устройството като факс, преминете към стъпка 14.
1)Намерете интерфейсните портове за факс на гърба на
устройството. 2)Свържете предоставения факсов кабел към
порта "линия" на устройството (порта, означен с
).
15
БЪлгарски Türkçe Română Hrvatski English

3)Connect the fax cord to a telephone jack. Note: Use only the fax
cord that came with the device. For more information about faxing,
see the Fax Guide.
3)Spojite kabel za faks na telefonsku utičnicu. Napomena:
Koristite samo kabel za faks koji se isporučuje s uređajem. Za više
o informacija o slanju faksa, pogledajte priručnik za faks.
3)Conectaţi cablul la o priză de telefon. Notă: Utilizaţi numai cablul
de fax livrat cu echipamentul. Pentru informaţii suplimentare despre
funcţionarea faxului, consultaţi Ghidul pentru fax.
3)Faks kablosunu bir telefon fişine takın. Not: Yalnızca aygıtla
birlikte verilen faks kablosunu kullanın. Faks ile ilgili daha fazla bilgi
için, Faks Kılavuzu'na bakın.
3)Включете факсовия кабел към телефонна розетка.
Забележка: Използвайте само факсовия кабел, предоставен с
устройството. За повече информация за работа с факсове вж.
Ръководството за факс.
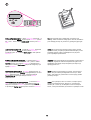
Turn on the device. Turn on the device by pressing the power
button next to the power socket on the back of the device.
Uključivanje uređaja. Uključite uređaj pritiskanjem gumba za
napajanje pored utičnice za napajanje na stražnjoj strani uređaja.
Pornirea echipamentului. Porniţi echipamentul apăsând butonul
de pornire/oprire de lângă conectorul de alimentare aflat în spatele
echipamentului.
Aygıtı açın. Aygıtı, arkası tarafındaki güç soketinin yanında
bulunan güç düğmesine basarak açın.
Включете устройството. Включете устройството, като
натиснете бутона за включване до гнездото на захранването на
гърба на устройството.
16

Tip: If the device has no power and no lights are lit on the control
panel, make sure that the power cord is attached securely to both
the device and a power outlet. Also, if the power cord is connected
to a power strip, make sure that the power strip is switched on, or
connect the device directly to a wall outlet to test the power strip.
Savjet: Ako uređaj nema napajanja i na upravljačkoj ploči ne gori
nijedna lampica, provjerite je li kabel za napajanje sigurno
pričvršćen na uređaj i utičnicu za napajanje. Također, ako je kabel
za napajanje spojen na produžni kabel, provjerite je li produžni
kabel uključen ili spojite uređaj izravno na zidnu utičnicu da
provjerite produžni kabel.
Sugestie: În cazul în care echipamentul nu este alimentat şi nu
este aprins nici un indicator luminos de pe panoul de control,
verificaţi cuplarea corectă a cablului de alimentare la echipament şi
la priză. De asemenea, dacă aţi conectat cablul de alimentare la un
prelungitor, asiguraţi-vă că acesta este pornit sau alimentaţi
echipamentul direct de la priză pentru a verifica prelungitorul.
İpucu: Aygıta güç gelmiyorsa ve kontrol panelinde hiçbir ışık
yanmıyorsa, güç kablosunun hem aygıta hem de prize düzgün
şekilde takıldığından emin olun. Ayrıca, güç kablosu bir ara kabloya
takılıysa, ara kablo düğmesinin açık konumda olduğundan emin
olun veya ara kablonun arızalı olup olmadığını anlamak için aygıtı
doğrudan elektrik prizine takın.
Съвет: Ако устройството не получава захранване и на панела
за управление не светят никакви лампички, проверете дали
захранващият кабел е включен здраво както към устройството,
така и към контакта на захранването. Освен това, ако
захранващият кабел е свързан към разклонител, се уверете, че
той е включен или свържете устройството направо към
контакта на мрежата, за да видите дали проблемът не е в
разклонителя.
Set the control panel display language and location (if
necessary). If prompted by the control panel display, select your
language and location information. Follow the instructions on the
control panel. Note: The device automatically turns off and then
turns on after you select the location.
Podešavanje jezika prikaza i lokacije na upravljačkoj ploči (ako je
potrebno). Ako prikaz na upravljačkoj ploči traži, odaberite svoj
jezik i informacije o lokaciji. Pratite upute na upravljačkoj ploči.
Napomena: Uređaj se automatski isključuje te potom uključuje
nakon što odaberete lokaciju.
Setaţi locaţia şi limba de afişare pentru panoul de control (dacă
este necesar). În cazul în care vi se solicită de la panoul de
control, selectaţi limba şi informaţiile referitoare la locaţie. Urmaţi
instrucţiunile afişate pe panoul de control. Notă: După selectarea
locaţiei, echipamentul se va opri şi apoi va porni automat.
Kontrol panelinin dilini ve konumunu ayarlayın (gerekiyorsa).
Kontrol paneli ekranında sizden istenirse, dil ve konumunuza ait
bilgileri seçin. Kontrol panelindeki yönergeleri izleyin. Not: Konumu
seçtikten sonra aygıt otomatik olarak kapanır ve sonra açılır.
Задайте езика на дисплея и местоположението на панела за
управление (ако е необходимо). Ако получите въпрос на
дисплея на панела за управление, изберете информацията за
своя език и местоположение. Следвайте указанията на панела
за управление. Забележка: След като изберете
местоположението си, устройството автоматично се изключва
и се включва отново.
17
БЪлгарски Türkçe Română Hrvatski English

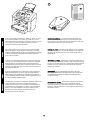
Print a configuration report. 1)Press
MENU
/
ENTER
. 2)Press the < or
the > button to select Reports, and then press
MENU
/
ENTER
. 3)Press
the < or the > button to select Config report, and then press
MENU
/
ENTER
.
Ispis izvješća o konfiguraciji. 1)Pritisnite
MENU
/
ENTER
. 2)Pritisnite
gumb < ili > za odabir Reports te zatim pritisnite
MENU
/
ENTER
.
3)Pritisnite gumb < ili > za odabir Config report te zatim pritisnite
MENU
/
ENTER
.
Tipărirea unui raport de configurare. 1)Apăsaţi butonul
MENU
/
ENTER
. 2)Apăsaţi unul dintre butoanele < sau > pentru a selecta
Reports(Rapoarte), apoi apăsaţi
MENU
/
ENTER
. 3)Apăsaţi butonul <
sau > pentru a selecta Config report (Raport de configurare), apoi
apăsaţi
MENU
/
ENTER
.
Yapılandırma raporu yazdırın. 1)
MENÜ
/
GIR
düğmesine basın. 2)<
veya > düğmesine basarak Raporlar seçeneğini belirleyin ve sonra
MENÜ
/
GIR
düğmesine basın. 3)< veya > düğmesine basarak
Yapılandırma rap seçeneğini belirleyin ve sonra
MENÜ
/
GIR
düğmesine basın.
Отпечатайте отчет за конфигурацията. 1)Натиснете
MENU
/
ENTER
. 2)Натиснете бутона < или >, за да изберете Reports,
след което натиснете
MENU
/
ENTER
. 3)Натиснете бутона < или >,
за да изберете Config report, след което натиснете
MENU
/
ENTER
.
Tip: If the page that prints is totally blank, remove the print
cartridge, make sure that the sealing tape is removed, reinstall the
print cartridge (see step 10), and then try printing the page again.
Savjet: Ako je stranica koja se ispiše potpuno prazna, uklonite
spremnik s tintom, provjerite je li pečatna traka uklonjena, ponovo
instalirajte spremnik s tintom (pogledajte korak 10)te potom
ponovo pokušajte ispisati stranicu.
Sugestie: Dacă pagina tipărită este complet albă, scoateţi cartuşul
de tipărire, asiguraţi-vă că banda transparentă de sigilare a fost
îndepărtată, reintroduceţi cartuşul de tipărire (vezi etapa 10)şi
tipăriţi pagina din nou.
İpucu: Yazdırılan sayfa tamamen boş çıkarsa, yazıcı kartuşunu
çıkarın, koruyucu bandın çıkarıldığından emin olun (10. adıma
bakın), yazıcı kartuşunu yeniden takın ve sonra sayfayı yeniden
yazdırmayı deneyin.
Съвет: Ако страницата, която се отпечата, е изцяло празна,
извадете печатащата касета, уверете се, че лепенката е
свалена (вж. стъпка 10), инсталирайте отново печатащата
касета, а след това опитайте да отпечатате страницата отново.
18

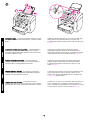
Self-test the copier. 1)Load the configuration report that you just
printed print-side down into the ADF input tray. 2)Adjust the media
guides.
Automatsko testiranje kopirnog uređaja. 1)Umetnite izvješće o
konfiguraciji koje ste upravo ispisali u ulaznu ladicu uređaja za
automatsko ulaganje dokumenata prednjom stranom prema dolje.
2)Podesite vodilice za medije.
Testarea automată a copiatorului. 1)Încărcaţi raportul de
configurare tipărit anterior cu faţa în jos în tava de alimentare cu
documente ADF. 2)Ajustaţi ghidajele pentru hârtie.
Fotokopi makinesini test edin. 1)Yazdırdığınız yapılandırma
raporunu, yazılı kısmı aşağı bakacak şekilde ADF giriş tepsisine
yerleştirin. 2)Ortam kılavuzlarını ayarlayın.
Пуснете авто-тест на копира. 1)Поставете отчета за
конфигурация, който току що сте отпечатали, с лицето надолу
във входната тава на АПУ. 2)Нагласете водачите за носители.
3)Make sure that the ADF media lever is set to the multiple-page
setting (which is the appropriate setting for most print jobs).
4)Verify that the original is loaded print-side down, and then press
START
/
COPY
.
3)Provjerite je li poluga uređaja za automatsko ulaganje
dokumenata postavljena na postavku za više stranica (što je
odgovarajuća postavka za većinu ispisa). 4)Provjerite je li original
umetnut prednjom stranom prema dolje te pritisnite
START
/
COPY
.
3)Asiguraţi-vă că selectorul ADF este setat la poziţia "pagini
multiple" (poziţie recomandată pentru majoritatea situaţiilor).
4)Verificaţi dacă originalul a fost introdus cu faţa în jos, apoi
apăsaţi
START
/
COPY
.
3)ADF ortam kolunun birden çok sayfa için ayarlandığından emin
olun (yazdırma işlerinin çoğu için uygun ayar budur). 4)Asıl
belgenin yazılı yüzünün aşağı baktığından emin olduktan sonra
BAŞLAT
/
KOPYALA
düğmesine basın.
3)Уверете се, че лостчето за носители на АПУ е настроено за
много страници (което е правилно за повечето задания за
печат). 4)Проверете дали оригиналът е поставен със страната
за печат надолу, след което натиснете бутона
START
/
COPY
.
19
БЪлгарски Türkçe Română Hrvatski English
Sayfa yükleniyor ...
Sayfa yükleniyor ...
Sayfa yükleniyor ...
Sayfa yükleniyor ...
Sayfa yükleniyor ...
Sayfa yükleniyor ...
Sayfa yükleniyor ...
Sayfa yükleniyor ...
-
 1
1
-
 2
2
-
 3
3
-
 4
4
-
 5
5
-
 6
6
-
 7
7
-
 8
8
-
 9
9
-
 10
10
-
 11
11
-
 12
12
-
 13
13
-
 14
14
-
 15
15
-
 16
16
-
 17
17
-
 18
18
-
 19
19
-
 20
20
-
 21
21
-
 22
22
-
 23
23
-
 24
24
-
 25
25
-
 26
26
-
 27
27
-
 28
28


HP LASERJET 3015 ALL-IN-ONE PRINTER Hızlı başlangıç Kılavuzu
- Tip
- Hızlı başlangıç Kılavuzu
Diğer dillerde
İlgili Makaleler
-
HP LASERJET 3380 ALL-IN-ONE PRINTER Hızlı başlangıç Kılavuzu
-
-
-
HP LASERJET 3055 ALL-IN-ONE PRINTER Hızlı başlangıç Kılavuzu
-
-
-
-
-
-