
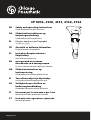
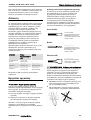
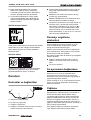
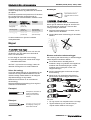
CP 0016, 4130, 4131, 4132, 4134
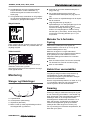
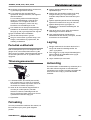
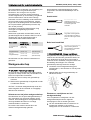
EN Safety and operating instructions
Handheld pneumatic pick hammers
DA Sikkerhedsinstruktioner og
betjeningsvejledning
Håndholdte trykluftmejselhamre
EL Οδηγίες Ασφάλειας και Χειρισμού
Αερόσφυρες χειρός
TR Güvenlik ve kullanım talimatları
El tipi pnömatik martopikörler
PL Instrukcja Bezpieczeństwa i
Eksploatacji
Lekki młot pneumatyczny
RU инструкций по технике
безопасности и эксплуатации
Ручные пневматические отбойные молотки
NO Sikkerhetsinstrukser og
bruksanvisning
Håndholdte pneumatiske pakkhammere
FI Turvallisuusohjeet ja käyttöohje
Käsikäyttöiset paineilmapiikkausvasarat
NL Veiligheidsvoorschriften en
bedieningshandleiding
Handbediende pneumatische bikhamers
IT Istruzioni per la sicurezza e per l'uso
Martelli picconatori pneumatici manuali
PT Instruções de segurança e operação
Martelos picadores
www.cp.com

ES Instrucciones de seguridad y de
funcionamiento
Martillos picadores neumáticos manuales
FR Prescriptions de sécurité et
instructions pour l'opérateur
Marteaux-piqueurs pneumatiques portatifs
DE Sicherheits- und Betriebsanleitung
Hand-Druckluftaufbrechhämmer
SV Säkerhetsinstruktion och
bruksanvisning
Handhållna tryckluftsdrivna bilningshammare
www.cp.com

Contents
ENGLISH ........................................................................................ 5
DANSK ......................................................................................... 23
ελληνικά ........................................................................................ 41
TÜRKÇE ....................................................................................... 61
JĘZYK ........................................................................................... 79
РУССИЙ ....................................................................................... 99
NORSK ....................................................................................... 119
SUOMI ....................................................................................... 137
NEDERLANDS ............................................................................. 155
ITALIANO ................................................................................... 175
PORTUGUÊS ............................................................................... 195
ESPAÑOL .................................................................................... 215
FRANÇAIS .................................................................................. 235
DEUTSCH ................................................................................... 255
SVENSKA ................................................................................... 275
www.cp.com


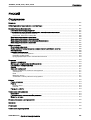
ENGLISH
Contents
Introduction ...................................................................................................................................................... 7
About the Safety and operating instructions .................................................................................................... 7
Safety instructions ............................................................................................................................................ 7
Safety signal words ..................................................................................................................................... 7
Personal precautions and qualifications ..................................................................................................... 7
Personal protective equipment .............................................................................................................. 7
Drugs, alcohol or medication ................................................................................................................. 7
Installation, precautions .............................................................................................................................. 8
Operation, precautions ............................................................................................................................... 8
Maintenance, precautions ......................................................................................................................... 11
Storage, precautions ................................................................................................................................. 12
Overview ........................................................................................................................................................ 13
Design and function .................................................................................................................................. 13
Choosing the correct pneumatic hammer for a task ................................................................................. 13
Main parts ................................................................................................................................................. 13
Labels ....................................................................................................................................................... 14
Data plate ............................................................................................................................................ 14
Noise level label ................................................................................................................................... 15
Safety label .......................................................................................................................................... 15
Installation ...................................................................................................................................................... 15
Hoses and connections ............................................................................................................................ 15
Methods to prevent freezing ..................................................................................................................... 15
Connecting a water separator ................................................................................................................... 15
Lubrication ................................................................................................................................................ 15
Working tool .............................................................................................................................................. 16
Selecting the right working tool ............................................................................................................ 16
Narrow chisel ....................................................................................................................................... 16
Moil point ............................................................................................................................................. 16
Wide bladed chisel ............................................................................................................................... 16
Fitting and removing the working tool .................................................................................................. 16
Operation ....................................................................................................................................................... 17
Start and stop ........................................................................................................................................... 17
Operating .................................................................................................................................................. 18
Starting a cut ........................................................................................................................................ 18
Breaking ............................................................................................................................................... 18
When taking a break ................................................................................................................................. 18
Maintenance .................................................................................................................................................. 18
Every day .................................................................................................................................................. 18
Periodic maintenance ............................................................................................................................... 19
Tightening torques .................................................................................................................................... 19
Troubleshooting ............................................................................................................................................. 19
Storage .......................................................................................................................................................... 19
Disposal ......................................................................................................................................................... 19
Technical data ................................................................................................................................................ 20
CP 0016, 4130, 4131, 4132, 4134
Contents
9800 0616 71 | Original instructions
5

Machine data ............................................................................................................................................ 20
Noise and vibration declaration statement ................................................................................................ 20
Noise and vibration data ........................................................................................................................... 21
EC Declaration of Conformity ........................................................................................................................ 22
EC Declaration of Conformity (EC Directive 2006/42/EC) ........................................................................ 22
Contents
CP 0016, 4130, 4131, 4132, 4134
6
9800 0616 71 | Original instructions

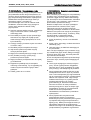
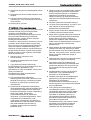
Introduction
Thank you for choosing Chicago Pneumatic brand
products. For over a century, the Chicago
Pneumatic brand has represented performance
and innovation in the pneumatic tool industry.
Today the brand is found around the world on a
range of pneumatic and hydraulic tools that
includes breakers, rock drills, chipping hammers,
clay-diggers, picks and busters, scabblers, pumps
and a whole lot more.
The Chicago Pneumatic brand is associated with
powerful and reliable products that are easy to
maintain and that give good value for the money.
For more information please visit www.cp.com
Atlas Copco (India) Ltd
90, M.I.D.C Industrial area
Satpur, Nashik, Maharashtra
422 007 India
About the Safety and
operating instructions
The aim of the instructions is to provide you with
knowledge of how to use the pneumatic pick
hammer in an efficient, safe way. The instructions
also give you advice and tell you how to perform
regular maintenance on the pneumatic pick
hammer.
Before using the pneumatic pick hammer for the
first time you must read these instructions carefully
and understand all of them.
Safety instructions
To reduce the risk of serious injury or death to
yourself or others, read and understand the Safety
and operating instruction before installing,
operating, repairing, maintaining, or changing
accessories on the machine.
Post this Safety and operating instruction at work
locations, provide copies to employees, and make
sure that everyone reads the Safety and operating
instruction before operating or servicing the
machine. For professional use only.
In addition, the operator or the operator's employer
must assess the specific risks that may be present
as a result of each use of the machine.
Save all warnings and instructions for future
reference.
Safety signal words
The safety signal words Danger, Warning and
Caution have the following meanings:
DANGER Indicates a hazardous
situation which, if not avoided,
will result in death or serious
injury.
WARNING Indicates a hazardous
situation which, if not avoided,
could result in death or
serious injury.
CAUTION Indicates a hazardous
situation which, if not avoided,
could result in minor or
moderate injury.
Personal precautions and
qualifications
Only qualified and trained persons may operate or
maintain the machine. They must be physically
able to handle the bulk, weight, and power of the
tool. Always use your common sense and good
judgement.
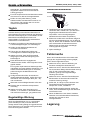
Personal protective equipment
Always use approved protective equipment.
Operators and all other persons in the working
area must wear protective equipment, including at
a minimum:
•
Protective helmet
•
Hearing protection
•
Impact resistant eye protection with side
protection
•
Respiratory protection when appropriate
•
Protective gloves
•
Proper protective boots
•
Appropriate work overall or similar clothing (not
loose-fitting) that covers your arms and legs.
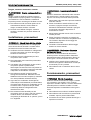
Drugs, alcohol or medication
WARNING Drugs, alcohol or medication
Drugs, alcohol or medication may impair your
judgment and powers of concentration. Poor
reactions and incorrect assessments can lead to
severe accidents or death.
►
Never use the machine when you are tired or
under the influence of drugs, alcohol or
medication.
CP 0016, 4130, 4131, 4132, 4134
Safety and operating instructions
9800 0616 71 | Original instructions
7

►
No person who is under the influence of drugs,
alcohol or medication may operate the
machine.
Installation, precautions
DANGER Whipping air hose
A compressed air hose that comes loose can lash
around and cause personal injury or death. To
reduce this risk:
►
Check that the compressed air hose and the
connections are not damaged, replace if
necessary.
►
Check that all compressed air connections are
properly attached.
►
Never carry a pneumatic machine by the air
hose.
►
Never attempt to disconnect a compressed air
hose that is pressurized. First switch off the
compressed air at the compressor and then
bleed the machine by activating the start and
stop device.
►
Do not use quick disconnect couplings at tool
inlet. Use hardened steel (or material with
comparable shock resistance) threaded hose
fittings.
►
Whenever universal twist couplings (claw
couplings) are used, we recommend that lock
pins are installed and whipcheck safety cables
are used to safeguard against possible hose to
tool and hose to hose connection failure.
►
Never point a compressed air hose at yourself
or anyone else. To avoid the risk of getting
injured, never use compressed air to blow for
example dust, dirt etc. from your clothes.
WARNING Ejected working tool
If the tool retainer on the machine is not in a locked
position, the inserted tool can be ejected with
force, which can cause personal injury.
►
Never start the machine while changing the
working tool.
►
Before changing the working tool or
accessories, stop the machine, switch off the
power supply and bleed the machine by
activating the start and stop device.
►
Never point the inserted tool at yourself or
anyone else.
►
Make sure that the working tool is fully inserted
and the tool retainer is in a locked position
before the machine is started.
►
Check the locking function by pulling the
inserted tool outwards forcefully.
WARNING Moving or slipping working tool
An incorrect dimension of the inserted tool’s shank
can result in that the inserted tool is lost or is
slipping out during operation. Risk of severe injury
or crushed hands and fingers.
►
Check that the working tool has the shank
length and dimensions that the machine is
intended for.
►
Never use an working tool without a collar.
Operation, precautions
DANGER Explosion hazard
If an working tool comes into contact with
explosives or explosive gases, an explosion could
occur. When working on certain materials and
when using certain materials in machine parts,
sparks and ignition can occur. Explosions will lead
to severe injuries or death.
►
Never operate the machine in any explosive
environment.
►
Never use the machine near flammable
materials, fumes or dust.
►
Make sure that there are no undetected
sources of gas or explosives.
WARNING Unexpected movements
The working tool is exposed to heavy strains when
the machine is used. The working tool may break
due to fatigue after a certain amount of use. If the
working tool breaks or gets stuck, there may be
sudden and unexpected movement that can cause
injuries. Furthermore, losing your balance or
slipping may cause injury.
►
Make sure that you always keep a stable
position with your feet as far apart as your
shoulder width, and keeping a balanced body
weight.
►
Always inspect the equipment prior to use.
Never use the equipment if you suspect that it
is damaged.
►
Make sure that the handles are clean and free
of grease and oil.
►
Keep your feet away from the working tool.
►
Stand firmly and always hold on to the machine
with both hands.
►
Never start the machine when it is lying on the
ground.
Safety and operating instructions
CP 0016, 4130, 4131, 4132, 4134
8
9800 0616 71 | Original instructions

►
Never ‘ride’ on the machine with one leg over
the handle.
►
Never strike or abuse the equipment.
►
Check regularly for wear on the working tool,
and check whether there are any signs of
damage or visible cracks.
►
Pay attention and look at what you are doing.
WARNING Dust and fume hazard
Dusts and/or fumes generated or dispersed when
using the machine may cause serious and
permanent respiratory disease, illness, or other
bodily injury (for example, silicosis or other
irreversible lung disease that can be fatal, cancer,
birth defects, and/or skin inflammation).
Some dusts and fumes created by drilling,
breaking, hammering, sawing, grinding and other
construction activities contain substances known to
the State of California and other authorities to
cause respiratory disease, cancer, birth defects, or
other reproductive harm. Some examples of such
substances are:
•
Crystalline silica, cement, and other masonry
products.
•
Arsenic and chromium from chemically-treated
rubber.
•
Lead from lead-based paints.
Dust and fumes in the air can be invisible to the
naked eye, so do not rely on eye sight to
determine if there is dust or fumes in the air.
To reduce the risk of exposure to dust and fumes,
do all of the following:
►
Perform site-specific risk assessment. The risk
assessment should include dust and fumes
created by the use of the machine and the
potential for disturbing existing dust.
►
Use proper engineering controls to minimize the
amount of dust and fumes in the air and to
minimize build-up on equipment, surfaces,
clothing, and body parts. Examples of controls
include: exhaust ventilation and dust collection
systems, water sprays, and wet drilling. Control
dusts and fumes at the source where possible.
Make sure that controls are properly installed,
maintained and correctly used.
►
Wear, maintain and correctly use respiratory
protection as instructed by your employer and
as required by occupational health and safety
regulations. The respiratory protection must be
effective for the type of substance at issue (and
if applicable, approved by relevant
governmental authority).
►
Work in a well ventilated area.
►
If the machine has an exhaust, direct the
exhaust so as to reduce disturbance of dust in a
dust filled environment.
►
Operate and maintain the machine as
recommended in the operating and safety
instructions
►
Select, maintain and replace consumables/
working tools/ other accessories as
recommended in the operating and safety
instructions. Incorrect selection or lack of
maintenance of consumables/ inserted tools/
other accessories may cause an unnecessary
increase in dust or fumes.
►
Wear washable or disposable protective clothes
at the worksite, and shower and change into
clean clothes before leaving the worksite to
reduce exposure of dust and fumes to yourself,
other persons, cars, homes, and other areas.
►
Avoid eating, drinking, and using tobacco
products in areas where there is dust or fumes.
►
Wash your hands and face thoroughly as soon
as possible upon leaving the exposure area,
and always before eating, drinking, using
tobacco products, or making contact with other
persons.
►
Comply with all applicable laws and regulations,
including occupational health and safety
regulations.
►
Participate in air monitoring, medical
examination programs, and health and safety
training programs provided by your employer or
trade organizations and in accordance with
occupational health and safety regulations and
recommendations. Consult with physicians
experienced with relevant occupational
medicine.
►
Work with your employer and trade organization
to reduce dust and fume exposure at the
worksite and to reduce the risks. Effective
health and safety programs, policies and
procedures for protecting workers and others
against harmful exposure to dust and fumes
should be established and implemented based
on advice from health and safety experts.
Consult with experts.
►
Residues of hazardous substances on the
machine can be a risk. Before undertaking any
maintenance on the machine, clean it
thoroughly.
CP 0016, 4130, 4131, 4132, 4134
Safety and operating instructions
9800 0616 71 | Original instructions
9

WARNING Projectiles
Failure of the work piece, of accessories, or even
of the machine itself may generate high velocity
projectiles. During operating, splinters or other
particles from the working material may become
projectiles and cause personal injury by striking the
operator or other persons. To reduce these risk:
►
Use approved personal protective equipment
and safety helmet, including impact resistant
eye protection with side protection.
►
Make sure that no unauthorised persons
trespass into the working zone.
►
Keep the workplace free from foreign objects.
►
Ensure that the work piece is securely fixed.
WARNING Splinters hazard
Using the working tool as a hand struck tool can
result in splinters hitting the operator and can
cause personal injury.
►
Never use a working tool as a hand struck tool.
They are specifically designed and heat-treated
to be used only in a machine.
WARNING Slipping, tripping and falling
hazards
There is a risk of slipping, tripping or falling, for
example tripping on hoses or on other objects.
Slipping, tripping or falling can cause injury. To
reduce this risk:
►
Always make sure that no hose or other object
is in your way or in any other person's way.
►
Always make sure you are in a stable position
with your feet as far apart as your shoulder
width and keeping a balanced body weight.
WARNING Motion hazards
When using the machine to perform work-related
activities, you may experience discomfort in the
hands, arms, shoulders, neck, or other parts of the
body.
►
Adopt a comfortable posture while maintaining
secure footing and avoiding awkward off-
balanced postures.
►
Changing posture during extended tasks may
help avoid discomfort and fatigue.
►
In case of persistent or recurring symptoms,
consult a qualified health professional.
WARNING Vibration hazards
Normal and proper use of the machine exposes
the operator to vibration. Regular and frequent
exposure to vibration may cause, contribute to, or
aggravate injury or disorders to the operator’s
fingers, hands, wrists, arms, shoulders and/or
nerves and blood supply or other body parts,
including debilitating and/or permanent injuries or
disorders that may develop gradually over periods
of weeks, months, or years. Such injuries or
disorders may include damage to the blood
circulatory system, damage to the nervous system,
damage to joints, and possibly damage to other
body structures.
If numbness, persistent recurring discomfort,
burning sensation, stiffness, throbbing, tingling,
pain, clumsiness, weakened grip, whitening of the
skin, or other symptoms occur at any time, when
operating the machine or when not operating the
machine, stop operating the machine, tell your
employer and seek medical attention. Continued
use of the machine after the occurrence of any
such symptom may increase the risk of symptoms
becoming more severe and/or permanent.
Operate and maintain the machine as
recommended in these instructions, to prevent an
unnecessary increase in vibration.
The following may help to reduce exposure to
vibration for the operator:
►
Let the machine do the job. Use a minimum
hand grip consistent with proper control and
safe operation. Use the correct feed force on
the machine. Avoid pressing too hard.
►
If the machine has vibration absorbing handles,
keep them in a central position, avoid pressing
the handles into the end stops.
►
When the percussion mechanism is activated,
the only body contact with the machine you
should have are your hands on the handle or
handles. Avoid any other contact, for example
supporting any part of the body against the
machine or leaning onto the machine trying to
increase the feed force. It is also important not
to keep the start and stop device engaged while
extracting the tool from the work surface.
►
Make sure that the inserted tool is well-
maintained (including sharpness, if a cutting
tool), not worn out, and of the proper size.
Working tools that are not well-maintained, or
that are worn out, or that are not of the proper
size result in longer time to complete a task
(and a longer period of exposure to vibration)
and may result in or contribute to higher levels
of vibration exposure.
Safety and operating instructions
CP 0016, 4130, 4131, 4132, 4134
10
9800 0616 71 | Original instructions

►
Immediately stop working if the machine
suddenly starts to vibrate strongly. Before
resuming the work, find and remove the cause
of the increased vibrations.
►
Never grab, hold or touch the inserted tool
when using the machine.
►
Participate in health surveillance or monitoring,
medical exams and training programs offered
by your employer and when required by law.
►
When working in cold conditions wear warm
clothing and keep hands warm and dry.
►
The exhaust air is strongly chilled and shall not
make contact with the operator. Always direct
the exhaust air away from hands and body.
See the ”Noise and vibration declaration
statement” for the machine, including the declared
vibration values. This information can be found at
the end of these Safety and operating instructions.
◆
Comply with the recommended air-pressure
when operating the machine. Either higher or
lower air-pressure has the potential of resulting
in higher levels of vibration.
DANGER Electrical hazard
The machine is not electrically insulated. If the
machine comes into contact with electricity, serious
injuries or death may result.
►
Never operate the machine near any electric
wire or other source of electricity.
►
Make sure that there are no concealed wires or
other sources of electricity in the working area.
WARNING Concealed object hazard
During operating, concealed wires and pipes
constitute a danger that can result in serious injury.
►
Check the composition of the material before
operating.
►
Watch out for concealed cables and pipes for
example electricity, telephone, water, gas and
sewage lines etc.
►
If the inserted tool seems to have hit a
concealed object, switch off the machine
immediately.
►
Make sure that there is no danger before
continuing.
WARNING Involuntary start
Involuntary start of the machine may cause injury.
►
Keep your hands away from the start and stop
device until you are ready to start the machine.
►
Learn how the machine is switched off in the
event of an emergency.
►
Release the start and stop device immediately
in all cases of power supply interruption.
►
Whenever fitting or removing the working tool,
switch off the air supply, bleed the machine by
pressing the start and stop device and
disconnect the machine from the power source.
WARNING Noise hazard
High noise levels can cause permanent and
disabling hearing loss and other problems such as
tinnitus (ringing, buzzing, whistling or humming in
the ears). To reduce risk and prevent an
unnecessary increase in noise levels:
►
Risk assessment of these hazards and
implementation of appropriate controls is
essential.
►
Operate and maintain the machine as
recommended in these instructions.
►
Select, maintain and replace the working tool as
recommended in these instructions.
►
If the machine has a muffler, check that it is in
place and in good working condition.
►
Always use hearing protection.
►
Use damping material to prevent work pieces
from "ringing".
Maintenance, precautions
WARNING Machine modification
Any machine modification may result in bodily
injuries to yourself or others.
►
Never modify the machine. Modified machines
are not covered by warranty or product liability.
►
Always use approved original parts, tools, and
accessories.
►
Change damaged parts immediately.
►
Replace worn components in good time.
CAUTION Hot working tool
The tip of the working tool can become hot and
sharp when used. Touching it can lead to burns
and cuts.
►
Never touch a hot or sharp working tool.
►
Wait until the working tool has cooled down
before carrying out maintenance work.
CP 0016, 4130, 4131, 4132, 4134
Safety and operating instructions
9800 0616 71 | Original instructions
11

WARNING Working tool hazards
Accidental engagement of the start and stop
device during maintenance or installation can
cause serious injuries, when the power source is
connected.
►
Never inspect, clean, install, or remove the
working tool while the power source is
connected.
Storage, precautions
◆
Keep the machine and tools in a safe place, out
of the reach of children and locked up.
Safety and operating instructions
CP 0016, 4130, 4131, 4132, 4134
12
9800 0616 71 | Original instructions

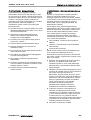
Overview
To reduce the risk of serious injury or death to
yourself or others, read the Safety instructions
section found on the previous pages of this manual
before operating the machine.
Design and function
These instructions apply to the CP 0016, CP 4130,
CP 4131, CP4132 and CP4134 models.
These machines are pneumatic tools designed for
medium duty to heavy duty chipping, cutting and
trimming as well as light concrete demolition and
soft tunnelling. Each machine model can be used
both horizontally and vertically. No other use is
permitted.
To choose the correct working tool, see the spare
parts list.
Choosing the correct
pneumatic hammer for a task
It is important to choose the correct size of
pneumatic hammer for the work to be performed.
A pneumatic hammer that is too small means that
the work will take longer.
A hammer that is too big means that there must be
frequent repositioning, which is unnecessarily tiring
for the operator.
A simple rule for choosing the correct size of
pneumatic hammer is that a normal sized piece of
broken material should be removed from the
workpiece within 5–10 seconds operation.
•
If it takes less than 5 seconds a smaller
pneumatic hammer should be selected.
•
If it takes more than 10 seconds a larger
pneumatic hammer should be selected.
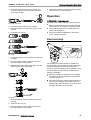
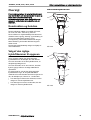
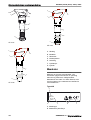
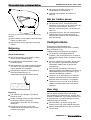
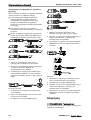
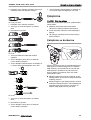
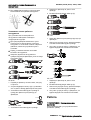
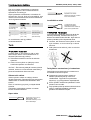
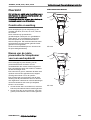
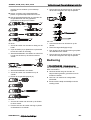
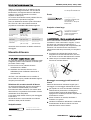
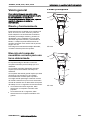
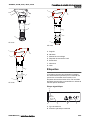
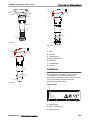
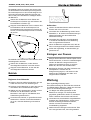
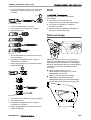
Main parts
A
B
C
D
E
F
G
CP 0016
A
B
C
D
E
G
F
CP 4130
CP 0016, 4130, 4131, 4132, 4134
Safety and operating instructions
9800 0616 71 | Original instructions
13

A
B
C
D
E
G
F
CP 4131
A
B
D
E
F
G
CP 4132
A
B
D
E
F
G
CP 4134
A. Handle
B. Trigger
C. Lock off trigger
D. Tool retainer
E. Air inlet
F. Muffler
G. Cylinder
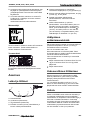
Labels
The machine is fitted with labels containing
important information about personal safety and
machine maintenance. The labels must be in such
condition that they are easy to read. New labels
can be ordered from the spare parts list.
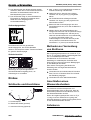
Data plate
Construction Tools PC AB
A
B C
p max
D
Del. wt.
Production year
xxxx
E
Type
Made in
Ser. No.
A. Machine type
B. Maximum hydraulic pressure
C. Serial number
Safety and operating instructions
CP 0016, 4130, 4131, 4132, 4134
14
9800 0616 71 | Original instructions

D. The warning symbol together with the book
symbol means that the user must read the
safety and operating instructions before the
machine is used for the first time.
E. The CE symbol means that the machine is EC-
approved. See the EC Declaration of
Conformity which is delivered with the machine
for more information.
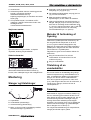
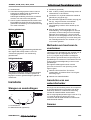
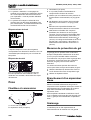
Noise level label
WA
xxx
dB
The label indicates the guaranteed noise level
corresponding to EC-directive 2000/14/EC. See
"Technical data" for accurate noise level.
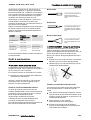
Safety label
To avoid injury, before using or servicing tool, read
and understand separately provided safety
instructions.
Installation
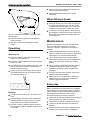
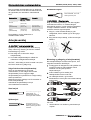
Hoses and connections
SRNO
A
B
C
D
A. Compressed air source
B. Water separator (optional)
C. Oiler (optional)
D. Max. 10 feet (3 meter) compressed air hose
between the oiler and the machine.
◆
Check that you are using the correct
recommended operating pressure, 87 psig (6
bar (e)).
◆
The maximum permissible air pressure, 90 psig
(6.2 bar (e)), must not be exceeded.
◆
Blow any impurities out of the compressed air
hose before connecting it to the machine.
◆
Select the correct dimension and length for the
compressed air hose. For hose lengths up to
100 feet (30 meters), a hose with a minimum
internal diameter of
3
⁄4 in. (19 mm) should be
used. If the hose length is between 100 and
330 feet (30 and 100 meters), a hose with a
minimum internal diameter of 1 in. (25 mm)
should be used.
Methods to prevent freezing
Ice formation in the muffler can occur when the
ambient air temperature is 32-50°F (0-10°C) and
the relative humidity is high.
The machine is designed to avoid the formation of
ice in the muffler. Despite this, under extreme
conditions ice can form in the muffler.
The following actions can be taken to further
counteract the risk of ice formation:
◆
Use CP Airolene Plus Tool Oil as a lubricant.
CP Airolene Plus Tool Oil counteracts freezing.
◆
Use a water separator.
Connecting a water separator
The length of the air hose between the compressor
and the water separator must be such that the
water vapour is cooled and condenses in the hose
before reaching the water separator.
If the ambient temperature is below 32 °F (0 °C)
the hose must be short enough to prevent the
water from freezing before reaching the water
separator.
Lubrication
The lubricant is important for the machine’s
function and has a great impact on the service life.
In order to supply the correct volume of oil, an oiler
should be connected to the air hose. The use of a
Chicago Pneumatic air line oiler is recommended.
To guarantee good lubrication, the length of the air
hose between the oiler and the pneumatic tool
should not exceed 10 feet (3 m).
Too much lubrication can cause starting problems,
low power or uneven performance.
CP 0016, 4130, 4131, 4132, 4134
Safety and operating instructions
9800 0616 71 | Original instructions
15

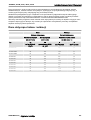
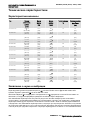
Use a synthetic lubricant such as CP Airolene Plus
Tool Oil or mineral oil with the properties
recommended in the table below.
Lubricant Temperature
range °F (°C)
Viscosity
CP Airolene Plus
Tool Oil
-4 to +120
(-20 to +50)
-
Air tool oil -4 to +60
(-20 to +15)
100-150 SUS
(ISO VG 22-32)
Air tool oil +60 to +120
(+15 to +50)
225-350 SUS
(ISO VG 46-68)
It is recommended that the oil contains a rust-
inhibitor.
Working tool
CAUTION Hot working tool
The tip of the working tool can become hot and
sharp when used. Touching it can lead to burns
and cuts.
►
Never touch a hot or sharp working tool.
►
Wait until the working tool has cooled down
before carrying out maintenance work.
NOTICE
Never cool a hot working tool in water, it
can result in brittleness and early failure.
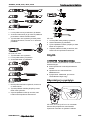
Selecting the right working tool
Selecting the right working tool is a precondition for
proper machine function. It is important to select
working tools of high quality to avoid unnecessary
machine damage.
The machine can be destroyed if you use an
incorrect working tool.
Recommended working tools are listed in the
machine's spare parts list.
Narrow chisel
The narrow chisel is used for
demolition and cutting work in
concrete and other types of
hard materials.
Moil point
The moil point is only used for
making holes in concrete and
other types of hard materials.
Wide bladed chisel
The wide bladed chisel is
used in soft materials, such as
asphalt and frozen ground.
WARNING Vibration hazard
Using inserted tools that do not fulfil the criteria
mentioned below, will result in a longer time to
complete a task, and may result in higher levels of
vibration exposure. A worn tool will also cause
increased working time.
►
Make sure that the inserted tool is well-
maintained, not worn out and of the proper size.
►
Always use a sharp tool in order to work
efficiently.
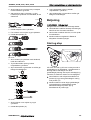
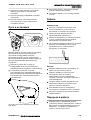
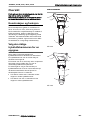
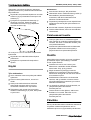
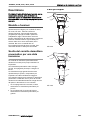
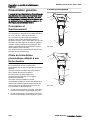
Fitting and removing the working tool
Whenever fitting or removing the working tool the
following instructions must be observed:
◆
To prevent an accidental start: switch off the
power supply and disconnect the machine from
the power source. Bleed the machine by
pressing the start and stop device.
◆
Before inserting a tool, lubricate the tool shank
with grease.
◆
Close the tool retainer and check the lock
function by tugging the inserted tool sharply
outwards.
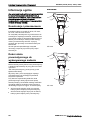
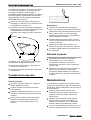
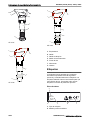
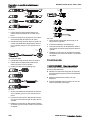
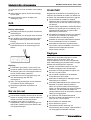
A
CP 0016
1. Slide the retainer over the shank and collar
onto the chisel.
2. Open the buffer (A) and place it on the chisel
between the retainer and the collar.
Safety and operating instructions
CP 0016, 4130, 4131, 4132, 4134
16
9800 0616 71 | Original instructions

3. Insert the chisel shank into the cylinder, and
screw the retainer onto the cylinder with hand
force until it is tight.
A
CP 4130, CP 4132
1. Insert the chisel shank into the cylinder.
2. Slide the retainer over the chisel and on to the
cylinder.
3. Insert the lock coil (A).
CP 4131
1. Screw the retainer on the cylinder by hand until
it is tight.
2. Push the retainer sleeve upwards and insert
the chisel shank in the cylinder.
3. Release the retainer sleeve and make sure the
sleeve returns to its end position.
A
CP 4134
1. Slide the retainer over the chisel and onto the
cylinder.
2. Insert the lock coil (A).
3. Push the retainer sleeve upwards and insert
the chisel shank in the cylinder.
4. Release the retainer sleeve and make sure the
sleeve returns to its end position.
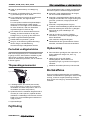
Operation
WARNING Involuntary start
Involuntary start of the machine may cause injury.
►
Keep your hands away from the start and stop
device until you are ready to start the machine.
►
Learn how the machine is switched off in the
event of an emergency.
►
Stop the machine immediately in all cases of
power supply interruption.
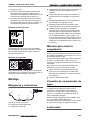
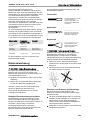
Start and stop
A
B
C
D
The CP0016, CP4130 and CP4131 models are
equipped with a throttle lever and a lock-off trigger.
The lock-off trigger is positioned inside the D-
handle. It locks the throttle lever (positioned on top
of the D-handle) and prevents the machine from
starting accidentally.
◆
Start the machine by pulling the lock-off trigger
to position (A) and squeezing the throttle lever
towards position (C).
◆
Stop the machine by releasing the throttle lever
and the lock-off trigger. The throttle lever will
automatically return to position (D) and the lock-
off trigger will return to position (B).
CP 0016, 4130, 4131, 4132, 4134
Safety and operating instructions
9800 0616 71 | Original instructions
17

The CP 4132 and CP 4134 are equipped to with
inside trigger.
◆
Start the machine by pulling inside trigger to
upward position
◆
Stop the machine by releasing the inside
trigger.
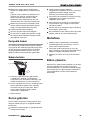
Operating
Starting a cut
◆
Stand in a stable position with your feet well
away from the inserted tool.
◆
Press the machine against the working surface
before you start.
◆
Start collaring at such a distance from the edge
that the machine is capable of breaking the
material without leverage.
◆
Never try to break off too large pieces. Adjust
the breaking distance (A) so that the inserted
tool does not get stuck.
A
Breaking
◆
Let the machine do the work; do not press too
hard.
◆
Avoid working in extremely hard materials for
example granite and reinforcing iron (re-bar)
which would cause substantial vibrations.
◆
Any form of idling, operating without working
tool or operating with an uplifted machine must
be avoided.
◆
When the machine is lifted, the start and stop
device must not be activated.
◆
Check regularly that the machine is well
lubricated.
When taking a break
◆
During all breaks you must place the machine
in such a way that there is no risk for it to be
unintentionally started. Make sure to place the
machine on the ground, so that it can not fall.
◆
In the event of a longer break or when leaving
the workplace: Switch off the power supply and
then bleed the machine by activating the start
and stop device.
Maintenance
Regular maintenance is a basic requirement for
the continued safe and efficient use of the
machine. Follow the maintenance instructions
carefully.
◆
Before starting maintenance on the machine,
clean it in order to avoid exposure to hazardous
substances. See “Dust and fume hazard”.
◆
Use only authorised parts. Any damage or
malfunction caused by the use of unauthorised
parts is not covered by warranty or product
liability.
◆
When cleaning mechanical parts with solvent,
comply with appropriate health and safety
regulations and ensure there is satisfactory
ventilation.
◆
For major service of the machine, contact the
nearest authorised workshop.
◆
After each service, check that the machine's
vibration level is normal. If not, contact the
nearest authorised workshop.
Every day
Before undertaking any maintenance or changing
the working tool on pneumatic machines, always
switch off the air supply and bleed the machine by
depressing the start and stop device then
disconnect the air hose from the machine.
◆
Clean and inspect the machine and its functions
each day before the work commences.
◆
Check the tool retainer for wear and function.
◆
Conduct a general inspection for leaks and
damage.
◆
Check that the air inlet nipple is tightened and
that the claw coupling is free from damage.
Safety and operating instructions
CP 0016, 4130, 4131, 4132, 4134
18
9800 0616 71 | Original instructions

◆
For the machine to maintain the specified
vibration values, always check the following:
Too large a clearance between the working
tool’s shank and the chisel bushing will
generate increased vibrations. To avoid getting
exposed to excessive vibrations, check the
chisel bushing for wear every day.
◆
If the machine has a vibration-absorbing
handle/handles, check that it moves freely (up
and down) and does not jam.
◆
Change damaged parts immediately.
◆
Replace worn components in good time.
◆
Make sure that all the attached and related
equipment, such as hoses, water separators
and oilers are properly maintained.
Periodic maintenance
After each operating period of approximately 150
impact hours or twice a year the machine must be
dismantled and all parts be cleaned and checked.
This work must be performed by authorised staff
who are trained for this task.
Tightening torques
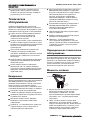
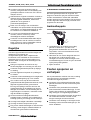
A
B
C
A. Air inlet nipple: 65-75 lbf/ft (88-102 Nm), use
Loctite® 243™ (Loctite is a registered
trademark of Henkel Corporation. 243 is a
trademark of Henkel Corporation.)
B. Nut: First tighten the four nuts diagonally with a
torque of 15 lbf/ft (20 Nm). Then tighten the
nuts in sequence using the same torque. This is
to allow the nylon bumper to set properly.
C. Nylon bumper
Troubleshooting
If the pneumatic machine does not start, has low
power or uneven performance, check the following
points.
◆
Check that the working tool being used has the
correct shank dimension.
◆
Check that the pneumatic machine is getting
the correct amount of lubricant. Too much
lubrication can cause starting problems, low
power or uneven performance.
◆
Check that the compressed air system supplies
the machine with sufficient air pressure to give
full power.
◆
Check that the dimension and length of the air
hose are according to the recommendations.
See “Installation”.
◆
If there is a risk of freezing, check that the
machine's exhaust ports are not blocked.
◆
If the machine function is still not satisfactory
after this procedure, contact an authorised
service workshop.
Storage
•
Clean the machine properly before storage, in
order to avoid hazardous substances. See
“Dust and fume hazard”
•
Pour approximately
1
⁄2 oz (5 cl) of oil directly into
the air inlet nipple, connect the machine to the
compressed air supply and start it for a few
seconds.
•
Always store the machine in a dry place.
Disposal
A used machine must be treated and disposed of
in such a way that the greatest possible portion of
the material can be recycled and any negative
influence on the environment is kept as low as
possible, and in respect to local restrictions.
CP 0016, 4130, 4131, 4132, 4134
Safety and operating instructions
9800 0616 71 | Original instructions
19

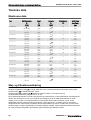
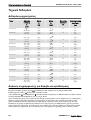
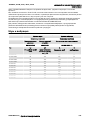
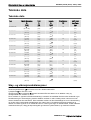
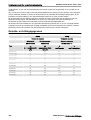
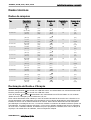
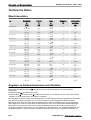
Technical data
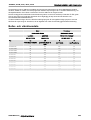
Machine data
Type Shank dimension
in.
(mm)
Weight
lb
(kg)
Length
in.
(mm)
Impact freq.
Hz
Air consumption
foot
3
/min
(l/s)
CP 0016 H19 H
3
⁄4 x 2
(H 19 x 50)
18 ¾
(8.5)
16
1
⁄2
(420)
32 26
(12)
CP 4130 3H H 0.580
(H 14.7)
18 ¾
(8.5)
16
1
⁄2
(420)
32 26
(12)
CP 4130 3R Rd. 0.680
(R 17.3)
18 ¾
(8.5)
16
1
⁄2
(420)
32 26
(12)
CP 4130 4H H 0.580
(H 14.7)
19 ¾
(9.0)
17
3
⁄4
(450)
25 27
(12.5)
CP 4130 4R Rd. 0.680
(R 17.3)
19 ¾
(9.0)
17
3
⁄4
(450)
25 27
(12.5)
CP 4131 3H H 0.580
(H 14.7)
18 ¾
(8.5)
16
1
⁄2
(420)
32 26
(12)
CP 4131 3R Rd. 0.680
(R 17.3)
18 ¾
(8.5)
16
1
⁄2
(420)
32 26
(12)
CP 4132 3H H 0.580
(H 14.7)
18 ¾
(8.5)
16
1
⁄2
(420)
32 26
(12)
CP 4132 3R Rd. 0.680
(R 17.3)
18 ¾
(8.5)
16
1
⁄2
(420)
32 26
(12)
CP 4132 4H H 0.580
(H 14.7)
19 ¾
(9.0)
18 ½
(470)
25 27
(12.5)
CP 4132 4R Rd. 0.680
(R 17.3)
19 ¾
(9.0)
18 ½
(470)
25 27
(12.5)
CP 4134 3H H 0.580
(H 14.7)
19 ¾
(9.0)
17
3
⁄4
(450)
32 26
(12)
CP 4134 3R Rd. 0.680
(R 17.3)
19 ¾
(9.0)
17
3
⁄4
(450)
32 26
(12)
CP 4134 4H H 0.580
(H 14.7)
22
(10.0)
19
3
⁄4
(500)
25 27
(12.5)
CP 4134 4R Rd. 0.680
(R 17.3)
22
(10.0)
19
3
⁄4
(500)
25 27
(12.5)
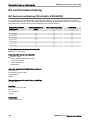
Noise and vibration declaration statement
Guaranteed sound power level Lw according to EN ISO 3744 in accordance with directive 2000/14/EC.
Sound pressure level Lp according to EN ISO 11203.
Vibration value A and uncertainty B determined according to EN ISO 28927-10. See table ”Noise and
vibration data” for the values of A, B, etc.
These declared values were obtained by laboratory type testing in accordance with the stated directive or
standards and are suitable for comparison with the declared values of other tools tested in accordance with
the same directive or standards. These declared values are not suitable for use in risk assessments and
values measured in individual work places may be higher. The actual exposure values and risk of harm
experienced by an individual user are unique and depend upon the way the user works, in what material the
machine is used, as well as upon the exposure time and the physical condition of the user, and the condition
of the machine.
Safety and operating instructions
CP 0016, 4130, 4131, 4132, 4134
20
9800 0616 71 | Original instructions
Sayfa yükleniyor...
Sayfa yükleniyor...
Sayfa yükleniyor...
Sayfa yükleniyor...
Sayfa yükleniyor...
Sayfa yükleniyor...
Sayfa yükleniyor...
Sayfa yükleniyor...
Sayfa yükleniyor...
Sayfa yükleniyor...
Sayfa yükleniyor...
Sayfa yükleniyor...
Sayfa yükleniyor...
Sayfa yükleniyor...
Sayfa yükleniyor...
Sayfa yükleniyor...
Sayfa yükleniyor...
Sayfa yükleniyor...
Sayfa yükleniyor...
Sayfa yükleniyor...
Sayfa yükleniyor...
Sayfa yükleniyor...
Sayfa yükleniyor...
Sayfa yükleniyor...
Sayfa yükleniyor...
Sayfa yükleniyor...
Sayfa yükleniyor...
Sayfa yükleniyor...
Sayfa yükleniyor...
Sayfa yükleniyor...
Sayfa yükleniyor...
Sayfa yükleniyor...
Sayfa yükleniyor...
Sayfa yükleniyor...
Sayfa yükleniyor...
Sayfa yükleniyor...
Sayfa yükleniyor...
Sayfa yükleniyor...
Sayfa yükleniyor...
Sayfa yükleniyor...
Sayfa yükleniyor...
Sayfa yükleniyor...
Sayfa yükleniyor...
Sayfa yükleniyor...
Sayfa yükleniyor...
Sayfa yükleniyor...
Sayfa yükleniyor...
Sayfa yükleniyor...
Sayfa yükleniyor...
Sayfa yükleniyor...
Sayfa yükleniyor...
Sayfa yükleniyor...
Sayfa yükleniyor...
Sayfa yükleniyor...
Sayfa yükleniyor...
Sayfa yükleniyor...
Sayfa yükleniyor...
Sayfa yükleniyor...
Sayfa yükleniyor...
Sayfa yükleniyor...
Sayfa yükleniyor...
Sayfa yükleniyor...
Sayfa yükleniyor...
Sayfa yükleniyor...
Sayfa yükleniyor...
Sayfa yükleniyor...
Sayfa yükleniyor...
Sayfa yükleniyor...
Sayfa yükleniyor...
Sayfa yükleniyor...
Sayfa yükleniyor...
Sayfa yükleniyor...
Sayfa yükleniyor...
Sayfa yükleniyor...
Sayfa yükleniyor...
Sayfa yükleniyor...
Sayfa yükleniyor...
Sayfa yükleniyor...
Sayfa yükleniyor...
Sayfa yükleniyor...
Sayfa yükleniyor...
Sayfa yükleniyor...
Sayfa yükleniyor...
Sayfa yükleniyor...
Sayfa yükleniyor...
Sayfa yükleniyor...
Sayfa yükleniyor...
Sayfa yükleniyor...
Sayfa yükleniyor...
Sayfa yükleniyor...
Sayfa yükleniyor...
Sayfa yükleniyor...
Sayfa yükleniyor...
Sayfa yükleniyor...
Sayfa yükleniyor...
Sayfa yükleniyor...
Sayfa yükleniyor...
Sayfa yükleniyor...
Sayfa yükleniyor...
Sayfa yükleniyor...
Sayfa yükleniyor...
Sayfa yükleniyor...
Sayfa yükleniyor...
Sayfa yükleniyor...
Sayfa yükleniyor...
Sayfa yükleniyor...
Sayfa yükleniyor...
Sayfa yükleniyor...
Sayfa yükleniyor...
Sayfa yükleniyor...
Sayfa yükleniyor...
Sayfa yükleniyor...
Sayfa yükleniyor...
Sayfa yükleniyor...
Sayfa yükleniyor...
Sayfa yükleniyor...
Sayfa yükleniyor...
Sayfa yükleniyor...
Sayfa yükleniyor...
Sayfa yükleniyor...
Sayfa yükleniyor...
Sayfa yükleniyor...
Sayfa yükleniyor...
Sayfa yükleniyor...
Sayfa yükleniyor...
Sayfa yükleniyor...
Sayfa yükleniyor...
Sayfa yükleniyor...
Sayfa yükleniyor...
Sayfa yükleniyor...
Sayfa yükleniyor...
Sayfa yükleniyor...
Sayfa yükleniyor...
Sayfa yükleniyor...
Sayfa yükleniyor...
Sayfa yükleniyor...
Sayfa yükleniyor...
Sayfa yükleniyor...
Sayfa yükleniyor...
Sayfa yükleniyor...
Sayfa yükleniyor...
Sayfa yükleniyor...
Sayfa yükleniyor...
Sayfa yükleniyor...
Sayfa yükleniyor...
Sayfa yükleniyor...
Sayfa yükleniyor...
Sayfa yükleniyor...
Sayfa yükleniyor...
Sayfa yükleniyor...
Sayfa yükleniyor...
Sayfa yükleniyor...
Sayfa yükleniyor...
Sayfa yükleniyor...
Sayfa yükleniyor...
Sayfa yükleniyor...
Sayfa yükleniyor...
Sayfa yükleniyor...
Sayfa yükleniyor...
Sayfa yükleniyor...
Sayfa yükleniyor...
Sayfa yükleniyor...
Sayfa yükleniyor...
Sayfa yükleniyor...
Sayfa yükleniyor...
Sayfa yükleniyor...
Sayfa yükleniyor...
Sayfa yükleniyor...
Sayfa yükleniyor...
Sayfa yükleniyor...
Sayfa yükleniyor...
Sayfa yükleniyor...
Sayfa yükleniyor...
Sayfa yükleniyor...
Sayfa yükleniyor...
Sayfa yükleniyor...
Sayfa yükleniyor...
Sayfa yükleniyor...
Sayfa yükleniyor...
Sayfa yükleniyor...
Sayfa yükleniyor...
Sayfa yükleniyor...
Sayfa yükleniyor...
Sayfa yükleniyor...
Sayfa yükleniyor...
Sayfa yükleniyor...
Sayfa yükleniyor...
Sayfa yükleniyor...
Sayfa yükleniyor...
Sayfa yükleniyor...
Sayfa yükleniyor...
Sayfa yükleniyor...
Sayfa yükleniyor...
Sayfa yükleniyor...
Sayfa yükleniyor...
Sayfa yükleniyor...
Sayfa yükleniyor...
Sayfa yükleniyor...
Sayfa yükleniyor...
Sayfa yükleniyor...
Sayfa yükleniyor...
Sayfa yükleniyor...
Sayfa yükleniyor...
Sayfa yükleniyor...
Sayfa yükleniyor...
Sayfa yükleniyor...
Sayfa yükleniyor...
Sayfa yükleniyor...
Sayfa yükleniyor...
Sayfa yükleniyor...
Sayfa yükleniyor...
Sayfa yükleniyor...
Sayfa yükleniyor...
Sayfa yükleniyor...
Sayfa yükleniyor...
Sayfa yükleniyor...
Sayfa yükleniyor...
Sayfa yükleniyor...
Sayfa yükleniyor...
Sayfa yükleniyor...
Sayfa yükleniyor...
Sayfa yükleniyor...
Sayfa yükleniyor...
Sayfa yükleniyor...
Sayfa yükleniyor...
Sayfa yükleniyor...
Sayfa yükleniyor...
Sayfa yükleniyor...
Sayfa yükleniyor...
Sayfa yükleniyor...
Sayfa yükleniyor...
Sayfa yükleniyor...
Sayfa yükleniyor...
Sayfa yükleniyor...
Sayfa yükleniyor...
Sayfa yükleniyor...
Sayfa yükleniyor...
Sayfa yükleniyor...
Sayfa yükleniyor...
Sayfa yükleniyor...
Sayfa yükleniyor...
Sayfa yükleniyor...
Sayfa yükleniyor...
Sayfa yükleniyor...
Sayfa yükleniyor...
Sayfa yükleniyor...
Sayfa yükleniyor...
Sayfa yükleniyor...
Sayfa yükleniyor...
Sayfa yükleniyor...
Sayfa yükleniyor...
Sayfa yükleniyor...
Sayfa yükleniyor...
Sayfa yükleniyor...
Sayfa yükleniyor...
Sayfa yükleniyor...
Sayfa yükleniyor...
Sayfa yükleniyor...
Sayfa yükleniyor...
Sayfa yükleniyor...
Sayfa yükleniyor...
Sayfa yükleniyor...
Sayfa yükleniyor...
Sayfa yükleniyor...
Sayfa yükleniyor...
Sayfa yükleniyor...
Sayfa yükleniyor...
Sayfa yükleniyor...
Sayfa yükleniyor...
Sayfa yükleniyor...
Sayfa yükleniyor...
Sayfa yükleniyor...
Sayfa yükleniyor...
Sayfa yükleniyor...
Sayfa yükleniyor...
Sayfa yükleniyor...
-
 1
1
-
 2
2
-
 3
3
-
 4
4
-
 5
5
-
 6
6
-
 7
7
-
 8
8
-
 9
9
-
 10
10
-
 11
11
-
 12
12
-
 13
13
-
 14
14
-
 15
15
-
 16
16
-
 17
17
-
 18
18
-
 19
19
-
 20
20
-
 21
21
-
 22
22
-
 23
23
-
 24
24
-
 25
25
-
 26
26
-
 27
27
-
 28
28
-
 29
29
-
 30
30
-
 31
31
-
 32
32
-
 33
33
-
 34
34
-
 35
35
-
 36
36
-
 37
37
-
 38
38
-
 39
39
-
 40
40
-
 41
41
-
 42
42
-
 43
43
-
 44
44
-
 45
45
-
 46
46
-
 47
47
-
 48
48
-
 49
49
-
 50
50
-
 51
51
-
 52
52
-
 53
53
-
 54
54
-
 55
55
-
 56
56
-
 57
57
-
 58
58
-
 59
59
-
 60
60
-
 61
61
-
 62
62
-
 63
63
-
 64
64
-
 65
65
-
 66
66
-
 67
67
-
 68
68
-
 69
69
-
 70
70
-
 71
71
-
 72
72
-
 73
73
-
 74
74
-
 75
75
-
 76
76
-
 77
77
-
 78
78
-
 79
79
-
 80
80
-
 81
81
-
 82
82
-
 83
83
-
 84
84
-
 85
85
-
 86
86
-
 87
87
-
 88
88
-
 89
89
-
 90
90
-
 91
91
-
 92
92
-
 93
93
-
 94
94
-
 95
95
-
 96
96
-
 97
97
-
 98
98
-
 99
99
-
 100
100
-
 101
101
-
 102
102
-
 103
103
-
 104
104
-
 105
105
-
 106
106
-
 107
107
-
 108
108
-
 109
109
-
 110
110
-
 111
111
-
 112
112
-
 113
113
-
 114
114
-
 115
115
-
 116
116
-
 117
117
-
 118
118
-
 119
119
-
 120
120
-
 121
121
-
 122
122
-
 123
123
-
 124
124
-
 125
125
-
 126
126
-
 127
127
-
 128
128
-
 129
129
-
 130
130
-
 131
131
-
 132
132
-
 133
133
-
 134
134
-
 135
135
-
 136
136
-
 137
137
-
 138
138
-
 139
139
-
 140
140
-
 141
141
-
 142
142
-
 143
143
-
 144
144
-
 145
145
-
 146
146
-
 147
147
-
 148
148
-
 149
149
-
 150
150
-
 151
151
-
 152
152
-
 153
153
-
 154
154
-
 155
155
-
 156
156
-
 157
157
-
 158
158
-
 159
159
-
 160
160
-
 161
161
-
 162
162
-
 163
163
-
 164
164
-
 165
165
-
 166
166
-
 167
167
-
 168
168
-
 169
169
-
 170
170
-
 171
171
-
 172
172
-
 173
173
-
 174
174
-
 175
175
-
 176
176
-
 177
177
-
 178
178
-
 179
179
-
 180
180
-
 181
181
-
 182
182
-
 183
183
-
 184
184
-
 185
185
-
 186
186
-
 187
187
-
 188
188
-
 189
189
-
 190
190
-
 191
191
-
 192
192
-
 193
193
-
 194
194
-
 195
195
-
 196
196
-
 197
197
-
 198
198
-
 199
199
-
 200
200
-
 201
201
-
 202
202
-
 203
203
-
 204
204
-
 205
205
-
 206
206
-
 207
207
-
 208
208
-
 209
209
-
 210
210
-
 211
211
-
 212
212
-
 213
213
-
 214
214
-
 215
215
-
 216
216
-
 217
217
-
 218
218
-
 219
219
-
 220
220
-
 221
221
-
 222
222
-
 223
223
-
 224
224
-
 225
225
-
 226
226
-
 227
227
-
 228
228
-
 229
229
-
 230
230
-
 231
231
-
 232
232
-
 233
233
-
 234
234
-
 235
235
-
 236
236
-
 237
237
-
 238
238
-
 239
239
-
 240
240
-
 241
241
-
 242
242
-
 243
243
-
 244
244
-
 245
245
-
 246
246
-
 247
247
-
 248
248
-
 249
249
-
 250
250
-
 251
251
-
 252
252
-
 253
253
-
 254
254
-
 255
255
-
 256
256
-
 257
257
-
 258
258
-
 259
259
-
 260
260
-
 261
261
-
 262
262
-
 263
263
-
 264
264
-
 265
265
-
 266
266
-
 267
267
-
 268
268
-
 269
269
-
 270
270
-
 271
271
-
 272
272
-
 273
273
-
 274
274
-
 275
275
-
 276
276
-
 277
277
-
 278
278
-
 279
279
-
 280
280
-
 281
281
-
 282
282
-
 283
283
-
 284
284
-
 285
285
-
 286
286
-
 287
287
-
 288
288
-
 289
289
-
 290
290
-
 291
291
-
 292
292
-
 293
293
-
 294
294
-
 295
295
-
 296
296


Chicago Pneumatic CP 0016,4130,4131,4132,4134 Kullanma talimatları
- Tip
- Kullanma talimatları
diğer dillerde
- français: Chicago Pneumatic CP 0016,4130,4131,4132,4134 Mode d'emploi
- italiano: Chicago Pneumatic CP 0016,4130,4131,4132,4134 Istruzioni per l'uso
- Deutsch: Chicago Pneumatic CP 0016,4130,4131,4132,4134 Bedienungsanleitung
- português: Chicago Pneumatic CP 0016,4130,4131,4132,4134 Instruções de operação
- dansk: Chicago Pneumatic CP 0016,4130,4131,4132,4134 Betjeningsvejledning
İlgili makaleler
-
Chicago Pneumatic CP 4133, 4136 Kullanma talimatları
-
-
-
-
Chicago Pneumatic CP Rail, CP Road Kullanma talimatları
-
-