
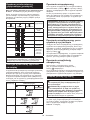
DUH501
DUH601
DUH751
DUH502
DUH602
DUH752
EN
Cordless Hedge Trimmer INSTRUCTION MANUAL 8
FR
Taille-haie sans l MANUEL D’INSTRUCTIONS 16
DE
Akku-Heckenschere BETRIEBSANLEITUNG 25
IT
Tagliasiepi a batteria ISTRUZIONI PER L’USO 34
NL
Accuheggenschaar GEBRUIKSAANWIJZING 43
ES
Cortasetos Inalámbrico
MANUAL DE
INSTRUCCIONES
52
PT
Aparador De Cerca Viva a
Bateria
MANUAL DE INSTRUÇÕES 61
DA
Akku hækketrimmer BRUGSANVISNING 70
EL
Φορητό ψαλίδι μπορντούρας ΕΓΧΕΙΡΙΔΙΟ ΟΔΗΓΙΩΝ 78
TR
Akülü Çit Budama KULLANMA KILAVUZU 87

1
2
3
Fig.1
1
2
Fig.2
1
Fig.3
2
1
Fig.4
12
3
Fig.5
2
1
Fig.6
1
Fig.7
1
Fig.8
2

1
2
Fig.9
1
Fig.10
1
5
2
3
4
Fig.11
1
2
Fig.12
1
1
Fig.13
1
Fig.14
3

1
2
3
4
5
Fig.15
1
2
Fig.16
1
2
Fig.17
1
2
Fig.18
2
1
Fig.19
1
1
2
Fig.20
1
Fig.21
4

1
Fig.22
1
Fig.23
(1)
(2)
Fig.24
Fig.25
Fig.26
Fig.27
Fig.28
Fig.29
5

Fig.30
Fig.31
Fig.32
1
Fig.33
Fig.34
1
2
Fig.35
1
2
Fig.36
1
Fig.37
6

1
2
Fig.38
2
1
Fig.39
7

8 ENGLISH
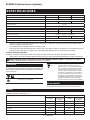
ENGLISH (Original instructions)
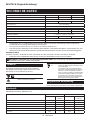
SPECIFICATIONS
Model: DUH501 DUH601 DUH751
Blade length 500 mm 600 mm 750 mm
Strokes per minute 0 - 2,000 / 0 - 3,600 / 0 - 4,400 min
-1
Overall length 1,016 mm 1,121 mm 1,261 mm
Rated voltage D.C. 18 V
Net weight 3.8 - 4.5 kg
Model: DUH502 DUH602 DUH752
Blade length 500 mm 600 mm 750 mm
Strokes per minute 0 - 2,000 / 0 - 3,600 / 0 - 4,400 min
-1
Overall length 1,016 mm 1,121 mm 1,261 mm
Rated voltage D.C. 18 V
Net weight 3.8 - 4.5 kg
•
Due to our continuing program of research and development, the specications herein are subject to change without notice.
• Specications may differ from country to country.
• The weight may differ depending on the attachment(s), including the battery cartridge. The lightest and heavi-
est combination, according to EPTA-Procedure 01/2014, are shown in the table.
Applicable battery cartridge
BL1815N / BL1820 / BL1820B / BL1830 / BL1830B / BL1840 / BL1840B / BL1850 / BL1850B / BL1860B
• Some of the battery cartridges listed above may not be available depending on your region of residence.
WARNING: Only use the battery cartridges listed above. Use of any other battery cartridges may cause
injury and/or re.
Symbols
The followings show the symbols used for the equip-
ment. Be sure that you understand their meaning before
use.
Read instruction manual.
Do not expose to moisture.
Ni-MH
Li-ion
Only for EU countries
Do not dispose of electric equipment or battery
pack together with household waste material!
In observance of the European Directives,
on Waste Electric and Electronic
Equipment and Batteries and Accumulators
and Waste Batteries and Accumulators
and their implementation in accordance
with national laws, electric equipment and
batteries and battery pack(s) that have
reached the end of their life must be col-
lected separately and returned to an envi-
ronmentally compatible recycling facility.
Intended use
The tool is intended for trimming hedges.
Noise
Applicable standard : EN60745-2-15
Model Sound pressure level Sound power level
L
PA
(dB(A)) Uncertainty K
(dB(A))
L
PA
(dB(A)) Uncertainty K
(dB(A))
DUH501 84 3 97 3
DUH601 82 3 95 3
DUH751 84 3 97 3
DUH502 81.3 3 86.8 3
DUH602 82.1 3 87.4 3
DUH752 80.5 3 87.8 3

9 ENGLISH
NOTE: The declared noise emission value(s) has been measured in accordance with a standard test method and
may be used for comparing one tool with another.
NOTE: The declared noise emission value(s) may also be used in a preliminary assessment of exposure.
WARNING: Wear ear protection.
WARNING: The noise emission during actual use of the power tool can differ from the declared val-
ue(s) depending on the ways in which the tool is used especially what kind of workpiece is processed.
WARNING: Be sure to identify safety measures to protect the operator that are based on an estimation
of exposure in the actual conditions of use (taking account of all parts of the operating cycle such as the
times when the tool is switched off and when it is running idle in addition to the trigger time).
Vibration
The vibration total value (tri-axial vector sum) deter-
mined according to EN60745-2-15:
Model DUH501
Vibration emission (a
h
) : 2.5 m/s
2
Uncertainty (K) : 1.5 m/s
2
Model DUH601
Vibration emission (a
h
) : 2.5 m/s
2
or less
Uncertainty (K) : 1.5 m/s
2
Model DUH751
Vibration emission (a
h
) : 2.5 m/s
2
Uncertainty (K) : 1.5 m/s
2
Model DUH502
Vibration emission (a
h
) : 2.5 m/s
2
Uncertainty (K) : 1.5 m/s
2
Model DUH602
Vibration emission (a
h
) : 2.5 m/s
2
or less
Uncertainty (K) : 1.5 m/s
2
Model DUH752
Vibration emission (a
h
) : 2.5 m/s
2
or less
Uncertainty (K) : 1.5 m/s
2
NOTE: The declared vibration total value(s) has been
measured in accordance with a standard test method
and may be used for comparing one tool with another.
NOTE: The declared vibration total value(s) may also
be used in a preliminary assessment of exposure.
WARNING: The vibration emission during
actual use of the power tool can differ from the
declared value(s) depending on the ways in which
the tool is used especially what kind of workpiece
is processed.
WARNING: Be sure to identify safety mea-
sures to protect the operator that are based on an
estimation of exposure in the actual conditions of
use (taking account of all parts of the operating
cycle such as the times when the tool is switched
off and when it is running idle in addition to the
trigger time).
EC Declaration of Conformity
For European countries only
The EC declaration of conformity is included as Annex A
to this instruction manual.
SAFETY WARNINGS
General power tool safety warnings
WARNING: Read all safety warnings, instruc-
tions, illustrations and specications provided
with this power tool. Failure to follow all instructions
listed below may result in electric shock, re and/or
serious injury.
Save all warnings and instruc-
tions for future reference.
The term "power tool" in the warnings refers to your
mains-operated (corded) power tool or battery-operated
(cordless) power tool.
Cordless Hedge Trimmer Safety
Warnings
1. Keep all parts of the body away from the cut-
ter blade. Do not remove cut material or hold
material to be cut when blades are moving.
Make sure the switch is off when clearing
jammed material. A moment of inattention while
operating the hedge trimmer may result in serious
personal injury.
2. Carry the hedge trimmer by the handle with
the cutter blade stopped. When transporting or
storing the hedge trimmer always t the cut-
ting device cover. Proper handling of the hedge
trimmer will reduce possible personal injury from
the cutter blades.
3. Hold the power tool by insulated gripping
surfaces only, because the cutter blade may
contact hidden wiring. Cutter blades contacting
a "live" wire may make exposed metal parts of the
power tool "live" and could give the operator an
electric shock.
4.
DANGER - Keep hands away from blade. Contact
with blade will result in serious personal injury.
5. Do not use the hedge trimmer in the rain or in
wet or very damp conditions. The electric motor
is not waterproof.
6.
First-time users should have an experienced hedge
trimmer user show them how to use the trimmer.
7. The hedge trimmer must not be used by
children or young persons under 18 years of
age. Young persons over 16 years of age may be
exempted from this restriction if they are undergo-
ing training under the supervision of an expert.

10 ENGLISH
8.
Use the hedge trimmer only if you are in good
physical condition. If you are tired, your attention will
be reduced. Be especially careful at the end of a work-
ing day. Perform all work calmly and carefully. The
user is responsible for all damages to third parties.
9. Never use the trimmer when under the inu-
ence of alcohol, drugs or medication.
10. Work gloves of stout leather are part of the
basic equipment of the hedge trimmer and
must always be worn when working with it.
Also wear sturdy shoes with anti-skid soles.
11.
Before starting work check to make sure that the
trimmer is in good and safe working order. Ensure
guards are tted properly. The hedge trimmer
must not be used unless fully assembled.
12. Make sure you have a secure footing before
starting operation.
13. Hold the tool rmly when using the tool.
14.
Do not operate the tool at no-load unnecessarily.
15. Immediately switch off the motor and remove
the battery cartridge if the cutter should come
into contact with a fence or other hard object.
Check the cutter for damage, and if damaged
repair immediately.
16. Before checking the cutter, taking care of
faults, or removing material caught in the cut-
ter, always switch off the trimmer and remove
the battery cartridge.
17. Switch off the trimmer and remove the battery
cartridge before doing any maintenance work.
18. When moving the hedge trimmer to another
location, including during work, always
remove the battery cartridge and put the blade
cover on the cutter blades. Never carry or
transport the trimmer with the cutter running.
Never grasp the cutter with your hands.
19.
Clean the hedge trimmer and especially the
cutter after use, and before putting the trimmer
into storage for extended periods. Lightly oil the
cutter and put on the cover. The cover supplied
with the unit can be hung on the wall, providing a
safe and practical way to store the hedge trimmer.
20. Store the hedge trimmer with the cover on, in
a dry room. Keep it out of reach of children.
Never store the trimmer outdoors.
21.
Never point the shear blades to yourself or others.
22. If the blades stop moving due to the stuck of
foreign objects between the blades during
operation, switch off the tool and remove the
battery cartridge, and then remove the foreign
objects using tools such as pliers. Removing
the foreign objects by hand may cause an injury
for the reason that the blades may move in reac-
tion to removing the foreign objects.
23. Avoid dangerous environment. Don't use the
tool in damp or wet locations or expose it to
rain. Water entering the tool will increase the
risk of electric shock.
24. Do not dispose of the battery(ies) in a re. The
cell may explode. Check with local codes for
possible special disposal instructions.
25.
Do not open or mutilate the battery(ies). Released
electrolyte is corrosive and may cause damage to
the eyes or skin. It may be toxic if swallowed.
26.
Do not charge battery in rain, or in wet locations.
27. Check the hedges and bushes for foreign
objects, such as wire fences or hidden wiring
before operating the tool.
SAVE THESE INSTRUCTIONS.
WARNING: DO NOT let comfort or familiarity
with product (gained from repeated use) replace
strict adherence to safety rules for the subject
product. MISUSE or failure to follow the safety
rules stated in this instruction manual may cause
serious personal injury.
Important safety instructions for
battery cartridge
1.
Before using battery cartridge, read all instruc-
tions and cautionary markings on (1) battery
charger, (2) battery, and (3) product using battery.
2. Do not disassemble battery cartridge.
3. If operating time has become excessively
shorter, stop operating immediately. It may
result in a risk of overheating, possible burns
and even an explosion.
4.
If electrolyte gets into your eyes, rinse them out
with clear water and seek medical attention right
away. It may result in loss of your eyesight.
5. Do not short the battery cartridge:
(1) Do not touch the terminals with any con-
ductive material.
(2) Avoid storing battery cartridge in a con-
tainer with other metal objects such as
nails, coins, etc.
(3) Do not expose battery cartridge to water
or rain.
A battery short can cause a large current ow,
overheating, possible burns and even a breakdown.
6. Do not store the tool and battery cartridge in
locations where the temperature may reach or
exceed 50 °C (122 °F).
7. Do not incinerate the battery cartridge even if
it is severely damaged or is completely worn
out. The battery cartridge can explode in a re.
8. Be careful not to drop or strike battery.
9. Do not use a damaged battery.
10.
The contained lithium-ion batteries are subject to
the Dangerous Goods Legislation requirements.
For commercial transports e.g. by third parties,
forwarding agents, special requirement on pack-
aging and labeling must be observed.
For preparation of the item being shipped, consulting an
expert for hazardous material is required. Please also
observe possibly more detailed national regulations.
Tape or mask off open contacts and pack up the
battery in such a manner that it cannot move
around in the packaging.
11. Follow your local regulations relating to dis-
posal of battery.
12. Use the batteries only with the products
specied by Makita. Installing the batteries to
non-compliant products may result in a re, exces-
sive heat, explosion, or leak of electrolyte.
SAVE THESE INSTRUCTIONS.

11 ENGLISH
CAUTION:
Only use genuine Makita batteries.
Use of non-genuine Makita batteries, or batteries that
have been altered, may result in the battery bursting
causing res, personal injury and damage. It will also
void the Makita warranty for the Makita tool and charger.
Tips for maintaining maximum
battery life
1. Charge the battery cartridge before completely
discharged. Always stop tool operation and
charge the battery cartridge when you notice
less tool power.
2.
Never recharge a fully charged battery cartridge.
Overcharging shortens the battery service life.
3.
Charge the battery cartridge with room tempera-
ture at 10 °C - 40 °C (50 °F - 104 °F). Let a hot
battery cartridge cool down before charging it.
4. Charge the battery cartridge if you do not use
it for a long period (more than six months).
FUNCTIONAL
DESCRIPTION
CAUTION: Always be sure that the tool is
switched off and the battery cartridge is removed
before adjusting or checking function on the tool.
Installing or removing battery
cartridge
CAUTION: Always switch off the tool before
installing or removing of the battery cartridge.
CAUTION: Hold the tool and the battery car-
tridge rmly when installing or removing battery
cartridge. Failure to hold the tool and the battery
cartridge rmly may cause them to slip off your hands
and result in damage to the tool and battery cartridge
and a personal injury.
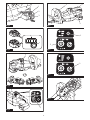
► Fig.1: 1. Red indicator 2. Button 3. Battery cartridge
To remove the battery cartridge, slide it from the tool
while sliding the button on the front of the cartridge.
To install the battery cartridge, align the tongue on the
battery cartridge with the groove in the housing and slip
it into place. Insert it all the way until it locks in place
with a little click. If you can see the red indicator on the
upper side of the button, it is not locked completely.
CAUTION: Always install the battery cartridge
fully until the red indicator cannot be seen. If not,
it may accidentally fall out of the tool, causing injury to
you or someone around you.
CAUTION: Do not install the battery cartridge
forcibly. If the cartridge does not slide in easily, it is
not being inserted correctly.
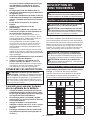
Indicating the remaining battery capacity
Only for battery cartridges with the indicator
► Fig.2: 1. Indicator lamps 2. Check button
Press the check button on the battery cartridge to indicate the remain-
ing battery capacity. The indicator lamps light up for a few seconds.
Indicator lamps Remaining
capacity
Lighted Off Blinking
75% to 100%
50% to 75%
25% to 50%
0% to 25%
Charge the
battery.
The battery
may have
malfunctioned.
NOTE: Depending on the conditions of use and the
ambient temperature, the indication may differ slightly
from the actual capacity.
Tool / battery protection system
The tool is equipped with a tool/battery protection system. This
system automatically cuts off power to the motor to extend tool and
battery life. The tool will automatically stop during operation if the
tool or battery is placed under one of the following conditions:
Status Indicator lamps
On Off Blinking
Overload
Overheat
Over
discharge
Overload protection
If the tool is overloaded by entangled branches or other
debris, and the middle indicators start blinking and
the tool automatically stops.
In this situation, turn the tool off and stop the application
that caused the tool to become overloaded. Then turn
the tool on to restart.

12 ENGLISH
NOTICE: Depending on the usage conditions,
the tool is automatically turned off without any
indication if the tool is overloaded by entangled
branches or debris. In this case, switch off the
tool and remove the battery cartridge, and then
remove entangled branches or debris using tools
such as pliers. After removing the branches or
debris, install the battery cartridge and turn on
the tool again.
Overheat protection for tool or battery
There are two types of overheating; tool overheating
and battery overheating. When the tool over heating
occurs, all speed indicators blink. When the battery over
heating occurs, indicator blinks.
If the overheating occurs, the tool stops automatically.
Let the tool and/or battery cool down before turning the
tool on again.
Overdischarge protection
When the battery capacity becomes low, the tool stops
automatically and indicator blinks.
If the tool does not operate even when the switches are
operated, remove the battery from the tool and charge
the battery.
Angle setting of the handle
CAUTION: Always make sure that the handle
is locked in the desired position before operation.
CAUTION: Do not pull down the lever to
unlock the handle while pulling the switch trigger.
Do not pull the switch trigger while pulling down
the lever and turning the handle. Failure to do so
may cause a malfunction of the tool.
You can set the angle of the handle to 0°, 45°, or 90°
to the left or right. To change the angle of the handle,
turn the handle while pulling down the lever, and then
release the lever.
► Fig.3: 1. Lever
Power switch action
WARNING: For your safety, this tool is
equipped with lock-off lever which prevents the
tool from unintended starting. NEVER use the tool
if it runs when you simply press the switch lever
and pull the switch trigger without pressing the
lock-off lever. Return the tool to our authorized
service center for proper repairs BEFORE further
usage.
WARNING: NEVER tape down or defeat pur-
pose and function of lock-off lever.
WARNING: Before installing the battery car-
tridge on the tool, always check to see that the
switch trigger and switch lever actuate properly
and return to the "OFF" position when released.
Operating a tool with a switch that does not actuate
properly can lead to loss of control and serious per-
sonal injury.
CAUTION: Never put your nger on the
switch when carrying. The tool may start uninten-
tionally and cause injury.
NOTICE: Do not pull the switch trigger hard with-
out pressing the lock-off lever. This can cause
switch breakage.
Press and hold the main power button to turn on the
tool. The power lamp lights up when the tool is turned
on. To turn off the tool, press and hold the main power
button again. The power lamp goes off when the tool is
turned off.
► Fig.4: 1. Power lamp 2. Main power button
NOTE: The tool is automatically turned off if the tool is
not operated for a certain period.
To prevent the switch trigger from being accidentally
pulled, a lock-off lever is provided. To start the tool,
depress the lock-off lever, and then press the switch
lever and pull the switch trigger. The tool speed
increases by increasing pressure on the switch trigger.
Release the switch trigger to stop.
► Fig.5: 1. Switch lever 2. Lock-off lever 3. Switch
trigger
Speed adjusting
You can adjust the tool speed by tapping the main
power button.
Each time you tap the main power button, the level of
speed will change.
► Fig.6: 1. Power lamp 2. Main power button
Indicator Mode Stroke speed
High 4,400 min
-1
Medium 3,600 min
-1
Low 2,000 min
-1
Reverse button for debris removal
WARNING: If the entangled branches or
debris cannot be removed by the reverse func-
tion, switch off the tool and remove the bat-
tery cartridge, and then remove the entangled
branches or debris using tools such as pliers.
Failure to switch off the tool and remove the bat-
tery cartridge may result in serious personal injury
from accidental start-up. Removing the entangled
branches or debris by hand may cause an injury,
since the shear blades may move in reaction to
removing them.

13 ENGLISH
This tool has a reverse button to change the direction
of shear blades movement. It is only for removing
branches and debris entangled in the tool.
To reverse the shear blades movement, tap the reverse
button when the shear blades have stopped, then press
the switch lever and pull the switch trigger while press-
ing the lock-off lever. The power lamp starts blinking,
and the shear blades move in reverse direction.
When entangled branches and debris are removed,
the tool returns to the regular movement and the power
lamp stops blinking and lights up.
► Fig.7: 1. Reverse button
NOTE:
If the entangled branches or debris cannot be removed,
release and pull the switch trigger until they are removed.
NOTE: If you tap the reverse button while the shear
blades are still moving, the tool comes to stop and to
be ready for reverse movement.
ASSEMBLY
CAUTION: Always be sure that the tool is
switched off and the battery cartridge is removed
before carrying out any work on the tool.
CAUTION: When replacing the shear blades,
always wear gloves so that your hands do not
directly contact the blades.
NOTICE: When replacing the shear blades, do
not wipe off grease from the gear and crank.
Installing or removing the shear
blades
CAUTION: Attach the blade cover before
removing or installing the shear blades.
You can install 500 mm, 600 mm, or 750 mm shear
blades to your tool.
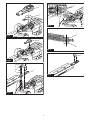
1. Place the tool upside down, and then remove 6
screws.
► Fig.8: 1. Screw
2. Remove the cover and the plate.
► Fig.9: 1. Cover 2. Plate
NOTE: The plate may remain on the cover.
3. Remove the rod.
► Fig.10: 1. Rod
NOTE: The rod may remain on the cover.
4. Remove 2 screws, the felt pad, the washers, and
the sleeves, and then remove the shear blades.
► Fig.11: 1. Felt pad 2. Screw 3. Washer 4. Sleeve
5. Shear blades
5. Remove the blade cover.
6. Attach the blade cover to the new shear blades.
7. Adjust the crank so that 2 holes are lined up on
the alignment line.
► Fig.12: 1. Hole 2. Alignment line
8. Align the protrusions on the shear blades vertically
at the same position.
► Fig.13: 1. Protrusion
9. Attach the felt pad to the shear blades.
► Fig.14: 1. Felt pad
10. Insert the protrusion on the shear blades to the
hole on the rod, then align the position of the felt pad
with the holes on the tool, and then attach new sleeves
and washers.
► Fig.15: 1. Protrusion 2. Hole 3. Felt pad 4. Washer
5. Sleeve
NOTICE: Apply a small amount of grease to the
inner periphery of the hole of the rod.
NOTICE: Be careful not to lose the washers and
the sleeves.
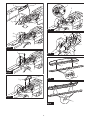
11. Align the holes on the shear blades with the holes
on the tool, and then tighten 2 screws to x the shear
blades.
► Fig.16: 1. Screw 2. Hole
12. Attach the rod.
► Fig.17: 1. Rod 2. Small hole
NOTICE: Apply a small amount of grease to the
inner periphery of the small hole of the rod.
NOTICE: Make sure that the protrusion on the
shear blades ts in the small hole on the rod.
13. Attach the plate.
► Fig.18: 1. Protrusion 2. Plate
NOTICE: Make sure that the protrusion on the
shear blades ts in the hole on the plate.
14. Attach the cover, and then tighten 6 screws.
► Fig.19: 1. Cover 2. Screw
NOTICE: Be sure to attach 2 long screws to the
center holes.
NOTICE: If the shear blades do not move
smoothly, the shear blades are not engaged with
the rods properly. Install the shear blades again.
NOTICE: If the parts other than the shear
blades such as the rods are worn out, ask Makita
Authorized Service Centers for parts replacement
or repairs.
Installing or removing the chip receiver
Optional accessory
CAUTION: When installing or removing the
chip receiver, always wear gloves so that your
hands do not directly contact the shear blades.
NOTICE: The blade cover cannot be installed if
the chip receiver is installed on the tool. Before
carrying or storing the tool, uninstall the chip
receiver, and then install the blade cover to avoid
blade exposure.
NOTICE: Be sure to remove the blade cover
before installing the chip receiver.

14 ENGLISH
The chip receiver gathers discarded leaves and makes
clean-up afterward much easier. It can be installed on
either side of the tool.
To install the chip receiver, align the hooks of the chip
receiver with the arrow marks on the shear blades, and
then press the chip receiver against the shear blades so
that the hooks t into the grooves on the shear blades.
► Fig.20: 1. Hook 2. Arrow mark
► Fig.21: 1. Hook
NOTICE: Make sure that the chip receiver does
not overlap the branch catcher.
► Fig.22: 1. Branch catcher
To remove the chip receiver, press the levers on both
sides to release the hooks.
► Fig.23: 1. Lever
NOTICE: Never try to remove the chip receiver
by an excessive force with its hooks locked in the
grooves of the shear blades.
OPERATION
WARNING: Keep hands away from shear
blades.
CAUTION: Avoid operating the tool in very
hot weather as much as practicable. When operat-
ing the tool, be careful of your physical condition.
CAUTION: Be careful not to accidentally
contact a metal fence or other hard objects while
trimming. The shear blades may break and cause
an injury.
CAUTION: Be careful not to allow the shear
blades to contact the ground. The tool may recoil
and cause an injury.
CAUTION: Overreaching with a hedge trim-
mer, particularly from a ladder, is extremely
dangerous. Do not work while standing on anything
wobbly or inrm.
NOTICE: Do not attempt to cut branches thicker
than 10 mm in diameter with the tool. Cut branches
to 10 cm lower than the cutting height using branch
cutters before using the tool.
► Fig.24: (1) Cutting height (2) 10 cm
NOTICE: Do not cut down dead trees or similar
hard objects. Doing so may damage the tool.
NOTICE: Do not trim the grass or weeds while
using the shear blades. The shear blades may
become tangled in the grass or weeds.
Hold the tool with both hands, press the switch lever
and pull the switch trigger while pressing the lock-off
lever, and then move it forward.
► Fig.25
For basic operation, tilt the shear blades toward the
trimming direction and move it calmly and slowly at the
speed rate of 3 to 4 seconds per meter.
► Fig.26
To cut a hedge top evenly, tie a string at the desired
height and trim along it.
► Fig.27
If the chip receiver is attached to the shear blades, it
gathers discarded leaves and makes clean-up after-
ward much easier.
► Fig.28
To cut a hedge side evenly, cut from the bottom to top.
► Fig.29
When trimming to make a round shape (trimming box-
wood or rhododendron, etc.), trim from the root to the
top for a beautiful nish.
► Fig.30
MAINTENANCE
CAUTION: Always be sure that the tool is
switched off and the battery cartridge is removed
before attempting to perform inspection or
maintenance.
To maintain product SAFETY and RELIABILITY,
repairs, any other maintenance or adjustment should
be performed by Makita Authorized or Factory Service
Centers, always using Makita replacement parts.
Cleaning the tool
Clean the tool by wiping off dust with a dry cloth or one
dipped in soapy water and wrung out.
NOTICE: Never use gasoline, benzine, thinner,
alcohol or the like. Discoloration, deformation or
cracks may result.
Shear blade maintenance
Before the operation or once per hour during operation,
apply low-viscosity oil (machine oil, or spray-type lubri-
cating oil) to the shear blades.
► Fig.31
After operation, remove dust from both sides of the
shear blades with a wired brush, wipe it off with a cloth
and then apply low-viscosity oil (machine oil, or spray-
type lubricating oil) to the shear blades.
► Fig.32
NOTICE: Do not wash the shear blades in water.
Doing so may cause rust or damage to the tool.
NOTICE: Dirt and corrosion cause excessive
blade friction and shorten the operating time per
battery charge.

15 ENGLISH
Storage
The hook hole in the tool bottom is convenient for hang-
ing the tool from a nail or screw on the wall.
Attach the blade cover to the shear blades so that the
blades are not exposed. Store the tool out of the reach
of children. Store the tool in a place not exposed to
moisture or rain.
► Fig.33: 1. Hole
Grinding the shear blades
NOTICE: If the shear blades have considerably
deformed by grinding, replace the shear blades
with new ones.
1. Install the battery cartridge to the tool.
2. Turn on and start the tool so that the upper blade
and lower blade are positioned alternately.
► Fig.34
3. Turn off the tool and remove the battery cartridge
from the tool.
4. Remove the screw, and then remove the branch
catcher.
► Fig.35: 1. Screw 2. Branch catcher
5. Set the angle of a le to 45°, and grind the upper
blade from 3 directions with the le.
► Fig.36: (1) File (2) 45°
CAUTION: Before grinding the shear blades,
make sure that the tool is switched off and the
battery cartridge is removed from the tool.
6. Place the tool upside down, and then remove the
burrs from the shear blades with the le.
► Fig.37: 1. File
7. Set the angle of the le to 45°, and grind the lower
blade from 3 directions with the le.
8. Return the tool to normal position, and then
remove the burrs from the shear blades with the le.
9. Attach the branch catcher by tightening the screw.
Grease lubrication
Interval of lubrication: Every 100 operating hours
1. Remove 3 screws, and then remove the bottom
cover.
► Fig.38: 1. Screw 2. Bottom cover
2. Remove the cap from the grease vessel, and then
attach the grease vessel to the hole on the cover by
turning the grease vessel.
► Fig.39: 1. Cover 2. Grease vessel
3. Apply the grease to the tool (Approximately 5 g as
a guide).
4. Remove the grease vessel.
5. Attach the bottom cover, and then tighten 3
screws.
OPTIONAL
ACCESSORIES
CAUTION: These accessories or attachments
are recommended for use with your Makita tool
specied in this manual. The use of any other
accessories or attachments might present a risk of
injury to persons. Only use accessory or attachment
for its stated purpose.
If you need any assistance for more details regard-
ing these accessories, ask your local Makita Service
Center.
• Shear blade assembly
• Shear blade cover
• Chip receiver
• Grease vessel
• Makita genuine battery and charger
NOTE: Some items in the list may be included in the
tool package as standard accessories. They may
differ from country to country.

16 FRANÇAIS
FRANÇAIS (Instructions originales)
SPÉCIFICATIONS
Modèle : DUH501 DUH601 DUH751
Longueur de la lame 500 mm 600 mm 750 mm
Nombre de courses par minute 0 - 2 000 / 0 - 3 600 / 0 - 4 400 min
-1
Longueur totale 1 016 mm 1 121 mm 1 261 mm
Tension nominale 18 VCC
Poids net 3,8 - 4,5 kg
Modèle : DUH502 DUH602 DUH752
Longueur de la lame 500 mm 600 mm 750 mm
Nombre de courses par minute 0 - 2 000 / 0 - 3 600 / 0 - 4 400 min
-1
Longueur totale 1 016 mm 1 121 mm 1 261 mm
Tension nominale 18 VCC
Poids net 3,8 - 4,5 kg
• Étant donné l’évolution constante de notre programme de recherche et de développement, les spécications
contenues dans ce manuel sont sujettes à modication sans préavis.
• Les spécications peuvent varier suivant les pays.
• Le poids peut être différent selon les accessoires, notamment la batterie. Les associations la plus légère et la
plus lourde, conformément à la procédure EPTA 01/2014, sont indiquées dans le tableau.
Batterie applicable
BL1815N / BL1820 / BL1820B / BL1830 / BL1830B / BL1840 / BL1840B / BL1850 / BL1850B / BL1860B
• Certaines batteries répertoriées ci-dessus peuvent ne pas être disponibles selon la région où vous résidez.
AVERTISSEMENT : N’utilisez que les batteries répertoriées ci-dessus. L’utilisation de n’importe quelle
autre batterie peut provoquer des blessures et/ou un incendie.
Symboles
Vous trouverez ci-dessous les symboles utilisés pour
l’appareil. Veillez à comprendre leur signication avant
toute utilisation.
Lire le mode d’emploi.
Ne pas exposer à l’eau.
Ni-MH
Li-ion
Pour les pays de l’Union européenne uniquement
Ne jetez pas les appareils électriques ou
les batteries avec vos ordures ménagères !
Conformément aux directives européennes rela-
tives aux déchets d’équipements électriques et
électroniques et aux piles et accumulateurs ainsi
qu’aux déchets de piles et d’accumulateurs et leur
mise en œuvre conformément aux lois nationales,
les équipements électriques, les piles et les batte-
ries en n de vie doivent faire l’objet d’une collecte
sélective et être conés à une usine de recyclage
respectueuse de l’environnement.
Utilisations
L’outil est conçu pour tailler les haies.
Bruit
Norme applicable : EN60745-2-15
Modèle Niveau de pression acoustique Niveau de puissance sonore
L
PA
(dB(A)) Incertitude K
(dB(A))
L
PA
(dB(A)) Incertitude K
(dB(A))
DUH501 84 3 97 3
DUH601 82 3 95 3
DUH751 84 3 97 3
DUH502 81,3 3 86,8 3
DUH602 82,1 3 87,4 3
DUH752 80,5 3 87,8 3

17 FRANÇAIS
NOTE : La ou les valeurs d’émission de bruit déclarées ont été mesurées conformément à la méthode de test
standard et peuvent être utilisées pour comparer les outils entre eux.
NOTE : La ou les valeurs d’émission de bruit déclarées peuvent aussi être utilisées pour l’évaluation préliminaire
de l’exposition.
AVERTISSEMENT : Portez un serre-tête antibruit.
AVERTISSEMENT : L’émission de bruit lors de l’usage réel de l’outil électrique peut être différente de
la ou des valeurs déclarées, suivant la façon dont l’outil est utilisé, particulièrement selon le type de pièce
usinée.
AVERTISSEMENT : Les mesures de sécurité à prendre pour protéger l’utilisateur doivent être basées
sur une estimation de l’exposition dans des conditions réelles d’utilisation (en tenant compte de toutes
les composantes du cycle d’utilisation, comme par exemple le moment de sa mise hors tension, lorsqu’il
tourne à vide et le moment de son déclenchement).
Vibrations
Valeur totale de vibrations (somme de vecteur triaxial)
déterminée selon EN60745-2-15 :
Modèle DUH501
Émission de vibrations (a
h
) : 2,5 m/s
2
Incertitude (K) : 1,5 m/s
2
Modèle DUH601
Émission de vibrations (a
h
) : 2,5 m/s
2
ou moins
Incertitude (K) : 1,5 m/s
2
Modèle DUH751
Émission de vibrations (a
h
) : 2,5 m/s
2
Incertitude (K) : 1,5 m/s
2
Modèle DUH502
Émission de vibrations (a
h
) : 2,5 m/s
2
Incertitude (K) : 1,5 m/s
2
Modèle DUH602
Émission de vibrations (a
h
) : 2,5 m/s
2
ou moins
Incertitude (K) : 1,5 m/s
2
Modèle DUH752
Émission de vibrations (a
h
) : 2,5 m/s
2
ou moins
Incertitude (K) : 1,5 m/s
2
NOTE : La ou les valeurs de vibration totales décla-
rées ont été mesurées conformément à la méthode
de test standard et peuvent être utilisées pour com-
parer les outils entre eux.
NOTE : La ou les valeurs de vibration totales décla-
rées peuvent aussi être utilisées pour l’évaluation
préliminaire de l’exposition.
AVERTISSEMENT : L’émission de vibrations
lors de l’usage réel de l’outil électrique peut être
différente de la ou des valeurs déclarées, suivant
la façon dont l’outil est utilisé, particulièrement
selon le type de pièce usinée.
AVERTISSEMENT : Les mesures de sécurité
à prendre pour protéger l’utilisateur doivent être
basées sur une estimation de l’exposition dans
des conditions réelles d’utilisation (en tenant
compte de toutes les composantes du cycle
d’utilisation, comme par exemple le moment de
sa mise hors tension, lorsqu’il tourne à vide et le
moment de son déclenchement).
Déclaration de conformité CE
Pour les pays européens uniquement
La déclaration de conformité CE est fournie en Annexe
A à ce mode d’emploi.
CONSIGNES DE SÉCURITÉ
Consignes de sécurité générales
pour outils électriques
AVERTISSEMENT : Veuillez lire les
consignes de sécurité, instructions, illustrations
et spécications qui accompagnent cet outil
électrique. Le non-respect de toutes les instructions
indiquées ci-dessous peut entraîner une électrocu-
tion, un incendie et/ou de graves blessures.
Conservez toutes les mises en
garde et instructions pour réfé-
rence ultérieure.
Le terme « outil électrique » dans les avertissements
fait référence à l’outil électrique alimenté par le secteur
(avec cordon d’alimentation) ou à l’outil électrique fonc-
tionnant sur batterie (sans cordon d’alimentation).
Consignes de sécurité pour taille-
haie sans l
1. Prenez soin de n’approcher aucune partie
du corps de la lame de coupe. Ne retirez pas
le matériau coupé, ni ne tenez le matériau à
couper lorsque les lames sont en mouvement.
Assurez-vous que le commutateur est éteint
lorsque vous dégagez un matériau bloqué.
Un moment d’inattention en cours d’utilisation du
taille-haie peut entraîner des blessures graves.
2. Transportez le taille-haie par la poignée avec
la lame de coupe arrêtée. Lors du transport ou
du rangement du taille-haie, mettez toujours
en place le couvercle du dispositif de coupe.
Une manipulation correcte du taille-haie réduira
le risque de blessure présenté par les lames de
coupe.

18 FRANÇAIS
3.
Tenez l’outil électrique uniquement par ses surfaces
de prise isolées, car la lame de coupe pourrait
entrer en contact avec le câblage caché. Le contact
des lames de coupe avec un l sous tension peut
transmettre du courant dans les pièces métalliques
exposées de l’outil électrique et électrocuter l’utilisateur.
4. DANGER - Gardez vos mains à l’écart de la
lame. Le contact avec la lame présente un risque
de graves blessures corporelles.
5. N’utilisez pas le taille-haie sous la pluie
ou dans des conditions mouillées ou très
humides. Le moteur électrique n’est pas étanche.
6. Les utilisateurs novices doivent être formés
par un utilisateur de taille-haie expérimenté
pour leur montrer comment l’utiliser.
7. Le taille-haie ne doit pas être utilisé par des
enfants ou des adolescents de moins de 18
ans. Cette restriction peut ne pas s’appliquer aux
mineurs de plus de 16 ans s’ils sont en cours de
formation sous la surveillance d’un expert.
8.
N’utilisez le taille-haie que si vous êtes en bonne
condition physique. Si vous êtes fatigué, votre
attention sera réduite. Redoublez de précaution à la n
d’une journée de travail. Travaillez toujours en faisant
preuve de calme et de prudence. L’utilisateur est res-
ponsable de tous les dommages causés à des tiers.
9.
N’utilisez jamais le taille-haie lorsque vous êtes sous
l’inuence d’alcool, de drogues ou de médicaments.
10. Les gants de travail en cuir robuste font partie
de l’équipement de base du taille-haie et leur
port est obligatoire pendant que vous l’utilisez.
Portez également des chaussures solides à
semelles antidérapantes.
11.
Avant de commencer la tâche, assurez-vous que le
taille-haie est dans un bon état de marche sécuritaire.
Assurez-vous que les carters de protection sont
correctement installés. Le taille-haie ne doit pas être
utilisé tant qu’il n’est pas complètement assemblé.
12. Assurez-vous que vous avez une bonne assise
avant la mise en marche.
13. Tenez l’outil fermement lorsque vous l’utilisez.
14. Ne faites pas tourner l’outil à vide inutilement.
15.
Coupez immédiatement le moteur et retirez la batterie
si le coupoir entre en contact avec une clôture ou un
autre objet dur. Vériez si le coupoir est endommagé
et réparez-le sur-le-champ, le cas échéant.
16. Avant de vérier le coupoir, de le dépanner ou
de retirer les matériaux pris dedans, éteignez
toujours le taille-haie et retirez la batterie.
17. Éteignez le taille-haie et retirez la batterie
avant de procéder à l’entretien.
18.
Lorsque vous déplacez le taille-haie dans un
autre endroit, y compris pendant le travail, reti-
rez toujours la batterie et placez le couvre-lame
sur les lames de coupe. Ne transportez jamais
le taille-haie avec le coupoir fonctionnant. Ne
saisissez jamais le coupoir avec les mains.
19. Nettoyez le taille-haie et particulièrement le
coupoir après utilisation et avant de le ranger
pendant une période prolongée. Huilez légè-
rement le coupoir et mettez le couvercle en
place. Le couvercle fourni avec l’appareil peut
être accroché au mur, fournissant un moyen sûr et
pratique pour ranger le taille-haie.
20.
Rangez le taille-haie avec son couvercle en place
dans une pièce sèche. Gardez-le hors de portée des
enfants. Ne rangez jamais le taille-haie à l’extérieur.
21. Ne dirigez jamais les lames de cisaille vers
vous-même ou quelqu’un d’autre.
22. Si les lames cessent de bouger, car des corps
étrangers sont collés entre elles pendant le
fonctionnement, éteignez l’outil et retirez
la batterie, puis ôtez les corps étrangers en
utilisant un outil comme une pince. Ôter les
corps étrangers à la main présente un risque de
blessure, du fait que les lames peuvent bouger en
réaction au retrait des corps étrangers.
23. Évitez les environnements dangereux.
N’utilisez pas l’outil dans un endroit humide, ni
ne l’exposez à la pluie. Le risque d’électrocu-
tion augmente si de l’eau pénètre dans l’outil.
24. Ne jetez pas la ou les batteries au feu.
L’élément de la pile pourrait exploser.
Consultez les codes locaux pour de possibles
instructions de mise au rebut spéciales.
25. N’ouvrez ni ne manipulez la ou les batteries.
L’électrolyte qui s’échappe de la batterie est
corrosif et peut irriter la peau ou les yeux. Il
peut être toxique en cas d’ingestion.
26. Ne chargez pas la batterie sous la pluie ou
dans un endroit mouillé.
27. Vériez l’absence de corps étrangers comme
du l barbelé ou un câblage caché dans les
haies et les buissons avant d’utiliser l’outil.
CONSERVEZ CES INSTRUCTIONS.
AVERTISSEMENT : NE vous laissez PAS
tromper (au l d’une utilisation répétée) par un
sentiment d’aisance et de familiarité avec le
produit, en négligeant le respect rigoureux des
consignes de sécurité qui accompagnent le pro-
duit en question. La MAUVAISE UTILISATION de
l’outil ou l’ignorance des consignes de sécurité
indiquées dans ce mode d’emploi peut entraîner
de graves blessures.
Consignes de sécurité importantes
pour la batterie
1. Avant d’utiliser la batterie, lisez toutes les
instructions et précautions relatives (1) au
chargeur de batterie, (2) à la batterie, et (3) au
produit utilisant la batterie.
2. Ne démontez pas la batterie.
3. Cessez immédiatement l’utilisation si le temps
de fonctionnement devient excessivement
court. Il y a risque de surchauffe, de brûlures,
voire d’explosion.
4.
Si l’électrolyte pénètre dans vos yeux, rincez-les
à l’eau claire et consultez immédiatement un
médecin. Il y a risque de perte de la vue.
5. Ne court-circuitez pas la batterie :
(1) Ne touchez les bornes avec aucun maté-
riau conducteur.
(2)
Évitez de ranger la batterie dans un conteneur
avec d’autres objets métalliques, par exemple
des clous, des pièces de monnaie, etc.
(3)
N’exposez pas la batterie à l’eau ou à la pluie.

19 FRANÇAIS
Un court-circuit de la batterie peut provoquer
une intensité de courant élevée, une sur-
chauffe, parfois des brûlures et même une
panne.
6. Ne rangez pas l’outil et la batterie dans un
endroit où la température risque d’atteindre ou
de dépasser 50 °C.
7. Ne jetez pas la batterie au feu même si elle est
sérieusement endommagée ou complètement
épuisée. La batterie peut exploser au contact
du feu.
8. Évitez de laisser tomber ou de cogner la
batterie.
9. N’utilisez pas la batterie si elle est
endommagée.
10. Les batteries au lithium-ion contenues sont
soumises aux exigences de la législation sur
les marchandises dangereuses.
Lors du transport commercial par des tierces
parties ou des transitaires par exemple, des exi-
gences spéciques en matière d’étiquetage et
d’emballage doivent être respectées.
Pour la préparation de l’article expédié, il est
nécessaire de consulter un expert en matériau
dangereux. Veuillez également respecter les
réglementations nationales susceptibles d’être
plus détaillées.
Recouvrez les contacts exposés avec du ruban
adhésif ou du ruban de masquage et emballez la
batterie de telle sorte qu’elle ne puisse pas bouger
dans l’emballage.
11. Suivez les réglementations locales en matière
de mise au rebut des batteries.
12. Utilisez les batteries uniquement avec les
produits spéciés par Makita. L’insertion de
batteries dans des produits non conformes peut
provoquer un incendie, une chaleur excessive,
une explosion ou une fuite de l’électrolyte.
CONSERVEZ CES INSTRUCTIONS.
ATTENTION : N’utilisez que des batteries
Makita d’origine. L’utilisation de batteries de marque
autre que Makita ou de batteries modiées peut pro-
voquer l’explosion des batteries, ce qui présente un
risque d’incendie, de dommages matériels et corpo-
rels. Cela annulera également la garantie Makita pour
l’outil et le chargeur Makita.
Conseils pour assurer la durée
de vie optimale de la batterie
1. Chargez la batterie avant qu’elle ne soit com-
plètement déchargée. Arrêtez toujours l’outil
et rechargez la batterie quand vous remarquez
que la puissance de l’outil diminue.
2. Ne rechargez jamais une batterie complète-
ment chargée. La surcharge réduit la durée de
service de la batterie.
3. Chargez la batterie à une température
ambiante comprise entre 10 °C et 40 °C. Avant
de charger une batterie chaude, laissez-la
refroidir.
4. Rechargez la batterie si elle est restée inutili-
sée pendant une période prolongée (plus de
six mois).
DESCRIPTION DU
FONCTIONNEMENT
ATTENTION :
Assurez-vous toujours que
l’outil est hors tension et que sa batterie est retirée
avant de l’ajuster ou de vérier son fonctionnement.
Insertion ou retrait de la batterie
ATTENTION : Éteignez toujours l’outil avant
de mettre en place ou de retirer la batterie.
ATTENTION :
Tenez fermement l’outil et la batte-
rie lors de la mise en place ou du retrait de la batterie. Si
vous ne tenez pas fermement l’outil et la batterie, ils peuvent
vous glisser des mains, et s’abîmer ou vous blesser.
► Fig.1: 1. Voyant rouge 2. Bouton 3. Batterie
Pour retirer la batterie, faites-la glisser hors de l’outil
tout en faisant glisser le bouton à l’avant de la batterie.
Pour mettre en place la batterie, alignez la languette sur la
batterie avec la rainure sur le compartiment et insérez-la.
Insérez-la à fond jusqu’à ce qu’un léger déclic se fasse
entendre. Si le voyant rouge sur le dessus du bouton est
visible, cela signie qu’elle n’est pas bien verrouillée.
ATTENTION :
Insérez toujours complètement la
batterie jusqu’à ce que le voyant rouge ne soit plus visible.
Sinon, elle pourrait tomber accidentellement de l’outil, au risque
de vous blesser ou de blesser quelqu’un se trouvant près de vous.
ATTENTION : N’insérez pas la batterie de
force. Si elle ne glisse pas facilement, c’est que vous
ne l’insérez pas correctement.
Indication de la charge restante de la batterie
Uniquement pour les batteries avec voyant lumineux
► Fig.2: 1. Témoins 2. Bouton de vérication
Appuyez sur le bouton de vérication sur la batterie
pour indiquer la charge restante de la batterie. Les
témoins s’allument pendant quelques secondes.
Témoins Charge
restante
Allumé Éteint Clignotant
75 % à 100 %
50 % à 75 %
25 % à 50 %
0 % à 25 %
Chargez la
batterie.
Anomalie
possible
de la batterie.

20 FRANÇAIS
NOTE : Selon les conditions d’utilisation et la tem-
pérature ambiante, l’indication peut être légèrement
différente de la capacité réelle.
Système de protection de l’outil/la
batterie
L’outil est équipé d’un système de protection de l’outil/la
batterie. Ce système coupe automatiquement l’alimen-
tation vers le moteur pour prolonger la durée de vie de
l’outil et de la batterie. Si l’outil ou la batterie se trouve
dans l’une des situations suivantes, l’outil cessera
automatiquement de fonctionner.
État Témoins
Allumé Éteint Clignotant
Surcharge
Surchauffe
Décharge
excessive
Protection contre la surcharge
Si l’outil est surchargé par un enchevêtrement de
branches ou d’autres débris, les voyants et
intermédiaires se mettent à clignoter et l’outil s’arrête
automatiquement.
Dans ce cas, éteignez l’outil et arrêtez la tâche ayant
provoqué la surcharge de l’outil. Puis rallumez l’outil
pour reprendre la tâche.
REMARQUE : Selon les conditions d’utilisation,
l’outil s’éteint automatiquement sans indication
s’il est surchargé par un enchevêtrement de
branches ou de débris. Dans ce cas, éteignez
l’outil et retirez la batterie, puis ôtez l’enchevê-
trement de branches ou de débris en utilisant
un outil comme une pince. Après avoir ôté les
branches ou débris, remettez la batterie en place
et rallumez l’outil.
Protection contre la surchauffe de
l’outil ou de la batterie
Deux types de surchauffe sont possibles : surchauffe de
l’outil et surchauffe de la batterie. En cas de surchauffe
de l’outil, tous les indicateurs de vitesse clignotent.
En cas de surchauffe de la batterie, les indica-
teurs clignotent.
En cas de surchauffe, l’outil s’arrête automatiquement.
Laissez l’outil et/ou la batterie refroidir avant de rallumer
l’outil.
Protection contre la décharge totale
de la batterie
Lorsque la charge restante de la batterie devient très faible,
l’outil s’arrête automatiquement et l’indicateur clignote.
Si l’outil ne fonctionne pas même en actionnant les
interrupteurs, retirez la batterie de l’outil et chargez-la.
Réglage de l’angle de la poignée
ATTENTION : Avant l’utilisation, assu-
rez-vous toujours que la poignée se verrouille sur
la position souhaitée.
ATTENTION : N’abaissez pas le levier pour
déverrouiller la poignée tout en enclenchant la
gâchette. N’enclenchez pas la gâchette tout en
abaissant le levier et en tournant la poignée.
Sinon, l’outil risque de mal fonctionner.
Vous pouvez régler l’angle de la poignée à 0°, 45° ou
90° vers la gauche ou la droite. Pour changer l’angle de
la poignée, tournez-la tout en abaissant le levier, puis
relâchez le levier.
► Fig.3: 1. Levier
Fonctionnement de l’interrupteur
d’alimentation
AVERTISSEMENT : Par mesure de sécu-
rité, cet outil est équipé d’un levier de sécurité
qui empêche le démarrage inopiné de l’outil.
N’utilisez JAMAIS l’outil s’il se met en marche
lorsque vous appuyez simplement sur le levier
interrupteur et enclenchez la gâchette sans avoir
enfoncé le levier de sécurité. Conez l’outil à
notre centre d’entretien agréé pour le faire réparer
AVANT de poursuivre l’utilisation.
AVERTISSEMENT : Ne scotchez JAMAIS le
levier de sécurité, ni n’ignorez son objectif et sa
fonction.
AVERTISSEMENT : Avant d’insérer la batte-
rie dans l’outil, vériez toujours que la gâchette et
le levier interrupteur fonctionnent correctement
et reviennent en position d’arrêt lorsqu’ils sont
relâchés. L’utilisation d’un outil dont l’interrupteur est
défectueux comporte un risque de perte de contrôle
et de graves blessures.
ATTENTION : Ne placez jamais votre doigt
sur l’interrupteur lors du transport. L’outil risque-
rait de démarrer brusquement et de provoquer des
blessures.
REMARQUE : Évitez d’appuyer sur la gâchette
avec force lorsque le levier de sécurité n’est pas
enfoncé. Vous risqueriez de briser la gâchette.
Maintenez enfoncé le bouton d’alimentation principale pour
mettre l’outil sous tension. Le témoin d’alimentation s’allume
lorsque l’outil est mis sous tension. Pour éteindre l’outil, mainte-
nez à nouveau enfoncé le bouton d’alimentation principale. Le
témoin d’alimentation s’éteint lorsque l’outil est mis hors tension.
► Fig.4: 1. Témoin d’alimentation 2. Bouton d’alimen-
tation principale
Sayfa yükleniyor...
Sayfa yükleniyor...
Sayfa yükleniyor...
Sayfa yükleniyor...
Sayfa yükleniyor...
Sayfa yükleniyor...
Sayfa yükleniyor...
Sayfa yükleniyor...
Sayfa yükleniyor...
Sayfa yükleniyor...
Sayfa yükleniyor...
Sayfa yükleniyor...
Sayfa yükleniyor...
Sayfa yükleniyor...
Sayfa yükleniyor...
Sayfa yükleniyor...
Sayfa yükleniyor...
Sayfa yükleniyor...
Sayfa yükleniyor...
Sayfa yükleniyor...
Sayfa yükleniyor...
Sayfa yükleniyor...
Sayfa yükleniyor...
Sayfa yükleniyor...
Sayfa yükleniyor...
Sayfa yükleniyor...
Sayfa yükleniyor...
Sayfa yükleniyor...
Sayfa yükleniyor...
Sayfa yükleniyor...
Sayfa yükleniyor...
Sayfa yükleniyor...
Sayfa yükleniyor...
Sayfa yükleniyor...
Sayfa yükleniyor...
Sayfa yükleniyor...
Sayfa yükleniyor...
Sayfa yükleniyor...
Sayfa yükleniyor...
Sayfa yükleniyor...
Sayfa yükleniyor...
Sayfa yükleniyor...
Sayfa yükleniyor...
Sayfa yükleniyor...
Sayfa yükleniyor...
Sayfa yükleniyor...
Sayfa yükleniyor...
Sayfa yükleniyor...
Sayfa yükleniyor...
Sayfa yükleniyor...
Sayfa yükleniyor...
Sayfa yükleniyor...
Sayfa yükleniyor...
Sayfa yükleniyor...
Sayfa yükleniyor...
Sayfa yükleniyor...
Sayfa yükleniyor...
Sayfa yükleniyor...
Sayfa yükleniyor...
Sayfa yükleniyor...
Sayfa yükleniyor...
Sayfa yükleniyor...
Sayfa yükleniyor...
Sayfa yükleniyor...
Sayfa yükleniyor...
Sayfa yükleniyor...
Sayfa yükleniyor...
Sayfa yükleniyor...
Sayfa yükleniyor...
Sayfa yükleniyor...
Sayfa yükleniyor...
Sayfa yükleniyor...
Sayfa yükleniyor...
Sayfa yükleniyor...
Sayfa yükleniyor...
Sayfa yükleniyor...
-
 1
1
-
 2
2
-
 3
3
-
 4
4
-
 5
5
-
 6
6
-
 7
7
-
 8
8
-
 9
9
-
 10
10
-
 11
11
-
 12
12
-
 13
13
-
 14
14
-
 15
15
-
 16
16
-
 17
17
-
 18
18
-
 19
19
-
 20
20
-
 21
21
-
 22
22
-
 23
23
-
 24
24
-
 25
25
-
 26
26
-
 27
27
-
 28
28
-
 29
29
-
 30
30
-
 31
31
-
 32
32
-
 33
33
-
 34
34
-
 35
35
-
 36
36
-
 37
37
-
 38
38
-
 39
39
-
 40
40
-
 41
41
-
 42
42
-
 43
43
-
 44
44
-
 45
45
-
 46
46
-
 47
47
-
 48
48
-
 49
49
-
 50
50
-
 51
51
-
 52
52
-
 53
53
-
 54
54
-
 55
55
-
 56
56
-
 57
57
-
 58
58
-
 59
59
-
 60
60
-
 61
61
-
 62
62
-
 63
63
-
 64
64
-
 65
65
-
 66
66
-
 67
67
-
 68
68
-
 69
69
-
 70
70
-
 71
71
-
 72
72
-
 73
73
-
 74
74
-
 75
75
-
 76
76
-
 77
77
-
 78
78
-
 79
79
-
 80
80
-
 81
81
-
 82
82
-
 83
83
-
 84
84
-
 85
85
-
 86
86
-
 87
87
-
 88
88
-
 89
89
-
 90
90
-
 91
91
-
 92
92
-
 93
93
-
 94
94
-
 95
95
-
 96
96


Dolmar DUH502 El kitabı
- Kategori
- Elektrikli çit düzelticiler
- Tip
- El kitabı
diğer dillerde
- español: Dolmar DUH502 El manual del propietario
- français: Dolmar DUH502 Le manuel du propriétaire
- italiano: Dolmar DUH502 Manuale del proprietario
- Deutsch: Dolmar DUH502 Bedienungsanleitung
- português: Dolmar DUH502 Manual do proprietário
- dansk: Dolmar DUH502 Brugervejledning
- Nederlands: Dolmar DUH502 de handleiding
İlgili makaleler
Diğer belgeler
-
Makita DUH506 Kullanım kılavuzu
-
Makita DUN461W Kullanım kılavuzu
-
Makita UN460WD Kullanım kılavuzu
-
-
-
-
Ikra BDA MX-CH-18 (AHS 4518 LI) El kitabı
-
Makita UH201D Kullanım kılavuzu
-
Makita DPB180 Kullanım kılavuzu
-