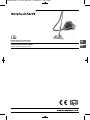
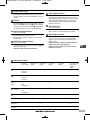
Morphy Richards PremAir Cyclonic 70035 Kullanım kılavuzu
- Kategori
- Elektrikli süpürgeler
- Tip
- Kullanım kılavuzu
Bu kılavuz aynı zamanda aşağıdakiler için de uygundur:

g
t
PremAir Cyclonic vacuum cleaner
Please read and keep these instructions
PremAir Cyclonic elektrikli süpürge
Lütfen bu talimatları okuyun ve saklayın
71063MTR Rev1_Ion 441375253 Rev 1 23/02/2012 14:49 Page 1

2
⁄
¤
‹
›
fi
fl
‡
‚
Ê
‰
„
Â
Ë
È
·
Í
Î
Ï
Ì
Ô
Ó
Á
Ò
Ú
Û
Ù
¤
ı
ˆ
71063MTR Rev1_Ion 441375253 Rev 1 23/02/2012 14:49 Page 2

3
www.morphyrichards.com
3
g
t
BA
Ú
Ò
DC
F G
E
ı
H
71063MTR Rev1_Ion 441375253 Rev 1 23/02/2012 14:49 Page 3

IMPORTANT SAFETY INSTRUCTIONS
The use of any electrical appliance requires the following
common sense safety rules.
Primarily there is danger of injury or death and secondly the
danger of damage to the appliance.
Please read before using the appliance.
Location
• Do not use or keep this product outside.
• Do not store the appliance near hot surfaces eg ovens or heating
appliances.
Mains lead
• Do not allow the mains lead to become strained or run this
appliance over it.
• If the electrical cable becomes damaged the cable assembly
must be replaced. Do not attempt this task yourself, contact the
helpline number that is found at the back of this booklet.
Personal safety
• The plug must be removed from the wall socket before cleaning
or maintaining the appliance.
• Never modify the cleaner in any way.
• Never use in the presence of explosive liquids or vapours.
• Never pick up inflammable or poisonous liquids such as petrol,
copier toner or other volatile substances. Never pick up acids,
asbestos or asbestos dust.
• Repairs to electrical appliances are only to be undertaken by
trained personnel. Unprofessional repairs can be dangerous for
users.
• Use only genuine Morphy Richards spare parts and accessories.
• The appliance must never be left running when unsupervised.
• This vacuum cleaner is intended for domestic use only. Misuse or
use for commercial or any other purpose will render the
guarantee invalid.
• This appliance is not intended for use by persons (including
children) with reduced physical, sensory or mental capabilities, or
lack of experience and knowledge, unless they have been given
supervision or instruction concerning use of the appliance by a
person responsible for their safety.
Product safety
• Never use the appliance without the filters being installed.
• Never use the appliance to vacuum hot ashes, broken glass,
sharp objects or liquids.
Children
• Children do not understand the dangers associated with
operating electrical appliances. Never allow children to use this
appliance.
• Young children should be supervised to ensure that they do not
play with the appliance or stumble over the power cord.
ELECTRICAL REQUIREMENTS
Check that the voltage on the rating plate of your appliance
corresponds with your house electricity supply which must be
A.C. (Alternating current).
UK only
If the socket outlets in your home are not suitable for the plug
supplied with this appliance the plug should be removed and the
appropriate one fitted.
If you cut off the plug and let go of the cable it will rewind into the
machine therefore you must pull out a length of cable and
secure it before cutting the plug off and re-fitting a new one.
WARNING: The plug removed from the mains lead, if severed,
must be destroyed as a plug with a bared flexible cord is
hazardous if engaged into a live socket outlet.
Where used, should the fuse in the 13 amp plug require changing
a 13 amp BS1362 fuse must be fitted.
g
4
71063MTR Rev1_Ion 441375253 Rev 1 23/02/2012 14:49 Page 4

5
www.morphyrichards.com
5
g
FEATURES
⁄ Hose inlet
¤ Dust canister
‹ Dust canister release button
› Carrying handle
fi On/off power switch
fl Eco switch
‡ Parking slot
· Tool storage drawer
‚ Plug recess
„ Cable rewind switch
‰ Exhaust filter grille
 Exhaust filter
Ê Dust canister lid
Á Pleated, washable dust canister filter
Ë Mesh filter cover
È Standard hose
Í Hose handle with airflow regulator
Î Telescopic tube (length adjustable)
Ï Combination floor nozzle
Ì Hard floor nozzle (certain models only)
Ó Large turbo nozzle (certain models only)
Ô Small turbo nozzle (certain models only)
Upholstery nozzle
Ò Clip on brush (attached to )
Ú Crevice tool
Note: ,Ò,Ú are stored in the tool storage drawer ·.
Û Stretch stair hose (certain models only)
Ù Filter cleaning brush
ı Dust canister lid release
ˆ Hair and Stair tool (certain models only)
OPERATING THE APPLIANCE
Quick start
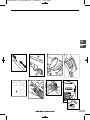
1 Assemble the combination floor nozzle Ï, telescopic tube and
hose as shown. (Shown on page 3).
2 Pull out the mains cable to it’s full length and plug into the mains
supply.
3 Switch on by pressing the on/off switch fi.
Tools and accessories
1 Fit the hose to the cleaner by inserting the hose end into the hose
inlet ⁄. When removing, squeeze the clips either side and pull.
2 Attach the telescopic tube. Extend to the required length by
pushing up the slider release and pulling out the tube A.
The hose handle features an airflow regulator which allows suction
to be reduced as required.
3 Attach your choice of floor nozzle to the telescopic tube Î.
Combination floor nozzle
The combination floor nozzle can be adjusted to suit different floor
surfaces. Retract the brushes for use on carpet. The brushes
should be down for use on hardfloors or damage may occur.
Hand tools
The crevice tool Ú (for awkward places, behind radiators etc) and
the upholstery nozzle with clip on brush Ò (for curtains and
upholstery) are stored in the tool drawer · B.
Using the large turbo nozzle
(certain models only)
Attach the large turbo nozzle to the telescopic tubes.
This nozzle is ideal for carpet and especially effective at removing
pet hair.
Using the small turbo nozzle
(certain models only)
Attach the turbo nozzle to the hose handle Í only for use on
upholstery and stairs.
WARNING: The turbo nozzle should not be used with the
extension tubes. Attach to the hose handle only.
Cleaning the turbo nozzles
The turbo nozzles should be regularly cleaned and any hairs or
fibres wrapped around the brush bar removed to maintain
optimum performance. To aid cleaning, the small turbo nozzle can
be opened up by pushing the button on the nozzle forwards. A
cover on the bottom of the large turbo nozzle allows access to the
turbine fan.
Hardfloor nozzle
(certain models only)
Attach the hardfloor nozzle to the telescopic tubes. This nozzle is
ideal for use on wood, laminate, tile and vinyl flooring.
Hair and Stair tool
(certain models only)
Attach the Hair and Stair tool ˆ to either the 2 separate
attachable tubes, or the single telescopic tube (dependent on
model).
This tool ˆ is suitable for cleaning the stairs, and when the
additional attachment is added, it is ideal for picking up human
and pet hair.
71063MTR Rev1_Ion 441375253 Rev 1 23/02/2012 14:49 Page 5

6
Stretch stair hose
An additional stretch hose is also provided for use on stairs. Fit
the hose to the cleaner by inserting the hose end into the hose
inlet. When removing squeeze the clips either side and pull.
WARNING: For safety, always leave the cleaner at the bottom
of the stairs and clean upwards.
WARNING: We do not recommend using the stair hose for
general floor cleaning.
Quick guide to accessories:
Combination Large turbo Small turbo Hard floor Crevice tool Upholstery Hair and
floor nozzle nozzle nozzle nozzle nozzle Stair tool
with clip
on-brush
Carpet
33
With brushes
retracted
Rugs
33
With brushes
retracted
Wood/
33
laminate With brushes
dow n
Tile
33
With brushes
down
Vinyl
3
Upholstery
333 33
Stairs
333
Small spaces
3
71063MTR Rev1_Ion 441375253 Rev 1 23/02/2012 14:49 Page 6

7www.morphyrichards.com
7
g
CONTROLS
Eco switch
A variable Eco switch fl varies the suction power as required. For
example, maximum suction can be used for cleaning carpets,
hard floors etc. and reduced suction for cleaning upholstery and
curtains.
Suction can also be controlled using the airflow regulator on the
hose handle. Closed for maximum suction, open for reduced
suction.
Automatic cable rewind
After use, unplug and press the cable rewind switch to retract the
cable.
WARNING: When using the cable rewind, always hold the plug
as the cable will rewind quickly.
DUST CANISTER
Emptying
To obtain the best results from your cleaner empty the dust
canister regularly, otherwise the airflow and cleaning power will be
reduced.
1 Everytime the dust canister is emptied, turn the yellow dial
(a minimum of 5 revolutions) prior to pressing the dust canister
release button (this will agitate the fine dust between the filter
pleats and restore the air flow)
2 Remove the dust canister from the product by pressing the dust
canister release button ‹ Lift up the lid and remove the canister
from the product, pulling the dust canister away from the product
C.
3 Holding the dust canister over a dustbin press the dust release
button as shown D, the bottom of the dust container will drop
down to release the dirt.
4 Close the bottom of the dust canister by pressing the base
upwards until it clicks into place.
5 Refit the dust canister back into the product. Make certain the
dust canister feet are located in place.
6 Close the lid securely.
Allergy sufferers
If the allergy sufferer is emptying the product it is recommended
that the container is placed into a plastic bag to empty.
1 Place the container inside the plastic bag, releasing the
container with one hand whilst holding the top of the bag closed
with the other, leave the dust to settle for a few seconds before
carefully removing the empty canister. The plastic bag can then be
sealed and disposed of.
FILTERS
Cleaning canister filter
1 Access the filter assembly by removing the lid. Press the lid
release button down then rotate the lid E.
2 Use the filter cleaning brush to remove any fluff from the outside
of the mesh filter or gently tap.
3 Rotate mesh filter anti-clockwise to disassemble.
4 Shake the pleated filter to remove any dust.
5 Both the mesh and pleated filters may be washed (in cool water
only) but must be thoroughly air dried before refitting.
6 To re-assemble, locate the pleated filter into the lid then secure
into place with the mesh filter by rotating the mesh filter anti-
clockwise.
7 Fit the lid with filter assembly onto the canister then rotate
clockwise until it locks into place.
IMPORTANT: Do not use detergents to clean the filter. The filter
should be regularly washed, and must be thoroughly dry before
the machine is used.
• The dust container may not lock back onto the machine unless
the filter is fitted correctly
Exhaust filter
The exhaust filter  is located at the rear of the cleaner. Press the
catch and pull the exhaust grille ‰ away F. Pull the bottom of
the filter outwards so the top of the filter unhooks from the filter
recess.
Foam filters may be washed (in cool water), thoroughly air-dried
and re-fitted. The pleated filters used on the Allergy models
cannot be washed and should be replaced every 6 months or
sooner depending on use.
IMPORTANT: To re-fit the filters, first hook the top of the filter into
the filter recess then push the bottom of the filter into location G.
Note: If the filter is not correctly hooked in the exhaust filter grille
will not close.
After fitting the filter, re-fit the exhaust filter grille by hooking the
bottom of the grille in first and then pushing the top close until it
clicks fully closed.
IMPORTANT: All filters should be checked regularly for signs of
damage, preferably after each cleaning task. The filters must be
replaced immediately if they become damaged.
• Always disconnect the cleaner from the mains when checking
filters.
• Always make sure all filters are fitted before use. Failure to do so
may result in damage to your product.
71063MTR Rev1_Ion 441375253 Rev 1 23/02/2012 14:49 Page 7

8
Storage position
When finished you can store the tubes and accessories by
locating the tube storage clip into the parking slot on the side of
the cleaner as shown H.
Safety cut-out
If the cleaner overheats a motor protection thermostat will
automatically switch the motor off. If this happens, switch the
cleaner off, unplug from the power supply and leave the cleaner to
cool for at least 60 minutes. Check the airways for blockages,
empty dust canister and clean the filters before restarting.
Cleaning and maintenance
Unplug from the mains before cleaning. The vacuum cleaner,
especially the dust compartment and all accessories can be
cleaned using a damp cloth or a non-abrasive cleaner and wiped
dry.
Purchasing replacement filters
Use only original Morphy Richards filters.
THIS SECTION IS ONLY APPLICABLE FOR
CUSTOMERS IN UK AND IRELAND
REGISTERING YOUR TWO YEAR GUARANTEE
Your standard one year guarantee is extended for an additional
12 months when you register the product within 28 days of
purchase with Morphy Richards. If you do not register the
product with Morphy Richards within 28 days, your product is
guaranteed for 1 year. To validate your 2 year guarantee register
with us online at www.morphyrichards.co.uk
N.B. Each qualifying product needs to be registered with Morphy
Richards individually. Please refer to the one year guarantee for
more information.
YOUR ONE YEAR GUARANTEE
It is important to retain the retailer’s receipt as proof of
purchase. Staple your receipt to this back cover for future
reference. Please quote the following information if the product
develops a fault. These numbers can be found on the base of
the product.
Model no.
Serial no.
All Morphy Richards products are individually tested before
leaving the factory. In the unlikely event of any appliance proving
to be faulty within 28 days of purchase, it should be returned to
the place of purchase for it to be replaced. If the fault develops
after 28 days and within 12 months of original purchase, you
should contact the Helpline number quoting Model number and
Serial number on the product, or write to Morphy Richards at
the address shown. You may be asked to return a copy of proof
of purchase. Subject to the exclusions set out below (see
Exclusions), the faulty appliance will then be repaired or
replaced and dispatched usually within 7 working days of
receipt. If, for any reason, this item is replaced during the 1 year
guarantee period, the guarantee on the new item will be
calculated from original purchase date. Therefore it is vital to
retain your original till receipt or invoice to indicate the date of
initial purchase. To qualify for the 1 year guarantee, the appliance
must have been used according to the instructions supplied. For
example, crumb trays should have been emptied regularly.
EXCLUSIONS
Morphy Richards shall not be liable to replace or repair the
goods under the terms of the guarantee where:
1 The fault has been caused or is attributable to accidental use,
misuse, negligent use or used contrary to the manufacturer’s
recommendations or where the fault has been caused by power
surges or damage caused in transit.
2 The appliance has been used on a voltage supply other than that
stamped on the products.
3 Repairs have been attempted by persons other than our service
staff (or authorised dealer).
4 The appliance has been used for hire purposes or non domestic
use.
5 The appliance is second hand.
6 Morphy Richards are not liable to carry out any type of servicing
work, under the guarantee.
7 Plastic filters for all Morphy Richards kettles and coffee makers are
not covered by the guarantee.
8 Batteries and damage from leakage are not covered by the
guarantee.
9 The filters have not be cleaned and replaced as instructed.
This guarantee does not confer any rights other than those
expressly set out above and does not cover any claims for
consequential loss or damage. This guarantee is offered as an
additional benefit and does not affect your statutory rights as a
consumer.
YOUR INTERNATIONAL TWO YEAR GUARANTEE
This appliance is covered by two-year repair or replacement
warranty.
It is important to retain the retailers receipt as proof of purchase.
Staple your receipt to this back cover for future reference.
Please quote the following information if the product develops a
fault. These numbers can be found on the base of the product.
Model no.
Serial no.
All Morphy Richards products are individually tested before
leaving the factory. In the unlikely event of any appliance proving
to be faulty within 28 days of purchase it should be returned to
the place of purchase for it to be replaced.
If the fault develops after 28 days and within 24 months of
original purchase, you should contact your local distributor
quoting Model number and Serial number on the product, or
write to your local distributor at the addresses shown.
You will be asked to return the product (in secure, adequate
packaging) to the address below along with a copy of proof of
purchase.
Subject to the exclusions set out below (1-9) the faulty appliance
71063MTR Rev1_Ion 441375253 Rev 1 23/02/2012 14:49 Page 8

9
g
will then be repaired or replaced and dispatched usually within 7
working days of receipt.
If for any reason this item is replaced during the 2-year
guarantee period, the guarantee on the new item will be
calculated from original purchase date. Therefore it is vital to
retain your original till receipt or invoice to indicate the date of
initial purchase.
To qualify for the 2-year guarantee the appliance must have been
used according to the manufacturers instructions. For example,
appliances must have been descaled and filters must have been
kept clean as instructed.
The local distributor shall not be liable to replace or repair the
goods under the terms of the guarantee where:
1 The fault has been caused or is attributable to accidental use,
misuse, negligent use or used contrary to the manufacturers
recommendations or where the fault has been caused by power
surges or damage caused in transit.
2 The appliance has been used on a voltage supply other than that
stamped on the products.
3 Repairs have been attempted by persons other than our service
staff (or authorised dealer).
4 Where the appliance has been used for hire purposes or non
domestic use.
5 The appliance is second hand.
6 The local distributor are not liable to carry out any type of servicing
work, under the guarantee.
7 The guarantee excludes consumables such as bags, filters and
glass carafes.
8 Batteries and damage from leakage are not covered by the
guarantee.
9 The filters have not be cleaned and replaced as instructed.
This guarantee does not confer any rights other than those
expressly set out above and does not cover any claims for
consequential loss or damage. This guarantee is offered as an
additional benefit and does not affect your statutory rights as a
consumer.
71063MTR Rev1_Ion 441375253 Rev 1 23/02/2012 14:49 Page 9

ÖNEMLİ GÜVENLİK TALİMATLARI
Tüm elektrikli cihazların kullanımında aşağıda belirtilen güvenlik
kuralları uygulanmalıdır.
Öncelikle yaralanma veya ölüm tehlikesi, ikinci olarak da cihazın
hasar görmesi tehlikesi bulunmaktadır.
Lütfen cihazı kullanmadan önce okuyun.
Konum
• Bu ürünü dışarıda, yağmur altında kullanmayın veya
depolamayın.
• Cihazı, sıcak yüzeyler (örneğin fırınlar veya ısıtma cihazları)
yakınında depolamayın.
Elektrik kablosu
• Elektrik kablosunun gerilmesine veya cihazın altından
geçmesine izin vermeyin.
• Elektrik kablosu hasar görürse, kablo takımı yenilenmelidir. Bu
işi kendi kendinize yapmaya çalışmayın, sayfanın altında
bulunan Destek Hattı numarasını arayın.
Kişisel emniyet
• Cihazın temizliği veya bakımını yapmadan önce fişi, duvar
prizinden çıkarılmalıdır.
• Cihazda asla herhangi bir şekilde değişiklik yapmayın.
• Cihazı patlayıcı sıvı veya gazların bulunduğu ortamlarda asla
kullanmayın.
• Benzin, fotokopi toneri veya diğer uçucu maddeler gibi yanıcı
veya zehirli sıvıları asla bu cihazla almayın. Asit, asbest veya
asbest tozunu asla bu cihazla almayın.
• Elektrikli cihazların onarımları, sadece eğitimli personel
tarafından yapılmalıdır. Profesyoneller tarafından
gerçekleştirilmeyen onarımlar, kullanıcılar için tehlikeli olabilir.
• Sadece orijinal Morphy Richards yedek parçalarını ve
aksesuarlarını kullanın.
• Cihaz, asla gözetimsiz çalışır durumda bırakılmamalıdır.
• Bu elektrik süpürgesi, sadece ev içi kullanım için tasarlanmıştır.
Hatalı veya ticari veya herhangi bir diğer amaçla kullanım,
garantiyi geçersiz hale getirecektir.
Ürün güvenliği
• Cihazı, filtreleri takılmadan asla kullanmayın.
• Cihazı, sıcak kül, kırık cam, keskin cisimler ve sıvıları vakumla
almak için asla kullanmayın.
Çocuklar
• Çocuklar elektrikli cihazların kullanımıyla ilgili tehlikeleri
bilmezler. Çocukların bu cihazı kullanmasına asla izin vermeyin.
ELEKTRİK GEREKSİNİMİ
Cihazınızın sınıflandırma plakasındaki voltajın evinizde A.A.
(alternatif akım) olması gereken elektrik beslemesiyle uyumlu
olup olmadığını kontrol edin.
ÖZELLİKLER
⁄ Hortum girişi
¤ Toz haznesi
‹ Toz haznesi serbest bırakma
düğmesi
› Taşıma sapı
fi Açma/kapama düğmesi
fl Değişken güç düğmesi
‡ Park oluğu
· Alet depo çekmecesi
‚ Fiş yuvası
„ Kablo geri sarma düğmesi
‰ Egzoz filtresi siperi
 Egzoz filtresi
Ê Toz haznesi kapağı
Á Plili, yıkanabilir toz haznesi filtresi
Ë Ağ filtre yuvası
È Standart hortum
Í Hava akımı regülatörlü hortum sapı
Î Teleskopik boru (uzunluğu ayarlanabilir)
Ï Kombine zemin başlığı
Ì Sert zemin başlığı (sadece belirli modellerde)
Ó Büyük turbo başlık (sadece belirli modellerde)
Ô Küçük turbo başlık (sadece belirli modellerde)
Döşeme başlığı
Ò Klipsli fırça (’e ekli)
Ú Dar aralık aparatı
Not: ,Ò,Ú alet depo
çekmecesinde depolanmıştır ·.
Û Esnek merdiven hortumu (sadece belirli modellerde)
Ù Filtre temizleme fırçası
ı Toz haznesi kapağı mandalı
Cihazı çalıştırma
Hızlı başlama
1 Kombine süpürme başlığını Ï, teleskopik boruyu ve hortumu,
gösterildiği şekilde monte edin. (Sayfa 3’te gösterilmektedir)
2 Elektrik kablosunu sonuna kadar çekin ve fişini elektrik prizine
takın.
3 Açma/kapama düğmesine basarak cihazı açın fi.
ALETLER VE AKSESUARLAR
1 Hortum ucunu hortum girişine takarak hortumu süpürgeye
monte edin ¤. Çıkarırken, her iki taraftaki klipsleri sıkıştırın ve
çekin.
2 Teleskopik boruyu takın. Kaymayı serbest bırakma düğmesine
basarak boruyu gerekli miktarda uzatın ve tüpü çekerek çıkarın
A.
Hortum sapında, emiş gücünü istenildiği şekilde düşürmeyi
sağlayan bir hava akımı regülatörü bulunur.
3 Seçtiğiniz süpürme başlığını teleskopik boruya ekleyin Î.
t
10
71063MTR Rev1_Ion 441375253 Rev 1 23/02/2012 14:49 Page 10

Kombine zemin başlığı
Kombine zemin başlığı, farklı zemin yüzeylerine uyum sağlamak
için ayarlanabilir. Halıda kullanım için fırçaları geri çekin. Sert
zeminlerde kullanım için fırçalar aşağı bırakılmalıdır, yoksa hasar
oluşabilir.
El aletleri
Dar aralık aparatı Ú (elverişsiz yerler, radyatör arkaları, vs. için) ve
klipsli fırçasıyla birlikte döşeme başlığı Ò (perdeler ve döşemelik
eşya için) alet çekmecesinde depolanmaktadır ·. Dar aralık aparatı
sert yüzeyler, üstü kapalı yerler, hassas eşyalar için kullanılır B.
Büyük turbo başlığın kullanımı
(sadece belirli modellerde)
Büyük turbo başlığı teleskopik boruya takın.
Bu başlık halılar için idealdir ve özellikle evcil hayvan tüylerini
almada etkilidir.
Küçük turbo başlığının kullanımı
(sadece belirli modellerde)
Sadece döşemelik eşya ve merdivenlerde kullanım için Í turbo
başlığı hortum sapına takın.
UYARI: Turbo başlık, uzatma borularıyla birlikte
kullanılmamalıdır. Sadece hortum sapına takın.
Turbo başlıkları temizleme
Turbo başlıklar düzenli olarak temizlenmeli ve ideal performansı
korumak için fırça çubuğu etrafına sarılmış tüm tüy ve havlar
uzaklaştırılmalıdır. Temizlemeye yardımcı olmak amacıyla, küçük
turbo başlığı, başlığın üzerindeki düğme ileri doğru itilerek
açılabilir. Büyük turbo başlığının altındaki bir kapak, türbinli
vantilatöre ulaşımı sağlar.
Sert zemin başlığı
(sadece belirli modellerde)
Sert zemin başlığını teleskopik boruya takın. Bu başlık, ahşap,
lamine, seramik ve vinil zeminlerde kullanım için idealdir.
Esnek merdiven hortumu
Merdivenlerde kullanım için, ilave bir esnek hortum da
verilmiştir. Hortum ucunu hortum girişine takarak hortumu
süpürgeye monte edin. Çıkarırken, her iki taraftaki klipsleri
sıkıştırın ve çekin.
UYARI: Güvenlik için, süpürgeyi her zaman merdivenin en
altında bırakın, yukarı doğru temizlik yapın.
UYARI: Genel zemin temizliği için merdiven hortumunu
kullanmamanızı öneririz.
11
t
Hızlı aksesuar rehberi:
Kombine Büyük turbo Küçük turbo Sert zemin Dar aralık Döşemelik eşya
zemin başlığı başlığı başlığı başlığı aparatı başlığı klipsli
fırçasıyla
birlikte
Halı
33
Fırça geri
çekiliyken
Kilim
33
Fırça geri
çekiliyken
Ahşap/
33
lamine Fırça
aşağıdayken
Karo seramik
33
Fırça
aşağıdayken
Vinil
3
Döşemelik eşya
33 3 3
Merdivenler
33
Dar alanlar
3
71063MTR Rev1_Ion 441375253 Rev 1 23/02/2012 14:49 Page 11

KUMANDALAR
Güç
1 Başlığı, teleskopik boruyu ve hortumu gösterildiği şekilde monte
edin. (Sayfa 3’te gösterilmektedir)
2 Elektrik kablosunu sonuna kadar çekin ve fişini elektrik prizine
takın.
3 Açma/kapama düğmesine basarak cihazı açın fi.
Değişken güç
Bir değişken güç düğmesi fl emiş gücünü istenilen şekilde
ayarlar. Örneğin, halı, sert zemin vb. temizliğinde maksimum, ve
döşemelik eşya ve perde temizliğinde düşürülmüş emiş gücü
kullanılabilir.
Emiş gücü ayrıca, hortum sapı üzerindeki hava akımı
regülatörünü kullanarak da kontrol edilebilir. Maksimum emiş
gücü için kapalı, düşürülmüş emiş gücü için açıktır.
Otomatik kablo sarıcı
Kullandıktan sonra, fişi prizden çekin ve kabloyu geri çekmek
için kablo sarma düğmesine basın.
UYARI: Kablo sarıcıyı kullanırken, kablo hızla geri
sarıldığından, fişi elinizde tutun.
TOZ HAZNESİ
Boşaltma
Süpürgenizden en iyi sonucu almak için toz haznesini düzenli
olarak boşaltın, aksi takdirde hava akımı ve temizleme gücü
azalacaktır.
1 Toz haznesini her boşaltmanızda, toz haznesi serbest bırakma
düğmesine basmadan önce sarı kadranı (minimum 5 devir)
çevirin (bu işlem, filtre plileri arasındaki ince tozu havalandıracak
ve hava akımını yeniden sağlayacaktır)
2 Toz haznesini, toz haznesi serbest bırakma düğmesine basarak
cihazdan ayırın ‹ Kapağı kaldırın ve hazneyi cihazın dışına
doğru çekerek çıkarın C.
3 Toz haznesini bir çöp kutusu üzerinde tutarak, gösterildiği
şekilde toz bırakma düğmesine basın D, toz konteynerinin
tabanı, tozu bırakmak için aşağı düşecektir.
4 Tabanı tık sesiyle tam yerine oturuncaya dek yukarı doğru
bastırarak, toz haznesinin altını kapatın.
5 Toz haznesini cihaz içindeki yuvasına tekrar yerleştirin. Toz
haznesi ayaklarının yerine yerleştiğinden emin olun.
6 Kapağı dikkatle kapayın.
ALERJİK KİŞİLER
Cihazı alerjik bir kişi boşaltıyorsa, konteyneri boşaltmak için bir
plastik poşetin içine koyması önerilir.
1 Konteyneri plastik poşetin içine yerleştirin, bir elinizle kapalı
poşetin tepesinden tutarken diğer elinizle konteyneri serbest
bırakın, boş hazneyi dikkatle çıkarmadan önce birkaç saniye
tozun çökmesini bekleyin. Daha sonra plastik poşetin ağzını
bağlayıp çöpe atın.
FİLTRELER
Toz haznesi filtresinin temizlenmesi
1 Kapağı kaldırarak filtre takımına ulaşın. Kapak serbest bırakma
düğmesine basın, sonra kapağı çevirin.
2 Tüylü kalıntıları temizlemek için, ağ filtrenin dışından, filtre
temizleme fırçasını kullanın.
3 Ağ filtreyi çıkarmak için saat yönünün aksine çevirin.
4 Plili filtreyi, tozdan arındırmak için sallayın.
5 Ağ ve plili filtreler yıkanabilir (sadece soğuk suda), ancak
yerlerine takılmadan önce mutlaka iyice kurutulmalıdırlar.
ÖNEMLİ: Filtreyi temizlemek için deterjan kullanmayın.
• Yerleşik orijinal filtrenin yıkanması ve kurutulması sırasında
kullanmanız için yedek bir filtre verilmiştir.
• Yeniden monte etmek için, plili filtreyi kapağın içine yerleştirin,
sonra ağ filtreyi saat yönünde çevirerek ağ filtreyle birlikte yerine
yerleştirin.
• Kapağı, filtre takımıyla birlikte haznenin üzerine takın ve yerine
kilitlenene kadar saat yönünde çevirin.
Vakum hava tazeleyici
(sadece belirli modellerde)
1 Toz haznesini boşalttıktan ve filtreleri (yukarıda madde 1-4’de
açıklandığı şekilde) çıkarttıktan sonra, ambalajını açın ve hava
tazeleyici kokuyu çıkarın.
2 Toz haznesinin içine, gösterildiği şekilde, doğrudan yerleştirin
E.
3 Filtreleri ve hazneyi yeniden yerlerine takın (yukarıda madde 5’te
açıklandığı şekilde).
Hava tazeleyicisini, sadece doğrudan toz haznesinin içine
yerleştirin. Filtrenin içine veya elektrikli süpürgenizin herhangi bir
diğer kısmına yerleştirmeyin.
Egzoz filtresi
Egzoz filtresi  süpürgenizin arka kısmında yer almaktadır.
Mandala basın ve egzoz siperini ‰ ayırın F. Filtrenin tabanını
dışa doğru çekin, böylece filtrenin tepesi filtre yuvasından
ayrılacaktır.
Köpük filtreleri (soğuk suda) yıkanabilir, iyice kurutulduktan
sonra yerine takılmalıdır. Alerji modellerinde kullanılan plili
filtreler yıkanmaz ve kulanıma bağlı olarak, her 6 ayda bir veya
daha öncesinde yenisiyle değiştirilmelidir.
ÖNEMLİ: Filtreleri yerlerine takmak için, önce filtrenin üstünü
filtre yuvasının içine asın ve filtrenin düğmesine basarak yerine
oturtun G.
Not: Filtre, egzoz filtresi siperinin içine doğru şekilde
asılmadıysa, kapanmayacaktır.
Filtreyi taktıktan sonra, önce siperin tabanını asarak, ardından
tık sesiyle tam kapanana dek üst mandalı iterek, egzoz filtresi
siperini yerine oturtun.
ÖNEMLİ: Tüm filtreler, mümkünse her temizleme işlemi
sonrasında, hasar izleri açısından düzenli olarak kontrol
edilmelidir. Filtreler hasar görmüşse derhal yenileriyle
değiştirilmelidir.
• Filtreleri kontrol ederken fişi mutlaka prizden çekin.
12
71063MTR Rev1_Ion 441375253 Rev 1 23/02/2012 14:50 Page 12

• Kullanım öncesinde tüm filtrelerin yerlerine tam oturduğundan
emin olun. Bunu yapmadığınız takdirde cihazınız hasar görebilir.
Depolama konumu
İşleminiz bittiğinde boruları ve aksesuarları, boru depolama
klipsini süpürgenin yan tarafındaki park oluğuna gösterildiği
şekilde yerleştirerek kaldırabilirsiniz.H.
Emniyet kumandası
Süpürge aşırı ısınırsa, motor koruyucu termostat motoru
otomatik olarak kapatır. Bu durum meydana geldiğinde,
süpürgeyi düğmesinden kapatın, fişini prizden çekin ve en az 30
dakika soğumaya bırakın. Tekrar çalıştırmaya başlamadan önce,
hava girişini engelleyen tıkanmaları kontrol edin, toz haznesini
boşaltın ve filtreleri temizleyin.
Temizlik ve bakım
Temizlemeden önce fişi prizden çekin. Elektrik süpürgesini,
özellikle toz bölümünü ve tüm aksesuarlarını, nemli bir bez veya
aşındırıcı olmayan bir temizleyiciyle, daha sonra kuru bezle
silmek kaydıyla temizleyebilirsiniz.
Yedek filtrelerin satın alınması
Sadece orijinal Morphy Richards filtrelerini kullanın. Bunlar,
Morphy Richards Yedek Parçalar bölümünden satın alınabilir.
DESTEK HATTI
Cihazınızla ilgili herhangi bir sıkıntı yaşarsanız, bizi aramakta
tereddüt etmeyin.
Satın aldığınız mağazaya göre muhtemelen biz size daha fazla
yardımcı olabiliriz.
Sorununuzun çalışanlarımız tarafından süratle halledilmesini
sağlamak için lütfen aşağıdaki bilgileri hazır bulundurun:
• Ürün adı
• Cihazın alt tarafında gösterilen model numarası.
• Cihazın alt tarafında gösterilen seri numarası.
İKİ YILLIK GARANTİNİZ
Bu cihaz, iki yıllık onarım ya da de ifltirme garantisi kapsamı
altındadır.
Satın alma kanıtı olarak perakende fiflinin saklanması önemlidir.
Fiflinizi ileride kullanmak için bu arka kısma zımbalayın.
Üründe bir arıza oluflursa lütfen afla ıdaki bilgileri belirtin. Bu
numaralar ürünün tabanında bulunabilir.
Model no.
Seri no.
Tüm Morphy Richards ürünleri fabrikadan çıkmadan önce tek tek
test edilmektedir. Cihazın satın alındıktan sonraki 28 gün içinde
arızalı oldu u belirlenmesi durumunda, de ifltirilmesi için satın
alındı ı yere iade edilmelidir.
28 gün sonra veya satın alma iflleminden sonraki 24 ay içinde
arıza oluflursa, ürünün üzerindeki Model numarası ve Seri
numarasını belirterek bölgenizdeki distribütör ile iletiflim kurmalı ya
da afla ıda verilen adresten bölgenizdeki distribütöre yazmalısınız.
Ürünü, satın alma kanıtının bir kopyasıyla birlikte afla ıdaki adrese
geri göndermeniz (güvenli, yeterli düzeyde paketlenmifl olarak)
istenecektir.
Afla ıda belirtilen garanti harici durumlara (1-9) tabi olarak, arızalı
cihaz tamir edilecek veya de ifltirilecek ve genellikle alındıktan
sonra 7 ifl günü içinde gönderilecektir.
Herhangi bir nedenle bu ürün 2 yıllık garanti döneminde
de ifltirilirse, yeni ürünün garantisi orijinal satın alma tarihinden
itibaren hesaplanacaktır. Bu nedenle ilk satın alma tarihini
belirtmek için faturanızı saklamanız önemlidir.
2 yıllık garantinin geçerli olması içifln cihazın, üreticinin
talimatlarına uygun olarak kullanılmıfl olması gerekmektedir.
Örne in, cihazda kireç çözücü ifllemlerinin uygulanması ve
filtrelerin belirtildi i gibi temiz tutulması gerekmektedir.
Morphy Richards ya da yerel distribütörünüz afla ıdaki durumlarda
cihazı garanti kapsamında de ifltirmek veya tamir etmek zorunda
olmayacaktır:
1 Arıza yanlıfl kullanım, ihmal veya üretici tavsiyelerine ters
kullanımdan kaynaklanıyorsa veya arıza güç yüklenmeleri ya da
taflıma sırasında oluflan hasardan kaynaklanıyorsa.
2 Cihaz, ürüne belirtilen dıflında bir besleme voltajıyla kullanıldıysa.
3 Servis personeli (veya yetkili bayi) dıflında kifliler tarafından tamir
yapılmaya çalıflılmıflsa.
4 Cihaz kiralama amacıyla veya ev dıflında kullanıldıysa.
5 Cihaz ikinci eldir.
6 Morphy Richards ya da bölgenizdeki distribütör, garanti
kapsamında herhangi bir tür servis ifllemi gerçeklefltirmek zorunda
de ildir.
7 Garanti çantalar, filtreler ve cam sürahiler gibi sarf malzemelerini
kapsamaz.
8 Piller ve sızıntı hasarı garanti kapsamında de ildir.
9 Filtrelerin belirtildiği şekilde temizlenmemesi ve değiştirilmemesi.
Bu garanti yukarıda açık olarak belirtilen dıflında herhangi bir hak
vermemektedir ve nihai hasardan dolayı tazminat taleplerini
kapsamamaktadır. Bu garanti ek bir fayda olarak sunulmaktadır ve
tüketici olarak yasal haklarınızı etkilememektedir.
13
t
71063MTR Rev1_Ion 441375253 Rev 1 23/02/2012 14:50 Page 13

14
71063MTR Rev1_Ion 441375253 Rev 1 23/02/2012 14:50 Page 14

15
g
t
g Morphy Richards products are intended for household use only.
Morphy Richards has a policy of continuous improvement in product quality and design.
The Company, therefore, reserves the right to change the specification of its models at any
time.
The After Sales Division,
Morphy Richards Ltd, Mexborough, South Yorkshire, England, S64 8AJ
Helpline (office hours) UK 0845 871 0960 Republic of Ireland 1800 409119
t
Morphy Richards ürünleri sadece ev içi kullanım amaçlıdır.
Morphy Richards, ürün kalitesi ve tasarımında sürekli geliştirme politikasına sahiptir.
Bu nedenle Şirket, modellerinin özelliklerini herhangi bir zamanda değiştirme hakkını saklı
tutar.
Gizpa Dayanıkılı Tüketim Mamülleri
Tic. ve Paz. İth. İhr. A.Ş.
Atatürk Cd. 19 Mayıs Mah. Esin Sok. No: 2/2
Koyzyataği-İSTANBUL
Tel +90(0216) 411 23 77 Fax +90(0216) 369 33 42
g For electrical products sold within the European Community.
At the end of the electrical products useful life it should not be disposed of with
household waste.
Please recycle where facilities exist.
Check with your Local Authority or retailer for recycling advice in your country.
71063MTR Rev1_Ion 441375253 Rev 1 23/02/2012 14:50 Page 15

VC71063MTR Rev1 02/12
71063MTR Rev1_Ion 441375253 Rev 1 23/02/2012 14:50 Page 16
-
 1
1
-
 2
2
-
 3
3
-
 4
4
-
 5
5
-
 6
6
-
 7
7
-
 8
8
-
 9
9
-
 10
10
-
 11
11
-
 12
12
-
 13
13
-
 14
14
-
 15
15
-
 16
16


Morphy Richards PremAir Cyclonic 70035 Kullanım kılavuzu
- Kategori
- Elektrikli süpürgeler
- Tip
- Kullanım kılavuzu
- Bu kılavuz aynı zamanda aşağıdakiler için de uygundur: