
USER MANUAL
PowerConf H500

USER MANUAL
PowerConf H500
English 01
Čeština 13
Dansk 25
Deutsch 37
Español 49
Suomi 61
Français 73
Italiano 85
Nederlands 97
Norsk 109
Język polski 121
Portugues do Brasil 133
Pусский 146
Svenska 159
Türkçe 171
日本語 183
한국어 195
简体中文 207
繁體中文 219
231
243

EN 01
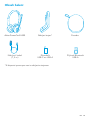
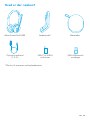
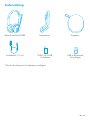
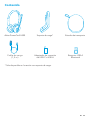
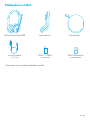
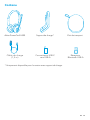
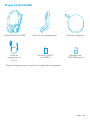
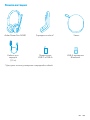
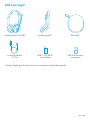
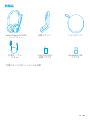
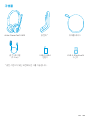
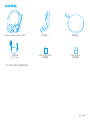
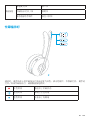
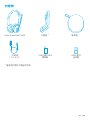
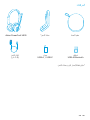
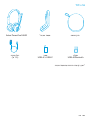
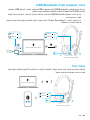
What's Included
Anker PowerConf H500
Charging cable
(1.5 m)
USB-C to USB-A
converter
*Only available for the version with the charging stand.
USB-A Bluetooth
receiver
Charging stand* Carry case

EN 02
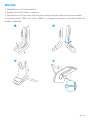
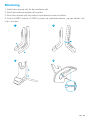
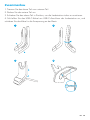
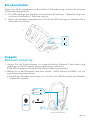
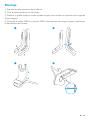
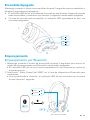
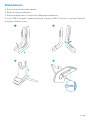
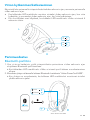
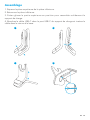
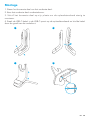
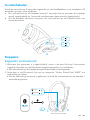
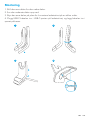
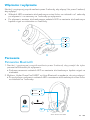
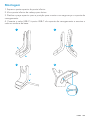
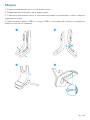
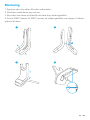
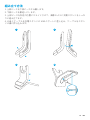
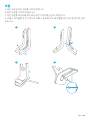
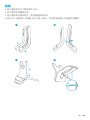
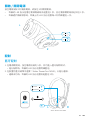
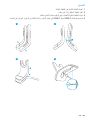
Assembling
1. Separate the upper piece from the lower piece.
2. Turn the lower piece upside down.
3. Slide the upper piece into position to securely assemble the charging stand.
4. Plug the USB-C cable into the USB-C port on the charging stand, and tuck the
cable into the groove at the base.
1 2
3 4

EN 03
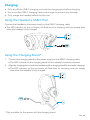
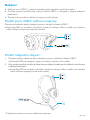
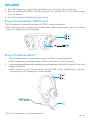
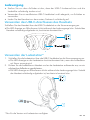
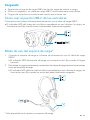
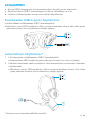
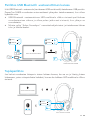
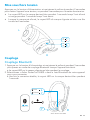
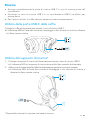
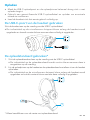
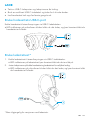
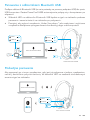
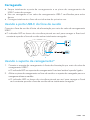
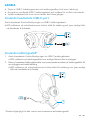
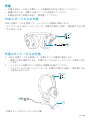
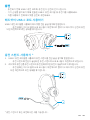
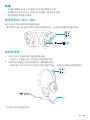
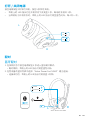
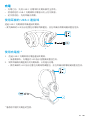
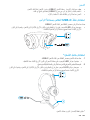
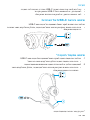
Charging
• Fully dry off the USB-C charging port and the charging pins before charging.
• Use a certied USB-C charging cable and charger to prevent any damage.
• Fully charge the headset before the rst use.
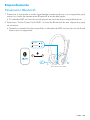
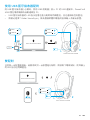
Using the Headset's USB-C Port
Connect the headset to the power supply via the USB-C charging cable.
• The LED indicator on the mic boom will ash blue for charging, and turn steady blue
when the headset is fully charged.
LR
T
r
a
n
s
p
a
r
e
n
c
y
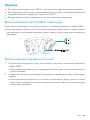
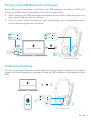
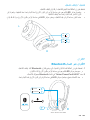
Using the Charging Stand*
1. Connect the charging stand to the power supply via the USB-C charging cable.
• The LED indicator on the charging stand will turn steady blue when powered.
2. Align the charging pins on both the headset and the charging stand for successful charging.
• The LED indicator on the mic boom will ash blue for charging, and turn steady
blue when the headset is fully charged.
* Only available for the version with the charging stand.

EN 04
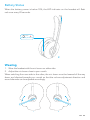
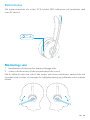
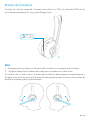
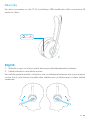
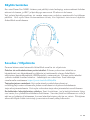
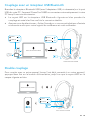
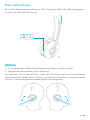
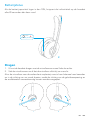
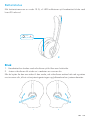
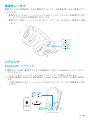
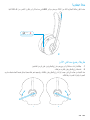
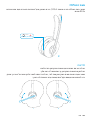
Battery Status
When the battery power is below 10%, the LED indicator on the headset will ash
red once every 20 seconds.
< 10%
R
Once every 20 seconds
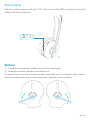
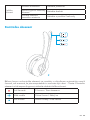
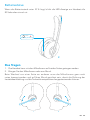
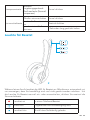
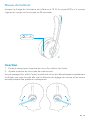
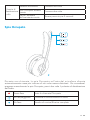
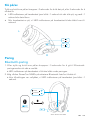
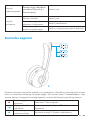
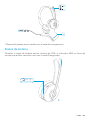
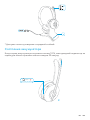
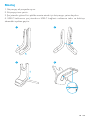
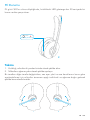
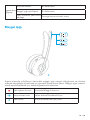
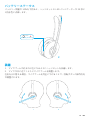
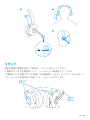
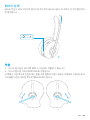
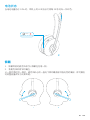
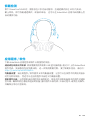
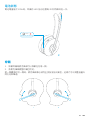
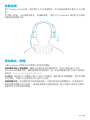
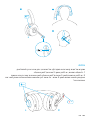
Wearing
1. Wear the headset with the mic boom on either side.
2. Adjust the mic boom close to your mouth.
When switching from one side to the other, the mic boom must be lowered all the way
down and directed towards your mouth so that the volume adjustment direction and
sound channels can be adjusted accordingly.
RL

EN 05
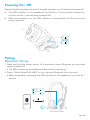
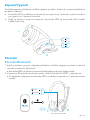
Powering On / Off
Press and hold the power button for 2 seconds to power on, or 5 seconds to power off.
• The LED indicator on the headset will turn blue for 1 second when powered on,
and turn red for 1 second when powered off.
• When the headset is on, the LED indicator on the headset will ash blue once
every 4 seconds.
ON
OFF
ON
OFF
2s
5s
1s
1s
L
R
T
r
a
n
s
p
a
r
e
n
c
y
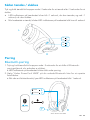
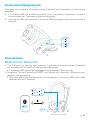
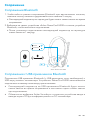
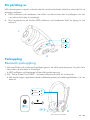
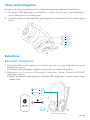
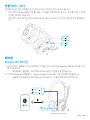
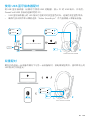
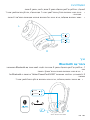
Pairing
Bluetooth Pairing
1. Press and hold the power button for 5 seconds to enter Bluetooth pairing mode
when powered off.
• The LED indicator on the headset will ash blue during pairing.
2. Select “Anker PowerConf H500” on your device’s Bluetooth list to connect.
• When successfully connected, the LED indicator on the headset will turn blue for 1
second.
Anker PowerConf H500
5s
Anker PowerConf H500
PAIRING
CONNECTED
LR
1s

EN 06
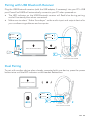
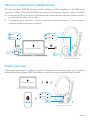
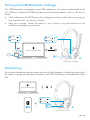
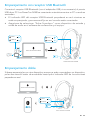
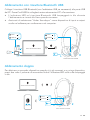
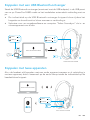
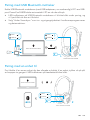
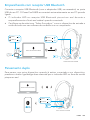
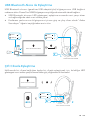
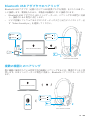
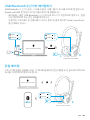
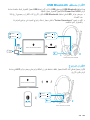
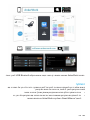
Pairing with USB Bluetooth Receiver
Plug the USB Bluetooth receiver (with the USB adapter, if necessary) into your PC's USB
port. PowerConf H500 will automatically connect to your PC when powered on.
• The LED indicator on the USB Bluetooth receiver will ash blue during pairing,
and will be steady blue when connected.
• Make sure to select "Anker Soundsync" as the audio input and output device for
your conferencing software and computer.
Anker PowerConf H500
PAIRING
CONNECTED
2s
Anker PowerConf H500
PAIRING
CONNECTED
LR
1s
Dual Pairing
To pair with another device when already connected with one device, press the power
button twice until the LED indicator on the headset ashes blue.
Anker PowerConf H500
x2
Anker PowerConf H500
Anker PowerConf H500
PAIRING
CONNECTED
LR
1s

EN 07
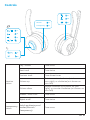
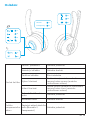
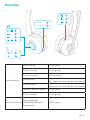
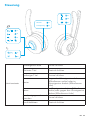
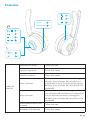
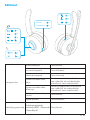
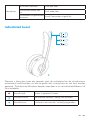
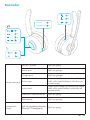
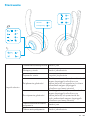
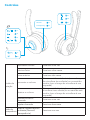
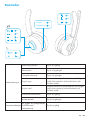
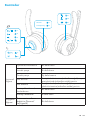
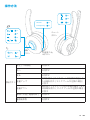
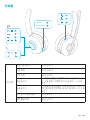
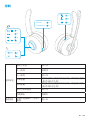
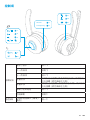
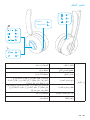
Controls
x1
x2
x1
x1
x2
x1
2s
x1
x2
x3
Normal
Transparency
T
r
a
n
s
p
a
r
e
n
c
y
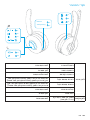
Rotation
button
Play / Pause Press once
Next track Press twice
Previous track Press three times
Volume up
Rotate counter-clockwise (mic boom on
your right), or clockwise (mic boom on
your left)
Volume down
Rotate clockwise (mic boom on your
right), or counter-clockwise (mic boom on
your left)
Answer / End a call Press once
Reject a call Press twice
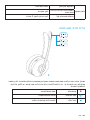
Transparency
button
Switch ambient sound
modes (Normal /
Transparency)
Press once

EN 08
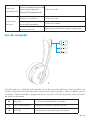
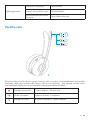
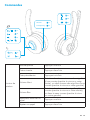
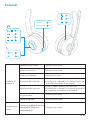
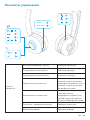
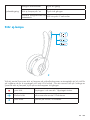
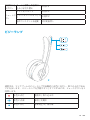
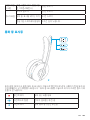
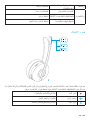
Mute button
Mute microphone Press once
Busy light on / off Press twice
Activate voice assistant
software Press and hold for 2 seconds
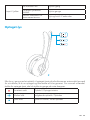
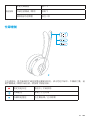
Busy Light
R
When on a call, the busy light on the mic boom will automatically turn red to indicate
that you are busy and do not want to be bothered. To manually turn the busy light on /
off, press the mute button twice.
Steady red On a call / Busy status
Flashing blue Incoming call / Being charged
Steady blue Listening to music / Fully charged

EN 09
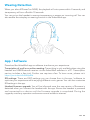
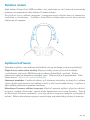
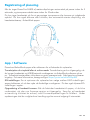
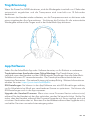
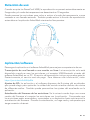
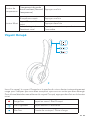
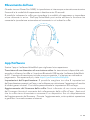
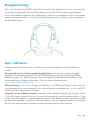
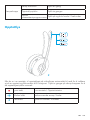
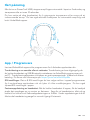
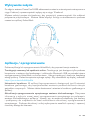
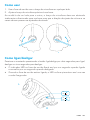
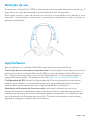
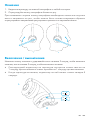
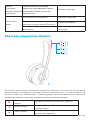
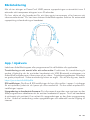
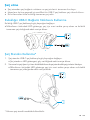
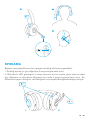
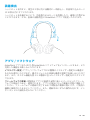
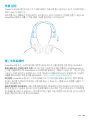
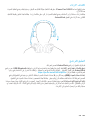
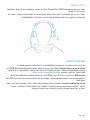
Wearing Detection
When you take off PowerConf H500, the playback will auto-pause within 2 seconds, and
transparency will turn off within 10 seconds.
You can put on the headset to resume transparency or answer an incoming call. You can
also enable the autoplay on wearing function in the AnkerWork app.
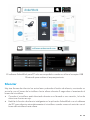
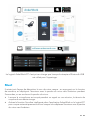
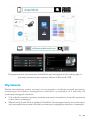
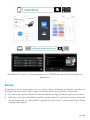
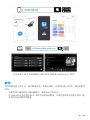
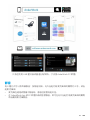
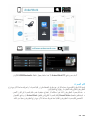
App / Software
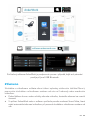
Download the AnkerWork app or software to enhance your experience.
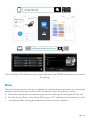
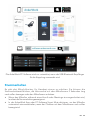
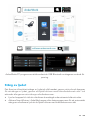
Transcription of a call or an online meeting: Transcribing is only available when using the
headset and USB Bluetooth receiver via the AnkerWork software in a PC. Transcription
service includes a free trial. Further use requires a fee. To learn more, please visit:
https://youtu.be/w2ntXAApE4s
EQ settings: There are 8 EQ settings you can choose from in the app / software to
optimize your experience while enjoying different music genres. You can also customize
EQ settings in the app.
Headset rmware upgrade: You will be informed once the new version of rmware is
detected when you connect the headset with the app. Ensure the headset is powered
and connected to a device until the firmware upgrade is completed. During the
upgrade, avoid any operation and ensure normal access to internet.

EN 10
The AnkerWork PC software is only supported when the USB Bluetooth receiver is used
for pairing.
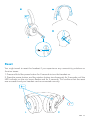
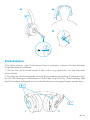
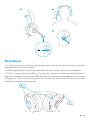
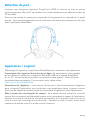
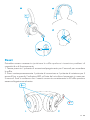
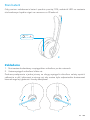
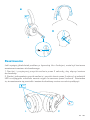
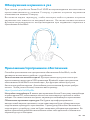
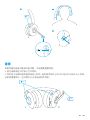
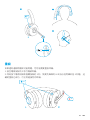
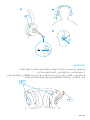
Mute
There are three ways to mute your headset: by pressing the mute button, by moving the
earpiece with the mic boom outward for 2 seconds, or by lifting the mic boom.
• When the microphone is muted during a call or a meeting, the mute light will turn red.
• Enable Smart Mute in the AnkerWork app or PC software to automatically mute
microphone when moving the earpiece with the mic boom outward.

EN 11
12
3
x1
2s
R
< 10%
ON
OFF
PAIRING
CONNECTED
1s
1s
1s
Once every 20 seconds
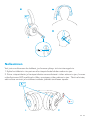
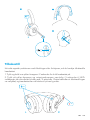
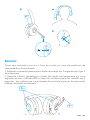
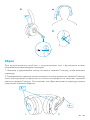
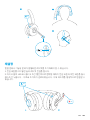
Reset
You might need to reset the headset if you experience any connectivity problems or
function issues.
1. Press and hold the power button for 2 seconds to turn the headset on.
2. Press the power button and the rotation button simultaneously for 5 seconds until the
LED indicator on the mic boom ashes red for 5 seconds. This conrms that the reset
was successful and your headset can be connected normally.
5s
5s
LR
T
r
a
n
s
p
a
r
e
n
c
y

EN 12
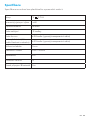
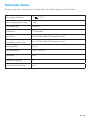
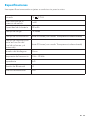
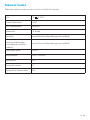
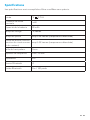
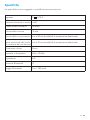
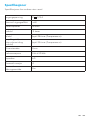
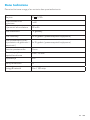
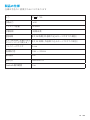
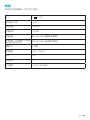
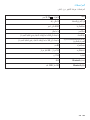
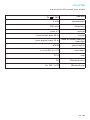
Specifications
Specications are subject to change without notice.
Input 5V 0.75A
Rated output power 5 mW
Battery capacity 500 mAh
Charging time < 2 hours
Talk time Up to 24 hours (Transparency off)
Playtime (varies by volume
level and content) Up to 35 hours (Transparency off)
Driver size 40 mm
Frequency response 10 Hz - 20 kHz
Impedance 16 Ω
Bluetooth version 5.0
Bluetooth range 30 m / 100 ft

CS 13
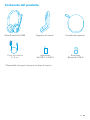
Obsah balení
Anker PowerConf H500
Nabíjecí kabel
(1,5 m)
Převodník
USB-C na USB-A
* K dispozici pouze pro verzi s nabíjecím stojanem.
Přijímač Bluetooth
USB-A
Nabíjecí stojan* Pouzdro

CS 14
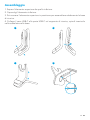
Montáž
1. Oddělte horní díl od spodního.
2. Spodní díl otočte vzhůru nohama.
3. Zasuňte horní díl na místo tak, aby celý nabíjecí stojan držel pevně pohromadě.
4. Zapojte kabel USB-C do portu USB-C na nabíjecím stojanu a zasuňte kabel do
drážky v základně.
1 2
3 4

CS 15
Nabíjení
• Nabíjecí port USB-C i nabíjecí kontakty před nabíjením pečlivě vysušte.
• Použijte pouze certifikovaný nabíjecí kabel USB-C a nabíječku, abyste zabránili
poškození.
• Před prvním použitím náhlavní soupravu plně nabijte.
Použití portu USB-C náhlavní soupravy
Připojte sluchátka ke zdroji napájení pomocí nabíjecího kabelu USB-C.
• Kontrolka LED na raménku mikrofonu bude při nabíjení blikat modře a po úplném
nabití náhlavní soupravy bude svítit modře.
LR
T
r
a
n
s
p
a
r
e
n
c
y
Použití nabíjecího stojanu*
1. Připojte nabíjecí stojan ke zdroji napájení pomocí nabíjecího kabelu USB-C.
• Kontrolka LED na nabíjecím stojanu bude při nabíjení svítit modře.
2. Aby nabíjení probíhalo dobře, je třeba slícovat nabíjecí kontakty na sluchátkách s mikrofonem
s nabíjecím stojanem.
• Kontrolka LED na raménku mikrofonu bude při nabíjení blikat modře a po úplném
nabití náhlavní soupravy bude svítit modře.
* K dispozici pouze pro verzi s nabíjecím stojanem.

CS 16
Stav baterie
Pokud je nabití baterie nižší než 10 %, blikne kontrolka LED na náhlavní soupravě
každých 20 sekund červeně.
< 10%
R
Once every 20 seconds
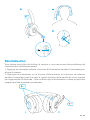
Nošení
1. Raménko s mikrofonem můžete nosit na libovolné straně.
2. Nastavte raménko mikrofonu do blízkosti úst.
Při výměně stran musí být mikrofon spuštěn úplně dolů a musí směřovat k vašim ústům,
aby bylo možné správně upravit směr nastavení hlasitosti a zvukové kanály.
RL

CS 17
Zapnutí/Vypnutí
Sluchátka zapnete přidržením tlačítka napájení po dobu 2 sekund a vypnete přidržením
po dobu 5 sekund.
• Kontrolka LED na náhlavní soupravě se po zapnutí na 1 sekundu rozsvítí modře a
po vypnutí na 1 sekundu červeně.
• Když je náhlavní souprava zapnutá, kontrolka LED na soupravě bliká modře
každé 4 sekundy.
ON
OFF
ON
OFF
2s
5s
1s
1s
L
R
T
r
a
n
s
p
a
r
e
n
c
y
Párování
Párování Bluetooth
1. Když je zařízení vypnuto, přejdete přidržením tlačítka napájení po dobu 5 sekund
do režimu párování Bluetooth.
• Kontrolka LED na náhlavní soupravě bude během párování blikat modře.
2. V seznamu Bluetooth na zařízení zvolte „Anker PowerConf H500“ a připojte se.
• Po úspěšném připojení se kontrolka LED na náhlavní soupravě na 1 sekundu rozsvítí
modře.
Anker PowerConf H500
5s
Anker PowerConf H500
PAIRING
CONNECTED
LR
1s

CS 18
Párování s přijímačem USB Bluetooth
Připojte přijímač USB Bluetooth (podle potřeby s USB adaptérem) do USB portu
v počítači. Zařízení PowerConf H500 se po zapnutí automaticky připojí k vašemu počítači.
• Kontrolka LED na přijímači USB Bluetooth bude během párování blikat modře a
po připojení bude svítit modře.
• V konferenčním softwaru vyberte možnost „Anker Soundsync“ pro vstupní a
výstupní zvukové zařízení a počítač.
Anker PowerConf H500
PAIRING
CONNECTED
2s
Anker PowerConf H500
PAIRING
CONNECTED
LR
1s
Duální párování
Pokud jste již připojeni k jednomu zařízení a chcete provést spárování s jiným, dvakrát
stiskněte tlačítko napájení (LED kontrolka na náhlavní soupravě začne blikat modře).
Anker PowerConf H500
x2
Anker PowerConf H500
Anker PowerConf H500
PAIRING
CONNECTED
LR
1s
Sayfa yükleniyor...
Sayfa yükleniyor...
Sayfa yükleniyor...
Sayfa yükleniyor...
Sayfa yükleniyor...
Sayfa yükleniyor...
Sayfa yükleniyor...
Sayfa yükleniyor...
Sayfa yükleniyor...
Sayfa yükleniyor...
Sayfa yükleniyor...
Sayfa yükleniyor...
Sayfa yükleniyor...
Sayfa yükleniyor...
Sayfa yükleniyor...
Sayfa yükleniyor...
Sayfa yükleniyor...
Sayfa yükleniyor...
Sayfa yükleniyor...
Sayfa yükleniyor...
Sayfa yükleniyor...
Sayfa yükleniyor...
Sayfa yükleniyor...
Sayfa yükleniyor...
Sayfa yükleniyor...
Sayfa yükleniyor...
Sayfa yükleniyor...
Sayfa yükleniyor...
Sayfa yükleniyor...
Sayfa yükleniyor...
Sayfa yükleniyor...
Sayfa yükleniyor...
Sayfa yükleniyor...
Sayfa yükleniyor...
Sayfa yükleniyor...
Sayfa yükleniyor...
Sayfa yükleniyor...
Sayfa yükleniyor...
Sayfa yükleniyor...
Sayfa yükleniyor...
Sayfa yükleniyor...
Sayfa yükleniyor...
Sayfa yükleniyor...
Sayfa yükleniyor...
Sayfa yükleniyor...
Sayfa yükleniyor...
Sayfa yükleniyor...
Sayfa yükleniyor...
Sayfa yükleniyor...
Sayfa yükleniyor...
Sayfa yükleniyor...
Sayfa yükleniyor...
Sayfa yükleniyor...
Sayfa yükleniyor...
Sayfa yükleniyor...
Sayfa yükleniyor...
Sayfa yükleniyor...
Sayfa yükleniyor...
Sayfa yükleniyor...
Sayfa yükleniyor...
Sayfa yükleniyor...
Sayfa yükleniyor...
Sayfa yükleniyor...
Sayfa yükleniyor...
Sayfa yükleniyor...
Sayfa yükleniyor...
Sayfa yükleniyor...
Sayfa yükleniyor...
Sayfa yükleniyor...
Sayfa yükleniyor...
Sayfa yükleniyor...
Sayfa yükleniyor...
Sayfa yükleniyor...
Sayfa yükleniyor...
Sayfa yükleniyor...
Sayfa yükleniyor...
Sayfa yükleniyor...
Sayfa yükleniyor...
Sayfa yükleniyor...
Sayfa yükleniyor...
Sayfa yükleniyor...
Sayfa yükleniyor...
Sayfa yükleniyor...
Sayfa yükleniyor...
Sayfa yükleniyor...
Sayfa yükleniyor...
Sayfa yükleniyor...
Sayfa yükleniyor...
Sayfa yükleniyor...
Sayfa yükleniyor...
Sayfa yükleniyor...
Sayfa yükleniyor...
Sayfa yükleniyor...
Sayfa yükleniyor...
Sayfa yükleniyor...
Sayfa yükleniyor...
Sayfa yükleniyor...
Sayfa yükleniyor...
Sayfa yükleniyor...
Sayfa yükleniyor...
Sayfa yükleniyor...
Sayfa yükleniyor...
Sayfa yükleniyor...
Sayfa yükleniyor...
Sayfa yükleniyor...
Sayfa yükleniyor...
Sayfa yükleniyor...
Sayfa yükleniyor...
Sayfa yükleniyor...
Sayfa yükleniyor...
Sayfa yükleniyor...
Sayfa yükleniyor...
Sayfa yükleniyor...
Sayfa yükleniyor...
Sayfa yükleniyor...
Sayfa yükleniyor...
Sayfa yükleniyor...
Sayfa yükleniyor...
Sayfa yükleniyor...
Sayfa yükleniyor...
Sayfa yükleniyor...
Sayfa yükleniyor...
Sayfa yükleniyor...
Sayfa yükleniyor...
Sayfa yükleniyor...
Sayfa yükleniyor...
Sayfa yükleniyor...
Sayfa yükleniyor...
Sayfa yükleniyor...
Sayfa yükleniyor...
Sayfa yükleniyor...
Sayfa yükleniyor...
Sayfa yükleniyor...
Sayfa yükleniyor...
Sayfa yükleniyor...
Sayfa yükleniyor...
Sayfa yükleniyor...
Sayfa yükleniyor...
Sayfa yükleniyor...
Sayfa yükleniyor...
Sayfa yükleniyor...
Sayfa yükleniyor...
Sayfa yükleniyor...
Sayfa yükleniyor...
Sayfa yükleniyor...
Sayfa yükleniyor...
Sayfa yükleniyor...
Sayfa yükleniyor...
Sayfa yükleniyor...
Sayfa yükleniyor...
Sayfa yükleniyor...
Sayfa yükleniyor...
Sayfa yükleniyor...
Sayfa yükleniyor...
Sayfa yükleniyor...
Sayfa yükleniyor...
Sayfa yükleniyor...
Sayfa yükleniyor...
Sayfa yükleniyor...
Sayfa yükleniyor...
Sayfa yükleniyor...
Sayfa yükleniyor...
Sayfa yükleniyor...
Sayfa yükleniyor...
Sayfa yükleniyor...
Sayfa yükleniyor...
Sayfa yükleniyor...
Sayfa yükleniyor...
Sayfa yükleniyor...
Sayfa yükleniyor...
Sayfa yükleniyor...
Sayfa yükleniyor...
Sayfa yükleniyor...
Sayfa yükleniyor...
Sayfa yükleniyor...
Sayfa yükleniyor...
Sayfa yükleniyor...
Sayfa yükleniyor...
Sayfa yükleniyor...
Sayfa yükleniyor...
Sayfa yükleniyor...
Sayfa yükleniyor...
Sayfa yükleniyor...
Sayfa yükleniyor...
Sayfa yükleniyor...
Sayfa yükleniyor...
Sayfa yükleniyor...
Sayfa yükleniyor...
Sayfa yükleniyor...
Sayfa yükleniyor...
Sayfa yükleniyor...
Sayfa yükleniyor...
Sayfa yükleniyor...
Sayfa yükleniyor...
Sayfa yükleniyor...
Sayfa yükleniyor...
Sayfa yükleniyor...
Sayfa yükleniyor...
Sayfa yükleniyor...
Sayfa yükleniyor...
Sayfa yükleniyor...
Sayfa yükleniyor...
Sayfa yükleniyor...
Sayfa yükleniyor...
Sayfa yükleniyor...
Sayfa yükleniyor...
Sayfa yükleniyor...
Sayfa yükleniyor...
Sayfa yükleniyor...
Sayfa yükleniyor...
Sayfa yükleniyor...
Sayfa yükleniyor...
Sayfa yükleniyor...
Sayfa yükleniyor...
Sayfa yükleniyor...
Sayfa yükleniyor...
Sayfa yükleniyor...
Sayfa yükleniyor...
Sayfa yükleniyor...
Sayfa yükleniyor...
Sayfa yükleniyor...
Sayfa yükleniyor...
Sayfa yükleniyor...
Sayfa yükleniyor...
Sayfa yükleniyor...
Sayfa yükleniyor...
Sayfa yükleniyor...
Sayfa yükleniyor...
Sayfa yükleniyor...
Sayfa yükleniyor...
Sayfa yükleniyor...
Sayfa yükleniyor...
Sayfa yükleniyor...
Sayfa yükleniyor...
Sayfa yükleniyor...
Sayfa yükleniyor...
-
 1
1
-
 2
2
-
 3
3
-
 4
4
-
 5
5
-
 6
6
-
 7
7
-
 8
8
-
 9
9
-
 10
10
-
 11
11
-
 12
12
-
 13
13
-
 14
14
-
 15
15
-
 16
16
-
 17
17
-
 18
18
-
 19
19
-
 20
20
-
 21
21
-
 22
22
-
 23
23
-
 24
24
-
 25
25
-
 26
26
-
 27
27
-
 28
28
-
 29
29
-
 30
30
-
 31
31
-
 32
32
-
 33
33
-
 34
34
-
 35
35
-
 36
36
-
 37
37
-
 38
38
-
 39
39
-
 40
40
-
 41
41
-
 42
42
-
 43
43
-
 44
44
-
 45
45
-
 46
46
-
 47
47
-
 48
48
-
 49
49
-
 50
50
-
 51
51
-
 52
52
-
 53
53
-
 54
54
-
 55
55
-
 56
56
-
 57
57
-
 58
58
-
 59
59
-
 60
60
-
 61
61
-
 62
62
-
 63
63
-
 64
64
-
 65
65
-
 66
66
-
 67
67
-
 68
68
-
 69
69
-
 70
70
-
 71
71
-
 72
72
-
 73
73
-
 74
74
-
 75
75
-
 76
76
-
 77
77
-
 78
78
-
 79
79
-
 80
80
-
 81
81
-
 82
82
-
 83
83
-
 84
84
-
 85
85
-
 86
86
-
 87
87
-
 88
88
-
 89
89
-
 90
90
-
 91
91
-
 92
92
-
 93
93
-
 94
94
-
 95
95
-
 96
96
-
 97
97
-
 98
98
-
 99
99
-
 100
100
-
 101
101
-
 102
102
-
 103
103
-
 104
104
-
 105
105
-
 106
106
-
 107
107
-
 108
108
-
 109
109
-
 110
110
-
 111
111
-
 112
112
-
 113
113
-
 114
114
-
 115
115
-
 116
116
-
 117
117
-
 118
118
-
 119
119
-
 120
120
-
 121
121
-
 122
122
-
 123
123
-
 124
124
-
 125
125
-
 126
126
-
 127
127
-
 128
128
-
 129
129
-
 130
130
-
 131
131
-
 132
132
-
 133
133
-
 134
134
-
 135
135
-
 136
136
-
 137
137
-
 138
138
-
 139
139
-
 140
140
-
 141
141
-
 142
142
-
 143
143
-
 144
144
-
 145
145
-
 146
146
-
 147
147
-
 148
148
-
 149
149
-
 150
150
-
 151
151
-
 152
152
-
 153
153
-
 154
154
-
 155
155
-
 156
156
-
 157
157
-
 158
158
-
 159
159
-
 160
160
-
 161
161
-
 162
162
-
 163
163
-
 164
164
-
 165
165
-
 166
166
-
 167
167
-
 168
168
-
 169
169
-
 170
170
-
 171
171
-
 172
172
-
 173
173
-
 174
174
-
 175
175
-
 176
176
-
 177
177
-
 178
178
-
 179
179
-
 180
180
-
 181
181
-
 182
182
-
 183
183
-
 184
184
-
 185
185
-
 186
186
-
 187
187
-
 188
188
-
 189
189
-
 190
190
-
 191
191
-
 192
192
-
 193
193
-
 194
194
-
 195
195
-
 196
196
-
 197
197
-
 198
198
-
 199
199
-
 200
200
-
 201
201
-
 202
202
-
 203
203
-
 204
204
-
 205
205
-
 206
206
-
 207
207
-
 208
208
-
 209
209
-
 210
210
-
 211
211
-
 212
212
-
 213
213
-
 214
214
-
 215
215
-
 216
216
-
 217
217
-
 218
218
-
 219
219
-
 220
220
-
 221
221
-
 222
222
-
 223
223
-
 224
224
-
 225
225
-
 226
226
-
 227
227
-
 228
228
-
 229
229
-
 230
230
-
 231
231
-
 232
232
-
 233
233
-
 234
234
-
 235
235
-
 236
236
-
 237
237
-
 238
238
-
 239
239
-
 240
240
-
 241
241
-
 242
242
-
 243
243
-
 244
244
-
 245
245
-
 246
246
-
 247
247
-
 248
248
-
 249
249
-
 250
250
-
 251
251
-
 252
252
-
 253
253
-
 254
254
-
 255
255
-
 256
256


diğer dillerde
- français: Anker PowerConf H500 Manuel utilisateur
- italiano: Anker PowerConf H500 Manuale utente
- 日本語: Anker PowerConf H500 ユーザーマニュアル
- português: Anker PowerConf H500 Manual do usuário