Beko TBV 8104 BX El kitabı
- Kategori
- Karıştırıcılar
- Tip
- El kitabı
Bu kılavuz aynı zamanda aşağıdakiler için de uygundur:

www.beko.com
TBV8104BX
01M-8812093200-1518-02
Vacuum Blender
User Manual
EN DE TR FR ES
RO PL IT AR

www.beko.com
Please read this manual first!
Dear Valued Customer,
Thank you for selecting this Beko appliance. We hope that you get the best
results from your appliance which has been manufactured with high quality
and state-of-the-art technology. For this reason, please read this user man-
ual and all other provided documents carefully before using the appliance
and keep it as a reference for future use. If you hand over the appliance to
someone else, give the user manual as well. Follow the instructions by paying
attention to all the information and warnings in the user manual.
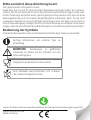
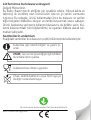
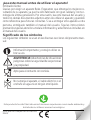
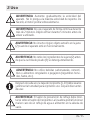
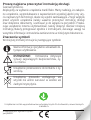
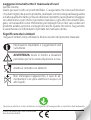
Meanings of the symbols
Following symbols are used in various sections of this manual:
Suitable for contact with food.
Do not immerse the appliance, the power ca-
ble, or the power plug in water or any other
liquid.
Conforms to the WEEE Directive.
Important information and useful hints
about usage.
WARNING:
Warnings for dangerous situa-
tions concerning the safety of life and prop-
erty.
Ths product has been produced n envronmentally-frendly, state-of-the-art facltes.

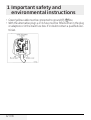
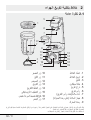
1. Blender lid
2. Blender jug
3. Cutter
4. Silicone ring
5. Vacuum lever
6. Vacuum head
7. Safety device (under the
Vacuum head)
8. Safety device (on the motor
unit)
The values which are declared in the markings affixed on your product or the other printed documents supplied with it
represent the values which were obtained in the laboratories pursuant to the pertinent standards. These values may vary
according to the usage of the appliance and ambient conditions.
1
20
2
3
4
5
6
7
8
9
10
13
14
15
18
19
11
12
16
17
9. Motor unit
10. Smoothie button
11. Ice button
12. Sauce button
13. Vacuum button
14. Vacuum+Blend button
15. Auto-Clean button
16. On / Off / Speed adjustment
knob
17. Pulse button

18. Cable compartment (under the
appliance)
19. Rubber feet
20. Measuring cup / Anti-insect
cap
In case of lose, break or need re-
placement for the parts below:
• Jug with lid and cutter – complete
set (1,2,3,4)
• Measuring cup (20)
• Set of 4 rubber feet (19)
Technical data
Voltage:
220-240V ~ 50-60 Hz
Power consumption:
1000 W
Rights to make technical and de-
sign changes are reserved.

5 / EN
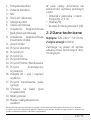
CONTENTS
ENGLISH 06-23
DEUTSCH 24-46
TÜRKÇE 47-65
FRANÇAIS 66-87
ESPAÑOL 88-109
ROMÂNĂ 110-131
POLSKI 132-155
ITALIANO 156-180
04-19
01M-8812103200-1518-02

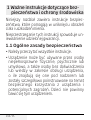
6 / EN
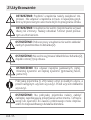
This section contains safety instructions that will
help protect from risk of personal injury or mate-
rial damage.
Failure to follow these instructions voids any
grant-ed warranty.
1.1 General safety
•Read all instructions.
•This appliance may be used by people whose
physical, perceptive or mental skills are impaired
or who are inexperienced or not knowledgeable
about the appliance as long as they are
supervised or informed and made aware of the
safe use of the appliance and the encountered
dangers. Children should not play with the
appliance.
•Do not operate any appliance with a damaged
cord or plug or after the appliance malfunctions,
or is dropped or damaged in any manner.
1 Important safety and
environmental instructions

7 / EN
1 Important safety and
environmental instructions
Contact the manufacturer at their customer
service telephone number for information on
examination, repair, or adjustment.
•The use of attachments, including canning jars,
not recommended by the manufacturer may
cause a risk of injury to persons.
•Do not attempt to dismantle the appliance.
•Do not operate or place any part of this appliance
or its parts on or near hot surfaces.
•Do not use the device for hot food.
•Your mains power supply should comply with
the information supplied on the rating plate of
the appliance.
•Do not use the appliance with an extension
cable.
•Do not touch the plug of the appliance with
damp or wet hands.

8 / EN
•Unplug from outlet when not in use, before
putting on or taking off parts, and before
cleaning.
•Hold the blending shaft of the appliance
carefully during transportation and cleaning.
•Never touch blades while using the appliance.
There is the possibility of injury due to incorrect
usage.
•Avoid contacting moving parts.
•Do not use outdoors.
•Do not let cord hang over edge of table or
counter.
•Keep hands and utensils out of container while
blending to reduce the risk of severe injury to
persons or damage to the blender. A scraper
may be used but must be used only when the
blender is not running.
•Blades are sharp. Handle carefully.
•Always operate blender with cover in place.
1 Important safety and
environmental instructions

9 / EN
•Do not blend hot liquids.
•To reduce the risk of electric shock, the plug
should only be connected to a proper outlet. If
the plug does not fit fully in the outlet, contact
a qualified electrician.Do not modify the plug in
any way.
•After cleaning, dry the appliance and all parts
before connecting it to mains supply and before
attaching the parts.
•Do not immerse the appliance, the power cable,
or the power plug in water or any other liquid.
•If you keep the packaging materials, store them
out of the reach of children.
•Children shall not use the appliance. Keep the
appliance out of the reach of children.
•Always disconnect the blender from the supply
if it is left unattended and before assembling,
disassembling.
1 Important safety and
environmental instructions

10 / EN
•Switch of the appliance and disconnect
from supply before changing accessories or
approachingpartsthatmoveinuse.•
• CAUTION: In order to avoid a hazard due to
inadvertent resetting of the thermal cut-out,
this appliance must not be supplied through an
external switching device, such as a timer, or
connected to a circuit that is regularly switched
on and o_ by the utility.
• SAVE THESE INSTRUCTIONS
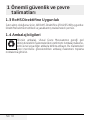
1.2 Compliance with the WEEE Directive and
Disposing of the Waste Product:
This product complies with EU WEEE Directive (2012/19/EU). This prod-
uct bears a classification symbol for waste electrical and electronic equip-
ment (WEEE).
This product has been manufactured with high quality parts
and materials which can be reused and are suitable for recy-
cling. Do not dispose of the waste product with normal domes-
tic and other wastes at the end of its service life. Take it to the
collection center for the recycling of electrical and electronic
equipment. Please consult your local authorities to learn about these col-
lection centers.
1 Important safety and
environmental instructions

11 / EN
1 Important safety and
environmental instructions
1.3 Compliance with RoHS Directive
The product you have purchased complies with EU RoHS Directive
(2011/65/EU). It does not contain harmful and prohibited materials spec-
ified in the Directive.
1.4 Package information
Packaging materials of the product are manufactured from recy-
clable materials in accordance with our National Environment
Regulations. Do not dispose of the packaging materials together
with the domestic or other wastes. Take them to the packaging
material collection points designated by the local authorities.
1.5 Plug Wiring
The moulded plug on this appliance incorporates a 13 A fuse. Should the
fuse need to be replaced an ASTA approved BS1362 fuse of the same
rating must be used. Do not forget to refit the fuse cover. In the event of
losing the fuse cover, the plug must not to be used until a replacement
fuse cover has been fitted. Colour of the replacement fuse cover must be
the same colour as that visible on the pin face of the plug Fuse covers are
availabe from any good electrical store.
Fiting a different plug
• As the colours of the wires in the mains lead of this appliance may not
correspond with the coloured markings identifying the terminals on
your plug, proceed as follows:
• Brown cable = L (Live)
• Blue cable = N (Neutral)

12 / EN
1 Important safety and
environmental instructions
• Green/yellow cable must be connected to ground (E) line
• With the alternative plugs a 13 A fuse must be fitted either in the plug
or adaptore or in the main fuse box. If in doubt contact a qualified elec-
trician.

13 / EN
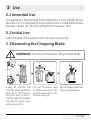
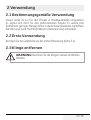
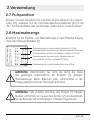
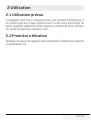
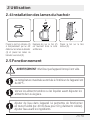
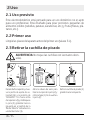
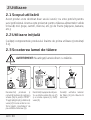
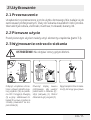
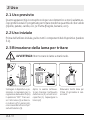
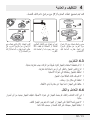
2.1 Intended Use
This appliance is intended only for household use; it is not suitable for pro-
fessional use. It is designed to chop small amounts of solid foods (onions,
potatoes, carrots, etc.) and fruit (strawberries, bananas, etc.).
2.2 Initial Use
Clean the parts of the appliance prior to initial use (see 3.1).
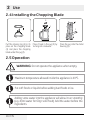
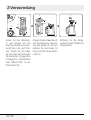
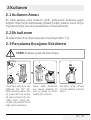
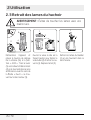
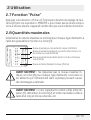
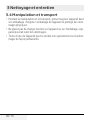
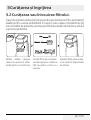
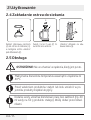
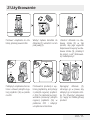
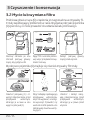
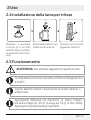
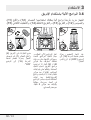
2.3 Removing the Chopping Blade
WARNING:
Do not touch the blades with your bare hands.
2
1
3
4
1
2
1
2
Unplug the appliance and
move the speed adjustment
knob (16) to “OFF” position.
Pull up the lever (5) and un-
lock the jug (2) anti-clockwise
according the “Open” arrow
on the motor unit (9).
Flip open the vacuum valve
to release vacuum from the
jug (2) and take out the lid (1).
Turn over the jug (2).
Remove chopping blade unit
(3) by turning clockwise.
2 Use

14 / EN
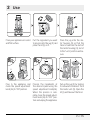
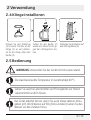
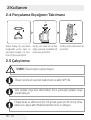
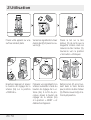
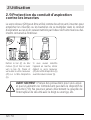
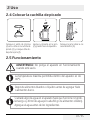
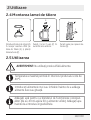
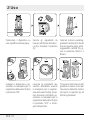
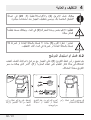
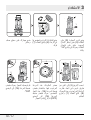
2.4 Installing the Chopping Blade
2
1
2
1
Put the silicone ring (4) in its
place on the chopping blade
(3) and place the chopping
blade under the jug (2).
Place it back in the jug (2) by
turning anti-clockwise.
Place the jug onto the motor
housing (9).
2.5 Operation
WARNING:
Do not operate the appliance when empty.
Maximum temperature allowed inside the appliance is 40°C.
Put soft foods or liquids before adding hard foods or ice.
Adding some water into the appliance will allow it run smoothly
(e.g. 40ml water for 60gr solid food). Add the water before the
ingredients.
2 Use

15 / EN
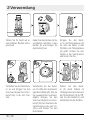
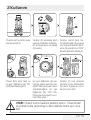
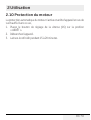
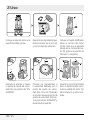
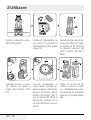
1
2
Place your appliance on a solid
and at surface.
Put the ingredient you want
to process into the jug (2) and
place the lid (1) on it.
Place the jug onto the mo-
tor housing (9) so that the
tab on it seats on the slots of
the motor housing (9), turn it
to the “Lock” position and se-
cure.
1
2
3
1
2
On
Min
Max
On
Min
Max
3
4
2
1
Plug in the appliance and
move the speed adjustment
knob (16) to “ON” position.
Process the ingredients at
the desired speed using the
speed adjustment knob(16).
When the process is com-
plete, move the speed adjust-
ment knob (16) to “OFF” posi-
tion and unplug the appliance.
Pull up the jug (2) by turning
it clockwise to remove it from
the motor unit (9). Open the
lid (1) and take out the food.
2 Use

16 / EN
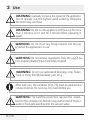
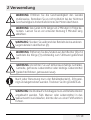
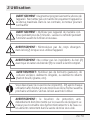
WARNING:
Gradually increase the speed of the appliance.
Do not operate it at the highest speed suddenly. Otherwise
the motor may overheat.
WARNING:
Do not run the appliance continuously for more
than 2 minutes. Let it cool for 5 minute before operating it
again.
WARNING:
Do not insert any foreign objects into the jug
(2) when the appliance is in use.
WARNING:
Do not remove ingredients from the jug (2) be-
fore chopping blade (3) has completely stopped.
WARNING:
Do not use carbonated beverage, crop, frozen
food, or sticky food (boiled bean, yam, etc.).
After each use, the container lid (1, 20) must be washed and
remove moisture for next use. Dry it well before use.
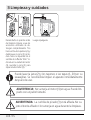
WARNING:
The backflow prevention cap must be assem-
bled on the container lid. Blender may malfunction if there is
water or food gets backflow into the vacuum valve.
2 Use

17 / EN
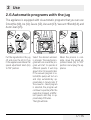
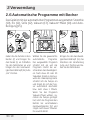
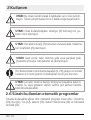
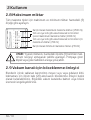
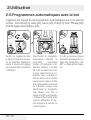
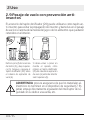
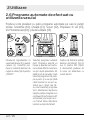
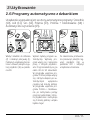
2.6 Automatic programs with the jug
The appliance is equipped with six automatic programs that you can use:
Smoothie (10), Ice (11), Sauce (12), Vacuum (13), Vacuum+Blend (14), and
Auto Clean (15).
22
3
1
On
Min
Max
1
On
Min
Max
On
Min
Max
Put the ingredients in the jug
(2) and close the lid (1). Plug
in the appliance and move the
speed adjustment knob (16)
to “ON” position.
Select the desired automat-
ic program. The selected pro-
gram will turn on and the pro-
gram will start to operate at
dierent speeds. It will stop
about 40 or 50 seconds later.
If the vacuum program is se-
lected,the pump will turn on
and stop automatically ap-
proximately 1 minute later. If
the vacuum + blend program
is selected, the program will
continue to operate (after the
pump has stopped), at dier-
ent speeds and stop in ap-
proximately 2 Minutes.
The light will blink.
When the process is com-
plete, move the speed ad-
justment knob (16) to “OFF”
position and unplug the ap-
pliance.
2 Use

18 / EN
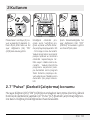
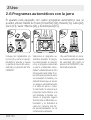
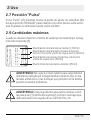
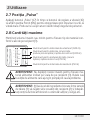
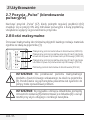
2.7 “Pulse” position
For mixing with high speed short pulses, turn speed adjustment knob (16)
to “ON” position and press “pulse” (17). The appliance will stop when you
release the button.
2.8 Maximum quantities
Maintain the maximum or the minimum volume for each type of material
by the scale on the container (3).
ml
1500
1250
1000
750
50 0
250
L
1.50
1.25
0.75
0.25
Max (V acuum )
Foods + Milk
Soymilk / Milk
0.50
Maximum level for materials to blend (1,500ml)
Minimum level for materials to blend (250ml)
Maximum level for materials including milk products
such as milk and soymilk to vacuum (1,000ml)
Maximum level for milk products such as milk and
soymilk to vacuum (700ml)
WARNING:
Do not exceed the maximum level for each food
material indicated by the scale on the container (3). Air bubbles
or food materials getting into the pump can cause trouble.
WARNING:
If there are ingredients stuck between the chop-
ping blades (3), please dismount it from the jug (2) and remove
the stuck matter using a long slender utensil, etc.
2 Use

19 / EN
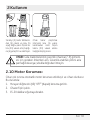
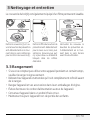
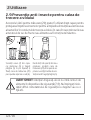
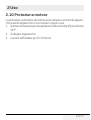
2.9 Anti-insect prevention for vacuum
passage
The measuring cup (20) accessory can be used as an anti-insect cap to
prevent insects or bacteria breeding in the vaccum passage.
1
2
Take out the jug (2) from the
motor housing (9) and pull
down the lever (5). Place and
secure the measuring cup
(20) onto the vacuum suction
head (6).
If you want to operate the
appliance again, remove the
measuring cup (20) from the
vacuum suction head (6)rst
before intend to pull upthe le-
ver (5).
WARNING:
Take cautions to make sure the food material
does not go into the safety device (7, 8). Never directly push
the safety switch pin with your finger or a rod, etc.
2.10 Motor Protection
Automatic motor protection will get activated and stop the appliance
when theappliance overheats. In this case;
1. Move the speed adjustment knob (16) to “OFF” position.
2. Unplug the appliance.
3. Let it cool for 15-20 minutes.
2 Use

20 / EN
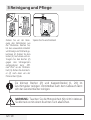
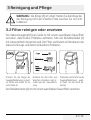
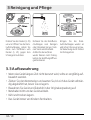
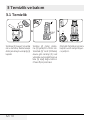
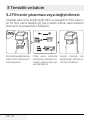
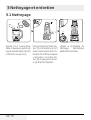
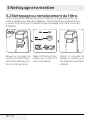
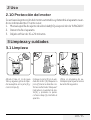
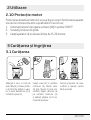
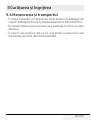
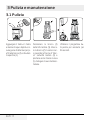
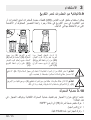
3.1 Cleaning
1
2
3
1
On
Min
Max
Add 1 or 1 ½ cups of luke
warm water and some drops
of dish-washing liquid into
the jug (2) and close the lid (1).
Place the jug (2) into the mo-
tor unit (9). Lock the jug (2)
clockwise according to the
“Lock” arrow on the motor
unit (9) and press down the
lever (5). Plug in the appliance.
Use Auto Clean program to
operate it for 26 seconds.
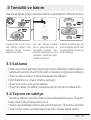
3
2
1
Unplug the appliance before
cleaning. Wait for the acces-
sories used to stop complete-
ly. Pull up the lever(5) and un-
lock the jug (2) anticlockwise
according to the “Open” arrow
on the motor unit (9). Pull up
the jug (2) to remove it from
the motor unit (9).
Then rinse it.
3 Cleaning and care
Sayfa yükleniyor...
Sayfa yükleniyor...
Sayfa yükleniyor...
Sayfa yükleniyor...
Sayfa yükleniyor...
Sayfa yükleniyor...
Sayfa yükleniyor...
Sayfa yükleniyor...
Sayfa yükleniyor...
Sayfa yükleniyor...
Sayfa yükleniyor...
Sayfa yükleniyor...
Sayfa yükleniyor...
Sayfa yükleniyor...
Sayfa yükleniyor...
Sayfa yükleniyor...
Sayfa yükleniyor...
Sayfa yükleniyor...
Sayfa yükleniyor...
Sayfa yükleniyor...
Sayfa yükleniyor...
Sayfa yükleniyor...
Sayfa yükleniyor...
Sayfa yükleniyor...
Sayfa yükleniyor...
Sayfa yükleniyor...
Sayfa yükleniyor...
Sayfa yükleniyor...
Sayfa yükleniyor...
Sayfa yükleniyor...
Sayfa yükleniyor...
Sayfa yükleniyor...
Sayfa yükleniyor...
Sayfa yükleniyor...
Sayfa yükleniyor...
Sayfa yükleniyor...
Sayfa yükleniyor...
Sayfa yükleniyor...
Sayfa yükleniyor...
Sayfa yükleniyor...
Sayfa yükleniyor...
Sayfa yükleniyor...
Sayfa yükleniyor...
Sayfa yükleniyor...
Sayfa yükleniyor...
Sayfa yükleniyor...
Sayfa yükleniyor...
Sayfa yükleniyor...
Sayfa yükleniyor...
Sayfa yükleniyor...
Sayfa yükleniyor...
Sayfa yükleniyor...
Sayfa yükleniyor...
Sayfa yükleniyor...
Sayfa yükleniyor...
Sayfa yükleniyor...
Sayfa yükleniyor...
Sayfa yükleniyor...
Sayfa yükleniyor...
Sayfa yükleniyor...
Sayfa yükleniyor...
Sayfa yükleniyor...
Sayfa yükleniyor...
Sayfa yükleniyor...
Sayfa yükleniyor...
Sayfa yükleniyor...
Sayfa yükleniyor...
Sayfa yükleniyor...
Sayfa yükleniyor...
Sayfa yükleniyor...
Sayfa yükleniyor...
Sayfa yükleniyor...
Sayfa yükleniyor...
Sayfa yükleniyor...
Sayfa yükleniyor...
Sayfa yükleniyor...
Sayfa yükleniyor...
Sayfa yükleniyor...
Sayfa yükleniyor...
Sayfa yükleniyor...
Sayfa yükleniyor...
Sayfa yükleniyor...
Sayfa yükleniyor...
Sayfa yükleniyor...
Sayfa yükleniyor...
Sayfa yükleniyor...
Sayfa yükleniyor...
Sayfa yükleniyor...
Sayfa yükleniyor...
Sayfa yükleniyor...
Sayfa yükleniyor...
Sayfa yükleniyor...
Sayfa yükleniyor...
Sayfa yükleniyor...
Sayfa yükleniyor...
Sayfa yükleniyor...
Sayfa yükleniyor...
Sayfa yükleniyor...
Sayfa yükleniyor...
Sayfa yükleniyor...
Sayfa yükleniyor...
Sayfa yükleniyor...
Sayfa yükleniyor...
Sayfa yükleniyor...
Sayfa yükleniyor...
Sayfa yükleniyor...
Sayfa yükleniyor...
Sayfa yükleniyor...
Sayfa yükleniyor...
Sayfa yükleniyor...
Sayfa yükleniyor...
Sayfa yükleniyor...
Sayfa yükleniyor...
Sayfa yükleniyor...
Sayfa yükleniyor...
Sayfa yükleniyor...
Sayfa yükleniyor...
Sayfa yükleniyor...
Sayfa yükleniyor...
Sayfa yükleniyor...
Sayfa yükleniyor...
Sayfa yükleniyor...
Sayfa yükleniyor...
Sayfa yükleniyor...
Sayfa yükleniyor...
Sayfa yükleniyor...
Sayfa yükleniyor...
Sayfa yükleniyor...
Sayfa yükleniyor...
Sayfa yükleniyor...
Sayfa yükleniyor...
Sayfa yükleniyor...
Sayfa yükleniyor...
Sayfa yükleniyor...
Sayfa yükleniyor...
Sayfa yükleniyor...
Sayfa yükleniyor...
Sayfa yükleniyor...
Sayfa yükleniyor...
Sayfa yükleniyor...
Sayfa yükleniyor...
Sayfa yükleniyor...
Sayfa yükleniyor...
Sayfa yükleniyor...
Sayfa yükleniyor...
Sayfa yükleniyor...
Sayfa yükleniyor...
Sayfa yükleniyor...
Sayfa yükleniyor...
Sayfa yükleniyor...
Sayfa yükleniyor...
Sayfa yükleniyor...
Sayfa yükleniyor...
Sayfa yükleniyor...
Sayfa yükleniyor...
Sayfa yükleniyor...
Sayfa yükleniyor...
Sayfa yükleniyor...
Sayfa yükleniyor...
Sayfa yükleniyor...
Sayfa yükleniyor...
Sayfa yükleniyor...
Sayfa yükleniyor...
Sayfa yükleniyor...
Sayfa yükleniyor...
Sayfa yükleniyor...
Sayfa yükleniyor...
Sayfa yükleniyor...
Sayfa yükleniyor...
Sayfa yükleniyor...
Sayfa yükleniyor...
Sayfa yükleniyor...
Sayfa yükleniyor...
Sayfa yükleniyor...
Sayfa yükleniyor...
Sayfa yükleniyor...
Sayfa yükleniyor...
Sayfa yükleniyor...
Sayfa yükleniyor...
Sayfa yükleniyor...
Sayfa yükleniyor...
-
 1
1
-
 2
2
-
 3
3
-
 4
4
-
 5
5
-
 6
6
-
 7
7
-
 8
8
-
 9
9
-
 10
10
-
 11
11
-
 12
12
-
 13
13
-
 14
14
-
 15
15
-
 16
16
-
 17
17
-
 18
18
-
 19
19
-
 20
20
-
 21
21
-
 22
22
-
 23
23
-
 24
24
-
 25
25
-
 26
26
-
 27
27
-
 28
28
-
 29
29
-
 30
30
-
 31
31
-
 32
32
-
 33
33
-
 34
34
-
 35
35
-
 36
36
-
 37
37
-
 38
38
-
 39
39
-
 40
40
-
 41
41
-
 42
42
-
 43
43
-
 44
44
-
 45
45
-
 46
46
-
 47
47
-
 48
48
-
 49
49
-
 50
50
-
 51
51
-
 52
52
-
 53
53
-
 54
54
-
 55
55
-
 56
56
-
 57
57
-
 58
58
-
 59
59
-
 60
60
-
 61
61
-
 62
62
-
 63
63
-
 64
64
-
 65
65
-
 66
66
-
 67
67
-
 68
68
-
 69
69
-
 70
70
-
 71
71
-
 72
72
-
 73
73
-
 74
74
-
 75
75
-
 76
76
-
 77
77
-
 78
78
-
 79
79
-
 80
80
-
 81
81
-
 82
82
-
 83
83
-
 84
84
-
 85
85
-
 86
86
-
 87
87
-
 88
88
-
 89
89
-
 90
90
-
 91
91
-
 92
92
-
 93
93
-
 94
94
-
 95
95
-
 96
96
-
 97
97
-
 98
98
-
 99
99
-
 100
100
-
 101
101
-
 102
102
-
 103
103
-
 104
104
-
 105
105
-
 106
106
-
 107
107
-
 108
108
-
 109
109
-
 110
110
-
 111
111
-
 112
112
-
 113
113
-
 114
114
-
 115
115
-
 116
116
-
 117
117
-
 118
118
-
 119
119
-
 120
120
-
 121
121
-
 122
122
-
 123
123
-
 124
124
-
 125
125
-
 126
126
-
 127
127
-
 128
128
-
 129
129
-
 130
130
-
 131
131
-
 132
132
-
 133
133
-
 134
134
-
 135
135
-
 136
136
-
 137
137
-
 138
138
-
 139
139
-
 140
140
-
 141
141
-
 142
142
-
 143
143
-
 144
144
-
 145
145
-
 146
146
-
 147
147
-
 148
148
-
 149
149
-
 150
150
-
 151
151
-
 152
152
-
 153
153
-
 154
154
-
 155
155
-
 156
156
-
 157
157
-
 158
158
-
 159
159
-
 160
160
-
 161
161
-
 162
162
-
 163
163
-
 164
164
-
 165
165
-
 166
166
-
 167
167
-
 168
168
-
 169
169
-
 170
170
-
 171
171
-
 172
172
-
 173
173
-
 174
174
-
 175
175
-
 176
176
-
 177
177
-
 178
178
-
 179
179
-
 180
180
-
 181
181
-
 182
182
-
 183
183
-
 184
184
-
 185
185
-
 186
186
-
 187
187
-
 188
188
-
 189
189
-
 190
190
-
 191
191
-
 192
192
-
 193
193
-
 194
194
-
 195
195
-
 196
196
-
 197
197
-
 198
198
-
 199
199
-
 200
200
-
 201
201


Beko TBV 8104 BX El kitabı
- Kategori
- Karıştırıcılar
- Tip
- El kitabı
- Bu kılavuz aynı zamanda aşağıdakiler için de uygundur:
diğer dillerde
- español: Beko TBV 8104 BX El manual del propietario
- français: Beko TBV 8104 BX Le manuel du propriétaire
- italiano: Beko TBV 8104 BX Manuale del proprietario
- polski: Beko TBV 8104 BX Instrukcja obsługi
- Deutsch: Beko TBV 8104 BX Bedienungsanleitung
- română: Beko TBV 8104 BX Manualul proprietarului
İlgili makaleler
Diğer belgeler
-
Bosch MMBV620M/01 El kitabı
-
Vitamix E310 El kitabı
-
Bosch MMBM7G3M El kitabı
-
Moulinex AR6887 Kullanım kılavuzu
-
-
-
-
KitchenAid 5KSB8270 El kitabı
-
-
mothercare Chicco_thermal insulation food container 6M+ Kullanici rehberi