
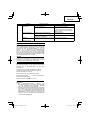
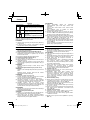
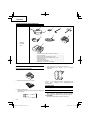
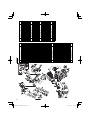
Cordless Grass Trimmer
Akku-Rasentrimmer
Χλοοκόπτης μπαταρίας
Akumulatorowa kosiarka do trawy
Akkus fűszegélynyíró
Akku seřezávač trávy
Akülü çim kesme
Masina de cosit cu acumulatori
Baterijska kosa
Аккумуляторный триммер
Read through carefully and understand these instructions before use.
Diese Anleitung vor Benutzung des Werkzeugs sorgfältig durchlesen und verstehen.
Διαβάστε προσεκτικά και κατανοήσετε αυτές τις οδηγίες πριν τη χρήση.
Przed użytkowaniem należy dokładnie przeczytać niniejszą instrukcję i zrozumieć jej treść.
Használat előtt olvassa el fi gyelmesen a használati utasítást.
Před použitím si pečlivě přečtěte tento návod a ujistěte se, že mu dobře rozumíte.
Aleti kullanmadan önce bu kılavuzu iyice okuyun ve talimatları anlayın.
Înainte de utilizare, citiţi cu atenţie și înţelegeţi prezentele instrucţiuni.
Pred uporabo natančno preberite in razumite ta navodila.
Внимательно прочтите данную инструкцию по эксплуатации прежде чем пользоваться инструментом.
Handling instructions
Bedienungsanleitung
Οδηγίες χειρισμού
Instrukcja obsługi
Kezelési utasítás
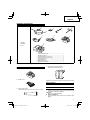
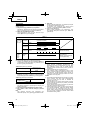
CG 18DL
•
CG 18DAL
CG18DL CG18DAL
Návod k obsluze
Kullanım talimatları
Instrucţiuni de utilizare
Navodila za rokovanje
Инструкция по эксплуатации

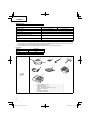
2
123
456
789
10 11 12
ST ART
BUTTON
1
2
1
2
3
4
5
1
6
7
8
9
0
!
@
#
$
%
^
&
!
(
)
q
w
e
r
t
w
u
y
i
%
a
o
p
!
4
p
s
d
4
l
k
j
h
g
f
w
*

3
13 14 15
16 17 18
19 20 21
22 23 24
z
;
k
z
x
c
b
v
n
z
n
z
m
,
z
/
¡
.
v
b
z
£
™
∞
¢
§
L
100 mm
100 mm
150 mm

4
25 26 27
28 29 30
*
¶
•
ª
º
⁄
¤
‹
3 mm
11.5 mm

5
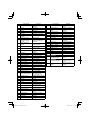
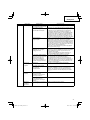
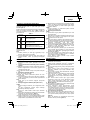
English Deutsch Ελληνικά Polski
1
Rechargeable battery Akkumulator
Επαναφορτιζόμενη
μπαταρία
Akumulator
2
Latch Schnapper Μάνδαλο Zapadka
3
Push Drücken Σπρώξε Wcisnąć
4
Insert Einsatz Εισχωρήστε Włóż/wprowadź
5
Pull out Herausziehen Τραβήξτε έξω Wyciągnij
6
Charger Ladegerät Φορτιστής Ładowarka
7
Pilot lamp Kontrollampe Δοκιμαστική λάμπα Lampka kontrolna
8
Line Leitung Γρα μμ ή Linia
9
Remaining battery
indicator switch
Ladezustand-
Anzeigeschalter
Διακόπτης ένδειξης
υπόλοιπου φορτίου
μπαταρίας
Przełącznik wakaźnika
pozostałej energii baterii
0
Remaining battery
indicator lamp
Ladezustand-
Kontrollleuchte
Ενδεικτική λυχνία
υπόλοιπου φορτίου
μπαταρίας
Lampka wakaźnika
pozostałej energii baterii
!
Main pipe Hauptrohr Κύριος σωλήνας Przewód główny
@
Locking hole Verriegelungsöff nung Τρύπα ασφάλισης Otwór blokady
#
Joint case Schäftungsgehäuse Περίβλημα ένωσης Obudowa złącza
$
Lock pin Spannstift Ασφαλιστική περόνη Kołek blokujący
%
Pull Ziehen Τραβήξτε Uchwyt przesuwania
^
Handle knob Griff knopf Κουμπί χερουλιού Pokrętło uchwytu
&
Motor side Motorseite Πλευρά κινητήρα Strona silnika
*
Loop handle Bügelgriff
Χερούλι σχήματος
βρόγχου
Uchwyt w kształcie pętli
(
Handle fi xture Griff befestigung Στερεωτικό χερουλιού Mocowanie uchwytu
)
M6 × 43 bolts M6 × 43-Schrauben Μπουλόνια M6 × 43 Śruby M6 × 43
q
M6 nuts M6-Muttern Παξιμάδια Μ6Nakrętki M6
w
Safety cover Sicherheitsabdeckung Κάλυμμα ασφαλείας Pokrywa zabezpieczająca
e
Cover guard Schutzvorrichtung Κάλυμμα προφυλακτήρα Osłona
r
Knife Messer Μαχαίρι Nóż
t
D4 tapping screw D4-Blechschraube D4 λαμαρινόβιδα Wkręt samogwintujący D4
y
Cover bracket Schutzhalter
Υποστήριγμα
καλύμματος
Wspornik pokrywy
u
M6 × 25 hex. socket
button bolts
M6 × 25-Innensechskant-
Rundkopfschrauben
Μπουλόνι εξαγ. κοίλης
κεφαλής M6 × 25
Śruby sześciokątne
M6 × 25
i
Cover holder Abdeckungshalterung Στήριγμα καλύμματος Uchwyt pokrywy
o
Hanger Einhängöse Αναρτήρας Wieszak
p
Bracket Halterung Στήριγμα Wspornik
a
Quick-release belt Schnelllösegurt
Ιμάντας γρήγορης
απελευθέρωσης
Śruba szybkomocująca
s
Hook Haken Γάντζος Haczyk
d
Quick-release bracket Schnelllösehalterung
Στήριγμα γρήγορης
απελευθέρωσης
Wspornik
szybkomocujący
f
Hexagonal bar wrench Sechskantinnenschlüssel Εξάγωνο κλειδί άλεν
Klucz sześciokątny
g
Cutter holder Messerhalterung Στήριγμα κόφτη Uchwyt noża
h
Winding protector Spulenschutz
Προστατευτικό
περιέλιξης
Osłona zwoju
j
Cutter holder cap Messerhaltekappe
Καπάκι στηρίγματος
κόφτη
Pokrywka uchwytu noża
k
Cutting head Schneidkopf Κεφαλή κοπής Głowica tnąca
l
Tighten Anziehen Σφίξτε Mocowanie

6
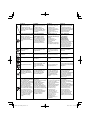
English Deutsch Ελληνικά Polski
;
Tap Klopfen Χτυπήστε Zaczep
z
Nylon line Nylonfaden Νάιλον κλωστή Żyłka nylonowa
x
Guide ball Führungskugel Οδηγητική μπίλια Kulka prowadząca
c
Turning (Right) Drehen (nach rechts) Περιστροφή (Δεξιά) Obracanie (w prawo)
v
Cutting body cap Schneidkörperkappe Κάλυμμα στοιχείου κοπής Pokrywka korpusu noża
b
Locking tab Verriegelungslasche Γλωττίδα ασφάλισης Klapka blokująca
n
Spool Spule Μασούρι Szpula
m
Stopper hole Stopfenbohrung Ανασταλτική τρύπα Otwór mocujący
,
Eyelet Öse Οφθαλμίδιο Oczko
.
Cutting body Schneidkörper Στοιχείο κοπής Korpus noża
/
Long hole Schlitzloch Βαθιά τρύπα Otwór szeroki
¡
Reel spring Spulenfeder Ελατήριο μασουριού Sprężyna bębna
™
Start button Startknopf Κουμπί εκκίνησης Przycisk uruchamiania
£
Power lamp Betriebsleuchte Λαμπτήρας ρεύματος Lampka zasilania
¢
Handle Gri
ff Χερούλι Uchwyt
∞
Lock lever Verriegelungshebel Μοχλός κλειδώματος Dźwignia blokady
§
Lever Hebel Μοχλός Dźwignia
¶
Forward Vorwärts Εμπρός W przód
•
Left side Linke Seite Αριστερή πλευρά Lewa strona
ª
Wear limit Verschließgrenze Όριο φθοράς Ogranicznik zużycia
º
Brush cap Motorsensenaufsatz Κάλυμμα ψήκτρας Pokrywka szczotki
⁄
Protrusion of carbon
brush
Krempe der Kohlebürste
Προεξοχή ψήκτρας
καρβουνακιού
Wystająca część szczotki
węglowej
¤
Nail of carbon brush Klaue der Kohlebürste
Καρφί
καρβουνακιού
Końcówka szczotek
węglowych
‹
Contact portion outside
brush tube
Kontaktteil außerhalb
des Bürstenrohrs
Τμήμα επαφής έξω από
το σωλήνα της ψήκτρας
Element kontaktowy na
zewnątrz komory szczotek

7
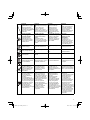
Magyar Čeština Türkçe Română
1
Os tölthető akkumulátor Akumulátor Şarj edilebilir batarya Acumulator reîncărcabil
2
Retesz Zámek Mandal Element de blocare
3
Benyomni Stisknout İtin Împingeţi
4
Bedugni Zasunout Yerleştirin Introduceţi
5
Kihúzni Zatáhnout Çekin Trageţi
6
Tőltő Nadíječka Şarj Cihazı Încărcător
7
Jelzőlámpa Indikátor Kılavuz lamba Lampă pilot
8
Vezeték Čára Üçgen işareti Linie
9
Fennmaradó tőltés
kijelzőjének kapcsolója
Vypínač indikátoru
zbývající energie baterie
Kalan pil göstergesi
anahtarı
Comutator indicator
acumulator rămas
0
Fennmaradó tőltét jelző
lámpa
Vypínač indikátoru
zbývající energie baterie
Kalan pil göstergesi
lambası
Comutator indicator
acumulator rămas
!
Nyél Hlavní roura Ana boru Tija principală
@
Zárónyílás Blokovací otvor Kilitleme deli
ğiOrifi ciu de blocare
#
Gömbcsukló Kloubové pouzdro Mafsal kutusu Carter de articulare
$
Csapszeg Upínací kolík Kilit pimi Ac de blocare
%
Húzás Tažení Çekin Împingeţi
^
Fogantyú gomb Knofl ík rukojeti Kol düğmesi Clapetă de ghidare
&
Motor oldal Strana motoru Motor tarafı Parte motor
*
Markolat Smyčková rukojeť Halka kol Mâner circular
(
Fogantyú rögzítése Připevnění rukojeti Kol tespit elemanı Siguranţă clapetă
)
M6 × 43 csavarok Šrouby M6 × 43 M6 × 43 cıvatalar Şuruburi M6 × 43
q
M6 anyák Matice M6 M6 somun Piuliţe M6
w
Biztonsági burkolat Bezpečnostní kryt Emniyet kapağı Capac de protecţie
e
Burkolatvédő Ochranné zařízení Kapak muhafazası Protecţie a capacului
r
Kés Řezný nástroj Bıçak Cuţit
t
D4 önmetsző csavar Samořezný šroub D4 D4 sac vidası Şurub cu fi letare D4
y
Burkolat bilincs Kryt úchytu Kapak braketi Suport capac
u
M6 × 25 hatlapfejű
csavarok
Imbusové šrouby M6 × 25
s kulatou hlavou
M6 × 25 altıgen soket
başlı cıvatalar
Şuruburi hexagonale
M6 × 25
i
Burkolattartó Pojistný kryt Kapak tutucu Portcapac
o
Akasztó Závěsné poutko Askı Carabină
p
Bilincs Úchyt Braket Suport
a
Gyorskioldó szíj Rychlovypínací pás Hızlı ayırma kayışı
Curea cu decuplare
instantanee
s
Kampó Hák Kanca Cârlig
d
Gyorskioldó bilincs Rychlovypínací úchyt Hızlı ayırma braketi Suport mobil
f
Hatszögű imbuszkulcs Šestihranný klíč Alyen anahtarı Cheie hexagonală
g
Vágó tartója Držák řezné části Kesici tutucusu Suport cuţit
h
Letekeredés-védő Ochrana proti navíjení Sarma koruyucusu Protecţia bobinei
j
Vágótartó-sapka Kryt držáku řezné části Kesici tutucusu kapağı Capac portcuţit
k
Vágófej Řezná hlava Kesme kafası Cap de tăiere
l
Megszorítás Utáhnout SıkınStrângeţi
;
Megérintés Poklepat Hafi fçe vurun Loviţi
z
Damil Nylonová struna Naylon ip Fir de nailon
x
Damilvezető Vodící koule Kılavuz bilye Bilă de ghidare
c
Fordulás (Jobbra) Otáčení (vpravo) Dönme (Sağa) Întoarcere (Dreapta)
v
Vágótest-sapka Víčko cívky sekací struny Kesici gövde başlığı Capac ansamblu de tăiere
b
Lezáró fül Zámková západka Kilitleme dili Buton de blocare
n
Orsó Cívka Makara Bobină

8
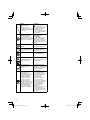
Magyar Čeština Türkçe Română
m
Megállító lyuk Otvor pro uchycení Durdurucu çentik
Orifi ciu dispozitiv de
oprire
,
Fűzőlyuk Očko İplik kılavuz gözü Buclă
.
Vágótest Tělo cívky Kesme gövdesi Ansamblu de tăiere
/
Hosszú lyuk Výřez Uzun delik Orifi ciu lung
¡
Tekercsrugó Pružina cívky Makara yayı Arc de bobină
™
Indítógomb Spouštěcí tlačítko Çalıştırma düğmesi Buton de pornire
£
Bekapcsolást jelző lámpa Kontrolka zapnutí Güç lambası Lampă electrică
¢
Fogantyú Rukojeť Tutamak Ghidaj
∞
Záró kar Zajišťovací páka Kilit kolu Manetă de blocare
§
Kar Páka Kol Manetă
¶
Előre Vpřed İleri Înainte
•
Baloldal Levá strana Sol taraf Partea stângă
ª
Megengedett kopás Mez opotřebení Aşınma sınırı Limită de uzur
ă
º
Kefe sapka Krytka kartáčů motoru Fırça kapağı Capac perie
⁄
A szénkefe kinyúlása
Vodící lamely uhlíkového
kartáče
Karbon fırça çıkıntısı Extensie perie cărbune
¤
A szénkefe szöge
Cvoček uhlíkového
kartáčku
Kömür çivisi Cuiul periei de cărbune
‹
Érintkező rész a szénkefe
csövén kívül
Dotyková část mimo
trubičku kartáčku
Kömür tüpünün dışındaki
temas bölümü
Zonă de contact în afara
tubului periei

9
Slovenščina Pyccкий
1
Baterija, ki se polni
Аккумуляторная
батарея
2
Zapah Фиксатор
3
Pritisnite Нажать
4
Vstavite Вставить
5
Izvlecite Вытащить
6
Polnilnik Зарядное устройство
7
Kontrolni svetlobni
indikator
Контрольная лампа
8
Trikotna označba Белая линия
9
Stikalo indikatorja
preostale energije
baterije
Переключатель
индикатора заряда
батареи
0
Lučka indikatorja
preostale energije
baterije
Световой индкатор
заряда батареи
!
Glavna cev Главная труба
@
Odprtina za zaskočko
Контровочное
отверстие
#
Povezovalni tulec
Соединительный
корпус
$
Zaskočka Фиксатор
%
Potegnite Потянуть
^
Ročica z gumbom Голо в к а рукоятки
&
Motorna stran К двигателю
*
Krožni roč
aj Ручка-скоба
(
Pritrdilo ročaja Крепеж ручки
)
M6 × 43 vijaki Болты M6 × 43
q
M6 matice Гай к и M6
w
Varnostni pokrov Защитная крышка
e
Varovalo pokrova Щиток крышки
r
Nož Нож
t
D4 nastavitveni vijak Винт-саморез D4
y
Konzola pokrova Скоба крышки
u
M6 × 25 imbus vijaki
Болты с торцевой
шестиугольной
головкой M6 × 25
i
Nosilec pokrova Удерживающая скоба
o
Nosilec Ушко
p
Konzola Скоба
a
Hitro odpenjalni jermen Ремень с защелкой
s
Kljuka Карабин
d
Hitro odpenjalno držalo Скоба-защелка
f
Šestkotni imbus ključ
Шестиугольный
торцевой ключ
g
Držalo noža Держатель ножа
h
Varovalo omota Кожух катушки
j
Pokrivalo držala noža
Колпачок держателя
ножа
k
Rezalna glava Режущая головка
l
Zategnite Зажать
;
Potapkajte Ударить
z
Najlonska vrvica Нейлоновый шнур
Slovenščina Pyccкий
x
Vodilna krogla
Направляющий
шарик
c
Obrnite (desno) Вращение (вправо)
v
Pokrivalo rezalnega
telesa
Крышка режущей
головки
b
Zaskočna spona Защелка
n
Tuljava Катушка
m
Odprtina za silk Стопорное отверстие
,
Očesno vodilo Проушина
.
Rezalno telo Режущая головка
/
Špranja
Продолговатое
отверстие
¡
Zvitek vzmeti Пружина катушки
™
Gumb za zagon Кнопка ПУСК
£
Lučka za delovanje Лампа питания
¢
Ročaj Рукоятка
∞
Zapiralni vzvod Запорный рычаг
§
Vzvod Рычаг
¶
Naprej Вперед
•
Leva stran Левая сторона
ª
Omejitev obrabe Предел износа
º
Pokrov ščetke Колпачок
щетки
⁄
Rob grafi tne ščetke
Выступ для угольной
щетки
¤
Zob grafi tne krtačke
Подпружиненный
контакт угольной
щетки
‹
Stični del zunaj cevi
krtačke
Участок контакта
снаружи щеточной
гильзы

10
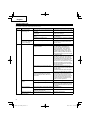
Symbols
WARNING
The following show
symbols used for the
machine. Be sure that you
understand their meaning
before use.
Symbole
WARNUNG
Die folgenden Symbole
werden für diese
Maschine verwendet.
Achten Sie darauf, diese
vor der Verwendung zu
verstehen.
Σύμβολα
ΠΡΟΣΟΧΗ
Τα παρακάτω δείχνουν
τα σύμβολα που
χρησιμοποιούνται στο
μηχάνημα. Βεβαιωθείτε
ότι κατανοείτε τη
σημασίας τους πριν τη
χρήση.
Symbole
OSTRZEŻENIE
Następujące oznaczenia
to symbole używane w
instrukcji obsługi maszyny.
Upewnij się, że rozumiesz
ich znaczenie zanim
użyjesz narzędzia.
Read all safety warnings
and all instructions.
Failure to follow the
warnings and instructions
may result in electric
shock, fi re and/or serious
injury.
Lesen Sie sämtliche
Sicherheitshinweise und
Anweisungen durch.
Wenn die Warnungen
und Anweisungen nicht
befolgt werden, kann es
zu Stromschlag, Brand
und/oder ernsthaften
Verletzungen kommen.
Διαβάζετε όλες τις
προειδοποιήσεις
ασφαλείας και όλες τις
οδηγίες.
Η μη τήρηση των
προειδοποιήσεων και
οδηγιών μπορεί να
προκαλέσει
ηλεκτροπληξία, πυρκαγιά
και/ή σοβαρό τραυματισμό.
Należy dokładnie
zapoznać się
ze wszystkimi
ostrzeżeniami
i wskazówkami
bezpieczeństwa.
Nieprzestrzeganie
ostrzeżeń oraz wskazówek
bezpieczeństwa może
spowodować porażenie
prądem elektrycznym,
pożar i/lub odniesienie
poważnych obrażeń.
Always wear eye
protection.
Tragen Sie immer einen
Augenschutz.
Φοράτε πάντα τον
κατάλληλο εξοπλισμό
για την προστασία των
ματιών.
Zawsze nosić okulary
ochronne.
Always wear hearing
protection.
Stets Gehörschutz tragen.
Να φοράτε πάντοτε
προστατευτικά ακοής.
Należy zawsze nosić
ochronę słuchu.
Do not expose to moisture. Keiner Feuchtigkeit
aussetzen.
Μην το εκθέσετε στην
υγρασία.
Nie narażać urządzenia na
działanie wilgoci.
Keep bystanders away.
Achten Sie darauf, dass
keine unbeteiligten
Personen in der Nähe
sind.
Κρατήστε μακριά τους
παρευρισκόμενους.
Osoby postronne powinny
pozostawać w bezpiecznej
odległości.
Remove battery before
adjusting or cleaning
and before leaving the
machine unattended for
any period.
Entfernen Sie die Batterie
vor dem Einstellen und
der Reinigung sowie
dann, wenn das Gerät
unbeaufsichtigt ist.
Αφαιρέστε τη μπαταρία
πριν από τη ρύθμιση ή
τον καθαρισμό και πριν
αφήσετε το μηχάνημα
χωρίς επίβλεψη για
οποιαδήποτε χρονική
περίοδο.
Akumulator należy
zawsze wyjąć przed
przystąpieniem do
wykonywania regulacji lub
czyszczenia oraz kiedy
urządzenie nie będzie
wykorzystywane przez
dłuższy czas.
Only for EU countries
Do not dispose of electric
tools together with
household waste material!
In observance of European
Directive 2002/96/EC
on waste electrical and
electronic equipment
and its implementation in
accordance with national
law, electric tools that
have reached the end of
their life must be collected
separately and returned
to an environmentally
compatible recycling
facility.
Nur für EU-Länder
Werfen Sie
Elektrowerkzeuge nicht in
den Hausmüll!
Gemäss Europäischer
Richtlinie 2002/96/
EG über Elektro- und
Elektronik- Altgeräte und
Umsetzung in nationales
Recht müssen verbrauchte
Elektrowerkzeuge
getrennt gesammelt und
einer umweltgerechaten
Wiederververtung
zugeführt werden.
Μόνο για τις χώρες της
ΕΕ
Μην πετάτε τα ηλεκτρικά
εργαλεία στον κάδο
οικιακών απορριμμάτων!
Σύμφωνα με την
ευρωπαϊκή οδηγία 2002/
96/ΕΚ περί ηλεκτρικών
και ηλεκτρονικών
συσκευών και την
ενσωμάτωσή της
στο εθνικό δίκαιο, τα
ηλεκτρικά εργαλεία
πρέπει να συλλέγονται
ξεχωριστά και να
επιστρέφονται για
ανακύκλωση με
τρόπο φιλικό προς
το
περιβάλλον.
Dotyczy tylko państw UE
Nie wyrzucaj
elektronarzędzi wraz z
odpadami z gospodarstwa
domowego!
Zgodnie z Europejską
Dyrektywą 2002/96/WE w
sprawie zużytego sprzętu
elektrotechnicznego i
elektronicznego oraz
dostosowaniem jej
do prawa krajowego,
zużyte elektronarzędzia
należy posegregować
i zutylizować w sposób
przyjazny dla środowiska.

11
Jelölések
FIGYELEM
Az alábbiakban a géphez
alkalmazott jelölések
vannak felsorolva. A gép
használata előtt feltétlenül
ismerje meg ezeket a
jelöléseket.
Symboly
UPOZORNĚNÍ
Následující text obsahuje
symboly, které jsou
použity na zařízení.
Ujistěte se, že rozumíte
jejich obsahu před tím, než
začnete zařízení používat.
Simgeler
DİKKAT
Aşağıda, bu alet için
kullanılan simgeler
gösterilmiştir. Aleti
kullanmadan önce bu
simgelerin ne anlama
geldiğini anladığınızdan
emin olun.
Simboluri
AVERTISMENT
În cele ce urmează sunt
prezentate simbolurile
folosite pentru mașină.
Înainte de utilizare,
asiguraţi-vă că înţelegeţi
semnifi caţia acestora.
Olvasson el minden
biztonsági fi gyelmeztetést
és minden utasítást.
A fi gyelmeztetések
és utasítások be nem
tartása áramütést, tüzet
és/vagy súlyos sérülést
eredményezhet.
Přečtěte si všechna
varování týkající se
bezpečnosti a všechny
pokyny.
Nedodržení těchto
varování a pokynů může
mít za následek elektrický
šok, požár a/nebo vážné
zranění.
Tüm güvenlik uyarılarını ve
tüm talimatları okuyun.
Uyarılara ve talimatlara
uyulmaması elektrik
çarpmasına, yangına ve/
veya ciddi yaralanmaya
neden olabilir.
Citiţi toate
avertismentele privind
siguranţa și toate
instrucţiunile.
Nerespectarea
avertismentelor și a
instrucţiunilor poate avea
ca efect producerea de
șocuri electrice, incendii
și/sau vătămări grave.
Mindig viseljen
védőszemüveget.
Vždy noste ochranu očí.
Daima koruyucu gözlük
takın.
Purtaţi întotdeauna
protecţie pentru ochi.
Mindig viseljen fülvédőt.
Používejte vždy chrániče
uší.
Daima koruyucu kulaklık
takın.
Purtaţi întotdeauna
protecţie auditivă.
Ne tegye ki a gépet
nedvességnek.
Nevystavujte zařízení
vlhkosti.
Neme maruz bırakmayın. Nu expuneţi la umezeală.
A bámészkodókat tartsa
távol a készüléktől.
Udržujte přítomné osoby v
bezpečné vzdálenosti.
İzleyicileri uzakta tutun.
Nu lăsaţi alte persoane să
se apropie.
Beállítás vagy tisztítás
előtt, illetve abban az
esetben, ha egy kis időre
felügyelet nélkül hagyja
a gépet, vegye ki az
akkumulátort.
Před nastavením
nebo čištěním a před
ponecháním stroje po
delší dobu bez dozoru
vyjměte baterie.
Ayar veya temizlik
yapmadan önce ve
makineyi uzun bir süre
gözetimsiz bırakacaksanız,
aküyü çıkarın.
Scoateţi bateria înainte
de reglare sau curăţare şi
înainte de a părăsi utilajul
pentru o perioadă de timp.
Csak EU-országok
számára Az elektromos
kéziszerszámokat
ne dobja a háztartási
szemétbe!
A használt villamos és
elektronikai készülékekről
szóló 2002/96/EK irányelv
és annak a nemzeti jogba
való átültetése szerint az
elhasznált elektromos
kéziszerszámokat
külön kell gyűjteni, és
környezetbarát módon újra
kell hasznosítani.
Jen pro státy EU Elektrické
nářadí nevyhazujte do
komunálního odpadu!
Podle evropské směrnice
2002/96/EG o nakládání
s použitými elektrickými a
elektronickými zařízeními
a odpovídajících
ustanovení právních
předpisů jednotlivých
zemí se použitá elektrická
nářadí musí sbírat
odděleně od ostatního
odpadu a podrobit
ekologicky šetrnému
recyklování.
Sadece AB ülkeleri için
Elektrikli el aletlerini
evdeki çöp kutusuna
atmayınız!
Kullanılmış elektrikli
aletleri, elektrik ve
elektronikli eski cihazlar
hakkındaki 2002/96/EC
Avrupa yönergelerine
göre ve bu yönergeler
ulusal hukuk kurallarına
göre uyarlanarak, ayrı
olarak toplanmalı ve çevre
şartlarına uygun bir şekilde
tekrar değerlendirmeye
gönderilmelidir.
Numai pentru ţările
membre UE
Nu aruncaţi această sculă
electrică împreună cu
deșeurile menajere!
În conformitate cu
Directiva Europeană
2002/96/CE referitoare la
deșeurile reprezentând
echipamente electrice
și electronice și la
implementarea acesteia în
conformitate cu legislaţiile
naţionale, sculele electrice
care au ajuns la
fi nalul
duratei de folosire trebuie
colectate separat și duse
la o unitate de reciclare
compatibilă cu mediul
înconjurător.

12
Simboli
OPOZORILO
V nadaljevanju so
prikazani simboli,
uporabljeni pri stroju. Pred
uporabo se prepričajte, da
jih razumete.
Символы
ПРЕДУПРЕЖДЕНИЕ
Ниже приведены
символы, используемые
для машины. Перед
началом работы
обязательно убедитесь
в том, что Вы понимаете
их значение.
Preberite vas varnostna
opozorila in navodila.
Z neupoštevanjem
opozoril in navodil tvegate
električni udar, požar in/ali
resne telesne poškodbe.
Прочтите все правила
безопасности и
инструкции.
Не выполнение правил
и инструкций может
привести к поражению
электрическим током,
пожару и/или серьезной
травме.
Uporaba zaščite za oči je
obvezna.
Всегда надевайте
средства защиты глаз.
Vedno uporabljajte zaščito
za ušesa.
Всегда пользуйтесь
средствами для защиты
органов слуха.
Ne izpostavljajte vlagi. Не подвергать
воздействию влаги.
V bližini stroja se naj ne
nahajo druge osebe.
Удалите посторонних из
рабочей зоны.
Odstranite baterijo,
preden nastavljate, čistite
ali puščate stroj brez
nadzora.
Перед проведением
регулировки и
триммера, а также перед
длительным хранением
триммера, удалите
аккумулятор.
Samo za države EU
Električnih orodij
ne zavržite skupaj z
gospodinjskimi odpadki!
V skladu z evropsko
direktivo 2002/96/EC
o odpadni električni
in elektronski opremi
in izvedbi v skladu z
državnimi zakoni, je treba
električna orodja, ki so
dosegla življenjsko dobo
ločeno zbirati in vrniti
v z okoljem združljivo
ustanovo za recikliranje.
Только для стран
ЕС Не выкидывайте
электроприборы вместе
с обоычным мусором!
В соответствии
с европейской
директивой 2002/96/
ЕС об утилизации
старых электрических и
электронных приборов
и в соответствии с
местными законами
электроприборы,
бывщие в
эксплуатации, должны
утилизовываться
отдельно безопасным
для окружающей среды
способом.

13
English
GENERAL POWER TOOL SAFETY WARNINGS
WARNING
Read all safety warnings and all instructions.
Failure to follow the warnings and instructions may result
in electric shock, fi re and/or serious injury.
Save all warnings and instructions for future
reference.
The term “power tool” in the warnings refers to your
mains-operated (corded) power tool or battery-operated
(cordless) power tool.
1) Work area safety
a) Keep work area clean and well lit.
Cluttered or dark areas invite accidents.
b) Do not operate power tools in explosive
atmospheres, such as in the presence of
fl ammable liquids, gases or dust.
Power tools create sparks which may ignite the
dust or fumes.
c) Keep
children and bystanders away while
operating a power tool.
Distractions can cause you to lose control.
2) Electrical safety
a) Power tool plugs must match the outlet.
Never modify the plug in any way.
Do not use any adapter plugs with earthed
(grounded) power tools.
Unmodifi ed plugs and matching outlets will reduce
risk of electric shock.
b) Avoid body contact with earthed or grounded
surfaces, such as
pipes, radiators, ranges and
refrigerators.
There is an increased risk of electric shock if your
body is earthed or grounded.
c) Do not expose power tools to rain or wet
conditions.
Water entering a power tool will increase the risk of
electric shock.
d) Do not abuse the cord. Never use the cord for
carrying, pulling or unplugging the power tool.
Keep cord away from heat, oil, sharp edges or
moving parts.
Damaged or entangled cords increase the risk of
electric shock.
e) When operating a
power tool outdoors, use an
extension cord suitable for outdoor use.
Use of a cord suitable for outdoor use reduces the
risk of electric shock.
f) If operating a power tool in a damp location
is unavoidable, use a residual current device
(RCD) protected supply.
Use of an RCD reduces the risk of electric shock.
3) Personal safety
a) Stay alert, watch what you are doing and use
common sense when operating a power tool.
Do not use a power tool while you are tired
or under the infl uence of drugs, alcohol or
medication.
A moment of inattention while operating power
tools may result in serious personal injury.
b) Use personal protective equipment. Always
wear eye protection.
Protective equipment such as dust mask, non-skid
safety shoes, hard hat, or hearing protection used
for appropriate conditions will reduce personal
injuries.
c) Prevent unintentional starting. Ensure the
switch is in the off position before connecting
to power source and/or
battery pack, picking
up or carrying the tool.
Carrying power tools with your fi nger on the switch
or energising power tools that have the switch on
invites accidents.
d) Remove any adjusting key or wrench before
turning the power tool on.
A wrench or a key left attached to a rotating part of
the power tool may result in personal injury.
e) Do not overreach. Keep proper footing and
balance at all times.
This enables better control of the power tool in
unexpected situations.
f) Dress properly. Do not wear loose clothing or
jewellery. Keep your hair, clothing and
gloves
away from moving parts.
Loose clothes, jewellery or long hair can be caught
in moving parts.
g) If devices are provided for the connection of
dust extraction and collection facilities, ensure
these are connected and properly used.
Use of dust collection can reduce dust related
hazards.
4) Power tool use and care
a) Do not force the power tool. Use the correct
power tool for your application.
The correct power tool will do the job better and
safer at the rate for which it was designed.
b) Do
not use the power tool if the switch does
not turn it on and off .
Any power tool that cannot be controlled with the
switch is dangerous and must be repaired.
c) Disconnect the plug from the power source
and/or the battery pack from the power tool
before making any adjustments, changing
accessories, or storing power tools.
Such preventive safety measures reduce the risk of
starting the power tool accidentally.
d) Store idle power tools out
of the reach of
children and do not allow persons unfamiliar
with the power tool or these instructions to
operate the power tool.
Power tools are dangerous in the hands of
untrained users.
e) Maintain power tools. Check for misalignment
or binding of moving parts, breakage of parts
and any other condition that may aff ect the
power toolsʼ
operation.
If damaged, have the power tool repaired
before use.
Many accidents are caused by poorly maintained
power tools.
f) Keep cutting tools sharp and clean.
Properly maintained cutting tools with sharp cutting
edges are less likely to bind and are easier to
control.
g) Use the power tool, accessories and tool bits
etc. in accordance with these instructions,
taking into account the working conditions
and the work to be performed.
Use of the power tool for operations diff erent
from those intended could result in a hazardous
situation.

14
English
5) Battery tool use and care
a) Recharge only with the charger specifi ed by
the manufacturer.
A charger that is suitable for one type of battery
pack may create a risk of fi re when used with
another battery pack.
b) Use power tools only with specifi cally
designated battery packs.
Use of any other battery packs may create a risk of
injury and fi re.
c) When battery pack is not in use, keep it away
from other metal objects like paper clips,
coins,
keys, nails, screws, or other small metal
objects that can make a connection from one
terminal to another.
Shorting the battery terminals together may cause
burns or a fi re.
d) Under abusive conditions, liquid may be
ejected from the battery; avoid contact. If
contact accidentally occurs, fl ush with water. If
liquid contacts eyes, additionally seek medical
help.
Liquid ejected from the battery may cause irritation
or burns.
6) Service
a) Have your power tool serviced by a qualifi ed
repair person using only identical replacement
parts.
This will ensure that the safety of the power tool is
maintained.
PRECAUTION
Keep children and infi rm persons away.
When not in use, tools should be stored out of reach
of children and infi rm persons.
GRASS TRIMMER SAFETY WARNINGS
IMPORTANT
READ CAREFULLY BEFORE USE
KEEP FOR FUTURE REFERENCE
Safe operation practices
● Training
a) Read the instructions carefully. Be familiar with the
controls and the proper use of the machine.
b) Never allow people unfamiliar with these instructions
or children to use the machine. Local regulations can
restrict the age of the operator.
c) Keep in mind that the operator or user is responsible
for accidents or hazards occurring to other people or
their property.
● Preparation
a) Never operate the machine while people, especially
children, or pets are nearby.
b) Wear eye protection and stout shoes at all times while
operating the machine.
● Operation
a) Use the machine only in daylight or good artifi cial light.
b) Never operate the machine with damaged guards or
shields or without guards or shields in place.
c) Switch on the motor only when the hands and feet are
away from the cutting means.
d) Always disconnect the machine from the power supply
(i.e. remove the plug from the mains or remove the
disabling device)
– whenever leaving the machine unattended;
– before clearing a blockage;
– before checking, cleaning or working on the
machine;
– after striking a foreign object;
– whenever the machine starts vibrating abnormally.
e) Take care against injury to feet and hands from the
cutting means.
f) Always ensure that the ventilation openings are kept
clear of debris.
● Maintenance and storage
a) Disconnect the machine from the power supply
(i.e. remove the plug from the mains or remove the
disabling device) before carrying out maintenance or
cleaning work.
b) Use only the manufacturer’s recommended
replacement parts and accessories.
c) Inspect and maintain the machine regularly. Have the
machine repaired only by an authorized repairer.
d) When not in use, store the machine out of the reach of
children.
PRECAUTIONS FOR CORDLESS GRASS
TRIMMER
WARNING
1. Exercise patience in all work with the tool. And dress
properly to keep warm.
2. Plan all work ahead to prevent accidents.
3. Do not operate the tool at night or under bad weather
conditions when visibility is poor. And do not operate
the tool when it is raining or right after it has been
raining.
Working on slippery ground could lead to an accident if
you lose your balance.
4. Inspect the cutting head before starting work.
Do not use the tool if the cutting head is cracked,
scarred or bent.
Make sure the cutting head is properly attached. A
cutting head that falls apart or comes loose during
operation could cause an accident.
5. Be sure to attach the safety cover and the shoulder belt
before starting work.
Operating the tool without these parts could lead to
injury.
6. Be sure to attach the loop handle before starting work.
Make sure it is not loose but properly attached before
starting work. Hold the loop handle fi rmly during work
and do not swing the tool around, but use the correct
posture and maintain your balance.
Losing your balance during work could lead to an
injury.
7. Take care when starting the motor.
Place the tool on level ground.
Do not operate the tool within 15 m of people or
animals.
Make sure that the cutting head does not come into
contact with the ground or trees and plants.
A careless start could lead to injury.
8. Do not secure the lock lever.
Accidentally pulling back the lever could lead to
unexpected injury.
9. Before leaving the tool, press the start button to turn it
off .
10. Operate the tool with care near electric cables, gas
pipes and similar installations.
11. Look out for and remove empty cans, wire, stones or
other obstacles before starting work. And do not work
near tree roots or rocks.
Working in such areas could damage the cutting head
or lead to injury.
12. Do not raise the rotation speed excessively.
Raise the speed gradually and not abruptly.
Adjust lever position to suit the work load.
Objects that fl y out of the tool could cause unexpected
injury.

15
English
13. Never touch the cutting head during operation.
Also make sure it does not come into contact with your
hair, clothes, etc.
14. In the following situations, turn off the motor and check
that the cutting head has stopped rotating.
To move to another work area.
To remove rubbish or grass that has become stuck in
the tool.
To remove from the work area obstacles or the rubbish,
grass and chips generated by trimming.
To lay down the tool.
Doing this with the cutting head still rotating could lead
to unexpected accidents.
15. Do not use the tool within 15 m of another person.
When you work with someone else, maintain a
distance of more than 15 m.
Flying chips could lead to unexpected accidents.
When working on unstable surfaces like slopes,
make sure that your co-worker is not exposed to any
hazards.
Use whistles or other means for calling the attention of
your co-workers.
16. When grass and other objects become entangled in
the cutting head, turn off the motor and make sure the
cutting head has stopped rotating before removing
them.
Removing objects from the cutting head when it is still
rotating will lead to injury.
Continuing operation when foreign matter is stuck in
the cutting head may lead to damage.
17. If the tool is operating poorly and produces strange
noise or vibrations, turn off the motor immediately and
ask your dealer to have it inspected and repaired.
Continued use under these conditions could lead to
injury or tool damage.
18. If you drop or bump the tool, inspect it carefully to
check there is no damage, cracks or deformation.
Using a tool that is damaged, cracked or deformed
could result in injury.
19. Secure the tool during vehicle transport to ensure that
it lies still.
Failure to heed this warning may result in an accident.
CAUTION
1. Do not turn on the cutting head for cutting objects other
than grass. Do not operate the tool in water puddles
and make sure that soil does not come into contact
with the cutting head.
2. The tool contains precision parts and should not be
dropped, exposed to strong impact or water.
The tool could be damaged or malfunction.
3. When the tool is to be stored after use or be
transported, remove the cutting head.
4. Do not expose the tool to insecticide and other
chemicals.
Such chemicals could cause cracking and other
damage.
5. Replace warning labels with new labels when they
become diffi cult to recognize or illegible and when they
start to peel.
Ask your dealer to provide the warning labels.
PRECAUTIONS FOR BATTERY AND CHARGER
1. Always charge the battery at a temperature of 0°C –
40°C. A temperature of less than 0°C will result in over
charging which is dangerous. The battery cannot be
charged at a temperature higher than 40°C.
The most suitable temperature for charging is that of
20°C – 25°C.
2. When one charging is completed, leave the charger for
about 15 minutes before the next charging of battery.
Do not charge the battery more than 2 hours.
3. Do not allow foreign matter to enter the hole for
connecting the rechargeable battery.
4. Do not insert object into the air ventilation slots of the
charger.
Inserting metal objects or infl ammables into the
charger air ventilation slots will result in electrical
shock hazard or damaged charger.
5. Using an exhausted battery will damage the charger.
6. Bring the battery to the shop from which it was
purchased as soon as the post-charging battery life
becomes too short for practical use. Do not dispose of
the exhausted battery.
7. Never disassemble the rechargeable battery and
charger.
8. Never short-circuit the rechargeable battery. Short-
circuiting the battery will cause a great electric current
and overheat. It results in burn or damage to the
battery.
9. Do not dispose of the battery in fi re. If the battery is
burnt, it may explode.
CAUTION ON LITHIUM-ION BATTERY
To extend the lifetime, the lithium-ion battery equips with
the protection function to stop the output.
In the cases of 1 to 3 described below, when using this
product, even if you are pulling the switch, the motor may
stop. This is not the trouble but the result of protection
function.
1. When the battery power remaining runs out, the motor
stops.
In such case, charge it up immediately.
2. If the tool is overloaded, the motor may stop. In this
case, release the switch of tool and eliminate causes
of overloading. After that, you can use it again.
3. If the battery is overheated under overload work, the
battery power may stop.
In this case, stop using the battery and let the battery
cool. After that, you can use it again.
Furthermore, please heed the following warning and
caution.
WARNING
In order to prevent any battery leakage, heat generation,
smoke emission, explosion and ignition beforehand,
please be sure to heed the following precautions.
1. Make sure that swarf and dust do not collect on the
battery.
◯ During work make sure that swarf and dust do not fall
on the battery.
◯ Make sure that any swarf and dust falling on the power
tool during work do not collect on the battery.
◯ Do not store an unused battery in a location exposed
to swarf and dust.
◯ Before storing a battery, remove any swarf and dust
that may adhere to it and do not store it together with
metal parts (screws, nails, etc.).
2. Do not pierce battery with a sharp object such as a
nail, strike with a hammer, step on, throw or subject the
battery to severe physical shock.
3. Do not use an apparently damaged or deformed
battery.
4. Do not use the battery in reverse polarity.
5. Do not connect directly to an electrical outlets or car
cigarette lighter sockets.
6. Do not use the battery for a purpose other than those
specifi ed.

16
English
7. If the battery charging fails to complete even when a
specifi ed recharging time has elapsed, immediately
stop further recharging.
8. Do not put or subject the battery to high temperatures
or high pressure such as into a microwave oven, dryer,
or high pressure container.
9. Keep away from fi re immediately when leakage or foul
odor are detected.
10. Do not use in a location where strong static electricity
generates.
11. If there is battery leakage, foul odor, heat generated,
discolored or deformed, or in any way appears
abnormal during use, recharging or storage,
immediately remove it from the equipment or battery
charger, and stop use.
CAUTION
1. If liquid leaking from the battery gets into your eyes,
do not rub your eyes and wash them well with fresh
clean water such as tap water and contact a doctor
immediately.
If left untreated, the liquid may cause eye-problems.
2. If liquid leaks onto your skin or clothes, wash well with
clean water such as tap water immediately.
There is a possibility that this can cause skin irritation.
3. If you fi nd rust, foul odor, overheating, discolor,
deformation, and/or other irregularities when using the
battery for the fi rst time, do not use and return it to your
supplier or vendor.
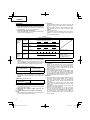
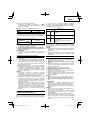
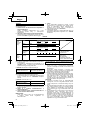
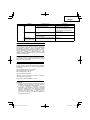
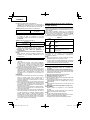
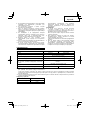
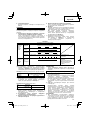
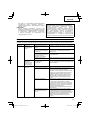
SPECIFICATIONS
POWER TOOL
Model CG18DL CG18DAL
Pole type Attachment type Straight type
Cutting capacity diameter 425 mm
Rotation direction Counterclockwise as seen from gear case
No-load speed 0–4500 min
-1
Operating time on one charge *
1
(When supplied rechargeable battery is fully charged)
5 min*
2
Battery BSL1830: Li-ion 18 V (3.0 Ah 10 cells)
Weight (without cutting head and shoulder belt) 5.4 kg 5.2 kg
*1 The data in the above table is provided only as an example. Since type of grass, knife sharpness, cutting head rpm,
ambient temperature, rechargeable battery characteristics, work methods, etc. can vary widely the above should only
be used as a rough guideline.
*2 Conditions: Outer diameter of nylon cord cutter 425 mm, switch set to full speed.
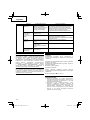
CHARGER
Model UC18YRSL
Charging voltage 14.4 V 18 V
Weight 0.6 kg

17
English
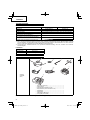
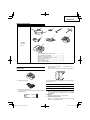
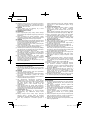
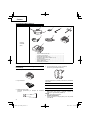
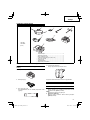
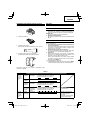
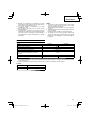
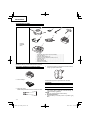
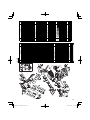
STANDARD ACCESSORIES
CG18DL
CG18DAL
(LSC)
1
2
3
4
5
6
7
8
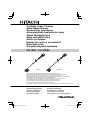
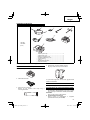
1 Nylon head (Sure tap) ..................................................1
2 Winding protector .........................................................1
3 Hexagonal bar wrench 4 mm .......................................1
4 Box wrench (Hex. socket 17/19) ...................................1
5 Protective glasses ........................................................1
6 Shoulder belt ................................................................1
7 Battery (BSL1830) ........................................................1
8 Charger (UC18YRSL) ...................................................1
OPTIONAL ACCESSORIES (sold separately)
1. Battery (BSL1830)
2. Battery cover
3. Grease (100 g tube)
Lubricate the gear case once every 50 hours of work.
Standard accessories are subject to change without notice.
4. Shin guard (1 kit with 2 guards)
Protects feet from fl ying debris.
Optional accessories are subject to change without notice.
APPLICATIONS
Trimming, scaling and mowing of weed.
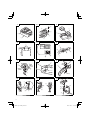
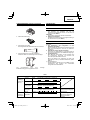
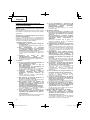
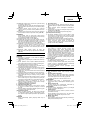
BATTERY REMOVAL/INSTALLATION
1. Battery removal
Hold the housing tightly and push the battery latches
to remove the battery (see Fig. 2).
CAUTION
Never short-circuit the battery.
2. Battery installation
Insert the battery while observing its polarities (see
Fig. 2).

18
English
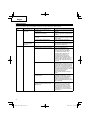
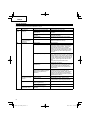
CHARGING
Before using the power tool, charge the battery as follows.
1. Connect the charger’s power cord to a receptacle.
When the power cord is connected, the charger’s pilot
lamp will blink in red. (At 1-second intervals)
2. Insert the battery into the charger.
Firmly insert the battery into the charger until the line is
visible, as shown in Fig. 3 and 4.
3. Charging
When inserting a battery in the charger, charging will
commence and the pilot lamp will light continuously in
red.
When the battery becomes fully recharged, the pilot
lamp will blink in red. (At 1-second intervals) (See
Table 1)
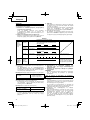
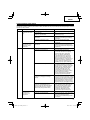
(1) Pilot lamp indication
The indications of the pilot lamp will be as shown in
Table 1, according to the condition of the charger or
the rechargeable battery.
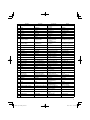
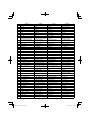
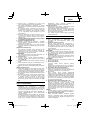
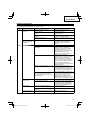
Table 1
Indications of the pilot lamp
The
pilot lamp
lights or
blinks in
red.
Before
charging
Blinks Lights for 0.5 seconds. Does not light for 0.5
seconds. (off for 0.5 seconds)
While
charging
Lights Lights continuously
Charging
complete
Blinks Lights for 0.5 seconds. Does not light for 0.5
seconds. (off for 0.5 seconds)
Charging
impossible
Flickers Lights for 0.1 seconds. Does not light for 0.1
seconds. (off for 0.1 seconds)
Malfunction in the
battery or the charger
The
pilot lamp
lights in
green.
Overheat
standby
Lights Lights continuously
Battery overheated.
Unable to charge
(Charging will commence
when battery cools).
(2) Regarding the temperatures of the rechargeable
battery
The temperatures for rechargeable batteries are as
shown in Table 2, and batteries that have become hot
should be cooled for a while before being recharged.
Table 2 Recharging ranges of batteries
Rechargeable batteries
Temperatures at
which the battery
can be recharged
BSL1830 0°C – 50°C
(3) Regarding recharging time
Depending on the combination of the charger and
batteries, the charging time will become as shown in
Table 3.
Table 3 Charging time (At 20°C)
Charger
Battery
UC18YRSL
BSL1830 Approx. 45 min.
NOTE
The charging time may vary according to temperature
and power source voltage.
4. Disconnect the charger’s power cord from the
receptacle.
5. Hold the charger fi rmly and pull out the battery.
NOTE
After operation, pull out batteries from the charger fi rst,
and then keep the batteries properly.
How to make the batteries perform longer
(1) Recharge the batteries before they become completely
exhausted.
When you feel that the power of the tool becomes
weaker, stop using the tool and recharge its battery.
If you continue to use the tool and exhaust the electric
current, the battery may be damaged and its life will
become shorter.
(2) Avoid recharging at high temperatures.
A rechargeable battery will be hot immediately after
use. If such a battery is recharged immediately after
use, its internal chemical substance will deteriorate,
and the battery life will be shortened. Leave the battery
and recharge it after it has cooled for a while.
CAUTION
○ When the battery charger has been continuosly used,
the battery charger will be heated, thus constituting
the cause of the failures. Once the charging has
been completed, give 15 minutes rest until the next
charging.
○ If the battery is recharged when it is warm due to
battery use or exposure to sunlight, the pilot lamp map
light in green.
The battery will not be recharged. In such a case, let
the battery cool before charging.
○ When the pilot lamp fl ickers in red (at 0.2-second
intervals), check for and take out any foreign objects
in the charger’s battery installation hole. If there are
no foreign objects, it is probable that the battery or
charger is malfunctioning. Take it to your authorized
Service Center.

19
English
ABOUT REMAINING BATTERY INDICATOR
When pressing the remaining battery indicator switch, the
remaining battery indicator lamp lights and the battery
remaining power can be checked. (Fig. 5) When releasing
your fi nger from the remaining battery indicator switch,
the remaining battery indicator lamp goes off . The Table
4 shows the state of remaining battery indicator lamp and
the battery remaining power.
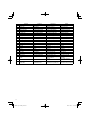
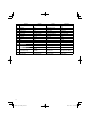
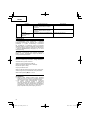
Table 4
State of lamp Battery Remaining Power
The battery remaining power is
enough.
The battery remaining power is a half.
The battery remaining power is nearly
empty.
Re-charge the battery soonest
possible.
As the remaining battery indicator shows somewhat
diff erently depending on ambient temperature and battery
characteristics, read it as a reference.
NOTE
○ Do not give a strong shock to the switch panel or break
it. It may lead to a trouble.
○ To save the battery power consumption, the remaining
battery indicator lamp lights while pressing the
remaining battery indicator switch.
PRIOR TO OPERATION
CAUTION
Pull out battery before doing any assembly.
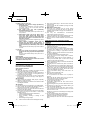
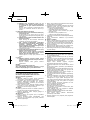
1. Assembling attachments [CG18DL only] (Fig. 6)
(1) Insert the lock pin in the main pipe locking hole of
the trimmer attachment and make sure the main pipe
cannot come loose.
(2) Tighten the handle knob to fi rmly secure it.
2. Installing the loop handle (Fig. 7)
(1) Remove the M6 × 43 bolts (2).
(2) Install the loop handle on the main pipe so that it leans
against the motor.
(3) Place the handle fi xture at the lower end of the main
pipe and secure it fi rmly using M6 × 43 bolts (2) and
M6 nuts (2).
NOTE
Secure the loop handle in a location that provides a
good grip.
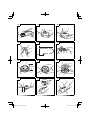
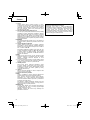
3. Installing safety cover (See Fig. 8 and 9)
WARNING
Be sure to install the safety cover in its designated
location.
Failure to heed this warning may result in injury from
fl ying stones.
NOTE
Use the supplied hexagonal bar wrench for installation.
(1) Use the supplied D4 tapping screw to install the knife
in the cover guard. (Fig. 8)
Attach the cover guard to the safety cover.
(2) Align the two holes in the cover bracket and the safety
cover and insert M6 × 25 hex. socket button bolts. (The
cover bracket is installed in the gear case.)
(3) Place the cover holder on the underside of the safety
cover and use the supplied Allen wrench to alternately
tighten the M6 × 25 hex. socket button bolts until they
are properly tightened.
CAUTION
Take care to avoid cutting yourself on the knife inside
the safety cover.
4. Installing the shoulder belt
WARNING
○ Be sure to attach the shoulder belt so that the grass
trimmer can be carried correctly.
○ If you get the feeling the tool is not operating normally,
turn off the motor immediately, remove the quick-
release bracket of the shoulder belt and remove the
tool.
CAUTION
○ If you do not support the tool when you pull the quick-
release belt, it may fall causing injury or damage.
Hold the main pipe with one hand while you pull with
the other hand.
○ Make sure the quick-release function operates
normally before you start working.
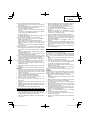
(1) Place the shoulder belt on the shoulder as shown
in Fig. 10 and engage it with the hanger on the tool.
Adjust the shoulder belt to suitable length.
(2) To remove the tool from the shoulder belt, support the
tool by holding the main pipe with one hand and use
the other hand to pull the quick-release belt as shown
in Fig. 10 to free it from the bracket.
(3) To strap on the tool, insert the bracket in the hook and
insert the quick-release bracket over the hook and into
the wide opening of the bracket. (Fig. 11)
Gently pull the shoulder belt to make sure that it is
properly attached.
CUTTING HEAD
1. Function
The “SURE-TAP” Cutting Head
○ Automatically feeds more nylon cutting line when it is
tapped at low rpm (not greater than 4500 min
-1
).
CAUTION
○ The cutting body cap must be securely attached to the
cutting body.
○ Check the cutting body, cutting body cap and other
components for cracks or other damage.
○ The cutting head must be securely mounted to the
unit’s gear case.
○ For outstanding performance and reliability, always
use HITACHI nylon cutting line. Never use wire or other
material which can become a dangerous missile.
○ If the Cutting Head does not feed cutting line properly,
check that the nylon line and all components are
properly installed. Contact HITACHI dealer if you need
assistance.
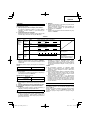
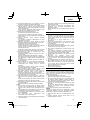
2. Installation (Fig. 12)
(1) Insert Hexagonal bar wrench into the hole of the gear
case in order to lock the cutter holder.
(2) Install cutter holder, winding protector, cutter holder
cap, cutting head on gear case of grass trimmer. The
mounting nut is left-hand-threaded. Turn clockwise to
loosen/counterclockwise to tighten.
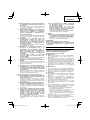
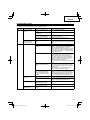
3. Adjustment of line length
(1) Set the motor speed as low as possible and tap the
cutting head on the ground. Nylon line is drawn out
about, 30 mm by one tapping. (Fig. 13)
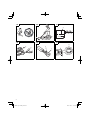
Also, you can extend nylon line with hands but the
motor must be completely stopped. (Fig. 14)
(2) Adjust nylon line to proper length 110 mm – 140 mm
before each operation.
(3) When nylon line is drawn out too long, rewind long
line outside by pushing and turning the guide ball with
hand. (Fig. 15)

20
English
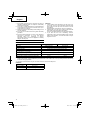
4. Nylon line replacement
(1) Remove cutting body cap by fi rmly pushing inward the
locking tabs with your thumbs (Fig. 16).
(2) After removing cutting body cap, take out spool, and
discard the left line.
(3) Fold the new nylon line half unevenly. (Fig. 17)
(4) Hook the “U” bent end of the nylon line into the groove
on the center partition of the spool.
Wind both halves of the line on the spool in the same
direction, keeping each half of the line on its own side
of the partition. (Fig. 18)
(5) Push each line into stopper holes, leaving the loose
ends approx. 100 mm in length. (Fig. 19)
(6) Insert both loose ends of the line through the eyelet
when placing the spool in the cutting body cap. (Fig.
20)
NOTE
When placing spool in the cutting body cap, try to
line up stopper holes (3) with eyelet (4) for easier line
release later.
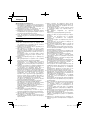
(7) Place reel spring into the spool. (Fig. 21)
(8) Place the cutting body over the cutting body cap so
that the locking tabs on the cutting body meet the long
holes on the cutting body. Then push the cutting body
cap securely until it clicks into place. (Fig. 21)
(9) Pull loose ends of line to release them from the stopper
holes. If the lines happen to come out too long (over
100 mm), rewind them to be approx. 100 mm by
pushing and turning guide ball. (Fig. 15)
(10)
The initial cutting line length should be approx. 150 mm
and should be equal on both sides. (Fig. 22)
OPERATION
Trimming grass
WARNING
○ Do not operate the tool at night or under bad weather
conditions when visibility is poor.
○ Do not operate the tool when it is raining or right after it
has been raining.
○ Wear proper footwear to prevent slipping that could
cause you to lose your balance and fall.
○ Do not use the tool on steep slopes.
When trimming grass on slopes that are not so steep,
trim by moving towards the ridge.
○ Place the tool on the shoulder belt, place the right hand
on the handle and the left hand on the loop handle and
hold it fi rmly.
○ Take care not to move the cutting head too close to
your feet.
○ Do not raise the cutting head above your knee during
cutting.
○ Do not use the tool where the cutting head may come
into contact with stones, tree and other obstacles.
○ A cutting attachment can injure while it continues to
spin after the motor is stopped. When the unit is turned
off , make sure the cutting attachment has stopped
before the unit is set down.
○ Do not use the tool within 15 m of another person.
When you work with someone else, maintain a
distance of more than 15 m.
1. Insert the battery while observing its polarities
2. Turn on the tool (Fig. 23)
○ Press the Start button on the housing, the power goes
on and the power lamp on the handle lights red.
○ Pressing the start button a second time turns the power
off and the red lamp on the handle goes off .
[Auto power off ]
When the power is turned on but the lever is not used
for one minute, the tool is automatically turned off . To
turn the tool on again, press the start button a second
time.
WARNING
Never leave the tool with the power on. This could
result in an accident.
3. Trimming grass
○ Grip the handle from above, press the lock lever and
pull the lever to start cutting head rotation. (Fig. 24)
○ Release the lever when you fi nish trimming and stop
the motor.
○ Place your thumb on the loop handle and grip the
handle with your other fi ngers. (Fig. 25)
○ Take a posture that makes it easy to move.
[Grass trimming techniques]
○ When the motor is turning slowly, it is weak and grass
tends to get caught in the knife. When it turns too fast,
the vibrations and noise are loud and battery power
consumption goes up.
○ At excessive speed, the battery will wear down faster.
○ Do not swing the pipe, but use the hips to move the
cutting head horizontally from right to left in an arc
while going forward and use the left side of the cutting
head for cutting grass. (Fig. 26)
OPERATIONAL CAUTIONS
Continuous work
This tool comes with an over-heat protection circuit
that protects the electronic parts that control the
rechargeable battery. In continuous trimming work,
tool temperature will rise and eventually trigger the
over-heat protection circuit, which will shut down the
tool.
If this happens, let the tool cool for a length of time.
When the temperature drops, it will again become
possible to use the tool. When the rechargeable
battery has to be exchanged during continuous
operation, let the tool rest for about 15 minutes.
Speed switch
Equipped with an electronic circuit, this switch enables
step-less speed changes.
If the switch trigger is set too low (low rpm range) and
the motor is continuously overworked, the electronic
circuits will become hot and could break down.
Do only light work at low motor speeds.
MAINTENANCE AND INSPECTION
CAUTION
○ Pull out battery before doing any inspection or
maintenance.
1. Checking the condition of the cutting head
The cutting head should be checked regularly. If
worn or broken cutting head can slip or decrease the
effi ciency of the motor and burn it out.
Replace worn cutting head with new ones.
CAUTION
○ If you use a cutting head of which point is worn or
broken, it will be dangerous. So replace it with a new
one.
2. Check the Screws
Loose screws are dangerous. Regularly inspect them
and make sure they are tight.
CAUTION
○ Using this power tool with loosened screws is
extremely dangerous.
Sayfa yükleniyor...
Sayfa yükleniyor...
Sayfa yükleniyor...
Sayfa yükleniyor...
Sayfa yükleniyor...
Sayfa yükleniyor...
Sayfa yükleniyor...
Sayfa yükleniyor...
Sayfa yükleniyor...
Sayfa yükleniyor...
Sayfa yükleniyor...
Sayfa yükleniyor...
Sayfa yükleniyor...
Sayfa yükleniyor...
Sayfa yükleniyor...
Sayfa yükleniyor...
Sayfa yükleniyor...
Sayfa yükleniyor...
Sayfa yükleniyor...
Sayfa yükleniyor...
Sayfa yükleniyor...
Sayfa yükleniyor...
Sayfa yükleniyor...
Sayfa yükleniyor...
Sayfa yükleniyor...
Sayfa yükleniyor...
Sayfa yükleniyor...
Sayfa yükleniyor...
Sayfa yükleniyor...
Sayfa yükleniyor...
Sayfa yükleniyor...
Sayfa yükleniyor...
Sayfa yükleniyor...
Sayfa yükleniyor...
Sayfa yükleniyor...
Sayfa yükleniyor...
Sayfa yükleniyor...
Sayfa yükleniyor...
Sayfa yükleniyor...
Sayfa yükleniyor...
Sayfa yükleniyor...
Sayfa yükleniyor...
Sayfa yükleniyor...
Sayfa yükleniyor...
Sayfa yükleniyor...
Sayfa yükleniyor...
Sayfa yükleniyor...
Sayfa yükleniyor...
Sayfa yükleniyor...
Sayfa yükleniyor...
Sayfa yükleniyor...
Sayfa yükleniyor...
Sayfa yükleniyor...
Sayfa yükleniyor...
Sayfa yükleniyor...
Sayfa yükleniyor...
Sayfa yükleniyor...
Sayfa yükleniyor...
Sayfa yükleniyor...
Sayfa yükleniyor...
Sayfa yükleniyor...
Sayfa yükleniyor...
Sayfa yükleniyor...
Sayfa yükleniyor...
Sayfa yükleniyor...
Sayfa yükleniyor...
Sayfa yükleniyor...
Sayfa yükleniyor...
Sayfa yükleniyor...
Sayfa yükleniyor...
Sayfa yükleniyor...
Sayfa yükleniyor...
Sayfa yükleniyor...
Sayfa yükleniyor...
Sayfa yükleniyor...
Sayfa yükleniyor...
Sayfa yükleniyor...
Sayfa yükleniyor...
Sayfa yükleniyor...
Sayfa yükleniyor...
Sayfa yükleniyor...
Sayfa yükleniyor...
Sayfa yükleniyor...
Sayfa yükleniyor...
Sayfa yükleniyor...
Sayfa yükleniyor...
Sayfa yükleniyor...
Sayfa yükleniyor...
Sayfa yükleniyor...
Sayfa yükleniyor...
Sayfa yükleniyor...
Sayfa yükleniyor...
Sayfa yükleniyor...
Sayfa yükleniyor...
Sayfa yükleniyor...
Sayfa yükleniyor...
Sayfa yükleniyor...
Sayfa yükleniyor...
Sayfa yükleniyor...
Sayfa yükleniyor...
Sayfa yükleniyor...
Sayfa yükleniyor...
Sayfa yükleniyor...
Sayfa yükleniyor...
Sayfa yükleniyor...
Sayfa yükleniyor...
Sayfa yükleniyor...
Sayfa yükleniyor...
Sayfa yükleniyor...
Sayfa yükleniyor...
Sayfa yükleniyor...
Sayfa yükleniyor...
Sayfa yükleniyor...
Sayfa yükleniyor...
Sayfa yükleniyor...
Sayfa yükleniyor...
-
 1
1
-
 2
2
-
 3
3
-
 4
4
-
 5
5
-
 6
6
-
 7
7
-
 8
8
-
 9
9
-
 10
10
-
 11
11
-
 12
12
-
 13
13
-
 14
14
-
 15
15
-
 16
16
-
 17
17
-
 18
18
-
 19
19
-
 20
20
-
 21
21
-
 22
22
-
 23
23
-
 24
24
-
 25
25
-
 26
26
-
 27
27
-
 28
28
-
 29
29
-
 30
30
-
 31
31
-
 32
32
-
 33
33
-
 34
34
-
 35
35
-
 36
36
-
 37
37
-
 38
38
-
 39
39
-
 40
40
-
 41
41
-
 42
42
-
 43
43
-
 44
44
-
 45
45
-
 46
46
-
 47
47
-
 48
48
-
 49
49
-
 50
50
-
 51
51
-
 52
52
-
 53
53
-
 54
54
-
 55
55
-
 56
56
-
 57
57
-
 58
58
-
 59
59
-
 60
60
-
 61
61
-
 62
62
-
 63
63
-
 64
64
-
 65
65
-
 66
66
-
 67
67
-
 68
68
-
 69
69
-
 70
70
-
 71
71
-
 72
72
-
 73
73
-
 74
74
-
 75
75
-
 76
76
-
 77
77
-
 78
78
-
 79
79
-
 80
80
-
 81
81
-
 82
82
-
 83
83
-
 84
84
-
 85
85
-
 86
86
-
 87
87
-
 88
88
-
 89
89
-
 90
90
-
 91
91
-
 92
92
-
 93
93
-
 94
94
-
 95
95
-
 96
96
-
 97
97
-
 98
98
-
 99
99
-
 100
100
-
 101
101
-
 102
102
-
 103
103
-
 104
104
-
 105
105
-
 106
106
-
 107
107
-
 108
108
-
 109
109
-
 110
110
-
 111
111
-
 112
112
-
 113
113
-
 114
114
-
 115
115
-
 116
116
-
 117
117
-
 118
118
-
 119
119
-
 120
120
-
 121
121
-
 122
122
-
 123
123
-
 124
124
-
 125
125
-
 126
126
-
 127
127
-
 128
128
-
 129
129
-
 130
130
-
 131
131
-
 132
132
-
 133
133
-
 134
134
-
 135
135
-
 136
136


Hikoki CG 18DAL Kullanım kılavuzu
- Kategori
- Elektrikli aletler
- Tip
- Kullanım kılavuzu
diğer dillerde
- slovenčina: Hikoki CG 18DAL Používateľská príručka
- polski: Hikoki CG 18DAL Instrukcja obsługi
- română: Hikoki CG 18DAL Manual de utilizare