Sayfa yükleniyor...
Sayfa yükleniyor...

Inhoud
Hoe moet u deze externe harde schijf op uw systeem aansluiten? (USB-installatie) 5
How to install the external harddisk for Windows 98 Second Edition and Windows ME) ? 8
Hoe moet u veilig de externe harde schijf loskoppelen zonder uw systeem uit te schakelen? 9
Hoe moet u snel de externe harde schijf formatteren? 11
Hoe moet u de externe harde schijf formatteren? 15
Hoe moet u de One-Click synchroniseren knop gebruiken? 21
Hoe moet u een backup terugzetten? 27
Hoe moet u de defragmenteren? 31
Garantie, milieu en veiligheid 43
Technische gegevens 44
Contenido
¿Cómo conectar esta disco duro externo en su sistema? (Instalación USB) 5
How to install the external harddisk for Windows 98 Second Edition and Windows ME) ? 8
¿Cómo desconectar de forma segura el equipo disco duro externo sin apagar el sistema? 9
¿Cómo formatear rápidamente el equipo disco duro externo? 11
¿Cómo formatear el equipo disco duro externo? 15
¿Cómo utilizar el botón One-Click para la sincronización? 21
¿Cómo restaurar una copia de seguridad? 27
¿Cómo desfragmentar? 31
Garantía, Entorno y Seguridad 45
Especificaciones 46
İçindekiler
Bu harici sabit disk sisteminize takma ?ekli? (USB kurulumu) 5
How to install the external harddisk for Windows 98 Second Edition and Windows ME) ? 8
Sisteminize kapatmadan harici sabit disk’nin güvenli ?ekilde ba?lantısını kesme ?ekli? 9
Harici sabit disk’ı hızlı formatlama ?ekli? 11
harici sabit disk’ı formatlama ?ekli? 15
Olarak senkronizasyon One-Click için dü?mesinin kullanılma ?ekli? 21
Bir yedek kopyayı geri yükleme şekli? 27
birle?tirme ?ekli? 31
Garanti, Ortam/Çevre ve Güvenlik 47
Teknik Özellikler 48
NL
E
TR
3
Sayfa yükleniyor...

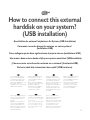
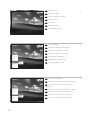
How to connect this external
harddisk on your system?
(USB installation)
Anschließen des externe Festplatte an Ihr System (USB-Installation)
Comment raccorder disque dur externe sur votre système ?
(Installation USB)
Come collegare questa disco rigido esterno al proprio sistema (installazione USB)
Hoe moet u deze externe harde schijf op uw systeem aansluiten? (USB-installatie)
¿Cómo conectar esta disco duro externo en su sistema? (Instalación USB)
Bu harici sabit disk sisteminize takma şekli? (USB kurulumu)
The next pages show how to
use your external HDD with
your desktop computer. Since
there are many brands and
types of PC’s available, the next
photographs show only
examples on how your external
HDD could be installed.
Auf den nächsten Seiten wird
Ihnen gezeigt, wie Sie Ihre
externe Festplatte mit Ihrem
PC verwenden.
Da es verschiedene Marken
und Arten von PCs gibt, zeigen
die nächsten Bilder nur
Beispiele, wie die Installation
einer externen Festplatte
vonstatten gehen kann.
Les pages suivantes vous
expliquent comment utiliser
votre disque dur externe avec
votre ordinateur de bureau.
Comme il existe de nombreuses
marques et de nombreux
modèles de PC, les illustrations
suivantes ne sont que des
exemples de la manière dont
votre disque dur externe peut
être installé.
Nelle prossime pagine verranno
date informazioni su come
usare l'unità HDD esterna con
il proprio computer.
Poiché esistono molte marche e
tipi di PC, le prossime foto
mostreranno solo esempi di
come l'unità HDD esterna
possa essere installata.
Op de volgende pagina’s kunt u
lezen hoe u uw externe HDD
met uw desktopcomputer
gebruikt.
Aangezien er vele merken en
soorten pc’s beschikbaar zijn,
laten de onderstaande foto’s
alleen voorbeelden zien van hoe
uw externe HDD zou kunnen
worden geïnstalleerd.
Las páginas a continuación
muestran cómo utilizar su di
sco
duro externo con su ordenador
de sobremesa.
Puesto que hay muchas marcas
y tipos de PC disponibles, las
fotos a continuación muestran
cómo debe instalarse el disco
duro externo.
İzleyen sayfalar, masaüstü
bilgisayarınızla harici HDD’nizi
(sabit disk sürücünüzü)
kullanma şeklini göstermektedir.
Piyasada bir çok marka ve tipte
PC bulunduğundan, izleyen
fotoğraflar; sadece harici
HDD’nizin nasıl kurulabileceğine
dair örnekleri göstermektedir.
UK D F I
NL E TR
5

6
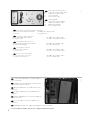
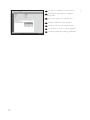
This can be found in the box:
A: Your new external HDD device
B: USB power adapter cable
C: How to Manual
D: Nero Software disc
Packungsinhalt:
A: Ihre neue externe Festplatte
B: USB power adapter cable
C: Bedienungsanleitung
D: Nero Software-CD
Votre boîte comprend les éléments suivants :
A: votre nouveau disque dur externe B: USB power adapter cable
C: Manuel D: Logiciel Nero
Contenuto della confezione:
A: La nuova unità HDD esterna B: USB power adapter cable
C: La guida d'uso D: Il disco del programma Nero
Het volgende zit in de doos:
A: Uw nieuwe externe HDD-apparaat B: USB power adapter cable
C: Instructiehandleiding D: Nero software-disc
La caja debe contener:
A: Su disco duro externo B: USB power adapter cable
C: Manual Cómo... D: Disco con el software Nero
Bu, kutu içinde bulunabilir:
A: Yeni harici HDD sürücünüz B: USB power adapter cable
C: Kullanma Şekli Kılavuzu D: Nero Yazılım diski
TR
E
NL
I
F
D
UK
1
2
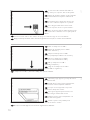
Connect the USB cable to an empty USB port
of your computer.*
Schließen Sie der USB-Kabels an einem freien
USB-Anschluss an Ihrem PC an.*
Branchez USB sur un port USB vide de votre
ordinateur.*
Collegare USB ad una porta USB libera del
computer.*
Sluit de USB-kabel aan op een vrije USB-poort
van uw computer.*
Conecte USB en un puerto USB libre de su
ordenador.*
USB bilgisayarınızın boş USB portuna/bağlantı noktasına takınız.*
* Use the USB power adapter cable for pc’s or laptops with limited bus power.
TR
E
NL
I
F
D
UK
Sayfa yükleniyor...
Sayfa yükleniyor...

How to safely disconnect the external
harddisk without shutting down your
system?
Sicheres Entfernen der externe Festplatte
ohne Herunterfahren Ihres Systems
Comment débrancher en toute sécurité le disque dur externe sans
éteindre le système ?
Come scollegare in modo sicuro l'unità disco rigido esterno senza spegnere
il sistema
Hoe moet u veilig de externe harde schijf loskoppelen
zonder uw systeem uit te schakelen?
¿Cómo desconectar de forma segura el equipo disco duro externo sin
apagar el sistema?
Sisteminize kapatmadan harici sabit disk’nin
güvenli şekilde bağlantısını kesme şekli?
The next pages show how to
disconnect your new external
HDD to a computer.
The screenshots are
representing the Microsoft
Windows XP™ operating
system. Other operating
systems may show different
popups.
Auf den nächsten Seiten wird
Ihnen gezeigt, wie Sie Ihre
externe Festplatte von Ihrem
PC entfernen. Die abgebildeten
Screenshots zeigen das Betriebs-
system Microsoft Windows XP™.
Bei anderen Betriebssystemen
können andere Popup-Fenster
angezeigt werden.
Les pages suivantes vous
indiquent comment débrancher
votre nouveau disque dur externe
de votre ordinateur. Les écrans
illustrés représentent le système
d’exploitation Microsoft
Windows XP™. Les autres
systèmes d’exploitation peuvent
présenter d’autres illustrations.
Nelle prossime pagine verranno
date informazioni su come
scollegare la nuova unità HDD
esterna dal proprio computer.
Nelle seguenti schermate è
rappresentato il sistema operativo
Microsoft Windows XP™.
Gli altri sistemi operativi possono
mostrare finestre diverse.
Op de volgende pagina’s kunt u
zien u uw nieuwe externe HDD
van een computer loskoppelt.
De schermafbeeldingen zijn
gebaseerd op het
besturingssysteem Microsoft
Windows XP™. Andere
besturingssystemen kunnen
afwijkende popups laten zien.
Las siguientes páginas muestran
cómo desconectar su nuevo
disco duro externo del
ordenador. Las imágenes de
pantalla representan el sistema
operativo Microsoft Windows
XP™. Otros sistemas
operativos podrían mostrar
pantallas distintas.
İzleyen sayfalar, bilgisayara
giden yeni harici HDD’nizin
bağlantısını kesme şeklini
göstermektedir.
Ekran resimleri; Microsoft
Windows XP™ işletim sistemini
temsil etmektedir. Diğer işletim
sistemleri; farklı açılır
menülerini gösterebilir.
UK D F I
NL E TR
9
Sayfa yükleniyor...

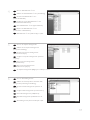
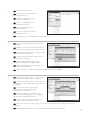
How to quick format the
external harddisk
?
Schnellformatieren der externe Festplatte
Comment formater rapidement le disque dur externe?
Come formattare rapidamente l'unità disco rigido esterno
Hoe moet u snel de externe harde schijf formatteren?
¿Cómo formatear rápidamente el equipo disco duro externo?
Harici sabit disk’ı hızlı formatlama şekli?
The next pages show how to
quick format your new external
HDD.
The screenshots are representing
the Microsoft Windows XP™
operating system. Other
operating systems may show
different popups.
If you only plan to use Windows
XP or 2000 we advice to
reformat to NTFS.
NTFS is not risible for Windows
98SE, ME, Mac, Linux.
Formatting will erase all the data.
Auf den nächsten Seiten wird
Ihnen gezeigt, wie Sie Ihre neue
externe Festplatte schnell
formatieren.
Die abgebildeten Screenshots
zeigen das Betriebssystem
Microsoft Windows XP™.
Bei anderen Betriebssystemen
können andere Popup-Fenster
angezeigt werden.
Wenn Sie nur Windows XP oder
2000 zu verwenden planen,
empfehlen wir eine
Neuformatierung auf NTFS.
NTFS lässt sich nicht für
Windows 98E, ME, Mac, Linux
einrichten.
Durch Formatierung gehen alle
Daten verloren.
Les pages suivantes montrent
comment formater rapidement
votre nouveau disque dur
externe.
Les écrans illustrés représentent
le système d’exploitation
Microsoft Windows XP™. Les
autres systèmes d’exploitation
peuvent présenter d’autres
illustrations.
Si vous comptez utiliser
exclusivement Windows XP ou
2000, nous recommandons de
reformater le disque en NTFS.
Le format NTFS n’est pas lisible
sous Windows 98SE, ME, Mac
et Linux.
Le formatage entraîne la perte
de toutes les données.
Nelle prossime pagine verranno
date informazioni su come
formattare rapidamente la
nuova unità HDD esterna.
Nelle seguenti schermate è
rappresentato il sistema
operativo Microsoft Windows
XP™.
Gli altri sistemi operativi possono
mostrare finestre diverse.
Se si ha in programma di
utilizzare Windows XP o 2000,
è consigliata la riformattazione
su NTFS.
NTFS non è utilizzabile con
Windows 98SE, ME, Mac, Linux.
La formattazione comporterà la
perdita di tutti i dati.
Op de volgende pagina’s kunt u
zien hoe u uw nieuwe externe
HDD snel moet formatteren.
De schermafbeeldingen zijn
gebaseerd op het besturings-
systeem Microsoft Windows
XP™. Andere besturings-
systemen kunnen afwijkende
popups laten zien.
Als u van plan bent Windows XP
of 2000 te gebruiken, adviseren
wij u te herformatteren naar
NTFS. NTFS is niet geschikt voor
Windows 98SE, ME, Mac, Linux.
Door formatteren zullen alle
gegevens verloren gaan.
Las páginas siguientes muestran
cómo formatear rápidamente su
nuevo disco duro externo.
Las imágenes de pantalla
representan el sistema operativo
Microsoft Windows XP™. Otros
sistemas operativos podrían
mostrar pantallas distintas.
Si sólo piensa utilizar Windows
XP o 2000, le recomendamos
reformatear en NTFS.
NTFS no es recomendable con
Windows 98SE, ME, Mac y
Linux.
El formateo borrará todos los
datos.
İzleyen sayfalar, yeni harici
HDD’nizin hızlı formatlama
şeklini göstermektedir.
Ekran resimleri; Microsoft
Windows XP™ işletim sistemini
temsil etmektedir. Diğer işletim
sistemleri; farklı açılır menülerini
gösterebilir.
Eğer sadece Windows XP yada
2000’i kullanmayı
düşünüyorsanız, NTFS’ye yeniden
formatlamanızı tavsiye ederiz.
NTFS; Windows 98SE, ME, Mac,
Linux için görünür değildir.
Formatlama işlemi ile, tüm veriler
kaybedilecektir.
UK D F I
NL E TR
11

12
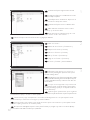
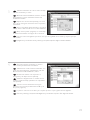
In Windows Explorer right click the external
HDD.
Im Windows Explorer rechtsklicken Sie auf der
externen Philips Festplatte.
Dans l’Explorateur de Windows, cliquez avec le
bouton droit sur le disque dur externe.
In Windows Explorer cliccare sull'unità HDD
esterna.
Klik in Windows Verkenner met de rechter-
muisknop op de externe HDD.
En el explorador de Windows haga clic con el
botón derecho en disco duro externo.
Windows Explorer’da harici HDD üzerine sağ düğmeyle tıklatınız.
TR
E
NL
I
F
D
UK
1
2
3
Click on "Format...".
Klicken Sie auf "Format..." (Formatieren...).
Cliquez sur "Format..." (Formater).
Cliccare su "Format..." (Formatta).
Klik op "Format..." (Formatteren).
Haga clic en "Format..." (Formatear).
"Format..." (Formatla...) üzerine tıklatınız.
TR
E
NL
I
F
D
UK
When this popup appears, you can choose a
quick format by selecting the "Quick Format" option
and then clicking "Start".
Sobald dieses Popup-Fenster angezeigt wird, wählen
Sie eine Schnellformatierung, indem Sie die Option "Quick
Format" (Schnellformatieren) markieren und dann auf
"Start" klicken.
Lorsque cet écran apparaît, vous pouvez choisir
un formatage rapide en sélectionnant l’option "Quick
Format" (Formatage rapide) et en cliquant ensuite sur
"Start" (Démarrer).
Quando appare questa finestra, si può scegliere la
formattazione rapida selezionando l'opzione "Quick Format"
(Formattazione rapida) e cliccando su "Start" (Inizia).
Wanneer deze popup verschijnt kunt u een snelle formattering kiezen door de optie "Quick Format"
(Snelformatteren) te selecteren en vervolgens op "Start" te klikken.
Cuando aparezca esta ventana, puede elegir el formateo rápido seleccionando la opción "Quick Format"
(Formateo rápido) y haciendo clic en "Start" (Inicio).
Bu açılır menü belirdiğinde,"Quick Format" (Hızlı Formatla) seçeneğini seçip daha sonra "Start" (Başlat)
üzerine tıklatarak bir hızlı formatlamayı seçebilirsiniz.
TR
E
NL
I
F
D
UK

13
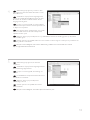
When this popup appears, you have to click
"OK". Please be aware that all the data that is on the
drive will be lost.
Sobald dieses Popup-Fenster angezeigt wird,
müssen Sie auf "OK" klicken. Bitte beachten Sie, dass
alle Daten, die auf dem Laufwerk sind bei diesem
Vorgang verloren gehen.
Lorsque cet écran apparaît, vous devez cliquer
sur "OK". Sachez que toutes les données présentes sur
ce disque seront perdues.
Non appena appare questa finestra, è necessario
cliccare su "OK". Si ricorda che tutti i dati presenti
sull'unità verranno persi.
Wanneer deze popup verschijnt moet u op "OK" klikken. Denk erom dat alle gegevens op het station
verloren zullen gaan.
Cuando aparezca esta pantalla, debe hacer clic en "OK". Por favor tenga en cuenta que se perderán todos
los datos grabados en la unidad.
Bu açılır menü belirdiğinde, "OK" üzerine tıklatmanız gereklidir. Sürücü üzerindeki tüm verilerin
kaybolacağını aklınızda bulundurunuz.
TR
E
NL
I
F
D
UK
4
5
When this popup appears, the format is
completed.
Sobald dieses Popup-Fenster angezeigt wird, ist
die Formatierung abgeschlossen.
Lorsque cet écran apparaît, le formatage est
terminé.
La visualizzazione di questa finestra indica che la
formattazione è terminata.
Wanneer deze popup verschijnt is de
formattering voltooid.
Cuando aparezca esta pantalla, el formateo
habrá terminado.
Bu açılır menü belirdiğinde, formatlama işlemi tamamlanmış olur.
TR
E
NL
I
F
D
UK
Sayfa yükleniyor...

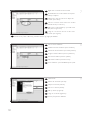
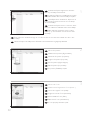
How to format the
external harddisk?
Formatieren der externe Festplatte
Comment formater le disque dur externe ?
Come formattare l'unità disco rigido esterno
Hoe moet u de externe harde schijf formatteren?
¿Cómo formatear el equipo disco duro externo?
harici sabit disk’ı formatlama şekli?
The next pages show how to
format your new external HDD.
The screenshots are representing
the Microsoft Windows XP™
operating system.
Other operating systems may
show different popups.
If you only plan to use Windows
XP or 2000 we advice to
reformat to NTFS.
NTFS is not risible for Windows
98SE, ME, Mac, Linux.
Formatting will loose all the data.
Auf den nächsten Seiten wird
Ihnen gezeigt, wie Sie Ihre neue
externe Festplatte formatieren.
Die abgebildeten Screenshots
zeigen das Betriebssystem
Microsoft Windows XP™.
Bei anderen Betriebssystemen
können andere Popup-Fenster
angezeigt werden.
Wenn Sie nur Windows XP oder
2000 zu verwenden planen,
empfehlen wir eine
Neuformatierung auf NTFS.
NTFS lässt sich nicht für
Windows 98E, ME, Mac, Linux
einrichten.
Durch Formatierung gehen alle
Daten verloren.
Les pages suivantes montrent
comment formater votre
nouveau disque dur externe.
Les écrans illustrés représentent
le système d’exploitation
Microsoft Windows XP™.
Les autres systèmes
d’exploitation peuvent
présenter d’autres illustrations.
Si vous comptez utiliser
exclusivement Windows XP ou
2000, nous recommandons de
reformater le disque en NTFS.
Le format NTFS n’est pas lisible
sous Windows 98SE, ME, Mac
et Linux.
Le formatage entraîne la perte
de toutes les données.
Nelle prossime pagine verranno
date informazioni su come
formattare la nuova unità HDD
esterna.
Nelle seguenti schermate è
rappresentato il sistema operativo
Microsoft Windows XP™.
Gli altri sistemi operativi possono
mostrare finestre diverse.
Se si ha in programma di
utilizzare Windows XP o 2000,
è consigliata la riformattazione
su NTFS.
NTFS non è utilizzabile con
Windows 98SE, ME, Mac, Linux.
La formattazione comporterà la
perdita di tutti i dati.
Op de volgende pagina’s kunt u
zien hoe u uw nieuwe externe
HDD moet formatteren.
De schermafbeeldingen zijn
gebaseerd op het besturings-
systeem Microsoft Windows
XP™. Andere besturings-
systemen kunnen afwijkende
popups laten zien.
Als u van plan bent Windows XP
of 2000 te gebruiken, adviseren
wij u te herformatteren naar
NTFS. NTFS is niet geschikt voor
Windows 98SE, ME, Mac, Linux.
Door formatteren zullen alle
gegevens verloren gaan.
Las páginas siguientes muestran
cómo formatear su nuevo disco
duro externo.
Las imágenes de pantalla
representan el sistema operativo
Microsoft Windows XP™. Otros
sistemas operativos podrían
mostrar pantallas distintas.
Si sólo piensa utilizar Windows
XP o 2000, le recomendamos
reformatear en NTFS.
NTFS no es recomendable con
Windows 98SE, ME, Mac y
Linux.
El formateo borrará todos los
datos.
İzleyen sayfalar, yeni harici
HDD’nizin formatlama şeklini
göstermektedir.
Ekran resimleri; Microsoft
Windows XP™ işletim sistemini
temsil etmektedir. Diğer işletim
sistemleri; farklı açılır menülerini
gösterebilir.
Eğer sadece Windows XP yada
2000’i kullanmayı
düşünüyorsanız, NTFS’ye yeniden
formatlamanızı tavsiye ederiz.
NTFS; Windows 98SE, ME, Mac,
Linux için görünür değildir.
Formatlama işlemi ile, tüm veriler
kaybedilecektir.
UK D F I
NL E TR
15
Sayfa yükleniyor...

17
Choose "Administrative Tools".
Wählen Sie "Administrative Tools" (Verwaltung).
Choisissez "Administrative Tools"
(Outils administratifs).
Scegliere la scheda "Administrative Tools"
(Strumenti di amministrazione).
Kies "Administrative Tools" (Systeembeheer).
Elija la ficha "Administrative Tools"
(Herramientas administrativas).
"Administrative Tools" (İdari Araçlar)’ı seçiniz.
TR
E
NL
I
F
D
UK
4
5
6
Choose "Computer Management".
Wählen Sie "Computer Management"
(Computerverwaltung).
Choisissez "Computer Management"
(Gestion informatique).
Scegliere "Computer Management" (Gestione
computer).
Kies "Computer Management"
(Computerbeheer).
Elija "Computer Management"
(Administración de equipos).
"Computer Management" (Bilgisayar Yönetimi)’ni seçiniz.
TR
E
NL
I
F
D
UK
Choose "Disk Management".
Wählen Sie "Datenspeicher" und dann "Disk
Management" (Datenträgerverwaltung).
Choisissez "Disk Management" (Gestion du
disque).
Scegliere "Disk Management" (Gestione disco).
Kies "Disk Management" (Schijfbeheer).
Elija "Disk Management" (Administración de
discos).
"Disk Management" (Disk Yönetimi)’ni seçiniz.
TR
E
NL
I
F
D
UK

18
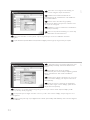
Right click on "Unallocated" hard disk.
Rechtsklicken Sie auf die "Unallocated" (nicht
zugeordnete) Festplatte.
Cliquez avec le bouton droit sur disque dur
"Unallocated" (Non alloué).
Cliccare con il tasto destro del mouse sul disco
rigido "Unallocated" (non allocato).
Klik met de rechtermuisknop op "Unallocated
hard disk" (Niet toegewezen).
Haga clic con el botón derecho en disco duro
"Unallocated" (No asignado).
"Unallocated" (Tahsis edilmemiş) sabit disk üzerine sağ düğmeyle tıklatınız.
TR
E
NL
I
F
D
UK
7
8
9
Choose "New Partition".
Wählen Sie "New Partition" (Neue Partition).
Choisissez "New Partition" (Nouvelle partition).
Scegliere "New Partition" (Nuova partizione).
Kies "New Partition" (Nieuwe partitie).
Elija "New Partition" (Partición nueva).
"New Partition" (Yeni Disk Bölümü)’nü seçiniz.
TR
E
NL
I
F
D
UK
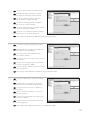
Click "Next".
Klicken Sie auf "Next" (Weiter).
Cliquez sur "Next" (Suivant).
Cliccare su "Next" (Avanti).
Klik op "Next" (Volgende).
Haga clic en "Next" (Siguiente).
"Next" (İleri) üzerine tıklatınız.
TR
E
NL
I
F
D
UK

19
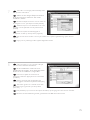
Accept "Primary partition" by clicking "Next".
Bestätigen Sie "Primary partition" (Primäre
Partition), indem Sie auf "Next" (Weiter) klicken.
Acceptez la "Primary partition" (Partition
primaire) en cliquant sur "Next" (Suivant).
Accettare la "Primary partition" (Partizione
primaria) cliccando su "Next" (Avanti).
Accepteer "Primary partition" (Primaire partitie)
door op "Next" (Volgende) te klikken.
Acepte la opción "Primary partition" (Partición
primaria) haciendo clic en "Next" (Siguiente).
"Next" (İleri) üzerine tıklatarak "Birincil disk bölümünü" kabul ediniz".
TR
E
NL
I
F
D
UK
10
11
12
Accept the size given (maximum) by clicking
"Next".
Bestätigen Sie die angegebene Maximalgröße,
indem Sie auf "Next" (Weiter) klicken.
Acceptez la taille donnée (maximum) en
cliquant sur "Next" (Suivant).
Accettare le dimensioni fornite (max.) cliccando
su "Next" (Avanti).
Accepteer de opgegeven grootte (maximum)
door op "Next" (Volgende) te klikken.
Acepte el tamaño (máximo) indicando haciendo
clic en "Next" (Siguiente).
"Next" (İleri) üzerine tıklatarak verili(maksimum) boyutu kabul ediniz.
TR
E
NL
I
F
D
UK
Accept the drive letter to be given by clicking
"Next".
Bestätigen Sie den angegebenen Laufwerk-
buchstaben, indem Sie auf "Next" (Weiter) klicken.
Acceptez la lettre du lecteur en cliquant sur
"Next" (Suivant).
Cliccare su "Next" (Avanti) per accettare la
lettera di unità assegnata.
Accepteer de stationletter die wordt gegeven
door op "Next" te klikken.
Acepte la letra de la unidad indicada haciendo
clic en "Next" (Siguiente).
"Next" (İleri) üzerine tıklatarak verilecek sürücü harfini kabul ediniz.
TR
E
NL
I
F
D
UK

20
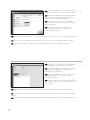
Choose the file system (default is NTFS) and
give the disk a name under "Volume label" and click
"Next".
Wählen Sie das Dateisystem (Standard ist NTFS)
und geben Sie der Festplatte einen Namen unter
"Volume label" (Datenträgerbezeichnung) und klicken
Sie auf "Next" (Weiter).
Choisissez le système de fichier (la valeur par
défaut est NTFS) et nommez le disque sous "Volume
label" (En-tête de volume) et cliquez sur "Next" (Suivant).
Scegliere il file system (predefinito: NTFS),
assegnare al disco un nome sotto "Volume label"
(Etichetta di volume), quindi cliccare su "Next"
(Avanti).
Kies het bestandssysteem (standaard is NTFS) en geef het station een naam onder "Volume label"
(Volumenaam) en klik op "Next" (Volgende).
Elija el sistema de archivo (la opción predefinida es NTFS) y dé un nombre al disco en "Volume label"
(Etiqueta del volumen) y haga clic en "Next" (Siguiente).
Dosya sistemini seçiniz (varsayılan, NTFS’dir) ve "Volume label" (Birim/Oylum etiketi) altında diske bir ad
verip "Next" (İleri) üzerine tıklatınız.üzerine tıklatınız.
TR
E
NL
I
F
D
UK
13
14
15
Click "Finish".
Klicken Sie auf "Finish" (Fertig stellen).
Cliquez sur "Finish" (Terminer).
Cliccare su "Finish" (Fine).
Klik op "Finish" (Voltooien).
Haga clic en "Finish" (Finalizar).
"Finish" (Bitir) üzerine tıklatınız.
TR
E
NL
I
F
D
UK
The hard disk will be formatted (it is hardly to
see that the drive is being formatted).
Die Festplatte wird jetzt formatiert (was fast
unbemerkt vonstatten geht).
Le disque dur est formaté (l’on voit à peine que
le disque est formaté).
A questo punto il disco rigido è stato formattato
(non è semplice appurare se l'unità è stata formattata).
De harde schijf wordt geformatteerd (het is
nauwelijks te zien dat het station wordt geformatteerd).
Se formateará el disco duro (es difícil ver que se
está formateando el disco duro).
Sabit disk formatlanacaktır (sürücünün formatlanmakta olduğunu anlamak oldukça zordur).
TR
E
NL
I
F
D
UK
Sayfa yükleniyor...

22
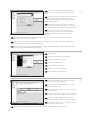
If you push the One-Click button for the first
time after installation of the NERO software the
following screen will appear:
Wenn Sie auf die Schaltfläche One-Click
erstmals nach der Installation der NERO-Software
klicken, wird folgender Bildschirm angezeigt:
Lorsque le bouton One-Click est utilisé pour la
première fois après l’installation du logiciel NERO, la
fenêtre suivante s’affiche à l’écran :
Se si seleziona il pulsante One-Click per la prima
volta dopo l'installazione del software NERO, appare
la seguente schermata:
Als u voor de eerste keer op de knop One-Click drukt na installatie van de NERO-software, verschijnt het
volgende scherm:
Si pulsa el botón One-Click por primera vez después de instalar el software NERO, aparecerá la siguiente
pantalla:
Eğer One-Click düğmesine, NERO yazılımının kurulumundan sonra ilk kez basıyorsanız, aşağıdaki ekran
belirecektir.
TR
E
NL
I
F
D
UK
1
2
You have to click the Next button in order to
start the Job Wizard.
Klicken Sie auf die Schaltfläche „Weiter“, um
den Aufgaben-Assistenten zu starten.
Appuyez sur le bouton Next (Suivant) pour
démarrer le Job Wizard (Assistant de création des
tâches).
Cliccare sul pulsante Next (Avanti) per avviare
la procedura guidata.
U moet op de knop Next (volgende) klikken
om de Job Wizard te starten.
Haga clic en el botón Siguiente para iniciar el Asistente de Trabajos.
İş Sihirbazı’nı başlatmak için İleri düğmesi üzerine tıklatmanız gereklidir.
TR
E
NL
I
F
D
UK

23
Click the next button in order to make a backup
with files and folders you select.
Klicken Sie auf die Schaltfläche „Weiter“, um eine
Sicherungskopie von den markierten Dateien und
Ordnern zu erstellen.
Cliquez sur le bouton Next (Suivant) pour créer
une copie de sauvegarde des fichiers et des répertoires
sélectionnés.
Cliccare sul pulsante Next (Avanti) per eseguire il
backup dei file e delle cartelle che sono stati selezionati.
Klik op de knop Next (volgende) om een backup
te maken met bestanden en mappen die u selecteert.
Haga clic en el botón Siguiente para hacer una copia de seguridad de los archivos y carpetas que haya
seleccionado.
Seçtiğiniz dosya ve klasörler ile bir yedek kopya oluşturmak için ileri düğmesi üzerine tıklatınız.
TR
E
NL
I
F
D
UK
3
4
First select the files and folders you want to
make a backup and the hit the next button.
Markieren Sie erst die Dateien und Ordner, von
denen eine Sicherungskopie erstellt werden soll, und
klicken Sie dann auf die Schaltfläche „weiter“.
Choisissez les fichiers et les répertoires à
sauvegarder, puis cliquez sur next (Suivant).
Selezionare dapprima i file e le cartelle di cui si
desidera eseguire il backup, quindi cliccare sul pulsante
next (Avanti).
Selecteer eerst de bestanden en mappen
waarvan u een reservekopie wilt maken en klik op de
knop next (volgende).
Lo primero seleccione los archivos y las carpetas que desee copiar y pulse el botón Siguiente.
Önce bir yedek kopya oluşturmak istediğiniz dosya ve klasörleri seçiniz ve İleri düğmesine basınız.
TR
E
NL
I
F
D
UK
Sayfa yükleniyor...

25
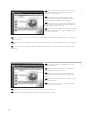
Select the correct target path and backup name
then press the next button.
Wählen Sie den richtigen Zielpfad und Namen
für die Sicherungskopie. Klicken Sie dann auf die
Schaltfläche „Weiter“.
Choisissez l’emplacement et le nom de fichier de
la sauvegarde à créer, puis cliquez sur Next (Suivant).
Selezionare il percorso di destinazione e il nome
di backup corretti, quindi cliccare sul pulsante Next
(Avanti).
Selecteer het juiste bestemmingspad en
backupnaam en druk op de knop Next (volgende).
Seleccione la ruta de destino correcta y el nombre de la copia de seguridad, luego pulse el botón
Siguiente.
Doğru yolu ve yedek kopya adını seçip ileri düğmesine basınız.
TR
E
NL
I
F
D
UK
7
8
This screen gives you an overview of the Job
you have added. Press the finish button.
Mit diesem Bildschirm erhalten Sie einen
Überblick über die Aufgabe, die Sie hinzugefügt haben.
Klicken Sie auf die Schaltfläche „Fertig stellen“.
Cet écran récapitule les données de la
sauvegarde à effectuer. Appuyez sur le bouton Finish
(Terminer).
Questa schermata offre un'anteprima del
processo aggiunto. Selezionare il pulsante Finish (Fine).
Dit scherm geeft u een overzicht van de taak
die u hebt toegevoegd. Druk op de knop Finish
(voltooien)
Esta pantalla le proporciona una descripción del trabajo que ha agregado. Pulse el botón Terminar.
Bu ekran, size ekledi iniz ‹fl’in genel bir görünümünü verir. Bitir dü mesine bas›n›z.
TR
E
NL
I
F
D
UK

26
If this screen appears you know that you have
added successfully a new job to the EasySync wizard.
Wenn dieser Bildschirm angezeigt wird, wissen
Sie, dass Sie eine neue Aufgabe mit dem EasySync-
Assistenten erfolgreich hinzugefügt haben.
La fenêtre suivante s’affiche pour indiquer
qu’une nouvelle tâche a été ajoutée avec succès dans
l’assistant EasySync.
Questa schermata viene visualizzata per
segnalare l'aggiunta di un nuovo processo alla
procedura guidata EasySync.
Als dit scherm verschijnt weet u dat u erin geslaagd bent een nieuwe taak toe te voegen aan de EasySync-
wizard.
Si aparece esta pantalla sabrá que ha agregado correctamente un nuevo trabajo al Asistente EasySync.
Eğer bu ekran belirirse, yeni bir İş’i EasySync sihirbazına başarı ile eklemiş olduğunuzu anlarsınız.
TR
E
NL
I
F
D
UK
9
10
Each time you press the One-Click button this
screen will appear and a backup process will run.
Jedes Mal, wenn Sie die Schaltfläche One-Click
klicken, wird dieser Bildschirm angezeigt und ein
Sicherungsprozess eingeleitet.
À chaque utilisation du bouton de One-Click,
cette fenêtre s’affiche à l’écran et une copie de
sauvegarde est réalisée.
Ogni volta che si seleziona il pulsante One-Click,
appare questa schermata e la procedura di backup
viene eseguita.
Iedere keer dat u op de One-Click knop drukt zal dit scherm verschijnen en wordt het backupproces
uitgevoerd.
Cada vez que pulse el botón de One-Click aparecerá esta pantalla y el proceso de copia de seguridad se
ejecutará.
One-Click dü mesine her bast› ›n›zda, bu ekran belirecek olup bir yedek kopya olma süreci, yürütülecektir.
TR
E
NL
I
F
D
UK

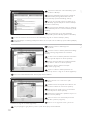
How to restore a backup?
Wiederherstellen einer Sicherungskopie
Comment restaurer une sauvegarde ?
Come ripristinare un backup
Hoe moet u een backup terugzetten?
¿Cómo restaurar una copia de seguridad?
Bir yedek kopyayı geri yükleme şekli?
The next pages show how to
restore a backup.
The screenshots are
representing the Microsoft
Windows XP™ operating
system. Other operating
systems may show different
popups.
Auf den nächsten Seiten wird
Ihnen gezeigt, wie Sie eine
Sicherungskopie
wiederherstellen.
Die abgebildeten Screenshots
zeigen das Betriebssystem
Microsoft Windows XP™.
Bei anderen Betriebssystemen
können andere Popup-Fenster
angezeigt werden.
Les pages suivantes vous
expliquent comment restaurer
une sauvegarde.
Les écrans illustrés représentent
le système d’exploitation
Microsoft Windows XP™.
Les autres systèmes
d’exploitation peuvent
présenter d’autres illustrations.
Nelle prossime pagine verranno
date informazioni su come
ripristinare un backup.
Nelle seguenti schermate è
rappresentato il sistema
operativo Microsoft Windows
XP™. Gli altri sistemi operativi
possono mostrare finestre
diverse.
Op de volgende pagina’s kunt u
zien hoe u een backup terug
kunt zetten.
De schermafbeeldingen zijn
gebaseerd op het besturings-
systeem Microsoft Windows
XP™. Andere besturings-
systemen kunnen afwijkende
popups laten zien.
Las páginas siguientes
muestran como restaurar una
copia de seguridad.
Las imágenes de pantalla
representan el sistema
operativo Microsoft Windows
XP™. Otros sistemas
operativos podrían mostrar
pantallas distintas.
İzleyen sayfalar, bir yedek
kopyayı geri yükleme şeklini
göstermektedir.
Ekran resimleri; Microsoft
Windows XP™ işletim sistemini
temsil etmektedir. Diğer işletim
sistemleri; farklı açılır
menülerini gösterebilir.
UK D F I
NL E TR
27

28
Select the file source and restore path.
Click "Next".
Wählen Sie die Dateiquelle und stellen Sie den
Pfad wieder her. Klicken Sie auf "Next" (Weiter).
Sélectionnez le chemin source et restauration
du fichier. Cliquez sur "Next" (Suivant).
Selezionare l'origine file e ripristinare il percorso.
Cliccare su "Next" (Avanti).
Selecteer de bron en het herstelpad van het
bestand. Klik op "Next" (Volgende).
Seleccione el origen del archivo y la ruta de
restauración. Haga clic en "Next" (Siguiente).
Dosya kaynağını ve geri yükleme yolunu seçiniz. "Next" (İleri) üzerine tıklatınız.
TR
E
NL
I
F
D
UK
1
2
3
The Restore Window of Nero BackItUp opens.
Click on "Restore Backup".
Das Nero BackItUp Fenster Restore Window
(Wiederherstellen) wird geöffnet. Klicken Sie auf
"Restore Backup" (Wiederherstellung starten).
L’écran de restauration (Restore Window) de
Nero BackItUp apparaît. Cliquez sur "Restore Backup"
(Démarrer restauration).
Si apre la finestra di ripristino (Restore Window)
di Nero BackItUp. Cliccare su "Restore Backup" (Avvia
ripristino).
Het venster Restore van Nero BackItUp
verschijnt. Klik op "Restore Backup" (Start met herstellen).
Se abre la ventana de Restauración de Nero BackItUp. Haga clic en "Restore Backup" (Iniciar).
Nero BackItUp’ın YedekKopyasınıAl)Geri Yükle Penceresi açılır. "Restore Backup" (Geri Yüklemeyi Başlat)
üzerine tıklatınız.
TR
E
NL
I
F
D
UK
The Nero Restore Wizard appears.
Click on "Next".
Der Nero Restore Wizard (Wiederherstellungs-
assistent) wird angezeigt. Klicken Sie auf "Next"
(Weiter).
Le Nero Restore Wizard (Assistant restauration
de Nero) apparaît. Cliquez sur "Next" (Suivant).
Appare la finestra di Restore Wizard (ripristino
guidato) di Nero. Cliccare su "Next" (Avanti).
De Nero Restore Wizard verschijnt.
Klik op "Next" (Volgende).
Aparece el Restore Wizard (Asistente de
restauración) de Nero. Haga clic en "Next" (Siguiente).
Nero Geri Yükle Sihirbazı belirir. "Next" (İleri) üzerine tıklatınız.
TR
E
NL
I
F
D
UK

29
4
5
6
Click "Next".
Klicken Sie auf "Next" (Weiter).
Cliquez sur "Next" (Suivant).
Cliccare su "Next" (Avanti).
Klik op "Next" (Volgende).
Haga clic en "Next" (Siguiente).
"Next" (İleri) üzerine tıklatınız.
TR
E
NL
I
F
D
UK
Click "Next".
Klicken Sie auf "Next" (Weiter).
Cliquez sur "Next" (Suivant).
Cliccare su "Next" (Avanti).
Klik op "Next" (Volgende).
Haga clic en "Next" (Siguiente).
"Next" (İleri) üzerine tıklatınız.
TR
E
NL
I
F
D
UK
Click on "Restore".
Klicken Sie auf "Restore" (Wiederherstellen).
Cliquez sur "Restore" (Restauration).
Cliccare su "Restore" (Ripristina).
Klik op "Restore" (Herstellen).
Haga clic en "Restore" (Restaurar).
"Restore" (Geri Yükle) üzerine tıklatınız.
TR
E
NL
I
F
D
UK

30
7
You have successfully restored your backup.
Sie haben Ihre Sicherungskopie erfolgreich
wiederhergestellt.
Vous avez restauré votre sauvegarde avec
succès.
Il ripristino del backup è stato effettuato.
U hebt nu met succes een backup hersteld.
Ha restaurado con éxito su copia de seguridad.
Yedek kopyanızı başarılı şekilde geri yüklediniz.
TR
E
NL
I
F
D
UK
Sayfa yükleniyor...
Sayfa yükleniyor...
Sayfa yükleniyor...
Sayfa yükleniyor...
Sayfa yükleniyor...
Sayfa yükleniyor...
Sayfa yükleniyor...
Sayfa yükleniyor...
Sayfa yükleniyor...
Sayfa yükleniyor...
Sayfa yükleniyor...
Sayfa yükleniyor...
Sayfa yükleniyor...
Sayfa yükleniyor...
Sayfa yükleniyor...
Sayfa yükleniyor...
Sayfa yükleniyor...
Sayfa yükleniyor...
Sayfa yükleniyor...
Sayfa yükleniyor...
Sayfa yükleniyor...
Sayfa yükleniyor...
-
 1
1
-
 2
2
-
 3
3
-
 4
4
-
 5
5
-
 6
6
-
 7
7
-
 8
8
-
 9
9
-
 10
10
-
 11
11
-
 12
12
-
 13
13
-
 14
14
-
 15
15
-
 16
16
-
 17
17
-
 18
18
-
 19
19
-
 20
20
-
 21
21
-
 22
22
-
 23
23
-
 24
24
-
 25
25
-
 26
26
-
 27
27
-
 28
28
-
 29
29
-
 30
30
-
 31
31
-
 32
32
-
 33
33
-
 34
34
-
 35
35
-
 36
36
-
 37
37
-
 38
38
-
 39
39
-
 40
40
-
 41
41
-
 42
42
-
 43
43
-
 44
44
-
 45
45
-
 46
46
-
 47
47
-
 48
48
-
 49
49
-
 50
50
-
 51
51
-
 52
52


Philips SPD5200CC/00 Kullanım kılavuzu
- Tip
- Kullanım kılavuzu
- Bu kılavuz aynı zamanda aşağıdakiler için de uygundur:
diğer dillerde
- español: Philips SPD5200CC/00 Manual de usuario
- français: Philips SPD5200CC/00 Manuel utilisateur
- italiano: Philips SPD5200CC/00 Manuale utente
- Deutsch: Philips SPD5200CC/00 Benutzerhandbuch
- English: Philips SPD5200CC/00 User manual
- Nederlands: Philips SPD5200CC/00 Handleiding
İlgili makaleler
-
Philips SPD5130 Kullanım kılavuzu
-
Philips SPD5200CC Kullanım kılavuzu
-
Philips SPE3031CC Kullanım kılavuzu
-
Philips SPE2020CC/10 Kullanım kılavuzu
-
-
-
Philips SPD5130 Kullanım kılavuzu
-
-
Philips 9305 125 2004.7 Kullanım kılavuzu
-
Diğer belgeler
-
Conceptronic CHD2UES200 Yükleme Rehberi
-
Seagate HD503HI Veri Sayfası
-
Conceptronic 640GB Network (LAN) HDD Yükleme Rehberi
-
Conceptronic MediaGiant Plus Kullanım kılavuzu
-
Conceptronic CM3GD1T Kullanım kılavuzu
-
Platinum MyDrive Serie Kullanım kılavuzu
-
Verbatim External HARD DRIVE USB 2.0 Kullanım kılavuzu
-
Trekstor DataStation maxi m.ub Kullanım kılavuzu
-
 BestMedia MyDrive CP 1.5TB Kullanma talimatları
-
