DeWalt D25892 Kullanım kılavuzu
- Kategori
- Elektrikli aletler
- Tip
- Kullanım kılavuzu

D25892

B
Copyright
DeWALT
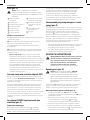
English (original instructions) 3
Pусский (перевод соригинала инструкции) 9
Türkçe (orijinal talimatlardan çevrilmiştir) 18
Англійська (оригінальні інструкції) 26

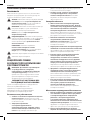
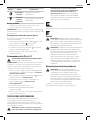
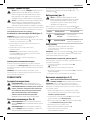
1
Fig. A
Fig. B Fig. C
3
2
6
7
12
10
1
5
2
3
4
6
7
8
XXXX XX XX
11
10
9

2
Fig. E
Fig. D
2
5
4

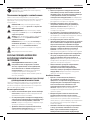
ENGLISH
3
The vibration and/or noise emission level given in this
information sheet has been measured in accordance with
a standardised test given in EN62841and may be used to
compare one tool with another. It may be used for a preliminary
assessment ofexposure.
WARNING: The declared vibration and/or noise emission
level represents the main applications of the tool. However
if the tool is used for different applications, with different
accessories or poorly maintained, the vibration and/or
noise emission may differ. This may significantly increase
the exposure level over the total workingperiod.
An estimation of the level of exposure to vibration and/or
noise should also take into account the times when the tool
is switched off or when it is running but not actually doing
the job. This may significantly reduce the exposure level
over the total workingperiod.
Identify additional safety measures to protect the operator
from the effects of vibration and/or noise such as: maintain
the tool and the accessories, keep the hands warm
(relevant for vibration), organisation of workpatterns.
WARNING: To reduce the risk of injury, read the
instructionmanual.
Definitions: Safety Guidelines
The definitions below describe the level of severity for each
signal word. Please read the manual and pay attention to
thesesymbols.
DANGER: Indicates an imminently hazardous
situation which, if not avoided, will result in death or
seriousinjury.
WARNING: Indicates a potentially hazardous situation
which, if not avoided, could result in death or
seriousinjury.
CAUTION: Indicates a potentially hazardous situation
which, if not avoided, may result in minor or
moderateinjury.
NOTICE: Indicates a practice not related to
personal injury which, if not avoided, may result in
propertydamage.
EC-Declaration of Conformity
Machinery Directive
Heavy-Duty Chipping Hammer
D25892
DeWALT
declares that these products described under
Technical Data are in compliance with:
2006/42/EC, EN60745-1:2009+A11:2010, EN60745-2-6:2010.
2000/14/EC, Electrical concrete breaker (hand-held), m ≤ 15 kg,
Annex VIII, TÜV Rheinland LGA Products GmbH (0197), D-90431
Nürnberg, Germany, Notified Body ID No.:0197.
Level of sound power according to 2000/14/EC
(Article 12, Annex III, No. 10; m ≤ 15 kg):
L
WA
(measured sound power level) dB(A) 101
L
WA
(guaranteed sound power level) dB(A) 103
These products also comply with Directive 2014/30/EU and
2011/65/EU. For more information, please contact
DeWALT
at
the following address or refer to the back of themanual.
The undersigned is responsible for compilation of the technical
file and makes this declaration on behalf of
DeWALT
.
Markus Rompel
Vice-President Engineering, PTE-Europe
DeWALT
, Richard-Klinger-Straße 11,
D-65510, Idstein, Germany
02.11.2017
D25892
Voltage V
AC
230
UK & Ireland V
AC
230/115
Type 2
Frequency Hz 50
Power Input W 1700
No-load beats per minute bpm 1105–2210
Single impact energy (EPTA 05/2009) J 19.4
Max. Impact Joule J 22.7
Tool holder SDS MAX
Weight (including handle) kg 10.0
Noise and vibration total values (triax vector sum) according to EN62841-2-6:
L
PA
(emission sound pressure level)
dB(A) 90
L
WA
(sound power level)
dB(A) 101
K
(uncertainty for the given sound level)
dB(A) 3
Chiselling
Vibration emission value a
h
,
Cheq
= m/s² 13.5*
Uncertainty K = m/s² 1.5
* Measured at the side handle. Side handle vibration is higher than vibration at
the main handle.
English (original instructions)
Congratulations!
You have chosen a
DeWALT
tool. Years of experience, thorough
product development and innovation make
DeWALT
one of the
most reliable partners for professional power toolusers.
Technical Data
HEAVYDUTY CHIPPING HAMMER
D25892

4
ENGLISH
GENERAL POWER TOOL SAFETY WARNINGS
WARNING: Read all safety warnings, instructions,
illustrations and specifications provided with this
power tool. Failure to follow all instructions listed below
may result in electric shock, fire and/or serious injury.
SAVE ALL WARNINGS AND INSTRUCTIONS
FOR FUTURE REFERENCE.
The term “power tool” in the warnings refers to your mains-
operated (corded) power tool or battery-operated (cordless)
powertool.
Work Area Safety
a ) Keep work area clean and well lit. Cluttered or dark
areas inviteaccidents.
b ) Do not operate power tools in explosive
atmospheres, such as in the presence of flammable
liquids, gases or dust. Power tools create sparks which
may ignite the dust orfumes.
c ) Keep children and bystanders away while operating
a power tool. Distractions can cause you to losecontrol.
Electrical Safety
d ) Power tool plugs must match the outlet. Never
modify the plug in any way. Do not use any adapter
plugs with earthed (grounded) power tools.
Unmodified plugs and matching outlets will reduce risk of
electricshock.
e ) Avoid body contact with earthed or grounded
surfaces, such as pipes, radiators, ranges and
refrigerators. There is an increased risk of electric shock if
your body is earthed orgrounded.
f ) Do not expose power tools to rain or wet conditions.
Water entering a power tool will increase the risk of
electricshock.
g ) Do not abuse the cord. Never use the cord for
carrying, pulling or unplugging the power tool. Keep
cord away from heat, oil, sharp edges or moving
parts. Damaged or entangled cords increase the risk of
electricshock.
h ) When operating a power tool outdoors, use an
extension cord suitable for outdoor use. Use of a cord
suitable for outdoor use reduces the risk of electricshock.
i ) If operating a power tool in a damp location is
unavoidable, use a residual current device (RCD)
protected supply. Use of an RCD reduces the risk of
electricshock.
Personal Safety
j ) Stay alert, watch what you are doing and use
common sense when operating a power tool. Do not
use a power tool while you are tired or under the
influence of drugs, alcohol or medication. A moment
of inattention while operating power tools may result in
serious personalinjury.
k ) Use personal protective equipment. Always wear eye
protection. Protective equipment such as a dust mask,
non-skid safety shoes, hard hat or hearing protection used
for appropriate conditions will reduce personalinjuries.
l ) Prevent unintentional starting. Ensure the switch
is in the off-position before connecting to power
source and/or battery pack, picking up or carrying
the tool. Carrying power tools with your finger on the
switch or energising power tools that have the switch on
invitesaccidents.
m ) Remove any adjusting key or wrench before turning
the power tool on. A wrench or a key left attached
to a rotating part of the power tool may result in
personalinjury.
n ) Do not overreach. Keep proper footing and balance
at all times. This enables better control of the power tool
in unexpectedsituations.
o ) Dress properly. Do not wear loose clothing or
jewellery. Keep your hair and clothing away from
moving parts. Loose clothes, jewellery or long hair can be
caught in movingparts.
p ) If devices are provided for the connection of dust
extraction and collection facilities, ensure these are
connected and properly used. Use of dust collection
can reduce dust-relatedhazards.
q ) Do not let familiarity gained from frequent use of
tools allow you to become complacent and ignore
tool safety principles. A careless action can cause severe
injury within a fraction of asecond.
Power Tool Use and Care
r ) Do not force the power tool. Use the correct power
tool for your application. The correct power tool
will do the job better and safer at the rate for which it
wasdesigned.
s ) Do not use the power tool if the switch does not turn
it on and off. Any power tool that cannot be controlled
with the switch is dangerous and must berepaired.
t ) Disconnect the plug from the power source and/
or remove the battery pack, if detachable, from
the power tool before making any adjustments,
changing accessories, or storing power tools. Such
preventive safety measures reduce the risk of starting the
power toolaccidentally.
u ) Store idle power tools out of the reach of children
and do not allow persons unfamiliar with the power
tool or these instructions to operate the power tool.
Power tools are dangerous in the hands of untrainedusers.
v ) Maintain power tools and accessories. Check for
misalignment or binding of moving parts, breakage
of parts and any other condition that may affect the
power tool’s operation. If damaged, have the power
tool repaired before use. Many accidents are caused by
poorly maintained powertools.
w ) Keep cutting tools sharp and clean. Properly
maintained cutting tools with sharp cutting edges are less
likely to bind and are easier tocontrol.
Denotes risk of electricshock.
Denotes risk offire.

5
ENGLISH
Electrical Safety
The electric motor has been designed for one voltage only.
Always check that the power supply corresponds to the voltage
on the rating plate.
Your
DeWALT
tool is double insulated in accordance
with EN62841; therefore no earth wire is required.
If the supply cord is damaged, it must be replaced only by
DeWALT
or an authorised serviceorganisation.
Mains Plug Replacement
(U.K. & Ireland Only)
If a new mains plug needs to be fitted:
• Safely dispose of the oldplug.
• Connect the brown lead to the live terminal in theplug.
• Connect the blue lead to the neutralterminal.
WARNING: No connection is to be made to the
earthterminal.
Follow the fitting instructions supplied with good quality plugs.
Recommended fuse: 13A.
Using an Extension Cable
If an extension cable is required, use an approved 3–core
extension cable suitable for the power input of this tool (see
Technical Data).The minimum conductor size is 1.5 mm
2
; the
maximum length is 30 m.
When using a cable reel, always unwind the cablecompletely.
WARNING: We recommend the use of a residual current
device with a residual current rating of 30mA or less.
Residual Risks
In spite of the application of the relevant safety regulations
and the implementation of safety devices, certain residual risks
cannot be avoided. These are:
• Impairment ofhearing.
• Risk of personal injury due to flyingparticles.
• Risk of burns due to accessories becoming hot
duringoperation.
• Risk of personal injury due to prolongeduse.
SAVE THESE INSTRUCTIONS
x ) Use the power tool, accessories and tool bits etc.
in accordance with these instructions, taking into
account the working conditions and the work to be
performed. Use of the power tool for operations different
from those intended could result in a hazardoussituation.
y ) Keep handles and grasping surfaces dry, clean and
free from oil and grease. Slippery handles and grasping
surfaces do not allow for safe handling and control of the
tool in unexpectedsituations.
Service
z ) Have your power tool serviced by a qualified repair
person using only identical replacement parts. This
will ensure that the safety of the power tool is maintained.
Additional Safety Instructions for
ChippingHammers
• Wear ear protectors. Exposure to noise can cause
hearingloss.
• Use auxiliary handle supplied with the tool. Loss of
control can cause personalinjury.
• Hold power tool by insulated gripping surfaces, when
performing an operation where the cutting accessory
may contact hidden wiring or its own cord. Cutting
accessory contacting a "live" wire may make exposed metal
parts of the power tool "live" and could give the operator an
electricshock.
• Use clamps or other practical way to secure and support
the workpiece to a stable platform. Holding the work by
hand or against your body is unstable and may lead to loss
ofcontrol.
• Wear safety goggles or other eye protection. Hammering
operations cause chips to fly. Flying particles can cause
permanent eye damage. Wear a dust mask or respirator
for applications that generate dust. Ear protection may be
required for mostapplications.
• Keep a firm grip on the tool at all times. Do not attempt
to operate this tool without holding it with both hands. It
is recommended that the side handle be used at all times.
Operating this tool with one hand will result in loss of control.
Breaking through or encountering hard materials such as
re-bar may be hazardous as well. Tighten the side handle
securely beforeuse.
• Do not operate this tool for long periods of time.
Vibration caused by hammer action may be harmful to your
hands and arms. Use gloves to provide extra cushion and limit
exposure by taking frequent restperiods.
• Do not recondition bits yourself. Chisel reconditioning
should be done by an authorized specialist. Improperly
reconditioned chisels could causeinjury.
• Wear gloves when operating tool or changing bits.
Accessible metal parts on the tool and bits may get extremely
hot during operation. Small bits of broken material may
damage barehands.
• Never lay the tool down until the bit has come to a
complete stop. Moving bits could causeinjury.
• Do not strike jammed bits with a hammer to dislodge
them. Fragments of metal or material chips could dislodge
and causeinjury.
• Slightly worn chisels can be resharpened bygrinding.
• Keep the power cord away from the bit. Do not wrap the
cord around any part of your body. An electric cord wrapped
around a spinning bit may cause personal injury and loss
ofcontrol.

6
ENGLISH
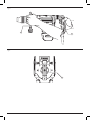
Side Handle (Fig.B)
WARNING: To reduce the risk of personal injury, ALWAYS
operate the tool with the side handle properly installed.
Failure to do so may result in the side handle slipping
during tool operation and subsequent loss of control. Hold
tool with both hands to maximizecontrol.
ASSEMBLY AND ADJUSTMENTS
WARNING: To reduce the risk of serious personal
injury, turn tool off and disconnect tool from power
source before making any adjustments or removing/
installing attachments or accessories. An accidental
start-up can causeinjury.
Active Vibration Control (AVC) System
For best vibration control, hold the tool as described in Proper
Hand Position and apply just enough pressure so the damping
device on the main handle is approximately midstroke.
The active vibration control neutralises rebound vibration from
the hammer mechanism. Lowering hand and arm vibration,
it allows more comfortable use for longer periods of time and
extends the life of theunit.
The hammer only needs enough pressure to engage the active
vibraton control. Applying too much pressure will not make the
tool chip faster and active vibration control will notengage.
DeWALT
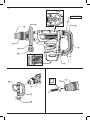
Tool Tag Ready (Fig. A)
Optional Accessory
Your hammer comes with
DeWALT
tool tag mounting holes
9
and fasteners for installing a
DeWALT
Tool Tag. You will need a
T20 bit tip to install the tag. The
DeWALT
Tool Tag is designed
for tracking and locating professional power tools, equipment,
and machines using the
DeWALT
Tool Connect™ app. For proper
installation of the
DeWALT
Tool Tag refer to the
DeWALT
Tool
Tagmanual.
Electronic Speed and Impact Control (Fig.A)
The electronic speed and impact control allows optimal tool
control for precisechiseling.
To set the electronic speed and impact control dial
8
, turn the
dial to the desired level. The higher the number, the greater
the speed and impact energy. Dial settings make the tool
extremely flexible and adaptable for many different appli cations.
The required setting depends on the bit size and hardness of
material beingchiseled.
• When chiselling soft, brittle materials or when minimum
break-out is required, set the dial to a low setting;
• When breaking harder materials, set the dial to a
highsetting.
Description (Fig. A)
WARNING: Never modify the power tool or any part of it.
Damage or personal injury couldresult.
1
ON/OFF rocker switch
2
Side handle
3
Front Barrel (Collar)
4
Mode selector dial
5
Main handle
6
Tool holder
7
Locking sleeve
8
Electronic speed and
impact control dial
9
DeWALT
tool tag mounting
holes
10
Screw for side handle
mounting
11
Date code
Intended Use
Your chipping hammer has been designed for professional
chiseling and chippingapplications.
DO NOT use under wet conditions or in the presence of
flammable liquids orgases.
Your chipping hammer is a professional powertool.
DO NOT let children come into contact with the tool.
Supervision is required when inexperienced operators use
thistool.
• Young children and the infirm. This appliance is not
intended for use by young children or infirm persons
without supervision.
• This product is not intended for use by persons (including
children) suffering from diminished physical, sensory or
mental abilities; lack of experience, knowledge or skills
unless they are supervised by a person responsible for their
safety. Children should never be left alone with thisproduct.
Date Code Position (Fig. A)
The date code
11
, which also includes the year of manufacture,
is printed into thehousing.
Example:
2020 XX XX
Year of Manufacture
Markings on Tool
The following pictograms are shown on the tool:
Read instruction manual beforeuse.
Wear earprotection.
Wear eyeprotection.
Package Contents
The package contains:
1 Chipping hammer
1 Side handle
1 Instruction manual
• Check for damage to the tool, parts or accessories which may
have occurred duringtransport.
• Take the time to thoroughly read and understand this manual
prior tooperation.

7
ENGLISH
Proper hand position requires one hand on the mounted side
handle
2
, with the other hand on the mainhandle
5
.
Mode Selection (Fig.E)
WARNING: Do not select the operating mode when the
tool isrunning. Tool must come to a complete stop before
activating the mode selector button or damage to the tool
mayresult.
Your tool is equipped with a mode selector dial
4
to selectthe
mode appropriate to desiredoperation.
Symbol Mode Application
Bit
Adjustment
Chisel bit position adjustment
Hammering/
Chipping
Light chipping, chiseling
anddemolition
To Select a Mode
• Rotate the mode selector dial so that the arrow points to the
symbol corresponding for the desiredmode.
NOTE: The arrow on the mode selector dial
4
must be pointing
at a mode symbol at all times. There are no operable positions
inbetween.
Indexing the Chisel Position (Fig.E)
The chisel can be indexed and locked into 24 differentpositions.
1. Rotate the mode selector switch
4
until it points towards
the position.
2. Rotate the chisel in the desiredposition.
3. Set the mode selector switch
4
to the “Hammering/
Chipping”position.
4. Twist the chisel until it locks inposition.
Performing an Application (Fig.A, E)
WARNING: TO REDUCE THE RISK OF PERSONAL
INJURY, ALWAYS ensure workpiece is anchored or
clampedfirmly.
NOTE: Operating temperature of this tool is 7 to +40˚C. Using
the tool outside of this temperature range will decrease the life
of thetool.
1. Insert the appropriate chisel and rotate it by hand to lock it
into the desired position. Refer to Bit and BitHolder.
2. Using the mode selector dial
4
, selectchipping mode. Refer
to ModeSelection.
3. Adjust the side handle
2
asnecessary. Refer to Mounting
the SideHandleAssembly.
4. Place the chisel on the desiredlocation.
5. Depress the ON/OFF rocker switch
1
.
6. To stop the hammer, release theON/OFF rockerswitch.
Proper Hand Position (Fig. D)
WARNING: To reduce the risk of serious personal injury,
ALWAYS use proper hand position asshown.
WARNING: To reduce the risk of serious personal
injury, ALWAYS hold securely in anticipation of a
suddenreaction.
OPERATION
Instructions for Use
WARNING: Always observe the safety instructions and
applicableregulations.
WARNING: To reduce the risk of serious personal
injury, turn tool off and disconnect tool from power
source before making any adjustments or removing/
installing attachments or accessories. An accidental
start-up can cause injury.
The side handle
2
clamps to the front of the gear case and may
be rotated 360˚ to permit right- or left-hand use.
Mounting the Side Handle Assembly (Fig.B)
1. Widen the ring opening
12
of the side handle
2
by rotating the screw for side handle mounting
10
anti-clockwise.
2. Slide the assembly onto the nose of the tool, through the
steel ring
12
and onto the collar
3
, past the chisel holder
andsleeve.
3. Rotate the side handle assembly to the desired position.
4. Lock the side handle mounting assembly in place by
securely tightening the screw for side handle mounting
10
rotating it clockwise so that the assembly will notrotate.
Bit and Bit Holder
WARNING: Burn Hazard. ALWAYS wear gloves when
changing bits. Accessible metal parts on the tool and bits
may get extremely hot during operation. Small bits of
broken material may damage barehands.
WARNING: Do not attempt to tighten or loosen chisel bits
(or any other accessory) by gripping the front part of the
chuck and turning the tool on. Damage to the chuck and
personal injury mayoccur.
The chipping hammer can be fitted with various chisel bits
depending on the desired application. Use sharp bitsonly.
Inserting and Removing SDSMAX Bits (Fig.C)
NOTE: Accessories and attachments used must be lubricated
around the SDSfitment beforeinstallation.
1. Pull back the locking sleeve
7
and insert the bit shank. The
bit shank must beclean.
2. Turn the bit slightly until the sleeve snaps back intoposition.
3. Ensure the bit is properlyengaged.
NOTE: The bit needs to move several centimeters in and out
of the tool holder
6
when properlyengaged.
4. To remove the bit, pull back the locking sleeve and pull the
bitout.
Bit Position Adjustment
Turn the mode selector to bit adjustment icon (Refer to Mode
Selection) to adjust the chisel to the desired position. There are
multiple positions to set the angle of thechisel.
NOTE: After finding the desired position, slightly maneuver
the chisel bit back and forth to ensure the chisel is
properlyengaged.

8
ENGLISH
Protecting the Environment
Separate collection. Products marked with this symbol
must not be disposed of with normal householdwaste.
Products contain materials that can be recovered
or recycled reducing the demand for raw materials.
Please recycle electrical products according to local provisions.
Further information is available at www.2helpU.com.
Optional Accessories
WARNING: Since accessories, other than those offered
by
DeWALT
, have not been tested with this product, use
of such accessories with this tool could be hazardous.
To reduce the risk of injury, only
DeWALT
recommended
accessories should be used with thisproduct.
Consult your dealer for further information on the
appropriateaccessories.
Cleaning
WARNING: Blow dirt and dust out of the main housing
with dry air as often as dirt is seen collecting in and around
the air vents. Wear approved eye protection and approved
dust mask when performing thisprocedure.
WARNING: Never use solvents or other harsh chemicals
for cleaning the non-metallic parts of the tool. These
chemicals may weaken the materials used in these parts.
Use a cloth dampened only with water and mild soap.
Never let any liquid get inside the tool; never immerse any
part of the tool into aliquid.
Lubrication
Your power tool requires no additionallubrication.
MAINTENANCE
Your power tool has been designed to operate over a long
period of time with a minimum of maintenance. Continuous
satisfactory operation depends upon proper tool care and
regularcleaning.
WARNING: To reduce the risk of serious personal
injury, turn tool off and disconnect tool from power
source before making any adjustments or removing/
installing attachments or accessories. An accidental
start-up can cause injury.

9
PУССКИЙ
: Во избежание риска получения
травм ознакомьтесь синструкцией.
Директива по механическому оборудованию
Отбойный Молоток Для Тяжёлых Работ
D25892
DeWALT
заявляет, что продукция, описанная в
соответствует:
2006/42/EC, EN60745-1:2009+A11:2010, EN60745-2-6:2010.
2000/14/EC, Электрический бетонолом (ручной), m ≤ 15 кг,
Приложение VIII, TÜV Rheinland LGA Products GmbH (0197),
D-90431 Nürnberg, Германия, Идентификационный №
уведомленного органа:0197.
Уровень звуковой мощности в соответствии с директивой
2000/14/EC
(Статья 12, Приложение III, № 10; m ≤ 15 кг):
L
WA
(измеренная звуковая мощность) дБ(A) 101
L
WA
(гарантированная звуковая мощность) дБ(A) 103
Эти продукты также соответствуют Директиве 2014/30/EU и
2011/65/EU. Для получения дополнительной информации
обратитесь в компанию
DeWALT
по адресу, указанному ниже
или приведенному на задней стороне обложкируководства.
Нижеподписавшийся несет ответственность за составление
технической документации и составил данную декларацию
по поручению компании
DeWALT
.
Маркус Ромпел
Вице-президент по инженерным разработкам, PTE-Europe
DeWALT
, Richard-Klinger-Straße 11,
D-65510, Idstein, Germany
02.11.2017
D25892
Напряжение В
перем.
тока
230
Тип 2
Частота Гц 50
Потребляемая мощность Вт 1700
Ударов в минуту без нагрузки уд./мин 1105–2210
Энергия одного удара
(EPTA 05/2009)
Дж 19,4
Mаксимум Импульс Джоуля J 22,7
Держатель насадки J SDS MAX
Вес (включая рукоятку) кг 10,0
Общие значения шума и вибрации (сумма триаксиального вектора),
определенные в соответствии со стандартом EN62841-2-6:
L
PA
(Уровень звукового давления)
дБ(A) 90
L
WA
(Уровень звуковой мощности)
дБ(A) 101
K
(погрешность для заданного уровня
мощности)
дБ(A) 3
Дробление
Значение эмиссии вибрации a
h
,
Cheq
= м/сек² 13,5*
Погрешность K = м/сек² 1,5
* Измеряется в боковой рукоятке. Вибрации в боковой рукоятке выше
вибраций в основной рукоятке.
!
Вы приобрели инструмент
DeWALT
. Многолетний опыт,
тщательная разработка изделий иинновации делают
компанию
DeWALT
одним из самых надёжных партнеров для
пользователей профессионального электроинструмента.
Pусский (перевод соригинала инструкции)
ОТБОЙНЫЙ МОЛОТОК ДЛЯ ТЯЖЁЛЫХ РАБОТ
D25892
Значение шумовой эмиссии и/или эмиссии вибрации,
указанное в данном справочном листке, было получено
в соответствии со стандартным тестом, приведенным
в EN62841, и может использоваться для сравнения
инструментов. Кроме того, оно может использоваться для
предварительной оценки воздействиявибрации.
! Заявленное значение шумовой
эмиссии и/или эмиссии вибрации относится к
основным областям применения инструмента.
Однако, если инструмент используется для
различных целей, с различными дополнительными
принадлежностями или при ненадлежащем уходе, то
уровень шума и/или вибрации может измениться.
Это может привести к значительному увеличению
уровня воздействия вибрации в течение всего
рабочегопериода.
При расчете приблизительного значения уровня
воздействия шума и/или вибрации также
необходимо учитывать время, когда инструмент
выключен или то время, когда он работает
на холостом ходу. Это может привести к
значительному снижению уровня воздействия
вибрации в течение всего рабочегопериода.
Определите дополнительные меры техники
безопасности для защиты оператора от
воздействия шума и/или вибрации, а именно:
поддержание инструмента и дополнительных
принадлежностей в рабочем состоянии, создание
комфортных условий работы (соответствующих
вибрации), хорошая организация рабочегоместа.

10
PУССКИЙ
:
, ,
. Несоблюдение всех
приведенных ниже инструкций может стать
причиной поражения электрическим током,
возгорания и/или тяжелойтравмы.
СОХРАНИТЕ ВСЕ ИНСТРУКЦИИ ДЛЯ
ПОСЛЕДУЮЩЕГОИСПОЛЬЗОВАНИЯ.
Термин «электроинструмент» впредупреждениях
относится кработающим от сети
(проводным) электроинструментам или
работающим от аккумуляторной батареи
(беспроводным)электроинструментам.
Безопасность на рабочем месте
a )
. Захламленное или плохо
освещенное рабочее место может стать причиной
несчастногослучая.
b )
, ,
,
. Искры, которые появляются при
:
Ниже описывается уровень опасности, обозначаемый
каждым из предупреждений. Прочитайте руководство
иобратите внимание на данныесимволы.
: Обозначает опасную ситуацию, которая
приведет
, вслучае несоблюдения
соответствующих мербезопасности.
: Указывает на потенциально опасную
ситуацию, которая, вслучае несоблюдения
соответствующих мер безопасности,
привести к
.
: Указывает на потенциально
опасную ситуацию, которая, вслучае несоблюдения
соответствующих мер безопасности
стать причиной травм
.
: Указывает на практики,
, но если ими пренебречь,
привести к.
Указывает на риск поражения электрическимтоком.
Указывает на рисквозгорания.
работе электроинструментов могут привести
квоспламенению пыли илипаров.
c ) ,
. Отвлекаясь
от работы вы можете потерять контроль
надинструментом.
Электробезопасность
d )
.
.
.
Использование оригинальных штепсельных вилок,
соответствующих типу сетевой розетки снижает
риск поражения электрическимтоком.
e )
, ,
. Если вы будете
заземлены, увеличивается риск поражения
электрическимтоком.
f )
.
При попадании воды вэлектроинструмент риск
поражения электротокомвозрастает.
g ) .
, ,
.
, ,
.
Поврежденный или запутанный кабель питания
повышает риск поражения электрическимтоком.
h )
,
.
Использования кабеля питания, предназначенного
для использования вне помещения, снижает риск
поражения электрическимтоком.
i )
,
() .
Использование УЗО сокращает риск поражения
электрическимтоком.
Обеспечение индивидуальной безопасности
j ) , ,
.
, ,
. Невнимательность
при работе сэлектроинструментом может
привести ксерьезным телеснымповреждениям.
k )
. .

11
PУССКИЙ
Средства защиты, такие как пылезащитная маска,
обувь снескользящей подошвой, каска изащитные
наушники, используемые при работе, уменьшают
риск получениятравм.
l )
.
/
,
,
,
«.». Если при переноске
электроинструмента он подключен ксети, ипри
этом ваш палец находится на выключателе, это
может стать причиной несчастныхслучаев.
m )
.
Ключ, оставленный на вращающейся части
электроинструмента, может привести ктравме.
n )
.
,
. Это позволит лучше контролировать
электроинструмент внепредвиденныхситуациях.
o ) .
. ,
. Возможно наматывание
свободной одежды, ювелирных изделий идлинных
волос на движущиесядетали.
p )
. Использование
устройства для пылеудаления сокращает риски,
связанные спылью.
q )
. Небрежное действие
может повлечь серьезные травмы за долюсекунды.
Эксплуатация электроинструмента иуход за
ним
r )
.
. Правильно подобранный
электроинструмент выполнит работу более
эффективно ибезопасно при стандартнойнагрузке.
s ) ,
. Любой
инструмент, управлять выключением
ивключением которого невозможно, опасен, иего
необходимоотремонтировать.
t ) ,
,
/
, . Такие
превентивные меры безопасности сокращают риск
случайного включенияэлектроинструмента.
u )
,
. Электроинструмент
представляет опасность вруках
неопытныхпользователей.
v )
.
,
,
,
.
,
,
. Большинство
несчастных случаев происходит из-за
электроинструментов, которые не обслуживаются
должнымобразом.
w )
. Вероятность
заклинивания инструмента, за которым следят
должным образом икоторый хорошо заточен,
значительно меньше, аработать снимлегче.
x ) ,
,
. Использование
электроинструмента для выполнения операций,
для которых он не предназначен, может привести
ксозданию опасныхситуаций.
y )
.
Скользкие рукоятки иповерхности захватывания
не позволяют обеспечить безопасность
работы иуправления инструментом
внепредвиденныхситуациях.
Обслуживание
z )
. Это позволит
обеспечить безопасность обслуживаемого
электрифицированногоинструмента.

12
PУССКИЙ
Электродвигатель рассчитан на работу только при одном
напряжении сети. Необходимо обязательно убедиться
втом, что напряжение источника питания соответствует
указанному на шильдике устройства. Необходимо также
убедиться втом, что напряжение работы зарядного
устройства соответствует напряжению всети.
Зарядное устройство
DeWALT
оснащено двойной
изоляцией всоответствии стребованиями
EN60745; поэтому провод заземления не требуется.
Вслучае повреждения кабеля питания его необходимо
заменить специально подготовленным кабелем, который
можно приобрести всервисных центрах
DeWALT
.
Использование удлинительного кабеля
Используйте удлинитель только вслучаях крайней
необходимости. Используйте только утвержденные
удлинители промышленного изготовления, рассчитанные
на мощность не меньшую, чем потребляемая мощность
зарядного устройства (см. ).
Минимальное поперечное сечение провода электрического
кабеля должно составлять 1мм
2
; максимальная длина 30м.
При использовании кабельного барабана всегда полностью
разматывайте кабель.
! Рекомендуется использовать
устройство защитного отключения (УЗО) с током
утечки до 30мA.
Несмотря на соблюдение соответствующих инструкций по
технике безопасности ииспользование предохранительных
устройств, некоторые остаточные риски невозможно
полностью исключить. А именно:
• ухудшение слуха;
• риск травм от разлетающихся частиц;
• риск получения ожогов врезультате нагревания
инструмента впроцессе работы;
• риск получения травмы врезультате
продолжительнойработы.
СОХРАНИТЕ НАСТОЯЩЕЕ РУКОВОДСТВО
• . Шум может
стать причиной сниженияслуха.
• ,
.
Потеря контроля может привести ктравме.
• ,
,
,
. Если вы держитесь
за металлические детали инструмента, то в случае
перерезания находящегося под напряжением провода,
возможно поражение оператора электрическимтоком.
•
. Удерживание заготовки рукой или прижимание
ее к телу не обеспечивает устойчивости и может
привести к потереконтроля.
•
. Во время сверления
могут разлетаться кусочки стружки и частицы
материала. Разлетающиеся осколки могут серьезно
повредить глаза. Если во время работы образуется
пыль, надевайте пылезащитную маску или респиратор.
При выполнении многих работ нужно использовать
защитныенаушники.
• .
Не пытайтесь работать данным инструментом,
удерживая его одной рукой. При работе рекомендуется
всегда использовать боковую рукоятку. В противном
случае, это может привести к потере управления.
Просверливание или касание таких твердых
материалов, как арматурные стержни, также может
представлять опасность. Перед использованием
надежно затяните боковуюрукоятку.
•
. Вибрация,
вызываемая инструментом, может оказывать
вредное воздействие на руки. Используйте перчатки,
для обеспечения дополнительной амортизации и
старайтесь ограничивать вредное воздействие за счет
частых перерывов вработе.
• .
Менять форму долота может только авторизованный
специалист. Ошибки в изменении формы могут
привести ктравме.
• ,
. Выступающие металлические
части инструмента и насадки могут очень
сильно нагреваться во время работы. Частицы
обрабатываемого материала могут стать причиной
травмы незащищенныхрук.
•
, .
Движущаяся насадка может привести ктравмам.
•
. Таким образом можно получить травму от
отколовшихся кусочков метала илиматериала.
• .
• ,
. Не оборачивайте кабель вокруг
любой части вашего тела. Провод, обернутый вокруг
вращающейся насадки может привести к травме и
потереуправления.

13
PУССКИЙ
(AVC)
Для наилучшего контроля вибраций, держите инструмент
способом, описанным в разделе «
» и прилагайте ровно столько усилия,
чтобы демпфирующее устройство на основной рукоятке
находилось примерно на серединехода.
Активный контроль вибрации нейтрализует вибрацию
отдачи от механизма перфоратора. Снижение уровня
вибрации, передаваемой на руки, позволяет оператору
более комфортно работать в течение длительного периода
времени и увеличивает срок службыинструмента.
Перфоратору требуется только достаточное давление для
срабатывания активного контроля вибрации. Чрезмерное
давление не увеличит производительность, а активный
контроль вибрации не будетзадействован.
DeWALT
(.)
Дополнительная принадлежность
Отбойный молоток оснащен монтажными отверстиями
метки инструмента
DeWALT
9
и крепежными деталями для
установки метки инструмента
DeWALT
. Вам понадобится
насадка Т20 для установки метки. Метка инструмента
DeWALT
предназначена для отслеживания и поиска
профессиональных электроинструментов, оборудования
и машин с помощью приложения
DeWALT
Tool Connect™.
Для правильной установки метки инструмента
DeWALT
обратитесь к руководству метки инструмента
DeWALT
.
(.)
Электронная регулировка оборотов и удара обеспечивает
оптимальное управление точнымдолблением.
Чтобы настроить электронный регулятор скорости и
ударов
8
, поверните регулятор в нужное положение. Чем
выше число, тем больше скорость и ударное воздействие.
Уровни регулятора делают инструмент крайне гибким и
универсальным для множества видов работ. Необходимая
настройка зависит от размера насадки и прочности
материала, подлежащегодроблению.
• При дроблении мягких, хрупких материалов или при
необходимости свести к минимуму количество осколков,
установите регулятор на низкуюскорость.
(. A)
: Никогда не вносите изменения в
конструкцию электроинструмента или какой-либо
его части. Это может привести к повреждению
илитравме.
1
Двухпозиционный
кулисный переключатель
2
Боковая рукоятка
3
Передний поршень
(муфта)
4
Регулятор переключения
режимов
5
Основная рукоятка
6
Держатель насадки
7
Зажимное кольцо
8
Электронный регулятор
скорости и ударов
9
Монтажные отверстия
для метки инструмента
DeWALT
10
Винт для установки
боковой рукоятки
11
Код даты
Сфера применения
Данный отбойный молоток был разработан для
разрушенияконструкций.
НЕ используйте в условиях повышенной влажности
или поблизости от легковоспламеняющихся жидкостей
илигазов.
Данный отбойный молоток является
профессиональнымэлектроинструментом.
Место положения кода даты (Рис. [Fig.] A)
Код даты
11
, который также включает всебя
год изготовления, отштампован на поверхности
корпусаинструмента.
Пример:
2020 XX XX
Год изготовления
На инструмент нанесены следующиеобозначения:
Перед началом работы прочтите руководство
поэксплуатации.
Используйте защитныенаушники.
Используйте защитныеочки.
В комплектацию входит:
1 Отбойный молоток
1 Боковая рукоятка
1 Руководство по эксплуатации
• Проверьте на наличие повреждений инструмента,
его деталей или дополнительных принадлежностей,
которые могли возникнуть во время транспортировки.
• Перед эксплуатацией внимательно прочтите данное
руководство.
НЕ допускайте детей к инструменту. Использование
инструмента неопытными пользователями должно
происходить под контролем опытногоколлеги.
• Данный инструмент не предназначен для использования
лицами (включая детей) с ограниченными физическими,
психическими и умственными возможностями, не
имеющими опыта, знаний или навыков работы с
ним, если они не находятся под наблюдением лица,
ответственного за их безопасность. Никогда не
оставляйте детей без присмотра с этиминструментом.

14
PУССКИЙ
:
,
,
-
/
. Случайный запуск может
привести ктравме.
При правильном расположении рук одна рука находится на
установленной боковой рукоятке
2
, а другая на основной
рукоятке
5
.
(.E)
: Не выполняйте смену рабочего
режима при работающем инструменте.
Инструмент следует полностью остановить
перед задействованием кнопки выбора
режимов, так как в противном случае возможно
повреждениеинструмента.
Данный инструмент оснащен регулятором переключения
режимов
4
, позволяющим выбрать нужный для конкретной
задачирежим.
(. D)
: Для уменьшения риска получения
тяжёлой травмы, правильно удерживайте
инструмент, как показано на рисунке.
: Для уменьшения риска получения
тяжёлой травмы, надёжно удерживайте
инструмент, предупреждая внезапные сбои
вработе.
: Всегда следуйте указаниям
действующих норм иправилбезопасности.
:
,
,
-
/
. Случайный запуск может
привести ктравме.
(.)
! Во избежание травмы, необходимо
проверять надежность установки боковой
рукоятки. Невыполнение этого требования может
привести к соскальзыванию боковой рукоятки во
время работы инструмента и к потере управления.
Чтобы обеспечить максимальный контроль над
инструментом, удерживайте его обеимируками.
Боковая рукоятка
2
крепится на передней части редуктора,
как показано на рисунке, и может поворачиваться на 360°
для использования как правой, так и левой рукой.
Установка узла боковой рукоятки (Рис. В)
1. Расширьте кольцевое отверстие
12
боковой
рукоятки
2
, поворачивая винт для установки боковой
рукоятки
10
против часовойстрелки.
2. Насадите боковую рукоятку в сборе на нос инструмента,
продев ее сквозь стальное кольцо
12
и на муфту
3
за
держателем для долота ивтулкой.
3. Поверните боковую рукоятку в сборе в нужное
положение.
4. Зафиксируйте боковую рукоятку в сборе, надежно
затянув винт для установки боковой рукоятки
10
путем поворачивания ее по часовой стрелке так, чтобы
рукоятка в сборе в итоге невращалась.
: Опасность ожога.
надевайте перчатки при замене дополнительных
приспособлений. Выступающие металлические
части инструмента и насадки могут очень
сильно нагреваться во время работы. Частицы
обрабатываемого материала могут стать
причиной травмы незащищенныхрук.
: Не пытайтесь затягивать
или ослаблять насадки (или любую другую
принадлежность), удерживая патрон и включая
инструмент. Это может привести к повреждению
патрона итравмам.
Отбойный молоток можно оснастить различными
насадками-долотами, в зависимости от задач. Используйте
только хорошо заточенныенасадки.
Установка и снятие насадок SDSMAX (Рис.C)
ПРИМЕЧАНИЕ: Принадлежности и насадки следует смазать
вокруг оснастки SDS передустановкой.
1. Оттяните назад зажимное кольцо
7
и вставьте хвостовик
насадки. Хвостовик насадки должен бытьчистым.
2. Слегка поверните насадку до тех пор, пока зажимное
кольцо не защелкнется наместе.
3. Убедитесь, что насадка надежнозакреплена.
ПРИМЕЧАНИЕ: Насадке необходимо двигаться на
несколько сантиметров взад и вперед из держателя
насадок
6
при надежномкреплении.
4. Чтобы снять насадку, оттяните назад зажимное кольцо и
извлекитенасадку.
Регулировка положения насадки
Поверните регулятор режимов на иконку регулировки (см.
), чтобы отрегулировать долото до нужного
положения. Существует несколько положений для выбора
угладолота.
ПРИМЕЧАНИЕ: Найдя нужное положения, немного
подвигайте долото взад и вперед, чтобы убедиться, что оно
надежнозакреплено.
• При удалении более прочных материалов, установите
регулятор на высокуюскорость.

15
PУССКИЙ
: Поскольку принадлежности,
отличные от тех, которые предлагает DEWALT,
не проходили тесты на данном изделии, то
использование этих принадлежностей может
привести к опасной ситуации. Во избежание риска
получения травмы, с данным продуктом должны
использоваться только рекомендованные DEWALT
дополнительныепринадлежности.
По вопросу приобретения дополнительных
принадлежностей обращайтесь к Вашемудилеру.
: Выдувайте грязь ипыль из корпуса
сухим сжатым воздухом по мере видимого скопления
грязи внутри и вокруг вентиляционных отверстий.
Выполняйте очистку, надев средство защиты глаз
иреспиратор утвержденноготипа.
: Никогда не используйте растворители
или другие агрессивные химические средства для
очистки неметаллических деталей инструмента.
Эти химикаты могут ухудшить свойства
материалов, примененных вданных деталях.
Используйте ткань, смоченную в воде с мягким
мылом. Не допускайте попадания какой-либо
жидкости внутрь инструмента; ни в коем случае
не погружайте какую-либо часть инструмента
вжидкость.
Ваш электроинструмент не требует дополнительнойсмазки.
Электроинструмент
DeWALT
имеет длительный срок
эксплуатации итребует минимальных затрат на
техобслуживание. Для длительной безотказной работы
необходимо обеспечить правильный уход за инструментом
иего регулярную очистку.
:
,
Символ Режим Применение
Регулировка
насадки
Регулировка положения
насадки-долота
Сверление
с ударом/
долбление
Легкое долбление, дробление
и разбивание
Выбор режима
• Поверните регулятор выбора режимов так, чтобы
стрелка указывала на нужныйрежим.
ПРИМЕЧАНИЕ: Стрелка на регуляторе выбора режимов
4
должна всегда указывать на символ режима. Промежуточных
положенийнет.
Регулировка положения долота (Рис. Е)
Долото можно установить и зафиксировать в
24разныхположениях.
1. Поворачивайте переключатель режимов
4
, пока он не
будет указывать на символ положения.
2. Поверните долото в нужноеположение.
3. Установите переключатель режимов
4
в положение
«Ударное сверление/дробление».
4. Поверните долото, чтобы зафиксировать его в
нужномположении.
(.A, E)
: ,
надежно закрепляйтезаготовку.
ПРИМЕЧАНИЕ: Рабочая температура данного инструмента
составляет от 7 до +40°C. Использование инструмента в
температурных режимах, выходящими за рамки рабочего
сокращает срок эксплуатацииинструмента.
1. Вставьте соответствующее долото и зафиксируйте его,
вращая вручную, в нужном положении. См.
.
2. При помощи регулятора выбора режимов
4
, выберите
режим дробления. См. .
3. Отрегулируйте в соответствии с необходимостью
боковую рукоятку
2
. См.
.
4. Установите долото в нужноеместо.
5. Нажмите на двухпозиционный кулисный
переключатель
1
.
6. Чтобы остановить молот, отпустите двухпозиционный
кулисныйпереключатель.
,
-
/
. Убедитесь, что курковый
переключатель находится в положении ВЫКЛ.
Непреднамеренный запуск инструмента может
привести кполучениютравмы.

16
PУССКИЙ
Отдельная утилизация. Изделия сданным символом
на маркировке запрещается утилизировать с
обычными бытовымиотходами.
Изделия содержат материалы, которые
могут быть извлечены или переработаны, снижая
потребность висходном сырье. Пожалуйста, утилизируйте
электрические изделия всоответствии сместными
нормами. Дополнительная информация доступна по адресу
www.2helpU.com.

17
PУССКИЙ
Электрооборудование торговых марок “Dewalt”, “Stanley”, “Stanley FatMAX”, “BLACK+DECKER”.
Директивы 2014/30/EU ЕВРОПЕЙСКОГО ПАРЛАМЕНТА И СОВЕТА от 26 февраля 2014 г. “О гармонизации законодательств Государств-
членов ЕС в области электромагнитной совместимости”, 2006/42/ЕС ЕВРОПЕЙСКОГО ПАРЛАМЕНТА И СОВЕТА от 17 мая 2006 г. “О машинах
и оборудовании”; 2014/35/EU ЕВРОПЕЙСКОГО ПАРЛАМЕНТА И СОВЕТА от 26 февраля 2014 г. “О гармонизации законодательств государств-
членов в области размещения на рынке электрооборудования, предназначенного для использования в определенных пределах напряжения”.
Серийный выпуск.
Транспортировка.
Категорически не допускается падение и любые механические
воздействия на упаковку при транспортировке.
При разгрузке/погрузке не допускается использование любого
вида техники, работающей по принципу зажима упаковки.
Приложение к руководству по эксплуатации электрооборудования для
определения месяца производства по номеру текущей календарной недели года
Уполномоченное изготовителем юр.лицо:
ООО "Стэнли Блэк энд Деккер", 117485, город Москва, улица
Обручева, дом 30/1, строение 2
Телефон: + 7 (495) 258-3981, факс: + 7 (495) 258-3984, E-mail:
Сведения о импортере указаны в сопроводительной
документации и/или на упаковке
Перечень критических отказов, возможные ошибочные
действия персонала.
Не допускается эксплуатация изделия:
-При появлении дыма из корпуса изделия
-При поврежденном и/ или оголенном сетевом кабеле
-при повреждении корпуса изделия, защитного кожуха, рукоятки
-при попадании жидкости в корпус
-при возникновении сильной вибрации
-при возникновении сильного искрения внутри корпуса
Критерии предельных состояний.
-При поврежденном и/или оголенном сетевом кабеле
-при повреждении корпуса изделия
ТОВАР СЕРТИФИЦИРОВАН
Орган по сертификации "РОСТЕСТ- Москва" , Адрес: 119049, г. Москва,
улица Житная, д. 14, стр. 1; 117418, Москва, Нахимовский просп., 31
(фактический), Телефон: (499) 1292311, (495) 6682893, Факс: (495)
6682893, E-mail: [email protected]
Изготовитель: Изготовитель: Блэк энд Деккер Холдингс ГмбХ, Германия,
65510, Идштайн, ул. Блэк энд Деккер, 40, тел. +496126212790.
Хранение.
Необходимо хранить в сухом месте, вдали от источников повышенных
температур и воздействия солнечных лучей. При хранении
необходимо избегать резкого перепада температур. Хранение без
упаковки не допускается
Срок службы.
Срок службы изделия составляет 5 лет. Не рекомендуется к
эксплуатации по истечении 5 лет хранения с даты изготовления без
предварительной проверки.
Дата изготовления (код даты) указана на корпусе инструмента.
Код даты, который также включает год изготовления, отштампован
на поверхности корпуса изделия.
Пример:
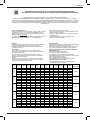
2014 46 XX, где 2014 –год изготовления, 46-неделя изготовления.
Определить месяц изготовления по указанной неделе изготовления
можно согласно приведенной ниже таблице.
Месяц Январь Февраль Март Апрель Май Июнь Июль Август Сентябрь Октябрь Ноябрь Декабрь
Год
производства
Неделя
1 5 9 14 18 23 27 31 36 40 44 49
2018
2 6 10 15 19 24 28 32 37 41 45 50
3 7 11 16 20 25 29 33 38 42 46 51
4 8 12 17 21 26 30 34 39 43 47 52
13 22 35 48
Неделя
1 6 10 14 18 23 27 31 36 40 45 49
2019
2 7 11 15 19 24 28 32 37 41 46 50
3 8 12 16 20 25 29 33 38 42 47 51
4 9 13 17 21 26 30 34 39 43 48 52
5 22 35 44
Неделя
1 6 10 14 19 23 27 32 36 40 45 49
2020
2 7 11 15 20 24 28 33 37 41 46 50
3 8 12 16 21 25 29 34 38 42 47 51
4 9 13 17 22 26 30 35 39 43 48 52
5 18 31 44
Неделя
2 6 10 14 19 23 27 32 36 41 45 49
2021
3 7 11 15 20 24 28 33 37 42 46 50
4 8 12 16 21 25 29 34 38 43 47 51
5 9 13 17 22 26 30 35 39 44 48 52
18 31 40 1
Неделя
2 6 10 15 19 23 28 32 36 41 45 49
2022
3 7 11 16 20 24 29 33 37 42 46 50
4 8 12 17 21 25 30 34 38 43 47 51
5 9 13 18 22 26 31 35 39 44 48 52
14 27 40 1

18
TÜRKÇE
UYARI: Yaralanma riskini azaltmak için, kullanım
kılavuzunuokuyun.
Tanımlar: Güvenlik Talimatları
Aşağıdaki tanımlar her işaret sözcüğü ciddiyet derecesini
gösterir. Lütfen kılavuzu okuyunuz ve bu simgelere dikkatediniz.
TEHLİKE: Engellenmemesi halinde ölüm veya ciddi
yaralanma ile sonuçlanabilecek çok yakın bir tehlikeli
durumugösterir.
UYARI: Engellenmemesi halinde ölüm veya ciddi
yaralanma ile sonuçlanabilecek potansiyel bir tehlikeli
durumugösterir.
DİKKAT: Engellenmemesi halinde önemsiz veya orta
dereceli yaralanma ile sonuçlanabilecek potansiyel bir
tehlikeli durumugösterir.
İKAZ: Engellenmemesi halinde maddi hasara
neden olabilecek, yaralanma ile ilişkisi olmayan
durumlarıgösterir.
Makıne Dırektıfı
Ağır Hizmet Tipi Havalı Kırıcı
D25892
DeWALT
, Teknik Özellikleri bölümünde açıklanan bu ürünlerin
aşağıda belirtilen yönergelere uygun olduğunu beyan eder:
eN60745-1:2009+A11:2010, eN60745-2-6:2010.
2000/14/EC Elektrikli beton kırıcı (elle kullanılan) m ≤ = 15 kg, Ek
VIII; TÜV Rheinland LGA Products GmbH (0197), D-90431
Nürnberg, Germany, Onaylanmış Gövde Tanıtım No.:0197.
2000/14/EC (Bölüm 12, Ek III, No. 10; m ≤ = 15 kg)
uyarınca ses seviyesi:
L
WA
(ölçülen ses şiddeti seviyesi) dB(A) 101
L
WA
(garanti edilen ses şiddeti seviyesi) dB(A) 103
Bu ürünler ayrıca 2014/30/EU ve 2011/65/EU Direktiflerine de
uygundur. Daha ayrıntılı bilgi için, lütfen aşağıdaki adresten
DeWALT
ile temas kurun veya kılavuzun arka kapağınabakın.
Bu belge altında imzası bulunan yetkili, teknik dosyanın
derlenmesinden sorumludur ve bu beyanı
DeWALT
adınavermiştir.
Markus Rompel
PTE-Avrupa, Mühendislik Birimi Genel Müdür Yardımcısı
DeWALT
, Richard-Klinger-Straße 11,
D-65510, Idstein, Almanya
02.11.2017
D25892
Voltaj V
DC
230
Tip 2
Frekans Hz 50
Giriş Gücü W 1700
Yüksüz dakika başına vuruş sayısı bpm 1105–2210
Tek darbe enerjisi (EPTA 05/2009) J 19,4
Maks. Darbe Joule J 22,7
Alet tutucu SDS MAX
Ağırlık (tutamak dahil) kg 10,0
EN62841-2-6 uyarınca gürültü ve titreşim toplam değerleri (triaks vektör
toplamı):
L
PA
(emisyon ses basıncı seviyesi)
dB(A) 90
L
WA
(ses güç seviyes)
dB(A) 101
K
(verilen ses seviyesi için belirsizlik)
dB(A) 3
Keskiyle yontma
Titreşim emisyon değeri a
h,Cheq
= m/s² 13,5*
Belirsizlik değeri K = m/s² 1,5
* Yan tutamakta ölçülür. Yan tutamak titreşimi ana tutamaktaki titreşimden
daha yüksektir.
Tebrikler!
Bir
DeWALT
aleti seçtiniz. Uzun süreli deneyim, sürekli ürün
geliştirme ve yenilik
DeWALT
markasının profesyonel elektrikli
alet kullanıcıları için en güvenilir ortaklardan birisi haline
gelmesinisağlamaktadır.
Teknik Özellikleri
Türkçe (orijinal talimatlardan çevrilmiştir)
AĞIR HIZMET TIPI HAVALI KIRICI
D25892
Bu bilgi sayfasında verilen titreşim ve/veya gürültü emisyonu
düzeyi, EN62841’de belirtilen standart teste uygun olarak
ölçülmüştür ve aletleri birbiriyle karşılaştırmak için kullanılabilir.
Maruz kalmaya dönük bir ön değerlendirme olarakkullanılabilir.
UYARI: Beyan edilen titreşim ve/veya gürültü emisyon
düzeyi, aletin ana uygulamalarını yansıtır. Bununla
birlikte alet farklı uygulamalar için, farklı aksesuarla
veya yeterince bakım yapılmadan kullanıldığında,
titreşim ve/veya gürültü emisyonu değişebilir. Bu, toplam
çalışma süresindeki maruz kalma seviyesini önemli
ölçüdeartırabilir.
Titreşim ve/veya gürültü maruz kalma seviyesine ilişkin bir
tahminde bulunurken aletin kapalı kaldığı veya çalıştığı
ancak gerçekte işi yapmadığı zamanlar da dikkate
alınmalıdır. Bu, toplam çalışma süresindeki maruziyet
düzeyini önemli ölçüdeazaltabilir.
Operatörü titreşim ve/veya gürültünün etkilerinden
korumak için aşağıdakiler gibi ilave güvenlik önlemleri
tanımlayın: aleti ve aksesuarları iyi koruyun, ellerinizi
sıcak tutun (titreşim için uygundur), çalışma sürelerini iyi
organizeedin.
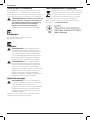
Sayfa yükleniyor...
Sayfa yükleniyor...
Sayfa yükleniyor...
Sayfa yükleniyor...
Sayfa yükleniyor...
Sayfa yükleniyor...
Sayfa yükleniyor...
Sayfa yükleniyor...
Sayfa yükleniyor...
Sayfa yükleniyor...
Sayfa yükleniyor...
Sayfa yükleniyor...
Sayfa yükleniyor...
Sayfa yükleniyor...
Sayfa yükleniyor...
Sayfa yükleniyor...
-
 1
1
-
 2
2
-
 3
3
-
 4
4
-
 5
5
-
 6
6
-
 7
7
-
 8
8
-
 9
9
-
 10
10
-
 11
11
-
 12
12
-
 13
13
-
 14
14
-
 15
15
-
 16
16
-
 17
17
-
 18
18
-
 19
19
-
 20
20
-
 21
21
-
 22
22
-
 23
23
-
 24
24
-
 25
25
-
 26
26
-
 27
27
-
 28
28
-
 29
29
-
 30
30
-
 31
31
-
 32
32
-
 33
33
-
 34
34
-
 35
35
-
 36
36


DeWalt D25892 Kullanım kılavuzu
- Kategori
- Elektrikli aletler
- Tip
- Kullanım kılavuzu
diğer dillerde
- English: DeWalt D25892 User manual
- русский: DeWalt D25892 Руководство пользователя
İlgili makaleler
-
DeWalt D25892 Kullanım kılavuzu
-
-
DeWalt D25872 Kullanım kılavuzu
-
-
-
-
-
-
-
DeWalt D25143 Kullanım kılavuzu