CYBEX SOLUTION Q2-FIX Kullanım kılavuzu
- Kategori
- Araba koltuğu
- Tip
- Kullanım kılavuzu

ENRUUAEELVLTTR
SOLUTION Q2-FIX
User guide
ECE R-44/04 Gr. 2/3, 15-36 kg (ca. 3-12 Y)

2
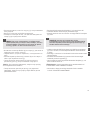
UA - УВАГА! ЦЕ КОРОТКА ІНСТРУКЦІЯ І ВОНА СУЛГУЄ ТІЛЬКИ ДЛЯ ОЗНАЙОМЛЕННЯ. ДЛЯ ЗАБЕЗПЕЧЕННЯ
МАКСИМАЛЬНОЇ БЕЗПЕКИ ТА КОМФОРТУ ВАШОЇ ДИТИНИ - НЕОБХІДНО ПРОЧИТАТИ ПОВНУ ІНСТРУКЦІЮ.
EN - WARNING! THIS SHORT MANUAL IS ONLY INTENDED AS AN OVERVIEW. YOU MUST READ THE ENTIRE MANUAL
CAREFULLY IN ORDER TO ACHIEVE THE MAXIMUM PROTECTION AND LEVEL OF COMFORT FOR YOUR CHILD.
LV - UZMANĪBU! ŠĪ ĪSĀ ROKASGRĀMATA IR TIKAI INFORMATĪVA NOZĪME. JUMS IR JĀIZLASA VISA ROKASGRAMATA
UZMANĪGI, LAI SASNIEGTU MAKSIMĀLU AIZSARDZĪBU UN AUGSTU KOMFORTA LĪMENI.
EE - HOIATUS! SEE LÜHIKE MANUAAL ON MÕELDUD ANDMAKS ÜLEVAADET. LUGEGE HOOLIKALT KOGU MANUAAL LÄBI,
TAGAMAKS TEIE LAPSE MAKSIMAALSET TURVALISUST JA MUGAVUST
RU - ВНИМАНИЕ! ДАННОЙ ИНСТРУКЦИИ ЯВЛЯЕТСЯ КРАТКИЙ ОБЗОР. ВАМ СЛЕДУЕТ ОЗНАКОМИТЬСЯ С ПОЛНОЙ
ИНСТРУКЦИЕЙ ДЛЯ МАКСИМАЛЬНОЙ БЕЗОПАСНОСТИ И КОМФОРТА ВАШЕГО РЕБЕНКА.
LT - ĮSPĖJIMAS! TAI TIK TRUMPA APŽVALGINĖ INSTRUKCIJA. NORĖDAMI PASIEKTI SAVO VAIKUI MAKSIMALŲ SAUGUMĄ IR
AUKŠTĄ KOMFORTO LYGĮ TURITE ATIDŽIAI PERSKAITYTI VISĄ PILNĄ INSTRUKCIJĄ.
TR - UYARI! BU KISA KILAVUZ YALNIZCA GENEL TASLAK NİTELİĞİNDEDİR. ÇOCUĞUNUZUN EN İYİ ŞEKİLDE KORUNMASI VE
RAHATI İÇİN BU KULLANIM KILAVUZUNUN TAMAMINI DİKKATLİCE OKUMAK VE UYGULAMAK ÇOK ÖNEMLİDİR.

3
EN
EN - Short guide RU -
UA -
EE -
краткая инструкция
Коротка інструкція
Lühike kasutusjuhend
LV -
LT -
TR -
Īss ceļvedis
Trumpas gidas
Kısa kılavuz
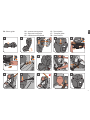
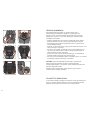
1
6
11
2
7
12
3
8
13
4
9
14
5
10
15
1
6
11
2
7
12
3
8
13
4
9
14
5
10
15
CLICK!

4

5
EN
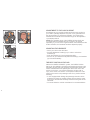
Thank you for purchasing the CYBEX Solution Q2-x. We assure you that in the process of
developing the CYBEX Solution Q2-x we focused on safety, comfort and user friendliness. This
product is manufactured under special quality monitoring and complies with the strictest safety
requirements.
DEAR CUSTOMER!

6
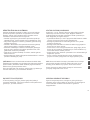
HOMOLOGATION
CYBEX Solution Q2-x seat cushion with
backrest and headrest
RECOMMENDED FOR:
Age: from approximately 3 to 12 years
Weight: 15 to 36 kg
Body height: up to 150 cm
For vehicle seats with three-point
automatic retractor belt according to ECE
R16
ECE R 44/04, group 2/3, 15 to 36 kg
SOLUTION Q2-FIX
08/2014
WARNING! For your child‘s maximum protection, it is essential
to use and install the CYBEX Solution Q2-x according to the
instructions in this user guide.
NOTE! Please keep the user guide close by for future reference
(e.g. by storing it in the pocket at the rear of the seat).
EN
SHORT GUIDE ..................................................................................3
HOMOLOGATION .............................................................................6
FIRST INSTALLATION ......................................................................7
ADJUSTMENT TO THE CHILD`S HEIGHT ......................................8
ADJUSTING THE HEADREST .........................................................8
THE BEST POSITION IN THE CAR .................................................8
INSTALLATION OF THE CAR SEAT WITH ISOFIX CONNECT .....10
RELEASING THE ISOFIX CONNECTORS ....................................12
PLACING THE CHILD SEAT IN THE CAR .....................................12
FASTENING YOUR CHILD’S SEATBELT .......................................13
IS YOUR CHILD PROPERLY SECURED? .....................................15
RECLINING HEADREST ................................................................15
PRODUCT CARE ............................................................................16
CLEANING ......................................................................................16
REMOVING THE SEAT COVER .....................................................17
DURABILITY OF THE PRODUCT ...................................................18
DISPOSAL .......................................................................................18
WARRANTY ....................................................................................19
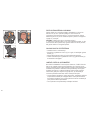
CONTENT
SOLUTION Q2-FIX
ECE R 44/04
____________
SEMI-UNIVERSAL
UNIVERSAL
15 - 36 kg
04301311
CYBEX GmbH
Riedinger Str. 18, 95448 Bayreuth
Germany

7
EN
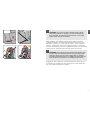
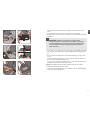
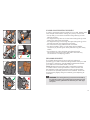
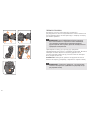
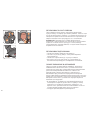
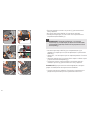
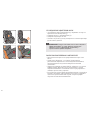
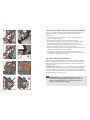
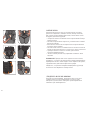
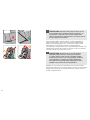
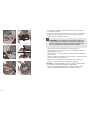
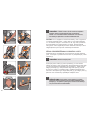
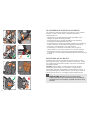
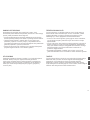
FIRST INSTALLATION
The child seat consists of a booster seat (d) and a backrest
(a) with height adjustable shoulder and headrest. Only the
combination of these two parts provides best protection and
comfort to your child.
NOTE! Please keep the user guide close by for future reference
(e.g. by storing it in the pocket (s) at the rear of the seat).
WARNING! The parts of the CYBEX Solution Q2-x must not
be used alone or in combination with boosters, backrests or
headrests from other manufacturers or from different product
series. In such instances, the certication expires immediately.
!
Connect the backrest (a) to the booster (d) by hooking the guide
lug (b) on the axis (c) of the booster (d). Insert the Linear Side-
impact Protection pads (L.S.P.) on both sides of the shoulder rest
into the appropriate installation holes (z). Push the pads slightly
downwards until you hear them click in.
WARNING! Please ensure that the plastic parts of the child
seat are never compressed (e.g. by jamming in the car door
or when adjusting the back seat).
!
b
a
d
d
a
z
LSP
s
c

8
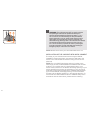
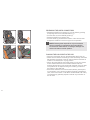
ADJUSTMENT TO THE CHILD`S HEIGHT
A headrest can only provide the best protection and comfort for
your child if optimally adjusted. Only then it can guarantee that
the diagonal belt (f) is positioned optimally. The height of the
headrest and the width of the shoulder wings can be adjusted in
11 possible positions.
NOTE! The shoulder wings of the CYBEX Solution Q2-x are
connected with the headrest and do not have to be moved
separately. If you can t two ngers between the headrest and the
child’s shoulders, the headrest has been adjusted properly.
e e
h
f
ADJUSTING THE HEADREST
• Place your child in the child seat.
• Pull the adjustment handle (h) up in order to unlock the
headrest (e).
• Push the headrest (e) into the desired position.
• As soon as you release the adjustment handle (h), the headrest
(e) locks automatically.
THE BEST POSITION IN THE CAR
Without the ISOFIX CONNECT system, the CYBEX Solution
Q2-x can be installed in all vehicles equipped with a three-point
automatic retractor belt. We generally recommend that the child
seat is installed behind the passengers seat in the rear of the
vehicle. In the front, your child is exposed to a higher risk of
injury in the event of a collision. In exceptional cases, the child
seat may be used on the passenger seat. If so, please note the
following:
• In cars equipped with airbags the passenger seat should be
pushed as far back as possible. Please ensure that the upper
point of the vehicle seat belt stays behind the belt guide of the
child seat.
• You must follow the vehicle manufacturer’s recommendations.

9
EN
When installing the CYBEX Solution Q2-x with the ISOFIX
CONNECT system, the child seat falls into the semi-universal
admission category, i.e. it may only be used in certain types of
vehicles. Please refer to the list of approved cars to check your
vehicle’s compatibility. This list is updated regularly, and the latest
version can be accessed online at www.cybex-online.com.
Luggage or other objects in the vehicle that may cause injury in
an accident must always be secured properly. Loose parts may
turn into deadly projectiles on impact.
WARNING! You must not use the CYBEX Solution Q2-x
with a two-point belt or a lap belt. If the seat is secured with
a two-point belt, the child may sustain serious, or even fatal
injuries in the event of an accident.
!
WARNING! The seat belt (f) must always run diagonally from
the back and never lead into direction of the front upper seat
belt point. Should you be unable to adjust this, for example,
by pushing the seat forward or by installing the seat in the rear
of the car, then the child seat is not suitable for this vehicle.
!
f
f

10
NOTE! Please never leave your child unattended in the car.
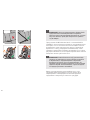
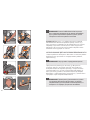
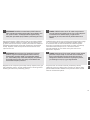
INSTALLATION OF THE CAR SEAT WITH ISOFIX CONNECT
NOTE! The car’s ISOFIX anchorage points (i) consist of two
metal rings per seat, located between the backrest and the seat
cushion of your vehicle seat. If in doubt please refer to your
vehicle owner’s manual. If the ISOFIX anchorage points (i) in your
vehicle are difcult to access, the upholstery in your car can be
protected by permanently attaching the supplied ISOFIX guides
(u) to the two ISOFIX anchorage points (i). In some vehicles it
is better to t the ISOFIX guides (u) in the opposite direction. To
ensure that the CYBEX Solution Q2-x is installed safely and in
accordance with the instructions, please note the following:
The safety of your child will be enhanced using the ISOFIX
CONNECT system which rmly connects the child seat to the
vehicle. Your child will still be buckled in using the car’s three-
point belt.
WARNING! This child seat may NOT be used in vehicles
with passenger seats that are positioned sideways. In
vehicles with backward-facing passenger seats, e.g. in a
van or minibus, the child seat may be used provided the
seat is approved to carry an adult. Please ensure that the
head rest is not removed when using the child seat on a
backward-facing passenger seat. The child seat must always
be secured with the three-point belt even when it is not in
use. This is necessary to protect the driver or passengers
from being injured by a loose child seat when making an
emergency stop or in the event of a collision.
!
i
u

11
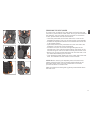
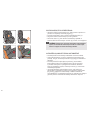
EN
• For adjustment pull handle (v), located on the bottom of the
seat.
• Pull the ISOFIX connectors (w) out as far as possible.
• Rotate the connectors 180° until they point towards the ISOFIX
guides (u).
• Push both of the ISOFIX connectors (w) into the ISOFIX guides
(u) until you hear them click into the ISOFIX anchorage points
(i).
• Ensure that the child seat is connected safely by trying to pull
it out.
• The green safety indicators (x) must then be clearly visible on
both of the red release buttons (y).
• You can now adjust the position of the seat using the handle (v)
located on the bottom of the child seat
• You can now buckle up the child. Please refer to “FASTENING
THE CHILD`S SEATBELT”.
WARNING! Please ensure that the two green safety
indicators (x) of the connectors are not visible. If necessary,
release the ISOFIX connectors by pushing and pulling back
the red release button (y). Repeat this procedure with the
other connector.
!
NOTE! For additional information please refer to the section
“PLACING THE SEAT IN THE CAR”.
w
w
v
CLICK!
CLICK!
x
y
i
u

12
NOTE! Following these steps will not only ensure that the
vehicle’s upholstery is protected but also that the ISOFIX
connectors are neither stained nor damaged. Damage and
stains could obstruct smooth operation.
!
RELEASING THE ISOFIX CONNECTORS
a
1 2
PUSH!
• Release the ISOFIX connectors (w) on both sides by pushing
and pulling back the red release buttons (y).
• Pull the seat out of the ISOFIX guides (u).
• Rotate the ISOFIX connectors 180°.
• Pull the handle (v) located at the bottom of the child car seat
and push the ISOFIX connectors (w) as far as possible.
PLACING THE CHILD SEAT IN THE CAR
• Place the child safety seat on the appropriate seat in the car.
• Please ensure that the backrest (a) of the child safety seat rests
at against the backrest of the car seat so that the child seat is
under no circumstances in a lying position.
• When using the ISOFIX anchorage points (i) in the car, please
ensure that the backrest of the CYBEX Solution Q2-x is
perfectly aligned and in full contact with the back of the car seat.
The position can be adjusted using the handle (v) located on
the bottom of the child seat.
• Should the headrest of the vehicle seat interfere, please pull it
out completely, turn it around or take it off entirely (exceptional
case, refer to the section “THE BEST POSITION IN THE CAR”).
The backrest (a) optimally adjusts to almost any inclination of
the car seat.

13
EN
WARNING! The backrest of the CYBEX Solution Q2-x
should rest at against the upright part of the car seat. To
provide the best possible protection for your child, the seat
should be in a normal upright position!
!
NOTE! It is possible that some car seats that are made of soft
material (e.g. velours, leather, etc.) may show signs of usage and/
or discolouration. In order to avoid this, you could, for example,
place a cover or towel underneath it. In this context, we would
also like to refer to you to our cleaning instructions, which must
absolutely be followed before the rst use of the seat.
WARNING! Never twist the belt!
!
WARNING! The belt buckle (l) of the car seat must under no
circumstances extend into the bottom belt guide (k). If the belt
strap is too long, the child seat is not suitable for this vehicle.
!
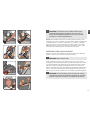
Put your child in the child seat. Pull out the three-point belt and
pass it in front of your child to the belt buckle (l).
Push the belt tongue (m) into the belt buckle (l). If you hear a
clicking sound it is securely locked. Put the lap section of the belt
(n) into the bottom belt guides (k) of the child seat. Now pull the
lap belt (n) tight by pulling the diagonal belt (f) until there is no
slack. The tighter the belt, the greater the protection against injury.
On the side of the belt buckle both the diagonal belt (f) and the
lap belt (n) should be inserted into the bottom belt guide together.
FASTENING YOUR CHILD’S SEATBELT
l
f
CLICK!
m
l
n
k k
n
n
g
g
p
f
f
e
f

14
WARNING! The lap belt must run as close as possible to
the line across the top of your child`s legs in order to offer
maximum protection in the event of a collision.
!
The lap section of the belt (n) should be placed in the bottom belt
guides (k) on both sides of the seat (d).
NOTE! Teach your child from the beginning to be aware of the
need for a tight seat belt and encourage him/her to pull the belt
tight if necessary.
Now run the diagonal belt (f) through the upper red belt guide
(g) in the shoulder rest (e) until it is inside the belt guide. The
diagonal belt (f) automatically slides over the belt guide hook
(p) meaning that it is always held in the correct position. Please
ensure that the diagonal belt (f) runs between the outer edge of
the shoulder and your child`s neck. If necessary, adjust the line of
the belt by adjusting the height of the headrest. The height of the
headrest can still be adjusted in the car. To remove the diagonal
belt (f) from the upper belt guide (g), press down the red belt
guide hook (p).

15
EN
IS YOUR CHILD PROPERLY SECURED?
In order to guarantee maximum safety for your child, please make
some simple checks before making your journey. Ensure that:
WARNING! The locking device (t) must never be blocked by
any objects! In case of an accident, the free movement of the
inclination must be guaranteed as otherwise your child might
be injured.
!
RECLINING HEADREST
The CYBEX Solution Q2-x has a reclining headrest (r)
preventing your child`s head from falling forward when your child
is sleeping. Furthermore, this adjustable headrest also makes
your child more comfortable whilst in the car.
NOTE! Please ensure that the child`s head always remains
in contact with the reclining headrest in order to ensure that
the headrest`s side-crash protection function works properly.
There are three possible positions for the headrest. These can
be achieved by slightly lifting the headrest (r) and adjusting its
inclination.
• the lap belt (n) runs within the bottom belt guides (k) on both
sides of the seat;
• the diagonal belt (f) also runs in the bottom belt guide (k) of the
seat on the side of the belt buckle;
• the diagonal belt (f) runs through the upper belt guide (g) of the
shoulder rest and runs diagonally to the back;
• the entire belt is snugly fastened and not twisted;
• the seat is locked in place on both sides with the ISOFIX
connectors (w) and the green safety indications (x) are clearly
visible;
• the backrest (a) of the child seat rests at against the
vehicle seat, ensuring that the child seat is not under any
circumstances in a sleeping position.
k
l
g
f
w
f+n
n
x
k
r
t

16
PRODUCT CARE
In order to guarantee the best possible protection of your child
seat, it is necessary that you take note of the following:
WARNING! Please do not use chemical detergents or
bleaching agents under any circumstances!
!
CLEANING
It is important to use only an original CYBEX Solution Q2-x seat
cover since the cover is also an essential part of the function. You
may obtain spare covers at your retailer.
NOTE! Please wash the cover before you use it for the rst time.
Seat covers are machine washable at max. 30°C on a delicate
cycle. If you wash it at higher temperature, the cover fabric may
lose colour. Please wash the cover separately and never dry it
mechanically! Do not dry the cover in direct sunlight! You can
clean the plastic parts with a mild detergent and warm water.
• All important parts of the child seat should be examined for
any damages on a regular basis. The mechanical parts must
function awlessly.
• It is essential that the child safety car seat does not get jammed
between hard objects e.g. like the door of the car, seat rail etc.
causing possible damage to the seat.
• The child seat must be examined by the manufacturer after
being dropped or any similar event.

17
EN
REMOVING THE SEAT COVER
The seat cover consists of four parts which are xed to the seat
with velcro, press studs or button holes. Once you have released
the fasteners, the cover parts can be removed. To remove the
covers, please follow the instructions below:
• Undo the press studs on the lower side of the cover for the
adjustable headrest. Then you can remove the cover upwards.
• Activate the adjustment handle for the headrest and move this
to its highest position.
• Open and loosen all the press buttons on the rear side of the
headrest. Then pull the cover off forwards.
• Pull down the cover on the left and right side panel of the
shoulder rest. Then undo the press studs on the interior of the
shoulder wings in order to be able to entirely remove the cover
• Before you can remove the backrest cover from the seat, undo
the associated fastenings its rear side.
• Then thread the elastic bands out on the under side of the seat
area, and withdraw the seat cushion cover forwards.
NOTE! Before removing the separate parts of the seat cover,
please ensure that the cover is already positioned above the
decorative silver parts. To put the covers back on the seat,
proceed as above in reverse order.
Make sure that the red belt guide (q) always rests visible above
the seat cover.
q

18
DURABILITY OF THE PRODUCT
The child seat is designed to full its purpose for an expected
service life of up to 9 years. However, since cars can be exposed
to high uctuations in temperature and unforeseeable stresses,
please take note of the following points:
DISPOSAL
At the end of the service life of the child seat, it must be properly
disposed of. Waste disposal regulations may vary regionally. In
order to guarantee a proper disposal of the child safety seat,
please contact your communal waste management authority or
local administration. In all cases, please note the waste disposal
regulations that apply in your country of residence.
• If the car is exposed to direct sunlight for a longer period of
time, the child seat must be taken out of the car or covered with
a light cloth.
• Examine all plastic and metal parts of the seat for any damage
or changes in form or colour on an annual basis. If you notice
any changes, the child seat must be disposed of or examined
by the manufacturer and replaced if necessary.
• Changes to the fabric, in particular colour fading, are normal
after years of use in a car and do not constitute a fault.

19
EN
WARRANTY
The following warranty applies solely in the country where
this product was initially sold by a retailer to a customer. The
warranty covers all manufacturing and material defects, existing
and appearing, at the date of purchase or appearing within a
term of two (2) years from the date of purchase from the retailer
who initially sold the product to a consumer (manufacturer’s
warranty). In the event that a manufacturing or material defect
should appear, we will – at our own discretion – either repair
the product free of charge or replace it with a new product. To
obtain such warranty it is required to take or ship the product to
the retailer, who initially sold this product to a customer, and to
submit an original proof of purchase (sales receipt or invoice) that
contains the date of purchase, the name of the retailer and the
type designation of this product. This warranty shall not apply in
the event that this product is taken or shipped to the manufacturer
or any other person other than the retailer who initially sold this
product to a consumer. Please check the product with respect to
completeness and manufacturing or material defects immediately
at the date of purchase or, in the event that the product was
purchased as a distance selling, immediately after receipt. In
the event of a defect stop using the product and take or ship
it immediately to the retailer who initially sold it. If there is a
warranty in place, the product has to be returned in a clean and
complete condition. Prior to contacting the retailer, please read
this instruction manual carefully. This warranty does not cover any
damages caused by misuse, environmental inuence (water, re,
road accidents etc.) or normal wear and tear. It applies only if the
product has always been used in compliance with the operating
instructions, if any and all modications and services have been
performed by authorized persons and if original components and
accessories have been used. This warranty does not exclude,
limit or otherwise affect any statutory consumer rights, including
claims in tort and claims with respect to a breach of contract,
which the buyer may have against the seller or the manufacturer
of the product.
CYBEX GmbH
Riedinger Str. 18,
95448 Bayreuth, Germany
Tel.: +49 921 78 511-511
Fax: +49 921 78 511- 888

20
Sayfa yükleniyor...
Sayfa yükleniyor...
Sayfa yükleniyor...
Sayfa yükleniyor...
Sayfa yükleniyor...
Sayfa yükleniyor...
Sayfa yükleniyor...
Sayfa yükleniyor...
Sayfa yükleniyor...
Sayfa yükleniyor...
Sayfa yükleniyor...
Sayfa yükleniyor...
Sayfa yükleniyor...
Sayfa yükleniyor...
Sayfa yükleniyor...
Sayfa yükleniyor...
Sayfa yükleniyor...
Sayfa yükleniyor...
Sayfa yükleniyor...
Sayfa yükleniyor...
Sayfa yükleniyor...
Sayfa yükleniyor...
Sayfa yükleniyor...
Sayfa yükleniyor...
Sayfa yükleniyor...
Sayfa yükleniyor...
Sayfa yükleniyor...
Sayfa yükleniyor...
Sayfa yükleniyor...
Sayfa yükleniyor...
Sayfa yükleniyor...
Sayfa yükleniyor...
Sayfa yükleniyor...
Sayfa yükleniyor...
Sayfa yükleniyor...
Sayfa yükleniyor...
Sayfa yükleniyor...
Sayfa yükleniyor...
Sayfa yükleniyor...
Sayfa yükleniyor...
Sayfa yükleniyor...
Sayfa yükleniyor...
Sayfa yükleniyor...
Sayfa yükleniyor...
Sayfa yükleniyor...
Sayfa yükleniyor...
Sayfa yükleniyor...
Sayfa yükleniyor...
Sayfa yükleniyor...
Sayfa yükleniyor...
Sayfa yükleniyor...
Sayfa yükleniyor...
Sayfa yükleniyor...
Sayfa yükleniyor...
Sayfa yükleniyor...
Sayfa yükleniyor...
Sayfa yükleniyor...
Sayfa yükleniyor...
Sayfa yükleniyor...
Sayfa yükleniyor...
-
 1
1
-
 2
2
-
 3
3
-
 4
4
-
 5
5
-
 6
6
-
 7
7
-
 8
8
-
 9
9
-
 10
10
-
 11
11
-
 12
12
-
 13
13
-
 14
14
-
 15
15
-
 16
16
-
 17
17
-
 18
18
-
 19
19
-
 20
20
-
 21
21
-
 22
22
-
 23
23
-
 24
24
-
 25
25
-
 26
26
-
 27
27
-
 28
28
-
 29
29
-
 30
30
-
 31
31
-
 32
32
-
 33
33
-
 34
34
-
 35
35
-
 36
36
-
 37
37
-
 38
38
-
 39
39
-
 40
40
-
 41
41
-
 42
42
-
 43
43
-
 44
44
-
 45
45
-
 46
46
-
 47
47
-
 48
48
-
 49
49
-
 50
50
-
 51
51
-
 52
52
-
 53
53
-
 54
54
-
 55
55
-
 56
56
-
 57
57
-
 58
58
-
 59
59
-
 60
60
-
 61
61
-
 62
62
-
 63
63
-
 64
64
-
 65
65
-
 66
66
-
 67
67
-
 68
68
-
 69
69
-
 70
70
-
 71
71
-
 72
72
-
 73
73
-
 74
74
-
 75
75
-
 76
76
-
 77
77
-
 78
78
-
 79
79
-
 80
80


CYBEX SOLUTION Q2-FIX Kullanım kılavuzu
- Kategori
- Araba koltuğu
- Tip
- Kullanım kılavuzu
diğer dillerde
- eesti: CYBEX SOLUTION Q2-FIX Kasutusjuhend
- English: CYBEX SOLUTION Q2-FIX User manual
İlgili makaleler
-
CYBEX SOLUTION X2-FIX Kullanım kılavuzu
-
-
CYBEX Pallas 2-fix Kullanım kılavuzu
-
CYBEX SOLUTION X-FIX Kullanım kılavuzu
-
CYBEX SOLUTION M Kullanım kılavuzu
-
-
CYBEX SOLUTION M-FIX Kullanım kılavuzu
-
CYBEX Juno-Fix Kullanım kılavuzu
-
CYBEX Isis Kullanım kılavuzu
-