Dolmar ET101C El kitabı
- Kategori
- Elektrikli aletler
- Tip
- El kitabı
Bu kılavuz aynı zamanda aşağıdakiler için de uygundur:

GB Electric Grass Trimmer Instruction Manual
F
Coupe-Herbe Electrique Manuel d’instructions
D
Elektro-Trimmer Gebrauchsanleitung
I
Tosaerba elettrico Istruzioni per l’uso
NL
Elektrische grastrimmer Gebruiksaanwijzing
E
Cortadora de Cesped Manual de instrucciones
P
Aparador de Grama Elétrico Manual de instruções
DK
Elektrisk græstrimmer Brugervejledning
GR
Ηλεκτρικό κουρευτικό γκαζόν Εγχειρίδιο οδηγιών
TR
Elektrikli Çim Biçme Makinesi Kullanım Kılavuzu
PL
Wykaszarka Elektryczna Instrukcja obsługi
HU
Elektromos fűnyíró Használati útmutató
SK
Elektrická kosačka na trávu Návod na obsluhu
CZ
Elektrický vyžínač Návod k použití
RO
Trimmer electric pentru iarbă Manual de instrucţiuni
UA
Електротример Інструкція з експлуатації
ET-71 C
ET-101 C

2
1
10
6
3
4
2
5
8
11
7
9
1
4
5
12
2 3

3
1
8
14
13
4 5
15
17
18
16
19
20
21
6 7
22
8 9
10 11

4
23
12 13
18
14

5
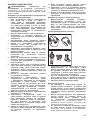
ENGLISH (Original instructions)
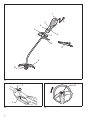
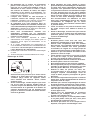
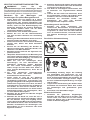
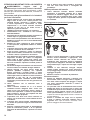
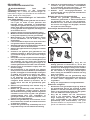
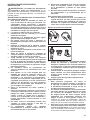
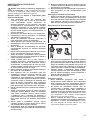
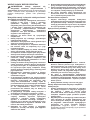
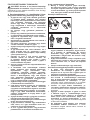
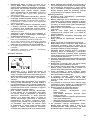
Explanation of general view
1 Cableholder
2 Powersupplycord(theshape
maydifferfromcountryto
country)
3 Rearhandle
4 Lock-offlever
5 Switchtrigger
6 Fronthandle
7 Hanger(suspensionpoint)
8 Barrier
9 Cuttingtoolguard(protector)
10 Cuttingtool
11 Shoulderharness
12 Mosteffectivecuttingarea
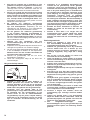
13 Handle
14 Rubberpart
15 Protector
16 Cup
17 Eyelets
18 Spool
19 Lockscrew
20 Cordcutter
21 Cover
22 Hanger
23 80–100mm
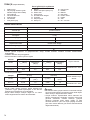
SPECIFICATIONS
Model ET-71C ET-101C
Typeofhandle Loophandle
Overalllength 1,550mm
Netweight 4.3kg
Continuousratinginput 700W 1,000W
Noloadspeed 6,500min
–1
6,500min
–1
Applicablecuttingtool Nyloncuttinghead
Cuttingwidth 350mm
Safetyclass
/ II
• Duetoourcontinuingprogramofresearchanddevelopment,thespecicationshereinaresubjecttochangewithout
notice.
• Specicationsmaydifferfromcountrytocountry.
• WeightaccordingtoEPTA-Procedure01/2003
Noise Soundpressurelevelaverage Soundpowerlevelaverage
Applicablestandard
Model L
PA
(dB(A))
UncertaintyK
(dB(A))
L
wA
(dB(A))
UncertaintyK
(dB(A))
ET-71C 81.6 2.5 93.75 1.46
EN50636-2-91:2014
ET-101C 79.8 2.5 93.4 1.61
• Wearearprotection.
Vibration Frontgrip Reargrip
Applicablestandardor
directive
Model a
h
(m/s
2
)
UncertaintyK
(m/s
2
)
a
h
(m/s
2
)
UncertaintyK
(m/s
2
)
ET-71C 2.272 1.5 2.222 1.5
EN50636-2-91:2014
ET-101C 2.268 1.5 2.248 1.5
• The declared vibration emission value has been
measuredinaccordancewiththestandardtestmethod
andmaybeusedforcomparingonetoolwithanother.
• The declared vibration emission value may also be
usedinapreliminaryassessmentofexposure.
WARNING:
• Thevibrationemissionduringactualuseofthepower
tool can differ from the declared emission value
dependingonthewaysinwhichthetoolisused.
• Be sure to identify safety measures to protect the
operatorthatarebasedonanestimationofexposurein
theactualconditionsofuse(takingaccountofallparts
oftheoperatingcyclesuchasthetimeswhenthetool
isswitchedoffandwhenitisrunningidleinadditionto
thetriggertime).

6
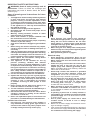
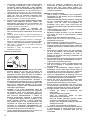
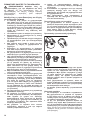
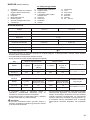
Symbols
Thefollowingshowthesymbolsusedfortheequipment.
Besurethatyouunderstandtheirmeaningbeforeuse.
• Takeparticularcareandattention.
• Readinstructionmanual.
• Danger;beawareofthrownobjects.
• The distance between the tool and
bystandersmustbeatleast15m.
360°
• Keepbystandersaway.
15m(50FT)
• Keepdistanceatleast15m.
• Wear a helmet, goggles and ear
protection.
• Wearprotectivegloves.
• Wear sturdy boots with nonslip
soles. Steeltoed safety boots are
recommended.
• Donotexposetomoisture.
• Disconnectthemainsplugifthecord
isdamagedorentangled.
• Donotuseblade.
• DOUBLEINSULATION
• OnlyforEUcountries
Donotdisposeofelectricequipment
together with household waste
material!
In observance of the European
Directive, on Waste Electric and
Electronic Equipment and its
implementation in accordance with
national law, electric equipment
that have reached the end of their
life must be collected separately
and returned to an environmentally
compatiblerecyclingfacility.
For European countries only
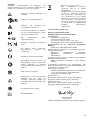
EC Declaration of Conformity
Makita declares that the following Machine(s):
DesignationofMachine:
ElectricGrassTrimmer
ModelNo./Type:ET-71C,ET-101C
Specications:see“SPECIFICATIONS”table.
Conforms to the following European Directives:
2000/14/EC,2006/42/EC,2004/108/EC
Theyaremanufacturedinaccordancewiththefollowing
standardorstandardizeddocuments:
EN60335-1, EN50636-2-91, EN62233,
EN55014-1, EN55014-2, EN61000-3-2,
EN61000-3-3
The technical le in accordance with 2006/42/EC is
availablefrom:
Makita,Jan-BaptistVinkstraat2,3070,Belgium
The conformity assessment procedure required by
Directive2000/14/ECwasinAccordancewithannexVI.
NotiedBody:
SociétéNationaledeCerticationetd’Homologation
11,ruedeLuxembourgL-5230Sandweiler
Identicationnumber0499
ModelET-71C
MeasuredSoundPowerLevel:93.75dB(A)
GuaranteedSoundPowerLevel:96dB(A)
ModelET-101C
MeasuredSoundPowerLevel:93.4dB(A)
GuaranteedSoundPowerLevel:96dB(A)
30.1.2015
YasushiFukaya
Director
Makita,Jan-BaptistVinkstraat2,3070,Belgium

7
IMPORTANT SAFETY INSTRUCTIONS
WARNING! Read all safety warnings and all
instructions. Failure to follow the warnings and
instructions mayresult in electricshock, re and/or
seriousinjury.
Save all warnings and instructions for future
reference.
1. This appliance can be used by children aged from
8 years and above and persons with reduced
physical, sensory or mental capabilities or lack
of experience and knowledge if they have been
given supervision or instruction concerning use
of the appliance in a safe way and understand
the hazards involved.
2. Children shall not play with the appliance.
3. Be familiar with the controls and proper use of
the equipment.
4. Warning. Cutting elements continue to rotate
after the motor is switched off.
5. Never allow children or people unfamiliar with
the instructions to use the machine.
6. Stop using the machine while people, especially
children, or pets are nearby.
7. Only use the machine in daylight or good articial
light.
8. Before using the machine and after any impact,
check for signs of wear or damage and repair as
necessary.
9. Take care against injury from any device tted for
trimming the lament line length. After extending
new cutter line always return the machine to its
normal operating position before switching on.
10. Never replace the non-metallic cutting means
with metallic cutting means.
11. This appliance is not intended for use by
persons (including children) with reduced
physical, sensory or mental capabilities, or lack
of experience and knowledge, unless they have
been given supervision or instruction concerning
use of the appliance by a person responsible for
their safety. Children should be supervised to
ensure that they do not play with the appliance.
12. Use the tool with the utmost care and attention.
13. Operate the tool only if you are in good physical
condition. Perform all work calmly and carefully.
Use common sense and keep in mind that the
operator or user is responsible for accidents
or hazards occurring to other people or their
property.
14. Never operate the tool when tired, feeling ill or
under the inuence of alcohol or drugs.
15. The tool should be switched off immediately if it
shows any signs of unusual operation.
16. Disconnect the machine from the mains before
checking, cleaning or working on the machine
and when it is not in use.
17. Never use replacement parts or accessories not
provided or recommended by the manufacturer.
Intended use of the tool
1. Use right tool. The electronic grass trimmer is
only intended for cutting grass, light weeds. It
should not be used for any other purpose such
as hedge cutting as this may cause injury.
Personal protective equipment
1. Dress Properly. The clothing worn should be
functional and appropriate, i.e. it should be tight-
tting but not cause hindrance. Do not wear
either jewelry or clothing which could become
entangled with high grass. Wear protective hair
covering to contain long hair.
2. When using the tool, always wear sturdy shoes
with a non-slip sole. This protects against injuries
and ensures a good footing.
3. Wear protective glasses or goggles.
Electrical safety
1. Avoid dangerous environment. Don’t use the
tool in damp or wet locations or expose it to rain.
Water entering the tool will increase the risk of
electric shock.
2. Power tool plugs must match the outlet. Never
modify the plug in any way. Do not use any
adapter plugs with earthed (grounded) power
tools. Unmodied plugs and matching outlets will
reduceriskofelectricshock.
3. Avoid body contact with earthed or grounded
surfaces such as pipes, radiators, ranges and
refrigerators. Thereisanincreasedriskofelectric
shockifyourbodyisearthedorgrounded.
4. Do not abuse the cord. Never use the cord for
carrying, pulling or unplugging the power tool.
Keep cord away from heat, oil, sharp edges
or moving parts. Damaged or entangled cords
increasetheriskofelectricshock.
5. When operating a power tool outdoors, use an
extension cord suitable for outdoor use. Useof
acordsuitable foroutdoorusereducesthe risk of
electricshock.
6. If operating a power tool in a damp location is
unavoidable, use a residual current device (RCD)
protected supply. UseofanRCDreducestherisk
ofelectricshock.
7. Use of power supply via a RCD with a rated
residual current of 30 mA or less is always
recommended.
8. Beforeuse,checkthesupplyandextensioncordfor
signsofdamageorageing.
9. Ifthecordbecomesdamagedduringuse,disconnect
thecordfromthesupplyimmediately. Do not touch
the cord before disconnecting the supply.

8
10. Do not use the tool if the cords are damaged or
worn.
11. Keepextensioncordawayfromcuttingelements.
Starting up the tool
1. Make sure that there are no children or other
people within a working range of 15 meters
(50 ft), also pay attention to any animals in the
working vicinity. Otherwise stop using the tool.
2. Before use always check that the tool is safe
for operation. Check the security of the cutting
tool and the guard and the switch trigger/lever
for easy and proper action. Check for clean and
dry handles and test the on/off function of the
switch.
3. Check damaged parts before further use of
the tool. A guard or other part that is damaged
should be carefully checked to determine that
it will operate properly and perform its intended
function. Check for alignment of moving parts,
binding of moving parts, breakage of parts,
mounting, and any other condition that may
affect its operation. A guard or other part that
is damaged should be properly repaired or
replaced by our authorized service center unless
indicated elsewhere in this manual.
4. Switch on the motor only when hands and feet
are away from the cutting tool.
5. Before starting make sure that the cutting tool has
no contact with hard objects such as branches,
stones etc. as the cutting tool will revolve when
starting.
Method of operation
1. Never operate the machine with damaged guards
or without the guards in place.
2. Only use the tool in good light and visibility.
During the winter season beware of slippery or
wet areas, ice and snow (risk of slipping). Always
ensure a safe footing.
3. Take care against injury to feet and hands from
the cutting tool.
4. Keep hands and feet away from the cutting
means at all times and especially when switching
on the motor.
5. Never cut above waist height.
6. Never stand on a ladder and run the tool.
7. Never work on unstable surfaces.
8. Do not overreach. Keep the balance at all times.
Always be sure of the footing on slopes. Always
walk and never run.
9. Remove sand, stones, nails etc. found within the
working range. Foreign particles may damage
the cutting tool and can cause to be thrown
away, resulting in a serious injury.
10. Should the cutting tool hit stones or other hard
objects, immediately switch off the motor and
inspect the cutting tool.
11. Before commencing cutting, the cutting tool
must have reached full working speed.
12. During operation always hold the tool with both
hands. Never hold the tool with one hand during
use. Always ensure a safe footing.
13. All protective equipment such as guards supplied
with the tool must be used during operation.
14. Except in case of emergency, never drop or
cast the tool to the ground or this may severely
damage the tool.
15. Never drag the tool on the ground when moving
from place to place, the tool may become
damaged if moved in this manner.
16. Always withdraw the mains plug:
− whenever leaving the tool unattended;
− before clearing a blockage;
− before checking, cleaning or working on the
tool;
− before making any adjustments, changing
accessories or storing;
− whenever the tool starts vibrating unusually;
− whenever transporting the tool.
17. Don’t force the tool. It will do the job better and
with less likelihood of a risk of injury at the rate
for which it was designed.
Maintenance instructions
1. The condition of the cutting tool, protective
devices and shoulder strap must be checked
before commencing work.
2. Turn off the motor and withdraw the mains plug
before carrying out maintenance, replacing the
cutting tool and cleaning the tool.
3. After use, withdraw the mains plug and check for
damage.
4. Check for loose fasteners and damaged parts
such as nearly halfway cut-off state in the cutting
tool.
5. When not in use store the equipment in a dry
location that is locked up or out of children’s
reach.
6. Use only the manufacturer’s recommended
replacement parts and accessories.
7. Always ensure that ventilation openings are kept
clear of debris.
8. Inspect and maintain the tool regularly, especially
before/after use. Have the tool repaired only by
our authorized service center.
9. Keep handles dry, clean and free from oil and
grease.
10. Never use water to cleaning the unit.
SAVE THESE INSTRUCTIONS.
WARNING:
DO NOT let comfort or familiarity with product (gained
from repeated use) replace strict adherence to safety
rules for the subject product. MISUSE or failure
to follow the safety rules stated in this instruction
manual may cause serious personal injury.

9
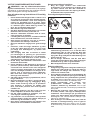
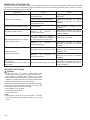
PARTS DESCRIPTION (Fig. 1)
FUNCTIONAL DESCRIPTION
WARNING:
• Always be sure that the tool is switched off and
unplugged before adjusting or checking the
functions on the tool.Failuretoswitchoffandunplug
may result in serious personal injury from accidental
start-up.
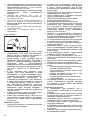
Power switch action (Fig. 2)
WARNING:
• Before plugging in, always check to see that the
switch trigger actuates properly and returns to
the “OFF” position when released. Do not pull the
switch trigger hard without sliding the lock-off
lever. This can cause switch breakage.Operatinga
tool witha switchthat doesnot actuateproperly can
leadtolossofcontrolandseriouspersonalinjury.
To prevent the switch trigger from being accidentally
pulled,alock-offleverisprovided.
Tostartthetool,slidethelock-offleverforwardandthen
pulltheswitchtrigger.Releasetheswitchtriggertostop.
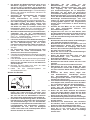
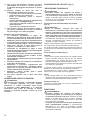
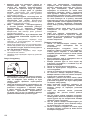
Nylon cutting head (Fig. 3)
NOTICE:
• Donotattempttobumpfeedtheheadwhilethetoolis
operatingatahighRPM.BumpfeedingatahighRPM
maycausedamagetothenyloncuttinghead.
• Thebumpfeedwillnotoperateproperlyiftheheadis
notrotating.
The nylon cutting head is a dual grass trimmer head
providedwithabump&feedmechanism.
Tofeedoutthenyloncord,bumpthecuttingheadagainst
thegroundwhilethecuttingheadisrotating.
NOTE:
• Ifthenyloncorddoesnotfeedoutwhilebumpingthe
head, rewind/replace the nylon cord by following the
proceduresdescribedunder“Maintenance.”
Cable holder (Fig. 4)
Makeasmallloopofpowercable,andhangitontothe
cableholder.
ASSEMBLY
WARNING:
• Always be sure that the tool is switched off and
unplugged before carrying out any work on the tool.
Failuretoswitchoffandunplugmayresultinserious
personalinjuryfromaccidentalstart-up.
• Never start the tool unless it is completely
assembled. Operation of the tool in a partially
assembledstatemayresultinseriouspersonalinjury
fromaccidentalstart-up.
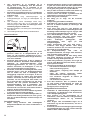
Installing the handle (Fig. 5)
WARNING:
• Donotremoveorshrinkthespacer.Thespacerkeeps
a certain distance between both hands. Setting the
grip/barrier assembly close to the other grip beyond
thelengthofthespacermaycauselossofcontroland
seriouspersonalinjury.
Fitthehandleandthebarrierontotherubberpartonthe
shaft pipe.Adjust the location of the handle, and then
tightenthemwithfourbolts.
Installing the protector (Fig. 6)
WARNING:
• Never use the tool without the protector illustrated
in place.Failuretodosocancauseseriouspersonal
injury.
CAUTION:
• Takecarenottoinjureyourselfonthecutterforcutting
thenyloncord.
1. Fittheprotectorontotheshaft.
2. Align theholeof the protectoralong the slitof the
metalpartontheshaft.
3. Tightenthemwiththebolt.
Installing nylon cutting head (Fig. 7)
NOTICE:
• Besuretousegenuinenyloncuttinghead.
NOTE:
• Removethecoveronthecordcutterbeforeuse.
Turn the toolupside down sothat you canreplacethe
nyloncuttingheadeasily.
1. Fitthecupontotheaxis.
2. Putthenyloncordsthroughtheeyeletstocomeout
ofthecup.
3. Fitthespoolontheaxis.
4. Pressthespoolintothecup.
5. Holdthecupandthespool,andthentighten them
withthelockscrewbyturningitclockwise.
To remove the nylon cutting head, turn the lock screw
counterclockwisewhileholdingthecup.
OPERATION
Correct handling of tool
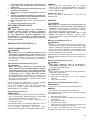
Correct posture (Fig. 8)
WARNING:
• Always position the tool on your right-hand side
so that the barrier is always in front of your body.
Correct positioning of the tool allows for maximum
control and will reduce the risk of serious personal
injury.
CAUTION:
• If during operation the nylon cutting head
accidentally impacts a rock or hard object, stop
the tool and inspect for any damage. If the nylon
cutting head is damaged, replace it immediately.
Use of adamaged nyloncutting headcould result in
seriouspersonalinjury.
Puttheshoulderharnessonyourleftshoulderbyputting
yourheadandrightarmthroughitandkeepthetoolon
yourrightsidewhilealwayskeepingthebarrierinfront
ofyourbody.

10
Attachment of shoulder harness (Fig. 9)
Adjusttheharnesslengthsothatthecuttingtooliskept
parallelwiththeground.
Connectthehangerandtheharness.
WARNING:
• Be extremely careful to maintain control of the tool
at all times. Do not allow the tool to be deected
toward you or anyone in the work vicinity.Failureto
keepcontrolofthetoolcouldresultinseriousinjuryto
thebystanderandtheoperator.
Adjustment of the hanger position and shoulder
harness (Fig. 10)
To change the hanger position, loosen the bolt on the
hanger.Thenmovethehanger.
Afteradjustingthehangerposition,tightentheboltwith.
MAINTENANCE
WARNING:
• Always be sure that the tool is switched off and
unplugged before attempting to perform inspection
or maintenance on the tool. Failure to switch off
andunplugmayresultinserious personalinjuryfrom
accidentalstart-up.
NOTICE:
• Never use gasoline, benzine, thinner, alcohol or the
like.Discoloration,deformationorcracksmayresult.
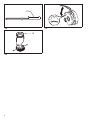
Replacing the nylon cord (Fig. 11)
WARNING:
• Make sure that the nylon cutting head is secured to
the tool properly before operation.Failuretoproperly
securethenyloncuttingheadmaycauseittoyapart
resultinginseriouspersonalinjury.
1. Remove the lock screw by turning it
counterclockwise.
2. Removethespoolandthecup.Andremovetheold
nyloncordfromthespool.
3. Cutanyloncordin3–6m.Foldthecuttingcordin
twohalves, leave oneofhalf longer 80–100 mm
thananother.(Fig. 12)
4. Hookthemiddleofthenewnyloncordtothenotch
locatedatthecenterofthespoolbetweenthetwo
channelsprovidedforthenyloncord.(Fig. 13)
5. Wind both ends rmly along the channels in the
directionindicatedbyarrowmarkonthespool.
6. Install the nylon cutting head as described in this
instructionmanual.(Fig. 14)
To maintain product SAFETY and RELIABILITY,
repairs,anyothermaintenanceoradjustmentshouldbe
performedbyDolmarAuthorizedServiceCenters,always
usingDolmarreplacementparts.

11
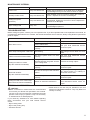
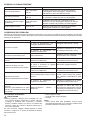
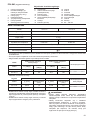
MAINTENANCE INTERVAL
Parts: Interval: Howto:
Powercord Everytimebeforeuse
Visuallyinspectwhetheritisnotbadlywornordamaged.
Ifitisdamaged,askyourlocalservicecenterforrepair.
Auxiliaryhandlescrew Everytimebeforeuse
Checkwhetherscrewisnotloose.Tightenthescrewifit
isloose.Replacethescrewifitisdamaged.
Cuttingtoolguard
(protector)
Everytimebeforeuse
Checkwhetherscrewisnotloose,whetherprotectoris
notdamaged.Tightenthescrewifitisloose.Replacethe
protectorifitisdamaged.
Nyloncuttinghead Every10h
Visuallyinspectwhetheritisnotbadlywornordamaged.
Ifitisdamaged,replaceit.
TROUBLESHOOTING
Beforeaskingforrepairs,conductyourowninspectionrst.Ifyoundaproblemthatisnotexplainedinthemanual,do
notattempttodismantlethetool.Instead,askDolmarAuthorizedServiceCenters,alwaysusingDolmarreplacement
partsforrepairs.
Malfunctionstatus Cause Action
Motordoesnotrun.
Powermainsisnotpluggedin. Pluginthemains.
Powercablebroken.
Ask your local authorized service
centerforrepair.
The drive system does not work
correctly.
Motorstopsrunningafteralittleuse. Overheating.
Stopusingoftooltoallowittocool
down.
ItdoesnotreachmaximumRPM.
The drive system does not work
correctly.
Ask your local authorized service
centerforrepair.
Cuttingtooldoesnotrotate:
stopthemachineimmediately!
Foreign objectsuch asa branchis
jammedbetweentheguardandthe
nyloncuttinghead.
Removetheforeignobject.
The drive system does not work
correctly.
Ask your local authorized service
centerforrepair.
Abnormalvibration:
stopthemachineimmediately!
Oneendofthenyloncordhasbeen
broken.
Bumpthenyloncuttingheadagainst
the ground while it is rotating to
causethecordtofeed.
The drive system does not work
correctly.
Ask your local authorized service
centerforrepair.
Cuttingtoolandmotorcannotstop:
Disconnectthemainsimmediately!
Electricorelectronicmalfunction.
Disconnectthemainsandaskyour
local authorized service center for
repair.
OPTIONAL ACCESSORIES
CAUTION:
• Theseaccessories orattachmentsare recommended
forusewithyourDomartoolspeciedinthismanual.
Theuseofanyotheraccessoriesorattachmentsmight
presentariskofinjurytopersons.Onlyuseaccessory
orattachmentforitsstatedpurpose.
If you need any assistance for more details regarding
these accessories, ask your local Dolmar Service
Center.
• Nyloncuttinghead
• Nyloncord(cuttingline)
• Shoulderharness
NOTE:
• Some items in the list may be included in the tool
packageasstandardaccessories.Theymaydifferfrom
countrytocountry.

12
FRANÇAIS (instructions originales)
Descriptif
1 Supportdecâble
2 Cordond’alimentation(laforme
peutvarierd’unpaysàl’autre)
3 Poignéearrière
4 Boutondesécurité
5 Gâchette
6 Poignéeavant
7 Anneaudesuspension
8 Protection
9 Déecteurdel’outildecoupe
10 Outildecoupe
11 Harnaissimple
12 Zonedecoupelaplusefcace
13 Poignée
14 Partierecouvertede
caoutchouc
15 Déecteur
16 Coupelle
17 Œillets
18 Bobine
19 Écroudeblocage
20 Coupe-l
21 Cachedeprotection
22 Anneaudesuspension
23 80–100mm
SPÉCIFICATIONS
Modèle ET-71C ET-101C
Typedepoignée Poignéecirculaire
Longueurtotale 1550mm
Poidsnet 4,3kg
Puissanceenrégimecontinu 700W 1000W
Vitesseàvide 6500min
–1
6500min
–1
Outildecoupeadapté Têtedecoupeàlnylon
Largeurdecoupe 350mm
Catégoriedesécurité
/ II
• Étantdonnél’évolutionconstantedenotreprogrammederechercheetdéveloppement,lesspécicationscontenues
danscemanuelsontmodiablessanspréavis.
• Lesspécicationspeuventvariersuivantlespays.
• PoidsselonlaprocédureEPTA01/2003
Niveau sonore
Niveaudepressionacoustique
moyen
Niveaudepuissanceacoustique
moyen
Normeapplicable
Modèle L
PA
(dB(A))
IncertitudeK
(dB(A))
L
wA
(dB(A))
IncertitudeK
(dB(A))
ET-71C 81,6 2,5 93,75 1,46
EN50636-2-91:2014
ET-101C 79,8 2,5 93,4 1,61
• Portezdesprotecteursd’oreilles.
Vibrations Poignéeavant Poignéearrière
Normeoudirective
applicable
Modèle a
h
(m/s
2
)
IncertitudeK
(m/s
2
)
a
h
(m/s
2
)
IncertitudeK
(m/s
2
)
ET-71C 2,272 1,5 2,222 1,5
EN50636-2-91:2014
ET-101C 2,268 1,5 2,248 1,5
• Lavaleurd’émissiondevibrationdéclaréeaétémesurée
conformémentàlaméthoded’essainormaliséeetpeut
êtreutiliséepourcomparerdifférentsoutils.
• Lavaleurd’émissiondevibrationdéclaréepeutaussi
êtreutiliséepourréaliseruneévaluationpréliminairede
l’exposition.
AVERTISSEMENT :
• L’émission de vibration pendant l’utilisation réelle de
l’outil électrique peut différer de la valeur d’émission
déclaréeenfonctiondelafaçondontl’outilestutilisé.
• Assurez-vous que les mesures de sécurité visant à
protégerl’opérateursontbaséessuruneestimationde
l’expositiondans lesconditionsnormales d’utilisation,
en tenant compte de toutes les phases du cycle de
fonctionnement, y compris les périodes d’arrêt et de
fonctionnementàvide.

13
Symboles
Lessymboles suivants voussignalentdesinformations
importantesrelativesàl’équipement.Assurez-vousque
vouscomprenezleursignicationavantutilisation.
• Soyezvigilant.
• Lisezlemanueld’instruction.
• Danger, risque de projection
d’objets.
• Distanceminimumentrel’outiletles
personnesprésentes:15m.
360°
• Éloignezlespersonnesprésentes.
15m(50FT)
• Restez à une distance de 15m
minimum.
• Portez un casque, des lunettes
de sécurité et des protecteurs
d’oreilles.
• Portezdesgantsdeprotection.
• Portez des chaussures solides à
semellesantidérapantes.Leportde
chaussuresdesécuritéàembouten
acierestrecommandé.
• N’exposezpasl’outilàl’humidité.
• Débranchezlaprisedel’alimentation
si le cordon est endommagé ou
emmêlé.
• N’utilisezpasdelame.
• DOUBLEISOLATION
• Pourl’UEuniquement
Ne jetez pas les équipements
électriques dans les ordures
ménagères!
Conformément à la directive
européenne relative aux déchets
d’équipements électriques et
électroniques (DEEE) et à sa
transposition dans la législation
nationale, les équipements
électriques qui ont atteint la n
de leur durée de service doivent
être collectésà partet être soumis
à un recyclage respectueux de
l’environnement.
Pour l’Europe uniquement
Déclaration de conformité CE
Makita déclare que la (les) machine(s) Makita
suivante(s) :
Désignationdelamachine:
Coupe-HerbeElectrique
N°demodèle/type:ET-71C,ET-101C
Spécications: se référer au tableau
«SPÉCIFICATIONS».
est (sont) conforme(s) aux directives européennes
suivantes :
2000/14/CE,2006/42/CE,2004/108/CE
etest(sont)fabriquée(s)conformémentauxnormesou
auxdocumentsnormaliséssuivants:
EN60335-1, EN50636-2-91, EN62233,
EN55014-1, EN55014-2, EN61000-3-2,
EN61000-3-3
La documentation technique conforme à la
norme2006/42/CEestdisponibleauprèsde:
Makita,Jan-BaptistVinkstraat2,3070,Belgique
Laprocédured’évaluationdelaconformitérequiseparla
Directive2000/14/CEaétéréaliséeenconformitéavec
l’annexeVI.
Organismenotié:
SociétéNationaledeCerticationetd’Homologation
11,ruedeLuxembourgL-5230Sandweiler
Numérod’identication0499
ModèleET-71C
Niveaudepuissanceacoustiquemesuré:93,75dB(A)
Niveaudepuissanceacoustiquegaranti:96dB(A)
ModèleET-101C
Niveaudepuissanceacoustiquemesuré:93,4dB(A)
Niveaudepuissanceacoustiquegaranti:96dB(A)
30.1.2015
YasushiFukaya
Directeur
Makita,Jan-BaptistVinkstraat2,3070,Belgique

14
IMPORTANTES CONSIGNES DE SÉCURITÉ
AVERTISSEMENT ! Veuillez lire toutes les
consignes de sécurité et instructions. Le non-
respectdesmisesengardeetdesinstructionspeut
entraîner unchoc électrique,un incendieet/ou des
blessuresgraves.
Conservez toutes les mises en garde et
instructions pour consultation ultérieure.
1. Cet appareil peut être utilisé par des enfants
de 8 ans et plus, ainsi que par des personnes
présentant des capacités physiques, sensorielles
ou mentales réduites, ou par des personnes
dénuées d’expérience et de connaissances si
elles ont pu faire l’objet d’une surveillance ou
recevoir des instructions préalables concernant
l’utilisation en toute sécurité de l’appareil et si
elles comprennent les risques associés.
2. Ne laissez pas les enfants jouer avec l’appareil.
3. Familiarisez-vous avec les commandes et
l’utilisation correcte de l’équipement.
4. Avertissement. Les éléments de coupe
continuent de tourner une fois l’alimentation du
moteur coupée.
5. Ne laissez jamais des enfants ou des personnes
non familiarisées avec les présentes instructions
utiliser l’outil.
6. N’utilisez jamais l’outil à proximité de personnes,
en particulier d’enfants, ou d’animaux
domestiques.
7. Utilisez l’outil uniquement à la lumière du jour ou
sous un bon éclairage articiel.
8. Avant d’utiliser l’outil et après tout choc,
vériez s’il présente des signes d’usure ou de
détérioration, et réparez-le si nécessaire.
9. Veillez à ne pas vous blesser avec le coupe-l
(mise à la bonne longueur du l de coupe). Après
allongement du l de coupe, remettez toujours
l’outil en position de fonctionnement normal
avant de le mettre en marche.
10. Ne remplacez jamais l’outil de coupe non
métallique par un outil de coupe métallique.
11. Cet outil n’est pas destiné à être utilisé par des
personnes (notamment des enfants) présentant
des capacités physiques, sensorielles ou
mentales réduites, ou par des personnes
dénuées d’expérience et de connaissances, sauf
si elles ont pu faire l’objet d’une surveillance ou
recevoir des instructions préalables concernant
l’utilisation de l’outil de la part des personnes
responsables de leur sécurité. Les enfants
doivent être surveillés pour s’assurer qu’ils ne
jouent pas avec l’appareil.
12. Utilisez toujours l’outil avec prudence.
13. N’utilisez l’outil que si vous êtes en bonne
condition physique. Faites très attention à tout
ce que vous faites. Faites appel à votre bon sens,
et souvenez-vous que l’opérateur ou l’utilisateur
est responsable des accidents et dommages
causés à des tiers ou à leurs biens.
14. N’utilisez jamais l’outil lorsque vous êtes fatigué,
malade, ou sous l’inuence d’alcool ou de
médicaments.
15. Arrêtez l’outil immédiatement si celui-ci présente
des signes de fonctionnement anormal.
16. Débranchez l’outil de l’alimentation électrique
lorsque vous ne l’utilisez pas, et avant toute
vérication, tout nettoyage ou toute intervention
sur l’outil.
17. Utilisez toujours des pièces de rechange ou des
accessoires fournis ou recommandés par le
fabricant.
Utilisation prévue de l’outil
1. Utilisez le bon outil. Le coupe-herbe électronique
est prévu uniquement pour couper l’herbe et
les mauvaises herbes. Il ne doit pas être utilisé
à d’autres ns, par exemple le taillage de haie,
sous peine de blessure.
Équipement de protection personnelle
1. Habillez-vous de façon appropriée. Portez des
vêtements fonctionnels et adaptés, c’est-à-dire
ajustés, mais n’entravant pas vos mouvements.
Ne portez pas de bijoux ou de vêtements risquant
de s’accrocher dans les herbes hautes. Portez un
couvre-chef protecteur pour retenir les cheveux
longs.
2. Lorsque vous utilisez l’outil, portez toujours des
chaussures solides à semelles antidérapantes.
Elles offrent une protection contre les blessures
et assurent un bon appui.
3. Portez des lunettes de sécurité.
Sécurité électrique
1. Évitez les environnements dangereux. N’utilisez
pas l’outil dans des endroits mouillés ou humides,
ne l’exposez pas à la pluie. La pénétration d’eau
dans l’outil augmente les risques de choc
électrique.
2. Le type de che de l’outil électrique doit
correspondre à celui de la prise de courant. Ne
modiez jamais la che, de quelque façon que
ce soit. N’utilisez pas de che d’adaptation avec
les outils électriques mis à la terre (masse).
L’utilisation de ches non modiées et de prises
du type correspondant réduit les risques de choc
électrique.
3. Évitez tout contact avec les surfaces mises à la
terre ou à la masse, telles que tuyaux, radiateurs,
cuisinières et réfrigérateurs. Lesrisquesdechoc
électriqueaugmententsivotrecorpssetrouvemisà
laterreouàlamasse.

15
4. Ne maltraitez pas le cordon. Ne transportez
jamais l’outil électrique par le cordon, et ne
tirez pas sur le cordon pour déplacer l’outil ou
débrancher la che. Tenez le cordon à l’écart
des sources de chaleur, de l’huile, des objets
tranchants et des pièces en mouvement. Les
cordonsendommagésouemmêlésaugmententles
risquesdechocélectrique.
5. Lorsque vous utilisez un outil électrique à
l’extérieur, utilisez une rallonge conçue pour
l’extérieur. L’utilisationd’unerallongeconçuepour
l’extérieurréduitlesrisquesdechocélectrique.
6. Si l’utilisation d’un outil électrique dans un
emplacement humide est inévitable, utilisez une
source d’alimentation protégée par un disjoncteur
différentiel. L’utilisationd’undisjoncteurdifférentiel
réduitlesrisquesdechocélectrique.
7. Nous vous recommandons d’utiliser une
alimentation protégée par un disjoncteur
différentiel dont le courant de déclenchement est
inférieur ou égal à 30 mA.
8. Avant toute utilisation, inspectez le cordon
d’alimentation et la rallonge pour vérier qu’ils ne
présentent aucun signe de détérioration ou de
vieillissement.
9. Si le cordon d’alimentation est endommagé en
coursd’utilisation,débranchez-leimmédiatementde
l’alimentation. Ne touchez pas le cordon avant de
l’avoir débranché de l’alimentation.
10. N’utilisezpasl’outilsilescordonssontendommagés
ouusés.
11. Tenezlarallongeàl’écartdesélémentsdecoupe.
Démarrage de l’outil
1. Assurez-vous que personne (et a fortiori aucun
enfant) ne se trouve dans une zone d’action de
15 mètres (50 pi) autour de l’appareil. Faites
aussi attention aux animaux. Sinon, arrêtez
d’utiliser l’outil.
2. Avant le démarrage, vériez toujours que l’outil
est en bon état de marche. Vériez l’état de
l’outil de coupe et du déecteur ainsi que le bon
fonctionnement de la gâchette et du bouton de
sécurité. Assurez-vous que les poignées sont
propres et sèches et vériez la fonction marche/
arrêt de la gâchette.
3. Avant utilisation de l’outil, vériez si celui-ci
présente des pièces endommagées. Un déecteur
ou toute autre pièce endommagée doivent être
inspectés avec précaution an de déterminer
s’ils peuvent fonctionner correctement et remplir
leur rôle. Assurez-vous que les pièces mobiles
ne sont pas désalignées ou bloquées, qu’aucune
pièce et aucun support ne sont cassés et que
l’outil n’a subi aucun dommage affectant son
bon fonctionnement. Un déecteur ou toute
autre pièce endommagée doivent être réparés
correctement ou remplacés par un centre
technique agréé, sauf indication contraire dans
le présent manuel.
4. Tenez vos mains et vos pieds à l’écart de l’outil
de coupe lorsque vous mettez le moteur en
marche.
5. Avant le démarrage, assurez-vous que l’outil de
coupe n’est pas en contact avec des objets durs
(branches, pierres, etc.). En effet, celui-ci se met
à tourner au démarrage.
Fonctionnement
1. N’utilisez jamais l’outil avec des avec des
déecteurs endommagés ou sans déecteur.
2. Utilisez l’outil uniquement dans des endroits
bien éclairés, où la visibilité est bonne. Pendant
l’hiver, faites attention aux zones glissantes
ou humides, au verglas et à la neige (risque de
chute). Conservez toujours un bon appui au sol.
3. Veillez à ne pas vous blesser aux mains et aux
pieds avec l’outil de coupe.
4. Tenez toujours vos mains et vos pieds à l’écart
de l’outil de coupe, et plus particulièrement
lorsque vous mettez le moteur en marche.
5. Ne coupez jamais d’herbe au-dessus de la taille.
6. N’utilisez jamais l’outil sur une échelle.
7. Ne travaillez jamais sur des surfaces instables.
8. Ne vous penchez pas trop en avant. Gardez votre
équilibre en permanence. Assurez bien vos pas
dans les pentes. Marchez, ne courez jamais.
9. Enlevez le sable, les pierres, les clous, etc.
se trouvant dans la zone d’action. Les corps
étrangers risquent d’endommager l’outil de
coupe et d’être projetés, provoquant de graves
blessures.
10. Si l’outil de coupe heurte des pierres ou d’autres
objets durs, arrêtez immédiatement le moteur et
inspectez l’outil de coupe.
11. Attendez que l’outil de coupe atteigne sa vitesse
de travail avant de commencer à couper l’herbe.
12. Tenez toujours l’outil à deux mains lorsque vous
l’utilisez. Ne tenez jamais l’outil avec une seule
main lorsque vous l’utilisez. Conservez toujours
un bon appui au sol.
13. Utilisez tous les équipements de protection
(déecteur par exemple) fournis avec l’outil
lorsque vous utilisez celui-ci.
14. Sauf en cas d’urgence, ne laissez jamais tomber
et ne jetez jamais l’outil par terre, sous peine
d’endommager gravement celui-ci.
15. Ne traînez pas l’outil sur le sol lorsque vous le
déplacez, sous peine d’endommager l’outil.

16
16. Débranchez toujours la prise de l’alimentation :
− lorsque vous laissez l’outil sans
surveillance ;
− avant d’éliminer un blocage ;
− avant toute vérication, nettoyage ou
intervention sur l’outil ;
− avant d’effectuer tout réglage, de changer les
accessoires ou de ranger l’outil ;
− en cas de vibration anormale de l’outil ;
− lorsque vous transportez l’outil.
17. Ne forcez pas l’outil. Son efcacité sera meilleure
et les risques de blessure moins élevés à la
vitesse pour laquelle il a été conçu.
Instructions d’entretien
1. Vériez l’état de l’outil de coupe, des dispositifs
de protection et du harnais avant de commencer
à travailler.
2. Arrêtez le moteur et débranchez la prise de
l’alimentation avant d’effectuer tout entretien, de
remplacer l’outil de coupe et de nettoyer l’outil.
3. Après utilisation, débranchez la prise de
l’alimentation et assurez-vous de l’absence de
détérioration.
4. Vériez que les xations sont bien serrées et que
les pièces ne sont pas endommagées ; vériez
par exemple que l’outil de coupe n’est pas
pratiquement à moitié coupé.
5. Lorsque vous ne l’utilisez pas, entreposez
l’outil dans un endroit sec et hors de portée des
enfants.
6. Utilisez toujours des pièces de rechange ou des
accessoires recommandés par le fabricant.
7. Assurez-vous toujours que les orices de
ventilation sont exempts de débris.
8. Inspectez et entretenez l’outil régulièrement, et
particulièrement avant/après utilisation. Faites
faire les réparations uniquement par un centre
technique agréé.
9. Les poignées doivent être sèches, et ne doivent
pas présenter de traces d’huile ou de graisse.
10. N’utilisez jamais d’eau pour nettoyer l’appareil.
CONSERVEZ CES INSTRUCTIONS.
AVERTISSEMENT :
NE vous laissez PAS tromper (au l d’une utilisation
répétée) par un sentiment d’aisance et de familiarité
avec le produit, en négligeant le respect rigoureux
des consignes de sécurité qui accompagnent le
produit en question. La MAUVAISE UTILISATION de
l’outil ou le non-respect des consignes de sécurité
indiquées dans ce manuel d’instructions peuvent
entraîner une blessure grave.
DESCRIPTION (Fig. 1)
DESCRIPTION DU FONCTIONNEMENT
AVERTISSEMENT :
• Assurez-vous toujours que l’outil est hors tension
et débranché avant de l’ajuster ou de vérier son
fonctionnement. Si vous ne mettez pas l’outil hors
tensionetsivousneledébranchezpas,sondémarrage
accidentelpeutentraîneruneblessuregrave.
Interrupteur (Fig. 2)
AVERTISSEMENT :
• Avant de brancher l’outil, vériez toujours que la
gâchette fonctionne correctement et qu’elle revient
en position d’arrêt (OFF) une fois relâchée. Ne
tirez pas sur la gâchette en forçant si vous n’avez
pas actionné le bouton de sécurité. Vous risquez
de casser l’interrupteur. L’utilisation d’un outil dont
l’interrupteur ne fonctionne pas correctement peut
entraînerlapertedemaîtrisedel’outiletdesblessures
graves.
Le bouton de sécurité permet d’éviter de tirer
accidentellementsurlagâchette.
Pourdémarrerl’outil,faitesglisserleboutondesécurité
versl’avantpuistirezsurlagâchette.Pourarrêterl’outil,
libérezlagâchette.
Tête de coupe à l nylon (Fig. 3)
REMARQUE :
• N’essayezpasd’utiliserlesystèmed’avanceparchoc
lorsque l’outil fonctionne à régime élevé. L’utilisation
dusystèmed’avancepar choc à régimeélevérisque
d’endommagerlatêtedecoupeàlnylon.
• Le système d’avance par choc ne fonctionne pas
correctementsilatêten’estpasenrotation.
Latêtedecoupeàlnylonestunetêtededésherbage
doubleéquipéed’unsystèmed’avanceparchoc.
Pourfaireavancerlelnylon,frappezlatêtedecoupe
surlesol,latêteétantenrotation.
NOTE :
• Silelnylonn’avancepaslorsquevousfrappezlatête
surlesol,rembobinez/remplacezlelnylonensuivant
lesprocéduresdécritesdans«Entretien».
Support de câble (Fig. 4)
Faites unepetite boucle surle câble d’alimentation,et
accrochez-lasurlesupportdecâble.
MONTAGE
AVERTISSEMENT :
• Avant d’effectuer toute intervention sur l’outil,
assurez-vous toujours qu’il est hors tension et
débranché.Sivousnemettezpasl’outilhorstension
et si vous ne le débranchez pas, son démarrage
accidentelpeutentraîneruneblessuregrave.
• Ne démarrez jamais l’outil s’il n’est pas entièrement
monté.L’utilisationdel’outilpartiellementmontépeut
entraîner une grave blessure suite à un démarrage
accidentel.

17
Pose de la poignée (Fig. 5)
AVERTISSEMENT :
• N’enlevez pas l’entretoise, ne la raccourcissez pas.
L’entretoise maintient une certaine distance entre les
deux mains. Une distance de montage inférieure à
la longueur de l’entretoise entre l’ensemble poignée/
protectionetl’autrepoignéepeutentraînerlapertede
maîtrisedel’outiletdesblessuresgraves.
Placezlapoignéeetlaprotectionsurlapartierecouverte
de caoutchouc de l’arbre. Réglez l’emplacement de
la poignée, et xez l’ensemble en place avec quatre
boulons.
Pose du déecteur (Fig. 6)
AVERTISSEMENT :
• N’utilisez jamais l’outil sans le déecteur en place
(voir l’illustration).Lenon-respectdecetteconsigne
peutentraînerdesblessuresgraves.
ATTENTION :
• Veillez à nepas vousblesser avecle coupe-l du l
nylon.
1. Placezledéecteursurl’arbre.
2. Alignezletroududéecteuraveclafentedelapartie
métalliquedel’arbre.
3. Assemblez-lesavecleboulon.
Pose de la tête de coupe à l nylon (Fig. 7)
REMARQUE :
• Veillez à utiliser une authentique tête de coupe à l
nylon.
NOTE :
• Enlevez le cache de protection du coupe-l avant
utilisation.
Retournezl’outilanderemplacerlatêtedecoupeàl
nylonfacilement.
1. Placezlacoupellesurl’axe.
2. Faites sortir les ls nylon par les œillets de la
coupelle.
3. Placezlabobinesurl’axe.
4. Appuyezsurlabobinepourlafairerentrerdansla
coupelle.
5. Maintenez la coupelle et la bobine, puis bloquez-
lesentournantl’écroudeblocagedanslesensdes
aiguillesd’unemontre.
Pourdémonterlatêtedecoupeàlnylon,tournezl’écrou
de blocage dans le sens inverse des aiguilles d’une
montreenmaintenantlacoupelle.
UTILISATION
Manipulation correcte de l’outil
Position correcte (Fig. 8)
AVERTISSEMENT :
• Placez toujours l’outil à votre droite an que la
protection se trouve toujours devant vous.Lebon
positionnementdel’outilpermetuncontrôlemaximalet
réduitlerisquedeblessuregrave.
ATTENTION :
• Si la tête de coupe à l nylon heurte accidentellement
une pierre ou un autre objet dur en cours
d’utilisation, arrêtez immédiatement l’outil et
assurez-vous qu’il n’est pas endommagé. Si la tête
de coupe à l nylon est endommagée, remplacez-
la immédiatement. L’utilisation d’une tête de coupe
à l nylonendommagée peut entraîner une blessure
grave.
Placez le harnais sur votre épaule gauche en passant
votretêteetvotrebrasdroitàl’intérieur.Maintenezl’outil
à votre droite an que la protectionse trouve toujours
devantvous.
Fixation du harnais (Fig. 9)
Ajustezlalongueurduharnaisanquel’outildecoupe
soittoujoursparallèleausol.
Fixezleharnaissurl’anneaudesuspension.
AVERTISSEMENT :
• Veillez à garder le contrôle de l’outil en permanence.
Ne laissez pas l’outil dévier vers vous ou vers toute
personne à proximité de la zone de travail.Laperte
decontrôledel’outilprésentedesrisquesdeblessure
gravepourl’opérateuretlespersonnesàproximité.
Réglage de la position de l’anneau de
suspension et du harnais (Fig. 10)
Pour modier la position de l’anneau de suspension,
desserrez le boulon se trouvant sur celui-ci. Déplacez
ensuitel’anneaudesuspension.
Réglez la position de l’anneau de suspension, puis
resserrezleboulon.
ENTRETIEN
AVERTISSEMENT :
• Assurez-vous toujours que l’outil est hors tension
et débranché avant d’effectuer tous travaux
d’inspection ou d’entretien sur celui-ci. Si vous
ne mettez pas l’outil hors tension et si vous ne le
débranchez pas, son démarrage accidentel peut
entraîneruneblessuregrave.
REMARQUE :
• N’utilisezjamaisd’essence,benzine,diluant,alcoolou
autreproduitsimilaire.Celarisqueraitdeprovoquerla
décoloration,ladéformationoulassurationdel’outil.

18
Remplacement du l nylon (Fig. 11)
AVERTISSEMENT :
• Assurez-vous que la tête de coupe à l nylon est
correctement maintenue en place avant utilisation.
Une têtede coupe àl nylon mal xée risqued’être
éjectéeetdeprovoquerdesblessuresgraves.
1. Retirez l’écrou de blocage en le tournant dans le
sensinversedesaiguillesd’unemontre.
2. Enlevezlabobineetlacoupelle.Enlevezensuitele
vieuxldelabobine.
3. Coupez un morceau de l nylon de longueur
3–6m. Pliez le l de coupe en deux parties
inégales, l’une étant plus longue que l’autre de
80–100mm.(Fig. 12)
4. Accrochez la boucle du nouveau l nylon sur
l’encoche située au centre de la bobine, entre les
deuxgorgesdestinéesaulnylon.(Fig. 13)
5. Enroulezenserrantleslsdanslesgorgesselonla
directionindiquéeparlaèchesurlabobine.
6. Installezlatêtedecoupeàlnyloncommeindiqué
dansleprésentmanuel.(Fig. 14)
PourmaintenirlaSÉCURITÉetlaFIABILITÉduproduit,
les réparations, travaux d’entretien et autres réglages
doiventêtreeffectuésdansuncentredeserviceDolmar
agréé, exclusivement avec des pièces de rechange
Dolmar.
INTERVALLE D’ENTRETIEN
Pièces: Périodicité: Opération:
Cordond’alimentation
Avantchaque
utilisation
Vériezvisuellementl’étatdelapièce(usureou
détériorationimportantes).Sielleestendommagée,
demandezàvotrecentretechniquederéaliserles
réparations.
Visdelapoignéeauxiliaire
Avantchaque
utilisation
Vériezsilavisestbienserrée.Serrezlavissielleest
desserrée.Remplacezlavissielleestendommagée.
Déecteurdel’outilde
coupe
Avantchaque
utilisation
Vériezsilavisestbienserréeetsiledéecteuresten
bonétat.Serrezlavissielleestdesserrée.Remplacezle
déecteurs’ilestendommagé.
Têtedecoupeàlnylon Toutesles10heures
Vériezvisuellementl’étatdelapièce(usureou
détériorationimportantes).Remplacez-lasielleest
endommagée.

19
DÉPANNAGE
Avantde fairefaire uneréparation, effectuez votre propre inspection. Si vous rencontrez un problème non décrit
dansleprésentmanuel,n’essayezpasdedémonterl’outil.Conez-leàuncentretechniqueagrééDolmar,quiutilise
toujoursdespiècesderechangeDolmarpourlesréparations.
Dysfonctionnement Cause Remède
Lemoteurnetournepas.
La prise n’est pas branchée sur
l’alimentationélectrique.
Branchez laprise sur l’alimentation
électrique.
Lecâbled’alimentationestcassé.
Demandez à un centre technique
agrééderéaliserlesréparations.
Le système d’entraînement ne
fonctionnepascorrectement.
Le moteur arrête de tourner après
unecourteutilisation.
Surchauffe.
Arrêtez d’utiliser l’outil et laissez-le
refroidir.
Impossible d’atteindre le plein
régime.
Le système d’entraînement ne
fonctionnepascorrectement.
Demandez à un centre technique
agrééderéaliserlesréparations.
L’outildecoupenetournepas:
arrêtezimmédiatementlamachine!
Un corps étranger (par exemple
une branche) est coincé entre le
déecteur et la tête de coupe à l
nylon.
Enlevezlecorpsétranger.
Le système d’entraînement ne
fonctionnepascorrectement.
Demandez à un centre technique
agrééderéaliserlesréparations.
Vibrationsanormales:
arrêtezimmédiatementlamachine!
Unedesextrémitésdulnylons’est
cassée.
Pour faire avancer le l nylon,
frappezlatêtedecoupesurlesol,la
têteétantenrotation.
Le système d’entraînement ne
fonctionnepascorrectement.
Demandez à un centre technique
agrééderéaliserlesréparations.
L’outil de coupe et le moteur ne
s’arrêtentpas:
débranchezimmédiatementl’outilde
l’alimentationélectrique!
Dysfonctionnement électrique ou
électronique.
Débranchez immédiatement l’outil
de l’alimentation électrique et
demandez à un centre technique
agrééderéaliserlesréparations.
ACCESSOIRES EN OPTION
ATTENTION :
• Ces accessoires ou pièces sont recommandés pour
l’utilisation avec l’outil Dolmar spéciédans cemode
d’emploi.L’utilisationdetoutautreaccessoireoupièce
peut comporter un risque de blessure. N’utilisez les
accessoiresoupiècesqu’auxnsauxquellesilsontété
conçus.
Si vousdésirez obtenir plusde détails concernantces
accessoires, veuillez contacter le centre de service
Dolmarleplusproche.
• Têtedecoupeàlnylon
• Filnylon(ldecoupe)
• Harnaissimple
REMARQUE :
• Ilsepeutquecertainsélémentsdelalistesoientfournis
avecl’outilentantqu’accessoiresstandard.Ilspeuvent
varierd’unpaysàl’autre.

20
DEUTSCH (Original-Anleitung)
Erläuterung der Gesamtansicht
1 Kabelhalter
2 Netzkabel(dieFormkannje
nachLandunterschiedlichsein)
3 HintererHandgriff
4 Einschaltsperrhebel
5 Elektronikschalter
6 VordererHandgriff
7 Aufhänger(Aufhängepunkt)
8 Sperre
9 Schneidwerkschutz
(Schutzhaube)
10 Schneidwerkzeug
11 Schultergurt
12 EffektivsterSchnittbereich
13 Handgriff
14 Gummiteil
15 Schutzhaube
16 Becher
17 Ösen
18 Spule
19 Sicherungsschraube
20 Fadenschneider
21 Abdeckung
22 Aufhänger
23 80–100mm
TECHNISCHE DATEN
Modell ET-71C ET-101C
Handgrifftyp Ringgriff
Gesamtlänge 1550mm
Nettogewicht 4,3kg
Dauer-Nennleistung 700W 1000W
Leerlaufdrehzahl 6500min
–1
6500min
–1
Verwendbares
Schneidwerkzeug
Nylonfadenkopf
Schnittbreite 350mm
Schutzart
/ II
• AufgrundunseresDauerprogrammsderForschungundEntwicklungunterliegendiehierangegebenentechnischen
DatenÄnderungohneVorankündigung.
• DietechnischenDatenkönnenvonLandzuLandunterschiedlichsein.
• GewichtnachEPTA-Verfahren01/2003
Geräusch
Durchschnittlicher
Schalldruckpegel
Durchschnittlicher
Schallleistungspegel
Zutreffender
Standard
Modell L
PA
(dB(A))
UnsicherheitK
(dB(A))
L
wA
(dB(A))
UnsicherheitK
(dB(A))
ET-71C 81,6 2,5 93,75 1,46
EN50636-2-91:2014
ET-101C 79,8 2,5 93,4 1,61
• EinenGehörschutztragen.
Vibration VordererGriff HintererGriff
Zutreffender
Standardoder
Richtlinie
Modell a
h
(m/s
2
)
UnsicherheitK
(m/s
2
)
a
h
(m/s
2
)
UnsicherheitK
(m/s
2
)
ET-71C 2,272 1,5 2,222 1,5
EN50636-2-91:2014
ET-101C 2,268 1,5 2,248 1,5
• Der angegebene Vibrationsemissionswert wurde im
Einklang mit der Standardprüfmethode gemessen
und kann für den Vergleich zwischen Geräten
herangezogenwerden.
• Der angegebene Vibrationsemissionswert kann
auch für eine Vorbewertung des Gefährdungsgrads
verwendetwerden.
WARNUNG:
• Die Vibrationsemission während der tatsächlichen
Benutzung des Elektrowerkzeugs kann je nach der
Benutzungsweise des Gerätes vom angegebenen
Emissionswertabweichen.
• Identizieren Sie Sicherheitsmaßnahmen zum
Schutz des Benutzers anhand einer Schätzung
des Gefährdungsgrads unter den tatsächlichen
Benutzungsbedingungen(unterBerücksichtigungaller
Phasen desArbeitszyklus, wie z. B. Ausschalt- und
LeerlaufzeitendesGeräteszusätzlichzurBetriebszeit).
Sayfa yükleniyor...
Sayfa yükleniyor...
Sayfa yükleniyor...
Sayfa yükleniyor...
Sayfa yükleniyor...
Sayfa yükleniyor...
Sayfa yükleniyor...
Sayfa yükleniyor...
Sayfa yükleniyor...
Sayfa yükleniyor...
Sayfa yükleniyor...
Sayfa yükleniyor...
Sayfa yükleniyor...
Sayfa yükleniyor...
Sayfa yükleniyor...
Sayfa yükleniyor...
Sayfa yükleniyor...
Sayfa yükleniyor...
Sayfa yükleniyor...
Sayfa yükleniyor...
Sayfa yükleniyor...
Sayfa yükleniyor...
Sayfa yükleniyor...
Sayfa yükleniyor...
Sayfa yükleniyor...
Sayfa yükleniyor...
Sayfa yükleniyor...
Sayfa yükleniyor...
Sayfa yükleniyor...
Sayfa yükleniyor...
Sayfa yükleniyor...
Sayfa yükleniyor...
Sayfa yükleniyor...
Sayfa yükleniyor...
Sayfa yükleniyor...
Sayfa yükleniyor...
Sayfa yükleniyor...
Sayfa yükleniyor...
Sayfa yükleniyor...
Sayfa yükleniyor...
Sayfa yükleniyor...
Sayfa yükleniyor...
Sayfa yükleniyor...
Sayfa yükleniyor...
Sayfa yükleniyor...
Sayfa yükleniyor...
Sayfa yükleniyor...
Sayfa yükleniyor...
Sayfa yükleniyor...
Sayfa yükleniyor...
Sayfa yükleniyor...
Sayfa yükleniyor...
Sayfa yükleniyor...
Sayfa yükleniyor...
Sayfa yükleniyor...
Sayfa yükleniyor...
Sayfa yükleniyor...
Sayfa yükleniyor...
Sayfa yükleniyor...
Sayfa yükleniyor...
Sayfa yükleniyor...
Sayfa yükleniyor...
Sayfa yükleniyor...
Sayfa yükleniyor...
Sayfa yükleniyor...
Sayfa yükleniyor...
Sayfa yükleniyor...
Sayfa yükleniyor...
Sayfa yükleniyor...
Sayfa yükleniyor...
Sayfa yükleniyor...
Sayfa yükleniyor...
Sayfa yükleniyor...
Sayfa yükleniyor...
Sayfa yükleniyor...
Sayfa yükleniyor...
Sayfa yükleniyor...
Sayfa yükleniyor...
Sayfa yükleniyor...
Sayfa yükleniyor...
Sayfa yükleniyor...
Sayfa yükleniyor...
Sayfa yükleniyor...
Sayfa yükleniyor...
Sayfa yükleniyor...
Sayfa yükleniyor...
Sayfa yükleniyor...
Sayfa yükleniyor...
Sayfa yükleniyor...
Sayfa yükleniyor...
Sayfa yükleniyor...
Sayfa yükleniyor...
Sayfa yükleniyor...
Sayfa yükleniyor...
Sayfa yükleniyor...
Sayfa yükleniyor...
Sayfa yükleniyor...
Sayfa yükleniyor...
Sayfa yükleniyor...
Sayfa yükleniyor...
Sayfa yükleniyor...
Sayfa yükleniyor...
Sayfa yükleniyor...
Sayfa yükleniyor...
Sayfa yükleniyor...
Sayfa yükleniyor...
Sayfa yükleniyor...
Sayfa yükleniyor...
-
 1
1
-
 2
2
-
 3
3
-
 4
4
-
 5
5
-
 6
6
-
 7
7
-
 8
8
-
 9
9
-
 10
10
-
 11
11
-
 12
12
-
 13
13
-
 14
14
-
 15
15
-
 16
16
-
 17
17
-
 18
18
-
 19
19
-
 20
20
-
 21
21
-
 22
22
-
 23
23
-
 24
24
-
 25
25
-
 26
26
-
 27
27
-
 28
28
-
 29
29
-
 30
30
-
 31
31
-
 32
32
-
 33
33
-
 34
34
-
 35
35
-
 36
36
-
 37
37
-
 38
38
-
 39
39
-
 40
40
-
 41
41
-
 42
42
-
 43
43
-
 44
44
-
 45
45
-
 46
46
-
 47
47
-
 48
48
-
 49
49
-
 50
50
-
 51
51
-
 52
52
-
 53
53
-
 54
54
-
 55
55
-
 56
56
-
 57
57
-
 58
58
-
 59
59
-
 60
60
-
 61
61
-
 62
62
-
 63
63
-
 64
64
-
 65
65
-
 66
66
-
 67
67
-
 68
68
-
 69
69
-
 70
70
-
 71
71
-
 72
72
-
 73
73
-
 74
74
-
 75
75
-
 76
76
-
 77
77
-
 78
78
-
 79
79
-
 80
80
-
 81
81
-
 82
82
-
 83
83
-
 84
84
-
 85
85
-
 86
86
-
 87
87
-
 88
88
-
 89
89
-
 90
90
-
 91
91
-
 92
92
-
 93
93
-
 94
94
-
 95
95
-
 96
96
-
 97
97
-
 98
98
-
 99
99
-
 100
100
-
 101
101
-
 102
102
-
 103
103
-
 104
104
-
 105
105
-
 106
106
-
 107
107
-
 108
108
-
 109
109
-
 110
110
-
 111
111
-
 112
112
-
 113
113
-
 114
114
-
 115
115
-
 116
116
-
 117
117
-
 118
118
-
 119
119
-
 120
120
-
 121
121
-
 122
122
-
 123
123
-
 124
124
-
 125
125
-
 126
126
-
 127
127
-
 128
128


Dolmar ET101C El kitabı
- Kategori
- Elektrikli aletler
- Tip
- El kitabı
- Bu kılavuz aynı zamanda aşağıdakiler için de uygundur:
diğer dillerde
- slovenčina: Dolmar ET101C Návod na obsluhu
- français: Dolmar ET101C Le manuel du propriétaire
- italiano: Dolmar ET101C Manuale del proprietario
- Deutsch: Dolmar ET101C Bedienungsanleitung
- português: Dolmar ET101C Manual do proprietário
- Nederlands: Dolmar ET101C de handleiding
- română: Dolmar ET101C Manualul proprietarului