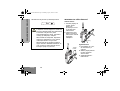
Motorola GP366R Kullanım kılavuzu
- Kategori
- Iki yönlü telsizler
- Tip
- Kullanım kılavuzu

GP366R

2
10
9
11
3
4
8
5
6
1
7
12
10B97_Inside Cover.fm Page 1 Monday, January 15, 2007 8:00 AM

10B97_Inside Cover.fm Page 2 Monday, January 15, 2007 8:00 AM

1
English
BASIC USER GUIDE
BASIC USER GUIDE
CONTENTS
General Information . . . . . . . . . . . . . . . . . 2
Operation and Control Functions. . . . . . 3
Radio Controls . . . . . . . . . . . . . . . . . . . . . . 3
Audio Signal Tones . . . . . . . . . . . . . . . . . . 4
Programmable Buttons . . . . . . . . . . . . . . . 6
Menu Keys . . . . . . . . . . . . . . . . . . . . . . . . . 6
Menu Navigation Chart . . . . . . . . . . . . . . . 7
LCD Display and Icons. . . . . . . . . . . . . . . . 8
Getting Started . . . . . . . . . . . . . . . . . . . . . 9
Radio On-Off/Volume Control . . . . . . . . . . 9
Selecting a Radio Channel. . . . . . . . . . . . . 9
Sending a Call . . . . . . . . . . . . . . . . . . . . . . 9
Receiving a Call . . . . . . . . . . . . . . . . . . . . . 9
Cancelling a Call . . . . . . . . . . . . . . . . . . . . 9
Ending a Call . . . . . . . . . . . . . . . . . . . . . . . 9
Battery Information . . . . . . . . . . . . . . . . 10
Battery Care and Tips . . . . . . . . . . . . . . . 10
Recycling or Disposal of Batteries . . . . . . 11
Charging the Battery . . . . . . . . . . . . . . . . 11
Accessory Information . . . . . . . . . . . . . .12
Attaching/Removing the Battery . . . . . . . .12
C
opyr
i
g
h
t
I
n
f
ormat
i
on
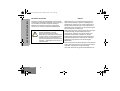
The Motorola products described in this manual may include copyrighted Motorola
computer programs stored in semiconductor memories or other mediums. Laws in
the United States and other countries preserve for Motorola certain exclusive
rights for copyrighted computer programs, including the exclusive right to copy or
reproduce in any form the copyrighted computer program. Accordingly, any
copyrighted Motorola computer programs contained in the Motorola products
described in this manual may not be copied or reproduced in any manner without
the express written permission of Motorola. Furthermore, the purchase of Motorola
products shall not be deemed to grant either directly or by implication, estoppel, or
otherwise, any licence under the copyrights, patents, or patent applications of
Motorola, except for the normal non-exclusive royalty-free licence to use that
arises by operation of the law in the sale of a product.
77D01-A GP366R.book Page 1 Monday, April 2, 2007 8:44 AM

2
English
BASIC USER GUIDE
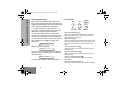
GENERAL INFORMATION
This user guide covers the basic operation of the
GP366R Portable Radio. Please consult your dealer
for further, more detailed information which is
contained in a full feature user guide 6866577D03.
ATTENTION!
This radio is restricted to occupational use only to
satisfy ICNIRP RF energy exposure requirements.
Before using this product, read the RF energy aware-
ness information and operating instructions in the
Product Safety and RF Exposure booklet (Motorola
Publication part number 6864117B25) to ensure
compliance with RF energy exposure limits.
For a list of Motorola-approved antennas, batteries,
and other accessories, visit the following web site
which lists approved accessories:
http://www.motorola.com/governmentandenterprise
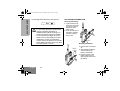
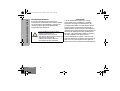
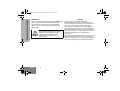
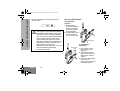
Before using this product, read the
operating instructions for safe usage
contained in the Product Safety and RF
Exposure booklet 6864117B25
enclosed with your radio.
!
C a u t i o n
77D01-A GP366R.book Page 2 Monday, April 2, 2007 8:44 AM

3
English
BASIC USER GUIDE
OPERATION AND CONTROL FUNCTIONS
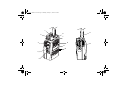
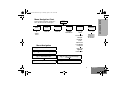
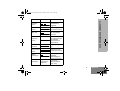
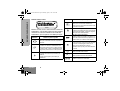
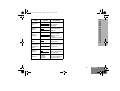
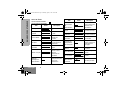
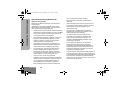
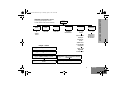
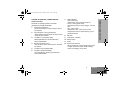
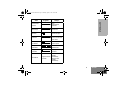
Radio Controls
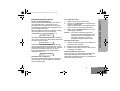
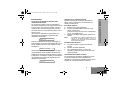
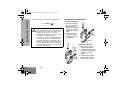
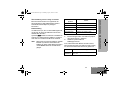
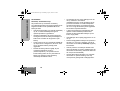
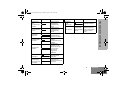
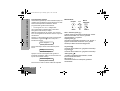
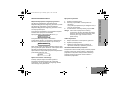
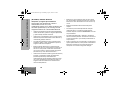
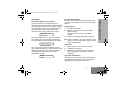
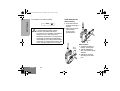
The numbers below refer to the illustrations on the
inside front cover.
1. Rotary Knob
Used as a channel selector and for multi-
function scrolling.
2. On-Off / Volume Knob
Used to turn the radio on or off, and to adjust
the radio’s volume.
3. Push to Talk Button (PTT)
Press and hold down this button to talk, release
it to listen.
4. Side Button 1 (programmable)
Recommended for Monitor/Cancel Button.
5. Side Button 2 (programmable)
6. Top Button (programmable)
Recommended as Emergency button.
7. LED Indicator
Green:
Successful power up.
Green Flashing:
Radio scanning.
Red:
Radio transmitting.
Red Flashing:
Channel busy - when receiving.
Yellow:
Radio called.
Yellow Flashing:
Radio call reminder alert.
Red Flashing:
Low battery warning - when
transmitting.
8. Microphone
9. LCD Display (1 Line)
10. Menu Keys
11. Antenna
12. Accessory Connector
Connects headsets, remote speaker/micro-
phones and other accessories. Replace
attached dust cap when not in use.
77D01-A GP366R.book Page 3 Monday, April 2, 2007 8:44 AM

4
English
BASIC USER GUIDE
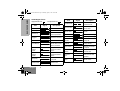
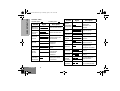
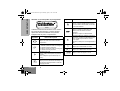
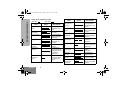
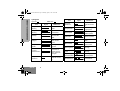
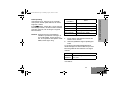
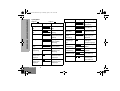
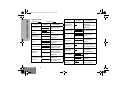
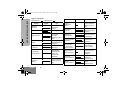
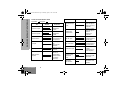
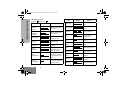
Audio Signal Tones
High pitched tone Low pitched tone
Tone Signal Description
Power up OK Radio self-test OK.
Power up Fail Radio self-test fail.
Button Error
Button/menu key
press not permitted.
Engaged
Channel busy or not
permitted to transmit.
Call Failed Call failed to connect.
Force Monitor
Radio must monitor
channel before trans
-
mission permitted.
Button
Feature
Enable
Any option button
pressed to enable a
feature.
Button
Feature
Disable
Any option button
pressed to disable a
feature.
Group Call
Radio receives a
Group Call.
Individual Call
Radio receives an
Individual Call.
Call Reminder
Reminder of
unanswered call.
TOT Pre-Alert
Warns of expiry of
time out timer.
Monitor Alert
Alerts to change of
squelch.
Scan Start Radio starts scanning.
Scan Stop Radio stops scanning.
Priority Call
Decode
Radio detects a
priority call.
Priority
Channel
Radio landed on the
priority channel.
Lone Worker
Reminds lone worker
to respond.
Low
Battery
Battery below receive
threshold level.
Hardware
Error
Hardware error, tone
continues until valid
operation.
Channel Free
Beep
Indicates current
channel is free.
Tone Signal Description
77D01-A GP366R.book Page 4 Monday, April 2, 2007 8:44 AM

5
English
BASIC USER GUIDE
Incoming
Emergency
Alert
Indicates an
emergency situation.
Keypad
Acknowledge
Confidence tone when
any key pressed.
Ringtones
English/French/
General
Incoming calls (high
tones), outgoing calls
(low tones).
Tone Signal Description
77D01-A GP366R.book Page 5 Monday, April 2, 2007 8:44 AM

6
English
BASIC USER GUIDE
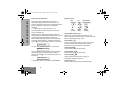
Programmable Buttons
Several of your radio’s keys and buttons can be
programmed by your dealer as short-cut buttons for
many of the radio’s features. Programmable buttons
include:
• The top button, side buttons 1 and 2.
Check with your dealer for a complete list of the
functions your radio supports.
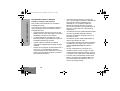
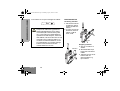
On your radio there is a keypad lock feature which
allows you to lock the menu keys to eliminate
accidental key presses.
Press the keypad lock button to lock the keys, the
display icon L will be lit and the display will show:
After 2 seconds the radio returns to the IDLE state.
Press the keypad lock button again to unlock the
keys when the icon will be extinguished and the
display will show:
The radio will then return to the IDLE state.
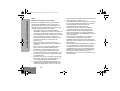
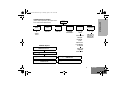
Menu Keys
Menu/Select Key
c
Used to enter the Menu Mode. When you are in the
Menu Mode, this key is also used to make menu
selections.
Exit Key
x
Used to move up to the next higher Menu level.
When the top level menu is selected this key is
used to exit the Menu Mode.
Up Key
+
Used for scrolling when in Menu Mode.
Down Key
e
Used for scrolling when in Menu Mode.
Right Key
f
Used as More key to provide additional information.
Left Key
d
Used as a backspace key when editing.
Lock Keypad
Unlock Keypad
Left
Up
Down
Right
Menu/
Select
Exit
xc
+
df
e
77D01-A GP366R.book Page 6 Monday, April 2, 2007 8:44 AM

7
English
BASIC USER GUIDE
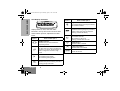
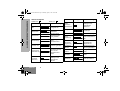
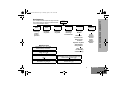
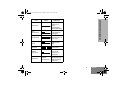
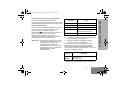
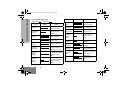
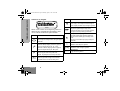
+e
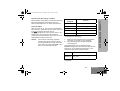
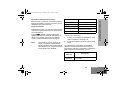
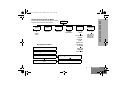
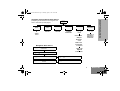
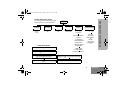
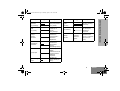
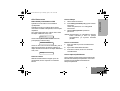
Menu Navigation
c
on/off
c to enter Menu Mode.
+ or e to scroll through the list.
c to select Menu item.
x to return to previous menu level
+ or e to scroll through
sub-list.
c to select sub-menu item.
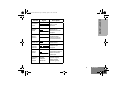
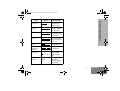
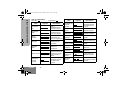
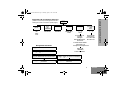
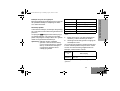
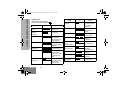
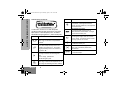
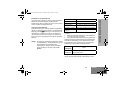
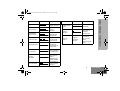
Menu Navigation Chart
(Refer to Menu Navigation guidelines—
lower, left-hand corner of this page)
SW Version
CP Version
SW Part No.
CP Part No.
select/
ID
status/
voice/
select/
enter ID
Utilities
Channel
+e
+e
Call Forward
Missed
Calls
select/
enterID
Channel No.
Contact
List
select/
enter ID
Status
Whisper
Backlight
Compand
Scan
Talkaround
Lone Worker
high/low
+e
Power Level
Radio
Information
77D01-A GP366R.book Page 7 Monday, April 2, 2007 8:44 AM

8
English
BASIC USER GUIDE
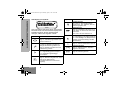
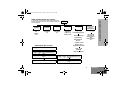
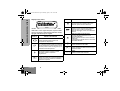
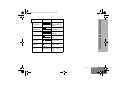
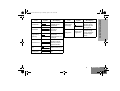
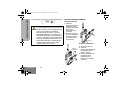
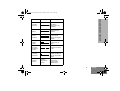
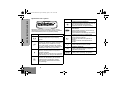
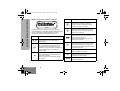
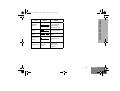
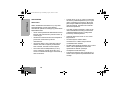
LCD Display and Icons
Displays channel, menu, and radio status
information. The top two screen rows show radio
status indicator symbols, explained in the table
below:
Symbol Name and Description
A
XPAND™ Indicator
Indicates that you have activated the
companding feature.
B
Power Level Indicator
“L” lights when your radio is configured to
transmit in Low Power. “
H” lights when your
radio is configured to transmit in High
Power.
C
Monitor Indicator
On indicates carrier squelch.
Off indicates signalling squelch.
H
Scan Indicator
Indicates that you are scanning. The dot is
lit during priority scan mode.
L
Keypad Lock Indicator
On indicates that the menu keys are locked.
Off indicates unlocked.
P
Battery Level Indicator
Shows the remaining charge in your battery,
based on how many bars are displayed.
Flashing, indicates flat battery.
Q
Missed Call Indicator
On indicates call in list.
Off indicates no calls in list.
Flashing, indicates new call in list.
D
DTMF Indicator
Indicates DTMF is enabled.
J
Talkaround Indicator
Indicates talkaround enabled.
!
Timer
Shows the call time.
Symbol Name and Description
77D01-A GP366R.book Page 8 Monday, April 2, 2007 8:44 AM

9
English
BASIC USER GUIDE
GETTING STARTED
Radio On-Off/Volume Control
To turn the radio on, turn the On-Off/Volume Control
knob clockwise. To turn the radio off, turn the
On-Off/Volume Control knob counterclockwise until
you hear a click.
At power up the radio will display a message
customised by your dealer, e.g.:
After this text has been displayed, the radio perform
a self test routine. On completion of a successful
self test the radio will display:
This may be a number or an alias and will be the
channel currently selected by the rotary channel
selector. Alternatively, if required the radio may
display a message customised by your dealer, e.g.
Selecting a Radio Channel
Turn the channel selector rotary knob clockwise or
counterclockwise until you reach the desired
channel indicated on the display.
Sending a Call
1. Select the desired channel.
2. Press the PTT button and speak clearly into the
microphone.
Your mouth should be 2.5 to 5 cm away from
the microphone.
3. Release the PTT button when you finish
speaking.
Note:The system may have a limited call time and
the call may be terminated automatically if this
call time is exceeded.
Receiving a Call
1. Turn your radio on and adjust the volume level.
2. Switch to the desired channel.
3. If, at any time, a call is received you will hear
the call at the volume level you have set.
Cancelling/Ending a Call
To terminate a call at any time press the Monitor/Call
Cancel button. Always end a call by pressing the
Monitor/Call Cancel button.
Radio On
Channel Number
Ready
77D01-A GP366R.book Page 9 Monday, April 2, 2007 8:44 AM

10
English
BASIC USER GUIDE
BATTERY INFORMATION
Battery Care and Tips
This product is powered by a lithium-ion
rechargeable battery.
The following battery tips will help you obtain the
highest performance and longest cycle life from your
Motorola rechargeable battery.
• Charge your new battery overnight (14-16 hrs)
before using it to obtain maximum battery
capacity and performance.
• Charging in non-Motorola equipment may lead
to battery damage and void the battery warranty.
• When charging a battery that is attached to the
radio, turn the radio off to ensure a full charge.
• The battery should be at about 25°C/77°F (room
temperature) whenever possible. Charging a
cold battery (below 10°C/50° F) may result in
leakage of electrolyte and ultimately, in failure of
the battery.
• Charging a hot battery (above 35°C/95°F)
results in reduced discharge capacity, affecting
the performance of the radio. Motorola rapid-rate
battery chargers contain a temperature-sensing
circuit to ensure that the battery is charged
within these temperature limits.
• New batteries can be stored up to two years
without significant cycle loss. Store new/unused
batteries in a cool dry area.
• Batteries which have been in storage should be
charged overnight.
• Do not return fully charged batteries to the
charger for an “extra boost”. This action will
significantly reduce battery life.
• Do not leave your radio and battery in the
charger when not charging. Continuous charging
will shorten battery life. (Do not use your charger
as a radio stand.)
• For optimum battery life and operation use only
Motorola brand chargers. They were designed to
operate as an integrated energy system.
77D01-A GP366R.book Page 10 Monday, April 2, 2007 8:44 AM

11
English
BASIC USER GUIDE
Recycling or Disposal of Batteries
Motorola endorses and encourages the recycling of all
re-chargeable batteries. Contact your dealer for further
information.
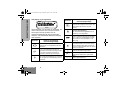
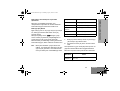
Charging the Battery
If a battery is new, or its charge level is very low, you
will need to charge the battery before you can use it in
your radio.
The P icon flashes when the battery is flat and the
hardware error tone will sound. This icon will only
appear when a genuine Motorola battery is used.
Note: Batteries are shipped uncharged from the
factory. New batteries could prematurely
indicate full charge, charge a new battery for
14-16 hrs before initial use.
1. Place the radio with the battery attached, or the
battery alone, in the charger.
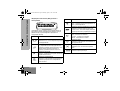
2. The charger’s LED indicates the charging
progress.
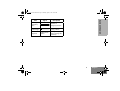
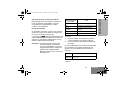
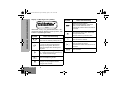
IP67 water submersible radios MUST be fitted with
Motorola authorized IP67 batteries, listed below, to
ensure proper functionality.
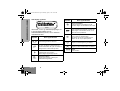
Charger LED Status
Red Battery is charging
Green Battery is fully charged
Flashing Red * Battery is unchargeable
Flashing Yellow Charger is getting ready to charge
Flashing Green Battery is 90% charged
* Battery is damaged. Please contact your dealer.
Part No. Description
PMNN4073_
PMNN4074_
Li-Ion, IP67 FM Approved
Li-Ion, IP67
Note: Do not use IP54 batteries with IP67 radios.
77D01-A GP366R.book Page 11 Monday, April 2, 2007 8:44 AM

12
English
BASIC USER GUIDE
The following label is attached to IP67 batteries:
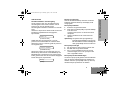
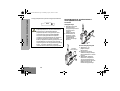
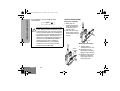
ACCESSORY INFORMATION
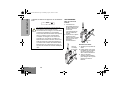
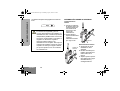
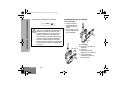
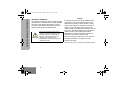
Attaching the Battery
1. Fit the extensions at
the bottom of the bat-
tery into the slots at
the bottom of the
radio’s body.
2. Press the top part of
the battery towards
the radio until you
hear a click.
Removing the Battery
1. Ensure radio is switched
off.
2. Slide the battery latches,
on both sides of the
battery, downwards.
3. Pull the top part of the
battery away from the
radio’s body, and remove
the battery.
The battery charger is not waterproof.
For your safety and proper operation of the
charger, IP67 radios with battery (or
standalone battery) MUST be dry prior to
placing in the battery charger for charging.
Do NOT operate the charger, when your
hands are wet or while holding a wet IP67
radio/battery. Do NOT touch the battery
contacts, when your hands are wet. Do NOT
put the battery into water, as this may cause
the metal contacts to corrode.
IP67
!
C a u t i o n
Slots
Battery
Latches
77D01-A GP366R.book Page 12 Monday, April 2, 2007 8:44 AM

1
Deutsch
ALLGEMEINES BENUTZERHANDBUCH
ALLGEMEINES
BENUTZERHANDBUCH
INHALT
ALLGEMEINE HINWEISE. . . . . . . . . . . . . . . . . 2
Betriebs- und Bedienfunktionen. . . . . . . . . . . 3
Bedienelemente . . . . . . . . . . . . . . . . . . . . . . . . . 3
Akustische Signale . . . . . . . . . . . . . . . . . . . . . . . 4
Programmierbare Tasten . . . . . . . . . . . . . . . . . . 6
Menütasten. . . . . . . . . . . . . . . . . . . . . . . . . . . . . 6
Menüoptionen. . . . . . . . . . . . . . . . . . . . . . . . . . . 7
LCD-Display und Symbole . . . . . . . . . . . . . . . . . 8
Inbetriebnahme des Geräts . . . . . . . . . . . . . . . 9
Ein-Aus/Lautstärkeregelung . . . . . . . . . . . . . . . . 9
Auswählen eines Funkkanals. . . . . . . . . . . . . . . 9
Aussenden eines Rufes . . . . . . . . . . . . . . . . . . . 9
Empfangen eines Rufes. . . . . . . . . . . . . . . . . . . 9
Abbrechen/Beenden eines Rufs . . . . . . . . . . . . 9
Akku. . . . . . . . . . . . . . . . . . . . . . . . . . . . . . . . . 10
Hinweise zum Umgang mit dem Akku . . . . . . . 10
Recycling oder Entsorgung von Akkus. . . . . . . 11
Laden des Akkus . . . . . . . . . . . . . . . . . . . . . . . 11
Zubehör . . . . . . . . . . . . . . . . . . . . . . . . . . . . . . 12
Einsetzen/Entnehmen des Akkus . . . . . . . . . . . 12
Copyright für die Computer-Software
Die in diesem Handbuch beschriebenen Motorola-Produkte werden zum Teil
mit urheberrechtlich geschützten Motorola-Computerprogrammen ausgeliefert,
die in Halbleiterspeichern oder auf anderen Medien gespeichert sind. Nach den
Gesetzen der USA und anderer Staaten sind bestimmte exklusive Rechte an
der urheberrechtlich geschützten Software, insbesondere Rechte der
Vervielfältigung, der Firma Motorola vorbehalten. Demzufolge dürfen
urheberrechtlich geschützte Motorola-Computerprogramme, die zusammen
mit den in diesem Handbuch beschriebenen Produkten ausgeliefert werden,
ohne die vorherige schriftliche Genehmigung von Motorola nicht kopiert oder in
irgendeiner Weise reproduziert werden. Auch der Erwerb der Motorola-
Produkte bedeutet in keiner Weise den Erwerb einer Lizenz für die
mitgelieferten Produkte, die durch Copyright, Patente oder Patentanmeldungen
von Motorola geschützt sind. Der Käufer erhält mit dem Erwerb lediglich die
normale Berechtigung, das Produkt in der dafür vorgesehenen Form und in
rechtmäßiger Weise zu benutzen.
77D01-A GP366R.book Page 1 Monday, April 2, 2007 8:44 AM

2
Deutsch
ALLGEMEINES BENUTZERHANDBUCH
ALLGEMEINE HINWEISE
Dieses Handbuch beschreibt die grundlegenden
Funktionen des Handsprechfunkgeräts GP366R.
Falls Sie weitere, detaillierte Informationen
wünschen - enthalten im detaillierten
Benutzerhandbuch 6866577D03 - wenden Sie sich
bitte an Ihren Motorola Vertriebspartner.
ACHTUNG!
Dieses Funkgerät ist in Erfüllung der ICNIRP-
Vorschriften für Funkfrequenzstrahlung nur für den
beruflichen Gebrauch bestimmt. Um die Einhaltung
der Belastungsgrenzen im Umgang mit
Funkfrequenzstrahlung zu gewährleisten, lesen Sie
bitte die im Heft über Produktsicherheit und
Funkfrequenzstrahlung (Motorola-Veröffentlichung
Teil-Nr. 6864117B25) enthaltenen Hinweise über
Funkfrequenzstrahlung und Betriebsinformationen,
bevor Sie das Funkgerät in Betrieb nehmen.
Eine Auflistung der von Motorola genehmigten
Antennen, Akkus, Batterien und anderen
Zubehörteilen finden Sie auf der folgenden Website:
http://www.motorola.com/governmentandenterprise
Bitte lesen Sie die im Heft 6864117B25
über Produktsicherheit und
Funkfrequenzstrahlung enthaltenen
Hinweise für den sicheren Einsatz des
Funkgeräts, bevor Sie es in Betrieb
nehmen. Das Heft erhalten Sie zusammen
mit Ihrem Funkgerät.
!
C a u t i o n
VORSICHT!
77D01-A GP366R.book Page 2 Monday, April 2, 2007 8:44 AM

3
Deutsch
ALLGEMEINES BENUTZERHANDBUCH
BETRIEBS- UND BEDIENFUNKTIONEN
Bedienelemente
Die Zuordnungsnummern beziehen sich auf die
Abbildungen auf den inneren Umschlagseiten.
1. Drehknopf
Zur Kanalwahl im Betriebsfunkmodus und für
multifunktionale Bedienungsabläufe.
2. Ein-Aus / Lautstärkeregler
Zum Ein- und Ausschalten des Funkgeräts,
und zum Einstellen der Lautstärke.
3. Seitliche Taste 1 (programmierbar)
Empfohlene Verwendung: Monitortaste /
Abbruchtaste.
4. Sendetaste (PTT)
Zum Sprechen diese Taste drücken und
gedrückt halten, zum Zuhören loslassen.
5. Seitliche Taste 2 (programmierbar)
6. Obere Taste (programmierbar)
Empfohlene Verwendung: Notruftaste.
7. LED-Anzeige
Grün:
Betriebsbereit.
Grün blinkend:
Funkgerät scannt.
Rot:
Funkgerät sendet.
Rot blinkend:
Kanal besetzt - beim Empfang.
Gelb:
Nachricht eingegangen.
Gelb blinkend:
Hinweiston Anruferinnerung.
Rot blinkend:
Warnung niedrige Akkukapazität
- beim Senden.
8. Mikrofon
9. LCD-Anzeige (einzeilig)
10. Menütasten
11. Antenne
12. Zubehöranschluß
Anschluß für Kopfhörer-Garnitur, externe
Lautsprecher/Mikrofone und anderes Zubehör.
Staubschutzkappe bei Nichtbenutzung wieder
einsetzen.
77D01-A GP366R.book Page 3 Monday, April 2, 2007 8:44 AM

4
Deutsch
ALLGEMEINES BENUTZERHANDBUCH
Akustische Signale
Hoher Ton Tiefer Ton
Ton Signal Beschreibung
Einschalten
OK
Selbsttest
Funkgerät OK
Fehler beim
Einschalten
Fehler während des
Selbsttests
Tastenfehler
Drücken dieser
Taste/Menütaste
nicht gestattet
Kanal belegt
Kanal belegt oder
keine
Sendeerlaubnis
Fehlerh. Ruf
Fehler beim
Verbindungsaufbau
Erzwungene
Überwachung
Funkgerät muß den
Kanal überwachen,
bevor es die
Sendeerlaubnis
erhält
Taste
„Funktion
aktivieren“
Funktion durch
Betätigen einer
Optionstaste
aktiviert
Taste
„Funktion
deaktivieren“
Funktion durch
Betätigen einer
Optionstaste
deaktiviert
Gruppenruf
Gruppenruf
empfangen
Einzelruf Einzelruf empfangen
Anruf-
erinnerung
Erinnerung an einen
nicht beantworteten
Ruf
Vorwarnung
Sendezeit-
begrenzung
Hinweis, daß
Sendezeit fast
abgelaufen ist
Hinweiston
Monitor
Monitorfunktion ein-
oder ausgeschaltet
Scannen
starten
Funkgerät startet
Scan
Scannen
beenden
Funkgerät beendet
Scan
Prioritätsruf
Auswerter
Funkgerät erkennt
einen Prioritätsruf.
Ton Signal Beschreibung
77D01-A GP366R.book Page 4 Monday, April 2, 2007 8:44 AM

5
Deutsch
ALLGEMEINES BENUTZERHANDBUCH
Prioritäts-
kanal
Funkgerät hat den
Prioritätskanal
eingestellt.
Alleinarbeiter-
schutz
Erinnerung an fällige
Sicherheitsmeldung
Akku leer
Akkuspannung unter
den Schwellwert
gesunken
Hardware-
Fehler
Hardware-Fehler;
Ton erklingt solange,
bis zulässiger
Betriebszustand
hergestellt ist.
Hinweiston
Kanal frei
Eingestellter Kanal
frei
Hinweiston
ankommender
Notruf
Hinweis auf einen
empfangenen Notruf
Tasten-
bestätigung
Bestätigungston bei
zulässiger
Tastenbetätigung
Rufsignale
Englisch/
Französisch/
Allgemein
Ankommende Rufe
(hohe Töne),
abgehende Rufe
(tiefe Töne)
Ton Signal Beschreibung
77D01-A GP366R.book Page 5 Monday, April 2, 2007 8:44 AM
Sayfa yükleniyor ...
Sayfa yükleniyor ...
Sayfa yükleniyor ...
Sayfa yükleniyor ...
Sayfa yükleniyor ...
Sayfa yükleniyor ...
Sayfa yükleniyor ...
Sayfa yükleniyor ...
Sayfa yükleniyor ...
Sayfa yükleniyor ...
Sayfa yükleniyor ...
Sayfa yükleniyor ...
Sayfa yükleniyor ...
Sayfa yükleniyor ...
Sayfa yükleniyor ...
Sayfa yükleniyor ...
Sayfa yükleniyor ...
Sayfa yükleniyor ...
Sayfa yükleniyor ...
Sayfa yükleniyor ...
Sayfa yükleniyor ...
Sayfa yükleniyor ...
Sayfa yükleniyor ...
Sayfa yükleniyor ...
Sayfa yükleniyor ...
Sayfa yükleniyor ...
Sayfa yükleniyor ...
Sayfa yükleniyor ...
Sayfa yükleniyor ...
Sayfa yükleniyor ...
Sayfa yükleniyor ...
Sayfa yükleniyor ...
Sayfa yükleniyor ...
Sayfa yükleniyor ...
Sayfa yükleniyor ...
Sayfa yükleniyor ...
Sayfa yükleniyor ...
Sayfa yükleniyor ...
Sayfa yükleniyor ...
Sayfa yükleniyor ...
Sayfa yükleniyor ...
Sayfa yükleniyor ...
Sayfa yükleniyor ...
Sayfa yükleniyor ...
Sayfa yükleniyor ...
Sayfa yükleniyor ...
Sayfa yükleniyor ...
Sayfa yükleniyor ...
Sayfa yükleniyor ...
Sayfa yükleniyor ...
Sayfa yükleniyor ...
Sayfa yükleniyor ...
Sayfa yükleniyor ...
Sayfa yükleniyor ...
Sayfa yükleniyor ...
Sayfa yükleniyor ...
Sayfa yükleniyor ...
Sayfa yükleniyor ...
Sayfa yükleniyor ...
Sayfa yükleniyor ...
Sayfa yükleniyor ...
Sayfa yükleniyor ...
Sayfa yükleniyor ...
Sayfa yükleniyor ...
Sayfa yükleniyor ...
Sayfa yükleniyor ...
Sayfa yükleniyor ...
Sayfa yükleniyor ...
Sayfa yükleniyor ...
Sayfa yükleniyor ...
Sayfa yükleniyor ...
Sayfa yükleniyor ...
Sayfa yükleniyor ...
Sayfa yükleniyor ...
Sayfa yükleniyor ...
Sayfa yükleniyor ...
Sayfa yükleniyor ...
Sayfa yükleniyor ...
Sayfa yükleniyor ...
Sayfa yükleniyor ...
Sayfa yükleniyor ...
Sayfa yükleniyor ...
Sayfa yükleniyor ...
Sayfa yükleniyor ...
Sayfa yükleniyor ...
Sayfa yükleniyor ...
Sayfa yükleniyor ...
Sayfa yükleniyor ...
Sayfa yükleniyor ...
Sayfa yükleniyor ...
Sayfa yükleniyor ...
Sayfa yükleniyor ...
Sayfa yükleniyor ...
Sayfa yükleniyor ...
Sayfa yükleniyor ...
Sayfa yükleniyor ...
Sayfa yükleniyor ...
Sayfa yükleniyor ...
Sayfa yükleniyor ...
Sayfa yükleniyor ...
Sayfa yükleniyor ...
Sayfa yükleniyor ...
Sayfa yükleniyor ...
Sayfa yükleniyor ...
Sayfa yükleniyor ...
Sayfa yükleniyor ...
Sayfa yükleniyor ...
Sayfa yükleniyor ...
Sayfa yükleniyor ...
Sayfa yükleniyor ...
Sayfa yükleniyor ...
Sayfa yükleniyor ...
Sayfa yükleniyor ...
Sayfa yükleniyor ...
Sayfa yükleniyor ...
Sayfa yükleniyor ...
Sayfa yükleniyor ...
Sayfa yükleniyor ...
Sayfa yükleniyor ...
Sayfa yükleniyor ...
Sayfa yükleniyor ...
Sayfa yükleniyor ...
Sayfa yükleniyor ...
Sayfa yükleniyor ...
Sayfa yükleniyor ...
Sayfa yükleniyor ...
Sayfa yükleniyor ...
Sayfa yükleniyor ...
Sayfa yükleniyor ...
Sayfa yükleniyor ...
Sayfa yükleniyor ...
Sayfa yükleniyor ...
Sayfa yükleniyor ...
Sayfa yükleniyor ...
Sayfa yükleniyor ...
Sayfa yükleniyor ...
Sayfa yükleniyor ...
Sayfa yükleniyor ...
Sayfa yükleniyor ...
Sayfa yükleniyor ...
Sayfa yükleniyor ...
Sayfa yükleniyor ...
Sayfa yükleniyor ...
Sayfa yükleniyor ...
Sayfa yükleniyor ...
Sayfa yükleniyor ...
Sayfa yükleniyor ...
Sayfa yükleniyor ...
Sayfa yükleniyor ...
Sayfa yükleniyor ...
Sayfa yükleniyor ...
Sayfa yükleniyor ...
Sayfa yükleniyor ...
Sayfa yükleniyor ...
Sayfa yükleniyor ...
Sayfa yükleniyor ...
Sayfa yükleniyor ...
Sayfa yükleniyor ...
Sayfa yükleniyor ...
Sayfa yükleniyor ...
Sayfa yükleniyor ...
Sayfa yükleniyor ...
Sayfa yükleniyor ...
Sayfa yükleniyor ...
Sayfa yükleniyor ...
Sayfa yükleniyor ...
Sayfa yükleniyor ...
Sayfa yükleniyor ...
Sayfa yükleniyor ...
Sayfa yükleniyor ...
Sayfa yükleniyor ...
Sayfa yükleniyor ...
Sayfa yükleniyor ...
Sayfa yükleniyor ...
Sayfa yükleniyor ...
Sayfa yükleniyor ...
-
 1
1
-
 2
2
-
 3
3
-
 4
4
-
 5
5
-
 6
6
-
 7
7
-
 8
8
-
 9
9
-
 10
10
-
 11
11
-
 12
12
-
 13
13
-
 14
14
-
 15
15
-
 16
16
-
 17
17
-
 18
18
-
 19
19
-
 20
20
-
 21
21
-
 22
22
-
 23
23
-
 24
24
-
 25
25
-
 26
26
-
 27
27
-
 28
28
-
 29
29
-
 30
30
-
 31
31
-
 32
32
-
 33
33
-
 34
34
-
 35
35
-
 36
36
-
 37
37
-
 38
38
-
 39
39
-
 40
40
-
 41
41
-
 42
42
-
 43
43
-
 44
44
-
 45
45
-
 46
46
-
 47
47
-
 48
48
-
 49
49
-
 50
50
-
 51
51
-
 52
52
-
 53
53
-
 54
54
-
 55
55
-
 56
56
-
 57
57
-
 58
58
-
 59
59
-
 60
60
-
 61
61
-
 62
62
-
 63
63
-
 64
64
-
 65
65
-
 66
66
-
 67
67
-
 68
68
-
 69
69
-
 70
70
-
 71
71
-
 72
72
-
 73
73
-
 74
74
-
 75
75
-
 76
76
-
 77
77
-
 78
78
-
 79
79
-
 80
80
-
 81
81
-
 82
82
-
 83
83
-
 84
84
-
 85
85
-
 86
86
-
 87
87
-
 88
88
-
 89
89
-
 90
90
-
 91
91
-
 92
92
-
 93
93
-
 94
94
-
 95
95
-
 96
96
-
 97
97
-
 98
98
-
 99
99
-
 100
100
-
 101
101
-
 102
102
-
 103
103
-
 104
104
-
 105
105
-
 106
106
-
 107
107
-
 108
108
-
 109
109
-
 110
110
-
 111
111
-
 112
112
-
 113
113
-
 114
114
-
 115
115
-
 116
116
-
 117
117
-
 118
118
-
 119
119
-
 120
120
-
 121
121
-
 122
122
-
 123
123
-
 124
124
-
 125
125
-
 126
126
-
 127
127
-
 128
128
-
 129
129
-
 130
130
-
 131
131
-
 132
132
-
 133
133
-
 134
134
-
 135
135
-
 136
136
-
 137
137
-
 138
138
-
 139
139
-
 140
140
-
 141
141
-
 142
142
-
 143
143
-
 144
144
-
 145
145
-
 146
146
-
 147
147
-
 148
148
-
 149
149
-
 150
150
-
 151
151
-
 152
152
-
 153
153
-
 154
154
-
 155
155
-
 156
156
-
 157
157
-
 158
158
-
 159
159
-
 160
160
-
 161
161
-
 162
162
-
 163
163
-
 164
164
-
 165
165
-
 166
166
-
 167
167
-
 168
168
-
 169
169
-
 170
170
-
 171
171
-
 172
172
-
 173
173
-
 174
174
-
 175
175
-
 176
176
-
 177
177
-
 178
178
-
 179
179
-
 180
180
-
 181
181
-
 182
182
-
 183
183
-
 184
184
-
 185
185
-
 186
186
-
 187
187
-
 188
188
-
 189
189
-
 190
190
-
 191
191
-
 192
192
-
 193
193
-
 194
194
-
 195
195
-
 196
196


Motorola GP366R Kullanım kılavuzu
- Kategori
- Iki yönlü telsizler
- Tip
- Kullanım kılavuzu
Diğer dillerde
- español: Motorola GP366R Manual de usuario
- français: Motorola GP366R Manuel utilisateur
- italiano: Motorola GP366R Manuale utente
- svenska: Motorola GP366R Användarmanual
- čeština: Motorola GP366R Uživatelský manuál
- polski: Motorola GP366R Instrukcja obsługi
- Deutsch: Motorola GP366R Benutzerhandbuch
- português: Motorola GP366R Manual do usuário
- English: Motorola GP366R User manual
- dansk: Motorola GP366R Brugermanual
- suomi: Motorola GP366R Ohjekirja
- Nederlands: Motorola GP366R Handleiding
- română: Motorola GP366R Manual de utilizare
İlgili Makaleler
-
Motorola GM360 Kullanım kılavuzu
-
-
-
-
-
-
-
-
-


