Philips GC8280 El kitabı
- Kategori
- Buharlı ütü istasyonları
- Tip
- El kitabı

8000 series
GC8280

2

3
MAX
E
F
A
CB
D
H
I
J
L
K
M
V
U
T
Q
N O
S
R
P
G
1
2

4

GC8280
ENGLISH 6
DANSK 19
DEUTSCH 32
46
ESPAÑOL 61
SUOMI
75
FRANÇAIS 88
ITALIANO 102
NEDERLANDS
116
NORSK 130
PORTUGUÊS 143
SVENSKA
157
TÜRKÇE
170

6
Introduction
Thank you for buying the Philips GC8280. Please read these instructions for
use, as they contain information about the surprising features of this ironing
system and some tips to make ironing easier and more enjoyable.
The Philips GC8280 is a powerful pressurised ironing system that produces
non-stop steam to make ironing easier. Thanks to the large water tank
you can iron without interruption. When the water tank is empty you can
detach it and rell it immediately.
The Philips GC8280 is equipped with a sophisticated display that gives you
more control over the ironing process. It gives feedback on the selected
temperature setting and has precise pre-programmed temperature settings
for 12 different fabrics. It also informs you about the steam setting and the
water level and warns you when the iron needs to be rinsed. The iron is
very safe thanks to the automatic iron-off function. Last but not least, it is
the only ironing system on the market with an integrated drip stop.
We hope you will enjoy using the Philips GC8280.
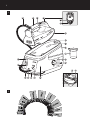
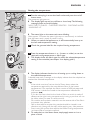
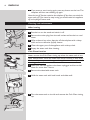
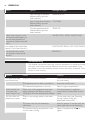
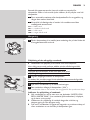
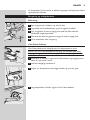
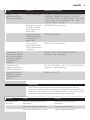
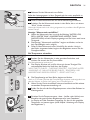
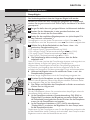
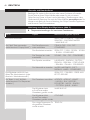
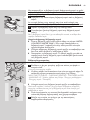
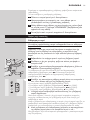
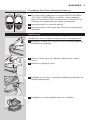
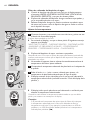
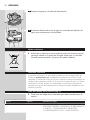
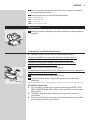
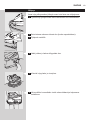
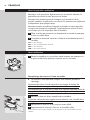
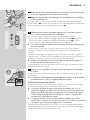
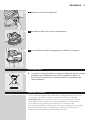
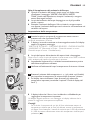
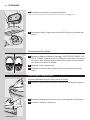
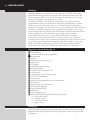
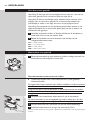
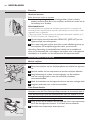
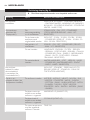
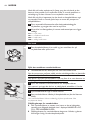
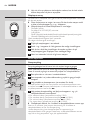
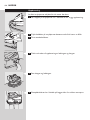
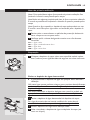
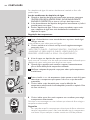
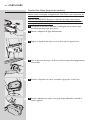
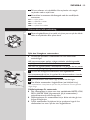
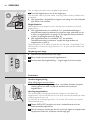
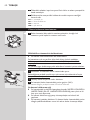
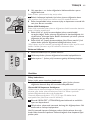
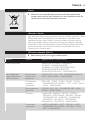
General description (Fig. 1)
A Supply hose
B Handle with soft grip
C Steam activator
D Display
E Temperature buttons (+/-)
F Menu button
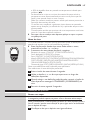
G Soleplate
H Safe storage lock
I Iron stand
J Detachable water tank
K Filling cup
L Cord & hose storage hook
M Calc-Clean rinsing cap
N Filling opening
O Water tank release lever
P Steam tank
Q On/off button with power-on light
R Transport handgrip
S Water tank rell light
T Mains cord
U Steam buttons (+/-)
V Steam tank control panel with steam light
p = maximum steam
[ = moderate steam
] = minimum steam
a = no steam
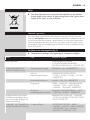
Important
Read this user manual carefully before you use the appliance and save it for
future reference.
Check if the voltage indicated on the type plate corresponds to the
local mains voltage before you connect the appliance.
Only connect the appliance to an earthed wall socket.
-
-
-
-
,
,
ENGLISH

Do not use the appliance if the plug, the cord, the supply hose or
the appliance itself shows visible damage, or if the appliance has been
dropped or is leaking.
Check the cord and the supply hose regularly for possible damage.
If the mains cord or the supply hose is damaged, it must be replaced
by Philips, a service centre authorised by Philips or similarly qualied
persons in order to avoid a hazard.
Never leave the appliance unattended when it is connected to the
mains.
Never immerse the iron or the steam tank in water.
This appliance is not intended for use by persons (including children)
with reduced physical, sensory or mental capabilities, or lack of
experience and knowledge, unless they have been given supervision
or instruction concerning use of the appliance by a person
responsible for their safety.
Children should be supervised to ensure that they do not play with
the appliance.
The soleplate of the iron can become extremely hot and may cause
burns if touched.
Do not allow the mains cord and supply hose to come into contact
with the soleplate when it is hot.
When you have nished ironing, when you clean the appliance, when
you ll or empty the water tank and also when you leave the iron
even for a short while: put the iron on the stand, switch the appliance
off and remove the mains plug from the wall socket.
Always place and use the iron and the steam tank on a stable, level
and horizontal surface. Do not put the steam tank on the soft part of
the ironing board.
If steam escapes from under the Calc-Clean rinsing cap when the
appliance is heating up, switch the appliance off and tighten the Calc-
Clean rinsing cap. If steam continues to escape when the appliance
is heating up, switch the appliance off and contact a service centre
authorised by Philips.
Do not use any other cap on the steam tank than the cap that has
been supplied with the appliance, as this cap also functions as a safety
valve.
Rinse the steam tank regularly according to the instructions in the
chapter ‘Cleaning’.
Never remove the Calc-Clean rinsing cap when the steam tank is
hot.
This appliance is intended for household use only.
This Philips appliance complies with all standards regarding electromagnetic
elds (EMF). If handled properly and according to the instructions in this
user manual, the appliance is safe to use based on scientic evidence
available today.
Note: The iron may give off some smoke when you use it for the rst time. This
is normal and will stop after a short while.
,
,
,
,
,
,
,
,
,
,
,
,
,
,
,
,
ENGLISH 7

Note: Some particles may come out of the soleplate when you use the iron for
the rst time. This is normal; the particles are harmless and will stop coming
out of the iron after a short while.
Note: When you switch the appliance on, the steam tank may produce a
pumping sound. This is normal; the sound tells you that water is being pumped
into the steam tank.
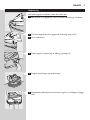
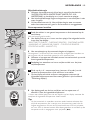
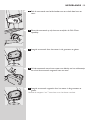
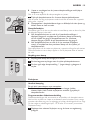
1 Remove any sticker or protective foil from the soleplate and clean
the soleplate with a soft cloth.
2 Check the hardness of the tap water with the test strip supplied.
y = soft water
u = moderately hard water
i = hard water
o = very hard water
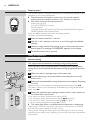
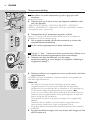
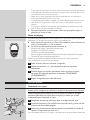
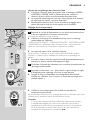
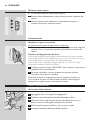
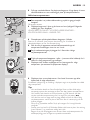
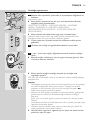
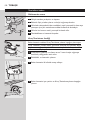
Preparing for use
1
Place the steam tank on a stable and level surface, i.e. on the hard
part of the ironing board or on a table.
Filling the detachable water tank
The water tank can be relled at any time during use.
Do not put hot water, perfume, vinegar, starch, descaling agents, ironing
aids or other chemicals in the water tank.
Do not overll the water tank, otherwise water may spill out of the
lling opening when you reinsert the water tank.
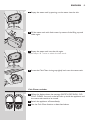
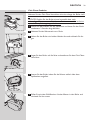
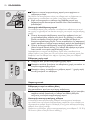
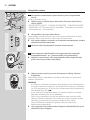
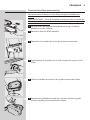
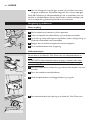
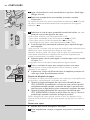
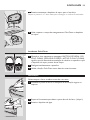
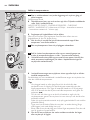
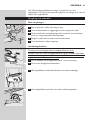
1 Remove the detachable water tank from the steam tank.
If the tap water in your area is very hard, we advise you to mix it with an
equal amount of distilled water.
2 Fill the water tank up to the MAX indication.
3 Slide the water tank back into the steam tank (‘click’).
If the water tank is not properly placed, the iron does not produce any
steam.
When the water tank is almost empty, the message ‘WATER LOW,
REFILL WATER TANK’ is shown on the display and you will hear two
short beeps.
The water tank rell light starts blinking and steam ironing is no
longer possible.
Rell the water tank. The iron starts steaming again as soon as the
water tank has been properly reinserted into the steam tank.
,
,
,
,
ENGLISH8

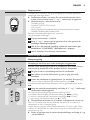
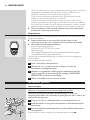
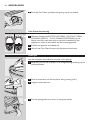
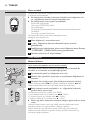
Setting the temperature
1 Put the mains plug in an earthed wall socket and press the on/off
button once.
The power-on light goes on.
The display lights up and you will hear a short beep. The following
message moves across the display:
’WELCOME TO PHILIPS - CHECKING SENSORS - CHECKING WATER
- WARMING UP’.
The steam light on the steam tank starts blinking.
After approx. 2 minutes the steam light stays on continuously to indicate
that the steam tank is ready for steam ironing.
When you switch the appliance on, it will automatically heat up to
the last used temperature setting.
2 Check the garment label for the required ironing temperature.
3 Press the temperature button + or - (hotter or colder) to set the
required ironing temperature or fabric type.
The display shows the fabric type for which the selectedtemperature
setting is most suitable (see chapter ‘Iron display guide’).
The display indicates that the iron is heating up or cooling down to
the selected temperature.
A double beep and a message on the display indicate that the soleplate has
reached the selected temperature.
Tips
If the article consists of various kind of bres, always select the
temperature required by the most delicate bre, i.e. the lowest
temperature. If, for example, the fabric consists of 60% polyester and
40% cotton, it should be ironed at the temperature indicated for
polyester (2).
If you do not know what kind or kinds of fabric an article is made of,
determine the right ironing temperature by ironing a part that will not
be visible when you wear or use the article.
Silk, woollen and synthetic materials: iron the reverse side of the fabric
to prevent shiny patches.
Fabrics that tend to acquire shiny patches should be ironed in one
direction only (along with the nap) while applying very little pressure.
Start ironing the articles that require the lowest ironing temperature,
i.e. those made of synthetic materials.
To make the iron cool down faster, simply apply steam or iron a
piece of cloth.
,
,
,
,
,
-
-
-
-
-
,
OnOn
MAXMAX
MAXMAX
ENGLISH 9

Display menu
The GC8280 offers 5 functions that allow you to adjust the settings of the
appliance to your own preferences.
These functions are listed in a menu. You can use the menu by
pressing the menu button and the + and - buttons on the iron.
The menu structure of these functions is:
Steam lock (on)/off
Iron off: 5/10/20/(30) minutes
Sound: (on)/off
Language: (English)/Dutch/French/German/Italian/Spanish/Portuguese
Water hardness: soft/(medium)/hard
Note: the default settings are shown between brackets.
To select your preferred settings:
1 Press the menu button for 1 second.
2 Use the + and - buttons on the iron to scroll through the available
settings.
3 When you have reached the setting of your choice, press the menu
button again. The message ‘CONFIRMED’ appears on the display.
4 To exit the menu, wait 3 seconds.
Using the appliance
Steam ironing
The supply hose may become hot during a long ironing session.
Note: The system may occasionally produce a pumping sound during steam
ironing. This is normal and tells you that water is being pumped into the steam
tank.
1 Make sure there is enough water in the water tank.
2 Put the mains plug in an earthed wall socket and press the on/off
button once.
3 Select the recommended ironing temperature (see chapter ‘Preparing
for use’).
Steam ironing is only possible at ironing temperatures higher than 2.
The steam function will automatically be disabled at ironing temperatures
lower than 2.
4 Select the required steam setting by means of the + and - buttons on
the steam tank control panel.
p for maximum steam (temperature setting MAX).
[ for moderate steam (temperature settings 3 to MAX).
] for minimum steam (temperature settings 2 to MAX).
a for no steam (temperature settings 1 to MAX).
The steam light blinks to indicate that the steam tank is heating up.
After approx. 2 minutes the steam light stays on continuously to indicate
that the steam tank is ready for steam ironing.
During steam ironing, the steam light starts blinking from time to time to
indicate that the steam tank is heating up to maintain the right temperature
and pressure.
,
,
-
-
-
-
-
,
OnOn
ENGLISH10

During ironing you can adjust the steam setting by means of the +
and - steam buttons.
It will take a few moments before the amount of steam is adjusted.
5 Press the steam activator to start steam ironing.
When you put the iron down during ironing, put it on its heel or on the
iron stand.
The opening and closing of the steam valve in the steam tank will
cause a clicking sound. This is perfectly normal.
Steam lock function
The steam lock allows you to steam iron non-stop without having to press
the steam activator continuously.
When the steam lock function has been set to ‘on’ (the default
setting in the display menu), the iron starts steaming continuously
when the steam activator is pressed once. To stop steaming, press
the steam activator once again.
When the steam lock function has been set to ‘off’ (see section
‘Display menu’), the iron will only produce steam when the steam
activator is pressed.
Release the steam lock when you put the iron on its heel or on the iron
stand. This prevents hot steam from escaping from the iron or from wetting
the iron stand.
Ironing without steam
There are two ways to iron without steam:
1 You can simply start ironing without pressing the steam activator.
2 You can also select steam setting a (no steam) and start ironing.
Features
Vertical steaming
Never direct the steam at people.
You can steam iron hanging curtains and clothes (jackets, suits,
coats) by holding the iron in vertical position and pressing the steam
activator.
Iron-off function
The iron-off function automatically switches the soleplate off when the
steam activator has not been pressed for a particular number of minutes,
depending on the iron-off time you have selected.
You can select an iron-off time of 5, 10, 20 or 30 minutes (see section
‘Display menu’).
1 The display will show the text ‘IRON OFF’ and you will hear an
intermittent beep.
,
,
,
,
,
,
ENGLISH 11

2 If you want to start ironing again, press any button on the iron. The
soleplate will then start heating up again.
Note: the iron-off function switches the soleplate off but does not switch the
steam tank off. If you intend to stop ironing, you should switch the appliance
off and unplug the steam tank.
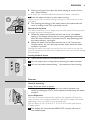
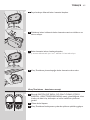
Cleaning and maintenance
After ironing
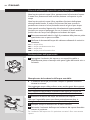
1 Put the iron on the stand and switch it off.
2 Remove the mains plug from the wall socket and let the iron cool
down.
3 Wipe scale and any other deposits off the soleplate with a damp
cloth and a non-abrasive (liquid) cleaner.
4 Clean the upper part of the appliance with a damp cloth.
5 Empty the water tank after cleaning.
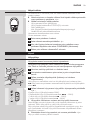
Calc-Clean function
Never remove the Calc-Clean rinsing cap when the steam tank is hot.
VERY IMPORTANT: Rinse the steam tank once a month or after every
10 times of use to prevent damage to the appliance and for optimal
steaming performance.
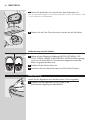
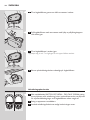
1 Make sure that the appliance has been unplugged and has cooled
down for more than 2 hours.
2 Remove the detachable water tank.
3 Hold the steam tank with both hands and shake well.
4 Turn the steam tank on its side and remove the Calc-Clean rinsing
cap.
OffOff
ENGLISH12

5 Empty the steam tank by pouring out the water into the sink.
6 Fill the steam tank with fresh water by means of the lling cup and
shake again.
7 Empty the steam tank into the sink again.
Repeat steps 6 & 7 twice to obtain the best result.
8 Screw the Calc-Clean rinsing cap tightly back onto the steam tank.
Calc-Clean reminder
1 When the display shows the message ‘SWITCH OFF IRON - DO
CALC CLEAN’, too much scale has built up inside the appliance and
the steam tank needs to be rinsed.
2 Switch the appliance off immediately.
3 Use the Calc-Clean function as described above.
ENGLISH 13

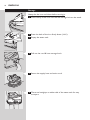
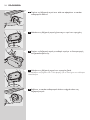
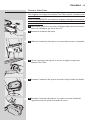
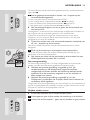
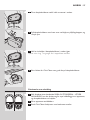
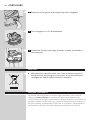
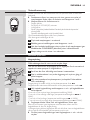
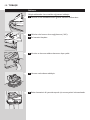
Storage
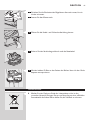
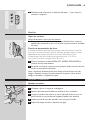
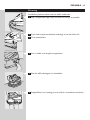
Always let the iron cool down before storing it.
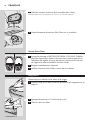
1 Insert the tip of the iron into the safe storage lock on the stand.
2 Press the back of the iron rmly down (‘click’).
3 Empty the water tank.
4 Pull out the cord & hose storage hook.
5 Secure the supply hose and mains cord.
6 There are handgrips on either side of the steam tank for easy
transport.
ENGLISH14

Environment
Do not throw the appliance away with the normal household waste
at the end of its life, but hand it in at an ofcial collection point for
recycling. By doing this you will help to preserve the environment.
Guarantee & service
If you need information or if you have a problem, please visit the Philips
website at www.philips.com or contact the Philips Customer Care
Centre in your country (you will nd its phone number in the worldwide
guarantee leaet). If there is no Customer Care Centre in your country,
contact your local Philips dealer or contact the Service Department of
Philips Domestic Appliances and Personal Care BV.
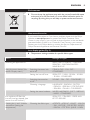
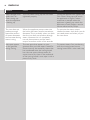
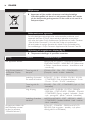
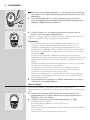
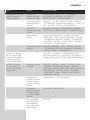
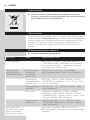
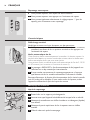
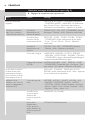
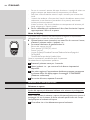
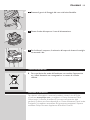
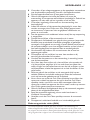
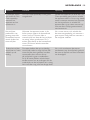
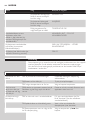
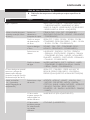
Iron display guide (Fig. 2)
Temperature settings suitable for specic fabric types.
Action Option Message in English
Switching the appliance on WELCOME TO PHILIPS - CHECKING
SENSORS - CHECKING WATER -
WARMING UP
Using the menu button (see
section ‘Display menu’)
Switching the steam lock
on or off
STEAM LOCK - ON - OFF -
CONFIRMED
Setting the iron-off time IRON OFF - 5 MIN - 10 MIN - 20 MIN
- 30 MIN - CONFIRMED
Switching the sound on
or off
SOUND - ON - OFF - CONFIRMED
Choosing a language LANGUAGE - ENGLISH - DUTCH
- FRENCH - GERMAN - PORTUGUESE
- SPANISH - ITALIAN - CONFIRMED
Setting the water hardness WATER HARDNESS - SOFT - MEDIUM
- HARD - CONFIRMED
Iron switches off after the
iron-off time has elapsed (see
section ‘Iron-off function’)
IRON OFF - STANDBY - PRESS ANY
KEY TO RESUME
Pressing the + and - buttons
(see section ‘Setting the
temperature’)
Choosing the fabric type ACETATE - ACRYLIC - VELVET - NYLON
- SILK - VISCOSE - POLYESTER - WOOL
- RAYON - COTTON - JEANS - LINEN
,
,
ENGLISH 15

Action Option Message in English
Iron warming up because
different fabric type has
been selected
WARMING UP
Iron cooling down because
different fabric type has
been selected
COOLING
Correct temperature for
selected fabric type has
been reached
TEMP OK
Water tank is empty or has
not been placed properly or
has not been placed at all
(see section ‘Water tank rell
light’)
WATER LOW - REFILL WATER TANK
Iron needs to be rinsed (see
section ‘Calc-Clean function’)
SWITCH OFF IRON - DO CALCCLEAN
Iron should not be used
(see chapter ‘Guarantee &
service’)
ERROR 01
Troubleshooting
This chapter summarises the most common problems you could encounter
with your iron. Please read the different sections for more details. If you
are unable to solve the problem, please contact the Philips Customer Care
Centre in your country.
Problem Cause Solution
The appliance does
not become hot.
There is a connection problem. Check the mains cord, the plug and
the wall socket.
The appliance has not been switched on. Press the on/off button.
The selected temperature is too low. Select a higher temperature.
Smoke comes out
of my new iron
when I switch it on.
Some parts of the appliance have been
lightly greased in the factory and may
initially give off some smoke when heated.
This phenomenon is perfectly
normal and will cease after a short
while.
The iron does not
produce any steam.
There is not enough water in the water
tank.
Fill the water tank (see ‘Preparing
for use’, section ‘Filling the
detachable water tank’).
The steam tank has not heated up
sufciently.
Wait for approx. 2 minutes until the
steam light stays on continuously).
The selected ironing temperature is too
low for steam ironing.
Select a temperature of 2 or
higher.
ENGLISH16

Problem Cause Solution
Steam setting a (no steam) has been
selected.
Select steam setting ] (minimum
steam), [ (moderate steam) or p
(maximum steam).
The water tank has not been placed
properly in the steam tank.
Place the water tank properly in the
steam tank (‘click’).
When the iron has been set to a very high
temperature, the steam produced is dry
and hardly visible. It will be even less visible
when the ambient temperature is relatively
high and it will be entirely invisible when
the temperature has been set to MAX.
Set the iron to a lower temperature,
e.g. 2, to check if the iron is
actually producing steam.
Water droplets
come out of the
soleplate.
When you start steam ironing and when
you have stopped steam ironing for a
while, the steam that was still present in
the supply hose will have cooled down
and condensed into water, which causes
water droplets to come out of the
soleplate.
This is perfectly normal. Hold the
iron over an old cloth and press
the steam activator when you start
ironing (again). Wait until steam
instead of water comes out of the
soleplate.
Flakes and impurities
come out of the
soleplate or the
soleplate is dirty.
Impurities or chemicals present in the
water have deposited in the steam vents
and/or on the soleplate.
Clean the soleplate with a damp
cloth.
’ERROR’ has
appeared on the
display and the iron
beeps continuously.
A sensor failure has been detected. Contact an authorised Philips
service centre.
The appliance
produces a pumping
sound.
Water is being pumped into the steam
tank.
This is normal.
The pumping sound does not stop. Unplug the iron immediately and
contact an authorised Philips service
centre.
Dirty water comes
out of the soleplate.
Too much scale and minerals have
accumulated inside the steam tank.
Rinse the steam tank. See chapter
‘Cleaning and maintenance’.
The iron produces
steam continuously.
The steam lock has been set to ‘on’. Press the steam activator again to
stop steaming. Set the steam lock
to ‘off ’ if you only want to obtain
steam when pressing the steam
activator (see section ‘Steam lock
function’).
ENGLISH 17

Problem Cause Solution
Steam escapes from
under the Calc-
Clean rinsing cap
when the appliance
is heating up.
The Calc-clean rinsing cap has not been
tightened properly.
Switch the appliance off, tighten the
Calc-Clean rinsing cap and switch
the appliance on again. If steam
continues to escape when the
appliance is heating up, switch the
appliance off and contact a service
centre authorised by Philips.
The iron does not
produce enough
steam/the amount
of steam decreases
and increases during
steam ironing.
When the appliance pumps water into
the boiler, the steam amount sometimes
decreases. This is probably when you think
that the iron does not produce enough
steam. However, this is a completely
normal phenomenon and the steam
output normalises within a few seconds.
To optimise the steam output,
release the steam lock when you do
not need steam and when you put
the iron down.
Wet spots appear
on the garment
during ironing.
The wet spots that appear on your
garment after you have steam ironed for
some time may be caused by steam that
has condensed onto the ironing board.
Iron the wet spots without steam for
some time to dry them. If the underside
of the ironing board is wet, wipe it with a
piece of dry cloth.
To prevent steam from condensing
onto the ironing board, use an
ironing board with a wire mesh top.
ENGLISH18

19
Introduktion
Tak fordi du har købt Philips GC8280. Læs venligst brugsvejledningen, da
den indeholder oplysninger om strygesystemets overraskende funktioner
samt nogle gode råd, der gør strygningen lettere og mere behagelig.
Det kraftfulde Philips GC8280-strygesystem med tryk producerer konstant
damp, hvilket gør strygningen lettere. Takket være den store vandtank kan
du stryge uden afbrydelse. Når vandtanken er tom, tages den blot af og
fyldes igen.
Philips GC8280 er udstyret med et avanceret display, der giver dig kontrol
over strygeprocessen. Displayet viser den valgte temperaturindstilling og
har præcise, forprogrammerede temperaturindstillinger til 12 forskellige
materialer. Det informerer dig tillige om dampindstilling og vandstand og
husker dig på, når strygejernet skal rengøres. Strygejernet er meget sikkert
at anvende takket være autosluk-funktionen. Sidst men ikke mindst, er det
det eneste strygesystem på markedet med integreret drypstopfunktion.
Vi håber, at du vil nyde brugen af Philips GC8280.
A Dampslange
B Håndtag med blødt greb
C Dampaktiveringsknap
D Display
E Temperatur-taster (+/-)
F Menu-tast
G Strygesål
H Lås til sikker opbevaring
I Holder til strygejernet
J Aftagelig vandtank
K Påfyldningsbæger
L Krog til opbevaring af ledning og slange
M Calc-Clean-dæksel
N Påfyldningsåbning
O Udløser til vandtank
P Damptank
Q On/off-kontakt med lys
R Transporthåndtag
S Indikator for påfyldning af vandtank
T Netledning
U Damp-taster (+/-)
V Betjeningspanel på damptanken med lysindikator for damp
p = maksimal dampmængde
[ = moderat dampmængde
] = minimal dampmængde
a = ingen damp
Vigtigt
Læs denne brugsvejledning omhyggeligt igennem, inden apparatet tages i
brug, og gem den til eventuelt senere brug.
Kontrollér, om spændingsangivelsen på typeskiltet svarer til den
lokale netspænding, før du tilslutter apparatet.
Apparatet må kun sluttes til en stikkontakt med jordforbindelse.
-
-
-
-
,
,
DANSK

Brug ikke apparatet, hvis stik, ledning, dampslange eller selve
apparatet viser tegn på beskadigelse, eller hvis apparatet er blevet
tabt, eller det er utæt.
Kontrollér med jævne mellemrum, at ledningen og dampslangen er
hel og ubeskadiget.
Hvis ledningen eller dampslangen beskadiges, må de kun udskiftes af
Philips, et autoriseret Philips-serviceværksted eller af en kvaliceret
fagmand for at undgå enhver risiko ved efterfølgende brug.
Hold altid apparatet under opsyn, når det er sluttet til lysnettet.
Hverken strygejern eller damptank må kommes ned i vand.
Dette apparat er ikke beregnet til at blive brugt af personer
(herunder børn) med nedsatte fysiske og mentale evner, nedsat
følesans eller manglende erfaring og viden, medmindre de er blevet
vejledt eller instrueret i apparatets anvendelse af en person, der er
ansvarlig for deres sikkerhed.
Apparatet bør holdes uden for børns rækkevidde for at sikre, at de
ikke kan komme til at lege med det.
Strygesålen kan blive utrolig varm og forårsage brandsår ved
berøring.
Netledning og dampslange må ikke komme i kontakt med
strygesålen, når denne er varm.
Når du er færdig med at stryge, når du rengør apparatet, når du
fylder eller tømmer vandtanken, og når du forlader strygejernet
– selv om det kun er i et kort øjeblik – skal du placere strygejernet i
standeren, slukke for apparatet og tage stikket ud af stikkontakten.
Placér og brug altid strygejern og damptank på et stabilt, plant og
vandret underlag. Damptanken må ikke stilles på den bløde del af
strygebrættet.
Hvis der slipper damp ud under Calc-Clean-dækslet, mens apparatet
varmer op, skal du slukke for apparatet og stramme Calc-Clean-
dækslet. Slipper der fortsat damp ud, mens apparatet varmer op, skal
du slukke for apparatet og kontakte din Philips-forhandler.
Brug ikke andre låg til damptanken end det medleverede, da det
samtidig fungerer som sikkerhedsventil.
Skyl damptanken med jævne mellemrum ifølge anvisningerne i
afsnittet “Rengøring”.
Calc-Clean-dækslet må aldrig fjernes, når damptanken er varm.
Dette apparat er kun beregnet til privat brug.
Elektromagnetiske felter (EMF)
Dette Philips-apparat overholder alle standarder for elektromagnetiske
felter (EMF). Ved korrekt anvendelse i overensstemmelse med
instruktionerne i denne brugsvejleding, er apparatet sikkert at anvende,
ifølge den videnskabelige viden, der er tilgængelig i dag.
Før apparatet tages i brug første gang
Bemærk: Der kan komme lidt røg fra strygejernet, når det tændes første gang.
Dette er helt normalt og vil hurtigt forsvinde.
Bemærk: Når strygejernet bruges første gang, kan der drysse lidt partikler ud
fra strygesålen. Dette er helt normalt. Partiklerne er uskadelige og forsvinder
efter et kort øjeblik.
,
,
,
,
,
,
,
,
,
,
,
,
,
,
,
,
DANSK20
Sayfa yükleniyor...
Sayfa yükleniyor...
Sayfa yükleniyor...
Sayfa yükleniyor...
Sayfa yükleniyor...
Sayfa yükleniyor...
Sayfa yükleniyor...
Sayfa yükleniyor...
Sayfa yükleniyor...
Sayfa yükleniyor...
Sayfa yükleniyor...
Sayfa yükleniyor...
Sayfa yükleniyor...
Sayfa yükleniyor...
Sayfa yükleniyor...
Sayfa yükleniyor...
Sayfa yükleniyor...
Sayfa yükleniyor...
Sayfa yükleniyor...
Sayfa yükleniyor...
Sayfa yükleniyor...
Sayfa yükleniyor...
Sayfa yükleniyor...
Sayfa yükleniyor...
Sayfa yükleniyor...
Sayfa yükleniyor...
Sayfa yükleniyor...
Sayfa yükleniyor...
Sayfa yükleniyor...
Sayfa yükleniyor...
Sayfa yükleniyor...
Sayfa yükleniyor...
Sayfa yükleniyor...
Sayfa yükleniyor...
Sayfa yükleniyor...
Sayfa yükleniyor...
Sayfa yükleniyor...
Sayfa yükleniyor...
Sayfa yükleniyor...
Sayfa yükleniyor...
Sayfa yükleniyor...
Sayfa yükleniyor...
Sayfa yükleniyor...
Sayfa yükleniyor...
Sayfa yükleniyor...
Sayfa yükleniyor...
Sayfa yükleniyor...
Sayfa yükleniyor...
Sayfa yükleniyor...
Sayfa yükleniyor...
Sayfa yükleniyor...
Sayfa yükleniyor...
Sayfa yükleniyor...
Sayfa yükleniyor...
Sayfa yükleniyor...
Sayfa yükleniyor...
Sayfa yükleniyor...
Sayfa yükleniyor...
Sayfa yükleniyor...
Sayfa yükleniyor...
Sayfa yükleniyor...
Sayfa yükleniyor...
Sayfa yükleniyor...
Sayfa yükleniyor...
Sayfa yükleniyor...
Sayfa yükleniyor...
Sayfa yükleniyor...
Sayfa yükleniyor...
Sayfa yükleniyor...
Sayfa yükleniyor...
Sayfa yükleniyor...
Sayfa yükleniyor...
Sayfa yükleniyor...
Sayfa yükleniyor...
Sayfa yükleniyor...
Sayfa yükleniyor...
Sayfa yükleniyor...
Sayfa yükleniyor...
Sayfa yükleniyor...
Sayfa yükleniyor...
Sayfa yükleniyor...
Sayfa yükleniyor...
Sayfa yükleniyor...
Sayfa yükleniyor...
Sayfa yükleniyor...
Sayfa yükleniyor...
Sayfa yükleniyor...
Sayfa yükleniyor...
Sayfa yükleniyor...
Sayfa yükleniyor...
Sayfa yükleniyor...
Sayfa yükleniyor...
Sayfa yükleniyor...
Sayfa yükleniyor...
Sayfa yükleniyor...
Sayfa yükleniyor...
Sayfa yükleniyor...
Sayfa yükleniyor...
Sayfa yükleniyor...
Sayfa yükleniyor...
Sayfa yükleniyor...
Sayfa yükleniyor...
Sayfa yükleniyor...
Sayfa yükleniyor...
Sayfa yükleniyor...
Sayfa yükleniyor...
Sayfa yükleniyor...
Sayfa yükleniyor...
Sayfa yükleniyor...
Sayfa yükleniyor...
Sayfa yükleniyor...
Sayfa yükleniyor...
Sayfa yükleniyor...
Sayfa yükleniyor...
Sayfa yükleniyor...
Sayfa yükleniyor...
Sayfa yükleniyor...
Sayfa yükleniyor...
Sayfa yükleniyor...
Sayfa yükleniyor...
Sayfa yükleniyor...
Sayfa yükleniyor...
Sayfa yükleniyor...
Sayfa yükleniyor...
Sayfa yükleniyor...
Sayfa yükleniyor...
Sayfa yükleniyor...
Sayfa yükleniyor...
Sayfa yükleniyor...
Sayfa yükleniyor...
Sayfa yükleniyor...
Sayfa yükleniyor...
Sayfa yükleniyor...
Sayfa yükleniyor...
Sayfa yükleniyor...
Sayfa yükleniyor...
Sayfa yükleniyor...
Sayfa yükleniyor...
Sayfa yükleniyor...
Sayfa yükleniyor...
Sayfa yükleniyor...
Sayfa yükleniyor...
Sayfa yükleniyor...
Sayfa yükleniyor...
Sayfa yükleniyor...
Sayfa yükleniyor...
Sayfa yükleniyor...
Sayfa yükleniyor...
Sayfa yükleniyor...
Sayfa yükleniyor...
Sayfa yükleniyor...
Sayfa yükleniyor...
Sayfa yükleniyor...
Sayfa yükleniyor...
Sayfa yükleniyor...
Sayfa yükleniyor...
Sayfa yükleniyor...
Sayfa yükleniyor...
Sayfa yükleniyor...
Sayfa yükleniyor...
Sayfa yükleniyor...
Sayfa yükleniyor...
Sayfa yükleniyor...
Sayfa yükleniyor...
Sayfa yükleniyor...
Sayfa yükleniyor...
-
 1
1
-
 2
2
-
 3
3
-
 4
4
-
 5
5
-
 6
6
-
 7
7
-
 8
8
-
 9
9
-
 10
10
-
 11
11
-
 12
12
-
 13
13
-
 14
14
-
 15
15
-
 16
16
-
 17
17
-
 18
18
-
 19
19
-
 20
20
-
 21
21
-
 22
22
-
 23
23
-
 24
24
-
 25
25
-
 26
26
-
 27
27
-
 28
28
-
 29
29
-
 30
30
-
 31
31
-
 32
32
-
 33
33
-
 34
34
-
 35
35
-
 36
36
-
 37
37
-
 38
38
-
 39
39
-
 40
40
-
 41
41
-
 42
42
-
 43
43
-
 44
44
-
 45
45
-
 46
46
-
 47
47
-
 48
48
-
 49
49
-
 50
50
-
 51
51
-
 52
52
-
 53
53
-
 54
54
-
 55
55
-
 56
56
-
 57
57
-
 58
58
-
 59
59
-
 60
60
-
 61
61
-
 62
62
-
 63
63
-
 64
64
-
 65
65
-
 66
66
-
 67
67
-
 68
68
-
 69
69
-
 70
70
-
 71
71
-
 72
72
-
 73
73
-
 74
74
-
 75
75
-
 76
76
-
 77
77
-
 78
78
-
 79
79
-
 80
80
-
 81
81
-
 82
82
-
 83
83
-
 84
84
-
 85
85
-
 86
86
-
 87
87
-
 88
88
-
 89
89
-
 90
90
-
 91
91
-
 92
92
-
 93
93
-
 94
94
-
 95
95
-
 96
96
-
 97
97
-
 98
98
-
 99
99
-
 100
100
-
 101
101
-
 102
102
-
 103
103
-
 104
104
-
 105
105
-
 106
106
-
 107
107
-
 108
108
-
 109
109
-
 110
110
-
 111
111
-
 112
112
-
 113
113
-
 114
114
-
 115
115
-
 116
116
-
 117
117
-
 118
118
-
 119
119
-
 120
120
-
 121
121
-
 122
122
-
 123
123
-
 124
124
-
 125
125
-
 126
126
-
 127
127
-
 128
128
-
 129
129
-
 130
130
-
 131
131
-
 132
132
-
 133
133
-
 134
134
-
 135
135
-
 136
136
-
 137
137
-
 138
138
-
 139
139
-
 140
140
-
 141
141
-
 142
142
-
 143
143
-
 144
144
-
 145
145
-
 146
146
-
 147
147
-
 148
148
-
 149
149
-
 150
150
-
 151
151
-
 152
152
-
 153
153
-
 154
154
-
 155
155
-
 156
156
-
 157
157
-
 158
158
-
 159
159
-
 160
160
-
 161
161
-
 162
162
-
 163
163
-
 164
164
-
 165
165
-
 166
166
-
 167
167
-
 168
168
-
 169
169
-
 170
170
-
 171
171
-
 172
172
-
 173
173
-
 174
174
-
 175
175
-
 176
176
-
 177
177
-
 178
178
-
 179
179
-
 180
180
-
 181
181
-
 182
182
-
 183
183
-
 184
184
-
 185
185
-
 186
186


Philips GC8280 El kitabı
- Kategori
- Buharlı ütü istasyonları
- Tip
- El kitabı
diğer dillerde
- español: Philips GC8280 El manual del propietario
- français: Philips GC8280 Le manuel du propriétaire
- italiano: Philips GC8280 Manuale del proprietario
- svenska: Philips GC8280 Bruksanvisning
- Deutsch: Philips GC8280 Bedienungsanleitung
- português: Philips GC8280 Manual do proprietário
- English: Philips GC8280 Owner's manual
- dansk: Philips GC8280 Brugervejledning
- suomi: Philips GC8280 Omistajan opas
- Nederlands: Philips GC8280 de handleiding
İlgili makaleler
-
Philips GC8080/28 Kullanım kılavuzu
-
Philips GC6320 Kullanım kılavuzu
-
Philips gc7320 02 Kullanım kılavuzu
-
Philips GC7220 El kitabı
-
Philips GC8215/01 Kullanım kılavuzu
-
-
Philips gc6104 El kitabı
-
-
Philips GC6310 El kitabı
-
Philips GC7423/02 Kullanım kılavuzu