Samsung PS43E450A1W Hızlı başlangıç Kılavuzu
- Kategori
- Plazma TV'ler
- Tip
- Hızlı başlangıç Kılavuzu
Bu kılavuz aynı zamanda aşağıdakiler için de uygundur:

Plasma TV
user manual
Thank you for purchasing this Samsung product.
To receive more complete service, please register
your product at
www.samsung.com/register
Model _____________ Serial No. _____________
E-MANUAL
© 2012 Samsung Electronics Co., Ltd. All rights reserved.
Contact SAMSUNG WORLDWIDE
If you have any questions or comments relating to Samsung products, please contact the SAMSUNG customer care centre.
Country
Customer Care Centre
Web Site
ALBANIA 42 27 5755 www.samsung.com
AUSTRIA 0810 - SAMSUNG (7267864, € 0.07/min) www.samsung.com
BELGIUM 02-201-24-18 www.samsung.com/be (Dutch)
www.samsung.com/be_fr (French)
BOSNIA 05 133 1999 www.samsung.com
BULGARIA 07001 33 11 www.samsung.com
CROATIA 062 SAMSUNG (062 726 7864) www.samsung.com
CZECH 800 - SAMSUNG (800-726786) www.samsung.com
Samsung Electronics Czech and Slovak, s.r.o., Oasis Florenc, Sokolovská 394/17, 180 00, Praha 8
DENMARK 70 70 19 70 www.samsung.com
FINLAND 030 - 6227 515 www.samsung.com
FRANCE 01 48 63 00 00 www.samsung.com
GERMANY 01805 - SAMSUNG (726-7864 € 0,14/Min) www.samsung.com
CYPRUS From landline : 8009 4000 www.samsung.com
GREECE From landline : 80111-SAMSUNG (7267864)
From landline & mobile : (+30) 210 6897691
www.samsung.com
HUNGARY 06-80-SAMSUNG(726-7864) www.samsung.com
ITALIA 800-SAMSUNG(726-7864) www.samsung.com
KOSOVO +381 0113216899 www.samsung.com
LUXEMBURG 261 03 710 www.samsung.com
MACEDONIA 023 207 777 www.samsung.com
MONTENEGRO 020 405 888 www.samsung.com
NETHERLANDS 0900-SAMSUNG (0900-7267864) (€ 0,10/Min) www.samsung.com
NORWAY 815-56 480 www.samsung.com
POLAND 0 801-1SAMSUNG(172-678)
+48 22 607-93-33
www.samsung.com
PORTUGAL 808 20-SAMSUNG (808 20 7267) www.samsung.com
RUMANIA From landline : 08010-SAMSUNG (7267864)
From landline & mobile : (+40) 21 206 01 10
www.samsung.com
SERBIA 0700 Samsung (0700 726 7864) www.samsung.com
SLOVAKIA 0800 - SAMSUNG (0800-726 786) www.samsung.com/sk
SPAIN 902 - 1 - SAMSUNG (902 172 678) www.samsung.com
SWEDEN 0771 726 7864 (SAMSUNG) www.samsung.com
SWITZERLAND 0848 - SAMSUNG(7267864, CHF 0.08/min) www.samsung.com/ch
www.samsung.com/ch_fr (French)
U.K 0330 SAMSUNG (7267864) www.samsung.com
EIRE 0818 717100 www.samsung.com
LITHUANIA 8-800-77777 www.samsung.com
LATVIA 8000-7267 www.samsung.com
ESTONIA 800-7267 www.samsung.com
TURKEY 444 77 11 www.samsung.com
SOUTH AFRICA 0860-SAMSUNG(726-7864 ) www.samsung.com
BN68-03998B
BN68-03998B-02
[PE450-TK]BN68-03998B.indb 1 2012-02-14 �� 10:46:27

English - 2
For more information on how to use e-Manual (p. 9)
Figures and illustrations in this User Manual are provided for reference only and may differ from actual product appearance. Product
design and specifications may be changed without notice.
Digital TV notice
1. Functionalities related to Digital TV (DVB) are only available in countries/areas where DVB-T (MPEG2 and MPEG4 AVC) digital terrestrial
signals are broadcasted or where you are able to access to a compatible DVB-C (MPEG2 and MPEG4 AAC) cable-TV service. Please
check with your local dealer the possibility to receive DVB-T or DVB-C signal.
2. DVB-T is the DVB European consortium standard for the broadcast transmission of digital terrestrial television and DVB-C is that for the
broadcast transmission of digital TV over cable. However, some differentiated features like EPG (Electric Programme Guide), VOD (Video On
Demand) and so on, are not included in this specification. So, they cannot be workable at this moment.
3. Although this TV set meets the latest DVB-T and DVB-C standards, as of [August, 2008], the compatibility with future DVB-T digital
terrestrial and DVB-C digital cable broadcasts cannot be guaranteed.
4. Depending on the countries/areas where this TV set is used some cable-TV providers may charge an additional fee for such a service and
you may be required to agree to terms and conditions of their business.
5. Some Digital TV functions might be unavailable in some countries or regions and DVB-C might not work correctly with some cable service
providers.
6. For more information, please contact your local Samsung customer care centre.
✎
The reception quality of TV may be affected due to differences in broadcasting method between the countries. Please check the TV
performance in the local SAMSUNG Authorized Dealer, or the Samsung Call Centre whether it can be improved by reconfiguring TV
setting or not.
User Instructions
• Screen Image retention
Do not display a still image (such as on a video game) on the plasma display panel for more than several minutes as it can cause screen
image retention. This image retention is also known as “screen burn”. To avoid such image retention, reduce the degree of brightness and
contrast of the screen when displaying a still image.
• Heat on the top of the Plasma TV
The top side of the product may be hot after long periods of use as heat dissipates from the panel through the vent hole in the upper part of
the product.
This is normal and does not indicate any defect or operation failure of the product.
However, children should be prevented from touching the upper part of the product.
• The product is making a “cracking” noise.
A “cracking” noise may occur when the product contracts or expands due to a change in the surrounding environment such as
temperature or humidity. This is normal and not a defect of the unit.
• Cell Defects
The PDP uses a panel consisting of 2,360,000(HD-level) to 6,221,000(FHD-level) pixels which require sophisticated technology to produce.
However, there may be a few bright or dark pixels on the screen. These pixels will have no impact on the performance of the product.
• Avoid operating the TV at temperatures below 41°F (5°C)
• A still image displayed too long may cause permanent damage to the PDP Panel.
Watching the Plasma TV in 4:3 format for a long period of time may leave traces of borders displayed on the left, right
and centre of the screen caused by the difference of light emission on the screen. Playing a DVD or a game console may
cause similar effects to the screen.
Damages caused by the above effect are not covered by the Warranty.
• After-images on the Screen.
Displaying still images from Video games and PC for longer than a certain period of time may produce partial after-images.
To prevent this effect, reduce the “brightness” and “contrast” when displaying still images for a long time.
• Warranty
Warranty does not cover any damage caused by image retention.
Burn-in is not covered by the warranty.
Correct Disposal of This Product (Waste Electrical & Electronic Equipment)
(Applicable in the European Union and other European countries with separate collection systems)
This marking on the product, accessories or literature indicates that the product and its electronic accessories (e.g. charger, headset, USB cable) should
not be disposed of with other household waste at the end of their working life. To prevent possible harm to the environment or human health from
uncontrolled waste disposal, please separate these items from other types of waste and recycle them responsibly to promote the sustainable reuse of
material resources. Household users should contact either the retailer where they purchased this product, or their local government office, for details
of where and how they can take these items for environmentally safe recycling. Business users should contact their supplier and check the terms and
conditions of the purchase contract. This product and its electronic accessories should not be mixed with other commercial wastes for disposal.
Correct disposal of batteries in this product
(Applicable in the European Union and other European countries with separate battery return systems)
This marking on the battery, manual or packaging indicates that the batteries in this product should not be disposed of with other household
waste at the end of their working life. Where marked, the chemical symbols Hg, Cd or Pb indicate that the battery contains mercury, cadmium
or lead above the reference levels in EC Directive 2006/66. If batteries are not properly disposed of, these substances can cause harm to human
health or the environment. To protect natural resources and to promote material reuse, please separate batteries from other types of waste and
recycle them through your local, free battery return system.
[PE450-TK]BN68-03998B.indb 2 2012-02-14 �� 10:46:28

English - 3
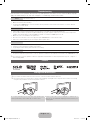
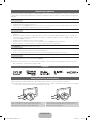
Accessories
✎
Please make sure the following items are included with your TV. If any items are missing, contact your dealer.
✎
The items’ colours and shapes may vary depending on the models.
✎
Cables not included in the package contents can be purchased separately.
• Remote Control & Batteries (AAA x 2) • Power Cord
• Owner’s Instructions • Cleaning Cloth
• Warranty Card / Safety Guide (Not available in some locations)
✎
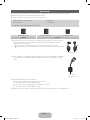
Ferrite Core for Power Cord: The ferrite cores are used to shield the cables from interference.
When connecting a cable, open the ferrite core and clip it around the cable near the plug as
shown in the figure.
x
A Maximum distance between the ferrite core and the end of the cord inserted in the TV: 3/4
inches
x
B Maximum distance between the ferrite core and the other end of the cord inserted in the AC
outlet: 3/4 inches
B
A
Power Cord
✎
Ferrite Core: The ferrite cores are used to shield the cables from interference. When connecting a
cable, open the ferrite core and clip it around the cable near the plug as shown in the figure.
Antenna Cable
(sold separately)
✎
An administration fee may be charged if either
(a) an engineer is called out at your request and there is no defect in the product
(i.e. where you have failed to read this user manual)
(b) you bring the unit to a repair centre and there is no defect in the product
(i.e. where you have failed to read this user manual)
✎
The amount of such administration charge will be advised to you before any work or home visit is carried out.
Ferrite Core (3EA) Ferrite Core (1EA) Ferrite Core (2EA)
PS43E450 PS51E450
[PE450-TK]BN68-03998B.indb 3 2012-02-14 �� 10:46:29

English - 4
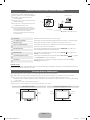
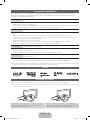
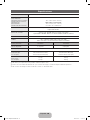
Using the TV’s Controller (Panel Key)
TV Controller is a multi directional button that
helps navigate without remote control.
✎
Some functions which require a PIN code
may not be available.
✎
The product colour and shape may vary
depending on the model.
✎
Exits the menu when pressing the controller
more than 1 second.
✎
When selecting the function by moving
the controller to the up/down/left/right
directions, be sure not to press the
controller. If you press it first, you cannot
operate it to move the up/down/left/right
directions.
Function menu
Return
Remote control sensor
TV Controller
Down (Front)
Up (Rear)
Right
Left
Power on Turns the TV on by pressing the controller in standby mode.
Adjusting the volume Adjusts the volume by moving the controller from side to side when the power is on.
Selecting a channel Selects a channel by moving the controller up and down when the power is on.
Using the function menu Press the controller when the power is on, then the function menu screen appears. If
you press it again, the function menu screen disappears.
Using the Menu
Selects the MENU(
m
) by moving the controller in the function menu screen. The
OSD(On Screen Display) of your TV’s feature appears.
Selecting the Source Selects the Source( ) by moving the controller in the function menu screen. The
Source list screen appears.
Selecting the Contents Home Selects the Contents Home( ) by moving the controller in the function menu
screen. The Contents Home main screen appears.
Power Off
Selects the Power Off(
P
) to turn the TV off by moving the controller in the function
menu screen.
Standby mode
Do not leave your TV in standby mode for long periods of time (when you are away on a holiday, for example). A small amount of
electric power is still consumed even when the power button is turned off. It is best to unplug the power cord.
Securing the Installation Space
Keep the required distances between the product and other objects (e.g. walls) to ensure proper ventilation.
Failing to do so may result in fire or a problem with the product due to an increase in the internal temperature of the product.
✎
When using a stand or wall-mount, use parts provided by Samsung Electronics only.
x
If you use parts provided by another manufacturer, it may result in a problem with the product or an injury due to the product
falling.
✎
The appearance may differ depending on the product.
✎
Be careful when you contact the TV because some parts can be somewhat hot.
Installation with a stand. Installation with a wall-mount.
10 cm10 cm
10 cm
10 cm
10 cm
10 cm
10 cm
[PE450-TK]BN68-03998B.indb 4 2012-02-14 �� 10:46:31

English - 5
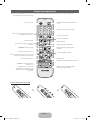
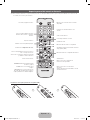
Viewing the Remote Control
✎
This is a special remote control for the visually impaired persons and has Braille points on the Power, Channel, and Volume
buttons.
A B C D
E-MANUAL
P.SIZE
AD/SUBT.
CONTENT
Installing batteries (Battery size: AAA)
Turns the TV on and off.
Displays and selects the available video
sources.
Returns to the previous channel.
Cuts off the sound temporarily.
Changes channels.
Displays channel lists on the screen.
Displays the EPG (Electronic Programme
Guide).
Displays information on the TV screen.
Exits the menu.
Press to directly access to channels.
Adjusts the volume.
Alternately select Teletext ON, Double, Mix
or OFF.
Displays the main on-screen menu.
Quickly select frequently used functions.
Views the Contents Home.
Returns to the previous menu.
Selects the on-screen menu items and
changes the values seen on the menu.
Use these buttons according to the direction
on screen.
Use these buttons in a specific feature.
For details, refer to the e-Manual.
E-MANUAL: Displays the e-Manual
guide. (p. 9)
P.SIZE: Selects the picture size.
AD/SUBT.: Audio Description selection.
(Not available in some locations) / Displays
digital subtitles.
[PE450-TK]BN68-03998B.indb 5 2012-02-14 �� 10:46:31

English - 6
Initial Setup
When the TV is initially powered on, a sequence of on-screen prompts will assist in configuring basic settings. Press the POWER
P
button. Setup is available only when the source is set to TV.
1. Menu Language: Selecting a menu language
Press the ▲ or ▼ button, then press the ENTER
E
button.
Select the desired OSD (On Screen Display) language.
2. Use Mode: Selecting Store Demo or Home Use
Press the ▲ or ▼ button, then press the ENTER
E
button.
Select the Home Use mode. Store Demo mode is for retail environments.
✎
When pressing TV controller, the function menu screen appears. Select the MENU(
m
) and press it more than 5 seconds
using the controller. The Store Demo mode is set.
✎
Cancel the Store Demo by selecting Source( ) and pressing it more than 5 seconds.
✎
Store Demo is only for shop display. If you select it, several functions are not able to use. Please select Home Use when you
watch at home.
3. Country (Depending on the country): Selecting a country
Press the ▲ or ▼ button, then press the ENTER
E
button.
Select the appropriate country.
✎
After selecting the country in the country menu, some models may proceed with an additional option to setup the pin number.
4. Auto Tuning (Step 1): Selecting how you watch your TV
Let’s find and store channels on your TV. Do you need to search for channels?
• Yes, I need to.: Memorises all of the available channels using RF cable.
• No, I don’t need to.: You don’t need to use Auto Tuning to find channels.
5. Auto Tuning (Step 2): Selecting a search options
Select the desired broadcasting signal and antenna source. Press the ▲/▼/◄/► button, then press the ENTER
E
button.
When setting the antenna source to Cable, a step appears allowing you to assign numerical values (channel frequencies) to the
channels. For more information, refer to Channel → Auto Tuning.
✎
Press the ENTER
E
button at any time to interrupt the memorisation process.
✎
See e-Manual chapter “Retuning Channels > Auto Tuning”
6. Clock: Setting the Clock Mode
• Auto: Set the current time automatically.
• Manual: Allows you to manually set the current date and time.
7. Time Zone (Depending on the country): Setting your Time Zone
This step is only available when the clock mode is set to Auto.
• Auto: Set the time zone automatically.
• Manual: Set the time zone manually.
✎
If you selected Manual, you can select whether to turn DST (Daylight Savings Time) On or Off. (Depending on the
country)
8. Setup Complete
Press the ENTER
E
button.
✎
The completed settings are displayed.
If You Want to Reset This Feature...
Select System - Setup (Initial Setup). Enter your 4 digit PIN number. The default PIN number is “0-0-0-0”. If you want to change the
PIN number, use the Change PIN function.
You should do Setup (MENU → System) again at home although you did in shop.
✎
If you forget the PIN code, press the remote control buttons in the following sequence in Standby mode, which resets the PIN to
“0-0-0-0”: MUTE → 8 → 2 → 4 → POWER (on)
[PE450-TK]BN68-03998B.indb 6 2012-02-14 �� 10:46:33

English - 7
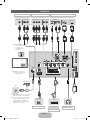
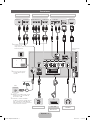
Connections
HDMI IN 2
HDMI IN 1
(DVI)
COMPONENT / AV IN
AUDIO
VIDEO
SERVICE
ANT IN
EXT (RGB)
DIGITAL
AUDIO OUT
(OPTICAL)
(5V 0.5A)
OPTICAL
EXT
AUDIO OUT
R-AUDIO-L
P
R
P
B
Y
COMPONENT OUT
AUDIO OUT
R-AUDIO-L
VIDEO OUT
R B
R B RG
WR
R
Y
Y
W
WR
R
W
R
G
DVI OUT
HDMI OUT
AUDIO OUT
R-AUDIO-L
PC
R
W
VHF/UHF Antenna
Cable
USB
or
TV Rear Panel
TV Side Panel
BD Player / PC
HDMI, HDMI/DVI connection
Audio connection
SCART connection
Headphone
connection
BD Player
Component connection
BD Player
AV connection
✎
The position of port may
differ depending on the
model.
✎
It supports both
Component and AV
connection in one
port.
VCR or DVD
✎
The PDP device may interfere with
an amateur radio or AM radio.
✎
When using two-way radio mobile
and portable units or amateur radio
or AM radio near by your TV, this
may cause the TV to malfunction.
[PE450-TK]BN68-03998B.indb 7 2012-02-14 �� 10:46:34

English - 8
SERVICE
SERVICE
Connector for service only.
✎✎
NOTE
• For HDMI/DVI cable connection, you must use the HDMI IN 1(DVI) port.
• The interlace mode is not supported.
• The set might operate abnormally if a non-standard video format is selected.
• Separate and Composite modes are supported. SOG(Sync On Green) is not supported.
• PC(D-Sub) input is not supported.
• Connecting through the HDMI cable may not be supported depending on the PC.
• The headphone jack supports only the 3 conductor tip-ring-sleeve (TRS) type.
Connecting to a COMMON INTERFACE slot
(Your TV viewing Card Slot)
To watch paid channels, the “CI or CI+ CARD” must be inserted.
• If you do not insert the “CI or CI+ CARD”, some channels will display
the message “Scrambled Signal”.
• The pairing information containing a telephone number, the “CI or CI+
CARD” ID the Host ID and other information will be displayed in about
2~3 minutes. If an error message is displayed, please contact your
service provider.
• When the configuration of channel information has finished, the
message “Updating Completed” is displayed, indicating the channel
list is updated.
TV Side Panel
y The image may differ depending on the
model.
Changing the Input Source
Source
TV / Ext. / HDMI1/DVI / HDMI2 / AV / Component
Use to select TV or other external input sources such as DVD / Blu-ray players / cable box / STB satellite receiver connected to the TV.
✎
In the displaying Source list, connected inputs will be highlighted.
✎
PC(D-Sub) input is not supported. If you want to connect PC to the TV, use HDMI1/DVI input.
✎
Ext. always stays activated.
✎
Press the TOOLS button.
• Edit Name
You can set an external input sources name you want.
– When connecting a PC to the HDMI IN 1(DVI) port with HDMI cable, you should set the TV to PC mode under Edit Name.
– When connecting a PC to the HDMI IN 1(DVI) port with HDMI to DVI cable, you should set the TV to DVI PC mode under
Edit Name.
– When connecting an AV devices to the HDMI IN 1(DVI) port with HDMI to DVI cable, you should set the TV to DVI Devices
mode under Edit Name.
• Information
You can see detailed information about the connected external device.
Display Modes (HDMI/DVI Input)
Optimal resolution is 1024 x 768@60Hz. See specification page for full available resolution.
[PE450-TK]BN68-03998B.indb 8 2012-02-14 �� 10:46:35

English - 9
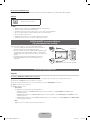
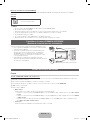
How to use the e-Manual
E-MANUAL
You can find instructions about your TV’s features in the e-Manual in your TV. To use, press the E-MANUAL button
on your remote. Move the cursor using the up/down/right/left buttons to highlight a category, then a topic, and then
press the ENTER
E
button. The e-Manual displays the page you want to see.
You can also access it through the menu:
O
MENUm → Support → e-Manual → ENTERE
✎
To return to the e-Manual main menu, press the E-MANUAL button on the remote.
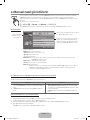
Screen Display
Operation Buttons
}
Index: Displays the index screen.
E
Enter: Selects a category or sub-menu.
e
Exit: Exit the e-Manual.
<Viewing the Contents>
a
Try now: Displays the OSD menu that corresponds to the topic. To return to the e-Manual screen, press
the E-MANUAL button.
b
Home: Moves to the e-Manual home screen.
L
Page: Moves to previous or next page.
{ Zoom: Magnifies a screen.
– Select the Zoom, and then press ENTER
E
to magnify the screen. You can scroll through the
magnified screen by using the ▲ or ▼ buttons. To return to the screen to normal size, press the
RETURN button.
Basic Features
Changing the Preset Picture Mode
Adjusting Picture Settings
Changing the Picture Options
Changing the Preset Sound Mode
Adjusting Sound Settings
}
Index
E
Enter
e
Exit
Currently displayed
video, TV
Programme, etc.
The category list. Press ◄ or ► button to
select the category you want.
Displays the sub-menu list. Use the arrow
buttons on your remote to move the cursor.
Press ENTER
E
button to select the sub-
menu you want.
How to toggle between an e-Manual topic and the corresponding OSD menu(s).
✎
This function is not enabled in some menus.
✎
You cannot use the Try now function if the menu is not activated.
Method 1 Method 2
1. If you want to use the menu that corresponds to an e-Manual
topic, press the red button to select Try now.
2. To return to the e-Manual screen, press the E-MANUAL button.
1. Press the ENTER
E
button when a topic is displayed. “Are
you sure?” appears. Select Yes, and then press the ENTER
E
button. The OSD window appears.
2. To return to the e-Manual screen, press the E-MANUAL button.
How to search for a topic on the index page
✎
This function may not be supported depending on the language.
1. If you want to search a keyword, press the blue button to select Index.
2. Press the ◄ or ► button to select a character order you want.
3. Press the ▲ or ▼ button to select a keyword you want to see, and then press the ENTER
E
button.
4. You can view the corresponding e-Manual instruction screen.
✎
To close the Index screen, press the RETURN button.
[PE450-TK]BN68-03998B.indb 9 2012-02-14 �� 10:46:37

English - 10
Installing the Wall Mount
The wall mount kit (sold separately) allows you to mount the TV
on the wall. For detailed information on installing the wall mount,
see the instructions provided with the wall mount. Contact a
technician for assistance when installing the wall mount bracket.
We do not advice you to do it yourself.
Samsung Electronics is not responsible for any damage to the
product or injury to yourself or others if you elect to install the TV
on your own.
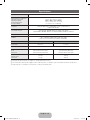
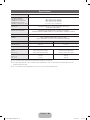
Wall Mount Kit Specifications (VESA)
✎
Wall mount kit is not supplied but sold separately.
Install your wall mount on a solid wall perpendicular to the floor.
When attaching to other building materials, please contact your
nearest dealer. If installed on a ceiling or slanted wall, it may fall
and result in severe personal injury.
✎
NOTE
x
Standard dimensions for wall mount kits are shown in
the table below.
x
When purchasing our wall mount kit, a detailed
installation manual and all parts necessary for assembly
are provided.
x
Do not use screws that do not comply with the VESA
standard screw specifications.
x
Do not use screws longer than the standard dimension,
as they may cause damage to the inside of the TV set.
x
For wall mounts that do not comply with the VESA
standard screw specifications, the length of the screws
may differ depending on their specifications.
x
Do not fasten the screws too strongly, this may damage
the product or cause the product to fall, leading to
personal injury. Samsung is not liable for these kinds of
accidents.
x
Samsung is not liable for product damage or personal
injury when a non-VESA or non-specified wall mount
is used or the consumer fails to follow the product
installation instructions.
x
Do not exceed 15 degrees tilt when mounting this TV.
inches
VESA Spec.
(A * B)
Standard
Screw
Quantity
43~51 400 X 400
M8 4
60~64 600 X 400
Do not install your Wall Mount
Kit while your TV is turned on.
It may result in personal injury
due to electric shock.
Securing the TV to the Wall
Caution: Pulling, pushing, or climbing onto the TV
may cause the TV to fall. In particular, ensure that
your children do not hang over or destabilize the TV;
doing so may cause the TV to tip over, resulting in
serious injuries or death. Follow all safety precautions
provided on the included Safety Flyer. For added
stability, install the anti-fall device for safety
purposes, as follows.
To avoid the TV from falling
1. Put the screws into the clamps and firmly fasten them onto the
wall. Confirm that the screws have been firmly installed onto the
wall.
✎
You may need additional material such as an anchor
depending on the type of wall.
✎
Since the necessary clamps, screws, and string are
not supplied, please purchase these additionally.
2. Remove the screws from the centre back of the TV, put the
screws into the clamps, and then fasten the screws onto the TV
again.
✎
Screws may not be supplied with the product. In this
case, please purchase the screws of the following
specifications.
3. Connect the clamps fixed onto the TV and the clamps fixed onto
the wall with a strong string and then tie the string tightly.
✎
NOTE
• Install the TV near to the wall so that it does not fall
backwards.
• It is safe to connect the string so that the clamps
fixed on the wall are equal to or lower than the
clamps fixed on the TV.
• Untie the string before moving the TV.
4. Verify all connections are properly secured. Periodically check
connections for any sign of fatigue for failure. If you have
any doubt about the security of your connections, contact a
professional installer.
[PE450-TK]BN68-03998B.indb 10 2012-02-14 �� 10:46:38

English - 11
Troubleshooting
If the TV seems to have a problem, first try this list of possible problems and solutions. If none of these troubleshooting tips
apply, visit “www.samsung.com”, then click on Support, or call Samsung customer service centre.
Issues
The TV will not turn on.
• Make sure the AC power cord is securely plugged in to the wall outlet and the TV.
• Make sure the wall outlet is working.
• Try pressing the POWER button on the TV to make sure the problem is not the remote. If the TV turns on, refer to “Remote
control does not work” below.
Issues
There is no picture/video.
• Check cable connections (remove and reconnect all cables connected to the TV and external devices).
• Set your external device’s (Cable/Set top Box, DVD, Blu-ray etc) video outputs to match the connections to the TV input. For
example, if an external device’s output is HDMI, it should be connected to an HDMI input on the TV.
• Make sure your connected devices are powered on.
• Be sure to select the TV’s correct source by pressing the SOURCE button on the remote control.
• Reboot the connected device by reconnecting the device’s power cable.
Issues
The remote control does not work.
• Replace the remote control batteries with the poles (+/–) in the right direction.
• Clean the sensor’s transmission window on the remote.
• Try pointing the remote directly at the TV from 5~6 feet away.
Issues
The cable/set top box remote control doesn’t turn the TV on or off, or adjust the volume.
• Program the Cable/Set top box remote control to operate the TV. Refer to the Cable/Set user manual for the SAMSUNG TV code.
✎
You can keep your TV as optimum condition to upgrade the latest firmware on web site (www.samsung.com → Support →
Downloads) by USB.
Licence
Storage and Maintenance
✎
If you remove the attached sticker on the TV screen, clean the residues and then watch TV.
✎
The exterior and screen of the product can get scratched during cleaning. Be sure to wipe the exterior and screen carefully
using the cloth provided or a soft cloth to prevent scratches.
Do not spray water directly onto the product. Any liquid that goes
into the product may cause a failure, fire, or electric shock.
Clean the product with a soft cloth dapped in a small amount of
water. Do not use a flammable liquid (e.g. benzene, thinners) or a
cleaning agent.
[PE450-TK]BN68-03998B.indb 11 2012-02-14 �� 10:46:39

English - 12
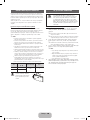
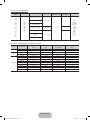
Specifications
Display Resolution 1024 X 768
Environmental Considerations
Operating Temperature
Operating Humidity
Storage Temperature
Storage Humidity
10°C 40°C 50°F 104°F
-20°C 45°C -4°F 113°F
to
10°C 40°C 50°F 104°F
-20°C 45°C -4°F 113°F
(
10°C 40°C 50°F 104°F
-20°C 45°C -4°F 113°F
to
10°C 40°C 50°F 104°F
-20°C 45°C -4°F 113°F
)
10% to 80%, non-condensing
10°C 40°C 50°F 104°F
-20°C 45°C -4°F 113°F
to
10°C 40°C 50°F 104°F
-20°C 45°C -4°F 113°F
(
10°C 40°C 50°F 104°F
-20°C 45°C -4°F 113°F
to
10°C 40°C 50°F 104°F
-20°C 45°C -4°F 113°F
)
5% to 95%, non-condensing
TV System Analogue: B/G, D/K, L, I (Depending on your country selection)
Digital: DVB-T/DVB-C
Colour/Video System Analogue: PAL, SECAM, NTSC-4.43, NTSC-3.58, PAL60
Digital: MPEG-2 MP@ML, MPEG-4, H.264/AVC MP@L3, MP@L4.0, HP@L4.0
Sound System BG, DK, L, NICAM, MPEG1, DD, DD+, HEAAC
HDMI IN Video: 1080 24p, 1080p, 1080i, 720p, 576p, 480p
Audio: 2Ch Linear PCM 32/44.1/48kHz, 16/20/24bits.
Model Name PS43E450 PS51E450
Screen Size
19 22 26 32 40 43 46 51 60
inches
19 22 26 32 40 43 46 51 60
inches
Sound (Output) 10W X 2
Dimensions (WxDxH)
Body
With stand
1011.8 X 56.0 X 622.4 (mm)
1011.8 X 262.0 X 675.9 (mm)
1187.8 X 56.0 X 706.6 (mm)
1187.8 X 262.0 X 760.1 (mm)
Weight
Without Stand
With Stand
14.2 kg
15.4 kg
19.6 kg
20.8 kg
✎
Design and specifications are subject to change without prior notice.
✎
For information about power supply, and more about power consumption, refer to the label attached to the product.
✎
Typical power consumption is measured according to IEC 62087 Ed.2
[PE450-TK]BN68-03998B.indb 12 2012-02-14 �� 10:46:40

English - 13
Supported Video Formats
File Extention Container Video Codec Resolution Frame rate (fps) Bit rate (Mbps) Audio Codec
*.avi
*.mkv
*.asf
*.wmv
*.mp4
*.3gp
*.vro
*.mpg
*.mpeg
*.ts
*.tp
*.trp
*.m2ts
*.mts
*.divx
AVI
MKV
ASF
MP4
3GP
VRO
VOB
PS
TS
DivX 3.11/4.x/5.x/6.1
1920 x 1080
6~30
30
AC3
LPCM
ADMPCM
(IMA, MS)
AAC
HE-AAC
WMA
DD+
MPEG
(MP3)
DTS Core
MPEG4 SP/ASP
H.264 BP/MP/HP
Motion JPEG 640 x 480 8
Window Media Video v9
1920 x 1080 30
MPEG2
MPEG1
Full available resolution: 1024 X 768 @ 60 Hz
Mode Resolution
Horizontal Frequency
(KHz)
Vertical Frequency
(Hz)
Pixel Clock Frequency
(MHz)
Sync Polarity (H / V)
IBM
640 x 350 31.469 70.086 25.175 +/-
720 x 400 31.469 70.087 28.322 -/+
MAC
640 x 480 35.000 66.667 30.240 -/-
832 x 624 49.726 74.551 57.284 -/-
VESA DMT
640 x 480 31.469 59.940 25.175 -/-
640 x 480 37.861 72.809 31.500 -/-
640 x 480 37.500 75.000 31.500 -/-
800 x 600 37.879 60.317 40.000 +/+
800 x 600 48.077 72.188 50.000 +/+
800 x 600 46.875 75.000 49.500 +/+
1024 x 768 48.363 60.004 65.000 -/-
1024 x 768 56.476 70.069 75.000 -/-
1024 x 768 60.023 75.029 78.750 +/+
[PE450-TK]BN68-03998B.indb 13 2012-02-14 �� 10:46:41

Türkçe - 2
e-Manual kullanımına ilişkin daha fazla bilgi için (s. 9)
Bu Kullanıcı Kılavuzundaki şekiller ve resimler yalnızca referans amaçlı verilmiştir ve gerçek ürünün görünümünden farklı olabilir. Ürün
tasarımı ve teknik özelikler bildirim yapılmaksızın değiştirilebilir.
Dijital TV uyarıları
1. Digital TV (DVB) ile ilgili olan işlevler, yalnız DVB-T (MPEG2 ve MPEG4 AVC) dijital yer üstü sinyallerinin yayınlandığı ya da uyumlu bir DVB-
C(MPEG2 ve MPEG4 AAC) kablolu TV servisine erişiminizin olduğu ülkelerde/alanlarda kullanılabilir. Lütfen bölgenizdeki DVB-T ya da DVB-C
sinyallerinin alınma olasılığı hakkında yerel bayiniz ile görüşünüz.
2. DVB-T dijital yer üstü televizyonların yayını için bir DVB Avrupa Birliği standardıdır ve DVB-C kablolu dijital TV'lerin yayını içindir. Ancak, EPG
(Elektrikli Program Kılavuzu), VOD (Talep Üzerine Video) ve diğerleri gibi bazı ayrıştırılmış özellikler, bu teknik özelliğe dahil edilmemiştir. Bu
nedenle, şu anda desteklenmemektedirler.
3. Bu TV seti [Ağustos, 2008] itibarıyla geçerli DVB-T ve DVB-C standartlarını karşılasa bile, gelecekteki DVB-T dijital karasal yayın ve DVB-C
dijital kablo yayınları ile uyumluluğu garanti edilemez.
4. Bu TV setinin kullanıldığı ülkelere/alanlara bağlı olarak bazı kablolu TV sağlayıcıları, bu tür bir hizmet için ek ödeme talep edebilir ve onların
koşullarına ve şartlarına uymanız gerekebilir.
5. Bazı Dijital TV işlevleri, bazı ülkelerde ya da bölgelerde kullanımda olmayabilir ve DVB-C kablolu hizmet sağlayıcılarından bazıları ile doğru
şekilde çalışmayabilir.
6. Daha fazla bilgi için, lütfen yerel Samsung müşteri hizmetleri merkeziniz ile iletişim kurun.
✎
TV'den sağlanan kalite ülkeler arasındaki yayın yöntemlerinin farklılığından etkilenebilir. Lütfen TV performansının TV ayarınızı yeniden
yapılandırarak iyileştirilip iyileştirilmeyeceğini görmek için, yerel SAMSUNG Yetkili Bayinizle veya SAMSUNG Çağrı Merkeziyle bu durumu
kontrol edin.
Kullanım Talimatları
• Ekran Görüntüsünün takılması
Plazma ekran panelinde durağan bir görüntüyü (örneğin bir video oyununda) birkaç dakikadan fazla tutmayın, aksi takdirde ekrandaki
görüntü takılabilir. Bu görüntü takılması "ekran yanması" olarak da bilinir. Bu tür bir görüntü takılmasını önlemek için, hareketsiz bir görüntü
gösterilirken ekranın parlaklık ve kontrast derecesini azaltın.
• Plazma TV’nin üst kısmında ısınma
Panelin yaydığı aşırı ısı, ürünün üst kısmındaki havalandırma deliğinden çıktığı için, uzun süreli kullanımlardan sonra ürünün üst tarafı sıcak
olabilir.
Bu normaldir ve üründe herhangi bir kusur ya da çalışma hatası olduğu anlamına gelmez.
Ancak çocukların, ürünün üst kısmına dokunması önlenmelidir.
• Üründen "çıtırtılar" geliyor.
Sıcaklık veya nem gibi çevre koşullarındaki değişiklik nedeniyle ürün yoğunlaştığı veya genleştiği zaman "çıtırtı" oluşabilir. Bu normaldir ve
ünitenin bir kusuru değildir.
• Hücre Kusurları
PDP'de, 2.360.000 (HD-düzeyi) ila 6.221.000 (FHD düzeyi) pikselden oluşan ve bu nedenle karmaşık bir üretim teknolojisi gerektiren
bir panel kullanılmaktadır. Bununla birlikte, ekranda birkaç parlak veya karanlık piksel bulunabilir. Bu pikseller, ürün performansı üzerinde
olumsuz bir etkiye sahip değildir.
• TV'yi 5°C (41°F) altındaki sıcaklıklarda çalıştırmaktan kaçının
• Çok uzun süreyle görüntülenen hareketsiz bir görüntü, PDP Panelinde kalıcı hasara neden olabilir.
Plazma televizyonu uzun süre 4:3 formatında izlemek, farklı ışık emisyonundan dolayı ekranın solunda, sağında ve ortasında
çizgi şeklinde izler bırakabilir. DVD veya oyun konsolu çalıştırmak da ekranda benzer bir etkiye neden olabilir.
Yukarıdaki etkilerin neden olduğu hasarlar Garanti kapsamında değildir.
• Ekrandaki görüntü izleri.
Video oyunlarında ve bilgisayarda uzun süre durağan resimlerin görüntülenmesi, kısmi görüntü izi oluşturabilir.
Bu etkiyi önlemek için, durağan görüntüleri uzun süre ekranda tutarken "parlaklık" ve "kontrast" derecelerini azaltın.
• Garanti
Görüntü takılması ile ilgili hasarlar garanti kapsamına girmez.
Ekranın yanması garanti kapsamında değildir.
Bu Ürünün Doğru Şekilde Elden Çıkarılması (Atık Elektrikli ve Elektronik Aletler)
(Avrupa Birliği'nde ve ayrı toplama sistemlerine sahip Avrupa ülkelerinde geçerlidir)
Ürün, aksesuarlar veya kitapçık üzerindeki bu işaret, ürünün ve elektronik aksesuarlarının (örn. şarj cihazı, kulaklık, USB kablosu) kullanım süresi sonunda
ürünün diğer ev atıkları ile birlikte atılmaması gerektiğini belirtir. Atıkların kontrolsüz şekilde elden çıkarılmasından doğabilecek çevre ve insan sağlığı
üzerindeki olası zararları önlemek için, lütfen bu ürünleri diğer atık türlerinden ayırın ve sorumlu davranarak malzeme kaynaklarının sürdürülebilir yeniden
kullanımını kolaylaştırın. Ürünü evde kullananlar, bu ürünlerin çevreye dost şekilde geri dönüşümünü sağlamakla ilgili ayrıntılar için ürünü satın aldıkları
bayi ya da yerel yönetim ofisleriyle irtibat kurmalıdır. Ticari kullanıcılar tedarikçilerine başvurmalı ve satın alma sözleşmesinin hüküm ve koşullarını kontrol
etmelidir. Bu ürün ve elektronik aksesuarlar, elden çıkarılırken diğer ticari atıklarla karıştırılmamalıdır.
Bu üründeki pillerin doğru şekilde elden çıkarılması
(Avrupa Birliği'nde ve ayrı pil geri dönüş sistemlerine sahip Avrupa ülkelerinde geçerlidir)
Pil, kılavuz veya paket üzerinde gösterilen bu işaret, bu üründeki pillerin kullanım süresi sonunda ürünün diğer ev atıkları ile birlikte atılmaması
gerektiğini belirtir. Belirtildiği durumda, Hg, Cd veya Pb kimyasal sembolleri pilin EC Direktifi 2006/66'daki seviyelere göre yüksek civa, kadmiyum
ve kurşun içerdiğini gösterir. Piller doğru şekilde çöpe atılmazlarsa, bu maddeler insan sağlığına ya da çevreye zarar verebilir. Doğal kaynakları
korumak ve malzeme yeniden kullanımını desteklemek için, lütfen pilleri diğer atık türlerinden ayırın ve yerel ve serbest pil geri dönüş sistemi ile geri
dönüştürün.
[PE450-TK]BN68-03998B.indb 2 2012-02-14 �� 10:46:42

Türkçe - 3
Aksesuarlar
✎
TV'nizle birlikte aşağıdaki öğelerin verildiğinden emin olun. Öğelerden herhangi biri eksikse, bayinizle görüşün.
✎
Öğelerin rengi ve şekli modele bağlı olarak farklılık gösterebilir.
✎
Paket içeriğinde bulunmayan kablolar ayrı olarak satın alınabilir.
• Uzaktan Kumanda ve Piller (AAA x 2) • Güç Kablosu
• Kullanım Talimatları • Temizleme Bezi
• Garanti Kartı / Güvenlik Kılavuzu (Bazı yerlerde yoktur)
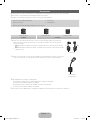
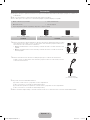
✎
Elektrik Kablosu için Ferrit Çekirdek: Ferrit çekirdekler, kabloları girişimden korumak için kullanılır.
Bir kabloyu bağlarken, ferrit çekirdeği açın ve aşağıdaki şekilde gösterildiği gibi fişe yakın bir
yerden kablonun etrafına geçirin.
x
A Ferrit çekirdek ve TV'ye takılan kablonun ucu arasındaki maksimum mesafe: 3/4 inç
x
B Ferrit çekirdek ve AC çıkışına takılmış kablonun diğer ucu arasındaki maksimum mesafe: 3/4
inç
B
A
Güç Kablosu
✎
Ferrit Çekirdek: Ferrit çekirdekler, kabloları girişimden korumak için kullanılır. Bir kabloyu bağlarken,
ferrit çekirdeği açın ve aşağıdaki şekilde gösterildiği gibi fişe yakın bir yerden kablonun etrafına
geçirin.
Anten Kablosu
(ayrı olarak satılır)
✎
Aşağıdaki durumlarda bir idari ücret alınabilir:
(a) bir teknisyen talep ettiğinizde ve ürününüzde bir sorun yoksa
(örn., bu kullanım kılavuzunu okuyamadığınız yerlerde)
(b) ürünü onarım merkezine getirdiğinizde ve ürününüzde bir sorun yoksa
(örn., bu kullanım kılavuzunu okuyamadığınız yerlerde)
✎
Bu gibi bir idari ücretin miktarı herhangi bir çalışma ya da ev ziyareti gerçekleşmeden önce size bildirilecektir.
Ferrit Çekirdek (3 adet) Ferrit Çekirdek (1 adet) Ferrit Çekirdek (2 adet)
PS43E450 PS51E450
[PE450-TK]BN68-03998B.indb 3 2012-02-14 �� 10:46:43

Türkçe - 4
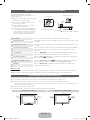
TV Kontrol Ünitesinin (Panel Tuşunun) Kullanımı
TV Denetleyicisi, uzaktan kumanda olmadan
gezinmeye yardımcı olan çok yönlü bir düğmedir.
✎
Bir PIN kodu gerektiren bazı işlevler
kullanılamayabilir.
✎
Ürünün rengi ve şekli, modele bağlı olarak
farklılık gösterebilir.
✎
Denetleyiciye 1 saniyeden daha uzun süre
basıldığında menüden çıkar.
✎
Kontrolörü yukarı/aşağı/sol/sağ yönlere
hareket ettirerek işlev seçerken, kontrolöre
basmamaya dikkat edin. Eğer çalıştırma
öncesinde kontrolöre basarsanız,
kontrolörü yukarı/aşağı/sol/sağ yönlerde
çalıştıramazsınız.
İşlev menüsü
Geri
Uzaktan kumanda sensörü
TV Denetçisi
Aşağı (Ön)
Yukarı (Arka)
Sağ
Sol
Güç açma Bekleme modunda denetleyiciye basarak TV'yi açar.
Ses düzeyini ayarlama Güç açıkken denetleyiciyi bir taraftan diğer tarafa hareket ettirerek ses düzeyini ayarlar.
Bir kanal seçme Güç açıkken denetleyiciyi yukarı ve aşağı hareket ettirerek bir kanal seçer.
İşlev menüsünü kullanma Güç açıkken denetleyiciye basın, ardından işlev menüsü ekranı görüntülenir. Tekrar
basarsanız, işlev menüsü ekranı kaybolur.
Menüyü kullanma
İşlev menüsü ekranında denetleyiciyi hareket ettirerek MENÜ(
m
) seçeneğini seçer.
TV'nizin OSD (Ekran Menüsü) özelliği görüntülenir.
Kaynak Seçme İşlev menüsü ekranında denetleyiciyi hareket ettirerek Kaynak( ) seçeneğini seçer.
Kaynak liste ekranı görüntülenir.
İçerik Ana Sayfasını Seçme İşlev menüsü ekranında denetleyiciyi hareket ettirerek Ev İçerikleri( ) seçeneğini
seçer. Ev İçerikleri ana ekranı görüntülenir.
Güç Kapalı TV'yi kapatmak için işlev menüsü ekranında denetleyiciyi hareket ettirerek Güç
Kapalı(
P
) seçeneğini seçer.
Bekleme modu
TV'nizi uzun süre (örneğin, tatile gittiğinizde) bekleme modunda bırakmayın. Güç düğmesi kapatılsa bile, az miktarda güç tüketimi hala
devam eder. Fişi prizden çıkarmak en iyi yoldur.
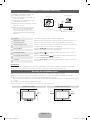
Kurulum Alanının Sabitlenmesi
Uygun havalandırma için, ürün ve diğer nesneler (duvar gibi) arasında gerekli mesafeyi bırakın.
Buna dikkat edilmemesi ürünün dahili sıcaklığında gerçekleşecek artış nedeniyle yangına veya üründe bir soruna neden olabilir.
✎
Bir stand veya duvar montajı kullanırken, yalnızca Samsung Electronics tarafından sağlanan parçaları kullanın.
x
Başka bir üretici tarafından sağlanan parçaların kullanılması, ürünün düşmesi nedeniyle üründe bir soruna veya yaralanmaya
neden olabilir.
✎
Görünüm ürüne bağlı olarak değişiklik gösterebilir.
✎
TV'yle temas ederken dikkatli olun, çünkü bazı parçalar biraz sıcak olabilir.
Bir standla monte etme. Bir duvar montajıyla monte etme.
10 cm10 cm
10 cm
10 cm
10 cm
10 cm
10 cm
[PE450-TK]BN68-03998B.indb 4 2012-02-14 �� 10:46:44

Türkçe - 5
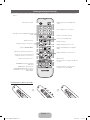
Uzaktan Kumandaya Bakış
✎
Bu uzaktan kumanda, görme sorunu olan kişiler için özel olarak tasarlanmıştır. Güç, Kanal ve Ses seviyesi düğmelerinin
üzerinde Braille noktaları bulunmaktadır.
A B C D
E-MANUAL
P.SIZE
AD/SUBT.
CONTENT
Pillerin takılması (Pil boyutu: AAA)
TV'yi açar ve kapatır.
Kullanılabilir video kaynaklarını görüntüler ve
seçer.
Önceki kanala geri döner.
Sesi geçici olarak kapatır.
Kanalları değiştirir.
Ekranda kanal listelerini görüntüler.
EPG'yi (Elektronik Program Kılavuzu)
görüntüler.
TV ekranında bilgileri görüntüler.
Menüden çıkar.
Kanallara doğrudan erişmek için basın.
Ses düzeyini ayarlar.
Alternatif olarak, Teletekst AÇIK, Çift, Karışık
veya KAPALI seçeneğini seçin.
Ana ekranda gösterimli menü sistemini
görüntüler
Sık kullanılan işlevleri hızlıca seçin.
Ev İçerikleri öğesini görüntüler.
Önceki menüye geri döner.
Ekran üzerindeki menü öğelerini seçer ve menü
üzerinde görüntülenen değerleri değiştirir
Bu düğmeleri ekrandaki talimata göre kullanın.
Belirli bir özellikte bu düğmeleri kullanın.
Ayrıntılar için, e-Kılavuza bakın.
E-MANUAL: e-Manual kılavuzunu
görüntüler. (s. 9)
P.SIZE: Resim boyutunu seçer.
AD/SUBT.: Ses Açıklaması seçimi.
(Bazı yerlerde yoktur) / Dijital altyazıları
görüntüler.
[PE450-TK]BN68-03998B.indb 5 2012-02-14 �� 10:46:44

Türkçe - 6
Başlangıç Kurulumu
TV ilk kez açıldığında, sıralı ekran uyarıları temel ayarların yapılandırılmasına yardımcı olur. POWER
P
düğmesine basın. Kurulum
yalnızca kaynak, TV olarak ayarlandığında kullanılabilir.
1. Menü Dili: Bir menü dili seçme
▲ veya ▼ düğmesine basın, ardından ENTER
E
düğmesine basın.
İstediğiniz OSD (Ekran Menüsü) dilini seçin.
2. Mod kullan: Dükkan Demosu veya Evde Kullanım seçeneğini seçme
▲ veya ▼ düğmesine basın, ardından ENTER
E
düğmesine basın.
Evde Kullanım modunu seçin. Dükkan Demosu modu yalnızca satış ortamları içindir.
✎
TV denetleyicisine basıldığında, işlev menüsü ekranı görüntülenir. MENÜ(
m
) seçeneğini seçin ve denetleyiciyi kullanarak 5
saniyeden daha uzun süre basın. Dükkan Demosu modu ayarlanır.
✎
Kaynak( ) seçeneğini seçerek ve 5 saniyeden daha uzun süre basarak Dükkan Demosu seçeneğini iptal edin.
✎
Dükkan Demosu yalnızca mağaza gösterimi içindir. Bunu seçerseniz, çeşitli işlevleri kullanamazsınız. Evde izlerken, lütfen
Evde Kullanım seçeneğini seçin.
3. Ülke (Ülkeye bağlı olarak): Bir ülke seçme
▲ veya ▼ düğmesine basın, ardından ENTER
E
düğmesine basın.
Uygun ülkeyi seçin.
✎
Ülke menüsünden ülkeyi seçtikten sonra, bazı modeller pin numarasını ayarlamak için ek bir seçenek içerebilir.
4. Otomatik Ayarlama (Adım 1): TV'nizi nasıl izleyeceğinizi seçme
Şimdi TV nizde kanalları bulalım ve kaydedelim. Kanalları aramanız gerekiyormu?
• Evet, gerekiyor.: RF kablosunu kullanarak mevcut kanalların tümünü belleğe alır.
• Hayır, gerekmiyor.: Kanalları bulmak için Otomatik Ayarlama kullanmanız gerekmez.
5. Otomatik Ayarlama (Adım 2): Arama seçeneklerini seçme
İstediğiniz yayın sinyalini ve anten kaynağını seçin. ▲/▼/◄/► düğmesine basın, ardından ENTER
E
düğmesine basın.
Anten kaynağını Kablo olarak ayarladığınızda, kanallara sayısal bir değer (kanal frekansları) atamanızı sağlayan bir adım görüntülenir.
Daha fazla bilgi için, Kanal → Otomatik Ayarlama kısmına bakın.
✎
Kayda alma işlemini herhangi bir anda kesmek için, ENTER
E
düğmesine basın.
✎
Bkz. e-Manual, bölüm “Kanalların Yeniden Ayarlanması > Otomatik Ayarlama”
6. Saat: Saat Modunu ayarlama
• Otomatik: Geçerli saati otomatik olarak ayarlayın.
• Manuel: Geçerli tarihi ve saati manuel olarak ayarlamanızı sağlar.
7. Saat Dilimi (Ülkeye bağlı olarak): Saat Diliminizi Ayarlama
Bu adım, yalnızca saat modu Otomatik olarak ayarlandığında kullanılabilir.
• Otomatik: Saat dilimini otomatik olarak ayarlayın.
• Manuel: Saat dilimini manuel olarak ayarlayın.
✎
Manuel seçeneğini seçtiyseniz, DST (Günışığı Tasarrufu Zamanı) seçeneğini Açık veya Kapalı olarak ayarlayabilirsiniz.
(Ülkeye bağlı olarak)
8. Kurulum Tamamlandı
ENTER
E
düğmesine basın.
✎
Tamamlanan ayarlar görüntülenir.
Bu Özelliği Sıfırlamak İstiyorsanız...
Sistem-Kurulum (Başlangıç Kurulumu) seçeneğini seçin. 4 basamaklı PIN numaranızı girin. Varsayılan PIN numarası “0-0-0-0”dır. PIN
numarasını değiştirmek istiyorsanız, PIN Değiştir işlevini kullanın.
Mağazada yapmış olsanız bile, Kurulum (MENU → Sistem) ayarını evde tekrar yapmanız gerekir.
✎
PIN kodunu unutursanız, PIN'in '0-0-0-0' olarak sıfırlanması için uzaktan kumanda düğmelerine Bekleme modunda aşağıdaki
sırayla basın: MUTE → 8 → 2 → 4 → POWER (açık)
[PE450-TK]BN68-03998B.indb 6 2012-02-14 �� 10:46:45

Türkçe - 7
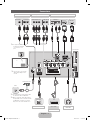
Bağlantılar
HDMI IN 2
HDMI IN 1
(DVI)
COMPONENT / AV IN
AUDIO
VIDEO
SERVICE
ANT IN
EXT (RGB)
DIGITAL
AUDIO OUT
(OPTICAL)
(5V 0.5A)
OPTICAL
EXT
AUDIO OUT
R-AUDIO-L
P
R
P
B
Y
COMPONENT OUT
AUDIO OUT
R-AUDIO-L
VIDEO OUT
R B
R B RG
WR
R
Y
Y
W
WR
R
W
R
G
DVI OUT
HDMI OUT
AUDIO OUT
R-AUDIO-L
PC
R
W
VHF/UHF Anteni
Kablo
USB
ya da
TV Arka Paneli
TV Yan Paneli
BD Oynatıcı / PC
HDMI, HDMI/DVI bağlantısı
Ses bağlantısı
SCART bağlantısı
Kulaklıklar bağlantısı:
BD Oynatıcı
Komponent bağlantısı
BD Oynatıcı
AV bağlantısı
✎
Bağlantı noktasının
konumu modele bağlı
olarak değişebilir.
✎
Bir bağlantı
noktasında hem
Parça hem de
AV bağlantısını
destekler.
VCR veya DVD
✎
PDP aygıtı amatör bir radyoyla veya
AM radyosuyla parazit yapabilir.
✎
TV’nizin yakınında iki yollu radyo
mobil ve taşınabilir birimler veya
amatör radyo veya AM radyo
kullandığınızda, bu TV’nin arıza
yapmasına yol açabilir.
[PE450-TK]BN68-03998B.indb 7 2012-02-14 �� 10:46:46

Türkçe - 8
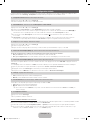
SERVICE
SERVICE
Yalnızca servis için konektör.
✎✎
NOT
• HDMI / DVI kablo bağlantısı için, HDMI IN 1(DVI) jakını kullanmalısınız.
• Geçmeli tarama modu desteklenmemektedir.
• Standartlara uymayan bir video biçimi seçilirse, cihaz normal olarak çalışmayabilir.
• Ayrı ve Kompozit modlar desteklenir. SOG (Yeşilde Senk.) desteklenmez.
• PC (D-Sub) girişi desteklenmez.
• HDMI kablosuyla bağlama codec'e bağlı olarak desteklenmeyebilir.
• Kulaklık jakı yalnızca 3 iletken uç-halka-kol (TRS) tipini destekler.
ORTAK ARAYÜZ yuvasına bağlanma
(TV görüntüleme Kart Yuvanız)
Ücretli kanalları izlemek için, “CI or CI+ CARD” takılı olmalıdır.
• “CI veya CI+ CARD” kartı takmazsanız, bazı kanallar “Scrambled
Signal” (Karışmış Sinyal) mesajıyla birlikte görüntülenir.
• Bir telefon numarası, “CI veya CI+ CARD” Kimliği, Ana Makine Kimliği
ve diğer bilgileri içeren eşleştirme bilgileri yaklaşık 2~3 dakika içinde
görüntülenir. Bir hata mesajı görüntülenirse, lütfen servis sağlayıcınızla
görüşün.
• Kanal bilgileri yapılandırması tamamlandığında, kanal listesinin
güncelleştirildiğini belirten “Güncelleme Tamamlandı” mesajı
görüntülenir.
TV Yan Paneli
y Görüntü, modele bağlı olarak değişebilir.
Giriş Kaynağını Değiştirme
Kaynak
TV / Harici / HDMI1/DVI / HDMI2 / AV / Komponent
TV'yi veya TV'ye bağlı DVD / Blu-ray oynatıcısı / kablo kutusu / STB uydu alıcısı gibi diğer harici giriş kaynaklarını kullanın.
✎
Görüntülenen Kaynak listesinde, bağlı girişler vurgulanır.
✎
PC (D-Sub) girişi desteklenmez. PC’yi TV’ye bağlamak istiyorsanız, HDMI1/DVI girişini kullanın.
✎
Harici her zaman etkin olarak kalır.
✎
TOOLS düğmesine basın.
• İsim Değiştir
İstediğiniz bir harici giriş kaynağı adını ayarlayabilirsiniz.
– HDMI kablosuyla bir PC'yi HDMI IN 1(DVI) bağlantı noktasına bağlarken, TV'yi İsim Değiştir altında PC moduna
ayarlamanız gerekir.
– HDMI-DVI kablosuyla bir PC'yi HDMI IN 1(DVI) bağlantı noktasına bağlarken, TV'yi İsim Değiştir altında DVI PC moduna
ayarlamanız gerekir.
– HDMI-DVI kablosuyla bir AV cihazını HDMI IN 1(DVI) bağlantı noktasına bağlarken, TV'yi İsim Değiştir altında DVI Cihazları
moduna ayarlamanız gerekir.
• Bilgi
Bağlanan harici cihaz hakkında ayrıntılı bilgileri görebilirsiniz.
Ekran Modları (HDMI/DVI Girişi)
Optimal çözünürlük 1024 X 768@60 Hz'dir. Tüm mevcut çözünürlük değerleri için, teknik özellik sayfasına bakın.
[PE450-TK]BN68-03998B.indb 8 2012-02-14 �� 10:46:47
Sayfa yükleniyor...
Sayfa yükleniyor...
Sayfa yükleniyor...
Sayfa yükleniyor...
Sayfa yükleniyor...
Sayfa yükleniyor...
Sayfa yükleniyor...
Sayfa yükleniyor...
Sayfa yükleniyor...
Sayfa yükleniyor...
Sayfa yükleniyor...
Sayfa yükleniyor...
Sayfa yükleniyor...
Sayfa yükleniyor...
Sayfa yükleniyor...
Sayfa yükleniyor...
Sayfa yükleniyor...
Sayfa yükleniyor...
Sayfa yükleniyor...
Sayfa yükleniyor...
Sayfa yükleniyor...
Sayfa yükleniyor...
Sayfa yükleniyor...
Sayfa yükleniyor...
Sayfa yükleniyor...
Sayfa yükleniyor...
Sayfa yükleniyor...
Sayfa yükleniyor...
Sayfa yükleniyor...
Sayfa yükleniyor...
Sayfa yükleniyor...
-
 1
1
-
 2
2
-
 3
3
-
 4
4
-
 5
5
-
 6
6
-
 7
7
-
 8
8
-
 9
9
-
 10
10
-
 11
11
-
 12
12
-
 13
13
-
 14
14
-
 15
15
-
 16
16
-
 17
17
-
 18
18
-
 19
19
-
 20
20
-
 21
21
-
 22
22
-
 23
23
-
 24
24
-
 25
25
-
 26
26
-
 27
27
-
 28
28
-
 29
29
-
 30
30
-
 31
31
-
 32
32
-
 33
33
-
 34
34
-
 35
35
-
 36
36
-
 37
37
-
 38
38
-
 39
39
-
 40
40
-
 41
41
-
 42
42
-
 43
43
-
 44
44
-
 45
45
-
 46
46
-
 47
47
-
 48
48
-
 49
49
-
 50
50
-
 51
51


Samsung PS43E450A1W Hızlı başlangıç Kılavuzu
- Kategori
- Plazma TV'ler
- Tip
- Hızlı başlangıç Kılavuzu
- Bu kılavuz aynı zamanda aşağıdakiler için de uygundur:
diğer dillerde
İlgili makaleler
-
Samsung LE32E420E2W Hızlı başlangıç Kılavuzu
-
Samsung PS43F4500AW Hızlı başlangıç Kılavuzu
-
Samsung PS43E490B1W Hızlı başlangıç Kılavuzu
-
Samsung PS59D550C1W Hızlı başlangıç Kılavuzu
-
Samsung PS64D8000FS Hızlı başlangıç Kılavuzu
-
Samsung UE40H4200AW Kullanım kılavuzu
-
Samsung ps42b430 Kullanım kılavuzu