
D25123
D25124

2
Copyright DeWALT
English (original instructions) 4
Türkçe (orijinal talimatlardan çevrilmiştir) 13

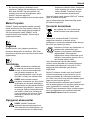
1
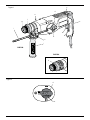
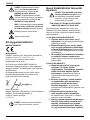
Figure 1
a
c
d
f
g
k
j
i
D25123
D25124
b
h
e
m
n
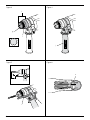
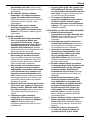
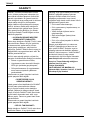
Figure 2
d
e

2
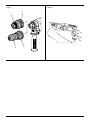
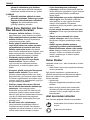
Figure 3
Figure 5
Figure 4
Figure 6
f
g
l
j
c
i
k

3
Figure 7 Figure 8
h
f
h
m
j
o

English
4
HEAVY-DUTY ROTARY HAMMERDRILL
D25123, D25124
Congratulations!
You have chosen a DeWALT tool. Years of
experience, thorough product development and
innovation make DeWALT one of the most reliable
partners for professional power tool users.
Technical Data
D25123 D25124
Voltage V 230 230
(U.K. & Ireland only) V 230/115 230/115
Type 10 01
Power input W 800 800
No-load speed min
–1
0–1,150 0–1,150
Load speed min
–1
0–830 0–830
Impact energy
Hammerdrilling J 3.1 3.1
Chiselling J 3.4 3.4
Maximum drilling range in
steel/wood/concrete mm 13/30/26 13/30/26
Chisel positions 52 52
Core drilling capacity
in soft brick mm 65 65
Tool holder SDS Plus
®
SDS Plus
®
Collar diameter mm 54 54
Weight kg 2.9 2.9
L
PA
(sound pressure) dB(A)
89 89
K
PA
(sound pressure uncertainty) dB(A)
3.8 3.8
L
WA
(sound power) dB(A)
100 100
K
WA
(sound power uncertainty) dB(A)
3.8 3.8
Vibration total values (triax vector sum) determined according to
EN 60745:
Vibration emission value a
h
Drilling into metal
a
h,D
=
m/s²
2.6 2.6
Uncertainty K = m/s²
1.5 1.5
Vibration emission value a
h
Drilling into concrete
a
h,HD
=
m/s²
17.8 17.8
Uncertainty K = m/s²
1.5 1.5
Vibration emission value a
h
Chiselling
a
h,Cheq
=
m/s²
9.8 9.8
Uncertainty K = m/s²
1.5 1.5
Vibration emission value a
h
Screwdriving without impact
a
h
=
m/s²
< 2.5 < 2.5
Uncertainty K = m/s²
1.5 1.5
The vibration emission level given in this information
sheet has been measured in accordance with a
standardised test given in EN 60745 and may be
used to compare one tool with another. It may be
used for a preliminary assessment of exposure.
WARNING: The declared vibration
emission level represents the main
applications of the tool. However if the
tool is used for different applications,
with different accessories or poorly
maintained, the vibration emission may
differ. This may significantly increase the
exposure level over the total working
period.
An estimation of the level of exposure to
vibration should also take into account
the times when the tool is switched off
or when it is running but not actually
doing the job. This may significantly
reduce the exposure level over the total
working period.
Identify additional safety measures to
protect the operator from the effects of
vibration such as: maintain the tool and
the accessories, keep the hands warm,
organisation of work patterns.
Fuses:
Europe 230 V tools 10 Amperes, mains
U.K. & Ireland 230 V tools 13 Amperes, in plugs
Definitions: Safety Guidelines
The definitions below describe the level of severity
for each signal word. Please read the manual and
pay attention to these symbols.
DANGER: Indicates an imminently
hazardous situation which, if not avoided,
will result in death or serious injury.

English
5
WARNING: To reduce the risk of injury,
read the instruction manual.
General Power Tool Safety Warnings
WARNING! Read all safety warnings
and instructions Failure to follow the
warnings and instructions may result in
electric shock, fire and/or serious injury.
Save all warningS and inStructionS
for future reference
The term “power tool” in the warnings refers
to your mains-operated (corded) power tool or
battery-operated (cordless) power tool.
1) WORK AREA SAFETY
a) Keep work area clean and well lit.
Cluttered or dark areas invite accidents.
b) Do not operate power tools in explosive
atmospheres, such as in the presence of
flammable liquids, gases or dust. Power
tools create sparks which may ignite the dust
or fumes.
c) Keep children and bystanders away while
operating a power tool. Distractions can
cause you to lose control.
2) ELECTRICAL SAFETY
a) Power tool plugs must match the outlet.
Never modify the plug in any way. Do
not use any adapter plugs with earthed
(grounded) power tools. Unmodified plugs
and matching outlets will reduce risk of
electric shock.
b) Avoid body contact with earthed or
grounded surfaces such as pipes,
radiators, ranges and refrigerators. There
is an increased risk of electric shock if your
body is earthed or grounded.
c) Do not expose power tools to rain or wet
conditions. Water entering a power tool will
increase the risk of electric shock.
d) Do not abuse the cord. Never use the
cord for carrying, pulling or unplugging
the power tool. Keep cord away from
heat, oil, sharp edges or moving parts.
Damaged or entangled cords increase the
risk of electric shock.
e) When operating a power tool outdoors,
use an extension cord suitable for outdoor
use. Use of a cord suitable for outdoor use
reduces the risk of electric shock.
WARNING: Indicates a potentially
hazardous situation which, if not
avoided, could result in death or
serious injury.
CAUTION: Indicates a potentially
hazardous situation which, if not
avoided, may result in minor or
moderate injury.
NOTICE: Indicates a practice not
related to personal injury which, if
not avoided, may result in property
damage.
Denotes risk of electric shock.
Denotes risk of fire.
EC-Declaration of Conformity
MACHINERY DIRECTIVE
D25123, D25124
DeWALT declares that these products described
under “technical data” are in compliance with:
2006/42/EC, EN 60745-1, EN60745-2-6.
These products also comply with Directive
2004/108/EC. For more information, please contact
DeWALT at the following address or refer to the
back of the manual.
The undersigned is responsible for compilation of the
technical file and makes this declaration on behalf of
DeWALT.
Horst Grossmann
Vice President Engineering and Product
Development
DeWALT, Richard-Klinger-Straße 11,
D-65510, Idstein, Germany
10.05.2010

English
6
f) If operating a power tool in a damp
location is unavoidable, use a residual
current device (RCD) protected supply.
Use of an RCD reduces the risk of electric
shock.
3) PERSONAL SAFETY
a) Stay alert, watch what you are doing and
use common sense when operating a
power tool. Do not use a power tool while
you are tired or under the influence of
drugs, alcohol or medication. A moment of
inattention while operating power tools may
result in serious personal injury.
b) Use personal protective equipment.
Always wear eye protection. Protective
equipment such as dust mask, non-skid
safety shoes, hard hat, or hearing protection
used for appropriate conditions will reduce
personal injuries.
c) Prevent unintentional starting. Ensure
the switch is in the off position before
connecting to power source and/or
battery pack, picking up or carrying the
tool. Carrying power tools with your finger
on the switch or energising power tools that
have the switch on invites accidents.
d) Remove any adjusting key or wrench
before turning the power tool on. A
wrench or a key left attached to a rotating
part of the power tool may result in personal
injury.
e) Do not overreach. Keep proper
footing and balance at all times. This
enables better control of the power tool in
unexpected situations.
f) Dress properly. Do not wear loose
clothing or jewellery. Keep your hair,
clothing and gloves away from moving
parts. Loose clothes, jewellery or long hair
can be caught in moving parts.
g) If devices are provided for the connection
of dust extraction and collection facilities,
ensure these are connected and properly
used. Use of dust collection can reduce
dust-related hazards.
4) POWER TOOL USE AND CARE
a) Do not force the power tool. Use the
correct power tool for your application.
The correct power tool will do the job
better and safer at the rate for which it
was designed.
b) Do not use the power tool if the switch
does not turn it on and off. Any power
tool that cannot be controlled with the switch
is dangerous and must be repaired.
c) Disconnect the plug from the power
source and/or the battery pack from
the power tool before making any
adjustments, changing accessories, or
storing power tools. Such preventive safety
measures reduce the risk of starting the
power tool accidentally.
d) Store idle power tools out of the reach
of children and do not allow persons
unfamiliar with the power tool or these
instructions to operate the power tool.
Power tools are dangerous in the hands of
untrained users.
e) Maintain power tools. Check for
misalignment or binding of moving parts,
breakage of parts and any other condition
that may affect the power tool’s operation.
If damaged, have the power tool repaired
before use. Many accidents are caused by
poorly maintained power tools.
f) Keep cutting tools sharp and clean.
Properly maintained cutting tools with sharp
cutting edges are less likely to bind and are
easier to control.
g) Use the power tool, accessories and
tool bits etc., in accordance with these
instructions taking into account the
working conditions and the work to
be performed. Use of the power tool for
operations different from those intended
could result in a hazardous situation.
5) SERVICE
a) Have your power tool serviced by a
qualified repair person using only identical
replacement parts. This will ensure that the
safety of the power tool is maintained.
Additional Specific Safety Rules for
Rotary Hammers
• Wear ear protectors. Exposure to noise can
cause hearing loss.
• Useauxiliaryhandlessuppliedwiththetool.
Loss of control can cause personal injury.
• Hold power tools by insulated gripping
surfaces when performing an operation
where the cutting tool may contact hidden
wiring or its own cord. Contact with a “live”
wire will make exposed metal parts of the tool
“live” and shock the operator.
• Use clamps or other practical way to secure
and support the workpiece to a stable
platform. Holding the work by hand or against
your body is unstable and may lead to loss of
control.

English
7
• Wear safety goggles or other eye protection.
Hammering operations cause chips to fly. Flying
particles can cause permanent eye damage.
Wear a dust mask or respirator for applications
that generate dust. Ear protection may be
required for most applications.
• Keep a firm grip on the tool at all times.
Do not attempt to operate this tool
without holding it with both hands. It is
recommended that the side handle be used at
all times. Operating this tool with one hand will
result in loss of control. Breaking through or
encountering hard materials such as re-bar may
be hazardous as well. Tighten the side handle
securely before use.
• Do not operate this tool for long periods of
time. Vibration caused by hammer action may
be harmful to your hands and arms. Use gloves
to provide extra cushion and limit exposure by
taking frequent rest periods.
• Do not recondition bits yourself. Chisel
reconditioning should be done by an authorized
specialist. Improperly reconditioned chisels
could cause injury.
• Wear gloves when operating tool or
changing bits. Accessible metal parts on the
tool and bits may get extremely hot during
operation. Small bits of broken material may
damage bare hands.
• Never lay the tool down until the bit has
come to a complete stop. Moving bits could
cause injury.
• Do not strike jammed bits with a hammer to
dislodge them. Fragments of metal or material
chips could dislodge and cause injury.
• Slightly worn chisels can be resharpened by
grinding.
• Keep the power cord away from the rotating
bit. Do not wrap the cord around any part of
your body. An electric cord wrapped around a
spinning bit may cause personal injury and loss
of control.
Residual Risks
The following risks are inherent to the use of rotary
hammers:
– Injuries caused by touching the rotating parts or
hot parts of the tool
In spite of the application of the relevant safety
regulations and the implementation of safety
devices, certain residual risks cannot be avoided.
These are:
– Impairment of hearing.
– Risk of squeezing fingers when changing the
accessory.
– Health hazards caused by breathing dust
developed when working in concrete and/or
masonry.
Markings on Tool
The following pictograms are shown on the tool:
Read instruction manual
before use.
Wear ear protection.
Wear eye protection.
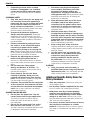
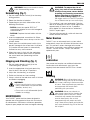
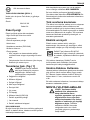
DATE CODE POSITION (FIG. 1)
The Date Code (n), which also includes the year of
manufacture, is printed into the housing.
Example:
2010 XX XX
Year of Manufacture
Package Contents
The package contains:
1 Heavy-duty rotary hammerdrill
1 Side handle
1 Depth adjustment rod
1 Kitbox
1 Keyless chuck (D25124K)
1 Instruction manual
1 Exploded drawing
• Checkfordamagetothetool,partsor
accessories which may have occurred during
transport.
• Takethetimetothoroughlyreadand
understand this manual prior to operation.
Description (fig. 1)
WARNING: Never modify the power
tool or any part of it. Damage or
personal injury could result.
a. Variable speed switch
b. Lock-on button
c. Forward/reverse slider
d. Mode selector

English
8
e. Safety lock
f. Tool holder
g. Dust cover
h. Locking collar (D25124)
i. Depth adjustment rod
j. Side handle
k. Depth stop clamp
INTENDED USE
These heavy-duty rotary hammers have been
designed for professional drilling and hammerdrilling,
screwdriving and light chipping
DO NOT use under wet conditions or in presence of
flammable liquids or gases.
These hammerdrills are professional power tools.
DO NOT let children come into contact with the
tool. Supervision is required when inexperienced
operators use this tool.
Torque Limiting Clutch
All rotary hammerdrills are equipped with a torque
limiting clutch that reduces the maximum torque
reaction transmitted to the operator in case of
jamming of a drill bit. This feature also prevents the
gearing and electric motor from stalling. The torque
limiting clutch has been factory-set and cannot be
adjusted.
Electrical Safety
The electric motor has been designed for one
voltage only. Always check that the power supply
corresponds to the voltage on the rating plate.
Your DeWALT charger is double insulated
in accordance with EN 60745; therefore
no earth wire is required.
WARNING: 115 V units have to
be operated via a fail-safe isolating
transformer with an earth screen
between the primary and secondary
winding.
If the supply cord is damaged, it must be replaced
by a specially prepared cord available through the
DeWALT service organization.
Mains Plug Replacement
(U.K. & Ireland Only)
If a new mains plug needs to be fitted:
• Safelydisposeoftheoldplug.
• Connectthebrownleadtotheliveterminalin
the plug.
• Connecttheblueleadtotheneutralterminal.
WARNING: No connection is to be
made to the earth terminal.
Follow the fitting instructions supplied with good
quality plugs. Recommended fuse: 3 A.
Using an Extension Cable
If an extension cable is required, use an approved
3–core extension cable suitable for the power
input of this tool (see technical data).The minimum
conductor size is 1.5 mm
2
; the maximum length is
30 m.
When using a cable reel, always unwind the cable
completely.
ASSEMBLY AND ADJUSTMENTS
WARNING: To reduce the risk of
injury, turn unit off and disconnect
machine from power source before
installing and removing accessories,
before adjusting or changing set-
ups or when making repairs. Be sure
the trigger switch is in the OFF position.
An accidental start-up can cause injury.
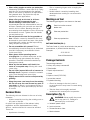
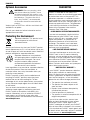
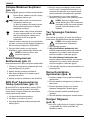
Selecting the Operating Mode
(fig. 2)
The tool can be used in the following operating
modes:
Rotary drilling: for screwdriving and for
drilling into steel, wood and plastics
Hammerdrilling: for concrete and masonry
drilling operations.
Bit rotation: non-working position used
only to rotate a flat chisel into the desired
position
Hammering only: for light chipping,
chiselling and demolition applications. In
this mode the tool can also be used as a
lever to free a jammed drill bit.
1. To select the operating mode, press the safety
lock (e) and rotate the mode selector switch
(d) until it points to the symbol of the required
mode.
2. Release the safety lock and check that the
mode selector switch is locked in place.
WARNING: Do not select the operating
mode when the tool is running.

English
9
Indexing the Chisel Position
(fig. 2)
The chisel can be indexed and locked into 52
different positions.
1. Rotate the mode selector switch (d) until it
points to the “bit rotation” position.
2. Rotate the chisel in the desired position.
3. Set the mode selector switch (d) to the
“hammering only” position.
4. Twist the chisel until it locks in position.
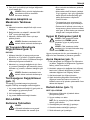
Inserting and Removing SDS Plus
®
Accessories (fig. 3)
This tool uses SDS Plus
®
accessories (refer to the
inset in fig. 3 for a cross-section of an SDS Plus
®
bit shank). We recommend to use professional
accessories only.
1. Clean and grease the bit shank.
2. Insert the bit shank into the tool holder (f).
3. Push the bit down and turn it slightly until it fits
into the slots.
4. Pull on the bit to check if it is properly locked.
The hammering function requires the bit to be
able to move axially several centimetres when
locked in the tool holder.
5. To remove a bit pull back the tool holder locking
sleeve (l) and pull out the bit.
WARNING: Always wear gloves when
you change accessories. The exposed
metal parts on the tool and accessory
may become extremly hot during
operation.
Fitting the Side Handle (fig. 4)
The side handle (j) can be fitted to suit both RH- and
LH-users.
WARNING: Do not use the tool without
the side handle properly assembled.
1. Loosen the side handle.
2. For RH-users: slide the side handle clamp
over the collar behind the tool holder, handle at
the left.
For LH-users: slide the side handle clamp over
the collar behind the tool holder, handle at the
right.
3. Rotate the side handle to the desired position
and tighten the handle.
Setting the Drilling Depth (fig. 5)
1. Insert the required drill bit as described above.
2. Press the depth stop clamp (k) and keep it
depressed.
3. Fit the depth adjustment rod (i) through the hole
in the depth stop clamp.
4. Adjust the drilling depth as shown.
5. Release the depth stop clamp.
Forward/reverse Slider (fig. 6)
1. Push the forward/reverse slider (c) to the
RH-side for forward (RH) rotation. See arrows
on tool.
2. Push the forward/reverse slider (c) to the
LH-side for reverse (LH) rotation.
WARNING: Always wait until the motor
has come to a complete standstill
before changing the direction of rotation.
Fitting the Chuck Adapter and Chuck
D25123
1. Screw the chuck onto the threaded end of the
chuck adapter.
2. Insert the connected chuck and adapter in the
tool as though it were a standard SDS Plus
®
bit.
3. To remove the chuck, proceed as for removing
a standard SDS Plus
®
bit.
WARNING: Never use standard chucks
in the hammerdrilling mode.
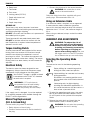
Replacing the Tool Holder with the
Chuck (fig. 7)
D25124K
1. Turn the locking collar (h) into the unlocking
position and pull the tool holder (f) off.
2. Push the chuck (m) onto the spindle and turn
the locking collar into the locking position.
3. To replace the chuck with the tool holder, first
remove the chuck the same way as the tool
holder was removed. Then place the tool holder
the same way as the chuck was placed.
WARNING: Never use standard chucks
in the hammerdrilling mode.
Replacing the Dust Cover (fig. 3)
The dust cover (g) prevents dust ingress into the
mechanism. Replace a worn dust cover immediately.

English
10
1. Pull back the tool holder locking sleeve (l) and
pull the dust cover (g) off.
2. Fit the new dust cover.
3. Release the tool holder locking sleeve.
OPERATION
Instructions for Use
WARNING:
•Always observe the safety instructions
and applicable regulations.
•Be aware of the location of pipework
and wiring.
•Apply only a gentle pressure to
the tool (approx. 5 kg). Excessive
force does not speed up drilling but
decreases tool performance and may
shorten tool life.
•Do not drill or drive too deep to
prevent damage to the dust cover.
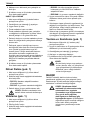
•Always hold the tool firmly with both
hands and ensure a secure stance
(fig. 8). Always operate the tool with
the side handle properly mounted.
Proper Hand Position (fig. 8)
WARNING: To reduce the risk of
serious personal injury, ALWAYS use
proper hand position as shown.
WARNING: To reduce the risk of
serious personal injury, ALWAYS hold
securely in anticipation of a sudden
reaction.
Proper hand position requires one hand on the side
handle (j), with the other hand on the main handle
(o).
Switching On and Off (fig. 1)
1. To run the tool, press the variable speed switch
(a). The pressure exerted on the variable speed
switch determines the tool speed.
2. For continuous operation, press and hold down
the variable speed switch, press the lock-on
button (b) and release the switch.
3. To stop the tool, release the switch.
4. To stop the tool in continuous operation, press
the switch briefly and release it. Always switch
off the tool when work is finished and before
unplugging.
Hammerdrilling (fig. 1)
DRILLING WITH A SOLID BIT
1. Set the mode selector switch (d) to the
hammerdrilling position.
2. Insert the appropriate drill bit.
NOTE: For best results use high quality carbide-
tipped bits.
3. Adjust the side handle (j) as required.
4. If necessary, set the drilling depth.
5. Mark the spot where the hole is to be drilled.
6. Place the drill bit on the spot and switch on the
tool.
7. Always switch off the tool when work is finished
and before unplugging.
DRILLING WITH A CORE BIT
1. Set the mode selector (d) to the hammerdrilling
position.
2. Adjust the side handle (j) as required.
3. Insert the appropriate core bit.
4. Assemble the centerdrill into the core bit.
5. Place the centerdrill on the spot and press the
variable speed switch (a). Drill until the core
penetrates into the concrete approx. 1 cm.
6. Stop drilling and remove the centerdrill. Place
the core bit back into the hole and continue
drilling.
7. When drilling through a structure thicker than
the depth of the core bit, break away the round
cylinder of concrete or core inside the bit at
regular intervals. To avoid unwanted breaking
away of concrete around the hole, first drill a
hole the diameter of the center drill completely
through the structure. Then drill the cored hole
halfway from each side.
8. Always switch off the tool when work is finished
and before unplugging.
Rotary Drilling (fig. 1)
1. Set the mode selector switch (d) to the “rotary
drilling” position.
2. Depending on your tool, follow either of the
following instructions:
– D25123: Fit the chuck adapter/chuck
assembly.
– D25124: Replace the tool holder with the
chuck .
3. Proceed as described for hammerdrilling.

English
11
WARNING: Never use standard chucks
in the hammerdrilling mode.
Screwdriving (fig. 1)
1. Set the mode selector switch (d) to the rotary
drilling position.
2. Select the direction of rotation.
3. Depending on your tool, follow either of the
following instructions:
– D25123: Insert the special SDS Plus
®
screwdriving adaptor for use with hexagonal
screwdriver bits.
– D25124K: Replace the tool holder with the
chuck.
4. Insert the appropriate screwdriver bit. When
driving slotted head screws always use bits with
a finder sleeve.
5. Gently press the variable speed switch (a) to
prevent damage to the screw head. In reverse
(LH) rotation the tool speed is automatically
reduced for easy screw removal.
6. When the screw is flush with the workpiece,
release the variable speed switch to prevent
the screw head from penetrating into the
workpiece.
Chipping and Chiselling (fig. 1)
1. Set the mode selector switch (d) to the
“hammering only” position.
2. Insert the appropriate chisel and rotate it by
hand to lock it into one of 52 positions.
3. Adjust the side handle (j) as required.
4. Switch on the tool and start working.
5. Always switch off the tool when work is finished
and before unplugging.
WARNING:
•Do not use this tool to mix or pump
easily combustible or explosive fluids
(benzine, alcohol, etc.).
•Donotmixorstirinflammableliquids
labelled accordingly.
MAINTENANCE
Your DeWALT power tool has been designed to
operate over a long period of time with a minimum
of maintenance. Continuous satisfactory operation
depends upon proper tool care and regular cleaning.
WARNING: To reduce the risk of
injury, turn unit off and disconnect
machine from power source before
installing and removing accessories,
before adjusting or changing set-
ups or when making repairs. Be sure
the trigger switch is in the OFF position.
An accidental start-up can cause injury.
• Thismachineisnotuser-serviceable.Takethe
tool to an authorised DeWALT repair agent after
approximately 40 hours of use. If problems
occur before this time contact an authorised
DeWALT repair agent.
• Thetoolwillautomaticallyswitchoffwhenthe
carbon brushes are worn.
Motor Brushes
DeWALT uses an advanced brush system which
automatically stops the drill when the brushes wear
out. This prevents serious damage to the motor.
New brush assemblies are available at authorised
DeWALT service centers. Always use identical
replacement parts.
Lubrication
Your power tool requires no additional lubrication.
Accessories and attachments used must be
regularly lubricated around the SDS Plus
®
fitment.
Cleaning
WARNING: Blow dirt and dust out of
the main housing with dry air as often as
dirt is seen collecting in and around the
air vents. Wear approved eye protection
and approved dust mask when
performing this procedure.
WARNING: Never use solvents or
other harsh chemicals for cleaning the
non-metallic parts of the tool. These
chemicals may weaken the materials
used in these parts. Use a cloth
dampened only with water and mild
soap. Never let any liquid get inside the
tool; never immerse any part of the tool
into a liquid.

English
12
Optional Accessories
WARNING: Since accessories, other
than those offered by DeWALT, have
not been tested with this product, use
of such accessories with this tool could
be hazardous. To reduce the risk of
injury, only DeWALT, recommended
accessories should be used with this
product.
Various types of SDS Plus
®
drill bits and chisels are
available as an option.
Consult your dealer for further information on the
appropriate accessories.
Protecting the Environment
Separate collection. This product must
not be disposed of with normal
household waste.
Should you find one day that your D
eWALT product
needs replacement, or if it is of no further use to you,
do not dispose of it with household waste. Make this
product available for separate collection.
Separate collection of used products
and packaging allows materials to be
recycled and used again. Re-use of
recycled materials helps prevent
environmental pollution and reduces
the demand for raw materials.
Local regulations may provide for separate collection
of electrical products from the household, at
municipal waste sites or by the retailer when you
purchase a new product.
DeWALT provides a facility for the collection and
recycling of DeWALT products once they have
reached the end of their working life. To take
advantage of this service please return your product
to any authorised repair agent who will collect them
on our behalf.
You can check the location of your nearest
authorised repair agent by contacting your local
DeWALT office at the address indicated in this
manual. Alternatively, a list of authorised DeWALT
repair agents and full details of our after-sales
service and contacts are available on the Internet at:
www.2helpU.com.
GUARANTEE
DeWALT is confident of the quality of its
products and offers an outstanding guarantee
for professional users of the product. This
guarantee statement is in addition to and in
no way prejudices your contractual rights as a
professional user or your statutory rights as a
private non-professional user. The guarantee
is valid within the territories of the Member
States of the European Union and the
European Free Trade Area.
• 30 DAY NO RISK SATISFACTION GUARANTEE •
If you are not completely satisfied with the
performance of your D
eWALT tool, simply
return it within 30 days, complete with all
original components, as purchased, to
the point of purchase, for a full refund or
exchange. The product must have been
subject to fair wear and tear and proof of
purchase must be produced.
• ONE YEAR FREE SERVICE CONTRACT •
If you need maintenance or service for your
D
eWALT tool, in the 12 months following
purchase, you are entitled to one service free
of charge. It will be undertaken free of charge
at an authorised DeWALT repair agent. Proof
of purchase must be produced. Includes
labour. Excludes accessories and spare parts
unless failed under warranty.
•ONE YEAR FULL WARRANTY •
If your D
eWALT product becomes defective
due to faulty materials or workmanship
within 12 months from the date of purchase,
DeWALT guarantees to replace all defective
parts free of charge or – at our discretion –
replace the unit free of charge provided that:
• Theproducthasnotbeenmisused;
• Theproducthasbeensubjecttofair
wear and tear;
• Repairshavenotbeenattemptedby
unauthorised persons;
• Proofofpurchaseisproduced.
• Theproductisreturnedcompletewithall
original components
If you wish to make a claim, contact your
seller or check the location of your nearest
authorised DeWALT repair agent in the
DeWALT catalogue or contact your DeWALT
office at the address indicated in this manual.
A list of authorised DeWALT repair agents and
full details of our after-sales service is available
on the Internet at: www.2helpU.com

Türkçe
13
Bir DeWALT aleti seçtiniz. Uzun süreli deneyim,
esaslı ürün geliştirme ve yenilik DeWALT’ın
profesyonel elektrikli alet kullanıcıları için en
güvenilir ortaklardan birisi haline gelmesini
sağlamaktadır.
Voltaj V 230 230
Tipler 10 01
Giriş gücü W 800 800
Yüksüz hız dev/dak 0–1.150 0–1.150
Yük hızı dev/dak 0–830 0–830
Darbe enerjisi
Darbeli delme J 3,1 3,1
Keskileme J 3,4 3,4
Çelik/tahta/betonda azami
delme kapasitesi mm 13/30/26 13/30/26
Keski pozisyonları 52 52
Yumuşak tuğlada karot
alma kapasitesi mm 65 65
Uç yuvası SDS Plus
®
SDS Plus
®
Bilezik çapı mm 54 54
Ağırlık kg 2,9 2,9
L
PA
(ses basıncı) dB(A) 89 89
K
PA
(ses basıncı
belirsizliği) dB(A) 3,8 3,8
L
WA
(
ses gücü
)
dB(A) 100 100
K
WA
(
ses gücü
belirsizliği
)
dB(A) 3,8 3,8
Toplam titreşim değerleri (üç yönün vektör toplamı)
EN 60745’ya göre belirlenmiştir:
Titreşim emisyon değeri a
h
Metal delme
a
h,D
= m/s
2
2,6 2,6
Belirsizlik değeri K = m/s
2
1,5 1,5
Titreşim emisyon değeri a
h
Beton delme
a
h,HD
= m/s
2
17,8 17,8
Belirsizlik değeri K = m/s
2
1,5 1,5
Titreşim emisyon değeri a
h
Keskileme
a
h,Cheq
= m/s
2
9,8 9,8
Belirsizlik değeri K = m/s
2
1,5 1,5
Titreşim emisyon değeri a
h
Darbesiz vidalama
a
h
= m/s
2
< 2,5 < 2,5
Belirsizlik değeri K = m/s
2
1,5 1,5
Bu bilgi sayfasında verilen titreşim emisyon düzeyi,
EN 60745’te sağlanan standart teste uygun olarak
ölçülmüştür ve aletleri birbiriyle karşılaştırmak için
kullanılabilir. Ön maruziyet değerlendirmesi için
kullanılabilir.
UYARI: Beyan edilen titreşim emisyon
düzeyi, aletin ana uygulamalarını
yansıtır. Ancak alet farklı aksesuarlarla
farklı uygulamalar için kullanılırsa
veya bakımı kötü yapılırsa, titreşim
emisyonu değişebilir. Bu, toplam
çalışma süresindeki maruziyet düzeyini
önemli ölçüde artırabilir.
Tahmini titreşim maruziyeti, aletin
kapalı kaldığı veya çalışmasına
karşın iş görmediği zamanları da
dikkate almalıdır. Bu, toplam çalışma
süresindeki maruziyet düzeyini önemli
ölçüde azaltabilir.
Operatörü titreşim etkilerinden korumak
için şu türde ek güvenlik önlemleri alın:
Aletin ve aksesuarların bakımını yapın,
elleri sıcak tutun, çalışma modellerini
düzenleyin.
Avrupa 230 V aletler
10 Amper, ana şebeke
Aşağıdaki tanımlar her işaret sözcüğü ciddiyet
derecesini gösterir. Lütfen kılavuzu okuyunuz ve bu
simgelere dikkat ediniz.
TEHLİKE:Engellenmemesi halinde
ölüm veya ciddi yaralanma ile
sonuçlanabilecek çok yakınbir
tehlikeli durumu gösterir.

Türkçe
14
UYARI: Engellenmemesi halinde
ölüm veya
ciddi yaralanma ile
sonuçlanabilecek potansiyel bir
tehlikeli durumu gösterir.
DİKKAT:Engellenmemesi halinde
önemsiz veya orta dereceli yaralanma
ile sonuçlanabilecek potansiyel bir
tehlikeli durumu gösterir.
İKAZ:Engellenmemesi halinde maddi
hasaranedenolabilecek,yaralanma
ileilişkisiolmayan durumları gösterir.
Elektrik çarpması riskini belirtir.
Yangın riskini belirtir.
D25123, D25124
DeWALT, “teknik veriler” bölümünde açıklanan bu
ürünlerin 2006/42/EC, EN 60745-1 ve
EN60745-2-6 normlarına uygun olarak
tasarlandığını beyan eder.
Bu ürünler ayrıca 2004/108/EC Direktifi ile
uyumludur. Daha fazla bilgi için, lütfen aşağıdaki
adresten DeWALT ile irtibata geçin veya kılavuzun
arkasına bakın.
Bu belge altında imzası bulunan yetkili, teknik
dosyanın derlenmesinden sorumludur ve bu
beyanı DeWALT adına vermiştir.
Horst Grossmann
Başkan Yardımcısı, Mühendislik ve Ürün Geliştirme
DeWALT, Richard-Klinger-Straße 11,
D-65510, Idstein, Almanya
10.05.2010
UYARI: Yaralanma riskini azaltmak
için, kullanım kılavuzunu okuyun.
UYARI! Tümgüvenlikuyarılarını
vetümtalimatlarıokuyun.
Uyarı
ve talimatlara uyulmaması elektrik
çarpması, yangın ve/veya ciddi
yaralanmaya yol açabilir.
Uyarılarda geçen “elektrikli alet” terimi, ana
şebekeden güç alan (kablolu) elektrikli aletinizi
veya pil ile çalışan (kablosuz) elektrikli aletinizi
ifade etmektedir.
a)
Çalışmaalanınıtemiztutunveiyi
ışıklandırın.
Karışık veya karanlık bölgeler
kazalara yol açabilir.
b)
Elektriklialetleriyanıcısıvılar,gazlar
veyatozgibipatlayıcılarınbulunduğu
ortamlardakullanmayın.
Elektrikli aletler
toz veya dumanı ateşleyebilecek kıvılcımlar
çıkarmaktadır.
c)
Birelektriklialetikullanırkençocukları
veetraftakiinsanlarıuzaktatutun.
Dikkat dağıtıcı şeyler kontrolü kaybetmenize
sebep olabilir.
a)
Elektriklialetinfişleriprizeuygun
olmalıdır.Fişihiçbirşekilde
değiştirmeyin.Topraklanmışelektrikli
aletlerilebirlikteadaptörfişlerini
kullanmayın.
Değiştirilmemiş fişler ve
uygun prizler elektrik çarpması riskini
azaltacaktır.
b)
Borular,radyatörler,mutfakocakları
vebuzdolaplarıgibitopraklanmış
yüzeylerlevücudunuzuntemas
etmesini engelleyin.
Vücudunuzun
topraklanması halinde elektrik çarpması riski
artmaktadır.
c) Elektriklialetleriyağmuraveya
ıslakkoşullaramaruzbırakmayın.
Bir elektrikli aletin içine giren su, elektrik
çarpması riskini artıracaktır.
d)
Kabloyubaşkaamaçlarlakullanmayın.
Kabloyuhiçbirzamanelektriklialeti
taşımak,sürüklemekveyaprizden
çekmeküzerekullanmayın.Kabloyu
ısı,yağ,keskinköşelerveyahareketli

Türkçe
15
parçalardanuzaktutun.Hasarlı veya
dolaşmış kablolar elektrik çarpması riskini
artırmaktadır.
e)
Birelektriklialetidışmekanda
kullanırken,dışmekankullanımına
uygunbiruzatmakablosukullanın.
Dış mekan kullanımına uygun bir kablonun
kullanılması elektrik çarpması riskini
azaltmaktadır.
f)
Elektrikli aletin nemli ortamda
çalışmasıkaçınılmazsa,birartık
akımcihazı(RCD)korumalıbesleme
kullanın.
RCD kullanımı elektrik çarpma
riskini azaltır.
a)
Birelektriklialetikullanırkentetikte
olun,neyaptığınızadikkatedin
vesağduyunuzukullanın.Yorgun
olduğunuzzamanveyailaç,alkolya
dabaşkatedavietkisialtındaiken
elektriklialetikullanmayın.
Elektrikli
aletleri kullanırken bir anlık dikkatsizlik ciddi
kişisel yaralanmaya yol açabilir.
b)
Kişiselkoruyucuekipmankullanın.
Herzamangözkorumasıkullanın.
Uygun koşullarda kullanılan toz maskesi,
kaymaz emniyet ayakkabıları, kask veya
duyma koruması gibi koruyucu ekipman
kişisel yaralanmaları azaltacaktır.
c)
İstemeyerekçalıştırmaktankaçının.
Güçkaynağınıve/veyapiltakımını
bağlamadan,aletiyerdenkaldırmadan
yadataşımadanönceanahtarınoff
(kapalı)konumdaolduğundanemin
olun.
Elektrikli aletleri parmağınız anahtar
üzerindeyken taşımak veya anahtarı açık
konumdaki elektrikli aletleri prize takmak
kazalara yol açacaktır.
d)
Elektriklialetiaçıkkonumagetirmeden
öncevarsaayaranahtarınıveyaayarlı
penseyiçıkarın.Elektriklialetindönen
birparçasınabağlı
kalan bir ayarlı pense
veya anahtar kişisel yaralanmaya yol
açabilir.
e)
Yetişemeyeceğiniznoktalara
uzanmayın.Herzamaniçinuygun
ayakbasacakyerbulunvedengenizi
sağlayın.
Böylece beklenmeyen
durumlarda elektrikli alet daha iyi kontrol
edilebilecektir.
f) Uygun giysiler giyin. Bol giysiler veya
takıkullanmayın.Saçınız,giysileriniz
veeldivenlerinizihareketliparçalardan
uzaktutun.
Bol giysiler, takılar veya uzun
saç hareketli parçalara takılabilir.
g)
Tozçekmevetoplamaaraç-
gereçlerininbağlanmasıiçincihazlar
verilmesihalinde,bunlarınuygun
biçimdebağlanmasıvekullanılmasını
sağlayın.
Toz toplama kullanımı tozla ilgili
tehlikeleri azaltabilir.
a)
Elektriklialetizorlamayın.
Uygulamanıziçindoğruelektriklialeti
kullanın.
Doğru elektrikli alet, tasarlandığı
hızda işi daha iyi ve daha güvenli
yapacaktır.
b)
Açma/kapamaanahtarıçalışmazsa
elektriklialetikullanmayın.
Anahtar ile
kontrol edilemeyen herhangi bir elektrikli
alet tehlikelidir ve tamir edilmelidir.
c)
Herhangibirayarlamayapmadan,
aksesuvarlarıdeğiştirmedenveya
elektrikli aletleri saklamadan önce
fişigüçkaynağındançekinve/
veyapilleriçıkarın.
Bu türlü koruyucu
güvenlik önlemleri elektrikli aletin yanlışlıkla
çalışması riskini azaltır.
d)
Boştakielektriklialetleriçocukların
erişemeyeceğiyerlerdemuhafazaedin
veelektriklialetiveyabutalimatları
bilmeyenkişilerinelektriklialeti
kullanmasınaizinvermeyin.
Elektrikli
aletler eğitimsiz kullanıcıların elinde çok
tehlikelidir.
e)
Elektriklialetlerinbakımınıyapın.
Hareketliparçalarınhizalanmasını
veyabağlantılarını,parçalarınkırık
olupolmadığınıveelektriklialetlerin
çalışmasınıetkileyebilecekbaşka
koşullarıkontroledin.Hasarlıise,
kullanmadan önce elektrikli aletin
tamiriniyaptırın.
Kazaların pek çoğu,
bakımı yapılmayan elektrikli aletlerden
kaynaklanmaktadır.
f)
Kesmealetlerinikeskinvetemiztutun.
Bakımıgerektiğişekildeyapılmış
keskinuçlu
kesme aletlerinin rahatsızlık
yaratma olasılığı daha az, kontrolü daha
kolaydır.
g)
Elektriklielaletini,aksesuvarları
veuçlarıvb.çalışmaşartlarınıve
gerçekleştirilecekişigözönüne

Türkçe
16
alarakbutalimatlaragörekullanın.
Elektrikli aletin amacı dışındaki işlemlerde
kullanılması tehlikeli durumlara yol açabilir.
a)
Elektriklialetinizineğitimlibirtamir
görevlisitarafındansadeceaynıyedek
parçalarkullanılaraktamiredilmesini
sağlayın.
Bu şekilde elektrikli aletin
güvenliği sağlanmış olacaktır.
• Koruyucukulaklıkkullanın.Gürültüye
maruz kalınması, işitme kaybına yol açabilir.
• Ürünpaketindebulunanyardımcıtutma
kollarınıkullanın.
Kontrolü kaybetmeniz,
yaralanmanıza neden olabilir.
• Aletin,gömülüelektrikkablolarına
veyakendikablosunatemasetmesine
yolaçabilecekdurumlardaaletiizole
edilmişsaplarındantutun.
Alet elektrik
akımı bulunan kablolarla temas ettiğinde, akım
iletken metal parçaları üzerinden operatöre
iletilerek elektrik çarpmasına yol açabilir.
• Kesilecekparçayısağlambiryere
sabitlemekiçinişkenceveyabaşka
araçlarkullanın.
Parçanın elinizle
veya vücudunuzu kullanarak tutulması
güvenilmezdir ve kontrol kaybına neden
olabilir.
• Koruyucugözlükveyagözükoruyacak
başkaaraçlarkullanın.
Kırma delme
işlemleri uçuşan talaşlara neden olur. Uçan
parçacıklar kalıcı göz hasarına neden olabilir.
Toz üreten uygulamalarda toz maskesi veya
solunum aygıtı takın. Uygulamaların çoğu için
koruyucu kulaklık gerekebilir.
• Aletiherzamansıkıcatutun.Bualeti
herikielinizlekavramadankullanmaya
çalışmayın.
Yan tutamağın daima
kullanılması tavsiye edilir. Bu aletin tek elle
kullanılması kontrol kaybına neden olabilir.
Nervürlü çelik gibi sert malzemelerin kırılması
veya bu tür malzemelerle karşılaşılması
da tehlikeli olabilir. Kullanmadan önce yan
tutamağı sıkın.
• Bualetiuzunsüreçalıştırmayın.
Çekiç etkisinden kaynaklanan titreşim el
ve kollarınıza zarar verebilir. İlave tampon
sağlamak için eldiven kullanın ve sık sık ara
vererek maruz kalınan titreşimi sınırlayın.
•
Uçlarıkendibaşınızayenilemeye
çalışmayın.
Keskilerin yenilenmesi yetkili bir
uzman tarafından yapılmalıdır. Uygun olmayan
şekilde yenilenmiş keskiler yaralanmaya
neden olabilir.
• Aletikullanırkenveyauçlarıdeğiştirirken
eldiven giyin.
Alet üzerindeki açıkta olan
metal parçalar ve uçlar çalışma sırasında
oldukça sıcak olabilirler. Parçalanan
malzemenin küçük parçacıkları çıplak ellere
zarar verebilir.
•
Uçtamolarakdurmadanaletiaslayere
koymayın.
Dönen uçlar yaralanmaya neden
olabilir.
• Sıkışanuçlarıçıkarmakiçinuçlara
çekiçlevurmayın.
Metal veya malzeme
parçacıkları fırlayarak yaralanmaya neden
olabilir.
•
Hafifçeaşınmışkeskilertaşlama
yöntemiyleyenidenkeskinleştirilebilir.
• Elektrikkablosunudönenuçtanuzakta
tutun.
Kabloyu vücudunuzun hiçbir uzvuna
sarmayın.
Dönen uca dolaşan bir elektrik
kablosu yaralanmaya ve kontrol kaybına
neden olabilir.
Aşağıdaki riskler kırıcı - delici kullanmanın özünde
mevcuttur:
– Aletin dönen veya sıcak parçalarına dokunma
sonucu yaralanma
İlgili güvenlik kurallarının uygulanmasına ve
güvenlik donanımlarının kullanılmasına rağmen
kalıcı bazı risklerin önüne geçilememektedir.
Bunlar arasında:
– Işitme kaybı.
– Aksesuar değiştirirken parmakların ezilme
tehlikesi.
– Beton ve/veya çimento bazlı malzemeler
üzerinde çalışırken meydana gelen tozun
yutulması sonucu oluşan sağlık sorunları
bulunmaktadır.
Alet üzerinde aşağıdaki etiketler bulunmaktadır:
Kullanmadan önce kullanım kılavuzunu
okuyun.
Kulak koruması kullanın.

Türkçe
17
Göz koruması kullanın.
İmalat yılını da içeren Tarih Kodu (n) gövdeye
basılıdır.
Örnek:
2010 XX XX
İmalat Yılı
Paket içeriğinde şunlar bulunmaktadır:
1 Ağır hizmet tipi döner kırıcı delici
1 Yan tutamak
1 Derinlik ayarlama çubuğu
1 Alet kutusu
1 Anahtarsız mandren (D25124K)
1 Kullanım kılavuzu
1 Parça şeması
• Alet, parçalar ve aksesuarlarda nakliye
sırasında hasar oluşup oluşmadığını kontrol
edin.
• Çalıştırmadan önce bu kılavuzu iyice okuyup
anlamak için zaman ayırın.
UYARI: Hiçbir zaman elektrikli
aleti veya herhangi bir parçasını
değiştirmeyin. Hasarla veya
yaralanmayla sonuçlanabilir.
a. Değişken hız düğmesi
b. Kilitleme düğmesi
c. İleri/geri düğmesi
d. Mod seçme düğmesi
e. Emniyet kilidi
f. Uç yuvası
g. Toz kapağı
h. Kilitleme bileziği (D25124)
i. Derinlik ayarlama çubuğu
j. Yan tutamak
k. Derinlik sabitleme kelepçesi
Bu ağır hizmet tipi döner kırıcı deliciler profesyonel
delme ve darbeli delme, vidalama ve hafif yontma
maksadıyla tasarlanmıştır.
Islak koşullarda veya yanıcı sıvı ya da gazların
mevcut olduğu ortamlarda
.
Bu kırıcı deliciler profesyonel elektrikli aletlerdir.
Çocukların alete ellemesine . Bu
alet deneyimsiz kullanıcılar tarafından kullanılırken
nezaret edilmelidir.
Tüm döner kırıcı deliciler matkap ucunun sıkışması
durumunda operatöre iletilen maksimum tork
tepkisini azaltmak için bir tork sınırlama kavraması
ile donatılmışlardır. Bu özellik ayrıca dişli ve elektrik
motorunun teklemesini de engeller. Tork sınırlama
kavraması fabrikada ayarlanmış olarak gelir ve
sonradan ayarlanamaz.
Elektrik motoru sadece tek bir voltaj için
tasarlanmıştır. Her zaman güç kaynağının, etiket
plakasındaki voltajla aynı olup olmadığını kontrol
edin.
DeWALT şarj cihazınız EN 60745
standardına uygun olarak çift yalıtımlıdır;
bu nedenle, topraklama kablosuna gerek
yoktur.
Güç kablosu hasarlıysa, DeWALT servis
kuruluşundan temin edilebilen özel olarak
hazırlanmış bir kabloyla değiştirilmelidir.
Uzatma kablosu kullanılması gerekiyorsa bu aletin
giriş gücüne (teknik verilere bakın) uygun onaylı
bir 3 damarlı uzatma kablosu kullanın. Minimum
iletken ebadı 1.5 mm
2
; maksimum uzunluk 30
m’dir.
Bir kablo makarası kullanırken, her zaman kabloyu
tamamen makaradan çıkarın.
UYARI: Yaralanma riskini
azaltmakiçin,aksesuarları
takıpçıkarmadanönce,
ayarlamayapmadanveyaayarları
değiştirmedenönceveyatamir
etmeyebaşlamadanönceüniteyi
kapatınvemakineningüçkaynağı
bağlantısınıkesin.Tetikleme
anahtarının KAPALI konumda
olduğundan emin olun. Aletin
yanlışlıkla çalışması yaralanmaya
sebep olabilir.

Türkçe
18
Bu alet aşağıdaki çalışma modlarında kullanılabilir:
Döner delme: vidalama ve çelik, ahşap
ve plastikleri delmek için
Darbeli delme: beton ve çimento bazlı
malzemeleri delmek için.
Uç dönüşü: sadece düz keskiyi istenen
pozisyona döndürmek için kullanılan
çalışmayan pozisyon.
Sadece darbe: hafif yontma, keskileme
ve yıkım uygulamaları için. Bu modda
alet ayrıca sıkışan bir matkap ucunu
kurtarmak için bir levye gibi de
kullanılabilir.
1. Çalışma modunu seçmek için emniyet kilidine
(e) basın ve istene modun simgesini gösterene
dek mod seçme düğmesini (d) döndürün.
2. Emniyet kilidini bırakın ve mod seçme
düğmesinin yerine sabitlendiğini kontrol edin.
UYARI: Çalışma modunu, alet
çalışırken seçmeyin.
Keski belirlenerek 52 farklı pozisyona sabitlenebilir.
1. “Dönen uç” pozisyonunu gösterene dek mod
seçme düğmesini (d) çevirin.
2. Keskiyi istenilen pozisyona döndürün.
3. Mod seçme düğmesini (d) “sadece çekiç”
pozisyonuna çevirin.
4. Keskiyi pozisyona sabitlenene dek döndürün.
®
Bu alet SDS Plus
®
aksesuarlarını kullanır (SDS
Plus
®
uç sapının kesiti için şekil 3’deki küçük
resme bakın). Sadece profesyonel aksesuarlar
kullanmanızı tavsiye ederiz.
1. Uç sapını temizleyerek gresleyin.
2. Uç sapını uç yuvasına (f) sokun.
3. Ucu aşağı bastırarak oluklara oturana dek
hafifçe çevirin.
4. Düzgün oturup oturmadığını kontrol etmek
için ucu çekin. Kırma delme fonksiyonu, uç
yuvasına oturduğunda ucun eksenel olarak
birkaç santimetre oynayabilmesini gerektirir.
5. Ucu çıkarmak için uç yuvası sabitleme
bileziğini (l) geri çekin ve ucu çekerek çıkarın.
UYARI: Aksesuar değiştirirken
daima eldiven giyin. Alet ve aksesuar
üzerindeki açıkta olan metal parçalar
çalışma sırasında oldukça sıcak
olabilirler.
Yan tutamak (j) sağ elini ya da sol elini kullanan
kullanıcıların kullanabilecekleri şekilde takılabilir.
UYARI: Yan tutamak düzgün
takılmadan aleti kullanmayın.
1. Yan tutamağı gevşetin.
2.
tutamak solda kalacak şekilde yan tutamak
kelepçesini uç yuvasının arka kısmında
bulunan manşonun üzerinden geçirin.
tutamak sağda kalacak şekilde yan tutamak
kelepçesini uç yuvasının arka kısmında
bulunan manşonun üzerinden geçirin.
3. Yan tutamağı istenilen pozisyona döndürün ve
tutamağı sıkın.
1. Gereken matkap ucunu yukarıda anlatıldığı
şekilde takın.
2. Derinlik sabitleme kelepçesine (k) bastırın ve
basılı tutun.
3. Derinlik ayarlama çubuğunu (i) derinlik
sabitleme kelepçesinin içinden geçirin.
4. Delme derinliğini şekilde gösterildiği gibi
ayarlayın.
5. Derinlik sabitleme kelepçesini serbest bırakın.
1. İleri yönlü (sağ) dönüş için ileri/geri düğmesini
(c) sağ tarafa alın. Aletin üzerindeki ok
işaretlerine bakın.
Sayfa yükleniyor...
Sayfa yükleniyor...
Sayfa yükleniyor...
Sayfa yükleniyor...
Sayfa yükleniyor...
Sayfa yükleniyor...
-
 1
1
-
 2
2
-
 3
3
-
 4
4
-
 5
5
-
 6
6
-
 7
7
-
 8
8
-
 9
9
-
 10
10
-
 11
11
-
 12
12
-
 13
13
-
 14
14
-
 15
15
-
 16
16
-
 17
17
-
 18
18
-
 19
19
-
 20
20
-
 21
21
-
 22
22
-
 23
23
-
 24
24
-
 25
25
-
 26
26


DeWalt D25013K Kullanım kılavuzu
- Kategori
- Elektrikli aletler
- Tip
- Kullanım kılavuzu
diğer dillerde
- English: DeWalt D25013K User manual