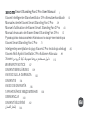
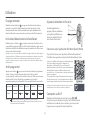
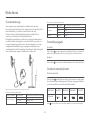
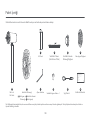
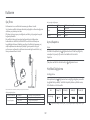
Xiaomi 2 Pro Smart Standing Fan Kullanım kılavuzu
- Tip
- Kullanım kılavuzu

Smart Standing Fan 2 Pro User Manual
.1
Xiaomi Intelligenter Standventilator 2 Pro Benutzerhandbuch
.15
Manuale utente Xiaomi Smart Standing Fan 2 Pro
.29
Manuel d'utilisation de Xiaomi Smart Standing Fan 2 Pro
.43
Manual de usuario de Xiaomi Smart Standing Fan 2 Pro
.57
.127
.129
.132
.134
.136
.138
.140
.142
.144
Руководство пользователя Напольного смарт-вентилятора
Xiaomi Smart Standing Fan 2Pro
.71
Inteligentny wentylator stojący Xiaomi 2 Pro Instrukcja obsługi
.85
Xiaomi Akıllı Ayaklı Vantilatör 2 Pro Kullanım Kılavuzu
.99
.113
Xiaomi ﻦﻣ وﺮﺑ 2 ﺔﻴﻛذ ﺔــﻳدﻮﻤﻋ ﺔــﺣوﺮﻣ مﺪﺨﺘــﺴﻣ ﻞــﻴﻟد
WARRANTY NOTICE
AVISO DE GARANTÍA
ГАРАНТИЙНОЕ УВЕДОМЛЕНИЕ
GARANTIE
GARANTIEERKLÄRUNG
AVVISO SULLA GARANZIA
GWARANCJA
GARANTİ BİLDİRİMİ
نﺎﻤﻀﻟا رﺎﻌﺷإ


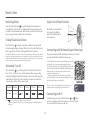
Safety Instructions READ AND SAVE THESE INSTRUCTIONS
Improper use may lead to electric shocks, fire, personal injury, or other damage.
WARNINGS
1
This appliance can be used by children aged from 8 years and above and
persons with reduced physical, sensory or mental capabilities or lack of
experience and knowledge if they have been given supervision or instruction
concerning use of the appliance in a safe way and understand the hazards
involved. Children shall not play with the appliance. Cleaning and user
maintenance shall not be made by children without supervision.
This appliance is not intended for use by persons (including children) with
reduced physical, sensory or mental capabilities, or lack of experience and
knowledge, unless they have been given supervision or instruction concerning
use of the appliance by a person responsible for their safety.
Children should be supervised to ensure that they do not play with the appliance.
Ensure that the fan is switched off from the supply mains before removing the guard.
This appliance contains baeries that are non-replaceable.
WARNING: For the purposes of recharging the baery, only use the detachable
supply unit <BLJ24W120200P-V> provided with this appliance.

Safety Instructions
2
Do not use this fan if the power cord of the charging base is damaged or its
power plug is loose.
Do not operate any fan with a damaged cord or plug. Discard fan or return to an
authorized service facility for examination and/or repair.
Do not use this fan in a place where it will easily fall over or where there are other
unstable objects nearby.
Do not excessively pinch, bend, or twist the power cord of the charging base as
this may expose or break its core.
Do not insert your fingers or any object into the front grille, rear grille, or the fan
blades when the fan is in use.
Keep hair and fabrics away from the fan to avoid geing them caught in the fan.
Under normal use of condition, this equipment should be kept a separation
distance of at least 20 cm between the antenna and the body of the user.
This appliance contains built-in li-ion baery. Do not disassemble, impact, crush
the baery or throw it into fire. If there is severe swelling, do not continue to use.
Do not leave the baery in high temperature environment.

1
Safety Instructions
3
Do not use any improper power outlet.
Do not use the charging base provided with this fan for any other device.
Prior to cleaning or other maintenance, the appliance must be disconnected
from the supply mains.
Do not improperly dispose of old baeries. Used baeries should be discarded
at a professional recycling facility.
Do not charge the fan on uneven places or plush materials. Otherwise, it is easy
to cause circuit failure or fire due to poor contact between the charging base
and the charging port.

To avoid electric shocks, fire, personal injury, or other damage, make sure the fan base is installed last. Please follow the installation instructions in the user
manual.
Do not turn on the fan or connect it to the charging base if it is not completely assembled.
Turn off or unplug the fan before installing or disassembling it. Do not touch the on/off buon to prevent the fan from running and causing danger.
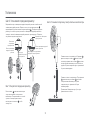
Installation
Firmly hold the fan stand to avoid it from falling down and causing personal injury.
Using the Fan
Do not lean on or tilt the fan while it is running.
Do not shake the fan's head repeatedly so as to avoid damage to the internal mechanism.
Immediately stop using the fan if it makes unusual sounds, gives off bad odors, overheats, or rotates irregularly.
Charging the Fan
Do not unplug the charging base by directly pulling at the cord or wiggling it out of the outlet. Instead, pull the plug out itself.
When the baery is depleted, the fan should be charged as soon as possible. To prevent the baery from being damaged, connect the charging base to the fan
base in a timely manner.
Do not aempt to repair the charging base by yourself if it is damaged.
When the charging base is damaged or broken, it must be replaced with a genuine one purchased from the manufacturer or aer-sales service department.
When the fan is charging, the fan base may get warm. It is recommended to charge the fan on insulating materials or in places that are not easily affected by
heat sources, so as to prevent the places where the fan is put from becoming discolored or deformed.
Care & Maintenance
When maintaining and cleaning the fan, make sure to remove the fan base first before removing other parts and to install the fan base last when installing.
Make sure the fan is unplugged before removing the protective cover.
Safety Instructions
PRECAUTIONS
Transportation
4

11 12
13
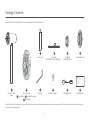
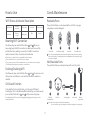
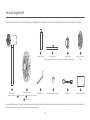
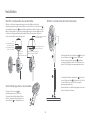
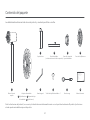
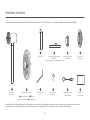
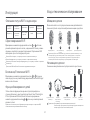
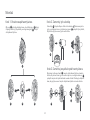
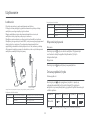
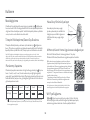
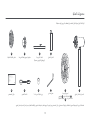
Package Contents
Fan Assembly
( Front Grille + Fan Blade Assembly
+ Rear Grille)
2
Charging Base
9
Motor & Upper
Stand
1
4
Fan Base
(with Built-in Li-ion Baery)
Hex Key
7
User Manual
10
3
Lower Stand Fan Blade
Assembly Knob
Rear Grille Knob
5 6
Fan Grille Screw ×1
8
5
Read this manual carefully before use, and retain it for future reference.
Note: Illustrations of the product, accessories, and user interface in the user manual are for reference purposes only. The actual product and functions may vary
due to product enhancements.
Smart Standing Fan 2 Pro User Manual
.1
Xiaomi Intelligenter Standventilator 2 Pro Benutzerhandbuch
.15
Manuale utente Xiaomi Smart Standing Fan 2 Pro
.29
Manuel d'utilisation de Xiaomi Smart Standing Fan 2 Pro
.43
Manual de usuario de Xiaomi Smart Standing Fan 2 Pro
.57
.127
.129
.132
.134
.136
.138
.140
.142
.144
Руководство пользователя Напольного смарт-вентилятора
Xiaomi Smart Standing Fan 2Pro
.71
Inteligentny wentylator stojący Xiaomi 2 Pro Instrukcja obsługi
.85
Xiaomi Akıllı Ayaklı Vantilatör 2 Pro Kullanım Kılavuzu
.99
.113
Xiaomi ﻦﻣ وﺮﺑ 2 ﺔﻴﻛذ ﺔــﻳدﻮﻤﻋ ﺔــﺣوﺮﻣ مﺪﺨﺘــﺴﻣ ﻞــﻴﻟد
WARRANTY NOTICE
AVISO DE GARANTÍA
ГАРАНТИЙНОЕ УВЕДОМЛЕНИЕ
GARANTIE
GARANTIEERKLÄRUNG
AVVISO SULLA GARANZIA
GWARANCJA
GARANTİ BİLDİRİMİ
نﺎﻤﻀﻟا رﺎﻌﺷإ

6
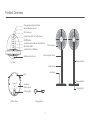
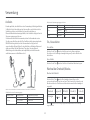
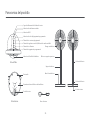
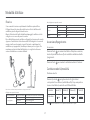
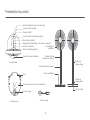
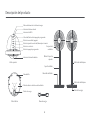
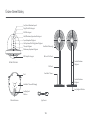
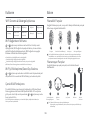
Product Overview
Boom View
Charging Port
Fan Base
Boom Cover
Pad
Top View
Baery Level Indicator
Speed/Scheduled Turn-off Indicator
Wi-Fi Indicator
Natural Breeze Indicator
Charging Base Alignment Mark
Speed Adjustment/Mode Switch Buon
Scheduled Turn-off Buon
On/Off Buon
Oscillation Buon
Charging Base
Motor & Upper Stand
Fan Base
Lower Stand
Fan Assembly
Release Buon
Release Buon
Charging Port

7
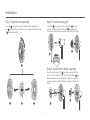
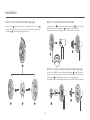
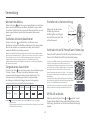
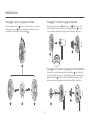
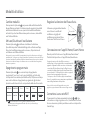
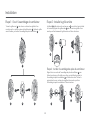
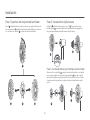
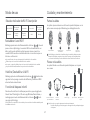
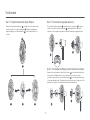
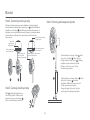
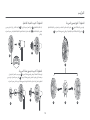
Installation
Step 1: Open the fan assembly Step 2: Install the rear grille
Turn the front grille counterclockwise until it separates from
the rear grille. Remove the front and rear grille, then take out the
fan blade assembly.
11
12
13
Install the rear grille onto the motor with " " facing
upwards, and then install and turn the rear grille knob
clockwise to firmly fix the rear grille to the sha of the motor.
6
13
Step 3: Install the fan blade assembly
Align the center hole of the fan blade assembly with the
motor's sha to install it into position, then install the fan
blade assembly knob onto the motor's sha. Turn the knob
counterclockwise to fix the fan blade assembly to the motor's
sha.
12
5
11 12 13
2
6
13
12
5

8
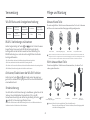
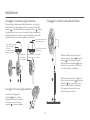
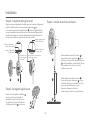
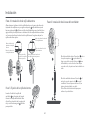
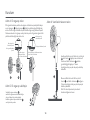
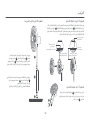
Installation
Step 6: Install the fan base
Insert the fan grille screw into
the hole at the boom of the fan
grille. Turn the screw clockwise with
the included hex key to tighten it.
Step 5: Fasten the front grille
8
7
Step 4: Install the front grille
Standing fan mode: Connect motor &
upper stand to the lower stand, and
then connect lower stand to the fan
base, as illustrated. Once you hear a click,
the parts have been installed successfully.
Note: Press the release buon to remove
the lower stand.
Table fan mode: Connect motor & upper
stand to the fan base. Once you hear a
click, the parts have been installed
successfully.
4
Align the front grille alignment mark with the rear grille le alignment
mark, and make sure the front grille is properly embedded into the
rear grille. Turn the front grille clockwise until the front grille
alignment mark aligns the rear grille right alignment mark. Make sure
the grilles are securely fastened.
11
13
Top View before
Fastening the
Front & Rear Grilles
Front Grille
Alignment Mark
Front Grille
Alignment Mark
Rear Grille Right
Alignment Mark
Rear Grille Le
Alignment Mark
Top View aer Fastening the
Front & Rear Grilles 1
1
3
4
8
7
3
4
1
11 13

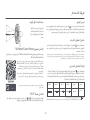
How to Use
9
Turning On/Off
Charging
≤30%
30%–100%
100%
Baery LevelFan Status
On/Off
· Connecting to the power outlet
Blinking orange
Blinking white
Off
Baery Level Indicator Status
30%–100%
1%–30%
0%
0%–100%Off
Off (The fan will automatically turn off)
Baery LevelFan Status
On
Off
· Not connecting to the power outlet
Baery Level Indicator Status
· Connect the charging base to the charging port on the boom of the fan
base, and then plug in the charging base.
· When the baery level indicator is blinking, the fan is successfully connected
to the power.
· You can use this fan by either connecting to a power outlet or not.
The fan is equipped with a built-in Wi-Fi module, and energy consumption
occurs even when it is turned off. By fully charging the fan and then turning
it off, the baery can last for approximately 2 days. To maintain optimal
baery performance, it is recommended to keep charging the fan if it is not
in use.
· It is recommended to fully charge the fan before use.
Note: Always charge and use the fan in a flat, stable place.
Press the buon to start the fan. When turned on for the first time,
the default speed is slow (1) and the mode is direct breeze.
Turning On
Turning Off
Press the buon to stop the fan while it is running.
Press the buon to adjust the speed, and the corresponding
indicators will light up (see table below). Aer the fan is turned off
and turned back on again, the speed will be the last used one.
Switching Speed/Mode
Switching Speed
Note: means the indicator is on; means the indicator is off.
Indicator
Speed Slow (1)
Orange
White
Medium (2) Fast (3) Turbo (4)

10
How to Use
Press and hold the buon to switch between direct breeze and
natural breeze. The indicator is off while in direct breeze mode and is
on while in natural breeze mode. Aer the fan is turned off and turned
back on again, the mode will be the last used one.
Switching Mode
Enable/Disable Oscillation
Press the buon to cycle through the scheduled turn-off times: 1
hour, 2 hours, 3 hours, 4 hours, and disabled, and the corresponding
indicator(s) will light up (see table below). Five seconds aer using the
scheduled turn-off function, the indicator(s) resume to indicate the
corresponding status of the current speed.
Scheduled Turn-off
Note: means the indicator is on; means the indicator is off.
Scheduled
Indicator
1 hour 2 hours 3 hours 4 hoursDisabled
For more scheduled turn-off options (up to 8 hours), please go to the Mi Home/Xiaomi
Home app.
Note: When the Wi-Fi connection is reset, the oscillation angle range will change to the default
angle of 90°. Unplug then plug the fan in or reset the Wi-Fi connection then turn on the fan, the
fan will automatically oscillate its angle if enabling the oscillation function. The oscillation time
varies depending on different angles, please wait with patience.
Press the buon to enable or disable oscillation. You can set the
oscillation angle range in the app. Aer the fan is turned off and turned
back on again, the oscillation seing will be the last used one.
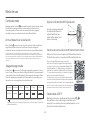
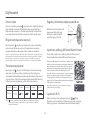
This product works with Mi Home/Xiaomi Home app*. Control
your device with Mi Home/Xiaomi Home app.
Scan the QR code to download and install the app. You will
be directed to the connection setup page if the app is
installed already. Or search "Mi Home/Xiaomi Home" in the
app store to download and install it. Open Mi Home/Xiaomi
Home app, tap"+"on the upper right, and then follow
prompts to add your device.
* The app is referred to as Xiaomi Home app in Europe
(except for Russia). The name of the app displayed on your
device should be taken as the default.
Note: The version of the app might have been updated, please
follow the instructions based on the current app version.
Connecting with Mi Home/Xiaomi Home App
Simultaneously press and hold the buons and . Once
you hear a long beep, the fan is awaiting a connection, then
you can pair it with a device via the app.
Connecting to Wi-Fi
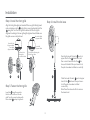
Adjust the Airflow Direction
Gently li or push down the
fan's head or fan grille to
adjust the airflow upwards
or downwards.
23° upwards
16 °downwards

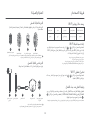
11
Motor &
Upper Stand
1
Fan Base
4
Lower Stand
3
Fan Blade
Assembly Knob
5
Charging Base
9
Care & Maintenance
Washable Parts
The parts listed below can be cleaned with a so cloth or sponge
using water or neutral detergent.
Note: Stop and unplug the fan, then disassemble it and clean its parts. Aer cleaning,
make sure all parts are completely dry before installing them and using the fan again.
Avoid direct sunlight.
Front Grille Fan Blade Assembly Rear Grille
11 12 13
Not Washable Parts
The parts listed below can be wiped clean with a so, dry cloth.
Notes: Do not rinse the parts listed above with water.
Rear Grille Knob
6
How to Use
Wi-Fi Status & Indicator Description
Wi-Fi Status
Indicator Blinking
orange
Awaiting
Connection
Blinking blue
Connecting
Blue
Connected
Orange
Fail to Connect
Simultaneously press and hold the buons and . Once you
hear a long beep, the Wi-Fi connection has been reset successfully
and then the fan is awaiting a connection. The Wi-Fi connection
needs to be reset on the circumstances listed below:
Reseing Wi-Fi Connection
The Xiaomi account that the fan is paired with has been changed.
The router that the fan is connected to has been changed.
The account or password of the router that the fan is connected to has been changed.
The Mi Home/Xiaomi Home app is unable to control the fan.
Do not use thinner, gasoline, detergent or alkaline detergent to clean any parts.
Enabling/Disabling Wi-Fi
Simultaneously press and hold the buons and for seven seconds
until you hear a notification sound, and then the Wi-Fi is enabled or
disabled.
To disable the function of child lock, go to the page of Mi Smart
Standing Fan 2 Pro in the Mi Home/Xiaomi Home app, or simultaneously
press and hold the buons and until you hear a long beep.
Note: Reseing the Wi-Fi connection or unplugging and plugging in the fan again can also
disable this function.
Child Lock Function

12
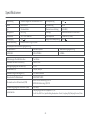
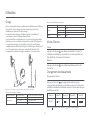
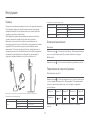
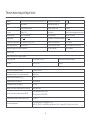
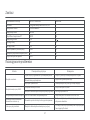
Specifications
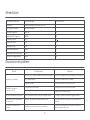
Product Information Requirements
Maximum Fan Flow Rate (F)
Fan Power Input (P)
Service Value (SV)
Maximum Air Velocity (c)
Measurement Standard for Service Value
Standby Power Consumption (PSB)
Fan Sound Power Level (LWA)
Contact Detailes
Test Data
20.28 m³/min
12.7 W
1.60 (m³/min)/W
3.47 meters/sec
EN IEC 60879:2019
Without Wi-Fi connection: 0.216 W
With Wi-Fi connection: 0.391 W
56.3 dB(A)
Zhejiang Xingyue Electric Equipment Co., Ltd.
South Side, 24th Floor, Jinpin Building, Headquarters Center, Yongkang City, Zhejiang Province, China
Name
Model
Smart Standing Fan 2 Pro Rated Voltage
24 W
Baery Capacity
Baery Type Rechargeable Li-ion Baery
2800 mAh(33.6 Wh)
343 × 330 × 1000 mm
≤58 dB(A)
Wi-Fi IEEE 802.11 b/g/n 2.4 GHz
Approx. 3.2 kg
12 V
Charging Input 12 V 2 A Limited Charging Voltage 0.8 V
Type Standing Fan
Net Weight
Wireless Connectivity
RF Specification
2.4 G Wi-Fi
Operation Frequency
2412–2472 MHz
Maximum Output Power
<20 dBm
*Radio Frequency and Radio Transmission Power
Item Dimensions
Noise Emission
Rated Power
BPLDS03DM

13
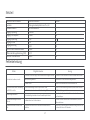
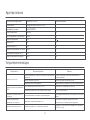
Power Adapter
Troubleshooting
Information Published
Manufacturer
Input Voltage
Efficiency at Low Load(10%)
No-load Power Consumption
Model Identifier
Input AC Frequency
Output Voltage
Output Current
Output Power
Value and Precision Unit
100–240
2.0
24.0
A
W
Average Active Efficiency 89.09
83.11
0.070
%
%
W
V~
50/60 Hz
Zhongshan Baolijin Electronic Co., Ltd.
BLJ24W120200P-V
12.0 V
-
-
Fault
The fan doesn't work.
The fan is unable to connect
to Wi-Fi.
Fan blades are stuck.
The baery level indicator
does not light up.
Possible Cause Solution
The baery is depleted.
Fan blades are stuck by a foreign object.
The baery enters into sleep protection.
Unplug the fan and remove the foreign object.
Connect the fan to the charging base to activate the
baery.
The oscillation function
does not work.The fan is under the auto-oscillation state. Wait for the auto-oscillation completes. It will last for
14 seconds at most.
Charge the fan with the charging base.
The Wi-Fi connection is 5 GHz. Connect to a 2.4 GHz Wi-Fi network.
The stand does not properly connect to the fan base.
Child lock is enabled.
The fan has been offline for more than half an hour. Reset the Wi-Fi connection.
Install the fan base with the stand correctly.
Disable the child lock function.

14
Manufactured for: Xiaomi Communications Co., Ltd.
Manufactured by: Zhejiang Xingyue Electric Equipment Co., Ltd.
(a Mi Ecosystem company)
Address: South Side, 24th Floor, Jinpin Building, Headquarters
Center, Yongkang City, Zhejiang Province, China
For further information, please go to www.mi.com V1.0
Hereby, Zhejiang Xingyue Electric Equipment Co., Ltd. declares that the radio equipment type BPLDS03DM is in compliance with Directive
2014/53/EU. The full text of the EU declaration of conformity is available at the following internet address:
hp://www.mi.com/global/service/support/declaration.html
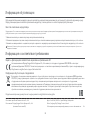
All products bearing this symbol are waste electrical and electronic equipment (WEEE as in directive 2012/19/EU) which should not be mixed
with unsorted household waste. Instead, you should protect human health and the environment by handing over your waste equipment to a
designated collection point for the recycling of waste electrical and electronic equipment, appointed by the government or local authorities.
Correct disposal and recycling will help prevent potential negative consequences to the environment and human health. Please contact the
installer or local authorities for more information about the location as well as terms and conditions of such collection points.
Regulatory Compliance Information
Environmental Notice
Steps of Removing the Baery
Europe —EU declaration of conformity
Disposal and recycling information
The built-in rechargeable li-ion baery of this fan contains chemicals that may pollute the environment. Before disposing of this fan, remove the baery
and then discard it at a professional recycling facility.
Warning: The fan will no longer be usable once the baery is removed. The following steps should only be completed upon the permanent disposal of the fan. Do not dismantle the fan on your own for
routine maintenance.
Note: If you accidentally touch the substances leaked from the baery, wash the affected area with a large amount of water and seek medical aention immediately.
1. Turn off the fan and remove the fan base.
2. Take the pads out from the fan base and unscrew the boom cover of the fan base to remove it.
3. Press the cable connector clip that connects to the baery, and pull out the cable. Then unscrew the baery to remove it.
For detailed e-manual, please go to www.mi.com/global/service/userguide

Sicherheitshinweise DIESE ANWEISUNGEN LESEN UND AUFBEWAHREN
15
Dieses Gerät ist für Kinder ab einem Alter von 8 Jahren und Personen geeignet,
die körperlich, sensorisch oder geistig behindert sind oder nicht über
ausreichend Erfahrung oder Kenntnisse verfügen, wenn sie eine Beaufsichtigung
oder Anweisung zur sicheren Nutzung des Geräts erhalten haben und wissen,
welche Gefahren aureten können. Kinder dürfen nicht mit dem Gerät spielen.
Die Reinigung und Benutzerwartung dürfen nicht von Kindern ohne Aufsicht
durchgeführt werden.
Dieses Gerät ist nicht für die Nutzung durch Personen (inklusive Kinder) mit
eingeschränkten körperlichen, sensorischen oder mentalen Fähigkeiten, oder
für Personen mit einem Mangel an Erfahrung und Wissen geeignet, es sei denn,
diese werden beaufsichtigt oder erhalten von einer Person, die für die
Sicherheit dieser Person(en) verantwortlich ist, eine Anleitung bezüglich der
Bedienung des Gerätes.
Kinder sollten beaufsichtigt werden, damit sichergestellt ist, dass diese nicht
mit dem Gerät spielen.
Unsachgemäßer Gebrauch kann zu Stromschlägen, Brand, Verletzungen oder anderen
Schäden führen.
WARNUNGEN

Sicherheitshinweise
Stellen Sie sicher, dass der Ventilator vom Stromnetz getrennt ist, bevor Sie die
Schutzvorrichtung entfernen.
Dieses Gerät enthält Akkus, die nicht ausgewechselt werden können.
WARNUNG: Zum Aufladen des Akkus darf ausschließlich das im Lieferumfang
dieses Geräts enthaltene abnehmbare Netzteil <BLJ24W120200P-V>
verwendet werden.
Unter normalen Betriebsbedingungen muss dieses Gerät einen Abstand von
mindestens 20cm zwischen der Antenne und dem Körper des Benutzers
einhalten.
Dieses Gerät enthält einen eingebauten Li-Ionen-Akku. Zerlegen Sie den Akku
nicht, schlagen Sie nicht auf ihn ein, zerdrücken Sie ihn nicht und werfen Sie ihn
nicht ins Feuer. Verwenden Sie diesen nicht weiter, wenn er stark anschwillt.
Der Akku darf nicht Umgebungen mit hohen Temperaturen gelassen werden.
Verwenden Sie diesen Ventilator nicht, wenn das Stromkabel der Ladestation
beschädigt oder sein Netzstecker lose ist.
Betreiben Sie keinen Ventilator mit beschädigtem Kabel oder Stecker.
Entsorgen Sie den Ventilator oder bringen Sie es zur Überprüfung und/oder
Reparatur zu einer autorisierten Kundendienststelle.
16

Verwenden Sie diesen Ventilator nicht an Orten, an denen er leicht umstürzen
kann oder an denen sich andere instabile Gegenstände in der Nähe befinden.
Ziehen, verdrehen oder verbiegen Sie das Stromkabel der Ladestation nicht zu
stark, da dies den Kern des Kabels freilegen oder brechen kann.
Stecken Sie Ihre Finger oder andere Gegenstände nicht in das vordere Gier,
das hintere Gier oder die Ventilatorbläer, wenn der Ventilator in Betrieb ist.
Halten Sie Haare und Stoffe vom Ventilator fern, um zu vermeiden, dass sie sich
im Ventilator verfangen.
Verwenden Sie keine ungeeignete Steckdose.
Verwenden Sie die mit diesem Ventilator mitgelieferte Ladestation nicht für
andere Geräte.
Entsorgen Sie alte Akkus sachgemäß. Verbrauchte Akkus sollten in einer
professionellen Recyclinganlage entsorgt werden.
Laden Sie den Ventilator nicht auf unebenen Flächen oder Plüschmaterialien
auf. Andernfalls kann es aufgrund des schlechten Kontakts zwischen der
Ladestation und dem Ladeanschluss leicht zu einem Stromausfall oder Brand
kommen.
Bevor die Reinigung oder andere Wartungen durchgeführt wird, muss das Gerät
vom Stromnetz getrennt werden.
Sicherheitshinweise
17

Um Stromschlag, Brand, Verletzungen oder andere Schäden zu vermeiden, vergewissern Sie sich, dass der Ventilatorsockel zuletzt installiert wird. Bie befolgen Sie die
Installationsanweisungen im Benutzerhandbuch.
Schalten Sie den Ventilator nicht ein und schließen Sie ihn nicht an die Ladestation an, wenn er nicht vollständig montiert ist.
Schalten Sie den Ventilator aus oder ziehen Sie den Stecker, bevor Sie ihn installieren oder auseinandernehmen. Berühren Sie nicht die Ein-/Aus-Taste, um zu verhindern,
dass der Ventilator läu und eine Gefahr darstellt.
Installation
Halten Sie den Ventilatorständer fest, um ein Herabfallen und Verletzungen zu vermeiden.
Verwendung des Ventilators
Lehnen Sie sich nicht an den laufenden Ventilator und kippen Sie ihn nicht, während er läu.
Schüeln Sie nicht wiederholt den Kopf des Ventilators, um Schäden am internen Mechanismus zu vermeiden.
Stellen Sie die Verwendung des Ventilators sofort ein, wenn er ungewöhnliche Geräusche macht, schlechte Gerüche abgibt, sich überhitzt oder sich unregelmäßig dreht.
Aufladen des Ventilators
Ziehen Sie den Stecker der Ladestation nicht durch direktes Ziehen an der Schnur oder durch Wackeln aus der Steckdose heraus. Ziehen Sie stadessen den Stecker selber
heraus.
Wenn der Akku leer ist, sollte der Ventilator so schnell wie möglich aufgeladen werden. Um eine Beschädigung des Akkus zu vermeiden, schließen Sie die Ladestation
rechtzeitig an den Ventilatorsockel an.
Versuchen Sie nicht, die Ladestation selbst zu reparieren, wenn sie beschädigt ist.
Wenn die Ladestation beschädigt oder kapu ist, muss sie durch eine Original-Ladestation ersetzt werden, die beim Hersteller oder beim Kundendienst gekau wurde.
Beim Aufladen des Ventilators kann sich der Ventilatorsockel erwärmen. Es wird empfohlen, den Ventilator auf isolierenden Materialien oder an Orten aufzuladen, die nicht
leicht von Wärmequellen beeinflusst werden können, um zu verhindern, dass sich die Stellen, an denen der Ventilator aufgestellt wird, verfärben oder verformen.
Pflege und Wartung
Achten Sie bei der Wartung und Reinigung des Ventilators darauf, dass Sie zuerst den Ventilatorsockel abnehmen, bevor Sie andere Teile entfernen, und dass Sie den
Ventilatorsockel bei der Installation zuletzt einbauen.
Vergewissern Sie sich, dass der Ventilator vom Netz getrennt ist, bevor Sie die Schutzabdeckung entfernen.
VORSICHTSMAßNAHMEN
Transport
18
Sicherheitshinweise
Sayfa yükleniyor...
Sayfa yükleniyor...
Sayfa yükleniyor...
Sayfa yükleniyor...
Sayfa yükleniyor...
Sayfa yükleniyor...
Sayfa yükleniyor...
Sayfa yükleniyor...
Sayfa yükleniyor...
Sayfa yükleniyor...
Sayfa yükleniyor...
Sayfa yükleniyor...
Sayfa yükleniyor...
Sayfa yükleniyor...
Sayfa yükleniyor...
Sayfa yükleniyor...
Sayfa yükleniyor...
Sayfa yükleniyor...
Sayfa yükleniyor...
Sayfa yükleniyor...
Sayfa yükleniyor...
Sayfa yükleniyor...
Sayfa yükleniyor...
Sayfa yükleniyor...
Sayfa yükleniyor...
Sayfa yükleniyor...
Sayfa yükleniyor...
Sayfa yükleniyor...
Sayfa yükleniyor...
Sayfa yükleniyor...
Sayfa yükleniyor...
Sayfa yükleniyor...
Sayfa yükleniyor...
Sayfa yükleniyor...
Sayfa yükleniyor...
Sayfa yükleniyor...
Sayfa yükleniyor...
Sayfa yükleniyor...
Sayfa yükleniyor...
Sayfa yükleniyor...
Sayfa yükleniyor...
Sayfa yükleniyor...
Sayfa yükleniyor...
Sayfa yükleniyor...
Sayfa yükleniyor...
Sayfa yükleniyor...
Sayfa yükleniyor...
Sayfa yükleniyor...
Sayfa yükleniyor...
Sayfa yükleniyor...
Sayfa yükleniyor...
Sayfa yükleniyor...
Sayfa yükleniyor...
Sayfa yükleniyor...
Sayfa yükleniyor...
Sayfa yükleniyor...
Sayfa yükleniyor...
Sayfa yükleniyor...
Sayfa yükleniyor...
Sayfa yükleniyor...
Sayfa yükleniyor...
Sayfa yükleniyor...
Sayfa yükleniyor...
Sayfa yükleniyor...
Sayfa yükleniyor...
Sayfa yükleniyor...
Sayfa yükleniyor...
Sayfa yükleniyor...
Sayfa yükleniyor...
Sayfa yükleniyor...
Sayfa yükleniyor...
Sayfa yükleniyor...
Sayfa yükleniyor...
Sayfa yükleniyor...
Sayfa yükleniyor...
Sayfa yükleniyor...
Sayfa yükleniyor...
Sayfa yükleniyor...
Sayfa yükleniyor...
Sayfa yükleniyor...
Sayfa yükleniyor...
Sayfa yükleniyor...
Sayfa yükleniyor...
Sayfa yükleniyor...
Sayfa yükleniyor...
Sayfa yükleniyor...
Sayfa yükleniyor...
Sayfa yükleniyor...
Sayfa yükleniyor...
Sayfa yükleniyor...
Sayfa yükleniyor...
Sayfa yükleniyor...
Sayfa yükleniyor...
Sayfa yükleniyor...
Sayfa yükleniyor...
Sayfa yükleniyor...
Sayfa yükleniyor...
Sayfa yükleniyor...
Sayfa yükleniyor...
Sayfa yükleniyor...
Sayfa yükleniyor...
Sayfa yükleniyor...
Sayfa yükleniyor...
Sayfa yükleniyor...
Sayfa yükleniyor...
Sayfa yükleniyor...
Sayfa yükleniyor...
Sayfa yükleniyor...
Sayfa yükleniyor...
Sayfa yükleniyor...
Sayfa yükleniyor...
Sayfa yükleniyor...
Sayfa yükleniyor...
Sayfa yükleniyor...
Sayfa yükleniyor...
Sayfa yükleniyor...
Sayfa yükleniyor...
Sayfa yükleniyor...
Sayfa yükleniyor...
Sayfa yükleniyor...
Sayfa yükleniyor...
Sayfa yükleniyor...
Sayfa yükleniyor...
Sayfa yükleniyor...
Sayfa yükleniyor...
Sayfa yükleniyor...
Sayfa yükleniyor...
Sayfa yükleniyor...
-
 1
1
-
 2
2
-
 3
3
-
 4
4
-
 5
5
-
 6
6
-
 7
7
-
 8
8
-
 9
9
-
 10
10
-
 11
11
-
 12
12
-
 13
13
-
 14
14
-
 15
15
-
 16
16
-
 17
17
-
 18
18
-
 19
19
-
 20
20
-
 21
21
-
 22
22
-
 23
23
-
 24
24
-
 25
25
-
 26
26
-
 27
27
-
 28
28
-
 29
29
-
 30
30
-
 31
31
-
 32
32
-
 33
33
-
 34
34
-
 35
35
-
 36
36
-
 37
37
-
 38
38
-
 39
39
-
 40
40
-
 41
41
-
 42
42
-
 43
43
-
 44
44
-
 45
45
-
 46
46
-
 47
47
-
 48
48
-
 49
49
-
 50
50
-
 51
51
-
 52
52
-
 53
53
-
 54
54
-
 55
55
-
 56
56
-
 57
57
-
 58
58
-
 59
59
-
 60
60
-
 61
61
-
 62
62
-
 63
63
-
 64
64
-
 65
65
-
 66
66
-
 67
67
-
 68
68
-
 69
69
-
 70
70
-
 71
71
-
 72
72
-
 73
73
-
 74
74
-
 75
75
-
 76
76
-
 77
77
-
 78
78
-
 79
79
-
 80
80
-
 81
81
-
 82
82
-
 83
83
-
 84
84
-
 85
85
-
 86
86
-
 87
87
-
 88
88
-
 89
89
-
 90
90
-
 91
91
-
 92
92
-
 93
93
-
 94
94
-
 95
95
-
 96
96
-
 97
97
-
 98
98
-
 99
99
-
 100
100
-
 101
101
-
 102
102
-
 103
103
-
 104
104
-
 105
105
-
 106
106
-
 107
107
-
 108
108
-
 109
109
-
 110
110
-
 111
111
-
 112
112
-
 113
113
-
 114
114
-
 115
115
-
 116
116
-
 117
117
-
 118
118
-
 119
119
-
 120
120
-
 121
121
-
 122
122
-
 123
123
-
 124
124
-
 125
125
-
 126
126
-
 127
127
-
 128
128
-
 129
129
-
 130
130
-
 131
131
-
 132
132
-
 133
133
-
 134
134
-
 135
135
-
 136
136
-
 137
137
-
 138
138
-
 139
139
-
 140
140
-
 141
141
-
 142
142
-
 143
143
-
 144
144
-
 145
145
-
 146
146
-
 147
147
-
 148
148


Xiaomi 2 Pro Smart Standing Fan Kullanım kılavuzu
- Tip
- Kullanım kılavuzu
diğer dillerde
İlgili makaleler
-
Xiaomi Pad 5 Keyboard Kullanici rehberi
-
Xiaomi BHR4457GL Kullanım kılavuzu
-
Xiaomi S1 Kullanım kılavuzu
-
Xiaomi Mi Vacuum Cleaner mini Kullanım kılavuzu
-
-
Xiaomi Mi Band 5 Kullanım kılavuzu
-
Xiaomi Mi Router AX9000 WiFi6 Enhanced Edition Kullanım kılavuzu
-
-
Mi Redmi 18W Fast Charge Power Bank 20000mAh (VXN430 Kullanım kılavuzu
-