Xiaomi BHR4457GL Kullanım kılavuzu
- Kategori
- Güvenlik kameraları
- Tip
- Kullanım kılavuzu

Mi 360° Home Security Camera 2K User Manual 1
Mi 360°-Heimsicherheitskamera 2K Benutzerhandbuch 13
Manuel d'utilisation de Mi 360° Home Security Camera 2K 25
Manual de usuario de Mi 360° Home Security Camera 2K 37
Manuale utente Mi 360° Home Security Camera 2K 49
Руководство пользователя IP-камеры домашнего
видеонаблюдения 360° Mi 2K 61
Mi 360° 홈 시큐리티 카메라 2K 사용 설명서 73
Domowa kamera bezpieczeństwa Mi 360° 2K Instrukcja obsługi 85
คู่มือผู้ใช้ Mi กล้องรักษาความปลอดภัยประจำบ้าน 360° 2K 97
Mi 360° Ev Tipi Güvenlik Kamerası 2K Kullanım Kılavuzu 109
Manual do utilizador da Câmara de videovigilância doméstica Mi
360° 2K 121
Mi 360° Home Beveiligingscamera 2K Gebruikershandleiding 133
Mi 360° 2K 145
157
Mi ﻦﻣ ﺔﺟرد 360 ﺔﻳواﺰﺑ 2K ﺔﻴﻟﺰﻨﻤﻟا ﺔﺒﻗاﺮﻤﻟا اﺮﻴﻣﺎﻛ مﺪﺨﺘﺴﻤﻟا ﻞﻴﻟد

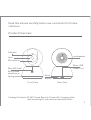
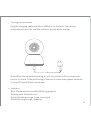
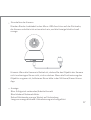
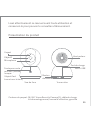
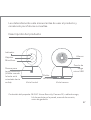
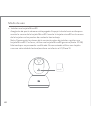
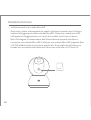
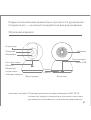
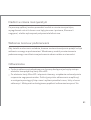
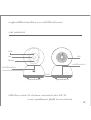
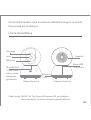
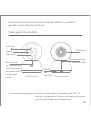
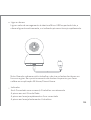
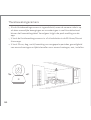
Product Overview
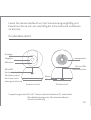
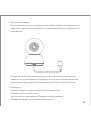
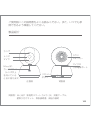
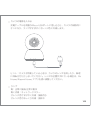
Package Contents: Mi 360° Home Security Camera 2K, charging cable,
wall mounting kit, user manual, warranty notice
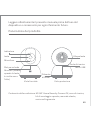
Front View Rear View
Loudspeaker
Reset
Buon
Micro-USB
Power Port
Read this manual carefully before use, and retain it for future
reference.
MicroSD Card
Slot (Visible
when lens is
facing upward)
Indicator
Lens
Microphone
RESET
1

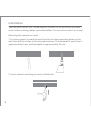
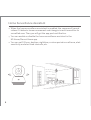
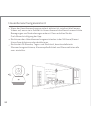
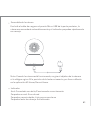
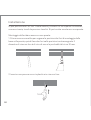
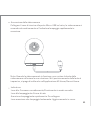
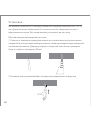
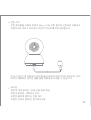
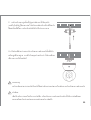
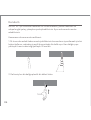
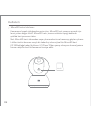
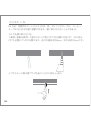
You can place the Mi 360° Home Security Camera 2K on horizontal surfaces,
such as desks, dining tables, and coffee tables. You can also mount it on a wall.
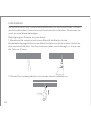
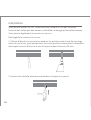
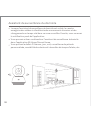
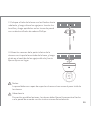
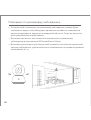
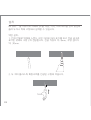
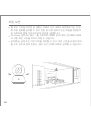
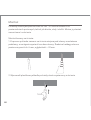
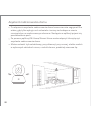
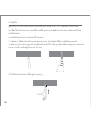
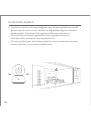
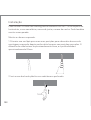
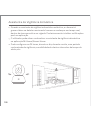
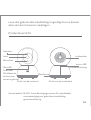
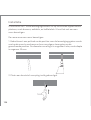
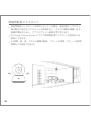
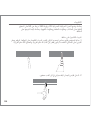
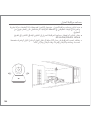
2. Insert a plastic wall plug into each drilled hole.
Installation
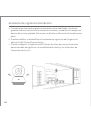
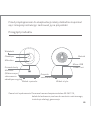
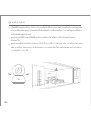
1. First use a pencil to mark the positions for the base mounting holes on the
wall, then drill two holes at the marked positions. The diameter of each hole is
approximately 6 mm, and the depth is approximately 30 mm.
Mounting the camera on a wall:
2

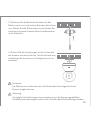
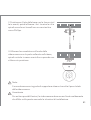
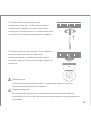
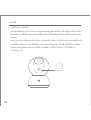
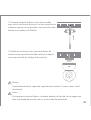
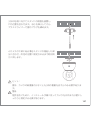
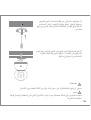
3. Place the side of the base with arrows facing
forward, and then align the holes. Insert the
screws and then tighten them into the wall
plugs with a Phillips head screwdriver.
4. Align the grooves on the boom of the camera
with the raised part on the base, and then turn it
clockwise until it locks into place.
Notes:
The wall must be able to support at least three times the total weight of
the camera.
Warning
To prevent possible injury, the camera must be securely fixed to the ceiling
or wall according to the installation instructions.
3

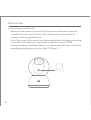
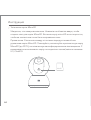
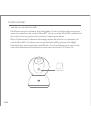
How to Use
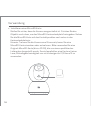
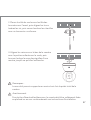
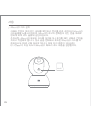
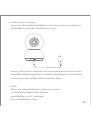
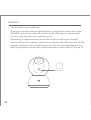
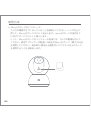
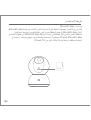
Make sure the camera is turned off. Push the lens upward to reveal the
microSD card slot. Insert the microSD card into the card slot with its
contact points facing downward.
Note: Disconnect the camera from the power before installing or removing
a microSD card. Please use a genuine microSD card (up to 32 GB)
manufactured by a qualified supplier. It is recommended to use a card with
a reading/writing speed of no less than U1/Class 10.
Installing a microSD card
MicroSD
4

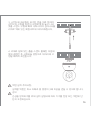
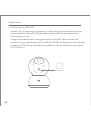
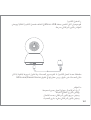
Plug the charging cable into Micro-USB port on the back, the camera
automatically turns on, and the indicator quickly blinks orange.
Note: When the camera is working, do not turn the lens of the camera nor
force it to rotate. If the positioning of the lens is inaccurate, please calibrate
it in the Mi Home/Xiaomi Home app.
Turning on the camera
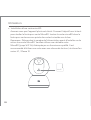
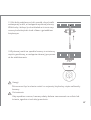
RESET
Indicator
Blue: Connected successfully/Working properly
Blinking blue: Network error
Quickly blinking orange: To be connected
Slowly blinking orange: Updating
5

Restoring factory seings
If the network connection or the Mi account that the camera is paired with
has been changed, you need to restore the factory seings. Press and hold
the reset buon for about three seconds. Once the indicator starts quickly
blinking orange, the factory seings have been restored successfully. Then
you can reconnect the camera with the app.
Note: Restoring factory seings will not delete the content on the microSD
card.
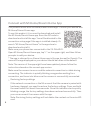
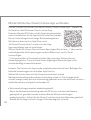
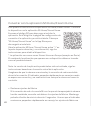
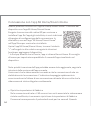
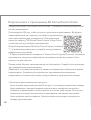
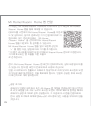
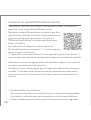
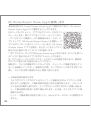
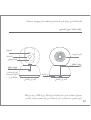
Connect with Mi Home/Xiaomi Home App
This product works with Mi Home/Xiaomi Home app*. Control your device with
Mi Home/Xiaomi Home app.
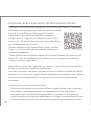
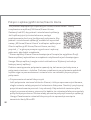
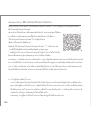
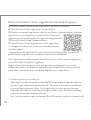
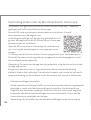
To use this product, it is a must to download and install
the Mi Home/Xiaomi Home app. Scan the QR code to
download and install the app. You will be directed to the
connection setup page if the app is installed already. Or
search "Mi Home/Xiaomi Home" in the app store to
download and install it.
Make sure your phone has connected to the 2.4 GHz Wi-Fi.
Open Mi Home/Xiaomi Home app, tap "+" on the upper right, and then follow
prompts to add your device.
* The app is referred to as Xiaomi Home app in Europe (except for Russia). The
name of the app displayed on your device should be taken as the default.
Note: The version of the app might have been updated, please follow the
instructions based on the current app version.
Make sure the camera turns on and the network connection is stable during
connecting. The indicator is quickly blinking orange when waiting for a
connection, and turns into blue once the camera is successfully connected.
6

In the app, you can view the real-time surveillance, adjust the sharpness of the
image, adjust the horizontal and vertical angles, capture and record, and make
calls.
Real-time Surveillance
Playback
As the ambient light dims, the camera can automatically switch to night vision
mode. With the built-in infrared lights, it can clearly capture video in the dark.
Infrared Night Vision
The playback feature of the camera is only available when a compatible
microSD card is installed.
Once a microSD card is installed and the camera is plugged in, it will
automatically start recording video. Tap the playback buon in the app,
then drag the timeline to select the time period you want to playback. The
maximum supported playback speed is 16x.
7

Home Surveillance Assistant
When the home surveillance assistant is enabled, the camera will record
videos if it detects human movement and changes in real-time within its
surveilled area. Then you will get the app push notification.
You can enable or disable the home surveillance assistant in the
Mi Home/Xiaomi Home app.
You can set 24-hour, daytime, nighime, custom period surveillance, alert
sensitivity and alert time intervals, etc.
8

In the app, you can select the device sharing option in the seings menu to
share the camera with others. Users you share the camera with need to
download the app and sign in with their Mi account.
Video Sharing
Note: Illustrations of product, accessories, and user interface in the user
manual are for reference purposes only. Actual product and functions may
vary due to product enhancements.
9

Precautions
The operating temperature range for this camera is between -10°C and 40°C.
Do not use the camera in environments with temperatures above or below
the specified range.
The camera is a precision electronic product. In order to ensure its normal
operation, do not install the camera in environments with high humidity
levels nor allow water to get into it.
To improve the camera's performance, do not place its lens facing or next to
a reflective surface, such as glass windows or white walls, as this will cause
the image to appear overly bright in areas close to the camera and darker in
areas further away, or cause the camera to produce white images.
Make sure the camera is installed in an area with a strong Wi-Fi signal. Do
not place the camera near the objects that may affect its Wi-Fi signal, such
as metal objects, microwave ovens.
Under normal use of condition, this equipment should be kept a separation
distance of at least 20 cm between the antenna and the body of the user.
10

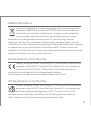
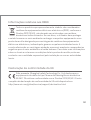
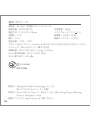
WEEE Information
EU Declaration of Conformity
All products bearing this symbol are waste electrical and electronic
equipment (WEEE as in directive 2012/19/EU) which should not be
mixed with unsorted household waste. Instead, you should protect
human health and the environment by handing over your waste
equipment to a designated collection point for the recycling of waste
electrical and electronic equipment, appointed by the government or local
authorities. Correct disposal and recycling will help prevent potential negative
consequences to the environment and human health. Please contact the
installer or local authorities for more information about the location as well as
terms and conditions of such collection points.
Hereby, Shanghai Imilab Technology Co., Ltd. declares that the radio
equipment type Mi 360° Home Security Camera 2K is in compliance
with Directive 2014/53/EU. The full text of the EU declaration of
conformity is available at the following internet address:
hp://www.mi.com/global/service/support/declaration.html
UK Declaration of Conformity
Hereby, Shanghai Imilab Technology Co., Ltd. declares that the radio
equipment type Mi 360° Home Security Camera 2K is in compliance
with Radio Equipment Regulations 2017. The full text of the UK
declaration of conformity is available at the following internet address:
hps://www.mi.com/uk/service/support/declaration.html
11

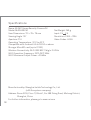
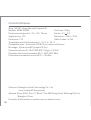
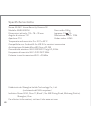
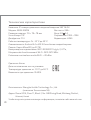
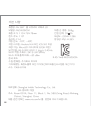
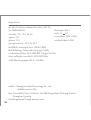
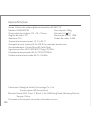
Specifications
Name: Mi 360° Home Security Camera 2K
Model: MJSXJ09CM
Item Dimensions: 115 × 78 × 78 mm
Viewing Angle: 110°
Aperture: F1.4
Operating Temperature: -10°C to 40°C
Compatible with: Android 4.4 & iOS 9.0 or above
Storage: MicroSD card (up to 32 GB)
Wireless Connectivity: Wi-Fi IEEE 802.11 b/g/n 2.4 GHz
Wi-Fi Operation Frequency: 2412–2472 MHz
Wi-Fi Maximum Output Power: <20 dBm
Manufactured by: Shanghai Imilab Technology Co., Ltd.
(a Mi Ecosystem company)
Address: Room 001A, Floor 11, Block 1, No. 588 Zixing Road, Minhang District,
Shanghai, China
For further information, please go to www.mi.com
Net Weight: 269 g
Input: 5 V 2 A
Resolution: 2304 × 1296
Video Codec: H.265
12

Produktübersicht
Verpackungsinhalt: Mi 360°-Heimsicherheitskamera 2K, Ladekabel,
Wandbefestigungssatz, Benutzerhandbuch,
Garantieerklärung
Vorderansicht Rückansicht
Lautsprecher
Reset
-Taste
Micro-USB-
Ladeanschluss
Lesen Sie diese Handbuch vor der Verwendung sorgfältig und
bewahren Sie es auf, um zukünig die Informationen nachlesen
zu können.
MicroSD-
Kartensteckplatz
(Sichtbar, wenn
die Linse nach
oben gerichtet ist)
Anzeige
Objektiv
Mikrofon
RESET
13

1. Markieren Sie zunächst mit einem Bleisti die Stellen für die
Sockelbefestigungslöcher an der Wand und bohren Sie dann zwei Löcher an
den markierten Stellen. Der Durchmesser jedes Lochs beträgt ca. 6 mm und
die Tiefe ca. 30 mm.
Befestigung der Kamera an einer Wand:
Sie können die Mi 360°-Heimsicherheitskamera 2K auf horizontalen Flächen
wie Schreibtischen, Esstischen und Couchtischen aufstellen. Sie können sie
auch an einer Wand befestigen.
2. Setzen Sie in jedes gebohrte Loch einen Kunststoffdübel ein.
Installation
14

3. Platzieren Sie die Seite des Sockels mit den
Pfeilen nach vorn, und richten Sie dann die Löcher
aus. Setzen Sie die Schrauben ein und ziehen Sie
sie dann mit einem Kreuzschlitzschraubendreher
in die Dübel ein.
4. Richten Sie die Vertiefungen an der Unterseite
der Kamera auf den erhöhten Teil des Sockels aus,
und drehen Sie ihn dann im Uhrzeigersinn, bis er
einrastet.
Hinweise:
Die Wand muss mindestens das Dreifache des Gesamtgewichts der
Kamera tragen können.
Warnung
Um mögliche Verletzungen zu vermeiden, muss die Kamera gemäß den
Installationsanweisungen sicher an der Decke oder Wand befestigt werden.
15

Verwendung
Stellen Sie sicher, dass die Kamera ausgeschaltet ist. Drücken Sie das
Objektiv nach oben, um den MicroSD-Kartensteckplatz freizugeben. Setzen
Sie die MicroSD-Karte mit den Kontaktpunkten nach unten in den
Kartensteckplatz ein.
Hinweis: Trennen Sie die Kamera vom Stromnetz, bevor Sie eine
MicroSD-Karte einsetzen oder entnehmen. Bie verwenden Sie eine
Original-MicroSD-Karte (bis zu 32 GB), die von einem qualifizierten
Lieferanten hergestellt wurde. Es wird empfohlen, eine Karte mit einer
Lese-/Schreibgeschwindigkeit von nicht weniger als U1/Klasse 10 zu
verwenden.
Installieren einer MicroSD-Karte
MicroSD
16

Stecken Sie das Ladekabel in den Micro-USB-Anschluss auf der Rückseite,
die Kamera schaltet sich automatisch ein, und die Anzeige blinkt schnell
orange.
Hinweis: Wenn die Kamera in Betrieb ist, drehen Sie das Objektiv der Kamera
nicht und zwingen Sie es nicht, sich zu drehen. Wenn die Positionierung des
Objektivs ungenau ist, kalibrieren Sie es bie in der Mi Home/Xiaomi Home
App.
Einschalten der Kamera
RESET
Anzeige
Blau: Erfolgreich verbunden/Arbeitet korrekt
Blau blinkend: Netzwerkfehler
Schnell blinkendes orange: Wartet auf Verbindung
Langsam orange blinkend: Aktualisierung wird ausgeführt
17

Mit der Mi Home-/Xiaomi Home-App verbinden
Werkseinstellungen werden wiederhergestellt
Wenn die Netzwerkverbindung oder das Mi-Konto, mit dem die Kamera
gekoppelt ist, geändert wurde, müssen Sie die Werkseinstellungen
wiederherstellen. Halten Sie die Reset-Taste für etwa drei Sekunden gedrückt.
Sobald die Anzeige schnell orange zu blinken beginnt, sind die
Dieses Produkt funktioniert mit der Mi Home-/Xiaomi Home-App*. Steuern Sie
Ihr Gerät mit der Mi Home-/Xiaomi Home-App.
Scannen Sie den QR-Code, um die App herunterzuladen
und zu installieren. Ist die App bereits installiert, werden
Sie zur Verbindungseinrichtungs-Seite weitergeleitet.
Sie können aber auch im App Store nach
„Mi Home/Xiaomi Home“ suchen, um die App
herunterzuladen und zu installieren.
Öffnen Sie die Mi Home-/Xiaomi Home-App, tippen Sie auf das „+“ oben rechts
und befolgen Sie die Anweisungen auf dem Bildschirm, um Ihr Gerät
hinzuzufügen.
* In Europa (außer in Russland) wird die App unter dem Namen Xiaomi
Home-App geführt. Der auf Ihrem Gerät angezeigte Name der App sollte
standardmäßig verwendet werden.
Hinweis: Die Version der App wurde möglicherweise aktualisiert. Befolgen Sie
bie die Anweisungen zur aktuellen App-Version.
Stellen Sie sicher, dass sich die Kamera einschaltet und die
Netzwerkverbindung während der Verbindung stabil ist. Die Anzeige blinkt
schnell orange, wenn auf eine Verbindung gewartet wird, und wechselt zu blau, s
obald die Kamera erfolgreich verbunden ist.
18

In der App können Sie sich die Echtzeit-Überwachung ansehen, die Bildschärfe
einstellen, den horizontalen und vertikalen Winkel anpassen, erfassen und
aufzeichnen sowie Anrufe tätigen.
Echtzeit-Überwachung
Wiedergabe
Wenn das Umfeldlicht schwächer wird, kann die Kamera automatisch in den
Nachtsichtmodus wechseln. Mit den eingebauten Infrarotlampen kann sie
auch im Dunkeln klare Videoaufnahmen machen.
Infrarot-Nachtsicht
Die Wiedergabefunktion der Kamera ist nur verfügbar, wenn eine kompatible
MicroSD-Karte installiert ist.
Sobald eine MicroSD-Karte installiert und die Kamera eingesteckt ist, beginnt
sie automatisch mit der Videoaufnahme. Tippen Sie auf die Wiedergabetaste
in der App und ziehen Sie dann die Zeitachse, um den Zeitraum auszuwählen,
den Sie wiedergeben möchten. Die maximal unterstützte
Wiedergabegeschwindigkeit beträgt 16x.
Werkseinstellungen erfolgreich wiederhergestellt worden. Dann können Sie
die Kamera wieder mit der App verbinden.
Hinweis: Die Wiederherstellung der Werkseinstellungen löscht nicht den Inhalt
auf der MicroSD-Karte.
19
Sayfa yükleniyor...
Sayfa yükleniyor...
Sayfa yükleniyor...
Sayfa yükleniyor...
Sayfa yükleniyor...
Sayfa yükleniyor...
Sayfa yükleniyor...
Sayfa yükleniyor...
Sayfa yükleniyor...
Sayfa yükleniyor...
Sayfa yükleniyor...
Sayfa yükleniyor...
Sayfa yükleniyor...
Sayfa yükleniyor...
Sayfa yükleniyor...
Sayfa yükleniyor...
Sayfa yükleniyor...
Sayfa yükleniyor...
Sayfa yükleniyor...
Sayfa yükleniyor...
Sayfa yükleniyor...
Sayfa yükleniyor...
Sayfa yükleniyor...
Sayfa yükleniyor...
Sayfa yükleniyor...
Sayfa yükleniyor...
Sayfa yükleniyor...
Sayfa yükleniyor...
Sayfa yükleniyor...
Sayfa yükleniyor...
Sayfa yükleniyor...
Sayfa yükleniyor...
Sayfa yükleniyor...
Sayfa yükleniyor...
Sayfa yükleniyor...
Sayfa yükleniyor...
Sayfa yükleniyor...
Sayfa yükleniyor...
Sayfa yükleniyor...
Sayfa yükleniyor...
Sayfa yükleniyor...
Sayfa yükleniyor...
Sayfa yükleniyor...
Sayfa yükleniyor...
Sayfa yükleniyor...
Sayfa yükleniyor...
Sayfa yükleniyor...
Sayfa yükleniyor...
Sayfa yükleniyor...
Sayfa yükleniyor...
Sayfa yükleniyor...
Sayfa yükleniyor...
Sayfa yükleniyor...
Sayfa yükleniyor...
Sayfa yükleniyor...
Sayfa yükleniyor...
Sayfa yükleniyor...
Sayfa yükleniyor...
Sayfa yükleniyor...
Sayfa yükleniyor...
Sayfa yükleniyor...
Sayfa yükleniyor...
Sayfa yükleniyor...
Sayfa yükleniyor...
Sayfa yükleniyor...
Sayfa yükleniyor...
Sayfa yükleniyor...
Sayfa yükleniyor...
Sayfa yükleniyor...
Sayfa yükleniyor...
Sayfa yükleniyor...
Sayfa yükleniyor...
Sayfa yükleniyor...
Sayfa yükleniyor...
Sayfa yükleniyor...
Sayfa yükleniyor...
Sayfa yükleniyor...
Sayfa yükleniyor...
Sayfa yükleniyor...
Sayfa yükleniyor...
Sayfa yükleniyor...
Sayfa yükleniyor...
Sayfa yükleniyor...
Sayfa yükleniyor...
Sayfa yükleniyor...
Sayfa yükleniyor...
Sayfa yükleniyor...
Sayfa yükleniyor...
Sayfa yükleniyor...
Sayfa yükleniyor...
Sayfa yükleniyor...
Sayfa yükleniyor...
Sayfa yükleniyor...
Sayfa yükleniyor...
Sayfa yükleniyor...
Sayfa yükleniyor...
Sayfa yükleniyor...
Sayfa yükleniyor...
Sayfa yükleniyor...
Sayfa yükleniyor...
Sayfa yükleniyor...
Sayfa yükleniyor...
Sayfa yükleniyor...
Sayfa yükleniyor...
Sayfa yükleniyor...
Sayfa yükleniyor...
Sayfa yükleniyor...
Sayfa yükleniyor...
Sayfa yükleniyor...
Sayfa yükleniyor...
Sayfa yükleniyor...
Sayfa yükleniyor...
Sayfa yükleniyor...
Sayfa yükleniyor...
Sayfa yükleniyor...
Sayfa yükleniyor...
Sayfa yükleniyor...
Sayfa yükleniyor...
Sayfa yükleniyor...
Sayfa yükleniyor...
Sayfa yükleniyor...
Sayfa yükleniyor...
Sayfa yükleniyor...
Sayfa yükleniyor...
Sayfa yükleniyor...
Sayfa yükleniyor...
Sayfa yükleniyor...
Sayfa yükleniyor...
Sayfa yükleniyor...
Sayfa yükleniyor...
Sayfa yükleniyor...
Sayfa yükleniyor...
Sayfa yükleniyor...
Sayfa yükleniyor...
Sayfa yükleniyor...
Sayfa yükleniyor...
Sayfa yükleniyor...
Sayfa yükleniyor...
Sayfa yükleniyor...
Sayfa yükleniyor...
Sayfa yükleniyor...
Sayfa yükleniyor...
Sayfa yükleniyor...
Sayfa yükleniyor...
Sayfa yükleniyor...
Sayfa yükleniyor...
Sayfa yükleniyor...
Sayfa yükleniyor...
Sayfa yükleniyor...
-
 1
1
-
 2
2
-
 3
3
-
 4
4
-
 5
5
-
 6
6
-
 7
7
-
 8
8
-
 9
9
-
 10
10
-
 11
11
-
 12
12
-
 13
13
-
 14
14
-
 15
15
-
 16
16
-
 17
17
-
 18
18
-
 19
19
-
 20
20
-
 21
21
-
 22
22
-
 23
23
-
 24
24
-
 25
25
-
 26
26
-
 27
27
-
 28
28
-
 29
29
-
 30
30
-
 31
31
-
 32
32
-
 33
33
-
 34
34
-
 35
35
-
 36
36
-
 37
37
-
 38
38
-
 39
39
-
 40
40
-
 41
41
-
 42
42
-
 43
43
-
 44
44
-
 45
45
-
 46
46
-
 47
47
-
 48
48
-
 49
49
-
 50
50
-
 51
51
-
 52
52
-
 53
53
-
 54
54
-
 55
55
-
 56
56
-
 57
57
-
 58
58
-
 59
59
-
 60
60
-
 61
61
-
 62
62
-
 63
63
-
 64
64
-
 65
65
-
 66
66
-
 67
67
-
 68
68
-
 69
69
-
 70
70
-
 71
71
-
 72
72
-
 73
73
-
 74
74
-
 75
75
-
 76
76
-
 77
77
-
 78
78
-
 79
79
-
 80
80
-
 81
81
-
 82
82
-
 83
83
-
 84
84
-
 85
85
-
 86
86
-
 87
87
-
 88
88
-
 89
89
-
 90
90
-
 91
91
-
 92
92
-
 93
93
-
 94
94
-
 95
95
-
 96
96
-
 97
97
-
 98
98
-
 99
99
-
 100
100
-
 101
101
-
 102
102
-
 103
103
-
 104
104
-
 105
105
-
 106
106
-
 107
107
-
 108
108
-
 109
109
-
 110
110
-
 111
111
-
 112
112
-
 113
113
-
 114
114
-
 115
115
-
 116
116
-
 117
117
-
 118
118
-
 119
119
-
 120
120
-
 121
121
-
 122
122
-
 123
123
-
 124
124
-
 125
125
-
 126
126
-
 127
127
-
 128
128
-
 129
129
-
 130
130
-
 131
131
-
 132
132
-
 133
133
-
 134
134
-
 135
135
-
 136
136
-
 137
137
-
 138
138
-
 139
139
-
 140
140
-
 141
141
-
 142
142
-
 143
143
-
 144
144
-
 145
145
-
 146
146
-
 147
147
-
 148
148
-
 149
149
-
 150
150
-
 151
151
-
 152
152
-
 153
153
-
 154
154
-
 155
155
-
 156
156
-
 157
157
-
 158
158
-
 159
159
-
 160
160
-
 161
161
-
 162
162
-
 163
163
-
 164
164
-
 165
165
-
 166
166
-
 167
167
-
 168
168
-
 169
169


Xiaomi BHR4457GL Kullanım kılavuzu
- Kategori
- Güvenlik kameraları
- Tip
- Kullanım kılavuzu
diğer dillerde
- français: Xiaomi BHR4457GL Manuel utilisateur
- italiano: Xiaomi BHR4457GL Manuale utente
- polski: Xiaomi BHR4457GL Instrukcja obsługi
- Deutsch: Xiaomi BHR4457GL Benutzerhandbuch
- português: Xiaomi BHR4457GL Manual do usuário