
GB Cordless Grass Shear Instruction manual
F Taille-Herbes sans Fil Manuel d’instructions
D Akku-Grasschere Betriebsanleitung
I Cesoie tagliaerba senza filo Istruzioni per l’uso
NL Accugrasschaar Gebruiksaanwijzing
E Tijeras Inalámbricas para Manual de instrucciones
Hierba
P Tesoura para Poda a Bateria Manual de instruções
DK Batteridreven græsklipper Brugsanvisning
GR Ψαλίδι Γρασιδιού Μπαταρίας Οδηγίες χρήσης
TR Akülü Çim Makası Kullanım kılavuzu
AX-1821H
012738

2
1 012739 2 012128
3 015676 4 012524
5 012523 6 012527
7 012526 8 012525
1
2
3
4
5
6
7
8
9
10
11
12
13
14
15

3
9 012528 10 012529
11 012533 12 012535
13 012536 14 012537
16
12
10
11
12
14
17
18
19
20
18
21
22
22 18 13

4
15 012538 16 012539
17 012540 18 012541
19 012542 20 012534
21 012543 22 012544
14
13
23
24
25
22
26
24
27
28
29
18
17
30
17

5
23 012530 24 012531
25 012532 26 012546
27 012545
28 011044
31
32
33
34
35

6
29 012561 30 012562
31 012563 32 012564
33 012565 34 012554
35 012556 36 012555
22
18
13
27
29
28
14
36
37
17
18
14

7
37 012557 38 012558
39 012559 40 012560
41 011045 42 010878
43 013054 44 012550
17
18
19
20
18
37
22
13
38
39
35
40
41
404042

8
45 013055 46 013053
47 013056 48 013057
49 012547 50 012566
43
44
45
46
47
48

9
ENGLISH (Original instructions)
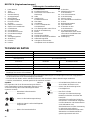
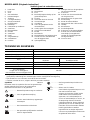
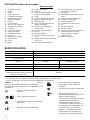
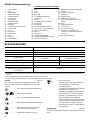
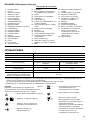
Explanation of general view
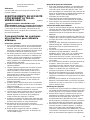
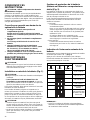
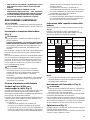
SPECIFICATIONS
• Due to our continuing program of research and development, the specifications herein are subject to change without
notice.
• Specifications and battery cartridge may differ from country to country.
• Weight, with battery cartridge, according to EPTA-Procedure 01/2003
Symbols
END010-4
The following show the symbols used for the equipment.
Be sure that you understand their meaning before use.
.................... Take particular care and attention.
....... Read instruction manual.
................... Danger; be aware of thrown objects.
..................Keep bystanders away.
................... Cutting means continues to run after
the motor is switched off.
................... Do not expose to moisture.
.............Only for EU countries
Do not dispose of electric equipment or
battery pack together with household
waste material!
In observance of the European
Directives, on Waste Electric and
Electronic Equipment and Batteries
and Accumulators and Waste Batteries
and Accumulators and their
implementation in accordance with
national laws, electric equipment and
batteries and battery pack(s) that have
reached the end of their life must be
collected separately and returned to an
environmentally compatible recycling
facility.
Intended use
ENE015-1
The tool is intended for cutting lawn edges or sprouts.
1. Red indicator
2. Button
3. Battery cartridge
4. Star marking
5. Indicator lamps
6. Check button
7. Lock-off button
8. Switch trigger
9. Indication lamp
10. Change lever
11. Protrusion on base frame
12. Base frame
13. Shear blades
14. Blade cover
15. Blade frame
16. Groove
17. Locking lever
18. Undercover
19. Press
20. Turn
21. Shear blade
22. Crank
23. Basic alignment line on the tool
housing
24. Pins
25. Recessed part of crank
26. Apply grease
27. Base plate
28. Hole in the base plate of shear
blades
29. Oval holes that are overlapped
30. Groove in the undercover
31. Brush
32. Machine oil
33. Hedge shear blade
34. Hedge shear blade cover
35. Storage case
36. Bent part of the base plate of
shear blades
37. Screws
38. Grass shear blade cover
39. Grass shear blade
40. Trimming direction
41. Tilt the blades
42. Hedge surface to be trimmed
43. String
44. Clamping nuts
45. Chip receiver
46. Screws on the shear blades
47. Blade cover to be always installed
before installing the chip receiver
48. Hook hole
Model AX-1821H
Effective cutting width 160 mm
Stroke per minute (min
-1
) 1,250
Rated voltage D.C. 18 V
Battery cartridge
AP-181/AP-1815/BL1815N/BL1820/
BL1820B
AP-183/BL1830/BL1840/BL1840B/
BL1850/BL1850B
Dimensions (L x W x H) 337 mm x 176 mm x 130 mm 353 mm x 176 mm x 130 mm
Net weight 1.4 kg 1.6 kg
Battery charger LG-184/DC18RC
(Optional accessory)
Blade length of optional hedge shear
blades
200 mm
Cd
Ni-MH
Li-ion

10
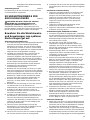
CORDLESS GRASS SHEAR
SAFETY WARNINGS
GEB070-4
WARNING! IMPORTANT READ CAREFULLY all
safety warnings and all instructions BEFORE USE.
Failure to follow the warnings and instructions may result
in electric shock, fire and/or serious injury.
Save all warnings and
instructions for future reference.
General instructions
1. To ensure correct operation, user has to read this
instruction manual to make himself familiar with the
handling of the equipment. Users insufficiently
informed will risk danger to themselves as well as
others due to improper handling.
2. Never allow children, persons with reduced physical,
sensory or mental capabilities or lack of experience
and knowledge or people unfamiliar with these
instructions to use the machine, local regulations may
restrict the age of the operator.
3. Use the equipment with the utmost care and attention.
4. Operate the equipment only if you are in good physical
condition. Perform all work calmly and carefully. Use
common sense and keep in mind that the operator or
user is responsible for accidents or hazards occurring
to other people or their property.
5. Never operate the machine while people, especially
children, or pets are nearby.
6. Never use the equipment after consumption of alcohol
or drugs, or if feeling tired or ill.
7. The motor is to be switched off immediately in case
that the equipment shows any problem or abnormal
sign.
8. Switch off and remove the battery cartridge when
resting and when leaving the equipment unattended,
and place it in a safe location to prevent danger to
others or damage to the equipment.
9. Don’t force the equipment. It will do the job better and
with less likelihood of a risk of injury at the rate for
which it was designed.
10. Don’t overreach. Keep proper footing and balance at
all times.
11. Avoid using the machine in bad weather conditions
especially when there is a risk of lightning.
Personal protective equipment
1. Dress properly. The clothing worn should be functional
and appropriate, i.e. it should be tight-fitting but not
cause hindrance. Do not wear either jewelry or
clothing which could become entangled. Wear
protective hair covering to contain long hair.
2. Wear eye protection and stout shoes at all times while
operating the machine.
3. Always wear substantial footwear and long trousers
while operating the machine.
Electrical and battery safety
1. Avoid dangerous environment. Don’t use the
equipment in damp or wet locations or expose it to
rain. Water entering an equipment will increase the
risk of electric shock.
2. Recharge only with the charger specified by the
manufacturer. A charger that is suitable for one type of
battery pack may create a risk of fire when used with
another battery pack.
3. Use power tools only with specifically designated
battery packs. Use of any other battery packs may
create a risk of injury and fire.
4. When battery pack is not in use, keep it away from
other metal objects, like paper clips, coins, keys, nails,
screws or other small metal objects, that can make a
connection from one terminal to another. Shorting the
battery terminals together may cause burns or a fire.
5. Under abusive conditions, liquid may be ejected from
the battery; avoid contact. If contact accidentally
occurs, flush with water. If liquid contacts eyes,
additionally seek medical help. Liquid ejected from the
battery may cause irritation or burns.
6. Do not dispose of the battery(ies) in a fire. The cell
may explode. Check with local codes for possible
special disposal instructions.
7. Do not open or mutilate the battery(ies). Released
electrolyte is corrosive and may cause damage to the
eyes or skin. It may be toxic if swallowed.
Starting up the equipment
1. Make sure that there are no children or other people
nearby, also pay attention to any animals in the
working vicinity. Otherwise stop using the equipment.
2. Before use always check that the equipment is safe
for operation. Check the security of the cutting tool
and the guard and the switch trigger/lever for easy and
proper action. Check for clean and dry handles and
test the function of the start/stop.
3. Check damaged parts before further use of the
equipment. A guard or other part that is damaged
should be carefully checked to determine that it will
operate properly and perform its intended function.
Check for alignment of moving parts, binding of
moving parts, breakage of parts, mounting, and any
other condition that may affect its operation. A guard
or other part that is damaged should be properly
repaired or replaced by our authorized service center
unless indicated elsewhere in this manual.
4. Switch on the motor only when the hands and feet are
away from the cutting tool.
5. Before starting make sure that the cutting tool has no
contact with any objects.
Method of operation
1. Only use the equipment in good light and visibility.
During the winter season beware of slippery or wet
areas, ice and snow (risk of slipping). Always ensure a
safe footing on slopes and be sure to walk and never
run.
2. Take care against injury to feet and hands from the
cutting tool.
3. Never stand on a ladder and run the equipment.
4. Never climb up into trees to perform cutting operation
with the equipment.
5. Never work on unstable surfaces.
6. Remove sand, stones, nails etc. found within the
working range. Foreign particles may damage the
cutting tool and can cause dangerous kick-backs.
7
. Should the cutting tool hit stones or other hard objects,
immediately switch off the motor and inspect the
cutting tool.

11
8. Inspect the cutting tool at short regular intervals for
damage (detection of hairline cracks by means of
tapping-noise test).
9. Before commencing cutting, the cutting tool must have
reached full working speed.
10. The cutting tool has to be equipped with the
appropriate guard. Never run the equipment with
damaged guards or without guards in place!
11. All protective installations and guards supplied with
the equipment must be used during operation.
12. Always remove the battery cartridge from the
equipment:
- whenever leaving the equipment unattended;
- before clearing a blockage;
- before checking, cleaning or working on the
equipment;
- after striking a foreign object;
- whenever the equipment starts vibrating abnormally.
13. Always ensure that the ventilation openings are kept
clear of debris.
14. Cutting means continues to run after the motor is
switched off.
Cutting Tools
1. Employ only the correct cutting tool for the job in hand.
Maintenance instructions
1. The condition of the equipment, in particular of the
cutting tool of the protective devices must be checked
before commencing work.
2. Turn off the motor and remove the battery cartridge
before carrying out maintenance, replacing cutting
tools or cleaning the equipment or cutting tool.
3. Check loose fasteners and damaged parts such as
cracks in the cutting attachment.
4. Follow instructions for lubricating and changing
accessories.
5. When not in use, store the equipment indoors in dry
and high or locked-up place - out of the reach of
children. Clean and maintain before storage.
6. Use only the manufacturer’s recommended
replacement parts and accessories.
7. Inspect and maintain the equipment regularly,
especially before/after use. Have the equipment
repaired only by our authorized service center.
8. Keep handles dry, clean and free from oil and grease.
KEEP FOR FUTURE REFERENCE
WARNING:
DO NOT let comfort or familiarity with product (gained
from repeated use) replace strict adherence to safety
rules for the subject product. MISUSE or failure to
follow the safety rules stated in this instruction
manual may cause serious personal injury.
General Power Tool Safety
Warnings GEA010-1
WARNING Read all safety warnings and all
instructions. Failure to follow the warnings and
instructions may result in electric shock, fire and/or
serious injury.
Save all warnings and
instructions for future reference.
CORDLESS HEDGE TRIMMER
SAFETY WARNINGS
GEB062-5
1. Keep all parts of the body away from the cutter
blade. Do not remove cut material or hold material
to be cut when blades are moving. Make sure the
switch is off when clearing jammed material. A
moment of inattention while operating the hedge
trimmer may result in serious personal injury.
2. Carry the hedge trimmer by the handle with the
cutter blade stopped. When transporting or
storing the hedge trimmer always fit the cutting
device cover. Proper handling of the hedge trimmer
will reduce possible personal injury from the cutter
blades.
3. Hold the power tool by insulated gripping surfaces
only, because the cutter blade may contact hidden
wiring. Cutter blades contacting a “live” wire may
make exposed metal parts of the power tool “live” and
could give the operator an electric shock.
4. Do not use the hedge trimmer in the rain or in wet or
very damp conditions. The electric motor is not
waterproof.
5. First-time users should have an experienced hedge
trimmer user show them how to use the trimmer.
6. The hedge trimmer must not be used by children or
young persons under 18 years of age. Young persons
over 16 years of age may be exempted from this
restriction if they are undergoing training under the
supervision of an expert.
7. Use the hedge trimmer only if you are in good physical
condition. If you are tired, your attention will be
reduced. Be especially careful at the end of a working
day. Perform all work calmly and carefully. The user is
responsible for all damages to third parties.
8. Never use the trimmer when under the influence of
alcohol, drugs or medication.
9. Work gloves of stout leather are part of the basic
equipment of the hedge trimmer and must always be
worn when working with it. Also wear sturdy shoes
with anti-skid soles.
10. Before starting work check to make sure that the
trimmer is in good and safe working order. Ensure
guards are fitted properly. The hedge trimmer must
not be used unless fully assembled.
11. Make sure you have a secure footing before starting
operation.
12. Hold the tool firmly when using the tool.
13. Do not operate the tool at no-load unnecessarily.
14. Immediately switch off the motor and remove the
battery cartridge if the cutter should come into contact
with a fence or other hard object. Check the cutter for
damage, and if damaged repair immediately.
15. Before checking the cutter, taking care of faults, or
removing material caught in the cutter, always switch
off the trimmer and remove the battery cartridge.
16. Switch off the trimmer and remove the battery
cartridge before doing any maintenance work.
17. When moving the hedge trimmer to another location,
including during work, always remove the battery
cartridge and put the blade cover on the cutter blades.

12
Never carry or transport the trimmer with the cutter
running. Never grasp the cutter with your hands.
18. Clean the hedge trimmer and especially the cutter
after use, and before putting the trimmer into storage
for extended periods. Lightly oil the cutter and put on
the cover. The cover supplied with the unit can be
hung on the wall, providing a safe and practical way to
store the hedge trimmer.
19. Store the hedge trimmer with the cover on, in a dry
room. Keep it out of reach of children. Never store the
trimmer outdoors.
SAVE THESE INSTRUCTIONS.
WARNING:
DO NOT let comfort or familiarity with product (gained
from repeated use) replace strict adherence to safety
rules for the subject product. MISUSE or failure to
follow the safety rules stated in this instruction
manual may cause serious personal injury.
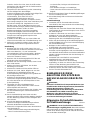
IMPORTANT SAFETY
INSTRUCTIONS
ENC011-1
FOR BATTERY CARTRIDGE
1. Before using battery cartridge, read all
instructions and cautionary markings on (1)
battery charger, (2) battery, and (3) product using
battery.
2. Do not disassemble battery cartridge.
3. If operating time has become excessively shorter,
stop operating immediately. It may result in a risk
of overheating, possible burns and even an
explosion.
4. If electrolyte gets into your eyes, rinse them out
with clear water and seek medical attention right
away. It may result in loss of your eyesight.
5. Do not short the battery cartridge:
(1) Do not touch the terminals with any
conductive material.
(2) Avoid storing battery cartridge in a container
with other metal objects such as nails, coins,
etc.
(3) Do not expose battery cartridge to water or
rain.
A battery short can cause a large current flow,
overheating, possible burns and even a
breakdown.
6. Do not store the tool and battery cartridge in
locations where the temperature may reach or
exceed 50°C (122°F).
7. Do not incinerate the battery cartridge even if it is
severely damaged or is completely worn out. The
battery cartridge can explode in a fire.
8. Be careful not to drop or strike battery.
9. Do not use a damaged battery.
10. Follow your local regulations relating to disposal
of battery.
SAVE THESE INSTRUCTIONS.
CAUTION: Only use genuine Makita/Dolmar
batteries.
Use of non-genuine Makita/Dolmar batteries, or batteries
that have been altered, may result in the battery bursting
causing fires, personal injury and damage. It will also void
the Makita/Dolmar warranty for the Makita/Dolmar tool
and charger.
Tips for maintaining maximum battery life
1. Charge the battery cartridge before completely
discharged.
Always stop tool operation and charge the battery
cartridge when you notice less tool power.
2. Never recharge a fully charged battery cartridge.
Overcharging shortens the battery service life.
3. Charge the battery cartridge with room
temperature at 10°C - 40°C (50°F - 104°F). Let a hot
battery cartridge cool down before charging it.
4. Charge the battery cartridge if you do not use it for
a long period (more than six months).
FUNCTIONAL DESCRIPTION
CAUTION:
• Always be sure that the tool is switched off and the
battery cartridge is removed before adjusting or
checking function on the tool.
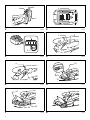
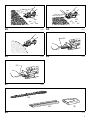
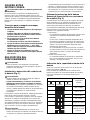
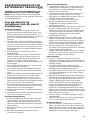
Installing or removing battery cartridge
(Fig. 1)
CAUTION:
• Always switch off the tool before installing or removing
of the battery cartridge.
• Hold the tool and the battery cartridge firmly when
installing or removing battery cartridge. Failure to
hold the tool and the battery cartridge firmly may cause
them to slip off your hands and result in damage to the
tool and battery cartridge and a personal injury.
To remove the battery cartridge, slide it from the tool while
sliding the button on the front of the cartridge.
To install the battery cartridge, align the tongue on the
battery cartridge with the groove in the housing and slip it
into place. Insert it all the way until it locks in place with a
little click. If you can see the red indicator on the upper
side of the button, it is not locked completely.
CAUTION:
• Always install the battery cartridge fully until the red
indicator cannot be seen. If not, it may accidentally fall
out of the tool, causing injury to you or someone
around you.
• Do not install the battery cartridge forcibly. If the
cartridge does not slide in easily, it is not being inserted
correctly.
Battery protection system (Lithium-ion
battery with star marking) (Fig. 2)
Lithium-ion batteries with a star marking are equipped
with a protection system. This system automatically cuts
off power to the tool to extend battery life.
The tool will automatically stop during operation if the tool
and/or battery are placed under one of the following
conditions:

13
• Overloaded:
The tool is operated in a manner that causes it to
draw an abnormally high current.
In this situation, release the trigger switch on the tool
and stop the application that caused the tool to
become overloaded. Then pull the trigger switch
again to restart.
If the tool does not start, the battery is overheated. In
this situation, let the battery cool before pulling the
trigger switch again.
• Low battery voltage:
The remaining battery capacity is too low and the tool
will not operate. In this situation, remove and
recharge the battery.
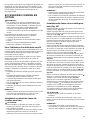
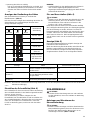
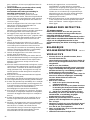
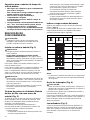
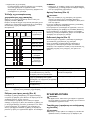
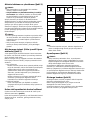
Indicating the remaining battery capacity
(Only for battery cartridges with “B” at the end of the
model number.) (Fig. 3)
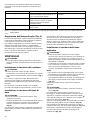
Press the check button on the battery cartridge to indicate
the remaining battery capacity. The indicator lamps light
up for few seconds.
015658
NOTE:
• Depending on the conditions of use and the ambient
temperature, the indication may differ slightly from the
actual capacity.
Switch action (Fig. 4)
CAUTION:
• Before inserting the battery cartridge into the tool,
always check to see that the switch trigger actuates
properly and returns to the “OFF” position when
released.
To prevent the switch trigger from being accidentally
pulled, a lock-off button is provided.
To start the tool, depress the lock-off button and pull the
switch trigger. Release the switch trigger to stop. The
lock-off button can be pressed from either right or left side.
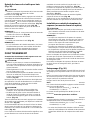
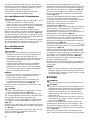
Indication lamp (Fig. 5)
Running the tool allows the indication lamp to show the
battery cartridge capacity status.
When the tool is also overloaded and has stopped during
operation, the lamp lights up in red.
Refer to the following table for the status and action to be
taken for the indication lamp.
Note 1: The time at which the indication lamp lights up varies by the temperature around the work area and the battery
cartridge conditions.
010970
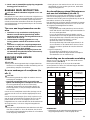
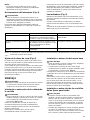
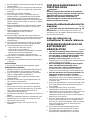
Adjusting the shearing height (Fig. 6)
Changing the position of holding the change lever allows
three-stepped setting for sheared grass height (10 mm,
20 mm, 30 mm).
To change setting, tilt the change lever for the base frame
position and with the change lever tilted move it up or
down along the tool surface until the protrusion on base
frame fits in one of the holes in the tool and release it.
Indicator lamps
Remaining
capacity
Lighted Off Blinking
75% to 100%
50% to 75%
25% to 50%
0% to 25%
Charge the
battery.
The battery may
have
malfunctioned.
Indication lamp Status Action to be taken
The lamp blinks in red. This indicates the appropriate time to
replace the battery cartridge when the
battery power becomes low.
Recharge the battery cartridge as soon
as possible.
The lamp lights up in red. (Note 1) This function works when the battery
power is almost used up. At this time,
tool stops immediately.
Recharge the battery cartridge.
The lamp lights up in red. (Note 1) Autostop due to overload. Turn off the tool.

14
ASSEMBLY
CAUTION:
• Always be sure that the tool is switched off and the
battery cartridge is removed before carrying out any
work on the tool.
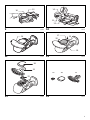
Installing or removing blade cover
CAUTION:
• Be careful not to contact the shear blade when
installing or removing the blade cover. Contacting the
shear blade may cause personal injuries. (Fig. 7 & 8)
Slide the blade cover from the tool’s side until the shear
blade completely hides itself and then push in it lightly
towards the tool from the front.
To remove the blade cover, take the above installation
procedure in reverse.
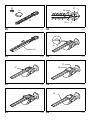
Installing or removing base frame
CAUTION:
• Before installing or removing base frame, be sure to
install the blade cover.
• When installing or removing base frame, take care that
your fingers are not be pinched between the tool and
base frame. (Fig. 9)
To remove the base frame, upset the tool and take it out
of the groove grabbing its bottom. (Fig. 10)
To install the base frame, fit the protrusion of base frame
near the change lever into the hole for the sheared grass
height setting. With the base frame so fitted, pull the lower
part of base frame and fit the other part of the base frame
in the groove in the tool.
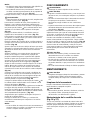
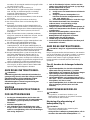
Installing or removing grass shear blades
CAUTION:
• Always be sure that the tool is switched off and the
battery cartridge is removed before installing or
removing shear blades. Failure to switch off and
remove the battery cartridge from the tool may result in
serious injury from accidental start-up.
• When replacing the shear blade, always wear gloves
without removing blade cover so that hands and face
does not directly contact the blade. Failure to do so
may cause personal injury.
NOTE:
• Do not wipe off grease from the gear and crank. Failure
to do so may cause damage to the tool.
• For specific way of removing and installing shear
blades refer to the reverse of a package for accessory
shear blades. (Fig. 11)
Remove the base frame and place the tool upside down.
CAUTION:
• Before placing the tool upside down, be sure to remove
the base frame. (Fig. 12)
To remove the shear blade, press the locking lever and
with the locking lever pressed turn the undercover
counterclockwise until the symbol on the undercover is
aligned with the symbol on the locking lever. (Fig. 13)
Take out the undercover, shear blade and crank in order
from the tool. (Fig. 14)
To install the grass shear blade, prepare the crank,
undercover and new grass shear blade. (Fig. 15)
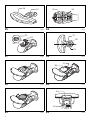
Take out the blade cover from the old shear blades and fit
it onto the new ones for easy handling during the
replacement of blades. (Fig. 16)
Adjust the three pin position so that these pins are lined
up at right angle in relation to the basic alignment line on
the tool housing. (Fig. 17)
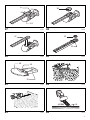
Fit the crank with its recessed part facing upwards onto
the pins. At this time, apply a small amount of grease to
the periphery of the crank using grease that the shear
blades as optional accessory are provided with or that
remains inside gear housing. (Fig. 18)
Overlap the oval hole in the upper blade with that in the
lower one. Move the shear blades so that the hole in the
base plate of shear blades are positioned in the center of
these overlapped oval holes. (Fig. 19)
Turn the shear blades upside down and install it so that
the pins on the tool fit in the hole in the shear blades.
Make sure that the shear blades are set in place securely
as far as they reach the base plate. (Fig. 20)
Place the undercover so that the symbol on the
undercover is aligned with the symbol on the locking
lever. (Fig. 21)
Press the undercover down and turn the undercover
clockwise while pressing it down until the symbol on
the label is aligned with the symbol on the locking lever
(the undercover is completely locked.). (Fig. 22)
At this time, make sure that the locking lever fits in the
groove in the undercover.
Remove the blade cover and then turn on the tool to
check it for proper movement.
NOTE:
• When the shear blades do not operate properly, there
is a poor fit between the blades and crank. Redo from
the beginning.
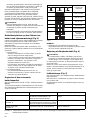
OPERATION
WARNING:
• Keep hands away from blades.
CAUTION:
• Smear the blade before and once per hour during
operation using machine oil or the like.
• Avoid operating the tool under the scorching sunlight
as much as practicable. When operating the tool, be
careful of your physical conditions.
• Hold the tool with one hand. Do not hold the front bulge
of the tool as a grip. (Fig. 23)
Turn the tool on after adjusting the shearing height and
hold it so that the foot of the tool rest on the ground. Then
gently move the tool forward into the area to be cut.
(Fig. 24)
When trimming around curb, fence or trees, move the tool
along them. Be careful for the blade not to contact them.
(Fig. 25)
When trimming sprouts or foliage of a small tree, remove
the base frame from the tool and cut little by little.
Shear big branches to your desired height beforehand
using branch scissors before using this tool.
CAUTION:
• When trimming twigs and foliage, do not attempt to trim
too much at a time. Proceed gently. Also do not attempt
to cut thick branches.

15
• Do not let the shear blades contact the grounds during
operation. The blades will be dulled, causing poor
performance.
• Do not trim wet grass or foliage of small trees.
MAINTENANCE
CAUTION:
• Always be sure that the tool is switched off and the
battery cartridge is removed before attempting to
perform inspection or maintenance.
Cleaning the tool
Clean out the tool by wiping off dust with a dry or soap-
dipped rag.
CAUTION:
• Never use gasoline, benzine, thinner, alcohol or the
like. Discoloration, deformation or cracks may result.
Shear blade maintenance (Fig. 26 & 27)
After operation, remove dust from both sides of the blade
with wired brush, wipe it off with a rag and then apply
enough low-viscosity oil, such as machine oil etc. and
spray-type lubricating oil.
CAUTION:
• Do not wash the blades in water. Failure to do so may
cause rust or damage on the tool.
• Dirt and corrosion cause excessive blade friction and
shorten the operating time per battery charge.
After use
• To clean off the exterior of the tool, dampen a soft cloth
in a soapy water and wipe gently. Never use thinner or
benzine.
• Do not store the tool in a place where volatile materials
are stored.
To maintain product SAFETY and RELIABILITY, repairs,
any other maintenance or adjustment should be
performed by Dolmar Authorized Service Centers, always
using Dolmar replacement parts.
OPTIONAL ACCESSORIES
CAUTION:
• These accessories or attachments are recommended
for use with your Dolmar tool specified in this manual.
The use of any other accessories or attachments might
present a risk of injury to persons. Only use accessory
or attachment for its stated purpose.
If you need any assistance for more details regarding
these accessories, ask your local Dolmar Service Center.
• Grass shear blade assembly
• Grass shear blade cover
• Base frame
• Makita/Dolmar genuine battery and charger
• Long handle attachment
For cordless hedge trimmer use
This tool can be used as a hedge trimmer by using the
hedge shear blade (optional accessory) and 2-way
change set (optional accessory).
To use this tool as a hedge trimmer, replacing the grass
shear blades with the hedge shear blades is required.
For removing the grass shear blades, refer to the
aforementioned section titled “Installing or removing grass
shear blades”. For installing the hedge shear blades, refer
to the section below titled “Installing or removing hedge
shear blades”.
• Hedge shear blade assembly (for Hedge Trimmer)
• 2-way change set consisting of the following two
accessories
• Hedge shear blade cover (for Hedge Trimmer)
• Storage case (for blade bottom section) (Fig. 28)
• Chip receiver for hedge trimming (for Hedge Trimmer)
NOTE:
• Some items in the list may be included in the tool
package as standard accessories. They may differ
from country to country.
Installing or removing hedge shear
blades
CAUTION:
• Before installing or removing shear blades, always be
sure that the tool is switched off and the battery
cartridge is removed.
• When replacing the shear blades, always wear gloves
without removing blade cover so that hands and face
do not directly contact the blade. Failure to do so may
cause personal injury.
NOTE:
• Do not wipe off grease from the gear and crank. Failure
to do so may cause damage to the tool.
• For specific way of removing and installing shear
blades refer to the reverse of a package for accessory
shear blades.
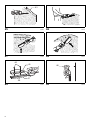
Installing the hedge shear blades (Fig. 29)
Prepare the crank, the undercover and new shear blades.
(Fig. 16)
Adjust the three pin position so that these three pins are
aligned with the basic alignment line on the tool housing.
(Fig. 17)
Fit the crank with its recessed part facing downward onto
the pins. At this time, apply a small amount of grease to
the periphery of the crank using grease that the shear
blades as optional accessory are provided with or that
remains inside gear housing. (Fig. 30)
Overlap the oval hole in the upper blade with that in the
lower one. Move the shear blades so that the hole in the
base plate of shear blades are positioned in the center of
these overlapped oval holes. (Fig. 31)
Take out the blade cover from the old shear blades and fit
it onto the new ones for easy handling during the
replacement of blades. (Fig. 32)
Turn the shear blades upside down and install it so that
pin on the tool fit in the hole in the shear blades. Fit the
bent part of the base plate of the shear blades to the
groove in the tool housing. Then make sure that the base
plate of the shear blades is set in place. (Fig. 33)
Tighten two screws with a coin firmly. (Fig. 34)
Place the undercover so that the symbol on the
undercover is aligned with the symbol on the locking
lever. (Fig. 35)
Press the undercover down and with the undercover
pressed down turn the undercover clockwise until the
symbol on the label is aligned with the symbol on the

16
locking lever (the undercover is completely locked.).
(Fig. 22)
At this time, make sure that the locking lever fits in the
groove in the undercover.
CAUTION:
• Never use the tool without installing the undercover on
it.
Remove the blade cover and then turn on the tool to
check it for proper movement.
NOTE:
• When the shear blades do not operate properly, there
is a poor fit between the blades and crank. Redo from
the beginning.
Removing the hedge shear blades
(Fig. 36)
CAUTION:
• Install the blade cover before removing or installing the
shear blades.
Reverse the tool. (Fig. 37)
To remove the shear blades, press the locking lever and
with the locking lever pressed turn the undercover
counterclockwise until the symbol on the undercover is
aligned with the symbol on the locking lever. (Fig. 38)
Take out the undercover from the tool. (Fig. 39)
Loosen two screws with a coin and remove the shear
blades.
NOTE:
• Do not remove the screws. Without removing the
screws loosened, shear blades can be removed.
(Fig. 40)
Remove the crank from the shear blades.
NOTE:
• The crank may remain in the tool. (Fig. 41)
NOTE:
• In the 2-way usage, the removed grass shear blades
need to be sheared in the blade storage case and
stored for future use.
OPERATION
Refer to the Important Safety Instructions before
operation.
CAUTION:
• Be careful not to accidentally contact a metal fence or
other hard objects while trimming. The blade will break
and may cause serious injury.
• Also, be careful for the shear blade not to contact the
ground.
• Overreaching with a hedge trimmer, particularly from a
ladder, is extremely dangerous. Do not work from
anything wobbly or infirm. (Fig. 42)
Do not attempt to cut branches thicker than 10 mm
diameter with this trimmer. These should first be cut with
shears down to the hedge trimming level.
CAUTION:
• Do not cut off dead trees or similar hard objects. Failure
to do so may damage the tool.
• Do not trim the grass or weeds while using hedge
shear blade. The shear blade may entangle the grass
or weeds. (Fig. 43)
Hold the trimmer with one hand, depress the lock-off
button and pull the switch trigger and then move it in front
of your body. (Fig. 44)
As a basic operation, tilt the blades towards the trimming
direction and move it calmly and slowly at the speed rate
of 3 - 4 seconds per meter. (Fig. 45)
To cut a hedge top evenly, it helps to tie a string at the
desired hedge height and to trim along it, using it as a
reference line. (Fig. 46)
Attaching the chip receiver (optional accessory) on the
tool when trimming the hedge straight can avoid cut off
leaves’ being thrown away. (Fig. 47)
To cut a hedge side evenly, it helps to cut from the bottom
upwards. (Fig. 48)
Trim boxwood or rhododendron from the base toward the
top for a nice appearance and good job.
Installing or removing chip receiver
(optional accessory)
CAUTION:
• Always be sure that the tool is switched off and the
battery cartridge is removed before installing or
removing chip receiver.
NOTE:
• When replacing the chip receiver, always wear gloves
so that hands and face does not directly contact the
blade. Failure to do so may cause personal injury.
• When replacing the chip receiver, always be careful not
to contact the shear blades.
• The chip receiver receives cut-off leaves and alleviates
collecting thrown-away leaves. This can be installed on
either side of the tool. (Fig. 49)
Place the chip receiver on the shear blades so that its slits
overlap with the screws on the shear blades and secure it
using two clamping nuts.
To remove the chip receiver, loosen and remove the two
clamping nuts and then take it out.
Storage (Fig. 50)
The hook hole in the tool bottom is convenient for hanging
the tool from a nail or screw on the wall.
Put the blade cover on the shear blades so that the blades
are not exposed. Store the tool out of the reach of children
carefully.
Store the tool in the place not exposed to water and rain.
Noise
ENG905-1
The typical A-weighted noise level determined according
to IEC60335:
Sound pressure level (L
pA
): 78 dB (A)
Uncertainty (K): 2.5 dB (A)
The noise level under working may exceed 80 dB (A).
Wear ear protection.
Vibration
ENG900-1
The vibration total value (tri-axial vector sum) determined
according to IEC60335:
Vibration emission (a
h
): 2.5 m/s
2
or less
Uncertainty (K): 1.5 m/s
2

17
ENG901-1
• The declared vibration emission value has been
measured in accordance with the standard test method
and may be used for comparing one tool with another.
• The declared vibration emission value may also be
used in a preliminary assessment of exposure.
WARNING:
• The vibration emission during actual use of the power
tool can differ from the declared emission value
depending on the ways in which the tool is used.
• Be sure to identify safety measures to protect the
operator that are based on an estimation of exposure in
the actual conditions of use (taking account of all parts
of the operating cycle such as the times when the tool
is switched off and when it is running idle in addition to
the trigger time).
Hedge trimming operation with optional hedge shear
blades
Noise
ENG905-1
The typical A-weighted noise level determined according
to EN60745:
Sound pressure level (L
pA
): 74 dB (A)
Uncertainty (K): 2.5 dB (A)
The noise level under working may exceed 80 dB (A).
Wear ear protection.
Vibration
ENG900-1
The vibration total value (tri-axial vector sum) determined
according to EN60745:
Vibration emission (a
h
): 2.5 m/s
2
or less
Uncertainty (K): 1.5 m/s
2
ENG901-1
• The declared vibration emission value has been
measured in accordance with the standard test method
and may be used for comparing one tool with another.
• The declared vibration emission value may also be
used in a preliminary assessment of exposure.
WARNING:
• The vibration emission during actual use of the power
tool can differ from the declared emission value
depending on the ways in which the tool is used.
• Be sure to identify safety measures to protect the
operator that are based on an estimation of exposure in
the actual conditions of use (taking account of all parts
of the operating cycle such as the times when the tool
is switched off and when it is running idle in addition to
the trigger time).
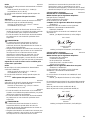
For European countries only
ENH003-15
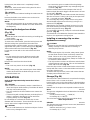
EC Declaration of Conformity
Makita declares that the following Machine(s):
Designation of Machine:
Cordless Grass Shear
Model No./Type: AX-1821H
Conforms to the following European Directives:
2006/42/EC
They are manufactured in accordance with the following
standard or standardized documents:
EN60745, EN60335
The technical file in accordance with 2006/42/EC is
available from:
Makita, Jan-Baptist Vinkstraat 2, 3070, Belgium
30. 9. 2015
Yasushi Fukaya
Director
Makita, Jan-Baptist Vinkstraat 2, 3070, Belgium
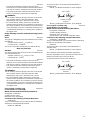
For European countries only
ENH021-8
EC Declaration of Conformity
Makita declares that the following Machine(s):
Designation of Machine:
Cordless Hedge Trimmer
Model No./Type: AX-1821H
Specifications: see “SPECIFICATIONS” table.
Conforms to the following European Directives:
2000/14/EC, 2006/42/EC
They are manufactured in accordance with the following
standard or standardized documents:
EN60745
The technical file in accordance with 2006/42/EC is
available from:
Makita, Jan-Baptist Vinkstraat 2, 3070, Belgium
The conformity assessment procedure required by
Directive 2000/14/EC was in Accordance with annex V.
Measured Sound Power Level: 82 dB (A)
Guaranteed Sound Power Level: 84 dB (A)
30. 9. 2015
Yasushi Fukaya
Director
Makita, Jan-Baptist Vinkstraat 2, 3070, Belgium

18
FRANÇAIS (Instructions d’origine)
Descriptif
SPÉCIFICATIONS
• Étant donné l’évolution constante de notre programme de recherche et de développement, les spécifications
contenues dans ce manuel sont sujettes à des modifications sans préavis.
• Les spécifications et la batterie peuvent varier d’un pays à l’autre.
• Poids, batterie incluse, selon la procédure EPTA 01/2003
Symboles
END010-4
Les symboles utilisés pour l’appareil sont indiqués ci-
dessous. Assurez-vous d’avoir bien compris leur
signification avant d’utiliser l’appareil.
.................... Usez d’attention et de soins
particuliers !
....... Reportez-vous au manuel
d’instructions.
................... Danger ; faites attention au risque de
projection d’objets.
.................. Éloignez les spectateurs.
................... L’organe de coupe continue à
fonctionner une fois le moteur éteint.
...................Tenez l’appareil à l’abri de l’humidité.
.............Pour les pays européens uniquement
Ne pas jeter les appareils électriques et
les bloc-batteries dans les ordures
ménagères !
Conformément aux directives
européennes relatives aux déchets
d’équipements électriques ou
électroniques (DEEE) ainsi qu’aux
batteries, aux accumulateurs et aux
batteries et accumulateurs usagés et à
leur transposition dans la législation
nationale, les appareils électriques, les
batteries et les bloc-batteries doivent
être collectés à part et être soumis à un
1. Voyant rouge
2. Bouton
3. Batterie
4. Étoile
5. Voyants
6. Bouton de vérification
7. Bouton de sécurité
8. Gâchette
9. Voyant
10. Levier de changement
11. Saillie sur le châssis
12. Châssis
13. Lames de cisailles
14. Couvercle de protection de la
lame
15. Châssis de la lame
16. Rainure
17. Levier de verrouillage
18. Couvercle supérieur
19. Appuyez
20. Tournez
21. Lame de cisailles
22. Bielle
23. Repère d’alignement de base sur
le carter de l’outil
24. Clous
25. Partie encastrée de la bielle
26. Appliquer de la graisse
27. Plaque de base
28. Orifice dans la plaque de base
des lames de cisailles
29. Orifices ovales qui se
chevauchent
30. Rainure dans le couvercle
supérieur
31. Brosse
32. Huile pour machine
33. Lame de cisailles pour haie
34. Couvercle de protection de la
lame de cisailles pour haie
35. Étui de rangement
36. Partie incurvée de la plaque de
base des lames de cisailles
37. Vis
38. Couvercle de protection de la
lame du taille-herbes
39. Lame du taille-herbes
40. Sens de la taille
41. Inclinez les lames
42. Surface de la haie à tailler
43. Ficelle
44. Écrous de serrage de collier
45. Récepteur de copeaux
46. Vis sur les lames de cisailles
47. Couvercle de protection de la
lame à installer
systématiquement avant
d’installer le récepteur de
copeaux
48. Orifice du crochet
Modèle AX-1821H
Largeur de coupe effective 160 mm
Passes par minute (min
-1
) 1 250
Tension nominale 18 V C.C.
Batterie
AP-181/AP-1815/BL1815N/BL1820/
BL1820B
AP-183/BL1830/BL1840/BL1840B/
BL1850/BL1850B
Dimensions (L x P x H) 337 mm x 176 mm x 130 mm 353 mm x 176 mm x 130 mm
Poids net 1,4 kg 1,6 kg
Chargeur de batterie LG-184/DC18RC
(Accessoire fourni en option)
Longueur de lames de cisailles pour haie
fournies en option
200 mm
Cd
Ni-MH
Li-ion

19
recyclage respectueux de
l’environnement.
Utilisations
ENE015-1
Cet outil a été conçu pour couper les bordures ou les
pousses d’arbres.
AVERTISSEMENTS DE SÉCURITÉ
CONCERNANT LE TAILLE-
HERBES SANS FIL
GEB070-4
AVERTISSEMENT ! IMPORTANT LISEZ
ATTENTIVEMENT toutes les consignes de sécurité et
toutes les instructions AVANT D’UTILISER L’OUTIL. Il
y a un risque de choc électrique, d’incendie et/ ou de
blessure grave si les consignes et les instructions ne sont
pas toutes respectées.
Conservez toutes les consignes
et instructions pour référence
ultérieure.
Instructions générales
1. Pour une utilisation correcte, lisez ce mode d’emploi
afin de vous familiariser avec le fonctionnement de
l’appareil. Sans ces informations, vous risquez de ne
pas utiliser l’appareil correctement et de vous mettre
en danger ou de blesser d’autres personnes.
2. Ne laissez jamais les enfants, les personnes dont les
capacités physiques, sensorielles ou mentales sont
réduites, n’ayant aucune expérience ni compétence,
ou ne connaissant pas les présentes instructions
utiliser l’appareil. Les réglementations locales peuvent
limiter l’âge de l’opérateur.
3. N’utilisez l’appareil qu’avec une précaution et une
attention extrêmes.
4. Utilisez l’appareil uniquement si vous êtes en bonne
condition physique. Effectuez tout le travail avec
calme et prudence. Faites preuve de bon sens et
gardez à l’esprit que l’opérateur ou l’utilisateur est
responsable des accidents ou blessures infligés à
d’autres personnes ou à leurs biens.
5. N’utilisez jamais l’appareil lorsque des personnes,
particulièrement des enfants, ou des animaux se
trouvent à proximité.
6. N’utilisez jamais l’appareil après avoir consommé de
l’alcool ou de la drogue, ou bien si vous vous sentez
fatigué ou malade.
7. Éteignez immédiatement le moteur si vous constatez
un problème ou une anormalité avec l’appareil.
8. Lorsque vous rangez l’appareil et que vous le laissez
sans surveillance, mettez-le hors tension, retirez la
batterie et placez-le en lieu sûr pour protéger les
autres et éviter que l’appareil ne s’abîme.
9. N’utilisez pas l’appareil au-dessus des capacités pour
lesquels il a été conçu : cela pourrait nuire à la qualité
du travail et provoquer un risque de blessures.
10. Ne tendez pas le bras de manière excessive.
Assurez-vous d’une bonne prise au sol et d’une bonne
position d’équilibre à tout moment.
11. Évitez d’utiliser l’appareil lorsque les conditions
météorologiques sont mauvaises, en particulier en
cas de risque d’orage.
Dispositif de protection individuelle
1. Portez des vêtements adéquats. Les vêtements que
vous portez doivent être fonctionnels et appropriés,
c’est-à-dire qu’ils doivent être près du corps, sans
pour autant gêner vos mouvements. Ne portez pas de
bijoux ou de vêtements susceptibles d’être happés par
l’appareil. Portez un filet de protection pour
envelopper les cheveux longs.
2. Portez toujours des lunettes de protection et des
chaussures solides lors de l’utilisation de l’appareil.
3. Portez toujours des chaussures résistantes et des
pantalons longs lors de l’utilisation de l’appareil.
Sécurité électrique et de la batterie
1. Évitez les environnements dangereux. N’utilisez pas
l’appareil dans des lieux humides et ne l’exposez pas
aux intempéries. Le risque de choc électrique
augmente lorsque de l’eau pénètre dans un appareil
électrique.
2. N’utilisez que le chargeur spécifié par le fabricant. Un
chargeur qui convient à un type de batterie peut créer
un risque d’incendie s’il est utilisé avec un autre type
de batterie.
3. Utilisez les outils électriques uniquement avec les
batteries désignées. L’utilisation d’autres types de
batterie peut créer un risque de blessures et
d’incendie.
4. Lorsque le bloc-batterie n’est pas utilisé, gardez-le
éloigné de tout objet métallique, comme les
trombones, pièces, clefs, clous, vis ou autres petits
objets métalliques, qui peuvent faire office de
connexion d’une borne à l’autre. Court-circuiter les
bornes de la batterie peut provoquer des brûlures ou
un incendie.
5. En cas de mauvaise utilisation, du liquide peut fuir de
la batterie ; évitez tout contact. Si un contact
accidentel se produit, nettoyez avec de l’eau. Si le
liquide entre en contact avec les yeux, consultez un
médecin. Le liquide émis par la batterie peut
provoquer une irritation ou des brûlures.
6. Ne jetez pas les batteries au feu. Elles risqueraient
d’exploser. Consultez la réglementation locale pour
connaître les éventuelles consignes de mise au rebut
spéciales.
7. N’ouvrez pas les batteries et n’essayez pas de les
démonter. L’électrolyte libéré est corrosif et risquerait
de blesser vos yeux ou votre peau. Si vous l’avalez, il
peut se révéler toxique.
Démarrage de l’appareil
1. Assurez-vous qu’aucun enfant ou adulte ne se trouve
à proximité et faites attention aux animaux situés dans
la zone de travail. Le cas échéant, arrêtez l’appareil.
2. Avant d’utiliser l’appareil, vérifiez toujours qu’il ne
présente aucun danger. Vérifiez la sécurité de l’outil
tranchant et de son protège-lame, ainsi que le
fonctionnement de la gâchette et du levier. Vérifiez
que les poignées sont propres et sèches, ainsi que le
bon fonctionnement de l’interrupteur marche/arrêt.
3. Recherchez les éventuelles pièces endommagées
avant de continuer à utiliser l’appareil. Un protège-
lame ou une autre pièce endommagé(e) doit être
inspecté(e) soigneusement pour déterminer s’il/si elle
va f
onctionner correctement. Assurez-vous que les
pièces en mouvement sont alignées et se déplacent

20
librement, qu’aucune pièce n’est cassée, que les
pièces sont correctement montées et qu’aucune
anomalie ne risque d’affecter le fonctionnement de
l’appareil. Un protège-lame ou toute autre pièce
endommagé(e) doit être correctement réparé(e) ou
remplacé(e) par un centre de service agréé, sauf
indication contraire dans ce manuel.
4. Ne mettez le moteur sous tension que lorsque vos
mains et vos pieds sont éloignés de la lame.
5. Avant de commencer, assurez-vous que l’outil de
coupe ne touche aucun objet.
Mode d’emploi
1. N’utilisez l’appareil que dans des conditions
d’éclairage et de luminosité suffisantes. En hiver,
soyez attentif aux zones glissantes ou mouillées, au
verglas et à la neige (risque de glissade). Assurez-
vous toujours d’avoir une bonne prise au sol sur les
pentes ; marchez et ne courrez pas.
2. Faites attention à ne pas vous blesser les pieds et les
mains avec l’outil de coupe.
3. N’utilisez jamais l’appareil sur une échelle.
4. Ne montez jamais dans un arbre pour utiliser
l’appareil.
5. Ne travaillez jamais sur des surfaces instables.
6. Enlevez le sable, les pierres, les clous, etc., trouvés à
l’intérieur du périmètre de travail. Des corps étrangers
peuvent endommager l’outil de coupe et causer des
chocs en retour dangereux.
7. Si l’outil de coupe heurte des pierres ou d’autres
objets durs, éteignez de suite le moteur et examinez
l’outil de coupe.
8. Examinez l’outil de coupe à intervalles réguliers courts
pour voir s’il n’a pas subi de dommages (détection de
fissures capillaires en utilisant le test de tapping).
9. Avant de commencer à couper, assurez-vous que
l’outil de coupe a atteint sa vitesse de fonctionnement
maximale.
10. L’outil de coupe doit toujours être équipé de son
protège-lame approprié. N’utilisez jamais l’appareil si
les protège-lames sont endommagés ou s’ils ne sont
pas en place !
11. Vous devez utiliser tous les carters et dispositifs de
protection fournis avec l’appareil pendant son
utilisation.
12. Retirez toujours la batterie de l’appareil :
- toutes les fois où l’appareil doit être laissé sans
surveillance ;
- avant toute opération de retrait d’obstruction ;
- avant toute opération de vérification, de nettoyage
ou de réparation de l’appareil ;
- après avoir heurté un objet étranger ;
- dès que l’appareil commence à vibrer de manière
anormale.
13. Assurez-vous toujours que les ouvertures de
ventilation ne sont pas obstruées par des débris.
14. Les éléments coupants continuent à fonctionner après
l’arrêt du moteur.
Outils de coupe
1. Utilisez uniquement l’outil de coupe adapté au travail.
Instructions d’entretien
1. Avant d’utiliser l’appareil, vérifiez son état, et
notamment l’outil de coupe et les dispositifs de
protection.
2. Avant d’effectuer une opération d’entretien, de
remplacer les lames ou de nettoyer l’appareil ou la
lame, mettez le moteur hors tension et retirez la
batterie.
3. Vérifiez que les dispositifs de fixation sont bien
attachés et recherchez les éventuelles pièces
endommagées, comme des fissures sur la fixation de
l’outil de coupe.
4. Suivez les instructions de lubrification et de
changement des accessoires.
5. Lorsque vous n’utilisez pas l’appareil, rangez-le en
intérieur, dans un endroit sec et, élevé ou verrouillé,
hors de portée des enfants. Nettoyez l’appareil et
effectuez les opérations d’entretien avant de le ranger.
6. N’utilisez que les pièces et accessoires de
remplacement recommandés par le fabricant.
7. Inspectez et assurez régulièrement l’entretien de
l’appareil, particulièrement avant/après utilisation. Ne
faites réparer l’appareil que par notre centre de
service agréé.
8. Gardez les poignées de l’outil sèches, propres et
exemptes d’huile ou de graisse.
CONSERVER POUR RÉFÉRENCE
ULTÉRIEURE.
AVERTISSEMENT:
NE vous laissez PAS tromper (au fil d’une utilisation
répétée) par un sentiment d’aisance et de familiarité
avec le produit, en négligeant le respect rigoureux
des consignes de sécurité qui accompagnent l’outil.
Une UTILISATION INCORRECTE de l’outil ou un non-
respect des consignes de sécurité indiquées dans ce
manuel d’instructions peuvent causer des blessures
graves.
Consignes de sécurité générales
des outils électriques
GEA010-1
AVERTISSEMENT Veuillez lire toutes les
consignes de sécurité et les instructions. Il y a un
risque de choc électrique, d’incendie et/ou de blessure
grave si les consignes et les instructions ne sont pas
toutes respectées.
Conservez toutes les consignes
et instructions pour référence
ultérieure.
CONSIGNES DE SÉCURITÉ
CONCERNANT LE TAILLE-HAIE
SANS FIL
GEB062-5
1. Maintenez toutes les parties du corps éloignées
de la lame de coupe. Ne retirez pas et ne retenez
pas le matériau à couper lorsque les lames sont
en mouvement. Assurez-vous que l’outil est éteint
lors du dégagement des matériaux enchevêtrés.
Tout moment d’inattention pendant l’utilisation du
taille-haie comporte un risque de blessure corporelle
grave.
Sayfa yükleniyor...
Sayfa yükleniyor...
Sayfa yükleniyor...
Sayfa yükleniyor...
Sayfa yükleniyor...
Sayfa yükleniyor...
Sayfa yükleniyor...
Sayfa yükleniyor...
Sayfa yükleniyor...
Sayfa yükleniyor...
Sayfa yükleniyor...
Sayfa yükleniyor...
Sayfa yükleniyor...
Sayfa yükleniyor...
Sayfa yükleniyor...
Sayfa yükleniyor...
Sayfa yükleniyor...
Sayfa yükleniyor...
Sayfa yükleniyor...
Sayfa yükleniyor...
Sayfa yükleniyor...
Sayfa yükleniyor...
Sayfa yükleniyor...
Sayfa yükleniyor...
Sayfa yükleniyor...
Sayfa yükleniyor...
Sayfa yükleniyor...
Sayfa yükleniyor...
Sayfa yükleniyor...
Sayfa yükleniyor...
Sayfa yükleniyor...
Sayfa yükleniyor...
Sayfa yükleniyor...
Sayfa yükleniyor...
Sayfa yükleniyor...
Sayfa yükleniyor...
Sayfa yükleniyor...
Sayfa yükleniyor...
Sayfa yükleniyor...
Sayfa yükleniyor...
Sayfa yükleniyor...
Sayfa yükleniyor...
Sayfa yükleniyor...
Sayfa yükleniyor...
Sayfa yükleniyor...
Sayfa yükleniyor...
Sayfa yükleniyor...
Sayfa yükleniyor...
Sayfa yükleniyor...
Sayfa yükleniyor...
Sayfa yükleniyor...
Sayfa yükleniyor...
Sayfa yükleniyor...
Sayfa yükleniyor...
Sayfa yükleniyor...
Sayfa yükleniyor...
Sayfa yükleniyor...
Sayfa yükleniyor...
Sayfa yükleniyor...
Sayfa yükleniyor...
Sayfa yükleniyor...
Sayfa yükleniyor...
Sayfa yükleniyor...
Sayfa yükleniyor...
Sayfa yükleniyor...
Sayfa yükleniyor...
Sayfa yükleniyor...
Sayfa yükleniyor...
Sayfa yükleniyor...
Sayfa yükleniyor...
Sayfa yükleniyor...
Sayfa yükleniyor...
Sayfa yükleniyor...
Sayfa yükleniyor...
Sayfa yükleniyor...
Sayfa yükleniyor...
Sayfa yükleniyor...
Sayfa yükleniyor...
Sayfa yükleniyor...
Sayfa yükleniyor...
Sayfa yükleniyor...
Sayfa yükleniyor...
Sayfa yükleniyor...
Sayfa yükleniyor...
Sayfa yükleniyor...
Sayfa yükleniyor...
Sayfa yükleniyor...
Sayfa yükleniyor...
Sayfa yükleniyor...
Sayfa yükleniyor...
Sayfa yükleniyor...
Sayfa yükleniyor...
-
 1
1
-
 2
2
-
 3
3
-
 4
4
-
 5
5
-
 6
6
-
 7
7
-
 8
8
-
 9
9
-
 10
10
-
 11
11
-
 12
12
-
 13
13
-
 14
14
-
 15
15
-
 16
16
-
 17
17
-
 18
18
-
 19
19
-
 20
20
-
 21
21
-
 22
22
-
 23
23
-
 24
24
-
 25
25
-
 26
26
-
 27
27
-
 28
28
-
 29
29
-
 30
30
-
 31
31
-
 32
32
-
 33
33
-
 34
34
-
 35
35
-
 36
36
-
 37
37
-
 38
38
-
 39
39
-
 40
40
-
 41
41
-
 42
42
-
 43
43
-
 44
44
-
 45
45
-
 46
46
-
 47
47
-
 48
48
-
 49
49
-
 50
50
-
 51
51
-
 52
52
-
 53
53
-
 54
54
-
 55
55
-
 56
56
-
 57
57
-
 58
58
-
 59
59
-
 60
60
-
 61
61
-
 62
62
-
 63
63
-
 64
64
-
 65
65
-
 66
66
-
 67
67
-
 68
68
-
 69
69
-
 70
70
-
 71
71
-
 72
72
-
 73
73
-
 74
74
-
 75
75
-
 76
76
-
 77
77
-
 78
78
-
 79
79
-
 80
80
-
 81
81
-
 82
82
-
 83
83
-
 84
84
-
 85
85
-
 86
86
-
 87
87
-
 88
88
-
 89
89
-
 90
90
-
 91
91
-
 92
92
-
 93
93
-
 94
94
-
 95
95
-
 96
96
-
 97
97
-
 98
98
-
 99
99
-
 100
100
-
 101
101
-
 102
102
-
 103
103
-
 104
104
-
 105
105
-
 106
106
-
 107
107
-
 108
108
-
 109
109
-
 110
110
-
 111
111
-
 112
112


diğer dillerde
- español: Dolmar AX1821H El manual del propietario
- français: Dolmar AX1821H Le manuel du propriétaire
- italiano: Dolmar AX1821H Manuale del proprietario
- Deutsch: Dolmar AX1821H Bedienungsanleitung
- português: Dolmar AX1821H Manual do proprietário
- dansk: Dolmar AX1821H Brugervejledning
- Nederlands: Dolmar AX1821H de handleiding