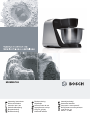
Bosch MUM55761/02 Kullanım kılavuzu
- Kategori
- Karıştırıcılar
- Tip
- Kullanım kılavuzu

en Operating instructions
fr Notice d’utilisation
it Istruzioni per l’uso
nl Gebruiksaanwijzing
da Brugsanvisning
no Bruksanvisning
sv Bruksanvisning
fi Käyttöohje
es Instrucciones de uso
pt Instruções de serviço
el Οδηγίες χρήσης
tr Kullanma talimatı
pl Instrukcja obsługi
hu Használati utasítás
uk Iнструкцiя з експлуатацiï
ru Инструкция по эксплуатации
ar
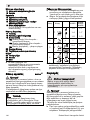
MUM55761

en English . . . . . . . . . . . . . . . . . . . . . . . . . . . . . . . . . . . . . . . . . . . . . . . . . . . . . . . . . . 3
fr Français . . . . . . . . . . . . . . . . . . . . . . . . . . . . . . . . . . . . . . . . . . . . . . . . . . . . . . . . .16
it Italiano . . . . . . . . . . . . . . . . . . . . . . . . . . . . . . . . . . . . . . . . . . . . . . . . . . . . . . . . . .31
nl Nederlands . . . . . . . . . . . . . . . . . . . . . . . . . . . . . . . . . . . . . . . . . . . . . . . . . . . . . .45
da Dansk . . . . . . . . . . . . . . . . . . . . . . . . . . . . . . . . . . . . . . . . . . . . . . . . . . . . . . . . . .59
no Norsk . . . . . . . . . . . . . . . . . . . . . . . . . . . . . . . . . . . . . . . . . . . . . . . . . . . . . . . . . . .72
sv Svenska . . . . . . . . . . . . . . . . . . . . . . . . . . . . . . . . . . . . . . . . . . . . . . . . . . . . . . . . .85
fi Suomi . . . . . . . . . . . . . . . . . . . . . . . . . . . . . . . . . . . . . . . . . . . . . . . . . . . . . . . . . .98
es Español . . . . . . . . . . . . . . . . . . . . . . . . . . . . . . . . . . . . . . . . . . . . . . . . . . . . . . . .111
pt Português . . . . . . . . . . . . . . . . . . . . . . . . . . . . . . . . . . . . . . . . . . . . . . . . . . . . . .126
el Ελληνικά . . . . . . . . . . . . . . . . . . . . . . . . . . . . . . . . . . . . . . . . . . . . . . . . . . . . . . .140
tr Türkçe . . . . . . . . . . . . . . . . . . . . . . . . . . . . . . . . . . . . . . . . . . . . . . . . . . . . . . . . .155
pl Polski . . . . . . . . . . . . . . . . . . . . . . . . . . . . . . . . . . . . . . . . . . . . . . . . . . . . . . . . . .171
hu Magyar . . . . . . . . . . . . . . . . . . . . . . . . . . . . . . . . . . . . . . . . . . . . . . . . . . . . . . . . .185
uk Українська . . . . . . . . . . . . . . . . . . . . . . . . . . . . . . . . . . . . . . . . . . . . . . . . . . . . .198
ru Русский . . . . . . . . . . . . . . . . . . . . . . . . . . . . . . . . . . . . . . . . . . . . . . . . . . . . . . . .212
ar . . . . . . . . . . . . . . . . . . . . . . . . . . . . . . . . . . . . . . . . . . . . . . . . . . . . . . . . . .245
. . . . . . . . . . . . . . . . . . . . . . . . . . . . . . . . . . . . . . . . . . . . . . . . .

Robert Bosch Hausgeräte GmbH 3
Contents
For your safety . . . . . . . . . . . . . . . . . . . 3
Overview . . . . . . . . . . . . . . . . . . . . . . . 5
Operation . . . . . . . . . . . . . . . . . . . . . . . 7
Cleaning and servicing . . . . . . . . . . . . . 10
Storage . . . . . . . . . . . . . . . . . . . . . . . . . 10
Troubleshooting . . . . . . . . . . . . . . . . . . 10
Application examples . . . . . . . . . . . . . . 11
Optional accessories . . . . . . . . . . . . . . 13
Disposal . . . . . . . . . . . . . . . . . . . . . . . . 15
Warranty conditions . . . . . . . . . . . . . . . 15
For your safety
Before use, read these instructions carefully in order to become familiar
with important safety and operating instructions for this appliance.
If the instructions for correct use of the appliance are not observed,
the manufacturer’s liability for any resulting damage will be excluded.
This appliance is designed for processing normal household quantities
in the home or similar quantities in non-industrial applications. Non-
industrial applications include e.g. use in employee kitchens in shops,
offices, agricultural and other commercial businesses, as well as use
by guests in boarding houses, small hotels and similar dwellings. Use
the appliance for processing normal quantities of food for domestic
use. Do not exceed permitted maximum quantities (see “Application
examples”).
This appliance is suitable for mixing, kneading and beating food.
It must not be used for processing other objects or substances.
Other applications are possible if the accessories approved by the
manufacturer are used.
Use the appliance with original accessories only. When using the
accessories, follow the enclosed operating instructions.
Please keep the operating instructions in a safe place. If passing
on the appliance to a third party, always include the operating
instructions.
, General safety instructions
Electric shock risk
The appliance must not be used by children. The appliance and its
power cord must be kept away from children.
Appliances can be used by persons with reduced physical, sensory or
mental capabilities or lack of experience and knowledge if they have
been given supervision or instruction concerning use of the appliance
in a safe way and if they understand the hazards involved.
Children shall not play with the appliance. Do not leave the running
appliance unattended.
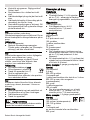
en
Congratulations on the purchase of your
new BOSCH appliance.
In doing so, you have opted for a modern,
high-quality domestic appliance.
You can find further information about our
products on our web page.

4 Robert Bosch Hausgeräte GmbH
Connect and operate the appliance only in accordance with the
specifications on the rating plate. Only use indoors. Do not use the
appliance if the power cord and/or appliance are damaged.
Before replacing accessories or additional parts, which move during
operation, switch off the appliance and disconnect from the power
supply. Always disconnect the appliance from the supply if it is left
unattended and before assembling, disassembling or cleaning.
Do not place the power cord over sharp edges or hot surfaces.
To prevent injury, a damaged power cord must be replaced by the
manufacturer or his customer service or a similarly qualified person.
Only our customer service may repair the appliance.
, Safety instructions for this appliance
Risk of injury
Risk of electric shock!
Do not insert mains plug until all preparations for working with the
appliance are complete.
Never immerse the base unit in liquid or hold under running water.
Do not use a steam cleaner.
Do not adjust the swivel arm while the appliance is switched on.
Wait until the drive has come to a standstill.
Do not change tool/accessory until the drive is at a standstill – when
the appliance is switched off, the drive continues running briefly.
Use only the rotary switch to switch the appliance on or off.
When the appliance is not in use, pull out the mains plug.
Before eliminating a fault, pull out the mains plug.
Risk of injury from the rotating tools!
Keep hands clear of rotating parts. While the appliance is operating,
never place fingers in the mixing bowl. Attach the cover (12) before
operating the appliance!
Do not change tools until the drive has come to a standstill – when the
appliance is switched off, the drive continues running briefly and stops
in the tool change position. Do not move the swivel arm until the tool
has come to a standstill. For reasons of safety the appliance cannot be
operated unless unused drives are covered with drive guards (5, 8).
Before attaching/removing the continuous-feed shredder, wait until the
drive has come to a standstill and pull out the mains plug. Do not reach
into the feed tube.
Risk of injury from sharp blades!
Do not grip the sharp blades or edges of the cutting discs. Take hold
of cutting discs by the edge only. Do not touch blender blades with
bare hands.
en

Robert Bosch Hausgeräte GmbH 5
Risk of injury from sharp blades/rotating drive!
Never place fingers in the attached blender! Do not remove/attach the
blender until the drive is at a standstill! Operate the assembled blender
only and with the lid attached.
Risk of scalding!
If processing hot liquids, steam escapes through the funnel in the lid.
Add a max. 0.5 litres of hot or frothing liquid.
Important!
Use the appliance with original accessories only. When using the
accessories, follow the enclosed operating instructions.
Use only one tool or accessory at any one time.
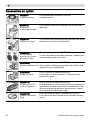
, Explanation of the symbols on the appliance or accessory
Follow the instructions in the operating instructions.
Caution! Rotating blades.
Caution! Rotating tools.
Do not place fingers in the feed tube.
Safety systems
Start lock-out
See “Operating positions” table.
The appliance can be switched on in pos. 1
and 3 only:
– when the bowl (11) has been inserted and
turned until it locks into place and
– the blender drive cover has been
attached (8).
Restart lock-out
If the power is interrupted, the appliance
remains switched on but the motor does
not start running again when the power is
restored. To switch the appliance on again,
turn the rotary switch to 0/off, then switch on.
Overload protection
If the motor switches itself off while the
appliance is being used, the overload
protection feature has been activated.
A possible cause may be that too much
food was processed at one time.
If a safety system is activated,
see “Troubleshooting”.
The operating instructions describe several
models, see also overview of models (Fig. ).
The appliance requires no maintenance.
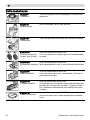
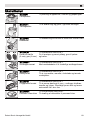
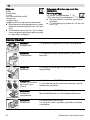
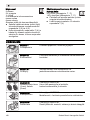
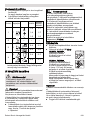
Overview
Please fold out the illustrated pages. Fig.
Base unit
1 Release button
2Swivel arm
“Easy Armlift” function to support the
upward movement of the arm (see
“Work positions”).
3 Rotary switch
When the appliance has been switched
off (position 0/off), the appliance runs
automatically to the optimum position for
changing the tools.
MUM52..:
0/off = Stop
M = Instantaneous switching at maximum
speed, hold switch for required blending
duration.
Settings 1–4, Operating speed:
1 = low speed – slow,
4 = high speed – fast.
en

6 Robert Bosch Hausgeräte GmbH
MUM54../MUM55../MUM56..:
0/off = Stop
M = Instantaneous switching at maximum
speed, hold switch for required blending
duration.
Settings 1–7, Operating speed:
1 = low speed – slow,
7 = high speed – fast.
4 On/Off display (MUM54../55../56..)
Is lit while the appliance is operating
(rotary switch on M or 1–7).
Flashes if the appliance has been
operated incorrectly, the electronic fuse
has tripped or the appliance is defective –
see section “Troubleshooting”.
5 Drive cover
To remove the drive cover, press on the
rear area and remove cover.
6 Drive for
– Continuous-feed shredder and
– Citrus press (optional accessory *).
When not in use, attach the drive cover.
7 Drive for tools (stirrer, whisk, kneading
hook) and mincer (optional accessory *)
8 Blender drive cover
9 Drive for blender (optional accessory *)
When not in use, attach the blender drive
cover.
10 Cord store
MUM52../MUM54..:
Stow the cord in the cord store
MUM55../MUM56..:
Automatic cord winder
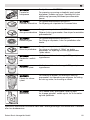
Bowl with accessories
11 Stainless steel stirring bowl
12 Lid
Tools
13 Stirrer
14 Whisk
15 Kneading hook with dough deflector
16 Accessories bag
For storage of the tools and cutting discs.
Continuous-feed shredder
17 Pusher
18 Cover with filling shaft
19 Cutting discs
19a Reversible slicing disc – thick/thin
19b Reversible shredding disc –
coarse/fine
19c Grating disc – medium-fine
20 Disc holder
21 Housing with outlet opening
Blender
*
22 Blender jug
23 Lid
24 Funnel
* If an accessory is not included in the
product package, it can be purchased via
the trade or customer service.
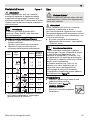
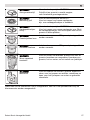
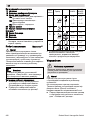
Operating positions Fig.
Attention!
Before operating the appliance, attach the
tool/accessory to the correct drive and in the
correct position and place in the operating
position according to this table.
The swivel arm must be engaged in every
operating position.
Selecting the operating position:
Press the Release button and move the
swivel arm.
Support movement with your hand.
Move the swivel arm until it engages in
the required position.
* Insert/remove whisk, stirrer or kneading
hook. Add large quantities of ingredients.
en
Note:
The swivel arm features an
“Easy Armlift”
function which supports the upwards
movement of the swivel arm.
Position Drive MUM52..
MUM54..
MUM55..
MUM56..
1
7
1
–4
1–4
1–2
1
–7
1–7
1–3
2
7
*
––
3
6
2
–4
3
–7
2
–3
3
–5
4
93
–4
5
–7
73
–4
5
–7

Robert Bosch Hausgeräte GmbH 7
Operation
Attention!
Do not operate the appliance without an
accessory/tool in the operating position.
Do not operate the appliance empty.
Do not expose appliance or accessories to
heat sources. Parts are not microwave-safe.
Before operating the appliance and
accessories for the first time, clean
thoroughly; see “Cleaning and servicing”.
Preparation
Place the base unit on a smooth,
clean surface.
Pull out the power cord (Fig. ).
MUM52../MUM54..
Cord store:
Pull out cable to the required
length.
MUM55../MUM56..
Automatic cord winder:
Pull out the cord in one go
to the required length (max.
100 cm) and slowly release;
the cord is locked.
Reducing the cord length:
Pull gently on the cord and allow it to roll
up to the required length. Then gently pull
the cord again and slowly release; the
cable is locked.
Warning!
Do not twist the cord when inserting it.
If the appliance features an automatic cord
winder, do not insert the cord manually. If the
cord jams, pull out the cord all the way and
then allow it to wind up.
Insert the mains plug.
Bowl and tools
Attention!
Use bowl with this appliance only.
Stirrer (13)
for stirring dough, e.g. cake mixture
Whisk (14)
for whisking egg whites, cream and
light dough, e.g. sponge mixture
Kneading hook (15)
for kneading heavy dough and mixing-
in ingredients that ought not be cut
(e.g. raisins and chocolate chips)
Working with the bowl and the tools Fig.
Press the Release button and move
the swivel arm to position 2.
Insert the bowl:
– Tilt the bowl forwards and then set it
down.
– Turn anti-clockwise until it locks into
place.
Depending on the processing task, insert
the stirrer, whisk or kneading hook until it
locks into position.
Note:
If using the kneading hook, rotate the
dough deflector until the kneading hook
can lock into position (Fig. –4b).
en
Risk of injury!
Do not insert mains plug until all
preparations for working with the
appliance are complete.
Important information
In these instructions for use the recom-
mended reference values for the opera-
ting speed refer to appliances with a 7-
setting rotary switch. For appliances with
a 4-setting rotary switch you can find the
values in brackets after the values for a 7-
setting rotary switch.
These operating instructions contain
a sticker with reference values for the
operating speed of the appliance when
using the tools or accessories.
We recommend attaching this sticker
to the appliance (Fig. ).
Risk of injury from rotating tools
While the appliance is operating, never
place fingers in the mixing bowl. Attach the
cover (12) before operating the appliance!
Do not change tools until the drive has
come to a standstill – when the appliance
is switched off, the drive continues running
briefly and stops in the tool change
position. Do not move the swivel arm until
the tool has come to a standstill.
For reasons of safety the appliance may
only be operated when unused drives have
been covered with drive guards (5, 8).

8 Robert Bosch Hausgeräte GmbH
Put the ingredients to be processed into
the bowl.
Press the Release button and move
the swivel arm to position 1.
Attach the cover.
Set the rotary switch to the desired
setting.
Our recommendation:
– Stirrer:
first stir in at setting 1 (1), then select
setting 7 (4)
– Whisk:
setting 7 (4), mix in at setting 1 (1)
– Kneading hook:
first stir in at setting 1 (1), knead at setting
3 (2)
Adding more ingredients
Switch off the appliance with the rotary
switch.
Add more ingredients through the feed
tube in the cover.
or
Remove lid.
Press the Release button and move
the swivel arm to position 2.
Add ingredients.
After using the appliance
Switch off the appliance with the rotary
switch.
Remove mains plug.
Remove lid.
Press the Release button and move
the swivel arm to position 2.
Take the tool out of the drive.
Remove the bowl.
Clean all parts, see “Cleaning and
servicing”.
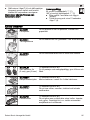
Continuous-feed shredder
Warning!
The continuous-feed shredder must be
completely assembled before use. Never
assemble the continuous-feed shredder on
the base unit.
Operate the continuous-feed shredder in the
indicated operating position only.
Predetermined breaking point Fig.
The built-in predetermined breaking point
protects the drive of the appliance. If an
overload occurs, the drive shaft of the con-
tinuous-feed shredder breaks. However, the
drive shaft can easily be replaced.
A new disc holder with drive shaft is available
from customer service.
Reversible slicing disc – thick/thin
for slicing fruit and vegetables.
Process at setting 5 (3).
Designation on the reversible slicing disc:
“1” for the thick slicing side
“3“ for the thin slicing side
Warning!
The reversible slicing disc is not suitable for
slicing hard cheese, bread, rolls or chocolate.
Slice boiled, waxy potatoes only when they
are cold.
Reversible shredding disc –
coarse/fine
for shredding vegetables, fruit and cheese,
except for hard cheese (e.g. Parmesan).
Processing at setting 3 (2) or 4 (3).
Designation on the reversible shredding disc:
“2” for the coarse shredding side
“4” for the fine shredding side
Warning!
The reversible shredding disc is not suitable
for shredding nuts. Shred soft cheese with
the coarse side only at setting 7 (4).
Grating disc – medium-fine
for grating raw potatoes, hard cheese
(e.g. Parmesan), cooled chocolate and nuts.
Process at setting 7 (4).
Warning!
The grating disc is not suitable for grating soft
cheese and cheese slices.
Working with the continuous-feed
shredder Fig.
Press the Release button and move
the swivel arm to position 2.
en
Risk of injury
Do not grip the sharp blades or edges of
the cutting discs. Take hold of cutting
discs by the edge only.
Before attaching/removing the continuous-
feed shredder, wait until the drive has
come to a standstill and pull out the mains
plug.
Do not reach into the feed tube.

Robert Bosch Hausgeräte GmbH 9
Insert the bowl:
– Tilt the bowl forwards and then set it
down.
– Turn anti-clockwise until it locks into
place.
Press the Release button and move
the swivel arm to position 3.
Remove drive cover from the drive
of the continuous-feed shredder
(Fig. -5a).
Hold disc holder at the lower end,
ensuring that the two tips are face up.
Carefully place the required slicing or
shredding disc onto the tips of the disc
holder (Fig. -6a). In the case of
reversible discs, ensure that the required
side is face up.
Grip disc holder at the upper end and
insert into the housing (Fig. -6b).
Attach the cover (note mark) and turn all
the way in a clockwise direction.
Place continuous-feed shredder on the
drive and rotate all the way in a clockwise
direction, as illustrated in Fig. -8.
Turn rotary switch to recommended
setting.
Put food to be processed in the feed tube
and push down with the pusher.
Warning!
Prevent the cut ingredients from building up
in the outlet opening.
Tip: To ensure even cutting results, process
thin ingredients in bunches.
Note: If the food to be processed sticks in the
continuous-feed shredder, switch food
processor off, pull out mains plug, wait until
the drive comes to a standstill, remove cover
from the continuous-feed shredder and
empty feed tube.
After using the appliance
Switch off the appliance with the rotary
switch.
Rotate the continuous-feed shredder in
an anti-clockwise direction and remove.
Rotate the lid in an anti-clockwise
direction and remove.
Remove disc holder with disc. To do this,
press finger from below against the drive
shaft (Fig. ).
Clean parts.
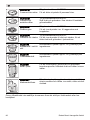
Blender
Warning!
Blender may be damaged. Do not process
deep-frozen ingredients (except ice cubes).
Do not operate blender when empty.
Working with the blender Fig.
Press the release button and move
the swivel arm to position 4.
Remove the blender drive cover.
Attach blender jug (mark on the handle on
mark on the base unit) and turn all the
way in an anti-clockwise direction.
Add ingredients.
Maximum amount of liquid = 1.25 litres;
maximum amount of frothing or hot
liquids = 0.5 litres;
Optimal processing capacity – solids =
50–100 g;
Attach the cover and turn anti-clockwise
all the way into the blender handle.
The cover must be locked in position.
Set the rotary switch to the desired
setting.
Adding more ingredients Fig. -8
Switch off the appliance with the rotary
switch.
Remove the lid and add ingredients
or
remove the funnel and gradually add
solid ingredients through the refill
opening
or
pour liquid ingredients through the funnel.
en
Risk of injury from sharp blades/
rotating drive!
Never place fingers in the attached
blender! Do not remove/attach the blender
until the drive is at a standstill! Operate the
assembled blender only and with the lid
attached.
Risk of scalding!
If processing hot liquids, steam escapes
through the funnel in the lid. Add a max.
0,5 litres of hot or frothing liquid.

10 Robert Bosch Hausgeräte GmbH
After using the appliance
Switch off the appliance with the rotary
switch.
Rotate the blender in a clockwise
direction and remove.
Tip: It is recommended to clean the blender
immediately after use.
Cleaning and servicing
Attention!
Do not use abrasive cleaning agents.
Surfaces may be damaged.
Cleaning the base unit
Remove mains plug.
Wipe the base unit and drive cover with
a damp cloth. If required, use a little
detergent.
Then dry the base unit.
Cleaning the bowl and tools
The bowl and tools are dishwasher-proof.
Do not wedge plastic parts in the dishwasher,
as they could be permanently deformed
during the washing process!
Cleaning the continuous-feed shredder
All parts of the continuous-feed shredder are
dishwasher-proof.
Tip: To remove the red film after processing
e.g. carrots, pour a little cooking oil on a cloth
and rub the film off the continuous-feed
shredder (not the cutting discs). Then rinse
the continuous-feed shredder.
Cleaning the blender
The blender jug, lid and funnel are
dishwasher-proof.
Tip: After processing liquids, it is often
sufficient to clean the blender without
removing it from the appliance. Pour a little
water and washing-up liquid into the attached
blender. Switch on the blender for several
seconds (setting M). Pour out the water and
rinse out the blender with clear water.
Storage
Fig.
Store tools and cutting discs in the
accessories bag.
Keep accessories bag in the bowl.
To store in the original packaging,
see Fig. .
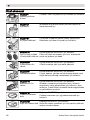
Troubleshooting
The swivel arm must be engaged in every
operating position.
Initially try to eliminate the problem which has
occurred with the help of the following
information.
Fault
Appliance does not start.
Remedial action
Check the power supply.
Check the mains plug.
en
Risk of electric shock!
Never immerse the base unit in water
or place under running water.
Do not use a steam cleaner.
Risk of injury from sharp blades!
Do not touch blender blades with bare
hands.
Important information
If required, clean accessories bag.
Follow care instructions in the bag.
Risk of injury!
When the appliance is not in use, pull out
the mains plug.
Risk of injury!
Before eliminating a fault, pull out the
mains plug.
Important information for MUM54../
MUM55../MUM56..
The Operating indicator flashes if the
appliance has been operated incorrectly
or the electronic fuse has tripped or the
appliance is defective.

Robert Bosch Hausgeräte GmbH 11
Check swivel arm. Correct position?
Engaged?
Screw on blender or bowl as far as
possible.
Attach the blender cover and screw on as
far as possible.
Attach drive cover to unused drives.
The safety lock is active.
Switch appliance to 0/off and then back to
the required setting.
Fault
Appliance switches off during use.
The overload protection feature has been
activated. Too much food was processed
at one time.
Remedial action
Switch off the appliance.
Reduce processing quantity. Do not
exceed permitted maximum quantities
(see “Application examples”).
Fault
While the drive was running, the release
button was inadvertently pressed.
The swivel arm moves up. The drive switches
off, but does not stop in the tool change
position.
Remedial action
Set the rotary switch to 0/off.
Move swivel arm to position 1.
Switch on appliance (setting 1).
Switch off appliance again.
Tool stops in tool change position.
Fault
Blender does not start working or stops
during use, the drive is “humming”. Blade is
blocked.
Remedial action
Switch off the appliance and pull out the
mains plug.
Detach the blender and remove the
obstruction.
Re-attach the blender.
Switch on the appliance.
Application examples
Whipped cream
100 g–600 g
Whip cream with the whisk for 1½
to 4 minutes at setting 7 (4) depending on
the quantity and properties of the cream.
Egg white
1 to 8 egg whites
Beat egg white with the whisk for
4 to 6 minutes at setting 7 (4).
Sponge mixture
Basic recipe
2 eggs
2–3 tbs. hot water
100 g sugar
1 packet of vanilla sugar
70 g flour
70 g cornflour
Baking powder if required
Beat the ingredients (except flour and
cornflour) with the whisk for approx. 4–6
minutes at setting 7 (4) until frothy.
Rotate switch to setting 1 (1) and spoon
in the sifted flour and cornflour within
approx. ½ to 1 minute.
Maximum quantity: 2 x basic recipe
Cake mixture
Basic recipe
3–4 eggs
200–250 g sugar
1 pinch of salt
1 packet of vanilla sugar or peel from ½
lemon
200–250 g butter or margarine (room
temperature)
500 g flour
1 packet of baking powder
125 ml of milk
Mix all ingredients with the stirrer for
approx. ½ minute at setting 1 (4), then for
approx. 3–4 minutes at setting 7 (4).
Maximum quantity: 1,5 x basic recipe
Short pastry
Basic recipe
125 g butter (room
temperature)
100–125 g sugar
1 egg
1 pinch of salt
A little lemon peel or vanilla sugar
250 g flour
en
Important information
If the fault cannot be eliminated,
please contact customer service.

12 Robert Bosch Hausgeräte GmbH
Baking powder if required
Using the stirrer, process all ingredients
for approx. ½ minute at setting 1 (1), then
for approx. 2–3 minutes at setting 6 (3).
From 500 g flour:
Knead the ingredients with the kneading
hook for approx. ½ minute at setting 1 (1),
then for approx. 3–4 minutes at setting 3
(2).
Maximum quantity: 2 x basic recipe
Yeast dough
Basic recipe
500 g flour
1 egg
80 g fat (room temperature)
80 g sugar
200–250 ml lukewarm milk
25 g fresh yeast or 1 packet of dried yeast
Peel of ½ lemon
1 pinch of salt
Process all ingredients for approx. ½
minute at setting 1, then for approx. 3–6
minutes at setting 3 (2) using the
kneading hook.
Maximum quantity: 1,5 x basic recipe
Pasta dough
Basic recipe
300 g flour
3 eggs
1–2 tbs. (10–20 g) cold water as required
Process all ingredients for approx. 3–5
minutes at setting 3 (2) until a dough
forms.
Maximum quantity: 1,5 x basic recipe
Bread dough
Basic recipe
750 g flour
2 packets of dry yeast
2 tsp. salt
450–500 ml warm water
Process all ingredients for approx. ½ minute
at setting 1, then for approx. 4–5 minutes at
setting 3 (2) using the kneading hook.
Mayonnaise
2 eggs
2 tsp. mustard
¼ l oil
2 tbs. lemon juice or vinegar
1 pinch of salt
1 pinch of sugar
Ingredients must be at the same
temperature.
Process the ingredients (except the oil) in
the blender for several seconds at setting
3 (2) or 4 (3).
Switch the blender to setting 7 (4) and
slowly pour the oil through the funnel and
mix until the mayonnaise emulsifies.
Eat the mayonnaise immediately, do not
store.
Honey bread spread
30 g butter (from refrigerator, 7 °C)
190 g honey (from refrigerator, 7 °C)
Cut butter into small pieces and put into
the blender.
Add honey and blend for 15 seconds at
setting 7 (4).
en

Robert Bosch Hausgeräte GmbH 13
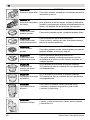
Optional accessories
MUZ5ZP1
Citrus press
For squeezing oranges, lemons and grapefruits.
MUZ5CC1
Dicer
For cutting fruit and vegetables into equally sized
cubes
MUZ5FW1
Mincer
For cutting fresh meat for steak tartare or meat loaf.
MUZ45LS1
Perforated disc set
fine (3 mm), coarse
(6 mm)
For the mincer MUZ5FW1.
Fine disc for pasties and spreads, coarse disc for
sausages and bacon.
MUZ45SV1
Viennese whirl
attachment
For the mincer MUZ5FW1.
With metal template for 4 different pastry moulds.
MUZ45RV1
Grater attachment
For the mincer MUZ5FW1.
For grating nuts, almonds, chocolate and dried bread
rolls.
MUZ45FV1
Juicer attachment
For the mincer MUZ5FW1.
For pressing soft fruit, except raspberries, tomatoes
and rose hips, to a pulp. At the same time e.g.
currants are automatically stemmed and pitted.
MUZ45PS1
Chipper disc
For the continuous-feed shredder MUZ5DS1.
For slicing raw potatoes for chips.
MUZ45AG1
Asian vegetable disc
For the continuous-feed shredder MUZ5DS1.
Slices fruit and vegetables into fine strips for Asian
vegetable dishes.
en

14 Robert Bosch Hausgeräte GmbH
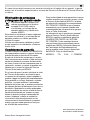
If an accessory is not included in the product package, it can be purchased via the trade or
from customer service.
MUZ45RS1
Grating disc coarse
For the continuous-feed shredder MUZ5DS1.
For grating raw potatoes, e.g. for potato pancakes or
dumplings.
MUZ45KP1
Potato fritter disc
For the continuous-feed shredder MUZ5DS1.
For grating raw potatoes for rostis and potato fritters,
for cutting fruit and vegetables into thick slices.
MUZ5ER2
Stainless steel
stirring bowl
Up to 750 g of flour plus ingredients can be processed
in the bowl.
MUZ5KR1
Plastic mixing bowl
Up to 750 g of flour plus ingredients can be processed
in the bowl.
MUZ5MX1
Plastic blender
attachment
For blending drinks, for pureeing fruit and vegetables,
for preparing mayonnaise, for cutting fruit, nuts, for
crushing ice cubes.
MUZ5MM1
Multi-mixer
For chopping herbs, vegetables, apples and meat, for
shredding carrots, radishes and cheese, for grating
nuts and cooled chocolate.
en

Robert Bosch Hausgeräte GmbH 15
Disposal
This appliance is identified according
to the European guideline 2012/19/EU
on waste electrical and electronic
equipment – WEEE.
The guideline specifies the framework
for an EU-wide valid return and re-use
of old appliances.
Please ask your dealer or inquire at your local
authority about current means of disposal.
Warranty conditions
The guarantee conditions for this appliance are
as defined by our representative in the country
in which it is sold.
Details regarding these conditions can be
obtained from the dealer from whom the
appliance was purchased.
The bill of sale or receipt must be produced
when making any claim under the terms of this
guarantee.
en
Subject to alterations.

16 Robert Bosch Hausgeräte GmbH
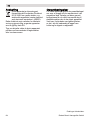
Sommaire
Pour votre sécurité . . . . . . . . . . . . . . . . 16
Vue d’ensemble . . . . . . . . . . . . . . . . . . 19
Utilisation . . . . . . . . . . . . . . . . . . . . . . . . 20
Nettoyage et entretien . . . . . . . . . . . . . . 24
Rangement . . . . . . . . . . . . . . . . . . . . . . 25
Dérangements et remèdes . . . . . . . . . . 25
Exemples d’utilisation . . . . . . . . . . . . . . 26
Accessoires en option . . . . . . . . . . . . . . 28
Mise au rebut . . . . . . . . . . . . . . . . . . . . 30
Conditions de garantie . . . . . . . . . . . . . 30
Pour votre sécurité
Veuillez lire la présente notice attentivement avant utilisation pour
connaître les consignes de sécurité et d’utilisation importantes visant
cet appareil.
Le non-respect des instructions permettant d’utiliser correctement
l’appareil dégage le fabricant de toute responsabilité envers les
dommages qui pourraient en résulter.
Cet appareil est destiné à la préparation de quantités habituellement
nécessaires dans un foyer, ou dans des applications non profession-
nelles similaires à celles d’un foyer. Les applications similaires à celles
d’un foyer comprennent par exemple l’utilisation dans les coins-cuisine
du personnel de magasins, de bureaux, d’entreprises agricoles et
autres entreprises commerciales et industrielles, ainsi que l’utilisation
par les clients de pensions, petits hôtels et immeubles d’habitation
similaire. Utilisez cet appareil uniquement pour des quantités de
préparations culinaires courantes et pour des durées de service
normales. Ne dépassez pas les quantités maximales admissibles
(voir « Exemples d’utilisation ») !
Cet appareil convient pour mélanger, pétrir et fouetter les produits
alimentaires. Il ne doit pas servir à transformer d’autres objets ou
substances. D’autres applications sont possible à condition d’utiliser
les accessoires homologués par le fabricant.
N’utilisez l’appareil qu’avec des accessoires d’origine. Lorsque vous
utilisez les accessoires, respectez les notices d’utilisation ci-jointes.
Rangez soigneusement la notice d’instructions. Si vous remettez
l’appareil à un tiers, joignez sa notice d’utilisation.
, Consignes générales de sécurité
Risque d’électrocution
L’utilisation de l’appareil par les enfants est interdite.
Des enfants, éloignez l’appareil et son cordon de raccordement.
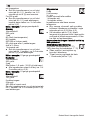
fr
Vous venez d’acheter ce nouvel appareil
BOSCH et nous vous en félicitons
cordialement.
Vous venez ainsi d’opter pour un appareil
électroménager moderne et de haute
qualité.
Sur notre site Web, vous trouverez des
informations avancées sur nos produits.

Robert Bosch Hausgeräte GmbH 17
Les personnes souffrant d’un handicap physique, sensoriel ou mental
ou ne détenant pas l’expérience et / ou les connaissances nécessaires
pourront utiliser les appareils à condition de le faire sous surveillance,
ou que son utilisation sûre leur ait été enseignée et qu’elles aient
compris les dangers qui en émanent.
Ne permettez jamais aux enfants de jouer avec l’appareil.
Ne laissez jamais fonctionner l’appareil sans surveillance.
Ne branchez et faites marcher l’appareil que conformément aux
indications figurant sur la plaque signalétique. N’utilisez cet appareil
que dans des locaux fermés. N’utilisez l’appareil que si son cordon
d’alimentation et l’appareil lui-même ne présentent aucun dommage.
Avant de remplacer des accessoires ou des pièces supplémentaires
déplacées en service, il faut éteindre l'appareil et le débrancher du
secteur. Débranchez toujours l’appareil du secteur s’il doit se trouver
sans surveillance, avant de l’assembler, de le démonter ou de le
nettoyer.
Veillez à ce que le cordon de branchement ne frotte pas sur des arêtes
vives ou des surfaces très chaudes. Afin d’écarter tout danger, seul le
fabricant ou son service après-vente ou une personne détenant une
qualification équivalente est habilité à remplacer un cordon de
branchement endommagé.
Les réparations sur l’appareil sont réservées à notre service après-
vente.
, Consignes de sécurité pour cet appareil
Risque de blessures
Risque d’électrocution !
Ne branchez la fiche mâle dans la prise de courant qu’une fois tous les
préparatifs sur l’appareil achevés.
Ne plongez jamais l’appareil de base dans l’eau, ne le maintenez
jamais sous l’eau du robinet.
Ne le nettoyez jamais avec un nettoyeur à vapeur.
Ne déplacez pas le bras pivotant lorsque l’appareil est allumé.
Attendez jusqu’à l’arrêt complet de l’entraînement.
Ne changez l’accessoire qu’après que le mécanisme d’entraînement
se soit immobilisé ; il continue de tourner quelques instants après avoir
éteint l’appareil.
Allumez et éteignez l’appareil uniquement par le sélecteur rotatif.
Si l’appareil ne sert pas, débranchez sa fiche mâle de la prise de
courant.
Avant de supprimer tout dérangement, débranchez la fiche mâle de la
prise à courant.
fr

18 Robert Bosch Hausgeräte GmbH
Risque de blessures avec les accessoires en rotation !
Ne touchez pas les pièces en rotation. Pendant le fonctionnement,
n’introduisez jamais les doigts dans le bol mélangeur. Utilisez-le
uniquement avec le couvercle (12) en place ! Changez les accessoires
uniquement lorsque l’appareil est au repos – une fois l’appareil éteint,
le mécanisme d’entraînement continue de tourner un certain temps
puis s’immobilise sur la position de changement des accessoires.
Tournez le bras pivotant seulement après que l’appareil s’est
immobilisé. Pour des raisons de sécurité, il n’est possible de faire
fonctionner l’appareil que si les entraînements qui ne servent pas sont
revêtus de leurs couvercles de protection (5, 8). Ne posez/retirez
l’accessoire râpeur / éminceur qu’après avoir éteint le moteur et
débranché la fiche mâle de la prise de courant. N’introduisez pas les
doigts dans l’ouverture d’ajout.
Risque de blessures avec les lames tranchantes !
N’approchez pas les doigts des lames et des arêtes, tranchantes,
des disques à réduire. Ne saisissez les disques à réduire que par leurs
bords !
Ne touchez pas les lames du mixeur avec les mains nues.
Risque de blessures avec les lames tranchantes / l’entraînement en
rotation !
N’introduisez jamais les doigts dans le mixeur en place ! Ne retirez /
posez le mixeur qu’après avoir arrêté l’entraînement ! N’utilisez le
mixeur qu’une fois assemblé et avec son couvercle en place.
Risque de brûlure !
Lorsque vous traitez des aliments mélangés très chauds, de la vapeur
traverse l’entonnoir ménagé dans le couvercle. Versez au maximum
0,5 litre de liquide très chaud ou moussant.
Important !
N’utilisez l’appareil qu’avec des accessoires d’origine. Lorsque vous
utilisez les accessoires, respectez les notices d’utilisation ci-jointes.
N’utilisez qu’un outil ou accessoire à la fois.
, Explication des symboles sur l’appareil et les accessoires
Respectez les instructions figurant dans la notice
d’utilisation.
Prudence ! Lames rotatives.
Prudence ! Accessoires rotatifs.
N’introduisez pas les doigts dans l’orifice d’ajout.
fr

Robert Bosch Hausgeräte GmbH 19
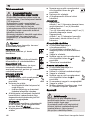
Systèmes de sécurité
Sécurité anti-enclenchement
Voir le tableau « Positions de travail »
L’appareil se met en marche sur les positions
1 et 3 uniquement :
– si vous avez mis le bol (11) en place
et l’avez fait tourner jusqu’à ce qu’il
encrante, et
– avez posé le couvercle protégeant
l’entraînement du mixeur (8).
Sécurité anti-réenclenchement
En cas de coupure de courant, l’appareil
reste en position allumée mais le moteur ne
redémarre pas une fois le courant revenu.
Pour rallumer, tournez le sélecteur rotatif sur
0 / off puis ramenez-le en position allumée.
Sécurité anti-surcharge
Si le moteur s’éteint tout seul pendant
l’utilisation, ceci signifie que la protection
anti-surcharge s’est activée. L’une des
causes possibles : trop grandes quantités
d’aliments traitées en même temps.
Pour savoir comment procéder si le système
de sécurité s’active, voir « Dérangements et
remèdes ».
La notice d’utilisation vaut pour différents
modèles (voir également la vue d’ensemble
des modèles, Figure ). L’appareil ne
nécessite aucun entretien.
Vue d’ensemble
Veuillez déplier les volets
illustrés. Figure
Appareil de base
1 Touche de déverrouillage
2 Bras pivotant
Fonction « Easy Armlift » pour assister
le mouvement montant du bras (voir
« Positions de travail »).
3 Interrupteur rotatif
Après l’extinction (position 0/off),
l’appareil se rend automatiquement sur la
position optimale pour changer les
accessoires.
MUM52..:
0 / off = Arrêt
M = Touche pulse, avec vitesse la plus
élevée, maintenez l’interrupteur pendant
la durée de fonctionnement souhaitée.
Positions 1–4, vitesse de travail :
1 = vitesse basse – marche lente,
4 = vitesse élevée – marche rapide.
MUM54../MUM55../MUM56..:
0 / off = Arrêt
M = Touche pulse, avec vitesse la plus
élevée, maintenez l’interrupteur pendant
la durée de fonctionnement souhaitée.
Positions 1–7, vitesse de travail :
1 = vitesse basse – marche lente,
7 = vitesse élevée – marche rapide.
4 Voyant de fonctionnement
(MUM54../55../56..)
Il reste allumé pendant la marche
(sélecteur rotatif sur M ou 1–7).
Il clignote en cas d’erreurs pendant
l’utilisation de l’appareil, si le fusible
électronique disjoncte ou en présence
d’un défaut dans l’appareil, voir le
chapitre « Dérangements et remèdes ».
5 Couvercle protégeant le mécanisme
d’entraînement
Pour retirer le couvercle protégeant
l’entraînement, appuyez sur la zone
arrière puis retirez le couvercle.
6 Entraînement pour
– accessoire râpeur / éminceur et
– presse-agrumes (accessoire en
option *).
Lorsque vous n’utilisez pas l’entraîne-
ment, protégez-le avec son couvercle.
7 Entraînement pour les accessoires
(fouet mélangeur, fouet batteur,
crochet pétrisseur) et hachoir à viande
(accessoire en option *)
8 Couvercle protégeant l’entraînement
du mixeur
9 Entraînement du bol mixeur
(accessoire en option *)
Lorsque vous n’utilisez pas l’entraîne-
ment, protégez-le avec son couvercle.
10 Rangement du cordon
MUM52../MUM54..:
Placez le cordon d’alimentation dans son
rangement
MUM55../MUM56..:
Enrouleur automatique de cordon
Bol mélangeur avec accessoires
11 Bol mélangeur en acier inoxydable
12 Couvercle
Accessoires
13 Fouet mélangeur
14 Fouet batteur
15 Crochet pétrisseur avec déflecteur de
pâte
fr

20 Robert Bosch Hausgeräte GmbH
16 Sacoche d’accessoires
Pour ranger les accessoires et les
disques à réduire.
Accessoire râpeur / éminceur
17 Pilon-poussoir
18 Couvercle avec ouverture pour ajout
19 Disques à réduire
19a Disque à découper réversible –
épais / mince
19b Disque à râper réversible – épais / fin
19c Disque à râper – mi-fin
20 Porte-disque
21 Boîtier avec orifice de sortie
Mixeur
*
22 Bol mixeur
23 Couvercle
24 Entonnoir
* Si un accessoire n’a pas été livré
d’origine, vous pouvez vous le procurer
dans le commerce et auprès du service
après-vente.
Positions de travail Figure
Attention !
Ne faites fonctionner l’appareil que si les
accessoires se trouvent sur l’entraînement
correct, sur la position correcte et en position
de travail.
Le bras pivotant doit encranter dans chaque
position de travail.
Réglage de la position de travail :
Appuyez sur la touche de déverrouillage
puis faites tourner le bras pivotant.
Aidez le mouvement d’une main.
Amenez le bras pivotant sur la position
voulue jusqu’à ce qu’il encrante.
* Mise en place / retrait du fouet batteur,
fouet mixeur et crochet à pétrir ; ajout de
grandes quantités à traiter.
Utilisation
Attention !
Ne faites fonctionner l’appareil qu’avec les
accessoires / outils en position de travail.
Ne faites pas fonctionner l’appareil à vide.
N’exposez pas l’appareil et ses accessoires
à des sources de chaleur. Les pièces ne vont
pas au four à micro-ondes.
Avant de les utiliser pour la première fois,
nettoyez soigneusement l’appareil et ses
accessoires, voir le chapitre intitulé
« Nettoyage et entretien ».
fr
Remarque :
Le bras pivotant est doté de la fonction
« Easy Armlift »
qui assiste le mouvement
montant du bras pivotant.
Position
Entraîne-
ment
MUM52..
MUM54..
MUM55..
MUM56..
1
7
1
–4
1–4
1–2
1
–7
1–7
1–3
2
7
*
––
3
6
2
–4
3
–7
2
–3
3
–5
4
93
–4
5
–7
73
–4
5
–7
Risque de blessures !
Ne branchez la fiche mâle dans la prise de
courant qu’une fois tous les préparatifs sur
l’appareil achevés.
Sayfa yükleniyor ...
Sayfa yükleniyor ...
Sayfa yükleniyor ...
Sayfa yükleniyor ...
Sayfa yükleniyor ...
Sayfa yükleniyor ...
Sayfa yükleniyor ...
Sayfa yükleniyor ...
Sayfa yükleniyor ...
Sayfa yükleniyor ...
Sayfa yükleniyor ...
Sayfa yükleniyor ...
Sayfa yükleniyor ...
Sayfa yükleniyor ...
Sayfa yükleniyor ...
Sayfa yükleniyor ...
Sayfa yükleniyor ...
Sayfa yükleniyor ...
Sayfa yükleniyor ...
Sayfa yükleniyor ...
Sayfa yükleniyor ...
Sayfa yükleniyor ...
Sayfa yükleniyor ...
Sayfa yükleniyor ...
Sayfa yükleniyor ...
Sayfa yükleniyor ...
Sayfa yükleniyor ...
Sayfa yükleniyor ...
Sayfa yükleniyor ...
Sayfa yükleniyor ...
Sayfa yükleniyor ...
Sayfa yükleniyor ...
Sayfa yükleniyor ...
Sayfa yükleniyor ...
Sayfa yükleniyor ...
Sayfa yükleniyor ...
Sayfa yükleniyor ...
Sayfa yükleniyor ...
Sayfa yükleniyor ...
Sayfa yükleniyor ...
Sayfa yükleniyor ...
Sayfa yükleniyor ...
Sayfa yükleniyor ...
Sayfa yükleniyor ...
Sayfa yükleniyor ...
Sayfa yükleniyor ...
Sayfa yükleniyor ...
Sayfa yükleniyor ...
Sayfa yükleniyor ...
Sayfa yükleniyor ...
Sayfa yükleniyor ...
Sayfa yükleniyor ...
Sayfa yükleniyor ...
Sayfa yükleniyor ...
Sayfa yükleniyor ...
Sayfa yükleniyor ...
Sayfa yükleniyor ...
Sayfa yükleniyor ...
Sayfa yükleniyor ...
Sayfa yükleniyor ...
Sayfa yükleniyor ...
Sayfa yükleniyor ...
Sayfa yükleniyor ...
Sayfa yükleniyor ...
Sayfa yükleniyor ...
Sayfa yükleniyor ...
Sayfa yükleniyor ...
Sayfa yükleniyor ...
Sayfa yükleniyor ...
Sayfa yükleniyor ...
Sayfa yükleniyor ...
Sayfa yükleniyor ...
Sayfa yükleniyor ...
Sayfa yükleniyor ...
Sayfa yükleniyor ...
Sayfa yükleniyor ...
Sayfa yükleniyor ...
Sayfa yükleniyor ...
Sayfa yükleniyor ...
Sayfa yükleniyor ...
Sayfa yükleniyor ...
Sayfa yükleniyor ...
Sayfa yükleniyor ...
Sayfa yükleniyor ...
Sayfa yükleniyor ...
Sayfa yükleniyor ...
Sayfa yükleniyor ...
Sayfa yükleniyor ...
Sayfa yükleniyor ...
Sayfa yükleniyor ...
Sayfa yükleniyor ...
Sayfa yükleniyor ...
Sayfa yükleniyor ...
Sayfa yükleniyor ...
Sayfa yükleniyor ...
Sayfa yükleniyor ...
Sayfa yükleniyor ...
Sayfa yükleniyor ...
Sayfa yükleniyor ...
Sayfa yükleniyor ...
Sayfa yükleniyor ...
Sayfa yükleniyor ...
Sayfa yükleniyor ...
Sayfa yükleniyor ...
Sayfa yükleniyor ...
Sayfa yükleniyor ...
Sayfa yükleniyor ...
Sayfa yükleniyor ...
Sayfa yükleniyor ...
Sayfa yükleniyor ...
Sayfa yükleniyor ...
Sayfa yükleniyor ...
Sayfa yükleniyor ...
Sayfa yükleniyor ...
Sayfa yükleniyor ...
Sayfa yükleniyor ...
Sayfa yükleniyor ...
Sayfa yükleniyor ...
Sayfa yükleniyor ...
Sayfa yükleniyor ...
Sayfa yükleniyor ...
Sayfa yükleniyor ...
Sayfa yükleniyor ...
Sayfa yükleniyor ...
Sayfa yükleniyor ...
Sayfa yükleniyor ...
Sayfa yükleniyor ...
Sayfa yükleniyor ...
Sayfa yükleniyor ...
Sayfa yükleniyor ...
Sayfa yükleniyor ...
Sayfa yükleniyor ...
Sayfa yükleniyor ...
Sayfa yükleniyor ...
Sayfa yükleniyor ...
Sayfa yükleniyor ...
Sayfa yükleniyor ...
Sayfa yükleniyor ...
Sayfa yükleniyor ...
Sayfa yükleniyor ...
Sayfa yükleniyor ...
Sayfa yükleniyor ...
Sayfa yükleniyor ...
Sayfa yükleniyor ...
Sayfa yükleniyor ...
Sayfa yükleniyor ...
Sayfa yükleniyor ...
Sayfa yükleniyor ...
Sayfa yükleniyor ...
Sayfa yükleniyor ...
Sayfa yükleniyor ...
Sayfa yükleniyor ...
Sayfa yükleniyor ...
Sayfa yükleniyor ...
Sayfa yükleniyor ...
Sayfa yükleniyor ...
Sayfa yükleniyor ...
Sayfa yükleniyor ...
Sayfa yükleniyor ...
Sayfa yükleniyor ...
Sayfa yükleniyor ...
Sayfa yükleniyor ...
Sayfa yükleniyor ...
Sayfa yükleniyor ...
Sayfa yükleniyor ...
Sayfa yükleniyor ...
Sayfa yükleniyor ...
Sayfa yükleniyor ...
Sayfa yükleniyor ...
Sayfa yükleniyor ...
Sayfa yükleniyor ...
Sayfa yükleniyor ...
Sayfa yükleniyor ...
Sayfa yükleniyor ...
Sayfa yükleniyor ...
Sayfa yükleniyor ...
Sayfa yükleniyor ...
Sayfa yükleniyor ...
Sayfa yükleniyor ...
Sayfa yükleniyor ...
Sayfa yükleniyor ...
Sayfa yükleniyor ...
Sayfa yükleniyor ...
Sayfa yükleniyor ...
Sayfa yükleniyor ...
Sayfa yükleniyor ...
Sayfa yükleniyor ...
Sayfa yükleniyor ...
Sayfa yükleniyor ...
Sayfa yükleniyor ...
Sayfa yükleniyor ...
Sayfa yükleniyor ...
Sayfa yükleniyor ...
Sayfa yükleniyor ...
Sayfa yükleniyor ...
Sayfa yükleniyor ...
Sayfa yükleniyor ...
Sayfa yükleniyor ...
Sayfa yükleniyor ...
Sayfa yükleniyor ...
Sayfa yükleniyor ...
Sayfa yükleniyor ...
Sayfa yükleniyor ...
Sayfa yükleniyor ...
Sayfa yükleniyor ...
Sayfa yükleniyor ...
Sayfa yükleniyor ...
Sayfa yükleniyor ...
Sayfa yükleniyor ...
Sayfa yükleniyor ...
Sayfa yükleniyor ...
Sayfa yükleniyor ...
Sayfa yükleniyor ...
Sayfa yükleniyor ...
Sayfa yükleniyor ...
Sayfa yükleniyor ...
Sayfa yükleniyor ...
Sayfa yükleniyor ...
Sayfa yükleniyor ...
Sayfa yükleniyor ...
Sayfa yükleniyor ...
Sayfa yükleniyor ...
Sayfa yükleniyor ...
Sayfa yükleniyor ...
Sayfa yükleniyor ...
Sayfa yükleniyor ...
Sayfa yükleniyor ...
Sayfa yükleniyor ...
Sayfa yükleniyor ...
Sayfa yükleniyor ...
Sayfa yükleniyor ...
Sayfa yükleniyor ...
Sayfa yükleniyor ...
Sayfa yükleniyor ...
Sayfa yükleniyor ...
Sayfa yükleniyor ...
-
 1
1
-
 2
2
-
 3
3
-
 4
4
-
 5
5
-
 6
6
-
 7
7
-
 8
8
-
 9
9
-
 10
10
-
 11
11
-
 12
12
-
 13
13
-
 14
14
-
 15
15
-
 16
16
-
 17
17
-
 18
18
-
 19
19
-
 20
20
-
 21
21
-
 22
22
-
 23
23
-
 24
24
-
 25
25
-
 26
26
-
 27
27
-
 28
28
-
 29
29
-
 30
30
-
 31
31
-
 32
32
-
 33
33
-
 34
34
-
 35
35
-
 36
36
-
 37
37
-
 38
38
-
 39
39
-
 40
40
-
 41
41
-
 42
42
-
 43
43
-
 44
44
-
 45
45
-
 46
46
-
 47
47
-
 48
48
-
 49
49
-
 50
50
-
 51
51
-
 52
52
-
 53
53
-
 54
54
-
 55
55
-
 56
56
-
 57
57
-
 58
58
-
 59
59
-
 60
60
-
 61
61
-
 62
62
-
 63
63
-
 64
64
-
 65
65
-
 66
66
-
 67
67
-
 68
68
-
 69
69
-
 70
70
-
 71
71
-
 72
72
-
 73
73
-
 74
74
-
 75
75
-
 76
76
-
 77
77
-
 78
78
-
 79
79
-
 80
80
-
 81
81
-
 82
82
-
 83
83
-
 84
84
-
 85
85
-
 86
86
-
 87
87
-
 88
88
-
 89
89
-
 90
90
-
 91
91
-
 92
92
-
 93
93
-
 94
94
-
 95
95
-
 96
96
-
 97
97
-
 98
98
-
 99
99
-
 100
100
-
 101
101
-
 102
102
-
 103
103
-
 104
104
-
 105
105
-
 106
106
-
 107
107
-
 108
108
-
 109
109
-
 110
110
-
 111
111
-
 112
112
-
 113
113
-
 114
114
-
 115
115
-
 116
116
-
 117
117
-
 118
118
-
 119
119
-
 120
120
-
 121
121
-
 122
122
-
 123
123
-
 124
124
-
 125
125
-
 126
126
-
 127
127
-
 128
128
-
 129
129
-
 130
130
-
 131
131
-
 132
132
-
 133
133
-
 134
134
-
 135
135
-
 136
136
-
 137
137
-
 138
138
-
 139
139
-
 140
140
-
 141
141
-
 142
142
-
 143
143
-
 144
144
-
 145
145
-
 146
146
-
 147
147
-
 148
148
-
 149
149
-
 150
150
-
 151
151
-
 152
152
-
 153
153
-
 154
154
-
 155
155
-
 156
156
-
 157
157
-
 158
158
-
 159
159
-
 160
160
-
 161
161
-
 162
162
-
 163
163
-
 164
164
-
 165
165
-
 166
166
-
 167
167
-
 168
168
-
 169
169
-
 170
170
-
 171
171
-
 172
172
-
 173
173
-
 174
174
-
 175
175
-
 176
176
-
 177
177
-
 178
178
-
 179
179
-
 180
180
-
 181
181
-
 182
182
-
 183
183
-
 184
184
-
 185
185
-
 186
186
-
 187
187
-
 188
188
-
 189
189
-
 190
190
-
 191
191
-
 192
192
-
 193
193
-
 194
194
-
 195
195
-
 196
196
-
 197
197
-
 198
198
-
 199
199
-
 200
200
-
 201
201
-
 202
202
-
 203
203
-
 204
204
-
 205
205
-
 206
206
-
 207
207
-
 208
208
-
 209
209
-
 210
210
-
 211
211
-
 212
212
-
 213
213
-
 214
214
-
 215
215
-
 216
216
-
 217
217
-
 218
218
-
 219
219
-
 220
220
-
 221
221
-
 222
222
-
 223
223
-
 224
224
-
 225
225
-
 226
226
-
 227
227
-
 228
228
-
 229
229
-
 230
230
-
 231
231
-
 232
232
-
 233
233
-
 234
234
-
 235
235
-
 236
236
-
 237
237
-
 238
238
-
 239
239
-
 240
240
-
 241
241
-
 242
242
-
 243
243
-
 244
244
-
 245
245
-
 246
246
-
 247
247
-
 248
248
-
 249
249
-
 250
250
-
 251
251
-
 252
252
-
 253
253
-
 254
254
-
 255
255
-
 256
256


Bosch MUM55761/02 Kullanım kılavuzu
- Kategori
- Karıştırıcılar
- Tip
- Kullanım kılavuzu
Diğer dillerde
- français: Bosch MUM55761/02 Manuel utilisateur
- dansk: Bosch MUM55761/02 Brugermanual
İlgili Makaleler
-
Bosch MUM54620/02 Kullanım kılavuzu
-
-
Bosch MUM58258/06 Kullanma talimatları
-
-
-
-
-
Bosch MUM58K20/03 Kullanım kılavuzu
-
Bosch MUM54I00/06 Kullanma talimatları
-
Bosch MUMXL20C Kullanım kılavuzu