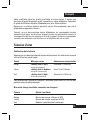
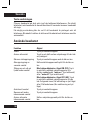
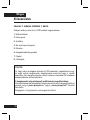
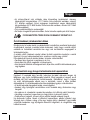
Motorola H790 - Headset - Monaural Hızlı başlangıç Kılavuzu
- Kategori
- Mobil kulaklıklar
- Tip
- Hızlı başlangıç Kılavuzu

MOTOROLA and the Stylized M Logo are registered in the US Patent &
Trademark Office. All other product or service names are the property of
their respective owners. The Bluetooth trademark and logos are owned by
the Bluetooth SIG, Inc. and any use of such marks by Motorola, Inc. is under
license. © 2009 Motorola, Inc. All rights reserved.
68014301015
motorola.com

MOTOROLA and the Stylized M Logo are registered in the US Patent &
Trademark Office. All other product or service names are the property of
their respective owners. The Bluetooth trademark and logos are owned by
the Bluetooth SIG, Inc. and any use of such marks by Motorola, Inc. is under
license. © 2009 Motorola, Inc. All rights reserved.
68014301015
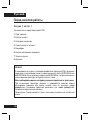
motorola H790
Quick Start Guide


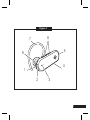
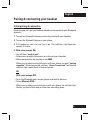
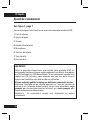
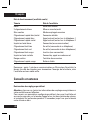
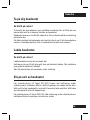
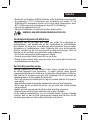
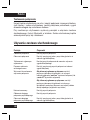
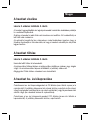
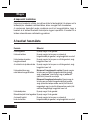
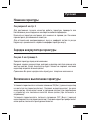
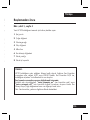
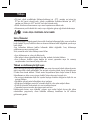
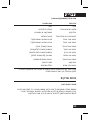
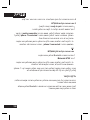
1
Figure 1
7
1
6
2
4
8
3
5

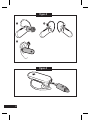
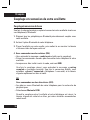
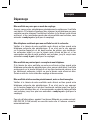
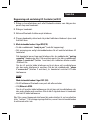
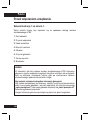
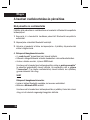
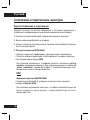
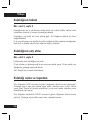
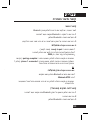
2
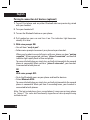
Figure 2
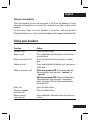
Figure 3

English
3
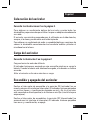
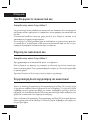
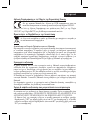
Before you begin
See figure 1 on page 1.
Take a moment to familiarize yourself with your new H790 Headset.
1 Charging port
2 Call button
3 Indicator light
4 Power switch
5 Microphone
6 Volume buttons
7 Earhook
8 Ear speaker
IMPORTANT
Depending on the country in which you purchased your H790 headset,
English language Voice Prompts may be defaulted ON or OFF. If the Voice
Prompts are ON, you will hear a voice when turning on the headset and
when using it.
If you wish to change the voice prompt default setting:
With the headset turned on, press and hold either Volume button and Call
button until you hear “voice prompts on” or “voice prompts off”.
Note: Voice prompts are supported in English only.

English
4
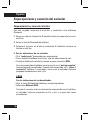
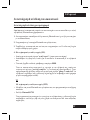
Wearing your headset
See figures 2 on page 2.
To get the best headset performance, try out all the supplied ear cushions
to get a good fit.
Your headset comes ready for the right ear. You can change it for wear on
the left ear.
For optimal audio performance and comfort, be sure to position the ear
cushion into your ear canal and point the headset microphone towards
your mouth.
Charging your headset
See figure 3 on page 2.
Charge your headset before using it.
The indicator light is red or yellow while the battery is charging. When the
battery is fully charged, the indicator light turns green.
Note: Headset is not functional while charging.
Turning headset on & off
Slide the Power switch to the ON position (no red is shown under the switch).
The indicator light flashes blue three times, then flashes in blue and purple (if
connected with a device) or is steadily blue (if ready to be paired).
Slide the Power switch to the OFF position (red is shown under switch). The
indicator light flashes three times then turns off.

English
5
Pairing & connecting your headset
Initial pairing & connection
Once charged, let’s get your headset paired and connected to your Bluetooth
phone(s).
1. Turn off any Bluetooth devices previously paired with your headset.
2. Turn on the Bluetooth feature on your phone.
3. Put headset on your ear and turn it on. The indicator light becomes
steadily lit in blue.
4. With voice prompts ON:
• You will hear“ready to pair”.
• Follow voice prompts to connect your phone to your headset.
• When prompted for the passkey, enter 0000.
• When your headset successfully pairs with your phone, you hear “pairing
complete”. When connected, you hear “phone 1 connected” and see the
indicator light rapidly flash in blue and purple.
• OR
• With voice prompts OFF:
• Go to the Bluetooth menu on your phone and look for devices.
• Select Motorola H790.
• When your headset successfully pairs with your phone, the indicator light
flashes purple and blue and you hear two ascending tones.

English
6
Pairing & connection to 2 devices (optional)
1. Turn off first phone and any other Bluetooth devices previously paired
with your headset.
2. Turn your headset off
3. Turn on the Bluetooth feature on your phone.
4. Put headset on your ear and turn it on. The indicator light becomes
steadily lit in blue.
5. With voice prompts ON:
• You will hear“ready to pair”.
• Follow voice prompts to connect your phone to your headset.
• When your headset successfully pairs with your phone, you hear “pairing
complete”. When connected, you hear “phone 1 connected” and see the
indicator light rapidly flash in blue and purple.
• To connect to both phones, simply turn on the first phone while the second
phone is connected. When you hear “phone 2 connected”, your headset
is connected to both phones.
• OR
• With voice prompts OFF:
• Go to the Bluetooth menu on your phone and look for devices.
• Select Motorola H790.
• To connect to both phones, simply turn on the first phone while the second
phone is connected. When you hear 2 ascending tones, your headset is
connected to both phones.
Note: The last paired phone (your second phone) is now your primary phone
(or “phone 1”) for voice dial functionality regardless of voice prompts being
activated or not.

English
7
Test your connection
Place the headset on your ear and make a call from the phone(s). If your
phone(s) and headset are successfully connected, you hear ringing on the
headset.
For daily use, make sure your headset is turned on, and your phone’s
Bluetooth feature is on. Your headset and phone will connect automatically!
Using your headset
Function Action
Answer a call Press the Call button
Reject a call Press and hold a Volume button until you hear
an audio tone
Make a voice dial call Press the Call button and you hear an audio
tone
Redial last call Press and hold the Call button until you hear an
audio tone
Mute or unmute a call With voice prompts ON: Press and hold both
Volume buttons until you hear “mute on” or
“mute off”
With voice prompts OFF: Press and hold both
Volume buttons until you hear 2 ascending
tones (for mute ON) and 2 descending tones
(for mute OFF)
End a call Press the Call button
Answer a second Press the Call button
incoming call
Reject second Press and hold a Volume button until you hear
incoming call a tone

English
8
Note: Your headset supports both Hands-free and Headset Profiles.
Accessing call functions depends upon which profile your phone supports.
See the instructions that came with your phone. See your phone’s user’s
guide for more information.
Note: Some call features are phone/network dependent.
Tip: When connected to two phones, voice prompts help manage call
functions such as voice dial, redial, and end call. Follow the voice prompts to
execute a function on the desired phone.
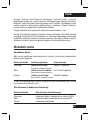
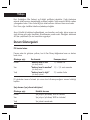
Status Indicators
Battery check
Press and hold both Volume buttons while not on a call.
Indicator light Voice prompt Talk time
Red “battery level is low” Less than 1.5 hours
Yellow “battery level is medium” Between 1.5 to 3.5 hours
Green “battery level is high” More than 3.5 hours
To save battery power, turn off the headset when you don’t use it for an
extended time.
Charging status (with charger plugged in)
Indicator light Headset status
Red Charging (battery level less than 50% charge)
Yellow Charging (battery level more than 50% charge)
Green Charging complete

English
9
Operating status (with no charger plugged in)
Indicator light Headset status
Off Power off
3 blue flashes Powering on/off
Steady blue Pairing/connect mode
Rapid blue/purple flashes Connection successful
Quick blue flash Incoming/outgoing call on phone 1
Quick purple flash Incoming/outgoing call on phone 2
Slow blue pulse Connected (on a call)
Slow blue flash Standby (connected to one phone)
Slow green flash Standby (connected to two phones)
Slow red flash Idle (not connected to a phone)
Slow purple pulse Connected call muted
Steady red Attempting to connect
Quick red flash Low battery
Note: After 1 minute on a call or 20 minutes of inactivity, the light stops
flashing to conserve power, but the headset remains on.
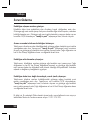
Tips and tricks
Restore to factory settings
Caution: This action erases all pairing information stored in your headset.
To restore your headset to original factory settings, with the headset turned
on, press and hold both Volume buttons and Call button for 10 seconds until
the indicator light is steady blue.

English
10
Troubleshooting
My headset will not enter pairing mode
Make sure that any devices previously paired with the headset are turned
off. If the indicator light is flashing in blue, first turn off the other device, then
turn the headset off and on. The indicator light becomes steadily lit in blue
and, with voice prompts ON, you hear “ready to pair”.
My phone doesn’t find my headset when searching
Make sure the indicator light on your headset is steadily lit in blue when
your phone is searching for devices. If not, press and hold the Call button
and both Volume buttons until you hear “ready to pair” and see the indicator
light steadily lit in blue.
My headset will not pair with my phone
If the indicator light is not steadily lit in blue when your phone is searching
for your headset, you can reset the headset by pressing and holding the Call
button and both Volume buttons until the indicator light is steadily lit in blue.
Then follow pair & connect instructions.
My headset connected before, but now it’s not working
Make sure the indicator light on your headset is steadily lit in blue when
your phone is searching for devices. If not, press and hold the Call and both
Volume buttons until you see the indicator light steadily lit in blue and, with
voice prompts ON, you hear“ready to pair”.
If you have any additional questions, please call your hotline number
(0870-9010-555) or visit us at www.hellomoto.com.

English
11
European Union Directives Conformance Statement
Hereby, Motorola Inc., declares that this H790 is in compliance
with the essential requirements and other relevant provisions of
Directive 1999/5/EC.
You can view your product’s Declaration of Conformity (DoC) to Directive
1999/5/EC (the R&TTE Directive) at www.motorola.com/rtte.
Caring for the Environment by Recycling
When you see this symbol on a Motorola product, do not dispose of
the product with household waste.
Recycling Mobile Phones and Accessories
Do not dispose of mobile phones or electrical accessories, such as chargers
or headsets, with your household waste. In some countries or regions,
collection systems are set up to handle electrical and electronic waste
items. Contact your regional authorities for more details. If collection systems
aren’t available, return unwanted mobile phones or electrical accessories to
any Motorola Approved Service Centre in your region.
FCC Notice to Users
FCC Notice The following statement applies to all products that have
received FCC approval. Applicable products bear the FCC logo, and/or an
FCC ID in the format FCC-ID:xxxxxx on the product label.
Motorola has not approved any changes or modifications to this device by
the user. Any changes or modifications could void the user’s authority to
operate the equipment. See 47 CFR Sec. 15.21.
This device complies with part 15 of the FCC Rules. Operation is subject
to the following two conditions: (1) This device may not cause harmful
interference, and (2) this device must accept any interference received,
including interference that may cause undesired operation. See 47 CFR Sec.
15.19(3).

English
12
This equipment has been tested and found to comply with the limits for a
Class B digital device, pursuant to part 15 of the FCC Rules. These limits are
designed to provide reasonable protection against harmful interference in
a residential installation. This equipment generates, uses and can radiate
radio frequency energy and, if not installed and used in accordance with
the instructions, may cause harmful interference to radio communications.
However, there is no guarantee that interference will not occur in a particular
installation. If this equipment does cause harmful interference to radio or
television reception, which can be determined by turning the equipment off
and on, the user is encouraged to try to correct the interference by one or
more of the following measures:
• Reorient or relocate the receiving antenna.
• Increase the separation between the equipment and the receiver.
• Connect the equipment to an outlet on a circuit different from that to which
the receiver is connected.
• Consult the dealer or an experienced radio/TV technician for help.
Approved Accessories
Use of accessories not approved by Motorola, including but not limited to
batteries, antennas, and convertible covers, may cause your mobile device
to exceed RF energy exposure guidelines and may void your mobile device’s
warranty.
Motorola recommends that you always use Motorola-branded chargers.
Motorola devices are designed to work with Motorola chargers.
For approved Motorola accessories, visit our Web site at: www.motorola.com
Use & safety for battery-powered accessories
Your battery is designed to last the life of the product. It should only be
removed by a recycling facility. ANY ATTEMPT TO REMOVE OR REPLACE
YOUR BATTERY WILL DAMAGE THE PRODUCT.
• Battery life may temporarily shorten in low-temperature conditions (-10°C
for storage/use below 0°C for recharge) or permanently reduce in high
temperature conditions (above 60°C for storage/use or above 45°C for
recharge).
• Do not let your mobile device get wet.
• Do not store your accessory in a parked car or direct sunlight.
WARNING: MAY EXPLODE IF DISPOSED OF IN FIRE.
Driving Precautions
Check and obey the laws and regulations on the use of mobile devices in the
area where you drive. The use of wireless devices and their accessories in
your area may be prohibited or restricted. The use of wireless phones while
driving may cause distraction. Discontinue a call if you can’t concentrate on
driving. When using your mobile device while driving, please:
• Give full attention to driving and to the road.
• Use your hands-free solution to perform hands-free calls.
• Pull off the road and park before making or answering a call if driving
conditions so require.
Caution about high volume usage
Warning: Exposure to loud noise from any source for extended periods of
time may temporarily or permanently affect your hearing. The louder the
volume sound level, the less time is required before your hearing could be
affected. Hearing damage from loud noise is sometimes undetectable at first
and can have a cumulative effect. To protect your hearing:
• Start your volume control at a low setting and use as low a volume as
possible.
• Limit the amount of time you use headsets or headphones at high volume.
• Where possible, use your headset in a quiet environment with low
background noise.
• Avoid turning up the volume to block out noisy surrounding.
• Turn the volume down if you can’t hear people speaking near you.
If you experience hearing discomfort, including the sensation of pressure or
fullness in your ears, ringing in your ears, or muffled speech, you should stop
listening to the device through your headset or headphones and have your
hearing checked by your doctor.

English
13
• Do not let your mobile device get wet.
• Do not store your accessory in a parked car or direct sunlight.
WARNING: MAY EXPLODE IF DISPOSED OF IN FIRE.
Driving Precautions
Check and obey the laws and regulations on the use of mobile devices in the
area where you drive. The use of wireless devices and their accessories in
your area may be prohibited or restricted. The use of wireless phones while
driving may cause distraction. Discontinue a call if you can’t concentrate on
driving. When using your mobile device while driving, please:
• Give full attention to driving and to the road.
• Use your hands-free solution to perform hands-free calls.
• Pull off the road and park before making or answering a call if driving
conditions so require.
Caution about high volume usage
Warning: Exposure to loud noise from any source for extended periods of
time may temporarily or permanently affect your hearing. The louder the
volume sound level, the less time is required before your hearing could be
affected. Hearing damage from loud noise is sometimes undetectable at first
and can have a cumulative effect. To protect your hearing:
• Start your volume control at a low setting and use as low a volume as
possible.
• Limit the amount of time you use headsets or headphones at high volume.
• Where possible, use your headset in a quiet environment with low
background noise.
• Avoid turning up the volume to block out noisy surrounding.
• Turn the volume down if you can’t hear people speaking near you.
If you experience hearing discomfort, including the sensation of pressure or
fullness in your ears, ringing in your ears, or muffled speech, you should stop
listening to the device through your headset or headphones and have your
hearing checked by your doctor.

Français
14
Avant de commencer
Voir figure 1, page 1
Prenez le temps de vous familiariser avec votre nouvelle oreillette H790.
1 Port de charge
2 Touche d’appel
3 Témoin
4 Bouton marche/arrêt
5 Microphone
6 Touches de volume
7 Tour d’oreille
8 Haut-parleur
IMPORTANT
Selon le pays dans lequel vous avez acheté votre oreillette H790, les
commandes vocales en langue anglaise peuvent, par défaut, être réglées
sur ON (activées) ou OFF (désactivées). Si les commandes vocales sont
réglées sur ON (activées), vous entendez une voix lors de la mise en
marche de l’oreillette, ainsi que lors de son utilisation.
Si vous souhaitez modifier le réglage par défaut des commandes vocales:
Alors que l’oreillette est en marche, appuyez sur l’une des touches de
volume et sur la touche d’appel jusqu’à ce que vous entendiez « voice
prompts on » (commandes vocales activées) ou « voice prompts off »
(commandes vocales désactivées).
Remarque : les commandes vocales sont disponibles en anglais
uniquement.

Français
15
Port de votre oreillette
Voir figures 2, page 2
Pour tirer le meilleur parti et pour une confort optimal, essayez tous les
embouts fournis.
Par défaut, votre oreillette est à réglée pour être portée à oreille droite. Vous
pouvez toutefois intervertir le tour d’oreille pour la porter à l’oreille gauche.
Pour une qualité et un confort d’écoute optimaux, veillez à placer
correctement l’embout sur votre oreille en dirigeant le microphone de
l’oreillette en direction de votre bouche.
Charge de votre oreillette
Voir figure 3, page 2
Chargez votre oreillette avant toute utilisation.
Le témoin est rouge ou jaune lorsque la batterie est en charge. Lorsque la
batterie est complètement chargée, le témoin devient vert.
Remarque : il est impossible d’utiliser l’oreillette pendant la charge.
Mise en marche/arrêt de l’oreillette
Glissez le bouton marche/arrêt en position ON/marche. Le témoin clignote
3 fois en bleu, puis clignote 3 fois en bleu et violet (en cas de connexion
à un périphérique) ou reste allumé en bleu (si l’oreillette est prête pour le
couplage).
Glissez le bouton marche/arrêt en position OFF/arrêt (le témoin situé sous le
bouton est rouge). Le témoin clignote 3 fois, puis s’éteint.

Français
16
Couplage et connexion de votre oreillette
Couplage/connexion de base
Une fois la charge terminée, couplez et connectez votre oreillette à votre ou
vos téléphone(s) Bluetooth.
1. Éteignez tous les périphériques Bluetooth précédemment couplés avec
votre oreillette.
2. Activez l’option Bluetooth de votre téléphone.
3. Placez l’oreillette sur votre oreille, puis mettez-la en marche. Le témoin
s’allume en bleu de façon continue.
4. Avec commandes vocales activées (ON):
• Vous entendez le message « ready to pair » (prêt pour le couplage).
• Suivez les commandes vocales pour connecter votre téléphone à votre
oreillette.
• Lorsque vous êtes invité à saisir le code, saisissez 0000.
• Une fois le couplage réussi, vous entendez le message « pairing
complete » (couplage terminé). Une fois la connexion établie, vous
entendez « phone 1 connected » (téléphone 1 connecté) et le témoin
clignote rapidement en bleu et violet.
• OU
• Avec commandes vocales désactivées (OFF):
• Accédez au menu Bluetooth de votre téléphone pour la recherche de
périphériques.
• Sélectionnez Motorola H790.
• Quand le couplage entre l’oreillette et votre téléphone est réussi, le
témoin clignote en violet et en bleu, puis deux tonalités ascendantes
retentissent.

Français
17
Couplage et connexion avec 2 périphériques (facultatif)
1. Éteignez d’abord votre téléphone et tous les périphériques Bluetooth
précédemment couplés avec votre oreillette.
2. Éteignez votre oreillette.
3. Activez l’option Bluetooth de votre téléphone.
4. Placez l’oreillette sur votre oreille, puis mettez-la en marche. Le témoin
s’allume en bleu de façon continue.
5. Avec commandes vocales activées (ON):
• Vous entendez le message « ready to pair » (prêt pour le couplage).
• Suivez les messages vocaux pour connecter votre téléphone à votre
oreillette.
• Une fois le couplage réussi, vous entendez le message « pairing
complete » (couplage terminé). Une fois la connexion établie, vous
entendez « phone 1 connected » (téléphone 1 connecté) et le témoin
clignote rapidement en bleu et violet.
• Pour connecter les deux téléphones simultanément, il vous suffit de
mettre votre premier téléphone en marche alors que le second est déjà
connecté. Lorsque vous entendez « phone 2 connected » (téléphone 2
connecté), votre oreillette est alors connectée aux deux téléphones.
• OU
• Avec commandes vocales désactivées (OFF):
• Accédez au menu Bluetooth de votre téléphone pour la recherche de
périphériques.
• Sélectionnez Motorola H790.
• Pour connecter les deux téléphones simultanément, il vous suffit de
mettre votre premier téléphone en marche alors que le second est déjà
connecté. Lorsque vous entendez 2 tonalités ascendantes, votre oreillette
est alors connectée aux deux téléphones.
Remarque : le dernier téléphone couplé (votre second téléphone) est
désormais votre téléphone principal (ou « téléphone 1 ») pour les fonctions de
numérotation vocale, que les commandes vocales soient activées ou non.
Sayfa yükleniyor ...
Sayfa yükleniyor ...
Sayfa yükleniyor ...
Sayfa yükleniyor ...
Sayfa yükleniyor ...
Sayfa yükleniyor ...
Sayfa yükleniyor ...
Sayfa yükleniyor ...
Sayfa yükleniyor ...
Sayfa yükleniyor ...
Sayfa yükleniyor ...
Sayfa yükleniyor ...
Sayfa yükleniyor ...
Sayfa yükleniyor ...
Sayfa yükleniyor ...
Sayfa yükleniyor ...
Sayfa yükleniyor ...
Sayfa yükleniyor ...
Sayfa yükleniyor ...
Sayfa yükleniyor ...
Sayfa yükleniyor ...
Sayfa yükleniyor ...
Sayfa yükleniyor ...
Sayfa yükleniyor ...
Sayfa yükleniyor ...
Sayfa yükleniyor ...
Sayfa yükleniyor ...
Sayfa yükleniyor ...
Sayfa yükleniyor ...
Sayfa yükleniyor ...
Sayfa yükleniyor ...
Sayfa yükleniyor ...
Sayfa yükleniyor ...
Sayfa yükleniyor ...
Sayfa yükleniyor ...
Sayfa yükleniyor ...
Sayfa yükleniyor ...
Sayfa yükleniyor ...
Sayfa yükleniyor ...
Sayfa yükleniyor ...
Sayfa yükleniyor ...
Sayfa yükleniyor ...
Sayfa yükleniyor ...
Sayfa yükleniyor ...
Sayfa yükleniyor ...
Sayfa yükleniyor ...
Sayfa yükleniyor ...
Sayfa yükleniyor ...
Sayfa yükleniyor ...
Sayfa yükleniyor ...
Sayfa yükleniyor ...
Sayfa yükleniyor ...
Sayfa yükleniyor ...
Sayfa yükleniyor ...
Sayfa yükleniyor ...
Sayfa yükleniyor ...
Sayfa yükleniyor ...
Sayfa yükleniyor ...
Sayfa yükleniyor ...
Sayfa yükleniyor ...
Sayfa yükleniyor ...
Sayfa yükleniyor ...
Sayfa yükleniyor ...
Sayfa yükleniyor ...
Sayfa yükleniyor ...
Sayfa yükleniyor ...
Sayfa yükleniyor ...
Sayfa yükleniyor ...
Sayfa yükleniyor ...
Sayfa yükleniyor ...
Sayfa yükleniyor ...
Sayfa yükleniyor ...
Sayfa yükleniyor ...
Sayfa yükleniyor ...
Sayfa yükleniyor ...
Sayfa yükleniyor ...
Sayfa yükleniyor ...
Sayfa yükleniyor ...
Sayfa yükleniyor ...
Sayfa yükleniyor ...
Sayfa yükleniyor ...
Sayfa yükleniyor ...
Sayfa yükleniyor ...
Sayfa yükleniyor ...
Sayfa yükleniyor ...
Sayfa yükleniyor ...
Sayfa yükleniyor ...
Sayfa yükleniyor ...
Sayfa yükleniyor ...
Sayfa yükleniyor ...
Sayfa yükleniyor ...
Sayfa yükleniyor ...
Sayfa yükleniyor ...
Sayfa yükleniyor ...
Sayfa yükleniyor ...
Sayfa yükleniyor ...
Sayfa yükleniyor ...
Sayfa yükleniyor ...
Sayfa yükleniyor ...
Sayfa yükleniyor ...
Sayfa yükleniyor ...
Sayfa yükleniyor ...
Sayfa yükleniyor ...
Sayfa yükleniyor ...
Sayfa yükleniyor ...
Sayfa yükleniyor ...
Sayfa yükleniyor ...
Sayfa yükleniyor ...
Sayfa yükleniyor ...
Sayfa yükleniyor ...
Sayfa yükleniyor ...
Sayfa yükleniyor ...
Sayfa yükleniyor ...
Sayfa yükleniyor ...
Sayfa yükleniyor ...
Sayfa yükleniyor ...
Sayfa yükleniyor ...
Sayfa yükleniyor ...
Sayfa yükleniyor ...
Sayfa yükleniyor ...
-
 1
1
-
 2
2
-
 3
3
-
 4
4
-
 5
5
-
 6
6
-
 7
7
-
 8
8
-
 9
9
-
 10
10
-
 11
11
-
 12
12
-
 13
13
-
 14
14
-
 15
15
-
 16
16
-
 17
17
-
 18
18
-
 19
19
-
 20
20
-
 21
21
-
 22
22
-
 23
23
-
 24
24
-
 25
25
-
 26
26
-
 27
27
-
 28
28
-
 29
29
-
 30
30
-
 31
31
-
 32
32
-
 33
33
-
 34
34
-
 35
35
-
 36
36
-
 37
37
-
 38
38
-
 39
39
-
 40
40
-
 41
41
-
 42
42
-
 43
43
-
 44
44
-
 45
45
-
 46
46
-
 47
47
-
 48
48
-
 49
49
-
 50
50
-
 51
51
-
 52
52
-
 53
53
-
 54
54
-
 55
55
-
 56
56
-
 57
57
-
 58
58
-
 59
59
-
 60
60
-
 61
61
-
 62
62
-
 63
63
-
 64
64
-
 65
65
-
 66
66
-
 67
67
-
 68
68
-
 69
69
-
 70
70
-
 71
71
-
 72
72
-
 73
73
-
 74
74
-
 75
75
-
 76
76
-
 77
77
-
 78
78
-
 79
79
-
 80
80
-
 81
81
-
 82
82
-
 83
83
-
 84
84
-
 85
85
-
 86
86
-
 87
87
-
 88
88
-
 89
89
-
 90
90
-
 91
91
-
 92
92
-
 93
93
-
 94
94
-
 95
95
-
 96
96
-
 97
97
-
 98
98
-
 99
99
-
 100
100
-
 101
101
-
 102
102
-
 103
103
-
 104
104
-
 105
105
-
 106
106
-
 107
107
-
 108
108
-
 109
109
-
 110
110
-
 111
111
-
 112
112
-
 113
113
-
 114
114
-
 115
115
-
 116
116
-
 117
117
-
 118
118
-
 119
119
-
 120
120
-
 121
121
-
 122
122
-
 123
123
-
 124
124
-
 125
125
-
 126
126
-
 127
127
-
 128
128
-
 129
129
-
 130
130
-
 131
131
-
 132
132
-
 133
133
-
 134
134
-
 135
135
-
 136
136
-
 137
137
-
 138
138
-
 139
139
-
 140
140


Motorola H790 - Headset - Monaural Hızlı başlangıç Kılavuzu
- Kategori
- Mobil kulaklıklar
- Tip
- Hızlı başlangıç Kılavuzu
Diğer dillerde
- español: Motorola H790 - Headset - Monaural Guía de inicio rápido
- français: Motorola H790 - Headset - Monaural Guide de démarrage rapide
- italiano: Motorola H790 - Headset - Monaural Guida Rapida
- svenska: Motorola H790 - Headset - Monaural Snabbstartsguide
- polski: Motorola H790 - Headset - Monaural Skrócona instrukcja obsługi
- Deutsch: Motorola H790 - Headset - Monaural Schnellstartanleitung
- English: Motorola H790 - Headset - Monaural Quick start guide
- русский: Motorola H790 - Headset - Monaural Инструкция по началу работы
İlgili Makaleler
-
Motorola HK200 Hızlı başlangıç Kılavuzu
-
Motorola HX550 Kullanım kılavuzu
-
-
-
-
-
-
-
-