Tefal CM2908 - Subito Mug El kitabı
- Kategori
- Kahve yapanlar
- Tip
- El kitabı
Bu kılavuz aynı zamanda aşağıdakiler için de uygundur:

FR
EN
NL
DE
IT
TR
PL
ET
LV
LT
BS
BG
HR
RO
SR
SL

2
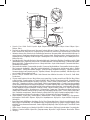
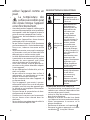
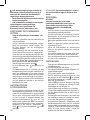
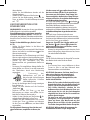
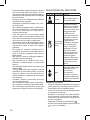
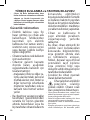
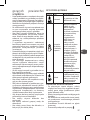
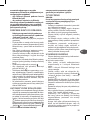
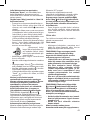
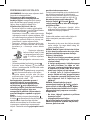
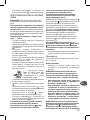
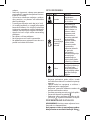
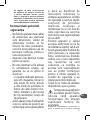
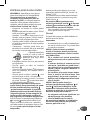
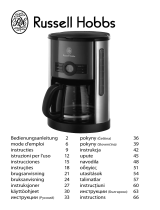
a. Couvercle - Cover - Deksel - Deckel - Coperchio - Kapak - Pokrywa - Kaas -Vāks - Dangtelis - Poklopac - - Poklopac - Capac-
Poklopac - Pokrov
b. Réservoir d’eau - Water tank - Waterreservoir - Wassertank - Serbatoio dell'acqua - Su haznesi - Zbiornik na wodę - Vee mahuti- Ūdens
tvertne- Vandens indas - Rezervoar vode - - Spremnik vode - Rezervor de apă - Rezervoar za vodu- Posoda za vodo
c. Graduation du niveau d’eau - Water level scale - Aanduiding van waterniveau - Wasserstandsskala - Indicatore del livello dell'acqua - Su
seviyesi göstergesi - Wyskalowany wskaźnik poziomu wody - Veetaseme skaala - Ūdens līmeņa iedaļas - Vandens lygio žymėjimas-
Pokazatelj nivoa vode - - Pokazatelj razine vode - Gradaia nivelului de apă - Pokazatelj nivoa vode-
Merilec nivoja vode
d. Porte-ltre amovible - Removable lter basket - Uitneembare lterhouder - Abnehmbarer Filterhalter - Porta-ltro removibile - Takılıp
çıkarılabilir ltre taşıyıcı - Wyjmowany uchwyt na ltr - Eemaldatav ltrihoidik - Noņemams ltra turētājs - Nuimamas ltro laikiklis-
Odvojivi držač ltera - - Odvojivi držač ltra - Suport de ltru detașabil - Demontažni držač ltera -
Neodstranljiva posoda za lter
e. Filtre permanent (réutilisable) - Permanent lter (reusable) - Permanente lter (herbruikbaar)- Permanentlter (wiederverwendbar)-
Filtro permanente (riutilizzabile) - Kalıcı ltre (yeniden kullanılanilir) - Filtr niewymienny (wielokrotnego użytku) - Püsilter
(korduvkasutatav) - Pastāvīgs ltrs (atkārtoti lietojams) - Nekeičiamas ltras (daugkartinio naudojimo) - Trajni lter (višekratni) -
( ) - Trajni ltar (višekratni) - Filtru permanent (reutilizabil) - Stalni lter (koji se može
ponovo koristiti)- Filter za večkratno uporabo
f. Verseuse - Coee pot - Koekan - Kanne - Caraa - Sürahi - Dzbanek - Kann - Mērkrūze - Kavos indas - Vrč - - Vrč - Carafă- Bokal-
Posoda za kavo
g. Sélecteur central 3 positions « Verseuse / Mug / Infusion ou stop-goutte Mug » - 3-position central selector (Coee Pot / Mug / Infusion
or Drip-Stop Mug) - Centrale regelaar met 3 standen “Koekan / Mok / Aftreksel of Druppelstop bij mok”- Hauptschalter mit 3
Einstellungen „Kanne/Becher/Aufbrühen oder Becher-Tropf-Stopp“ - Selettore centrale 3 posizioni “Caraa / Tazza / Infusione o Tazza
salva-goccia” - 3 konumlu seçici düğme « Sürahi / Bardak / Süzgeçli veya damlatmaz bardak » - Centralny 3-pozycyjny przełącznik
wyboru „Dzbanek/Kubek/Parzenie do kubka z blokadą kapania” - 3-asendiline valikunupp (kann / kruus / tõmbamine ja tilgapüüdjaga
kruusi jaoks) - Galvenā izvēlne, 3 pozīcijas “Mērkrūze / Krūze / Krūze- apliešana vai pilienu apturēšana“ - 3 padėčių jungiklis: „Kavos indas/
Puodelis / Užplikymas ar lašėjimo sustabdymas su funkcija „Puodelis“ - Izaberite centralna 3 položaja « Vrč / šoljica/ sipanje i funkcija
‘zaustavljanje kapljica’ u šoljicu» - 3 “ / /
” - Odabirnik 3 središnja položaja „posuda/točenje ili zaustavljanje kapanja posude“ - Selector central 3 poziii «Carafă/
Cană / Cană infuzie sau antipicurare» - Izaberite centralna 3 položaja « Bokal / šolja / sipanje i funkcija ‘zaustavljanje kapljica’ u šolju » -
Glavni gumb za izbiro treh možnosti « Posoda za kavo/ Lonček / Lonček za mešanico ali preprečevanje kapljanja»
h. Plaque chauante - Heating plate - Warmhoudplaat - Warmhalteplatte - Piastra riscaldante - Mutfak ocağı - Płyta grzewcza -
Kuumutusplaat - Sildošā virsma - Šildytuvas - Grijača ploča - - Grijača ploča - Suport de încălzire - Grejna ploča-
Grelna plošča
i. Bouton Marche/arrêt -On/O button - Aan/uit knop - Ein-/Aus-Taste - Pulsante Avvio/Arresto - Botón de encendido/apagado- Açma/
kapama düğmesi - Przycisk Wł./Wył. - Sisse-/väljalülitamise nupp - Ieslēgšanas/izslēgšanas poga - Įjungimo / išjungimo mygtukas - Gumb
za uklj/isklj - / - Gumb za uključivanje/isključivanje - Buton de pornire/oprire- Taster On/O - Gumb
Zagon / Ustavi
j. Cuillère doseuse - Measuring spoon - Maatlepel - Messlöel - Cucchiaio dosatore - Ölçü kaşığı - Łyżeczka-miarka - Doseerimislusikas-
Mērkarote - Dozavimo šaukštelis - Mjerna žlica - - Mjerna žlica - Lingură dozatoare - Merna kašika- Žlička za
odmerjanje
a
b
e
d
c
h
i
g
f
j

3
1 2 3
4 5 6
7 8 9
10

4
1 2 3
4 5 6
7 8

5
FR
• Lire attentivement le mode d’emploi
avant la première utilisation de
votre appareil et conservez-le : une
utilisation non conforme dégagerait
le fabricant de toute responsabilité.
Consignes de sécurité
• Si le câble d’alimentation
est endommagé, n’utilisez
pas l’appareil. Faites
obligatoirement remplacer
le câble d’alimentation par le
fabricant, son service après-
vente ou des personnes de
qualification similaire afin
d’éviter tout danger.
• Votre machine a été conçue
pour un usage domestique
seulement.
• Elle n’a pas été conçue pour
être utilisée dans les cas
suivants qui ne sont pas
couverts par la garantie:
− Dans des coins de cuisines ré-
servés au personnel dans des
magasins, bureaux et autres
environnements profes-
sionnels ; Dans des fermes ;
Par les clients des hôtels,
motels et autres environne-
ments à caractère résidentiel ;
Dans des environnements de
type chambres d’hôtes.
• Cet appareil peut être utilisé
par des enfants âgés d’au
moins 8 ans, à condition
qu’ils bénéficient d’une
surveillance ou qu’ils aient
reçu des instructions quant
à l’utilisation de l’appareil
en toute sécurité et qu’ils
comprennent bien les dangers
encourus. Le nettoyage et
l’entretien par l’utilisateur ne
doivent pas être eectués par
des enfants, à moins qu’ils
ne soient âgés de plus de 8
ans et qu’ils soient sous la
surveillance d’un adulte.
• Conserver l’appareil et son
câble hors de portée des
enfants âgés de moins de 8
ans.
• Cet appareil peut être utilisé
par des personnes dont
les capacités physiques,
sensorielles ou mentales sont
réduites ou dont l’expérience
ou les connaissances ne sont
pas suffisantes, à condition
qu’ils bénéficient d’une
surveillance ou qu’ils aient
reçu des instructions quant
à l’utilisation de l’appareil
en toute sécurité et en
comprennent bien les dangers
potentiels.
• Les enfants ne doivent pas

6
utiliser l’appareil comme un
jouet.
• La température des
surfaces accessibles peut
être élevée lorsque l’appareil
est en fonctionnement.
• Avant de brancher l’appareil, vérier que la
tension d’alimentation de votre installation
correspond à celle de l’appareil et que la
prise de courant comporte bien la terre.
• Toute erreur de branchement annule la
garantie.
• Débrancher l’appareil lors d’une absence
prolongée et lors du nettoyage.
• Ne pas utiliser l’appareil s’il ne fonctionne
pas correctement ou s’il a été endommagé.
Dans ce cas, s’adresser à un centre service
agréé.
• Toute intervention autre que le nettoyage
et l’entretien usuel par le client doit être
eectuée par un centre service agréé.
• Le câble d’alimentation ne doit jamais être
à proximité ou en contact avec les parties
chaudes de votre appareil, près d’une
source de chaleur ou sur un angle vif.
• Pour votre sécurité, n’utiliser que des ac-
cessoires et des pièces détachées adaptés
à votre appareil.
• Ne pas débrancher la che de la prise en
tirant sur le câble.
• Ne pas utiliser la verseuse dans un four à
micro-ondes, sur une amme et sur des
plaques de cuisinières électriques.
• Ne pas remettre d’eau dans l’appareil s’il
est encore chaud.
• Tous les appareils sont soumis à un con-
trôle qualité sévère. Des essais d’utilisation
pratiques sont faits avec des appareils pris
au hasard ce qui explique d’éventuelles
traces d’utilisation.
• Toujours fermer le couvercle lors du fonc-
tionnement de la cafetière.
• N’utilisez pas la verseuse sans le couvercle.
• Ne pas mettre d’eau chaude dans les
réservoirs.
• Ne pas réaliser une préparation de café si la
verseuse contient déjà du café.
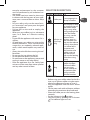
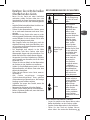
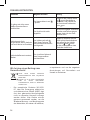
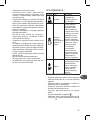
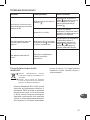
DESCRIPTION DU SELECTEUR
Position Description Utilisation
Verseuse
Pour préparer une
quantité de café de 4
à 10 tasses
Infusion ou
stop-goutte
Mug
Cette fonction est
idéale pour une
bonne infusion de
votre café lors de
l’utilisation avec
un mug : après
avoir préparé eau
et café pour un
mug, positionner le
sélecteur sur cette
position, mettre
en marche votre
machine et passer
ensuite le sélecteur
sur ‘Mug’ lorsqu’il n’y
a plus d’eau dans le
réservoir.
Cette fonction vous
permet aussi de
stopper l’écoulement
de gouttes sur la
plaque chauante
lors de l’utilisation
avec un mug.
Mug
Cette position
permet l’écoulement
du café infusé
dans votre mug.
Positionner le
sélecteur sur cette
position après avoir
utilisé la fonction
Infusion.
PREMIERE MISE EN SERVICE
• Faire fonctionner une première fois votre
cafetière sans café avec l’équivalent d’une
verseuse d’eau pour la rincer.
• Insérer la che du cordon d’alimentation
dans la prise électrique.
• Remplir le réservoir avec de l’eau froide
sans dépasser le niveau maximum indiqué.
• Placer correctement la verseuse sur la
plaque chauante.
• Positionner le sélecteur sur la position .
• Démarrer le cycle en appuyant sur le bou-
ton Marche . Le voyant s’allume.

7
FR
PRÉPARATION DU CAFÉ POUR
UN MUG
AVERTISSEMENT : Utilisez uniquement
du café moulu (les capsules ne sont pas
compatibles)
Cette cafetière est équipée d’un système
spécialement conçu pour la fonction
‘Mug’, permettant de faire infuser le café
dans le porte ltre avant de le faire couler
dans votre tasse et en obtenir ainsi le
meilleur arôme.
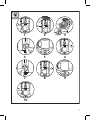
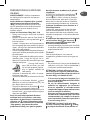
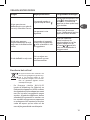
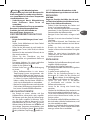
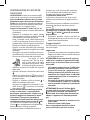
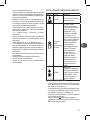
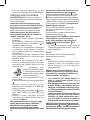
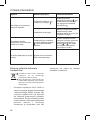
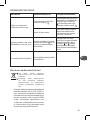
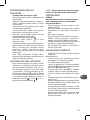
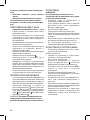
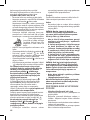
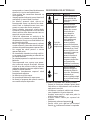
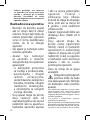
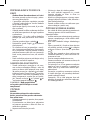
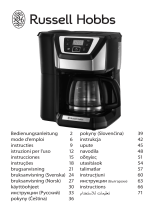
Suivre les illustrations ‘Mug’ de 1 à 10
• Placer votre mug au centre de la plaque
chauante.
• Remplir le réservoir avec de l’eau froide à
320 ml maximum, soit la graduation sur
le niveau d’eau.
A noter : Compte tenu de l’évaporation et
de l’absorption de l’eau pendant la prépa-
ration, 320 ml d’eau permettent d’obtenir
280 ml de café préparé.
• Ouvrir le compartiment du porte ltre pour
avoir accès au ltre permanent et le remplir
de café moulu.
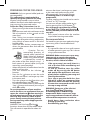
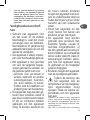
• Dosage : La quantité de café moulu recom-
mandée pour 1 mug de 320 ml est in-
diquée à l’intérieur du porte-ltre par une
marque intérieure :
• Dosage café moulu
pour 320 ml d’eau, soit 280
ml de café préparé (équiva-
lent à 2 petites cuillères de
café moulu)
• Adapater la quantité de café à la conte-
nance de votre mug.
• Tourner le sélecteur sur la fonction Infusion
.
• Appuyer sur le bouton ‘Marche’ pour
démarrer le cycle et attendre qu’il n’y ait
plus d’eau dans le réservoir.
• Tourner le sélecteur sur la position : votre
café infusé s’écoule dans votre tasse.
• Eteindre votre cafetière en appuyant sur le
bouton ‘Arrêt ’ et retirer votre tasse pour
déguster votre café.
Pour une utilisation optimale de votre
machine et de ses fonctions, nous vous
conseillons de positionner à nouveau le
sélecteur sur avant d’éteindre et retirer
votre tasse : vous utilisez alors la fonction
‘Stop-goutte’, qui permet de retirer
proprement le mug sans que les gouttes
de café restantes tombent sur la plaque
chauante.
ATTENTION : les fonctions stop-gouttes
ou Mug ne permettent pas d’éteindre
votre cafetière. Celle-ci restera en fonction
environ 30 minutes après qu’il n’y ait plus
d’eau dans le réservoir avant de s’éteindre
automatiquement. Pendant ces 30 minutes,
la plaque chauante est en fonction et à
forte température.
La fonction stop-gouttes ne doit pas être
utilisée comme fonction ‘Pause’ ou ‘OFF’.
Vous pouvez éteindre votre cafetière à tout
moment en appuyant sur le bouton Marche/
Arrêt .
N’oubliez pas de repositionner le sélecteur
sur la fonction ‘Mug’ ou ‘Verseuse’
pour toute nouvelle préparation an
d’éviter tout débordement.
• Attendre quelques minutes après l’arrêt de
la machine avant de préparer une seconde
préparation de café.
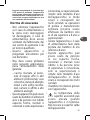
Conseil
Pour le petit-déjeuner, vous pouvez
remplacer la grande tasse ou le mug par un
bol !
Important
• Il est normal qu’il y ait un peu de dépôts de
café dans vos tasses. Cela est attribuable à
l’utilisation d’un ltre permanent.
ATTENTION : Veillez à utiliser une tasse
ou un mug d’une capacité susante pour
contenir la quantité de café prévue avec la
fonction Mug, soit 280 ml de café.
• Si la tasse ou le mug est trop petit, il y a
un risque de débordement et de brûlure
avec le café chaud.
• En cas de débordement, éteignez la
cafetière en appuyant sur le bouton
Arrêt et attendez le refroidissement
complet de l’appareil pour enlever votre
tasse et nettoyer la machine.
• Pour une tasse ou un mug d’une capac-
ité inférieure à 280 ml de café, nous vous
recommandons de remplir le réservoir
avec la quantité d’eau correspondant à
la tasse ou mug choisi.
ATTENTION : Pendant l’utilisation des
fonctions Infusion/stop-goutte et Mug
, la plaque chauante est en marche et

8
à forte température. Veillez à utiliser une
grande tasse ou un mug avec le matériau
adapté pour supporter la température
an :
− D’éviter toute brûlure par conduction
en reprenant votre tasse ;
− D’éviter la fonte de votre tasse.
N’utilisez pas de produits sensibles à
la chaleur, c’est-à-dire tout produit en
matière plastique, carton, polystyrène,
etc...
PREPARATION DU CAFE AVEC LA
VERSEUSE
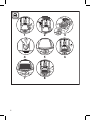
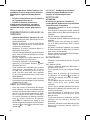
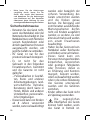
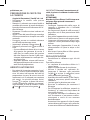
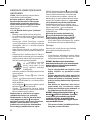
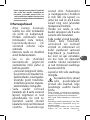
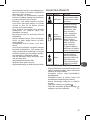
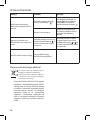
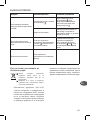
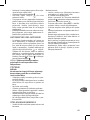
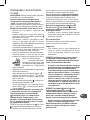
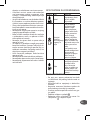
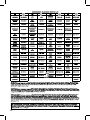
Suivre les illustrations ‘Verseuse’ de 1 à 8
• Placer la verseuse avec son couvercle sur la
plaque chauante.
• Remplir le réservoir avec de l’eau froide
selon le nombre de tasses souhaitées en
s’aidant des graduations.
• Respecter le niveau maximum d’eau in-
diqué dans le réservoir.
• Ouvrir le compartiment du porte ltre pour
avoir accès au ltre permanent et le rem-
plir de café moulu.
• Dosage : Mettre une cuillère doseuse rase
de café moulu par grande tasse.
• Tourner le sélecteur sur la position .
• Appuyer sur le bouton ‘Marche’ pour
démarrer le cylcle.
• Cette cafetière est équipée d’un système
stop-gouttes permettant de se servir
un café avec la verseuse avant la n du
cycle. Une fois votre café servi, replacer
la verseuse rapidement pour éviter tout
débordement.
• Attendre quelques minutes après l’arrêt de
la machine avant de préparer une seconde
préparation de café.
ARRET AUTOMATIQUE
• Pour des raisons d’économie d’énergie,
votre cafetière s’arrête automatiquement
environ 30 minutes après la n du cycle de
café (c’est-à-dire environ 30 minutes après
qu’il n’y ait plus d’eau dans le réservoir).
Le voyant lumineux du bouton marche/
arrêt s’éteint. Durant ces 30 minutes,
votre café est maintenu au chaud et à la
bonne température que ce soit en fonction
‘Verseuse’ ou ‘Mug’ ou ‘infustion/stop-
goutte’ .
IMPORTANT : Pendant le maintien au
chaud, la plaque chauante est en
fonction et à forte température.
NETTOYAGE
ATTENTION :
N’oubliez pas de laisser s’écouler le
restant de café présent dans le porte-ltre
avant d’évacuer la mouture.
• Débrancher l’appareil et laisser le refroidir
compètement.
• Pour évacuer la mouture usagée, retirer le
porte-ltre et/ou le ltre permanent de la
cafetière.
• Ne pas nettoyer l’appareil chaud.
• Le nettoyer avec un chion ou une éponge
humide.
• Vider et rincer avec de l’eau le porte-l-
tre et le ltre permanent après chaque
utilisation.
• Ne jamais immerger l’appareil, son cordon
d’alimentation ou sa che dans de l’eau ni
dans aucun autre liquide.
• Ne pas mettre le porte-ltre et le ltre per-
manent au lave-vaisselle.
DETARTRAGE
• Détartrer votre cafetière tous les 40 cycles
environ.
Vous pouvez utiliser :
− soit un sachet de détartrant dilué dans 2
grandes tasses d’eau.
− soit 2 grandes tasses de vinaigre d’alcool
blanc.
• Verser dans le réservoir (b). Positionner
le sélecteur sur verseuse et mettre la
cafetière en marche (sans café) en appuy-
ant sur .
• Laisser couler dans la verseuse (f) l’équiv-
alent d’une tasse, puis arrêter votre
cafetière.
• Laisser agir la solution pendant une heure.
• Remettre la cafetière en marche pour ter-
miner l’écoulement.
• Faire fonctionner la cafetière 2 ou 3 fois
avec l’équivalent d’une verseuse d’eau
pour la rincer.
La garantie exclut les cafetières ne fonc-
tionnant pas ou mal par absence de
détartrage.
Attention : dès que le cycle de café est plus
long ou plus bruyant, pensez à faire un
détartrage.

9
FR
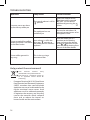
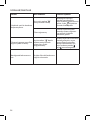
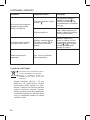
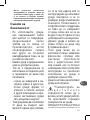
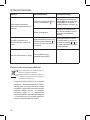
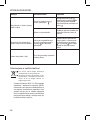
QUESTIONS/REPONSES
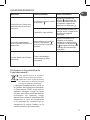
Questions Causes probables Actions correctives
Je n’arrive pas à lancer une
nouvelle infusion avec ma
verseuse
Le sélecteur central est resté
en position « »
Replacer le sélecteur en
position rapidement an
d’éviter tout débordement.
Ou éteindre l’appareil en
appuyant sur le bouton .
L’appareil n’a pas refroidi
Il faut attendre environ 10
minutes entre 2 préparation
de café que l’appareil
refroidisse.
J’ai arrêté mon appareil
mais il reste de l’eau dans le
porte-ltre.
Votre sélecteur est resté en
position stop-goutte « »
ou la verseuse n’a pas été
replacée.
Placer la verseuse ou un
récipient sur la plaque
chauante et repositionner
le sélecteur sur la position
ou pour que l’eau nisse de
s’écouler de l’extrémité du
porte-ltre.
J’ai des dépôts de café dans
mon mug
Cela est attribuable à
l’utilisation d’un ltre
permanent
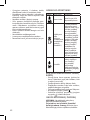
Participons à la protection de
l’environnement !
Votre appareil contient de nombreux
matériaux valorisables ou recyclables.
Conez celui-ci dans un point de collecte
ou à défaut dans un centre service agrée
pour que son traitement soit eectué.
• La directive Européenne 2012/19/UE sur
les Déchets des Equipements Electriques
et Electroniques (DEEE), exige que les
appareils ménagers usagés ne soient
pas jetés dans le ux normal des déchets
municipaux. Les appareils usagés
doivent êtres collectés séparément an
d’optimiser le taux de récupération
et le recyclage des matériaux qui les
composent et réduire l’impact sur la
santé humaine et l’environnement

10
• Please read the instructions for use
carefully before using your appliance
for the rst time and retain them for
future reference: Manufacturer cannot
accept any liability for non compliant
appliance use.
Safety Information
• Do not use the appliance
if the power cord or plug is
damaged. The power cord
must be replaced by the
manufacturer, its after-sales
service or similarly qualied
persons in order to avoid
danger.
• Your appliance is designed for
domestic use only.
• It is not intended to be used
in the following applications,
and the guarantee will not
apply for:
− sta kitchen areas in shops,
oces and other working en-
vironments; farm houses; by
clients in hotels, motels and
other residential type envi-
ronments; bed and breakfast
type environments.
• This appliance may be used
by children of at least 8 years
of age, as long as they are
supervised and have been
given instructions about using
the appliance safely and are
fully aware of the dangers
involved. Cleaning and user
maintenance shall not be
made by children unless they
are older than 8 and they are
supervised by an adult.
• Keep the appliance and its
cord out of reach of children
under 8 years of age.
• This appliance may be used by
persons with reduced physical,
sensory or mental capabilities,
or whose experience or
knowledge is not sufficient,
provided they are supervised
or have received instruction
to use the device safely and
understand the dangers.
• Children should not use the
appliance as a toy.
• The temperature of the
accessible surfaces may
be high when the appliance is
in operation. Do not touch the
hot surfaces of the appliance.
• Before plugging the appliance in, make
sure that the power it uses corresponds to
your electrical supply system and that the
outlet is earthed.
• Any error in the electrical connection will
negate your guarantee.
• Unplug the appliance when you have n-
ished using it and when you clean it.
• Do not use the appliance if it is not work-
ing properly or if it has been damaged. If
this occurs, contact an authorised service
centre.
• All interventions other than cleaning and

11
EN
everyday maintenance by the customer
must be performed by an authorised ser-
vice centre.
• The power cord must never be close to or
in contact with the hot parts of your appli-
ance, near a source of heat or over a sharp
edge.
• For your safety, only use the manufactur-
er’s accessories and spare parts designed
for your appliance.
• Do not pull on the cord to unplug the
appliance.
• Never put your coee jug in a microwave
oven, on a flame or a electric cooking
plates.
• Do not ll the appliance with water if it is
still hot.
• All appliances are subject to strict quality
control procedures. These include actual
usage tests on randomly selected appli-
ances, which would explain any traces of
use.
• Always close the lid when running the cof-
fee maker.
• Do not use the jug without the lid.
• Do not pour hot water in the tanks.
• Do not immerse the appliance, power cord
or plug in water or any other liquid.
• Place the appliance on a at, stable, heat
resistant surface away from water splashes
and any other sources of heat.
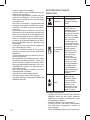
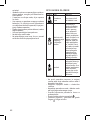
SELECTOR DESCRIPTION
Position Description Use
Coee pot
Use to prepare 4 to
10 cups of coee
Infusion or
Drip-Stop
Mug
This function is ideal
for good infusion of
your coee when
using a mug: after
having prepared the
water and coee
for a mug, set the
selector to this
position, turn on
your machine and
then set the selector
to 'Mug' when there
is no water left in
the water tank.
This function also
enables users to
stop the ow of
drips on the heating
plate when using
a mug.
Mug
This position
enables the ow
of infused coee
into your mug.
Set the selector to
this position after
having used the
Infusion function.
FIRST USE
• Before using your coee maker for the rst
time, run it without coee using the equiv-
alent of a coee pot of water to rinse it.
• Plug the appliance into the mains socket
outlet.
• Fill the water tank with cold water without
exceeding the maximum level indicated.
• Place the coee pot on the heating plate
correctly.
• Put the selector in the position.
• Start the cycle by pushing the On button
. The indicator light turns on.

12
PREPARING COFFEE FOR A MUG
WARNING: Only use ground coee (pods are
not compatible)
This coee maker is equipped with a
specially designed system for the ‘Mug’
function, which enables users to infuse
coee in the lter basket before pouring it
into your mug, for improved aroma.
Follow the "Mug" instructions 1 to 10.
• Place your mug in the centre of the heating
plate.
• Rell the water tank with cold water to the
320 ml maximum, or the mark on the
water level.
Note: Taking into account evaporation
and water absorption during preparation,
using 320 ml of water results in 280 ml of
brewed coee.
• Open the lter basket compartment to
access the permanent lter and rell the
ground coee.
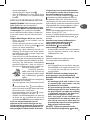
• Quantity: The rec-
ommended quantity of
ground coee required to
make 280ml of prepared
coee using 320ml of water
is indicated by a mark on
the inside of the lter basket using 1 - 2
level spoons of ground coee (using the
measuring spoon provided).
• Adapt the quantity of coee based on the
capacity of your mug.
• Turn the selector to the Infusion
function.
• Press the ‘On’ button to start the cycle
and wait until there is no longer any water
in the water tank.
• Turn the selector to the position: your
infused coee ows into your mug.
• Turn o your coee maker by pressing the
‘Stop’ button and remove your mug to
drink your coee.
To ensure optimal use of your machine
and its functions, we recommend that you
return the selector to before turning it
o and removing your mug: you then use
the ‘Drip-Stop’ function, which enables
you to cleanly remove the mug without
having remaining coee dripping on the
heating plate.
WARNING: The Drip-Stop or Mug
functions do not turn o your coee maker.
This will remain in operation for about 30
minutes after there is no longer any water
in the water tank before turning itself
o automatically. For these 30 minutes,
the heating plate is on and at a high
temperature.
The drip-stop function should not be used as
a "Pause" or "OFF" function.
You can turn o your coee maker at any
time by pressing the On/O button .
Do not forget to reposition the selector
to the "Mug" or "Coee pot" function
for the next time you brew coee to avoid
any spills.
• Wait several minutes after the machine
stops before brewing more coee.
Recommendation
For breakfast, you can even replace the large
cup or mug with a French coee bowl!
Important
• It is normal for there to be a small amount
of coee grounds in your cup. This is due to
using a permanent lter.
WARNING: Make sure to use a cup or mug
large enough to contain the quantity
of coee expected when using the Mug
function, which is 280 ml of coee.
• If the cup or mug is too small, there is a
risk of the hot coee overowing and
causing burns.
• In case of overflow, turn the coffee
maker o by pressing the O button
and wait for the appliance to cool com-
pletely before removing your mug and
cleaning the machine.
• For a cup or mug that holds less than
280 ml of coee, we recommend that
you ll the water tank with the quantity
of water that corresponds to the size of
the cup or mug selected.
WARNING: During use of the Infusion/
Drip-Stop and Mug functions,
the heating plate is on and at high
temperature. Make sure to use a large
cup or mug made out of materials able to
withstand the temperature in order to:
− Avoid burns from conduction when
picking up your mug.
− Avoid melting your mug.

13
EN
Do not use products sensitive to heat,
such as any materials made of plastic,
cardboard, polystyrene, etc.
PREPARING COFFEE WITH THE
COFFEE POT
Follow the "Coee pot" instructions 1
to 8.
• Place the coee pot with its lid on the heat-
ing plate.
• Rell the water tank with cold water based
on the number of cups desired using the
gradations on the side.
• Pay attention to the maximum water level
indicated on the water tank.
• Open the lter basket compartment to
access the permanent lter and rell the
ground coee.
• Quantity: One level spoon (using the meas-
uring spoon provided) of ground coee
per large cup.
• Turn the selector to the position.
• Press the "On" button to start the cycle.
• This coee maker is equipped with a drip-
stop system enabling you to serve coee
from the coee pot before the end of the
cycle. Once you have poured your coee,
replace the coee pot quickly to avoid any
spills.
• Wait several minutes after the machine
stops before brewing more coee.
AUTOMATIC OFF
• To save energy, your coee maker will turn
itself o automatically about 30 minutes
after the end of the coee brewing cycle
(more precisely, about 30 minutes after
there is no more water in the water tank).
The indicator light for the on/o button
turns o. Over this 30-minute period, your
coee is kept warm and at the proper tem-
perature, whether in the ‘Coee Pot’ or
‘Mug’ or ‘Infusion/Drip-Stop’ function.
IMPORTANT: When keeping warm,
the heating plate is on and at a high
temperature.
CLEANING
WARNING:
Do not forget to let the rest of the coee in
the lter basket ow out before removing
the grounds.
• Unplug the appliance and let it cool
completely.
• To drain the used grounds, remove the l-
ter basket and/or permanent lter from the
coee maker.
• Do not clean the appliance when it is hot.
• Clean it with a damp cloth.
• Empty and rinse the lter basket and the
permanent lter with water after each use.
• Never immerse the appliance, its power
cord, or its socket in water or any other
liquid.
• Do not put the lter basket or permanent
lter in the dishwasher.
DESCALING
• Descale your coee maker about every 40
cycles.
You can use:
− either a descaling packet diluted in 2 large
cups of water.
− or 2 large cups of white vinegar.
• Pour in water tank (b). Put the selector in
the coee pot position and turn on the
coee maker (without coee) by pressing
.
• Let the equivalent of one cup pour into the
coee pot (f), then turn the coee maker
o.
• Leave the solution to work for one hour.
• Turn the coee maker on to nish draining
it.
• Run the coee maker 2 or 3 times using
the equivalent of a coee pot of water to
rinse it.
The guarantee excludes coee makers that
do not work or work poorly due to lack of
descaling.
Note: when the coee cycle gets longer or
more noisy, it's time to think of descaling.

14
TROUBLESHOOTING
Questions Likely causes Corrective actions
I cannot start a new brew
cycle with my coee pot
The central selector is still in
" " position
Return the selector to the
position quickly to avoid
any spills. Or, turn o the
appliance by pressing the
button.
The appliance has not
cooled o yet.
You need to wait about 10
minutes between brews to let
the appliance cool.
I have turned o my coee
maker, but there is still water
in the lter basket.
Your selector is still in the
drip-stop " " position or
the coee pot has not been
replaced.
Place the coee pot or a
container on the heating
plate and move the selector
to the or position so that
water can nish draining from
the rest of the lter basket.
I have coee grounds in
my mug
This is due to using a
permanent lter
Help protect the environment!
Your machine contains many
recoverable or recyclable materials.
Take these to a collection centre, or
to an approved service centre for
processing.
• European Directive 2012/19/EU on Waste
from Electrical and Electronic Equipment
(WEEE), mandates that used household
appliances are not to be discarded in the
regular municipal waste stream. Used
appliances must be collected separately
to optimize the recovery and recycling
rate for the materials which compose
them and to reduce the impact on
human health and the environment.

15
NL
• Lees de gebruiksaanwijzing grondig
door voordat u uw apparaat in gebruik
neemt en bewaar deze voor latere
raadpleging. De fabrikant is niet aans-
prakelijk voor schade of letsel veroor-
zaakt door verkeerd gebruik van het
apparaat.
Veiligheidsvoorschrif-
ten
• Gebruik het apparaat niet
als het snoer of de stekker
beschadigd is. Laat het snoer
vervangen door de fabrikant,
klantendienst of gelijksoortig
gekwalificeerd persoon om elk
gevaar te vermijden.
• Uw apparaat is alleen ontwor-
pen voor huishoudelijk gebruik.
• Het apparaat is niet geschikt
om voor de volgende toepas-
singen gebruikt te worden, en
de garantie geldt niet voor:
−kantines voor personeel in
winkels, kantoren en andere
werkomgevingen; boerderi-
jen; door klanten in hotels,
motels, bed & breakfasts en
andere types van huisvesting.
• Dit apparaat mag worden ge-
bruikt door kinderen vanaf 8
jaar als ze onder toezicht staan
of als ze richtlijnen hebben
gekregen om het apparaat
veilig te kunnen hanteren en
de risico’s kennen. Kinderen
mogen het apparaat niet reini-
gen en onderhouden tenzij ze
ouder dan 8 jaar zijn en onder
toezicht van een volwassene
staan.
• Houd het apparaat en het
snoer buiten het bereik van
kinderen jonger dan 8 jaar.
• Dit apparaat mag worden
gebruikt door personen met
beperkte fysieke, visuele of
mentale mogelijkheden, of
die een gebrek aan ervaring of
kennis hebben, op voorwaarde
dat ze onder toezicht staan of
aanwijzingen hebben gekre-
gen hoe het apparaat veilig
te gebruiken en de mogelijke
gevaren begrijpen.
• Kinderen mogen het apparaat
niet als speelgoed gebruiken.
• Tijdens de werking van
het apparaat kan de
temperatuur van de toeganke-
lijke oppervlakken hoog
oplopen. Raak de warme op-
pervlakken van het apparaat
niet aan.
• Voordat u de stekker in het stopcontact
steekt, zorg dat de spanning vermeld op
het apparaat overeenkomt met de net-
spanning van uw woning en dat het stop-
contact geaard is.
• Elke fout in de elektrische verbinding

16
maakt uw garantie ongeldig.
• Haal de stekker uit het stopcontact na ge-
bruik en voor reiniging.
• Gebruik het apparaat niet als deze niet juist
werkt of beschadigd is. Als dit zich voor-
doet, neem contact op met een bevoegd
servicecentrum.
• Laat elke tussenkomst, uitgezonderd de
reiniging en dagelijks onderhoud van het
apparaat, aan een bevoegd servicecen-
trum over.
• Leg het snoer nooit in de buurt van of zorg
dat deze niet in contact komt met de hete
delen van uw apparaat, in de nabijheid van
een warmtebron of over een scherpe rand.
• Voor uw veiligheid, gebruik alleen toebe-
horen en reserveonderdelen van de fabri-
kant die speciek voor het apparaat zijn
ontworpen.
• Trek niet aan het snoer om de stekker uit
het stopcontact te halen.
• Plaats uw koekan nooit in een magne-
tronoven, op een vlam of een elektrische
kookplaat.
• Vul het apparaat niet met water als het ap-
paraat nog warm is.
• Alle apparaten zijn onderhevig aan strikte
kwaliteitscontroleprocedures. Deze om-
vatten eectieve gebruikstesten op wille-
keurig geselecteerde apparaten. Het is dus
mogelijk dat u sporen van gebruik op uw
apparaat aantreft.
• Sluit altijd het deksel voordat u het kof-
ezetapparaat inschakelt.
• Gebruik de kan niet zonder deksel.
• Giet geen warm water in de reservoirs.
• Zet geen koe als er zich reeds koe in de
koekan bevindt.
BESCHRIJVING VAN DE
REGELAAR
Stand Beschrijving Gebruik
Koekan
Om tussen 4 en
10 kopjes koe te
zetten
Extractie of
druppelstop
bij mok
Deze functie is
ideaal voor een
goede extractie van
uw koe tijdens
het gebruik met een
mok. Na het vullen
met water en koe
voor het zetten
van één mok, stel
je de regelaar in op
deze stand. Schakel
uw apparaat in en
stel de regelaar
vervolgens in op
‘Mok’ wanneer er
zich niet langer
water in het
reservoir bevindt.
Deze functie stelt
u tevens in staat
om het druppelen
van koe op de
warmhoudplaat
tijdens het gebruik
met een mok te
stoppen.
Mok
Deze stand zorgt
ervoor dat de
getrokken koe
in uw mok kan
stromen. Stel de
regelaar in op
deze stand na het
gebruiken van de
stand Extractie.
INGEBRUIKNAME
• Vul het reservoir de eerste keer met een
koekan water en voeg geen gemalen
koe toe, en schakel uw apparaat in om
het grondig te spoelen.
• Steek de stekker in een stopcontact.
• Vul het reservoir met koud water zonder
het maximum aangegeven niveau te
overschrijden.
• Plaats de koekan op een juiste manier op

17
NL
de warmhoudplaat.
• Stel de regelaar in op de stand .
• Start de koezetcyclus door op de knop
Aan te drukken. Het controlelampje
brandt.
KOFFIE VOOR ÉÉN MOK ZETTEN
WAARSCHUWING: Gebruik alleen gemalen
koe (koepads zijn niet geschikt).
Dit koezetapparaat is voorzien van een
systeem dat speciaal voor de functie ‘Mok’
is ontworpen . Dit systeem laat de koe
eerst in de lterhouder trekken voordat het
in uw mok stroomt om een beter aroma te
krijgen.
Volg de afbeeldingen ‘Mok’ van 1 tot 10
• Plaats uw mok in het midden van de
warmhoudplaat.
• Vul het reservoir met koud water tot ma-
ximum 320 ml., of het symbool op het
niveau van water-aanduiding.
Opmerking: Houd rekening met de ver-
damping en absorptie van water tijdens
het koezetten, 320 ml water zorgt voor
280 ml gezette koe.
• Open het vak van de lterhouder om toe-
gang te krijgen tot de permanente lter en
doe vervolgens gemalen koe in de lter.
• Dosering: De aanbevolen hoeveelheid
gemalen koe voor 1 mok van 320 ml is
binnenin de lterhouder door middel van
een teken aangegeven:
• Dosering gemalen
koe voor 320 ml water of
280 ml gezette koe (gelijk
aan 2 koffielepels gemalen
koe)
• Pas de hoeveelheid koe aan naargelang
de inhoud van uw beker.
• Draai de regelaar naar de functie Extractie
.
• Druk op de knop ‘Aan’ om de koezet-
cyclus te starten en wacht totdat alle water
uit het reservoir is verdwenen.
• Draai de regelaar naar de stand : uw ge-
zette koe stroomt in uw mok.
• Schakel uw koezetapparaat uit door op
de knop ‘Uit’ te drukken en neem uw
mok met lekkere koe van het apparaat af.
Voor een optimaal gebruik van uw
apparaat en de functies bevelen we aan
om de regelaar opnieuw op in te stellen
voordat u het apparaat uitschakelt en uw
mok verwijdert. Gebruik aldus de functie
‘Druppelstop’ om uw mok probleemloos
te verwijderen zonder dat er druppels op
de warmhoudplaat terechtkomen.
OPGELET: de functie Druppelstop of Mok
schakelen uw koezetapparaat niet uit.
Het apparaat blijft circa 30 minuten na het
wegstromen van alle water uit het reservoir
ingeschakeld, waarna het automatisch wordt
uitgeschakeld. De warmhoudplaat is tijdens
deze 30 minuten ingeschakeld en zeer
warm.
Gebruik de druppelstopfunctie niet als
functie ‘Pauze’ of ‘OFF” (uit).
U kunt uw koezetapparaat op elk moment
uitschakelen door op de knop Aan/Uit te
drukken.
Voordat u een nieuwe koezetcyclus
start, vergeet niet om de regelaar
opnieuw op de functie ‘Mok’
of ‘Koekan’ in te stellen om
overstroming te vermijden.
• Wacht enkele minuten na het uitschakelen
van het apparaat voordat u een nieuwe
koezetcyclus start.
Advies
Voor het ontbijt kunt u de kop of mok
vervangen door een koekom!
Belangrijk
• Het is mogelijk dat er een kleine hoeveel-
heid koedik in uw kopjes aanwezig is. Dit
is te wijten aan het gebruik van een per-
manente lter.
OPGELET: Gebruik een kopje of mok die
groot genoeg is voor de hoeveelheid
gezette koe in de functie Mok, dit is 280
ml koe.
• Als het kopje of de mok te klein is, kan
er warme koe overstromen, wat tot
brandwonden kan leiden.
• Als overstroming optreedt, schakel het
koezetapparaat uit met de knop Uit
en wacht totdat het apparaat volledig
is afgekoeld voordat u uw kopje ver-
wijdert en het apparaat reinigt.
• Voor een kopje of een mok met een
inhoud kleiner dan 280 ml, raden we u
aan om het reservoir te vullen met een
hoeveelheid water die met het gekozen
kopje of mok overeenstemt.
OPGELET: Tijdens het gebruik van de
functie Extractie/druppelstop en Mok

18
is de warmhoudplaat ingeschakeld en
zeer warm. Gebruik alleen een kopje of
mok van een materiaal dat bestemd is
tegen hoge temperaturen om:
− Brandwonden bij het vastnemen van uw
kopje te vermijden;
− Het smelten van uw kopje te vermijden.
Gebruik geen warmtegevoelige
producten, zoals producten van
kunststof, karton, polystyreen, etc.
KOFFIE MET DE SCHENKKAN
ZETTEN
Volg de afbeeldingen ‘Schenkkan’ van
1 tot 8
• Plaats de schenkkan met het deksel op de
warmhoudplaat.
• Vul het reservoir met koud water naarge-
lang het gewenste aantal kopjes kof-
fie met behulp van de aangegeven
schaalverdeling.
• Houd rekening met het maximaal water-
niveau dat in het reservoir is aangegeven.
• Open het vak van de lterhouder om toe-
gang te krijgen tot de permanente lter. En
doe vervolgens gemalen koe in de lter.
• Dosering: Neem één gladgestreken maat-
lepel gemalen koe per koekop.
• Stel de regelaar in op de stand .
• Druk op de knop ‘Aan’ om de cyclus te
starten.
• Dit koezetapparaat is voorzien van een
druppelstopsysteem om de schenkkan tij-
dens het koezetten af te halen. Na het
serveren van de koe, plaats de schenkkan
snel terug om overstroming te vermijden.
• Wacht enkele minuten na het uitschakelen
van het apparaat voordat u een nieuwe
koezetcyclus start.
AUTOMATISCHE
UITSCHAKELING
• Om op energie te besparen wordt uw kof-
ezetapparaat automatisch na circa 30 mi-
nuten na de koezetcyclus uitgeschakeld
(d.w.z. circa 30 minuten nadat alle water
uit het reservoir is weggestroomd). Het
aan/uit-controlelampje gaat uit. Uw
koe wordt gedurende deze 30 minuten
op de juiste temperatuur warm gehouden,
ongeacht of de functie ‘Schenkkan’ ,
‘Mok’ of ‘Extractie/druppelstop’ wordt
gebruikt.
BELANGRIJK: De warmhoudplaat is tijdens
de warmhoudfase ingeschakeld en zeer
warm.
REINIGING
OPGELET:
Vergeet niet om de resterende
hoeveelheid koe die zich nog in de
lterhouder bevindt door te laten
stromen voordat u het koedik
verwijdert.
• Haal de stekker uit het stopcontact en laat
het apparaat volledig afkoelen.
• Om het koedik te verwijderen, haal de
lterhouder en/of permanente lter van
het koezetapparaat af.
• Reinig het apparaat niet als het nog warm
is.
• Maak het apparaat schoon met een voch-
tige doek of spons.
• Maak de filterhouder en permanente
lter na elk gebruik schoon en spoel ze
vervolgens.
• Dompel het apparaat, het snoer of de stek-
ker niet in water of een andere vloeistof.
• Was de lterhouder en de permanente l-
ter niet in de vaatwasser.
ONTKALKEN
• Ontkalk uw koezetapparaat na circa elke
40 koezetcycli.
U kunt het volgende gebruiken:
− een zakje ontkalkingsmiddel opgelost in 2
grote koekoppen.
− of 2 grote koppen witte alcoholazijn.
• Giet de oplossing in het reservoir (b). Stel
de regelaar in op Schenkkan en schakel
het koezetapparaat (zonder koe) in
door op te drukken.
• Laat circa één kopje van de oplossing in de
schenkkan (f) stromen en schakel uw kof-
ezetapparaat vervolgens uit.
• Laat de oplossing circa één uur inwerken.
• Schakel het koezetapparaat opnieuw in
om het doorstromen van de oplossing te
hervatten.
• Vul het reservoir vervolgens 2 of 3 keer met
een koekan water en schakel uw appa-
raat in om het grondig te spoelen.
Aanspraak op garantie is uitgesloten voor
koffiezetapparaten die niet of verkeerd
werken door het apparaat niet te ontkalken.
Opgelet: Zodra de koezetcyclus langer
duurt of meer lawaai maakt, wordt het
aanbevolen om het te ontkalken.

19
NL
VRAGEN/ANTWOORDEN
Vragen Mogelijke oorzaken Corrigerende handelingen
Ik kan geen nieuwe
koezetcyclus met gebruik
van mijn schenkkan starten
De centrale regelaar is
ingesteld op de stand “ ”
Stel de regelaar opnieuw snel
in op om overstroming te
vermijden. Of schakel het
apparaat uit door op de knop
te drukken.
Het apparaat is niet
afgekoeld.
Wacht circa 10 minuten
tussen 2 koezetcycli om het
apparaat te laten afkoelen.
Ik heb mijn apparaat
uitgeschakeld maar er blijft
nog water in de lterhouder
achter.
Uw regelaar is ingesteld
op de stand Druppelstop
of de schenkkan is niet
teruggeplaatst.
Plaats de schenkkan
of een houder op de
warmhoudplaat en stel de
regelaar opnieuw in op
de stand of totdat alle
water uit de lterhouder is
weggestroomd.
Ik heb koedik in mijn mok.
Dit is te wijten aan
het gebruik van een
permanente lter.
Bescherm het milieu!
Uw apparaat bevat vele materialen die
voor recycling/hergebruik geschikt zijn.
Niet in de vuilnisbak gooien of naar
een stortplaats brengen, maar naar een
door uw gemeente opgezet centraal
inzamelpunt brengen.
• De Europese richtlijn 2012/19/EC
inzake de Afdanking van Elektrisch en
Elektronische Apparatuur (AEEA) verklaart
dat afgedankte huishoudapparaten nooit
met het huisafval weggegooid mogen
worden. Afgedankte apparaten dienen
afzonderlijk ingezameld te worden om
het aandeel teruggewonnen apparaten
te verhogen en het materiaal te recyclen
zodat de impact op het milieu en de
menselijke gezondheid wordt beperkt.

20
• Bitte lesen Sie die Anleitungen
sorgfältig durch, bevor Sie Ihr
Gerät zum ersten Mal benutzen,
und bewahren Sie die Anleitungen
zum Nachlesen auf. Der Hersteller
übernimmt keine Haftung für eine
unsachgemäße Benutzung des Gerätes.
Sicherheitshinweise
• Benutzen Sie das Gerät nicht,
wenn das Netzkabel oder der
Netzstecker beschädigt ist. Das
Netzkabel muss vom Hersteller,
seinem Kundendienst oder
ähnlich qualizierten Personen
ausgetauscht werden, um
jegliche Gefahr zu vermeiden.
• Ihr Gerät ist nur für den
privaten Gebrauch konzipiert.
• Es ist nicht für den
Gebrauch in den folgenden
Einsatzbereichen bestimmt
und die Garantie ist nicht
gültig für:
− Personalküchen in Geschäf-
ten, Büros und anderen
Arbeitsumgebungen; land-
wirtschaftliche Betriebe;
Benutzung durch Gäste in
Hotels, Motels und anderen
Unterkünften; pensionsähn-
liche Umgebungen.
• Dieses Gerät kann von Kindern
ab 8 Jahren verwendet
werden, wenn sie beaufsichtigt
werden oder bezüglich der
sicheren Verwendung des
Geräts unterrichtet wurden
und die Risiken genau
kennen. Die Reinigung und
vom Benutzer auszuführende
Wartungsarbeiten dürfen
nicht von Kindern ausgeführt
werden; es sei denn, sie sind
älter als acht Jahre und werden
von einem Erwachsenen
beaufsichtigt.
• Halten Sie das Gerät und sein
Netzkabel außer Reichweite
von Kindern unter acht Jahren.
• Dieses Gerät kann von
Personen mit eingeschränkten
körperlichen, sensorischen
oder geistigen Fähigkeiten
oder Personen, denen es
an Erfahrung und Kenntnis
mangelt, benutzt werden,
sofern sie beaufsichtigt werden
oder in die sichere Benutzung
des Gerätes unterwiesen
wurden und die Gefahren
verstehen.
• Kinder sollten das Gerät nicht
als Spielzeug verwenden.
• Die zugänglichen
Oberächen des Geräts
können heißt werden, wenn
das Gerät in Betrieb ist.
Sayfa yükleniyor...
Sayfa yükleniyor...
Sayfa yükleniyor...
Sayfa yükleniyor...
Sayfa yükleniyor...
Sayfa yükleniyor...
Sayfa yükleniyor...
Sayfa yükleniyor...
Sayfa yükleniyor...
Sayfa yükleniyor...
Sayfa yükleniyor...
Sayfa yükleniyor...
Sayfa yükleniyor...
Sayfa yükleniyor...
Sayfa yükleniyor...
Sayfa yükleniyor...
Sayfa yükleniyor...
Sayfa yükleniyor...
Sayfa yükleniyor...
Sayfa yükleniyor...
Sayfa yükleniyor...
Sayfa yükleniyor...
Sayfa yükleniyor...
Sayfa yükleniyor...
Sayfa yükleniyor...
Sayfa yükleniyor...
Sayfa yükleniyor...
Sayfa yükleniyor...
Sayfa yükleniyor...
Sayfa yükleniyor...
Sayfa yükleniyor...
Sayfa yükleniyor...
Sayfa yükleniyor...
Sayfa yükleniyor...
Sayfa yükleniyor...
Sayfa yükleniyor...
Sayfa yükleniyor...
Sayfa yükleniyor...
Sayfa yükleniyor...
Sayfa yükleniyor...
Sayfa yükleniyor...
Sayfa yükleniyor...
Sayfa yükleniyor...
Sayfa yükleniyor...
Sayfa yükleniyor...
Sayfa yükleniyor...
Sayfa yükleniyor...
Sayfa yükleniyor...
Sayfa yükleniyor...
Sayfa yükleniyor...
Sayfa yükleniyor...
Sayfa yükleniyor...
Sayfa yükleniyor...
Sayfa yükleniyor...
Sayfa yükleniyor...
Sayfa yükleniyor...
Sayfa yükleniyor...
Sayfa yükleniyor...
Sayfa yükleniyor...
Sayfa yükleniyor...
Sayfa yükleniyor...
Sayfa yükleniyor...
Sayfa yükleniyor...
Sayfa yükleniyor...
Sayfa yükleniyor...
Sayfa yükleniyor...
Sayfa yükleniyor...
Sayfa yükleniyor...
-
 1
1
-
 2
2
-
 3
3
-
 4
4
-
 5
5
-
 6
6
-
 7
7
-
 8
8
-
 9
9
-
 10
10
-
 11
11
-
 12
12
-
 13
13
-
 14
14
-
 15
15
-
 16
16
-
 17
17
-
 18
18
-
 19
19
-
 20
20
-
 21
21
-
 22
22
-
 23
23
-
 24
24
-
 25
25
-
 26
26
-
 27
27
-
 28
28
-
 29
29
-
 30
30
-
 31
31
-
 32
32
-
 33
33
-
 34
34
-
 35
35
-
 36
36
-
 37
37
-
 38
38
-
 39
39
-
 40
40
-
 41
41
-
 42
42
-
 43
43
-
 44
44
-
 45
45
-
 46
46
-
 47
47
-
 48
48
-
 49
49
-
 50
50
-
 51
51
-
 52
52
-
 53
53
-
 54
54
-
 55
55
-
 56
56
-
 57
57
-
 58
58
-
 59
59
-
 60
60
-
 61
61
-
 62
62
-
 63
63
-
 64
64
-
 65
65
-
 66
66
-
 67
67
-
 68
68
-
 69
69
-
 70
70
-
 71
71
-
 72
72
-
 73
73
-
 74
74
-
 75
75
-
 76
76
-
 77
77
-
 78
78
-
 79
79
-
 80
80
-
 81
81
-
 82
82
-
 83
83
-
 84
84
-
 85
85
-
 86
86
-
 87
87
-
 88
88


Tefal CM2908 - Subito Mug El kitabı
- Kategori
- Kahve yapanlar
- Tip
- El kitabı
- Bu kılavuz aynı zamanda aşağıdakiler için de uygundur:
diğer dillerde
- eesti: Tefal CM2908 - Subito Mug Omaniku manuaal
- français: Tefal CM2908 - Subito Mug Le manuel du propriétaire
- italiano: Tefal CM2908 - Subito Mug Manuale del proprietario
- polski: Tefal CM2908 - Subito Mug Instrukcja obsługi
- Deutsch: Tefal CM2908 - Subito Mug Bedienungsanleitung
- English: Tefal CM2908 - Subito Mug Owner's manual
- Nederlands: Tefal CM2908 - Subito Mug de handleiding
- română: Tefal CM2908 - Subito Mug Manualul proprietarului
İlgili makaleler
Diğer belgeler
-
 Russell Hobbs Compact Home 24210-56 Kullanım kılavuzu
-
 Russell Hobbs 24210-56 Kullanım kılavuzu
-
 Russell Hobbs 18590-56 Kullanım kılavuzu
-
Russell Hobbs 18514-56 COTTAGE FLORAL DIGITAL Kullanım kılavuzu
-
 Russell Hobbs Cottage Floral 18514-56 Kullanım kılavuzu
-
Moulinex FG160810 Kullanım kılavuzu
-
 Russell Hobbs 22000-56 Kullanım kılavuzu
-
-
Kenwood CM900 series Kullanım kılavuzu
-
Rowenta CG3808 ADAGIO El kitabı


