
YAMAHA ELECTRONICS CORPORATION, USA
6660 ORANGETHORPE AVE., BUENA PARK, CALIF. 90620, U.S.A.
YAMAHA CANADA MUSIC LTD.
135 MILNER AVE., SCARBOROUGH, ONTARIO M1S 3R1, CANADA
YAMAHA ELECTRONIK EUROPA G.m.b.H.
SIEMENSSTR. 22-34, 25462 RELLINGEN BEI HAMBURG, GERMANY
YAMAHA ELECTRONIQUE FRANCE S.A.
RUE AMBROISE CROIZAT BP70 CROISSY-BEAUBOURG 77312 MARNE-LA-VALLEE CEDEX02, FRANCE
YAMAHA ELECTRONICS (UK) LTD.
YAMAHA HOUSE, 200 RICKMANSWORTH ROAD WATFORD, HERTS WD18 7GQ, ENGLAND
YAMAHA SCANDINAVIA A.B.
J A WETTERGRENS GATA 1, BOX 30053, 400 43 VÄSTRA FRÖLUNDA, SWEDEN
YAMAHA MUSIC AUSTRALIA PTY, LTD.
17-33 MARKET ST., SOUTH MELBOURNE, 3205 VIC., AUSTRALIA
©
2005 All rights reserved.
GB
OWNER’S MANUAL
MODE D’EMPLOI
BEDIENUNGSANLEITUNG
BRUKSANVISNING
MANUALE DI ISTRUZIONI
MANUAL DE INSTRUCCIONES
GEBRUIKSAANWIJZING
Printed in China 3139 246 16161
DVX-S301/DVX-S302/DVX-S303
DVX-S300_GB_cv.fm Page 1 Tuesday, June 7, 2005 11:29 AM

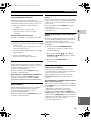
CAUTION: READ THIS BEFORE OPERATING YOUR UNIT.
i
1 To assure the finest performance, please read this manual
carefully. Keep it in a safe place for future reference.
2
Install this sound system in a well ventilated, cool, dry, clean place
with at least 10 cm on the top, 10 cm on the left and right, and 10
cm at the back of DVR-S300 and at least 1 m above, 30 cm
behind and on both sides of NX-SW300 or NX-SW301 for
adequate ventilation.
— away from direct sunlight, heat sources,
vibration, dust, moisture, and/or cold.
3 Locate this unit away from other electrical appliances, motors,
or transformers to avoid humming sounds.
4 Do not expose this unit to sudden temperature changes from
cold to hot, nor locate this unit in an environment with high
humidity (i.e., a room with a humidifier) to prevent
condensation inside this unit, which may cause an electrical
shock, fire, damage to this unit, and/or personal injury.
5 Avoid installing this unit in a location where foreign objects
may fall onto this unit or where this unit may be exposed to
liquid dripping or splashing. On the top of this unit, do not
place:
– Other components, as they may cause damage and/or
discoloration on the surface of this unit.
– Burning objects (i.e., candles), as they may cause fire,
damage to this unit, and/or personal injury.
– Containers with liquid in them, as they may fall, spilling
the liquid and causing an electrical shock to the user and/
or damage to this unit.
6 Do not cover this unit with a newspaper, tablecloth, curtain,
etc. in order not to obstruct heat radiation. If the temperature
inside this unit rises, it may cause fire, damage to this unit,
and/or personal injury.
7 Do not plug in this unit to a wall outlet until all connections
are complete.
8 Do not operate this unit upside-down. It may overheat,
possibly causing damage.
9 Do not use excessive force on switches, knobs and/or cords.
10 When disconnecting the power cord from the wall outlet,
grasp the plug; do not pull the cord.
11 Do not clean this unit with chemical solvents; this might
damage the finish. Use a clean, dry cloth.
12 Use only the voltage specified on this unit. Using this unit
with a higher voltage than specified is dangerous and may
cause fire, damage to this unit, and/or personal injury.
YAMAHA will not be held responsible for any damage
resulting from use of this unit with a voltage other than as
specified.
13 To prevent damage by lightning, keep the power cord out and
outdoor antennas disconnected from a wall outlet or the unit
during a lightning storm.
14 Do not attempt to modify or fix this unit. Contact qualified
YAMAHA service personnel when any service is needed. The
cabinet should never be opened for any reason.
15
When not planning to use this unit for long periods of time (i.e.,
vacation), disconnect the AC power plug from the wall outlet.
16 Be sure to read the “TROUBLESHOOTING” section on
common operating errors before concluding that this unit is
faulty.
17 Before moving this unit, press STANDBY/ON to set the unit
in standby mode, then disconnect the AC power plug from the
wall outlet.
18 Condensation will form when the surrounding temperature
changes suddenly. Disconnect the power cable from the
outlet, then leave the unit alone.
19 When using the unit for a long time, the unit may become
warm. Turn the power off, then leave the unit alone for
cooling.
20 Install this unit near the AC outlet and where the AC power
plug can be reached easily.
■ For U.K. customers
If the socket outlets in the home are not suitable for the
plug supplied with this appliance, it should be cut off and
an appropriate 3 pin plug fitted. For details, refer to the
instructions described below.
The plug severed from the mains lead must be destroyed, as a
plug with bared flexible cord is hazardous if engaged in a live
socket outlet.
■ Special Instructions for U.K. Model
CAUTION: READ THIS BEFORE OPERATING YOUR UNIT.
This unit is not disconnected from the AC power
source as long as it is connected to the wall outlet,
even if this unit itself is turned off. This state is called
the standby mode. In this state, this unit is designed to
consume a very small quantity of power.
Laser component in this product is capable of emitting
radiation exceeding the limit for Class 1.
WARNING
TO REDUCE THE RISK OF FIRE OR ELECTRIC
SHOCK, DO NOT EXPOSE THIS UNIT TO RAIN
OR MOISTURE.
CAUTION
Danger of explosion if battery is incorrectly replaced.
Replace only with the same or equivalent type.
Note
IMPORTANT
THE WIRES IN MAINS LEAD ARE COLOURED IN
ACCORDANCE WITH THE FOLLOWING CODE:
Blue: NEUTRAL
Brown: LIVE
As the colours of the wires in the mains lead of this
apparatus may not correspond with the coloured
markings identifying the terminals in your plug,
proceed as follows:
The wire which is coloured BLUE must be connected
to the terminal which is marked with the letter N or
coloured BLACK. The wire which is coloured
BROWN must be connected to the terminal which is
marked with the letter L or coloured RED.
Making sure that neither core is connected to the earth
terminal of the three pin plug.

CAUTION: READ THIS BEFORE OPERATING YOUR UNIT.
ii
English
¶ The name plate is located on the bottom of the unit.
¶ La plaquette signalétique est placée sur le panneau de
fond de l’appareil.
¶ Das Typenschild ist an der Unterseite des Gerätes
angeordnet.
¶ Namnplåten sitter på apparatens undersida.
¶ La targhetta del nome del modello si trova sul fondo
dell’unità.
¶ La placa de características está en la parte inferior de la
unidad.
¶ Het typeplaatje kunt u vinden aan de onderkant van het
toestel.
¶ Çàâîäñêàÿ òàáëè÷êà ðàñïîëîæåíà íà íèæíåé ñòîðîíå
àïïàðàòà.
LASER SAFETY
This unit employs a laser. Due to possible eye injury,
only a qualified service person should remove the
cover or attempt to service this device.
DANGER
This unit emits visible laser radiation when open.
Avoid direct eye exposure to beam. When this unit is
plugged into a wall outlet, do not place your eyes close
to the opening of the disc tray and other openings or
look inside.
LASER
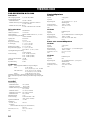
Type Semiconductor laser GaAlAs
Wave length 650 nm (DVD)
784 nm (VCD/CD)
Output Power 7 mW (DVD/VCD/CD)
Beam divergence 60 degrees
CAUTION
Use of controls or adjustments or performance of
procedures other than those specified herein may result
in hazardous radiation exposure.
INVISIBLE LASER RADIATION WHEN OPEN
DO NOT STARE INTO BEAM
CAUTION:
INVISIBLE LASER RADIATION WHEN OPEN
AVOID DIRECT EXPOSURE TO THE BEAM
DANGER:
SÉCURITÉ LASER
L'appareil utilise un laser. En raison des risques de
blessure des yeux, le retrait du couvercle ou les
réparations de l'appareil devront être confiés
exclusivement à un technicien d'entretien qualifié.
DANGER
Risque d'exposition au laser en cas d'ouverture. Eviter
toute exposition au faisceau. Lorsque cet appareil est
branché à la prise de courant, ne pas approcher les
yeux de l'ouverture du plateau changeur et des autres
ouvertures pour regarder à l'intérieur.
LASER
Type Laser à semi-conducteur
GaAIAs
Longueur d’onde 650 nm (DVD)
784 nm (VCD/CD)
Puissance de sortie 7 mW (DVD/VCD/CD)
Divergence de faisceau 60 degrés
AVERTISSEMENT
L’utilisation de commandes et l’emploi de réglages ou
de méthodes autres que ceux décrits ci-dessous,
peuvent entraîner une exposition à un rayonnement
dangereux.
VORSICHT MIT DEM LASER
Dieses Gerät enthält einen Laser. Um unnötige
Augenverletzungen zu vermeiden, sollten Sie alle
Wartungs- und Reparaturarbeiten einem qualifiziertem
Wartungstechniker überlassen.
GEFAHR
Sichtbare Laserstrahlen bei geöffneter Abdeckung.
Achten Sie darauf, nicht direkt in den Laserstrahl zu
blicken. Wenn das Gerät an die Wandsteckdose
angeschlossen ist, halten Sie die Augen von der
Öffnung des Disc-Fachs und der Öffnungen fern, und
blicken Sie in diesem Fall nicht in das Innere des
Gerätes
.
LASER
Typ Halbleiter-GaAlAs-Laser
Wellenlänge 650 nm (DVD)
784 nm (VCD/CD)
Ausgangsleistung 7 mW (DVD/VCD/CD)
Strahlstreuung 60 Grad
VORSICHT
Die Verwendung von Bedienelementen oder die
Einstellung bzw. die Ausführung von anderen als in
dieser Anleitung beschriebenen Vorgängen kann zu
Gefährdung durch gefährliche Strahlung führen.

CAUTION: READ THIS BEFORE OPERATING YOUR UNIT.
iii
LASERSÄKERHET
Apparaten använder sig av en laser. På grund av risken
för ögonskador bör ingen annan än en kvalificerad
reparatör öppna höljet eller försöka reparera apparaten.
FARA
Apparaten avger slig laserstrålning i öppet läge.
Undvik direkt ögonkontakt med strålen. Placera inte
ögonen nära öppningen till skivfacket eller någon
annan öppning och titta inte in i apparaten, medan
apparaten är ansluten till ett nätuttag.
LASER
Typ Halvledarlaser GaAlAs
Våglängd 650 nm (DVD)
784 nm (VCD/CD)
Uteffekt 7 mW (DVD/VCD/CD)
Stråldivergens 60 grader
OBSERVERA
Användning av reglage eller justeringar eller utförande
av åtgärder på annat sätt än så som beskrivs häri kan
resultera i farlig strålning.
SICUREZZA DEL LASER
Quest'unità impiega un laser. Poiché è possibile
causare lesioni agli occhi, solo personale qualificato di
assistenza tecnica deve aprire la copertura o cercare di
riparare questo dispositivo.
PERICOLO
Radiazioni laser visibili quando aperto. Evitare
l'esposizione diretta al raggio laser Quando quest'unità
è collegata ad una presa a muro, non avvicinare gli
occhi all'apertura del cassetto del disco o ad altre
aperture per guardare all'interno.
LASER
Tipo
Laser a semiconduttori al GaAlAs
Lunghezza d'onda 650 nm (DVD)
784 nm (VCD/CD)
Potenza d'uscita 7 mW (DVD/VCD/CD)
Divergenza raggi 60 gradi
ATTENZIONE
L’uso di controlli, regolazioni, operazioni o procedure non
specificati in questo manuale possono risultare in esposizione
a radiazioni pericolose.
SEGURIDAD CONTRA LA RADIACIÓN LÁSER
Esta unidad utiliza rayos láser. Debido a la posibilidad
de que se produzcan daños en los ojos, la extracción de
la cubierta de la unidad o las reparaciones solamente
deberán ser realizadas por un técnico cualificado.
PELIGRO
Esta unidad emite radiación láser visible cuando se
abre. Evite la exposición directa a los rayos láser.
Cuando esta unidad esté enchufada a una toma de
corriente, no ponga sus ojos cerca de la abertura de la
bandeja del disco ni otras aberturas para mirar al
interior.
LÁSER
Tipo Láser de semiconductor
GaA1As
Longitud de onda 650 nm (DVD)
784 nm (VCD/CD)
Potencia de salida 7 mW (DVD/VCD/CD)
Divergencia del rayo láser 60 grados
PRECAUCIÓN
El uso de los controles, los ajustes o los
procedimientos que no se especifican enste manual
pueden causar una exposición peligrosa a la radiación.
VEILIGHEIDSINFORMATIE BETREFFENDE DE
LASER
Dit apparaat is voorzien van een laser. Om oogletsel te
voorkomen, mag u het verwijderen van de afdekking en
het uitvoeren van reparaties aan deze inrichting uitsluitend
door een bevoegde servicemonteur laten uitvoeren.
GEVAAR
Zichtbare laserstraling indien geopend. Voorkom
rechtstreekse blootstelling aan de laserstraal.
Als dit toestel is aangesloten op een stopcontact, houdt
u uw ogen niet dicht bij de opening van de disclade en
andere openingen om naar binnen te kijken.
LASER
Type GaAlAs Halfgeleiderlaser
Golflengte 650 nm (DVD)
784 nm (VCD/CD)
Uitgangsvermogen 7 mW (DVD/VCD/CD)
Uitwijking straal 60 graden
LET OP
Gebruik van bedieningsorganen, instellingen of
procedures anders dan beschreven in dit document kan
leiden tot blootstelling aan gevaarlijke stralen.
БЕЗОПАСНОЕ ИСПОЛЬЗОВАНИЕ ЛАЗЕРА
Äàííîå óñòðîéñòâî ñîäåðæèò ëàçåð. Èç-çà îïàñíîñòè òðàâìû ãëàç, ñíèìàòü
êðûøêó èëè îáñëóæèâàòü äàííîå óñòðîéñòâî äîëæåí òîëüêî
ñåðòèôèöèðîâàííûé îáñëóæèâàþùèé ïåðñîíàë.
ОПАСНОСТЬ
Äàííîå óñòðîéñòâî â îòêðûòîì ñîñòîÿíèè èçëó÷àåò âèäèìûå
ëàçåðíûå ëó÷è. Íå äîïóñêàéòå íåïîñðåäñòâåííîãî âîçäåéñòâèÿ
ëàçåðíûõ ëó÷åé íà ãëàçà. Êîãäà äàííîå óñòðîéñòâî ïîäêëþ÷åíî ê
ðîçåòêå, íå ïðèáëèæàéòå ãëàçà ê îòâåðñòèþ ëîòêà äèñêà è äðóãèì
îòâåðñòèÿì, è íå ñìîòðèòå âíóòðü àïïàðàòà.
ЛАЗЕР
Òèï
Ïîëóïðîâîäíèêîâûé ëàçåð GaAlAs
Äëèíà âîëíû 650 nm (DVD)
784 nm (VCD/CD)
Âûõîäíîå íàïðÿæåíèå
7 mW (DVD/VCD/CD)
Îòêëîíåíèå ëó÷à 60 ãðàäóñîâ
ПРЕДОСТЕРЕЖЕНИЕ
Èñïîëüçîâàíèå îðãàíîâ óïðàâëåíèÿ èëè ïðîèçâåäåíèå íàñòðîåê èëè
âûïîëíåíèå ïðîöåäóð, íå óêàçàííûõ â äàííîé èíñòðóêöèè, ìîæåò
îòðàçèòüñÿ íà âûäåëåíèè îïàñíîé ðàäèàöèè.

1
1
2
3
4
5
6
English
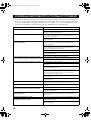
INTRODUCTION ......................................... 2
Supplied accessories........................................ 5
FUNCTIONAL OVERVIEW ......................... 6
Top and front panels (DVR-S300).................. 6
Rear panel (DVR-S300).................................. 7
Rear panel (NX-SW300)................................. 8
Rear panel (NX-SW301)................................. 8
Remote control (For DVR-S300).................... 9
CONNECTIONS ........................................ 11
Roles and layout of the speakers................... 11
Placing the center speaker............................. 12
Placing the front/surround speakers.............. 13
Placing the subwoofer................................... 13
SYSTEM CONNECTIONS........................ 14
Connecting the speakers (DVX-S301).......... 14
Connecting the speakers (DVX-S302).......... 15
Connecting the speakers (DVX-S303).......... 16
Connecting the speaker cables ...................... 17
Connecting the subwoofer............................. 17
Connecting the DVD receiver and the
subwoofer .................................................. 18
OTHER CONNECTIONS........................... 19
Connecting a TV ........................................... 19
Connecting the FM/AM antennas................. 20
Connecting external AV components ........... 21
Connecting digital audio components........... 22
GETTING STARTED................................. 23
Inserting batteries into the remote control .... 23
Using the remote control............................... 23
Setting a TV .................................................. 24
Setting language preferences......................... 26
Setting speaker channels ............................... 27
DISC OPERATION ................................... 28
Playing discs.................................................. 28
Basic playback controls................................. 28
Selecting various repeat shuffle functions..... 29
Shuffle ........................................................... 29
Other operations for video playback
(DVD/VCD/SVCD)................................... 30
Playing MP3/JPEG/DivX® discs.................. 33
Playing Super Audio CDs ............................. 34
Special features for picture disc playback..... 35
DVD SETUP MENU OPTIONS................. 36
General setup menu ....................................... 36
Audio setup menu.......................................... 38
Video setup menu.......................................... 39
Preference setup menu................................... 41
TUNER OPERATIONS ............................. 44
Tuning radio stations ..................................... 44
Presetting radio stations................................. 44
SOUND CONTROLS ................................ 46
Selecting surround sound .............................. 46
Selecting digital sound effects....................... 46
Adjusting the treble/bass level....................... 46
Adjusting the volume level............................ 47
Night listening mode ..................................... 47
Switching to active mode .............................. 47
Switching to standby mode ........................... 47
OTHER FUNCTIONS................................ 48
Setting remote control codes ......................... 48
Controlling other components....................... 48
Dimming the display screen .......................... 49
Setting the sleep timer ................................... 49
Recording on an external AV component ..... 49
TROUBLESHOOTING.............................. 50
GLOSSARY .............................................. 52
SPECIFICATIONS .................................... 54
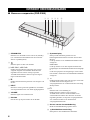
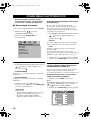
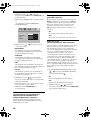
CONTENTS
1.INTRODUCTION
2.PREPARATION
3.BASIC OPERATION
4.OPERATIONS
5.ON-SCREEN MENU
6.OTHER FEATURES

INTRODUCTION
2
Thank you for purchasing this unit. This Owner’s Manual
explains the basic operation of this unit.
Notes about discs
– This receiver is designed for use with the following
discs: Super Audio CD (Super Audio CD), DVD-
Video, Video CD, Super Video CD, Audio CD, CD-
R, CD-RW, DVD-Audio, DVD+RW, DVD+R,
DVD-R, DVD-RW and DVD-RW (VR format).
This receiver can play:
– MP3 and picture (Kodak, JPEG) files recorded on
CD-R(W).
– JPEG/ISO 9660 format
– Maximum 30 character display
–DivX
®
disc on CD-R[W]/DVD+R[W]/
DVD-R[W](3.11, 4.x and 5.x)
– CD-R, CD-RW and DVD-RW (VR format) cannot
be played unless finalized.
– Some discs cannot be played depending on the
recording conditions, such as the PC environment
and application software. The characteristics and
condition of some discs; materials, scratches,
curvature, etc, may result in playback failure.
– Be sure to use only CD-R and CD-RW discs made
by reliable manufacturers.
– Do not use any non-standard shaped discs (heart-
shaped, etc.).
– Do not use discs with tape, seals, or paste on their
surface. Doing so may damage this receiver.
– Do not use discs affixed with labels printed by a
commercially available label printer.
Cleaning discs
– When a disc becomes dirty, clean it with a cleaning
cloth. Wipe the disc from the center out. Do not
wipe in a circlar motion.
– Do not use solvents such as benzine, thinner,
commercially available cleaners, or antistatic spray
intended for analog records.
Avoid high temperatures, moisture, water
and dust
– Do not expose the system, batteries or discs to
humidity, rain, sand or excessive heat (caused by
heating equipment or direct sunlight). Always keep
the disc tray closed to avoid getting dust on the lens.
Avoid condensation problem
– The lens may cloud over when the receiver is
suddenly moved from cold to warm surroundings,
making it impossible to play a disc. Leave the
receiver in the warm environment until the moisture
evaporates.
Disc care
– Write only on the printed side of a CD-R/
CD-RW and only with a soft felt-tipped pen.
– Handle the disc by its edge; do not touch the
surface.
Cabinet care
– Use a soft cloth slightly moistened with a mild
detergent solution. Do not use a solution containing
alcohol, spirits, ammonia, or abrasives.
Choosing a suitable location
– Place the receiver on a flat, hard, and stable surface.
INTRODUCTION
Notes

3
INTRODUCTION
English
INTRODUCTION
1
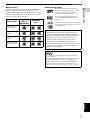
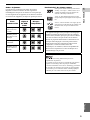
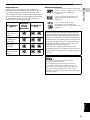
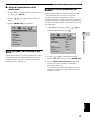
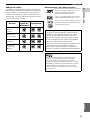
Region codes
The unit is designed to support the Region Management
System. Check the region code number on the disc
package. If the number does not match the unit’s region
number (see the table below or the back of the unit), the
unit may be unable to play the disc.
Sound field features
Manufactured under license from Dolby
Laboratories. “Dolby”, “Pro Logic”, “MLP
Lossless” and the double-D symbol are
trademarks of Dolby Laboratories.
“DTS” and “DTS Digital Surround” are
registered trademarks of Digital Theater
Systems, Inc.
“DivX”, “DivX Certified”, and associated logos
are trademarks of DivXNetworks, Inc and are
used under license.
Destination
Region
code of
DVR-S300
Playable
discs
U.S.A. and
Canada models
U.K. and Europe
models
Australia
model
Korea, Asia and
Taiwan models
1 1
ALL
2 2
ALL
4 4
ALL
3 3
ALL
This product incorporates copyright protection
technology that is protected by method claims of
certain U.S. patents and other intellectual property
rights owned by Macrovision Corporation and other
rights owners. Use of this copyright protection
technology must be authorized by Macrovision
Corporation, and is intended for home and other
limited viewing uses only unless otherwise authorized
by Macrovision Corporation. Reverse engineering or
disassembly is prohibited.
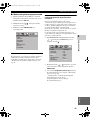
Active Servo Processing Subwoofer System with built-in
power amplifier.
This subwoofer system (NX-SW300, NX-SW301) employes
Advanced YAMAHA Active Servo Technology which
YAMAHA has developed for reproducing higher quality
super-bass sound. This super-bass sound adds a more
realistic, theater-in-the-home effect to your stereo syetem.

4
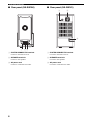
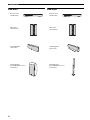
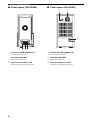
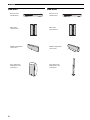
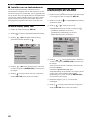
INTRODUCTION
DVX-S301 DVX-S302
DVD receiver
(DVR-S300)
Subwoofer
(NX-SW301)
Center speaker
(NX-C301)
Front/Surround
speakers (x4)
(NX-S301)
DVD receiver
(DVR-S300)
Subwoofer
(NX-SW301)
Center speaker
(NX-C302)
Front/Surround
speakers (x4)
(NX-S302)

5
INTRODUCTION
English
INTRODUCTION
1
DVX-S303
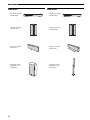
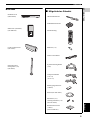
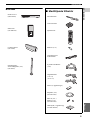
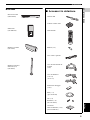
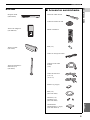
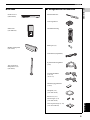
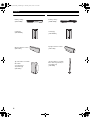
■ Supplied accessories
DVD receiver
(DVR-S300)
Subwoofer
(NX-SW300)
Center speaker
(NX-C302)
Front/Surround
speakers (x 4)
(NX-S302)
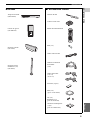
TV VOL TV CH
EFFECT SURR
VOL
TRE
MENU
SET UP
PRESET
SUBTITLE AUDIO ANGLE ZOOM
TV AUX TUNER DVD/CD
TV
INPUT
MUTE
BASS
ENTER
TOP MENU/RETURN
ON SCREEN
PROG
REPEAT A - B
SHUFFLE
SCAN
PAGE
DIMMER
POWER
POWER
SLEEP
NIGHT
TV
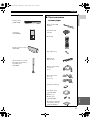
System control cable
(4 m )
FM wire antenna
Video pin cable
Remote control
AM loop antenna
Speaker cables
(5 m x 3)
(15 m x 2)
Fasteners (2 sets)
Batteries (x 2)
Base(x 4)
(For NX-S302)
Screws (x 8)
Washers (x 8)
(For NX-S302)
Non-skid pad (1 set)
(For NX-SW301)

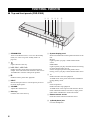
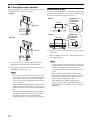
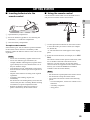
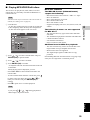
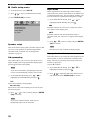
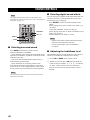
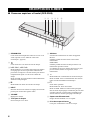
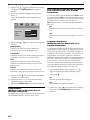
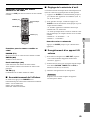
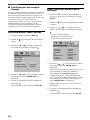
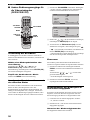
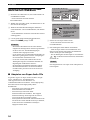
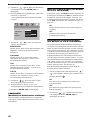
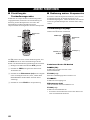
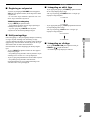
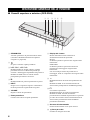
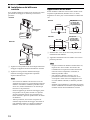
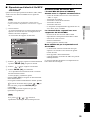
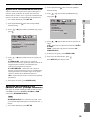
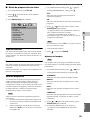
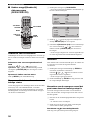
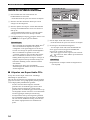
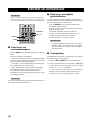
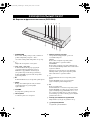
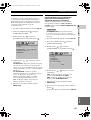
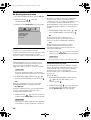
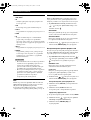
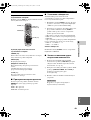
FUNCTIONAL OVERVIEW
6
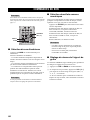
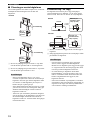
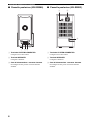
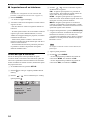
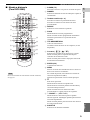
■ Top and front panels (DVR-S300)
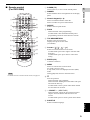
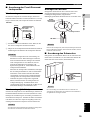
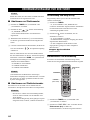
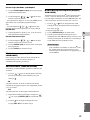
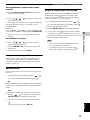
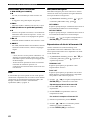
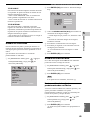
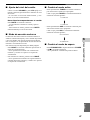
1 STANDBY/ON
Turns on the DVD receiver, or sets it to the standby
mode (see “Auto eco power standby mode” on
page 28).
2
Opens/closes the disc tray.
3 b / a , w / f
DVD/CD mode: selects the previous/next track or
chapter. Press and hold to fast forward or fast reverse.
TUNER mode: tunes the radio preset up/down.
4 e
DVD/CD mode: pauses disc playback.
5 INPUT
Selects and input source or sets the priority level for
the audio input signals.
6 VOLUME
Adjusts the volume level.
7 Disc tray
Load the disc in the disc tray.
8 System display panel
Shows information about the operational status of the
unit.
MULTI
Lights up when you play a multi-channel audio
source.
DOWNMIX
Lights up when you play discs that allow down mixing
of multi-channel audio sources.
It does not light up for discs that prohibit down
mixing, even if you play a multi-channel audio source.
9 h
DVD/CD mode: starts disc playback.
TUNER mode: starts preset radio station installation
in Plug & Play mode.
0 s
Exits an operation.
DVD/CD mode: stops playback.
TUNER mode: erases a preset radio station in Preset
mode if held more than two seconds, or stops preset
radio station installation in Auto Preset mode.
A Remote control sensor
Point the remote control towards this sensor.
B Head phone jack
Connects headphones.
FUNCTIONAL OVERVIEW
654321
B
A
0
9
8
7

FUNCTIONAL OVERVIEW
7
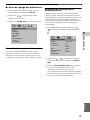
INTRODUCTION
1
English
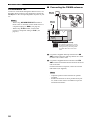
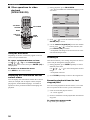
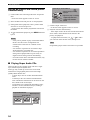
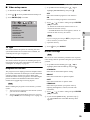
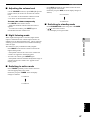
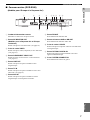
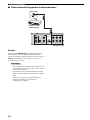
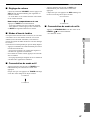
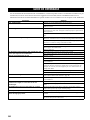
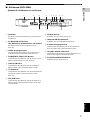
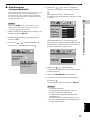
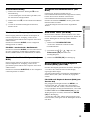
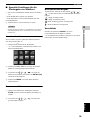
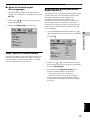
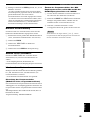
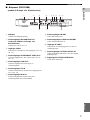
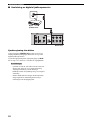
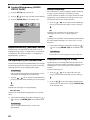
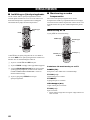
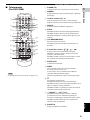
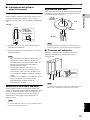
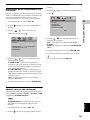
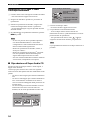
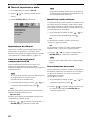
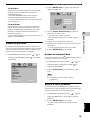
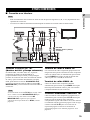
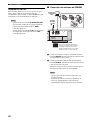
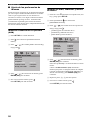
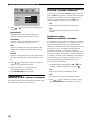
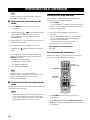
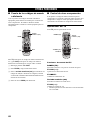
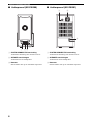
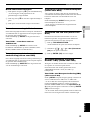
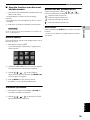
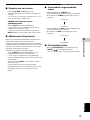
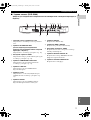
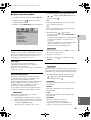
■ Rear panel (DVR-S300)
(U.K. and Europe models)
1 AC power cord
Connect to a standard AC outlet.
2 AV MONITOR OUT terminal
(U.K. and Europe models only)
Connect to your TV (see page 19).
3 VIDEO output terminal
Connect to the video (composite) jack on your TV
(see page 19).
4 COMPONENT VIDEO OUT terminal
Connect the the Y P
B/CB PR/CR jacks on your TV (see
page 19).
5 LINE OUT terminal
Connect to the AUDIO IN jacks on your VCR.
6 TV IN terminal
Connect to the corresponding AUDIO OUT jacks on
your TV (see page 19).
7 AUX IN terminal
Connect to the AUDIO OUT jacks on your VCR or
cassette deck.
8 FM ANT terminal
Connect the FM antenna.
9 GND and AM ANT terminals
Connect the AM loop antenna.
0 S VIDEO output terminal
Connect to the S-video jack on your TV or VCR.
A OPTICAL DIGITAL IN terminal
Connect to the DIGITAL OUT jack on your digital
audio component.
B SYSTEM CONNECTOR terminal
Connect the subwoofer.
SYSTEM
CONNECTOR
AUX INTV INLINE OUT
S VIDEO
AV MONITOR OUT
(DVD ONLY)
VIDEO
OPTICAL
COMPONENT
Y
P
R PB
PCM/DTS
q
DIGITAL
DIGITAL INVIDEO OUT (DVD ONLY)
FM
ANT
AM
ANT
GND
TO SUBWOOFER
75Ω UNBAL
L
R
9821 4 5 6 73
B0A

FUNCTIONAL OVERVIEW
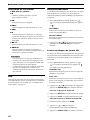
8
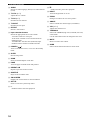
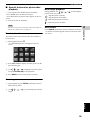
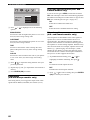
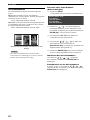
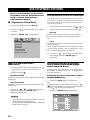
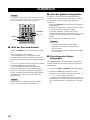
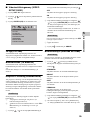
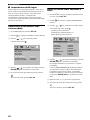
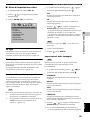
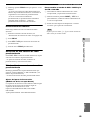
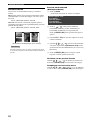
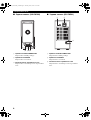
■ Rear panel (NX-SW300)
1 SYSTEM CONNECTOR terminal
Connect to the DVD receiver.
2 SPEAKER terminals
Connect to the speakers.
3 AC power cord
Connect to a standard AC outlet.
■ Rear panel (NX-SW301)
1 SYSTEM CONNECTOR terminal
Connect to the DVD receiver.
2 SPEAKER terminals
Connect to the speakers.
3 AC power cord
Connect to a standard AC outlet.
1 23
12
3

FUNCTIONAL OVERVIEW
9
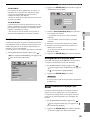
INTRODUCTION
1
English
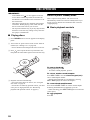
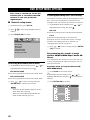
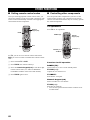
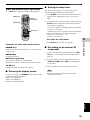
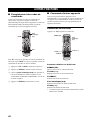
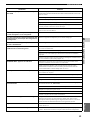
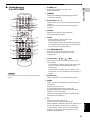
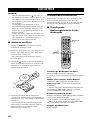
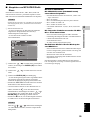
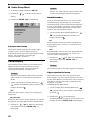
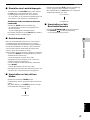
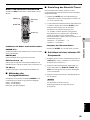
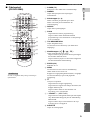
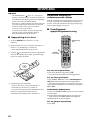
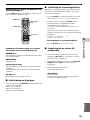
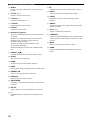
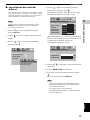
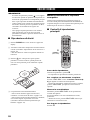
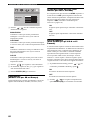
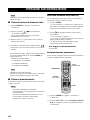
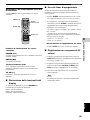
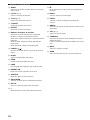
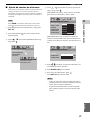
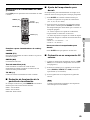
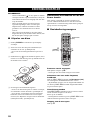
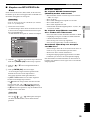
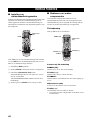
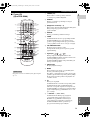
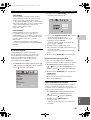
■ Remote control
(For DVR-S300)
For details on how to use the remote control, see page 23.
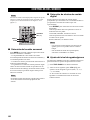
1 POWER (TV)
Turns on the TV, or sets it to the standby mode.
2 DIMMER
Selects different levels of brightness for the display
panel.
3 Numeric keypad (0 – 9)
Enters a track/title number of the disc.
Enters a number of a preset radio station.
4 REPEAT
Selects various repeat modes.
5 PROG
DVD/CD mode: starts programming.
TUNER mode: starts automatic/manual preset
programming if held for more than two seconds.
6 TOP MENU/RETURN
Returns to the previous menu.
Displays the top-level disc menu
(if available).
7 Cursors ( / / / )
Selects movement direction in the menu.
TUNER mode: press left or right to tune the radio
frequency.
TUNER mode: press up or down to select auto
tuning.
8 ENTER (OK)
Confirms a selection.
9 MENU
Enters or exits the disc contents menu.
For VCD version 2.0 only:
In stop mode, turns on/off playback control (PBC)
mode.
During playback, returns to the main menu.
0 s
Exits an operation.
DVD/CD mode: stops playback.
DVD/CD mode: holding down the button will open
and close the disc tray.
TUNER mode: erases a preset radio station if held
for more than two seconds.
A d PRESET u ( b / a )
DVD/CD mode: selects the previous/next track or
chapter. Press and hold to fast forward or fast
reverse.
TUNER mode: press to select a preset radio station.
B SUBTITLE
Selects a subtitle language.
Note
TV VOL TV CH
EFFECT SURR
VOL
TRE
MENU
SET UP
PRESET
SUBTITLE AUDIO ANGLE ZOOM
TV AUX TUNER DVD/CD
TV
INPUT
MUTE
BASS
ENTER
TOP MENU/RETURN
ON SCREEN
PROG
REPEAT A - B
SHUFFLE
SCAN
PAG E
DIMMER
POWER
POWER
SLEEP
NIGHT
TV
P
Q
R
S
t
U
V
W
X
Y
7
8
9
0
A
B
C
D
E
F
G
H
1
2
3
4
5
6
I
J
K
L
N
O
M

FUNCTIONAL OVERVIEW
10
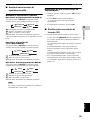
C AUDIO
Selects an audio language (DVD) or an audio channel
(VCD).
D TV VOL (+ / –)
Adjusts the TV volume.
E TV CH (+ / –)
Switches the TV channel.
F TV INPUT
Switches the TV input.
G EFFECT
Selects a sound effect.
H Input selection buttons
Selects the appropriate active source mode.
TV mode: switches to TV input.
AUX mode: switches to AUX ANALOG/AUX
DIGITAL input.
TUNER mode: switches tuner (FM/AM) input.
DVD/CD mode: switches to DVD/CD mode.
I POWER ( )
Turns on the DVD receiver, or sets it to the standby
mode.
J SLEEP
Sets the sleep timer.
K SCAN
Scans each track/chapter on the disc.
L PAGE
Turns the pages of DVD-Audio still pictures.
M REPEAT A-B
Repeats a specific section on a disc.
N SHUFFLE
Plays tracks in random order.
O ON SCREEN
Displays the current status or disc information.
P SET UP
Enters or exits the system setup menu.
Q h
DVD/CD mode: starts disc playback.
R e
DVD/CD mode: pauses disc playback.
S NIGHT
Turns the Night mode on or off.
T ZOOM
Enlarges or reduces the TV screen picture.
U ANGLE
Selects a DVD disc camera angle (if available).
V VOL (+ / –)
Adjusts the volume level.
W TRE/BASS
Selects the TREBLE (high tone) or BASS (low tone)
sound mode.
Use the VOLUME control to change the tone level.
X MUTE
Mutes or restores the volume.
Y SURR
Selects multi-channel surround or stereo mode.

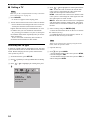
CONNECTIONS
11
English
PREPARATION
2
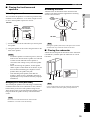
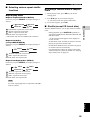
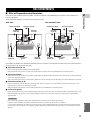
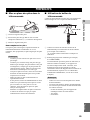
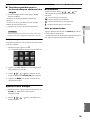
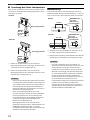
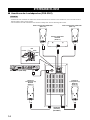
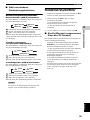
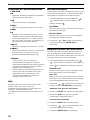
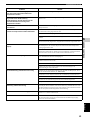
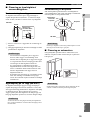
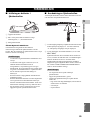
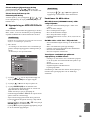
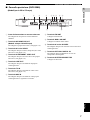
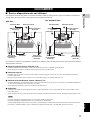
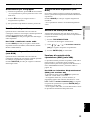
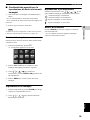
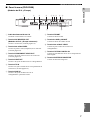
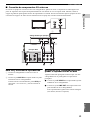
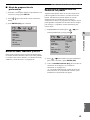
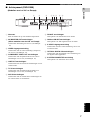
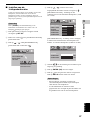
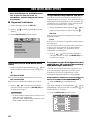
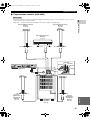
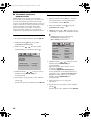
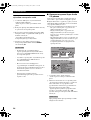
■ Roles and layout of the speakers
To enjoy quality sounds you need to place the speakers in their appropriate positions and install them correctly.
The following show the recommended layout of the speakers.
For the best possible surround sound, all of the speakers (except the subwoofer) should be placed at the same distance
from the listening position.
1 Front Speakers (L, R)
Place the front left/right speakers on both sides of your TV at equal distances.
Main roles: Produces front channel (stereo) sounds and effect sounds.
2 Center Speaker
Place on top of the TV or inside the TV rack so that the speaker and TV are aligned vertically.
Main role: Produces sounds oriented toward the center of the screen such as dialogues or vocal sounds.
3 Surround Speakers (L, R)
Place the surround left/right speakers behind the listening position. (For NX-S301, we recommend placing them at a height of 1.8 m
(6 feet) and pointing them at the listening position.)
Main roles: Produces surround sounds and effect sounds.
4 Subwoofer
Place the subwoofer near a front speaker and turn it slightly toward the center of the room to reduce wall reflections.
Main roles: Produces bass sounds and low frequency (LFE) sounds contained in Dolby Digital or DTS.
To avoid magnetic interference, do not position the front speakers too close to your TV.
Allow adequate ventilation around the DVD receiver and subwoofer.
Bass sounds produced by the subwoofer may be heard differently depending on the listening position and subwoofer location.
To enjoy desired sounds, try to change the location of the subwoofer according to the listening position.
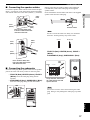
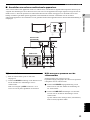
CONNECTIONS
1
1
2
3
4
3
+
–
+
–
DVD receiver
Center speaker
Front
speaker (R)
Surround
speaker (L)
Subwoofer
Surround
speaker (R)
Front
speaker (L)
DVX-S301
1
1
2
4
3
3
DVD receiver Center speaker
Front
speaker (R)
Subwoofer
Front
speaker (L)
Surround
speaker (R)
Surround
speaker (L)
DVX-S302/DVX-S303
Note

CONNECTIONS
12
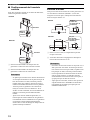
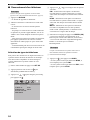
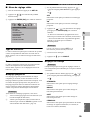
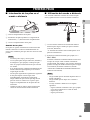
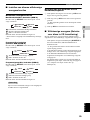
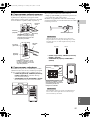
■ Placing the center speaker
When placing the center speaker on top of the TV, use the
supplied fasteners to secure the speaker.
1 Peel off the seals on one side of the fasteners and
attach them to the bottom of the center speaker.
2 Peel off the seals on the other side of the fasteners and
attach them to the top of the TV.
– Do not place the speaker on the TV if the top of the
TV is uneven or narrower than the bottom surface
of the speaker. Doing so may cause the speaker to
fall. In this case, place the speaker inside a TV rack
or on a level floor.
– Before attaching the fasteners to the TV, clean the
surface with a dry cloth. A dirty or wet surface may
weaken the adhesive force and cause the speaker to
fall.
– Do not touch the bonding surfaces of the fasteners
after peeling off the seals. Doing so may weaken
the adhensive force and cause the speaker to
fall.this installation. Use metric screw threads only.
Attaching to a wall
You can attach the speakers to a wall using commercially
available screws (Diameter: 3.5 to 4 mm, Length: 25 mm
or more). Each speaker requires two screws.
1 Install two screws in the wall where you want to place
the speaker.
2 Hang the speaker on the screws using the holes in the
back of the speaker.
– To attach a speaker to a wall using screws, the wall
must be firm. Do not attach a speaker to a wall that
is made of weak materials such as plaster or
veneered woods. Doing so may cause the speaker
to fall.
– When connectiong the speakers, fix the speaker
cables in place so that cables do not loosen. If your
foot or hand accidentally gets caught on a loose
speaker cable, the speaker may fall.
– After attaching each speaker, check that the
speaker is fixed securely. YAMAHA will bear no
reponsibility for any accidents caused by improper
installations.
Notes
Fastener
Peel off
the seal
NX-C301
Fastener
Peel off
the seal
NX-C302
Notes
+
–
5 mm
Screws (3.5
to 4 mm dia.,
commercially
available)
20 mm or more
110 mm
NX-C301
+
–
5 mm
Screws (3.5
to 4 mm dia.,
commercially
available)
20 mm or more
151 mm
NX-C302

CONNECTIONS
13
English
PREPARATION
2
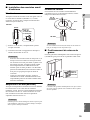
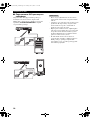
■ Placing the front/surround
speakers
Attaching to a wall
You can attach the speakers to a wall using commercially
available screws (Diameter: 3.5 to 4 mm, Length: 25 mm
or more). Each speaker requires two screws.
1 Install two screws in the wall where you want to place
the speaker.
2 Hang the speaker on the screws using the holes in the
back of the speaker.
– To attach a speaker to a wall using screws, the wall
must be firm. Do not attach a speaker to a wall that
is made of weak materials such as plaster or
veneered woods. Doing so may cause the speaker
to fall.
– When connectiong the speakers, fix the speaker
cables in place so that cables do not loosen. If your
foot or hand accidentally gets caught on a loose
speaker cable, the speaker may fall.
– After attaching each speaker, check that the
speaker is fixed securely. YAMAHA will bear no
reponsibility for any accidents caused by improper
installations.
Hanging on a wall (NX-S301)
You can hang the speakers on a wall using a commercially
available bracket and screws (Diameter: 6 mm). Attach a
bracket firmly to the rear of the speakers using screws.
Then mount a screw on the wall where the speaker is to be
hung and hook the speaker securely onto the mounted
screws.
Do not use screw threads neasured in inches for this
installation. Use metric screw threads only.
Attaching the base
Attach the base to the bottom of the front/surround
speakers (NX-S302) with the supplied base mounting
screws as shown below.
Placing the speakers (NX-S302) on the places such as hard
wooden floor may scratch the surface of the floor.
■ Placing the subwoofer
Attach the non-skid pads to the bottom of the subwoofer
(NX-SW301), and then place the subwoofer on a level
hard floor.
Using non-skid pads prevents the subwoofer from sliding
when it vibrates, and ensure quality sound production.
Notes
Note
+
–
5 mm
Screws (3.5
to 4 mm dia.,
commercially
available)
20 mm or more
40 mm
NX-S301
Note
Note
Base
mounting
screws
NX-S302
Base
Washer
Peel off
the seal

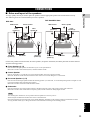
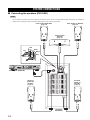
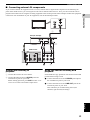
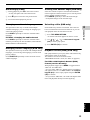
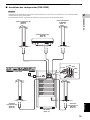
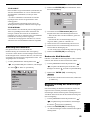
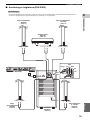
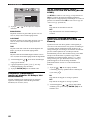
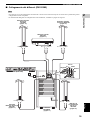
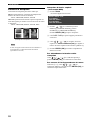
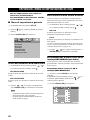
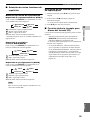
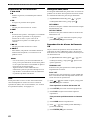
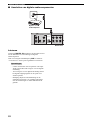
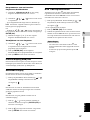
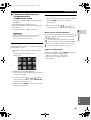
SYSTEM CONNECTIONS
14
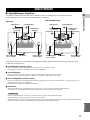
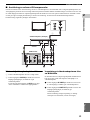
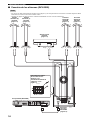
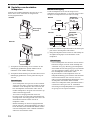
■ Connecting the speakers (DVX-S301)
– Do not connect the power cord of the subwoofer and DVD receiver into an AC outlet until all cable connections are completed.
– Please refer to the pages below for detailed information on how connect each speaker.
SYSTEM CONNECTIONS
Notes
SYSTEM
CONNECTOR
TO SUBWOOFER
L
R
+
–
+
–
+
–
+
–
+
–
Front speaker (R)NX-S301
(page 17)
Surround
speaker (R)
NX-S301
(page 17)
Center speaker
NX-C301
(page 17)
Subwoofer
(NX-SW301)
DVD receiver (DVR-S300)
Front speaker (L) NX-S301
(page 17)
Surround
speaker (L)
NX-S301
(page 17)
Tab
Red
Green
Tab
Gray
White
Blue

SYSTEM CONNECTIONS
15
English
PREPARATION
2
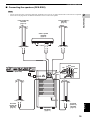
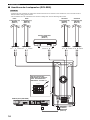
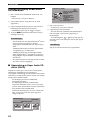
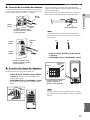
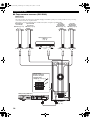
■ Connecting the speakers (DVX-S302)
– Do not connect the power cord of the subwoofer and DVD receiver into an AC outlet until all cable connections are completed.
– Please refer to the pages below for detailed information on how connect each speaker.
Notes
SYSTEM
CONNECTOR
TO SUBWOOFER
L
R
+
+
+
+
+
+
+
+
Front speaker (R)
NX-S302
(page 17)
Surround
speaker (R)
NX-S302
(page 17)
Center speaker
NX-C302
(page 17)
Subwoofer
NX-SW301
(page 17)
DVD receiver (DVR-S300)
Front speaker (L)
NX-S302
(page 17)
Surround
speaker (L)
NX-S302
(page 17)
Tab
Red
Green
Tab
Gray
White
Blue
Black
Red
Black
Red
Red
Red
Red
Black
Black
Black

SYSTEM CONNECTIONS
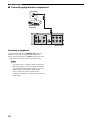
16
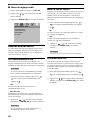
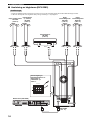
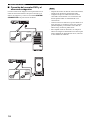
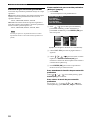
■ Connecting the speakers (DVX-S303)
– Do not connect the power cord of the subwoofer and DVD receiver into an AC outlet until all cable connections are completed.
– Please refer to the pages below for detailed information on how to connect each speaker.
Notes
FRONT
CENTE R
SURROUN D
SYSTEM
CONNECTOR
TO SUBWOOFER
L
R
FRONT
CENTER
SURROUND
SPEAKERS
+
+
+
+
+
+
+
+
Subwoofer
NX-SW300
(page 17)
DVD receiver (DVR-S300)
Front speaker
(R)
NX-S302
(page 17)
Front speaker
(L)
NX-S302
(page 17)
Center speaker
NX-C302
(page 17)
Surround
speaker (R)
NX-S302
(page 17)
Surround
speaker (R)
NX-S302
(page 17)
To remove the speaker
cable plugs, see
“Connecting the
subwoofer” on page 17.
Red
Black
Black
Black
Black
Black
Red
Red
Red
Red
Sayfa yükleniyor...
Sayfa yükleniyor...
Sayfa yükleniyor...
Sayfa yükleniyor...
Sayfa yükleniyor...
Sayfa yükleniyor...
Sayfa yükleniyor...
Sayfa yükleniyor...
Sayfa yükleniyor...
Sayfa yükleniyor...
Sayfa yükleniyor...
Sayfa yükleniyor...
Sayfa yükleniyor...
Sayfa yükleniyor...
Sayfa yükleniyor...
Sayfa yükleniyor...
Sayfa yükleniyor...
Sayfa yükleniyor...
Sayfa yükleniyor...
Sayfa yükleniyor...
Sayfa yükleniyor...
Sayfa yükleniyor...
Sayfa yükleniyor...
Sayfa yükleniyor...
Sayfa yükleniyor...
Sayfa yükleniyor...
Sayfa yükleniyor...
Sayfa yükleniyor...
Sayfa yükleniyor...
Sayfa yükleniyor...
Sayfa yükleniyor...
Sayfa yükleniyor...
Sayfa yükleniyor...
Sayfa yükleniyor...
Sayfa yükleniyor...
Sayfa yükleniyor...
Sayfa yükleniyor...
Sayfa yükleniyor...
Sayfa yükleniyor...
Sayfa yükleniyor...
Sayfa yükleniyor...
Sayfa yükleniyor...
Sayfa yükleniyor...
Sayfa yükleniyor...
Sayfa yükleniyor...
Sayfa yükleniyor...
Sayfa yükleniyor...
Sayfa yükleniyor...
Sayfa yükleniyor...
Sayfa yükleniyor...
Sayfa yükleniyor...
Sayfa yükleniyor...
Sayfa yükleniyor...
Sayfa yükleniyor...
Sayfa yükleniyor...
Sayfa yükleniyor...
Sayfa yükleniyor...
Sayfa yükleniyor...
Sayfa yükleniyor...
Sayfa yükleniyor...
Sayfa yükleniyor...
Sayfa yükleniyor...
Sayfa yükleniyor...
Sayfa yükleniyor...
Sayfa yükleniyor...
Sayfa yükleniyor...
Sayfa yükleniyor...
Sayfa yükleniyor...
Sayfa yükleniyor...
Sayfa yükleniyor...
Sayfa yükleniyor...
Sayfa yükleniyor...
Sayfa yükleniyor...
Sayfa yükleniyor...
Sayfa yükleniyor...
Sayfa yükleniyor...
Sayfa yükleniyor...
Sayfa yükleniyor...
Sayfa yükleniyor...
Sayfa yükleniyor...
Sayfa yükleniyor...
Sayfa yükleniyor...
Sayfa yükleniyor...
Sayfa yükleniyor...
Sayfa yükleniyor...
Sayfa yükleniyor...
Sayfa yükleniyor...
Sayfa yükleniyor...
Sayfa yükleniyor...
Sayfa yükleniyor...
Sayfa yükleniyor...
Sayfa yükleniyor...
Sayfa yükleniyor...
Sayfa yükleniyor...
Sayfa yükleniyor...
Sayfa yükleniyor...
Sayfa yükleniyor...
Sayfa yükleniyor...
Sayfa yükleniyor...
Sayfa yükleniyor...
Sayfa yükleniyor...
Sayfa yükleniyor...
Sayfa yükleniyor...
Sayfa yükleniyor...
Sayfa yükleniyor...
Sayfa yükleniyor...
Sayfa yükleniyor...
Sayfa yükleniyor...
Sayfa yükleniyor...
Sayfa yükleniyor...
Sayfa yükleniyor...
Sayfa yükleniyor...
Sayfa yükleniyor...
Sayfa yükleniyor...
Sayfa yükleniyor...
Sayfa yükleniyor...
Sayfa yükleniyor...
Sayfa yükleniyor...
Sayfa yükleniyor...
Sayfa yükleniyor...
Sayfa yükleniyor...
Sayfa yükleniyor...
Sayfa yükleniyor...
Sayfa yükleniyor...
Sayfa yükleniyor...
Sayfa yükleniyor...
Sayfa yükleniyor...
Sayfa yükleniyor...
Sayfa yükleniyor...
Sayfa yükleniyor...
Sayfa yükleniyor...
Sayfa yükleniyor...
Sayfa yükleniyor...
Sayfa yükleniyor...
Sayfa yükleniyor...
Sayfa yükleniyor...
Sayfa yükleniyor...
Sayfa yükleniyor...
Sayfa yükleniyor...
Sayfa yükleniyor...
Sayfa yükleniyor...
Sayfa yükleniyor...
Sayfa yükleniyor...
Sayfa yükleniyor...
Sayfa yükleniyor...
Sayfa yükleniyor...
Sayfa yükleniyor...
Sayfa yükleniyor...
Sayfa yükleniyor...
Sayfa yükleniyor...
Sayfa yükleniyor...
Sayfa yükleniyor...
Sayfa yükleniyor...
Sayfa yükleniyor...
Sayfa yükleniyor...
Sayfa yükleniyor...
Sayfa yükleniyor...
Sayfa yükleniyor...
Sayfa yükleniyor...
Sayfa yükleniyor...
Sayfa yükleniyor...
Sayfa yükleniyor...
Sayfa yükleniyor...
Sayfa yükleniyor...
Sayfa yükleniyor...
Sayfa yükleniyor...
Sayfa yükleniyor...
Sayfa yükleniyor...
Sayfa yükleniyor...
Sayfa yükleniyor...
Sayfa yükleniyor...
Sayfa yükleniyor...
Sayfa yükleniyor...
Sayfa yükleniyor...
Sayfa yükleniyor...
Sayfa yükleniyor...
Sayfa yükleniyor...
Sayfa yükleniyor...
Sayfa yükleniyor...
Sayfa yükleniyor...
Sayfa yükleniyor...
Sayfa yükleniyor...
Sayfa yükleniyor...
Sayfa yükleniyor...
Sayfa yükleniyor...
Sayfa yükleniyor...
Sayfa yükleniyor...
Sayfa yükleniyor...
Sayfa yükleniyor...
Sayfa yükleniyor...
Sayfa yükleniyor...
Sayfa yükleniyor...
Sayfa yükleniyor...
Sayfa yükleniyor...
Sayfa yükleniyor...
Sayfa yükleniyor...
Sayfa yükleniyor...
Sayfa yükleniyor...
Sayfa yükleniyor...
Sayfa yükleniyor...
Sayfa yükleniyor...
Sayfa yükleniyor...
Sayfa yükleniyor...
Sayfa yükleniyor...
Sayfa yükleniyor...
Sayfa yükleniyor...
Sayfa yükleniyor...
Sayfa yükleniyor...
Sayfa yükleniyor...
Sayfa yükleniyor...
Sayfa yükleniyor...
Sayfa yükleniyor...
Sayfa yükleniyor...
Sayfa yükleniyor...
Sayfa yükleniyor...
Sayfa yükleniyor...
Sayfa yükleniyor...
Sayfa yükleniyor...
Sayfa yükleniyor...
Sayfa yükleniyor...
Sayfa yükleniyor...
Sayfa yükleniyor...
Sayfa yükleniyor...
Sayfa yükleniyor...
Sayfa yükleniyor...
Sayfa yükleniyor...
Sayfa yükleniyor...
Sayfa yükleniyor...
Sayfa yükleniyor...
Sayfa yükleniyor...
Sayfa yükleniyor...
Sayfa yükleniyor...
Sayfa yükleniyor...
Sayfa yükleniyor...
Sayfa yükleniyor...
Sayfa yükleniyor...
Sayfa yükleniyor...
Sayfa yükleniyor...
Sayfa yükleniyor...
Sayfa yükleniyor...
Sayfa yükleniyor...
Sayfa yükleniyor...
Sayfa yükleniyor...
Sayfa yükleniyor...
Sayfa yükleniyor...
Sayfa yükleniyor...
Sayfa yükleniyor...
Sayfa yükleniyor...
Sayfa yükleniyor...
Sayfa yükleniyor...
Sayfa yükleniyor...
Sayfa yükleniyor...
Sayfa yükleniyor...
Sayfa yükleniyor...
Sayfa yükleniyor...
Sayfa yükleniyor...
Sayfa yükleniyor...
Sayfa yükleniyor...
Sayfa yükleniyor...
Sayfa yükleniyor...
Sayfa yükleniyor...
Sayfa yükleniyor...
Sayfa yükleniyor...
Sayfa yükleniyor...
Sayfa yükleniyor...
Sayfa yükleniyor...
Sayfa yükleniyor...
Sayfa yükleniyor...
Sayfa yükleniyor...
Sayfa yükleniyor...
Sayfa yükleniyor...
Sayfa yükleniyor...
Sayfa yükleniyor...
Sayfa yükleniyor...
Sayfa yükleniyor...
Sayfa yükleniyor...
Sayfa yükleniyor...
Sayfa yükleniyor...
Sayfa yükleniyor...
Sayfa yükleniyor...
Sayfa yükleniyor...
Sayfa yükleniyor...
Sayfa yükleniyor...
Sayfa yükleniyor...
Sayfa yükleniyor...
Sayfa yükleniyor...
Sayfa yükleniyor...
Sayfa yükleniyor...
Sayfa yükleniyor...
Sayfa yükleniyor...
Sayfa yükleniyor...
Sayfa yükleniyor...
Sayfa yükleniyor...
Sayfa yükleniyor...
Sayfa yükleniyor...
Sayfa yükleniyor...
Sayfa yükleniyor...
Sayfa yükleniyor...
Sayfa yükleniyor...
Sayfa yükleniyor...
Sayfa yükleniyor...
Sayfa yükleniyor...
Sayfa yükleniyor...
Sayfa yükleniyor...
Sayfa yükleniyor...
Sayfa yükleniyor...
Sayfa yükleniyor...
Sayfa yükleniyor...
Sayfa yükleniyor...
Sayfa yükleniyor...
Sayfa yükleniyor...
Sayfa yükleniyor...
Sayfa yükleniyor...
Sayfa yükleniyor...
Sayfa yükleniyor...
Sayfa yükleniyor...
Sayfa yükleniyor...
Sayfa yükleniyor...
Sayfa yükleniyor...
Sayfa yükleniyor...
Sayfa yükleniyor...
Sayfa yükleniyor...
Sayfa yükleniyor...
Sayfa yükleniyor...
Sayfa yükleniyor...
Sayfa yükleniyor...
Sayfa yükleniyor...
Sayfa yükleniyor...
Sayfa yükleniyor...
Sayfa yükleniyor...
Sayfa yükleniyor...
Sayfa yükleniyor...
Sayfa yükleniyor...
Sayfa yükleniyor...
Sayfa yükleniyor...
Sayfa yükleniyor...
Sayfa yükleniyor...
Sayfa yükleniyor...
Sayfa yükleniyor...
Sayfa yükleniyor...
Sayfa yükleniyor...
Sayfa yükleniyor...
Sayfa yükleniyor...
Sayfa yükleniyor...
Sayfa yükleniyor...
Sayfa yükleniyor...
Sayfa yükleniyor...
Sayfa yükleniyor...
Sayfa yükleniyor...
Sayfa yükleniyor...
Sayfa yükleniyor...
Sayfa yükleniyor...
Sayfa yükleniyor...
Sayfa yükleniyor...
Sayfa yükleniyor...
Sayfa yükleniyor...
Sayfa yükleniyor...
Sayfa yükleniyor...
Sayfa yükleniyor...
Sayfa yükleniyor...
Sayfa yükleniyor...
Sayfa yükleniyor...
Sayfa yükleniyor...
Sayfa yükleniyor...
Sayfa yükleniyor...
Sayfa yükleniyor...
Sayfa yükleniyor...
Sayfa yükleniyor...
Sayfa yükleniyor...
Sayfa yükleniyor...
Sayfa yükleniyor...
Sayfa yükleniyor...
Sayfa yükleniyor...
Sayfa yükleniyor...
Sayfa yükleniyor...
Sayfa yükleniyor...
Sayfa yükleniyor...
Sayfa yükleniyor...
Sayfa yükleniyor...
Sayfa yükleniyor...
Sayfa yükleniyor...
Sayfa yükleniyor...
Sayfa yükleniyor...
Sayfa yükleniyor...
Sayfa yükleniyor...
Sayfa yükleniyor...
Sayfa yükleniyor...
Sayfa yükleniyor...
Sayfa yükleniyor...
Sayfa yükleniyor...
Sayfa yükleniyor...
Sayfa yükleniyor...
Sayfa yükleniyor...
Sayfa yükleniyor...
Sayfa yükleniyor...
Sayfa yükleniyor...
Sayfa yükleniyor...
Sayfa yükleniyor...
Sayfa yükleniyor...
Sayfa yükleniyor...
Sayfa yükleniyor...
Sayfa yükleniyor...
Sayfa yükleniyor...
Sayfa yükleniyor...
Sayfa yükleniyor...
Sayfa yükleniyor...
Sayfa yükleniyor...
Sayfa yükleniyor...
Sayfa yükleniyor...
Sayfa yükleniyor...
Sayfa yükleniyor...
Sayfa yükleniyor...
Sayfa yükleniyor...
Sayfa yükleniyor...
Sayfa yükleniyor...
Sayfa yükleniyor...
Sayfa yükleniyor...
Sayfa yükleniyor...
Sayfa yükleniyor...
Sayfa yükleniyor...
Sayfa yükleniyor...
Sayfa yükleniyor...
Sayfa yükleniyor...
Sayfa yükleniyor...
Sayfa yükleniyor...
Sayfa yükleniyor...
Sayfa yükleniyor...
Sayfa yükleniyor...
Sayfa yükleniyor...
Sayfa yükleniyor...
Sayfa yükleniyor...
Sayfa yükleniyor...
Sayfa yükleniyor...
Sayfa yükleniyor...
Sayfa yükleniyor...
Sayfa yükleniyor...
-
 1
1
-
 2
2
-
 3
3
-
 4
4
-
 5
5
-
 6
6
-
 7
7
-
 8
8
-
 9
9
-
 10
10
-
 11
11
-
 12
12
-
 13
13
-
 14
14
-
 15
15
-
 16
16
-
 17
17
-
 18
18
-
 19
19
-
 20
20
-
 21
21
-
 22
22
-
 23
23
-
 24
24
-
 25
25
-
 26
26
-
 27
27
-
 28
28
-
 29
29
-
 30
30
-
 31
31
-
 32
32
-
 33
33
-
 34
34
-
 35
35
-
 36
36
-
 37
37
-
 38
38
-
 39
39
-
 40
40
-
 41
41
-
 42
42
-
 43
43
-
 44
44
-
 45
45
-
 46
46
-
 47
47
-
 48
48
-
 49
49
-
 50
50
-
 51
51
-
 52
52
-
 53
53
-
 54
54
-
 55
55
-
 56
56
-
 57
57
-
 58
58
-
 59
59
-
 60
60
-
 61
61
-
 62
62
-
 63
63
-
 64
64
-
 65
65
-
 66
66
-
 67
67
-
 68
68
-
 69
69
-
 70
70
-
 71
71
-
 72
72
-
 73
73
-
 74
74
-
 75
75
-
 76
76
-
 77
77
-
 78
78
-
 79
79
-
 80
80
-
 81
81
-
 82
82
-
 83
83
-
 84
84
-
 85
85
-
 86
86
-
 87
87
-
 88
88
-
 89
89
-
 90
90
-
 91
91
-
 92
92
-
 93
93
-
 94
94
-
 95
95
-
 96
96
-
 97
97
-
 98
98
-
 99
99
-
 100
100
-
 101
101
-
 102
102
-
 103
103
-
 104
104
-
 105
105
-
 106
106
-
 107
107
-
 108
108
-
 109
109
-
 110
110
-
 111
111
-
 112
112
-
 113
113
-
 114
114
-
 115
115
-
 116
116
-
 117
117
-
 118
118
-
 119
119
-
 120
120
-
 121
121
-
 122
122
-
 123
123
-
 124
124
-
 125
125
-
 126
126
-
 127
127
-
 128
128
-
 129
129
-
 130
130
-
 131
131
-
 132
132
-
 133
133
-
 134
134
-
 135
135
-
 136
136
-
 137
137
-
 138
138
-
 139
139
-
 140
140
-
 141
141
-
 142
142
-
 143
143
-
 144
144
-
 145
145
-
 146
146
-
 147
147
-
 148
148
-
 149
149
-
 150
150
-
 151
151
-
 152
152
-
 153
153
-
 154
154
-
 155
155
-
 156
156
-
 157
157
-
 158
158
-
 159
159
-
 160
160
-
 161
161
-
 162
162
-
 163
163
-
 164
164
-
 165
165
-
 166
166
-
 167
167
-
 168
168
-
 169
169
-
 170
170
-
 171
171
-
 172
172
-
 173
173
-
 174
174
-
 175
175
-
 176
176
-
 177
177
-
 178
178
-
 179
179
-
 180
180
-
 181
181
-
 182
182
-
 183
183
-
 184
184
-
 185
185
-
 186
186
-
 187
187
-
 188
188
-
 189
189
-
 190
190
-
 191
191
-
 192
192
-
 193
193
-
 194
194
-
 195
195
-
 196
196
-
 197
197
-
 198
198
-
 199
199
-
 200
200
-
 201
201
-
 202
202
-
 203
203
-
 204
204
-
 205
205
-
 206
206
-
 207
207
-
 208
208
-
 209
209
-
 210
210
-
 211
211
-
 212
212
-
 213
213
-
 214
214
-
 215
215
-
 216
216
-
 217
217
-
 218
218
-
 219
219
-
 220
220
-
 221
221
-
 222
222
-
 223
223
-
 224
224
-
 225
225
-
 226
226
-
 227
227
-
 228
228
-
 229
229
-
 230
230
-
 231
231
-
 232
232
-
 233
233
-
 234
234
-
 235
235
-
 236
236
-
 237
237
-
 238
238
-
 239
239
-
 240
240
-
 241
241
-
 242
242
-
 243
243
-
 244
244
-
 245
245
-
 246
246
-
 247
247
-
 248
248
-
 249
249
-
 250
250
-
 251
251
-
 252
252
-
 253
253
-
 254
254
-
 255
255
-
 256
256
-
 257
257
-
 258
258
-
 259
259
-
 260
260
-
 261
261
-
 262
262
-
 263
263
-
 264
264
-
 265
265
-
 266
266
-
 267
267
-
 268
268
-
 269
269
-
 270
270
-
 271
271
-
 272
272
-
 273
273
-
 274
274
-
 275
275
-
 276
276
-
 277
277
-
 278
278
-
 279
279
-
 280
280
-
 281
281
-
 282
282
-
 283
283
-
 284
284
-
 285
285
-
 286
286
-
 287
287
-
 288
288
-
 289
289
-
 290
290
-
 291
291
-
 292
292
-
 293
293
-
 294
294
-
 295
295
-
 296
296
-
 297
297
-
 298
298
-
 299
299
-
 300
300
-
 301
301
-
 302
302
-
 303
303
-
 304
304
-
 305
305
-
 306
306
-
 307
307
-
 308
308
-
 309
309
-
 310
310
-
 311
311
-
 312
312
-
 313
313
-
 314
314
-
 315
315
-
 316
316
-
 317
317
-
 318
318
-
 319
319
-
 320
320
-
 321
321
-
 322
322
-
 323
323
-
 324
324
-
 325
325
-
 326
326
-
 327
327
-
 328
328
-
 329
329
-
 330
330
-
 331
331
-
 332
332
-
 333
333
-
 334
334
-
 335
335
-
 336
336
-
 337
337
-
 338
338
-
 339
339
-
 340
340
-
 341
341
-
 342
342
-
 343
343
-
 344
344
-
 345
345
-
 346
346
-
 347
347
-
 348
348
-
 349
349
-
 350
350
-
 351
351
-
 352
352
-
 353
353
-
 354
354
-
 355
355
-
 356
356
-
 357
357
-
 358
358
-
 359
359
-
 360
360
-
 361
361
-
 362
362
-
 363
363
-
 364
364
-
 365
365
-
 366
366
-
 367
367
-
 368
368
-
 369
369
-
 370
370
-
 371
371
-
 372
372
-
 373
373
-
 374
374
-
 375
375
-
 376
376
-
 377
377
-
 378
378
-
 379
379
-
 380
380
-
 381
381
-
 382
382
-
 383
383
-
 384
384
-
 385
385
-
 386
386
-
 387
387
-
 388
388
-
 389
389
-
 390
390
-
 391
391
-
 392
392
-
 393
393
-
 394
394
-
 395
395
-
 396
396
-
 397
397
-
 398
398
-
 399
399
-
 400
400
-
 401
401
-
 402
402
-
 403
403
-
 404
404
-
 405
405
-
 406
406
-
 407
407
-
 408
408
-
 409
409
-
 410
410
-
 411
411
-
 412
412
-
 413
413
-
 414
414
-
 415
415
-
 416
416
-
 417
417
-
 418
418
-
 419
419
-
 420
420
-
 421
421
-
 422
422
-
 423
423
-
 424
424
-
 425
425
-
 426
426
-
 427
427
-
 428
428
-
 429
429
-
 430
430
-
 431
431
-
 432
432
-
 433
433
-
 434
434
-
 435
435
-
 436
436
-
 437
437
-
 438
438
-
 439
439
-
 440
440
-
 441
441
-
 442
442
-
 443
443
-
 444
444
-
 445
445
-
 446
446
-
 447
447
-
 448
448
-
 449
449
-
 450
450
-
 451
451
-
 452
452
-
 453
453
-
 454
454
-
 455
455
-
 456
456


Yamaha DVX-S301 El kitabı
- Kategori
- Dvd oynatıcılar
- Tip
- El kitabı
diğer dillerde
- español: Yamaha DVX-S301 El manual del propietario
- français: Yamaha DVX-S301 Le manuel du propriétaire
- italiano: Yamaha DVX-S301 Manuale del proprietario
- svenska: Yamaha DVX-S301 Bruksanvisning
- Deutsch: Yamaha DVX-S301 Bedienungsanleitung
- English: Yamaha DVX-S301 Owner's manual
- dansk: Yamaha DVX-S301 Brugervejledning
- русский: Yamaha DVX-S301 Инструкция по применению
- Nederlands: Yamaha DVX-S301 de handleiding
- română: Yamaha DVX-S301 Manualul proprietarului
İlgili makaleler
Diğer belgeler
-
Philips HTS3500S/12 Hızlı başlangıç Kılavuzu
-
-
-
-
OK. OPD 700D Kullanım kılavuzu
-
-
-
Philips HTS8010S/01 Kullanım kılavuzu
-
-
Hasbro Barney Die-Cast Vehicles Kullanma talimatları