Yamaha LSX-170 El kitabı
- Kategori
- Bluetooth müzik alıcıları
- Tip
- El kitabı

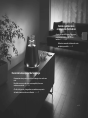
Lighting Audio Sys tem / Systeme Audio Lumineux
© 2014 Yamaha Corporation
Printed in China ZN46720
OWNER’S MANUAL
MODE D ’EMPLOI
BEDIENUNGSANLEITUNG
BRUKSANVISNING
Read the su ppl ied bo okle t “S afety Br och ure” be fo re us ing th e u nit.
Li sez le li vret fo urn i « Broch ure s u r l a s éc u ri té» ava nt d’u til ise r l ’un ité.
Lese n S ie die „Si che rhe its brosc hüre“, bevo r S ie das Ge rä t ve r we nde n.
Lä s d en med fö lja nde bros chyren ”S äker het sanv isn ing ar ” in nan du använ der receiver n.
Prim a d i u til izz are l ’un ità , l egg ere il “Vola nt ino su lla si curez za” for nito.
Lea el “Folle to de seg uri dad ” qu e s e p rop orcio na antes de ut ili zar la un ida d.
Lees he t m eeg eleverde boe kje “ Veili ghe ids broch ure” voordat u d it toe stel geb rui kt.
Пе ред ис пол ьз ован ием ап пар ата пр оч ти те пр ила га ем ую “бр ошю ру п о б езо пас нос ти”.
MANUALE DI ISTRUZIONI
MANUAL DE INSTRUCCIONES
GEBRUIKSAANWIJZING
ИНС ТРУКЦИЯ ПО ЭКСПЛУАТАЦИИ
G
English Français Deutsch Svenska Italiano Español
Nederlands
Русский

2 En
Contents
Introduction
Supplied accessories............4
About this manual............4
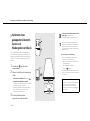
Part names
Main body............5
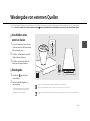
Remote control............6
Preparations
Installing “DTA CONTROLLER”............7
Turning on the lighting/power............7
Listening to music via Bluetooth connection
Pairing a device with the unit............8
Performing pairing and playing back music............9
Connecting a paired Bluetooth device and playing back music............10
Terminating the Bluetooth connection............10
Listening to external sources
Connecting an external device............11
Playing back............11
Using the SMART TIMER
Setting the SMART TIMER............12
Troubleshooting............13
Specifications............15

En 3
English
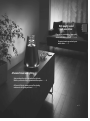
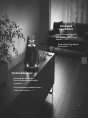
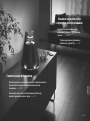
High quality sound
with ease of use
Plug and play convenience of your mobile
devices with enhanced sound.
..............8, 11
Convenient remote operation by your
mobile device.
............7
A fusion of music and lighting
Start your day in the right light and on the right note.
Wake to your favorite song in a comfortable atmosphere.
............12
At the end of the day, immerse yourself in a healing
ambience of soft lighting and sound.
............7

4 En
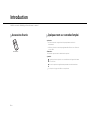
Introduction
Confirm the package contents and thoroughly read this manual.
Supplied accessories About this manual
• Operations
- How to operate this unit is described mainly using the remote control.
- “iPhone” described in this manual may also refer to “iPod touch” or “iPad.”
• Illustrations
Illustrations may differ from actual item depicted.
• Symbols
Remote control
Indicates precautions for use of the unit and feature limitations.
Indicates supplementary explanations for better use.
&
Indicates the corresponding reference page(s).

En 5
English
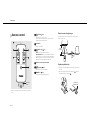
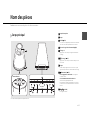
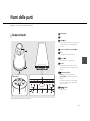
Part names
Familiarize yourself with all parts and these functions.
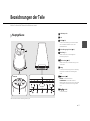
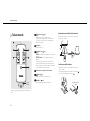
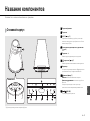
Main body
* The light effects represent the sound expansion.
Bottom
1 Light/speaker
2 Light
3 AUX IN (& P.11)
Connects to an external device via a commercially
available 3.5 mm stereo mini-plug cable.
4 Remote control signal sensor (& P.6)
5 Lighting –/+
Press to adjust the lighting brightness.
6 (Lighting) (& P.7)
Press to turn on or off the light.
7 Indicator
Lights when the unit is turned on. The indicator blinks
when the Bluetooth connection status changes.
8 A (Power) (& P.7)
Press: Turns the unit on/off.
Press and hold: Disconnects a Bluetooth device.
The unit plays a startup tone when turned on and a
shutdown tone when turned off.
9 / (VOLUME)
Controls the volume.

Part names
6 En
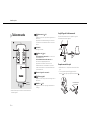
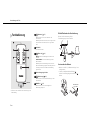
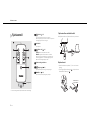
Remote control
* Remove the insulation sheet of the remote control before
using.
1 (Power) (& P.7)
Press to turn on or off the unit.
The unit plays a startup tone when turned on and a
shutdown tone when turned off.
2 VOLUME +/–
Controls the volume.
3 (Bluetooth) (& P.9)
Press: Connects to a Bluetooth device.
Press and hold: Disconnects from a Bluetooth device.
The unit plays a connection tone when establishing a
Bluetooth connection, and plays a disconnection tone
when disconnecting a Bluetooth connection.
4 Remote control signal transmitter
5 (Lighting) (& P.7)
Press to turn on or off the lighting.
6 DIMMER +/– (& P.7)
Press to adjust the lighting brightness.
Remote control angle/range
Point the remote control at the remote control signal
sensor on the unit.
Replacing the battery
• Check the “+” of the battery and insert it the correct way
around.
• While pushing the release tab in direction , slide out
the battery holder in direction .
Insulation
sheet*
Within
6 m (20 ft)
CR2025 type
lithium battery

En 7
English
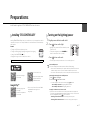
Preparations
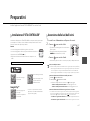
Install Yamaha’s application “DTA CONTROLLER” and turn the unit on.
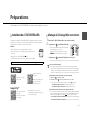
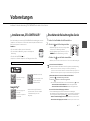
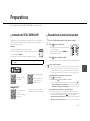
Installing “DTA CONTROLLER”
Installing DTA CONTROLLER application on a mobile device, such as a smartphone or tablet
computer, allows you to use a variety of additional convenient features of Yamaha desktop
audio systems.
Features
• Turning on/off of the unit, adjusting volume
• Turning on/off the lighting, adjusting the brightness of the lighting
• Setting of the SMART TIMER (& P.12)
• Playing back songs stored in a smart phone or tablet
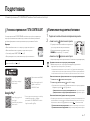
Turning on the lighting/power
1 Plug the power cable into a wall outlet.
2 • Press to turn on the light.
- Lighting can be turned on/off even when the power
of the unit is off.
- To adjust the brightness, press the DIMMER +/–
button on the remote control (10 steps).
• Press to turn on the unit.
- The unit plays a startup tone and turns on. You can then play music.The mobile device needs to be connected with the unit via Bluetooth connection (& P.8).
http://itunes.com/app/
dtacontroller
(For users in the U.S.A.)
https://itunes.apple.com/us/
app/dta-controller-us/
id549333293?mt=8
Google Play™
https://play.google.com/
store/apps/
details?id=com.yamaha.av.
dtacontroller
* If access to any of these fails, search for “DTA
CONTROLLER” on the App Store or
Google Play.
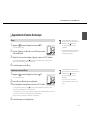
Auto standby function
• The auto standby function will be activated as follows (default setting).
- The unit turns off automatically if no operation has been performed for more than
20 minutes with no device connected to AUX IN or via Bluetooth connection.
-
The unit turns off automatically if no operation has been performed for more than 8 hours.
Activating/deactivating the auto standby function
1 Press to turn on the light.
2 Press and hold for at least 10 seconds.
• The auto standby function switches and the lighting (& P.5) blinks.
- Auto standby is activated: The lighting blinks three times.
- Auto standby is deactivated: The lighting blinks once.
Turning the notification-tone function on/off
• If you want to turn the notification tones (startup tone/shutdown tone, Bluetooth
connection tone, maximum/minimum volume notification tone) on or off, when the
unit is off, press
A while pressing to turn on the unit.
- If turning on the notification tones: The unit plays the startup tone.
- If turning off the notification tones: The unit does not play the startup tone.

8 En
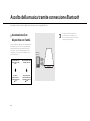
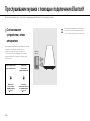
Listening to music via Bluetooth connection
You can listen to sound wirelessly from a Bluetooth compatible device.
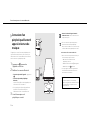
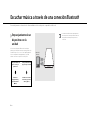
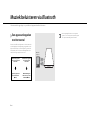
Pairing a device with
the unit
When connecting a Bluetooth device to the unit for the
first time, the device is required to be registered to the
unit. This process is called “pairing.” Once pairing is
completed, subsequent connection can be made with a
couple of easy steps.
A Bluetooth device
connecting for the first
time
A Bluetooth device
already having been
connected
Perform pairing and play
back music (& P.9)
Establish Bluetooth
connection and play back
music (& P.10)
Bluetooth
device
• If pairing information for a device is deleted, you
will need to perform pairing of that device again in
order to connect it again.

Listening to music via Bluetooth connection
En 9
English
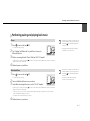
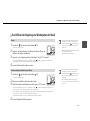
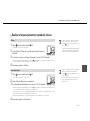
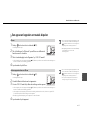
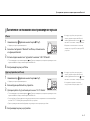
Performing pairing and playing back music
1 Press to turn on the unit (& P.7).
• The indicator lights in orange.
2 Tap “Settings” and “Bluetooth” on your iPhone to turn on its
Bluetooth function.
3 On the connecting list in the “Device” field, tap “LSX-170 Yamaha.”
• After pairing is complete, the indicator (& P.5) blinks in blue and the unit plays a Bluetooth connection tone when a
Bluetooth connection is established.
4 Play back music on your iPhone.
1 Press to turn on the unit (& P.7).
• The indicator lights in orange.
2 Turn on the Bluetooth function on your device.
3 In the Bluetooth setting of the device, select “LSX-170 Yamaha.”
• After pairing is complete, the indicator (& P.5) blinks in blue and the unit plays a Bluetooth connection tone when a
Bluetooth connection is established.
• If the device does not connect to the unit automatically after the pairing is completed, select “LSX-170 Yamaha”
again in the Bluetooth setting on your device.
• For details, see the owner’s manual of your device.
4 Play back music on your device.
iPhone
Other than iPhone
• If another device is already connected to the unit,
terminate that Bluetooth connection by pressing
and holding , then perform pairing with the
new device.
• The pairing operation may differ depending on
your iPhone or version of device OS.
• If another device is already connected to the unit,
terminate that Bluetooth connection by pressing
and holding , then perform pairing with the
new device.
• If a passkey is required during the pairing
operation, enter the number “0000.”

Listening to music via Bluetooth connection
10 En
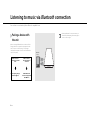
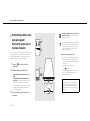
Connecting a paired
Bluetooth device and
playing back music
If the unit is connected to another device via Bluetooth
connection, terminate that connection (see “Terminating
the Bluetooth connection” on the right) before
connecting to the target device.
1 Press to turn on the unit.
2 Perform Bluetooth connection.
• Connecting from the unit: Press .
• Connecting from the Bluetooth device:
Turn on the Bluetooth function on the device and
select “LSX-170 Yamaha.”
• The indicator blinks in blue and the unit plays a
Bluetooth connection tone when a connection is
established.
3 Play back music on the connected
device.
1
2
Indicator
2, 3
• Decrease the volume of the unit before
playback. Otherwise, playback volume may be
too loud.
• If connecting from the unit, the unit searches for
the Bluetooth device connected the last time. In
this case, make sure that device’s Bluetooth
function is turned on.
Terminating the Bluetooth connection
• Bluetooth connection can be terminated by either
one of the following.
- Turn off the Bluetooth function of the connected
device.
- Press and hold
A on the unit.
- Press and hold .
• The indicator blinks in blue and the unit plays a
Bluetooth disconnection tone when the
connection is terminated.
Music enhancer
This function enhances the sound of compressed
digital sound by regenerating musical elements
that are lost through compression via Bluetooth
connection.

En 11
English
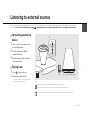
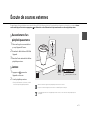
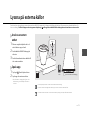
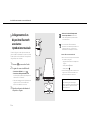
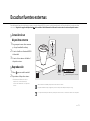
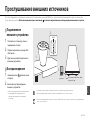
Listening to external sources
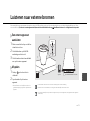
This unit allows playback of external devices connected to the AUX IN terminal. A commercially available 3.5 mm stereo mini-plug cable is required for this
connection. Be sure to turn off the unit by pressing and unplug the power cord from the wall outlet before connecting an external device.
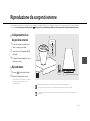
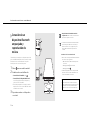
Connecting an external
device
1 Place a soft cloth on a table and turn
the unit upside down.
2 Plug the cable into the AUX IN
terminal of the unit.
3 Plug the other end of the cable into
the external device.
Playing back
1 Press to turn on the unit.
2 Play back the external device.
• For details on playback, see the owner’s manual
supplied with the external device.
• Decrease the volume of the unit and the external device before connection.
• When turning the machine upside down, make sure that it is stable so that it does not fall.
• If both a Bluetooth device and external device are played back, sound from both devices will be heard.
3.5 mm stereo mini-plug cable
AUX IN
1
2
3
External
device

12 En
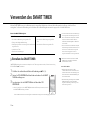
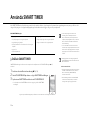
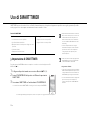
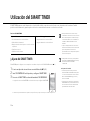
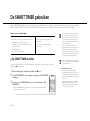
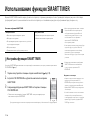
Using the SMART TIMER
The SMART TIMER allows you to turn on the lighting at the brightness you set and play back your favorite music as a wake-up timer every morning. You can also
turn off the lighting and stop music playback automatically while you are in bed listening to music.
What the SMART TIMER can do
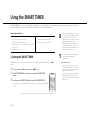
Setting the SMART TIMER
SMART TIMER settings can be performed with a smart phone or tablet that has the DTA CONTROLLER application (& P.7)
installed.
1 Connect a device via Bluetooth connection (& P.9, 10).
2 Start DTA CONTROLLER on the device and make the SMART TIMER
settings.
3 Synchronize the SMART TIMER with the unit by DTA CONTROLLER.
• Be sure to synchronize the SMART TIMER with the unit every time you perform the SMART TIMER
setting.
On-timer Off-timer
• Turn on the li
ghting at a specified time.
• Specify the brightness of the lighting.
• Play back the music of a connected device at a specified time.
• Specify a song.
• Preset the volume level.
• Turn off the lighting at a specified time.
• Turn off the power at a specified time.
Due to product improvements, specifications and appearance are subject to change without notice.
• To play back a song via Bluetooth connection at a
set time, it is required that the Bluetooth function
of your smart phone or tablet is turned on.
Additionally, in the case of an iPhone, do not quit
DTA CONTROLLER while multitasking.
• If another Bluetooth device is connected to the
unit at the time you set, the song you set as the
on-timer will not be played back. Disconnect any
other device before the time you set.
• The on-timer and off-timer of the SMART TIMER
can be activated/deactivated by DTA
CONTROLLER only.
Inner clock of the unit
• The unit copies the time to the unit’s inner clock
from DTA CONTROLLER when a device connects
to the unit via Bluetooth connection. The SMART
TIMER follows the unit’s inner clock.
• The clock setting will be reset and the SMART
TIMER will be deactivated if the power cable is
kept disconnected from the wall outlet for about
twenty four hours.

En 13
English
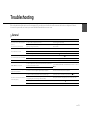
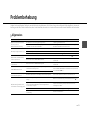
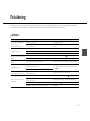
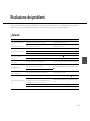
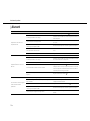
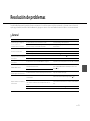
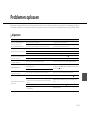
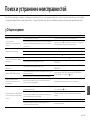
Troubleshooting
Refer to the table below if the unit does not function properly. If your solution is not listed below or if the instruction below does not help, turn off the unit,
disconnect the power cable, and contact your nearest authorized Yamaha dealer or service center.
General
Problem Cause Solution
The unit turns off soon after the power is
turned on.
The unit does not operate properly.
The power cable is not properly connected. Connect the power cable firmly.
This unit has been exposed to a strong external electric shock such as
lightning or strong static electricity.
Hold down
A on the front panel for more than 10 seconds to initialize and
reboot the unit.
The speakers make no sound.
The volume is minimum. Turn up the volume.
The power is off. Turn on the unit and play the music again.
The auto standby function is activated. Turn on the unit (& P.7).
The unit and/or lighting turn off suddenly.
The auto standby function is activated. Turn on the unit and/or lighting (& P.7).
The off-timer of the SMART TIMER is set. Check the setting of the off-timer from DTA CONTROLLER.
The unit and lighting turn on suddenly. The on-timer of the SMART TIMER is set. Check the setting of the on-timer from DTA CONTROLLER.
SMART TIMER does not operate.
The power cable has been disconnected for more than twenty four hours
and the clock information is cleared.
Set the SMART TIMER from DTA CONTROLLER and synchronize it to the unit
(& P.12).
SMART TIMER is not set from DTA CONTROLLER.
There is noise interference from digital or
high-frequency equipment.
This unit is too close to the digital or high-frequency equipment. Place this unit farther away from such equipment.
The remote control does not work or does
not function properly.
The remote control may be operated outside its operation range. Operate the remote control within its operation range (& P.6).
The remote control sensor on this unit may be exposed to direct sunlight or
strong lighting such as an inverter type fluorescent lamp.
Change the orientation of the lighting or unit, or location of the unit.
The battery may be worn out. Replace the battery with new one (& P.6).
There are obstacles between the sensor of this unit and the remote control. Remove the obstacles.

Troubleshooting
14 En
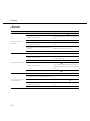
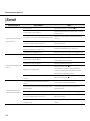
Bluetooth
Problem Cause Solution
Cannot make the unit pair with a
Bluetooth device.
The unit is turned off. Turn the unit on and perform the paring (& P.9).
Another Bluetooth device is connected.
Terminate current Bluetooth connection, and perform pairing with the new
device.
This unit and the device are too far apart. Pair the unit and device within a distance of 10 m (33 ft).
There is a device (microwave oven, wireless LAN, etc.) that outputs signals
in the 2.4 GHz frequency band nearby.
Move this unit away from the device that is emitting radio-frequency
signals.
A Bluetooth adaptor, etc., that you want to pair with this unit has a passkey
other than “0000.”
Use a Bluetooth adaptor, etc., whose passkey is “0000.”
The Bluetooth device does not support A2DP. Perform pairing with a device which supports A2DP.
Cannot make a Bluetooth connection.
The unit is turned off. Turn the unit on.
Another Bluetooth device is connected.
Terminate current Bluetooth connection, then establish a Bluetooth
connection with that device again.
The Bluetooth function of the device is turned off. Turn on the Bluetooth function of the device.
The pairing information has been deleted.
Perform pairing again (& P.9).
This unit can be paired with eight devices. If pairing with a ninth device is
performed, the pairing information with the earliest connection date will be
deleted.
This unit is not registered on the device’s Bluetooth connection list. Perform paring again (& P.9).
No sound is produced, or the sound is
interrupted during playback.
The volume of the connecting device is set too low. Turn up the volume of the connecting device.
The connecting device is not set to send Bluetooth audio signals to the unit.
Switch the output of Bluetooth audio signals of the connecting device to
the unit.
The Bluetooth connection of the unit with the device has terminated. Perform Bluetooth connection operations again (& P.10).
There is a device (microwave oven, wireless LAN, etc.) that outputs signals
in the 2.4 GHz frequency band nearby.
Move this unit away from the device that is emitting radio-frequency
signals.
This unit and the connecting device are too far apart. Move the connecting device to within 10 m (33 ft) of the unit.

En 15
English
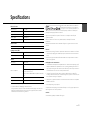
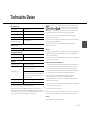
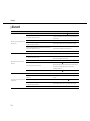
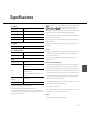
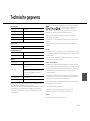
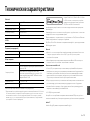
Specifications
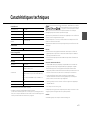
Specifications are subject to change without notice.
* The estimated lifetime of LED lighting is about 36,000 hours.
This figure is based on the shorter of either the duration until the lighting is worn out, or the
duration before luminous flux drops to below 70% of the original. Note, however, that the
estimated 36,000 hour duration is not guaranteed.
“Made for iPod,” “Made for iPhone,” and “Made for
iPad” mean that an electronic accessory has been
designed to connect specifically to iPod, iPhone, or
iPad, respectively, and has been certified by the
developer to meet Apple performance standards.
Apple is not responsible for the operation of this device or its compliance with safety and
regulatory standards.
Please note that the use of this accessory with iPod, iPhone, or iPad may affect wireless
performance.
iPad, iPhone, iPod and iPod touch are trademarks of Apple Inc., registered in the U.S. and other
countries.
Bluetooth
• Bluetooth is a technology for wireless communication between devices within an area of about
10 meters (33 ft) employing the 2.4 GHz frequency band, a band which can be used without a
license.
• Bluetooth is a registered trademark of the Bluetooth SIG and is used by Yamaha in accordance
with a license agreement.
Handling Bluetooth communications
• The 2.4 GHz band used by Bluetooth compatible devices is a radio band shared by many types of
equipment. While Bluetooth compatible devices use a technology minimizing the influence of
other components using the same radio band, such influence may reduce the speed or distance
of communications and in some cases interrupt communications.
• The speed of signal transfer and the distance at which communication is possible differs
according to the distance between the communicating devices, the presence of obstacles, radio
wave conditions and the type of equipment.
• Yamaha does not guarantee all wireless connections between this unit and devices compatible
with Bluetooth function.
© 2013 CSR plc and its group companies.
The aptX® mark and the aptX logo are trade marks of CSR plc or one of its group companies and
may be registered in one or more jurisdictions.
Android™
Android and Google Play are trademarks of Google, Inc.
Bluetooth section
Bluetooth version Ver. 2.1+EDR
Supported profile A2DP (Advanced Audio Distribution Profile)
Compatible codecs SBC, AAC, aptX®
Wireless output Bluetooth Class 2
Maximum communication range 10 m [33 ft] (without obstructions)
AUX IN section
Input connector 3.5 mm stereo mini jack
Lighting section (LED*)
Lifetime (Luminous flux under 70%) About 36,000 hours
Power consumption (When only the lighting is on) 7 W
General
Power supply AC 230 V, 50 Hz
Power consumption
Power-on condition (music is played back and the lighting is on):
15 W
Power-off condition (lighting and SMART TIMER are off and no
Bluetooth connection): 0.2 W
Standby condition (SMART TIMER is on) or Bluetooth standby:
0.6 W
Dimensions (W × H × D) 271 × 290 × 271 mm (10-5/8 × 11-3/8 × 10-5/8 in)
Weight 3.3 kg (7.3 lbs.)

2 Fr
Table des matières
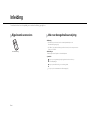
Introduction
Accessoires fournis............4
Quelques mots sur ce mode d’emploi............4
Nom des pièces
Corps principal............5
Télécommande............6
Préparations
Installation de « DTA CONTROLLER »............7
Allumage de l’éclairage/Mise sous tension............7
Écoute de musique avec la connexion Bluetooth
Appariement d’un périphérique avec l’appareil............8
Appariement et lecture de musique............9
Connexion d’un périphérique Bluetoo th apparié et lecture de musique............10
Désactivation de la connexion Bluetooth............10
Écoute de sources externes
Raccordement d’un périphérique externe............11
Lecture............11
Utilisation du SMART TIMER
Réglage du SMART TIMER............12
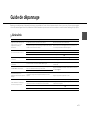
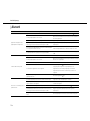
Guide de dépannage............13
Caractéristiques techniques............15

Fr 3
Français
Son de qualité élevée
et simplicité d’utilisation
Aspect pratique de Plug and Play sur vos
périphériques mobiles avec un son
amélioré. ..............8, 11
Utilisation commode à distance de votre
périphérique mobile. ............7
Fusion de la musique et de l’éclairage
Commencez votre journée sous le bon éclairage et sur une bonne
note.
Réveillez-vous au son de votre morceau préféré, dans une
ambiance conviviale. ............12
À la fin de la journée, plongez dans une ambiance reposante
de lumière tamisée et de sons calfeutrés. ............7

4 Fr
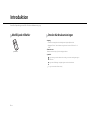
Introduction
Vérifiez le contenu de l’emballage et lisez entièrement ce manuel.
Accessoires fournis Quelques mots sur ce mode d’emploi
• Opérations
- Le fonctionnement de cet appareil est décrit principalement en utilisant la
télécommande.
- L’« iPhone », décrit dans ce manuel peut également faire référence à un « iPod touch»
ou à un « iPad ».
• Illustrations
Les illustrations peuvent varier du véritable article représenté.
• Symboles
Télécommande
Signale les précautions à prendre concernant l’utilisation de l’appareil et les limites
de ses fonctions.
Donne des explications supplémentaires permettant une meilleure utilisation.
&
Indique la ou les pages de référence correspondantes.

Fr 5
Français
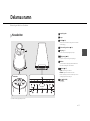
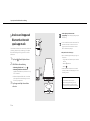
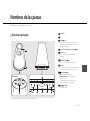
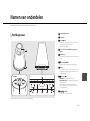
Nom des pièces
Familiarisez-vous avec toutes les pièces et les fonctions suivantes.
Corps principal
* Les effets lumineux représentent l’expansion du son.
Partie inférieure
1 Lampe/Haut-parleur
2 Lampe
3 AUX IN (& P.11)
Se connecte à un périphérique externe via un câble mini-
jack stéréo de 3,5 mm disponible dans le commerce.
4 Capteur de signal de télécommande (& P.6)
5 Éclairage –/+
Appuyez sur cette touche pour régler la luminosité de
l’éclairage.
6 (Éclairage) (& P.7)
Appuyez sur cette touche pour mettre la lampe sous ou
hors tension.
7 Voyant
S’allume lorsque l’appareil est sous tension. Le voyant
clignote lorsque l’état de la connexion Bluetooth change.
8 A (Alimentation) (& P.7)
Si vous appuyez sur cette touche : met l’appareil
sous/hors tension.
Si vous maintenez cette touche enfoncée :
déconnecte un périphérique Bluetooth.
L’appareil lit une tonalité de démarrage lors de sa mise
sous tension et une tonalité d’arrêt lors de sa mise hors
tension.
9 / (VOLUME)
Pour régler le volume.

Nom des pièces
6 Fr
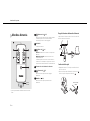
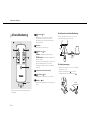
Télécommande
* Retirez la feuille de protection de la télécommande avant
d’utiliser l’appareil.
1 (Alimentation) (& P.7)
Appuyez sur cette touche pour mettre l’appareil sous ou
hors tension.
L’appareil lit une tonalité de démarrage lors de sa mise
sous tension et une tonalité d’arrêt lors de sa mise hors
tension.
2 VOLUME +/–
Pour régler le volume.
3 (Bluetooth) (& P.9)
Si vous appuyez sur cette touche : Se connecte à un
périphérique Bluetooth.
Si vous maintenez cette touche enfoncée : Se
déconnecte d’un périphérique Bluetooth.
L’appareil lit une tonalité de connexion lors de
l’établissement d’une connexion Bluetooth, et lit une
tonalité de déconnexion lors de la désactivation d’une
connexion Bluetooth.
4 Émetteur de signal de commande
5 (Éclairage) (& P.7)
Appuyez sur cette touche pour mettre l’éclairage sous ou
hors tension.
6 DIMMER +/– (& P.7)
Appuyez sur cette touche pour régler la luminosité de
l’éclairage.
Angle/Plage de la télécommande
Pointez la télécommande vers le capteur de signal de
télécommande situé sur l’appareil.
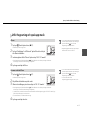
Remplacement de la pile
• Vérifiez la borne « + » de la pile et insérez-la dans le bon
sens.
•
Tout en poussant la patte de dégagement dans la
direction , faites glisser le porte-pile dans la direction .
Feuille de
protection*
6 m au
maximum
Pile au lithium de
type CR2025
Sayfa yükleniyor...
Sayfa yükleniyor...
Sayfa yükleniyor...
Sayfa yükleniyor...
Sayfa yükleniyor...
Sayfa yükleniyor...
Sayfa yükleniyor...
Sayfa yükleniyor...
Sayfa yükleniyor...
Sayfa yükleniyor...
Sayfa yükleniyor...
Sayfa yükleniyor...
Sayfa yükleniyor...
Sayfa yükleniyor...
Sayfa yükleniyor...
Sayfa yükleniyor...
Sayfa yükleniyor...
Sayfa yükleniyor...
Sayfa yükleniyor...
Sayfa yükleniyor...
Sayfa yükleniyor...
Sayfa yükleniyor...
Sayfa yükleniyor...
Sayfa yükleniyor...
Sayfa yükleniyor...
Sayfa yükleniyor...
Sayfa yükleniyor...
Sayfa yükleniyor...
Sayfa yükleniyor...
Sayfa yükleniyor...
Sayfa yükleniyor...
Sayfa yükleniyor...
Sayfa yükleniyor...
Sayfa yükleniyor...
Sayfa yükleniyor...
Sayfa yükleniyor...
Sayfa yükleniyor...
Sayfa yükleniyor...
Sayfa yükleniyor...
Sayfa yükleniyor...
Sayfa yükleniyor...
Sayfa yükleniyor...
Sayfa yükleniyor...
Sayfa yükleniyor...
Sayfa yükleniyor...
Sayfa yükleniyor...
Sayfa yükleniyor...
Sayfa yükleniyor...
Sayfa yükleniyor...
Sayfa yükleniyor...
Sayfa yükleniyor...
Sayfa yükleniyor...
Sayfa yükleniyor...
Sayfa yükleniyor...
Sayfa yükleniyor...
Sayfa yükleniyor...
Sayfa yükleniyor...
Sayfa yükleniyor...
Sayfa yükleniyor...
Sayfa yükleniyor...
Sayfa yükleniyor...
Sayfa yükleniyor...
Sayfa yükleniyor...
Sayfa yükleniyor...
Sayfa yükleniyor...
Sayfa yükleniyor...
Sayfa yükleniyor...
Sayfa yükleniyor...
Sayfa yükleniyor...
Sayfa yükleniyor...
Sayfa yükleniyor...
Sayfa yükleniyor...
Sayfa yükleniyor...
Sayfa yükleniyor...
Sayfa yükleniyor...
Sayfa yükleniyor...
Sayfa yükleniyor...
Sayfa yükleniyor...
Sayfa yükleniyor...
Sayfa yükleniyor...
Sayfa yükleniyor...
Sayfa yükleniyor...
Sayfa yükleniyor...
Sayfa yükleniyor...
Sayfa yükleniyor...
Sayfa yükleniyor...
Sayfa yükleniyor...
Sayfa yükleniyor...
Sayfa yükleniyor...
Sayfa yükleniyor...
Sayfa yükleniyor...
Sayfa yükleniyor...
Sayfa yükleniyor...
Sayfa yükleniyor...
-
 1
1
-
 2
2
-
 3
3
-
 4
4
-
 5
5
-
 6
6
-
 7
7
-
 8
8
-
 9
9
-
 10
10
-
 11
11
-
 12
12
-
 13
13
-
 14
14
-
 15
15
-
 16
16
-
 17
17
-
 18
18
-
 19
19
-
 20
20
-
 21
21
-
 22
22
-
 23
23
-
 24
24
-
 25
25
-
 26
26
-
 27
27
-
 28
28
-
 29
29
-
 30
30
-
 31
31
-
 32
32
-
 33
33
-
 34
34
-
 35
35
-
 36
36
-
 37
37
-
 38
38
-
 39
39
-
 40
40
-
 41
41
-
 42
42
-
 43
43
-
 44
44
-
 45
45
-
 46
46
-
 47
47
-
 48
48
-
 49
49
-
 50
50
-
 51
51
-
 52
52
-
 53
53
-
 54
54
-
 55
55
-
 56
56
-
 57
57
-
 58
58
-
 59
59
-
 60
60
-
 61
61
-
 62
62
-
 63
63
-
 64
64
-
 65
65
-
 66
66
-
 67
67
-
 68
68
-
 69
69
-
 70
70
-
 71
71
-
 72
72
-
 73
73
-
 74
74
-
 75
75
-
 76
76
-
 77
77
-
 78
78
-
 79
79
-
 80
80
-
 81
81
-
 82
82
-
 83
83
-
 84
84
-
 85
85
-
 86
86
-
 87
87
-
 88
88
-
 89
89
-
 90
90
-
 91
91
-
 92
92
-
 93
93
-
 94
94
-
 95
95
-
 96
96
-
 97
97
-
 98
98
-
 99
99
-
 100
100
-
 101
101
-
 102
102
-
 103
103
-
 104
104
-
 105
105
-
 106
106
-
 107
107
-
 108
108
-
 109
109
-
 110
110
-
 111
111
-
 112
112
-
 113
113
-
 114
114


Yamaha LSX-170 El kitabı
- Kategori
- Bluetooth müzik alıcıları
- Tip
- El kitabı
diğer dillerde
- español: Yamaha LSX-170 El manual del propietario
- français: Yamaha LSX-170 Le manuel du propriétaire
- italiano: Yamaha LSX-170 Manuale del proprietario
- svenska: Yamaha LSX-170 Bruksanvisning
- Deutsch: Yamaha LSX-170 Bedienungsanleitung
- English: Yamaha LSX-170 Owner's manual
- dansk: Yamaha LSX-170 Brugervejledning
- русский: Yamaha LSX-170 Инструкция по применению
- suomi: Yamaha LSX-170 Omistajan opas
- Nederlands: Yamaha LSX-170 de handleiding

