Samsung LE19R71B Kullanici rehberi
- Kategori
- LCD TV'ler
- Tip
- Kullanici rehberi
Bu kılavuz aynı zamanda aşağıdakiler için de uygundur:

êÛÍÓ‚Ó‰ÒÚ‚Ó ÔÓ ˝ÍÒÔÎÛ‡Ú‡ˆËË
è‰ ̇˜‡ÎÓÏ ˝ÍÒÔÎÛ‡Ú‡ˆËË ÛÒÚÓÈÒÚ‚‡
‚ÌËχÚÂθÌÓ ÔÓ˜ËÚ‡ÈÚ ̇ÒÚÓfl˘Â ÛÍÓ‚Ó‰ÒÚ‚Ó Ë
ÒÓı‡ÌËÚÂ Â„Ó ‰Îfl ·Û‰Û˘Â„Ó ËÒÔÓθÁÓ‚‡ÌËfl.
ùäêÄççõÖ åÖçû
ÑàëèãÖâ èä
íÖãÖíÖäëí
á‡Â„ËÒÚËÛÈÚÂÒ¸ ‚ ÍÎÛ·Â Samsung ̇ Ò‡ÈÚÂ
www.samsung.com/global/register
BN68-01074E-00
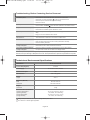
Contact SAMSUNG WORLD-WIDE
If you have any questions or comments relating to Samsung products,
please contact the SAMSUNG customer care centre.
ë‚flÁ˚‚‡ÈÚÂÒ¸ Ò SAMSUNG ÔÓ ‚ÒÂÏÛ ÏËÛ
ÖÒÎË Û ‚‡Ò ÂÒÚ¸ Ô‰ÎÓÊÂÌËfl ËÎË ‚ÓÔÓÒ˚ ÔÓ ÔÓ‰ÛÍÚ‡Ï Samsung,
Ò‚flÁ˚‚‡ÈÚÂÒ¸ Ò ËÌÙÓχˆËÓÌÌ˚Ï ˆÂÌÚÓÏ Samsung.
á‚ÂÚ‡ÈÚÂÒ¸ Û ÍÓÏԇ̥˛ SAMSUNG ì êßáçàï äêÄ∫çÄï ëÇßíì
ì ‡Á¥ ‚ËÌËÍÌÂÌÌfl Á‡ÔËڇ̸ ‡·Ó ÍÓÏÂÌÚ‡¥‚ ÒÚÓÒÓ‚ÌÓ ‚ËÓ·¥‚ Samsung,
Á‚ÂÚ‡ÈÚÂÒ¸ Û ˆÂÌÚ Ó·ÒÎÛ„Ó‚Û‚‡ÌÌfl ÍÎ¥πÌÚ¥‚ ÍÓÏԇ̥ª SAMSUNG.
Country
RUSSIA
UKRAINE
Customer Care Center
8-800-200-0400
8-800-502-0000
Web Site
www.samsung.ru
www.samsung.com/ur
íÖãÖÇàáéê ë
ÜàÑäéäêàëíÄã
ãàóÖëäàå
ùäêÄçéå
LE19R71B
LE19R71W
BN68-01074E-X0Cover.qxd 8/24/06 11:12 PM Page 1

Precautions When Displaying a Still Image
A still image may cause permanent damage to the TV screen.
• Do not display a still image on the LCD panel for more than 2 hours as it can cause screen image retention.
This image retention is also known as "screen burn".
To avoid such image retention, reduce the degree of brightness and contrast of the screen when displaying a still image.
• Watching the LCD TV in 4:3 format for a long period of time may leave traces of borders displayed on the left, right and center
of the screen caused by the difference of light emission on the screen.
Playing a DVD or a game console may cause a similar effect to the screen.
Damages caused by the above effect are not covered by the Warranty.
• Displaying still images from Video games and PC for longer than a certain period of time may produce partial after-images.
To prevent this effect, reduce the ‘brightness’ and ‘contrast’ when displaying still images.
åÂ˚ Ô‰ÓÒÚÓÓÊÌÓÒÚË ÔË ‚ÓÒÔÓËÁ‚‰ÂÌËË ÌÂÔÓ‰‚ËÊÌÓ„Ó ËÁÓ·‡ÊÂÌËfl.
çÂÔÓ‰‚ËÊÌÓ ËÁÓ·‡ÊÂÌË ÏÓÊÂÚ Ò¸ÂÁÌÓ Ôӂ‰ËÚ¸ ˝Í‡Ì ÚÂ΂ËÁÓ‡.
• ç ÒΉÛÂÚ ÔÓÒχÚË‚‡Ú¸ ÌÂÔÓ‰‚ËÊÌÓ ËÁÓ·‡ÊÂÌË ̇ Üä ˝Í‡Ì ·ÓΠ‰‚Ûı ˜‡ÒÓ‚, ˜ÚÓ·˚ Ì ‚˚Á‚‡Ú¸ ˝ÙÙÂÍÚ ÓÒÚ‡ÚÓ˜ÌÓ„Ó
ËÁÓ·‡ÊÂÌËfl ̇ ˝Í‡ÌÂ. èÓ‰Ó·ÌÓ ÓÒÚ‡ÚÓ˜ÌÓ ËÁÓ·‡ÊÂÌË ڇÍÊ ËÁ‚ÂÒÚÌÓ Í‡Í “‚˚„Ó‡ÌË ˝Í‡Ì‡”.
ÇÓ ËÁ·ÂʇÌË ڇÍÓ„Ó ˝ÙÙÂÍÚ‡ ÛÏÂ̸¯ËÚ ÛÓ‚Â̸ flÍÓÒÚË Ë ÍÓÌÚ‡ÒÚÌÓÒÚË ˝Í‡Ì‡ ÔË ÓÚÓ·‡ÊÂÌËË ÌÂÔÓ‰‚ËÊÌ˚ı ËÁÓ·‡ÊÂÌËÈ.
• ÇÒΉÒÚ‚Ë ˝ÍÒÔÎÛ‡Ú‡ˆËË ÚÂ΂ËÁÓ‡ Ò Üä ˝Í‡ÌÓÏ ‚ ÙÓχÚ 4:3 ̇ ÔÓÚflÊÂÌËË ‰ÓÎ„Ó„Ó ‚ÂÏÂÌË, Ò΂‡, ÒÔ‡‚‡ Ë ‚
ˆÂÌÚ ˝Í‡Ì‡ ÏÓ„ÛÚ ÔÓfl‚ËÚ¸Òfl ÒΉ˚ „‡Ìˈ ÙÓχڇ, ‚˚Á‚‡ÌÌ˚ ‡ÁÌˈÂÈ ËÁÎÛ˜ÂÌËfl Ò‚ÂÚ‡ ‚ ‡ÁÌ˚ı ӷ·ÒÚflı ˝Í‡Ì‡.
àÒÔÓθÁÓ‚‡ÌË ÚÂ΂ËÁÓ‡ ‰Îfl ‚ÓÒÔÓËÁ‚‰ÂÌËfl DVD-‰ËÒÍÓ‚ ËÎË ÔÓ‰Íβ˜ÂÌË ˄ӂÓÈ ÔËÒÚ‡‚ÍË ÏÓÊÂÚ Ó͇Á‡Ú¸ ÔÓ‰Ó·ÌÓÂ
‚ÓÁ‰ÂÈÒÚ‚Ë ̇ ˝Í‡Ì. èÓ‚ÂʉÂÌËfl, ‚˚Á‚‡ÌÌ˚ ‚˚¯ÂÛ͇Á‡ÌÌ˚Ï ˝ÙÙÂÍÚÓÏ, Ì ÔÓ‰ÎÂÊ‡Ú „‡‡ÌÚËÈÌÓÏÛ ÂÏÓÌÚÛ.
• ÑÎËÚÂθÌÓ ÓÚÓ·‡ÊÂÌË ÌÂÔÓ‰‚ËÊÌ˚ı ËÁÓ·‡ÊÂÌËÈ, ̇ÔËÏÂ, ÔË ÔÓ‰Íβ˜ÂÌËË ˝Í‡Ì‡ Í ‚ˉÂÓË„Â Ë ÍÓÏÔ¸˛ÚÂÛ, ÏÓÊÂÚ ‚˚Á‚‡Ú¸ ÔÓfl‚ÎÂÌËÂ
ÓÒÚ‡ÚÓ˜Ì˚ı ËÁÓ·‡ÊÂÌËÈ. ÇÓ ËÁ·ÂʇÌË ‚ÓÁÌËÍÌÓ‚ÂÌËfl ÔÓ‰Ó·ÌÓ„Ó ˝ÙÙÂÍÚ‡, ÔË ÓÚÓ·‡ÊÂÌËË ÌÂÔÓ‰‚ËÊÌ˚ı ËÁÓ·‡ÊÂÌËÈ ÛÏÂ̸¯ËÚ ÛÓ‚Â̸
Ô‡‡ÏÂÚÓ‚ "flÍÓÒÚË" Ë "ÍÓÌÚ‡ÒÚÌÓÒÚË".
á‡ÔÓ·¥ÊÌ¥ Á‡ıÓ‰Ë Ô¥‰ ˜‡Ò ‚¥‰Ú‚ÓÂÌÌfl ÌÂÛıÓÏÓ„Ó ÁÓ·‡ÊÂÌÌfl.
Ç¥‰Ú‚ÓÂÌÌfl ÌÂÛıÓÏÓ„Ó ÁÓ·‡ÊÂÌÌfl ÏÓÊ ‚ËÍÎË͇ÚË ÌÂÔÓÔ‡‚Ì ÔÓ¯ÍÓ‰ÊÂÌÌfl Â͇ÌÛ ÚÂ΂¥ÁÓ‡.
• ç ‚‡ÚÓ Ô„Îfl‰‡ÚË ÌÂÛıÓÏ ÁÓ·‡ÊÂÌÌfl ̇ êä Â͇̥ ·¥Î¸¯Â ‰‚Óı „Ó‰ËÌ, ˘Ó· Ì ‚ËÍÎË͇ÚË Á‡Î˯ÍÓ‚Ó„Ó ÁÓ·‡ÊÂÌÌfl.
ÖÙÂÍÚ Á‡Î˯ÍÓ‚Ó„Ó ÁÓ·‡ÊÂÌÌfl Ú‡ÍÓÊ ‚¥‰ÓÏËÈ flÍ "‚Ë„ÓflÌÌfl Â͇ÌÛ".
ôÓ· ÛÌËÍÌÛÚË Ú‡ÍÓ„Ó ÂÙÂÍÚÛ, ÒÎ¥‰ ÁÏÂ̯ۂ‡ÚË ¥‚Â̸ flÒ͇‚ÓÒÚ¥ Ú‡ ÍÓÌÚ‡ÒÚÌÓÒÚ¥ ̇ ˜‡Ò ‚¥‰Ú‚ÓÂÌÌfl ÌÂÛıÓÏÓ„Ó ÁÓ·‡ÊÂÌÌfl.
• Ç̇ÒÎ¥‰ÓÍ ÂÍÒÔÎÛ‡Ú‡ˆ¥ª ÚÂ΂¥ÁÓ‡ Á êä Â͇ÌÓÏ Û ÙÓχڥ 4:3 ÔÓÚfl„ÓÏ ÚË‚‡ÎÓ„Ó ˜‡ÒÛ, ÁÎ¥‚‡, ÒÔ‡‚‡ Ú‡ ‚ ˆÂÌÚ¥ Â͇ÌÛ
ÏÓÊÛÚ¸ ‚ËÌË͇ÚË ÒÎ¥‰Ë ÏÂÊ ˆ¸Ó„Ó ÙÓχÚÛ, ˘Ó ÔÓflÒÌ˛πÚ¸Òfl ÌÂ¥‚ÌÓϥ̥ÒÚ˛ Ò‚¥ÚÎÓ‚Ó„Ó ‚ËÔÓÏ¥Ì˛‚‡ÌÌfl Û ¥ÁÌËı ˜‡ÒÚË̇ı
Â͇ÌÛ. èÓ‰¥·ÌËÈ ÂÙÂÍÚ ÏÓÊ ‚ËÌË͇ÚË Á‡ ÛÏÓ‚Ë ˜‡ÒÚÓ„Ó ‚ËÍÓËÒÚ‡ÌÌfl ÚÂ΂¥ÁÓ‡ ‰Îfl Ô„Îfl‰Û DVD-‰ËÒÍ¥‚ ˜Ë Ô¥‰Íβ˜ÂÌÌfl
¥„Ó‚Óª ÔËÒÚ‡‚ÍË. ìÏÓ‚Ë „‡‡ÌÚ¥ÈÌÓ„Ó Ó·ÒÎÛ„Ó‚Û‚‡ÌÌfl Ì ÔÓ¯Ë˛˛Ú¸Òfl ̇ ÔÓ¯ÍÓ‰ÊÂÌÌfl, ÔÓ‚'flÁ‡Ì¥ Á ‚ËÌËÍÌÂÌÌflÏ
‚ˢ‚͇Á‡ÌÓ„Ó ÂÙÂÍÚÛ.
• ÑÓ‚„ÓÚË‚‡Î ‚¥‰Ó·‡ÊÂÌÌfl ÌÂÛıÓÏËı Ó·'πÍÚ¥‚, ̇ÔËÍ·‰, flÍ˘Ó ÂÍ‡Ì Ô¥‰Íβ˜ÂÌÓ ‰Ó ÍÓÏÔ'˛Ú‡ ˜Ë ‚¥‰ÂÓ„Ë, ÏÓÊ ÒÔ˘ËÌËÚË ÔÓfl‚Û Ì‡
Â͇̥ Á‡Î˯ÍÓ‚Ëı ÁÓ·‡ÊÂ̸. ôÓ· ÛÌËÍÌÛÚË ˆ¸Ó„Ó, ÒÎ¥‰ ÁÏÂ̯ۂ‡ÚË Á̇˜ÂÌÌfl Ô‡‡ÏÂÚ¥‚ “flÒ͇‚ÓÒÚ¥” Ú‡ “ÍÓÌÚ‡ÒÚÌÓÒÚ¥”, ÍÓÎË Ì‡ Â͇̥
Á̇ıÓ‰ËÚ¸Òfl ÌÂÛıÓÏ ÁÓ·‡ÊÂÌÌfl.
© 2006 Samsung Electronics Co., Ltd. All rights reserved.
CSI-Still.qxd 8/24/06 11:14 PM Page 1

English-1
English
Contents
CONNECTING AND PREPARING YOUR TV
List of Parts .............................................................. 2
Viewing the Control Panel ........................................ 3
Viewing the Connection Panel.................................. 4
Viewing the Remote Control .................................... 5
Installing Batteries in the Remote Control ................ 6
Switching On and Off................................................ 6
Placing Your Television in Standby Mode ................ 6
Plug & Play .............................................................. 6
SETTING THE CHANNELS
Storing Channels Automatically................................ 7
Storing Channels Manually ...................................... 8
Editing the Channels ................................................ 9
Sorting the Stored Channels .................................... 9
Assigning Channels Names .................................... 10
Fine Tuning Channel Reception .............................. 10
SETTING THE PICTURE
Changing the Picture Standard ................................ 11
Adjusting the Custom Picture .................................. 11
Changing the Colour Tone........................................ 12
Changing the Picture Size........................................ 12
Adjusting the Colour Control .................................... 13
Freezing the Picture ................................................ 13
SETTING THE SOUND
Changing the Sound Standard ............................14
Customizing the Sound ........................................14
Selecting the Sound mode ..................................14
Adjusting the Volume Automatically ....................15
SETTING THE TIME
Setting and Displaying the Current Time..............15
Setting the Sleep Timer ........................................16
Switching the Television
On and Off Automatically......................................17
SETTING THE OTHERS
Choosing Your Language ....................................17
Setting the Blue Screen Mode..............................18
Selecting the Source ............................................18
Editing the Input Source Names ..........................19
USING THE TELETEXT FEATURE
Teletext Decoder ..................................................19
Displaying the Teletext Information ......................20
Selecting a Specific Teletext Page ......................20
Using Fastext to Select a Teletext Page ..............21
Storing Teletext Pages..........................................21
SETTING THE PC
Setting up Your PC Software
(Based on Windows XP) ......................................22
Display Modes ......................................................22
Setting the PC ......................................................23
RECOMMENDATIONS FOR USE
How to Adjust the Stand ......................................24
How to Adjust the Angle of the TV ......................24
Installing the Wall Mount Kit ................................24
Installing VESA compliant mounting devices ......24
Using the Decoration Covers ..............................24
Troubleshooting:
Before Contacting Service Personnel ..................25
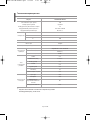
Technical and Environmental Specifications ......25
Symbol Press Important Note One-Touch
Button
BN68-01074E-X0Eng.qxd 8/24/06 11:13 PM Page 1

English-2
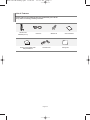
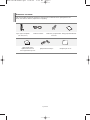
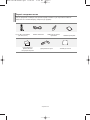
Please make sure the following items are included with your LCD TV.
If any items are missing, contact your dealer.
List of Features
Remote Control
& Batteries (AAA x 2)
Power Cord Wall Mount kit Owner’s Instructions
Warranty Card / Registration Card/
Safety Guide Manual
Decoration Cover Cleaning Cloth
BN68-01074E-X0Eng.qxd 8/24/06 11:13 PM Page 2

English-3
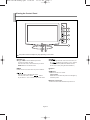
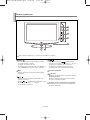
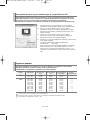
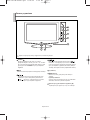
SOURCE
Toggles between all the available input sources
(TV, Ext., AV, S-Video, PC, DVI).
In the on-screen menu, use this button as you use the
ENTER button on the remote control.
MENU
Press to see an on-screen menu of your TV’s features.
Press to increase or decrease the volume.
In the on-screen menu, use the buttons
as you use the
and buttons on the remote control.
Press to change channels. In the on-screen menu, use
the buttons as you use the and buttons
on the remote control. (Without the Remote Control,
You can turn on TV by using the Channel buttons.)
Speaker
(Power)
Press to turn the TV on and off.
Power Indicator
Blinks and turns off when the power is on and lights up
in stand-by mode.
Remote Control Sensor
Aim the remote control towards this spot on the TV.
Viewing the Control Panel
The product colour and shape may vary depending on the model.
BN68-01074E-X0Eng.qxd 8/24/06 11:13 PM Page 3

English-4
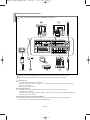
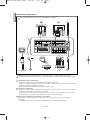
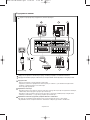
Power Input
Whenever you connect an external device to your TV, make sure that power on the unit is turned off.
When connecting an external device, match the colour of the connection terminal to the cable.
The product colour and shape may vary depending on the model.
Connecting DVI
- Connect the DVI connector to the DVD connector.
- Connect the stereo audio cable to “R - AUDIO - L” on the rear of your set and the other end to “Audio Out” of the
sound card on your DVD.
- DVI does not support PC function.
Connecting Computer
- Connect the D- Sub cable (optional) to “PC (PC IN)” on the rear of your set and the other end to the
Video Card of your computer.
- Connect the stereo audio cable (optional) to “AUDIO (PC IN)” on the rear of your set and the other end to “Audio Out”
of the sound card on your computer.
Connecting an Aerial or Cable Television Network
To view television channels correctly, a signal must be received by the set from one of the following sources:
- An outdoor aerial / A cable television network / A satellite network
Viewing the Connection Panel
BN68-01074E-X0Eng.qxd 8/24/06 11:13 PM Page 4

English-5
Connecting Set-Top Box, VCR or DVD
- Connect the VCR or DVD SCART cable (optional) to the SCART connector of the VCR or DVD.
- If you wish to connect both the Set-Top Box and VCR (or DVD), you should connect the Set-Top Box to the VCR (or DVD)
and connect the VCR (or DVD) to your set.
Connecting External A/V Devices
-
Connect RCA (optional) or S-VIDEO cable (optional) to an appropriate external A/V device such as VCR, DVD or Camcorder.
- Connect RCA audio cables (optional) to “R - AUDIO - L” on the rear of your set and the other ends to corresponding audio
out connectors on the A/V device.
- Headphone may be connected to the headphone output ( ) on the rear of your set. While the headphone is connected,
the sound from the built-in speakers will be disabled.
Kensington Lock
- The Kensington lock (optional) is a device used to physically fix the system when used in a public place.
- If you want to use a locking device, contact the dealer where you purchased the TV.
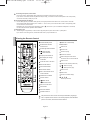
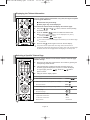
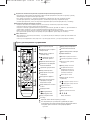
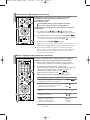
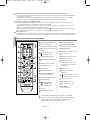
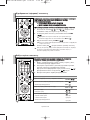
Television Standby button
Number buttons for direct
channel access
One/Two-digit channel selection
: Volume increase
: Volume decrease
Temporary sound switch-off
Menu display and change
confirmation
Control the cursor in the menu
Sound mode selection
Picture effect selection
Sound effect selection
Use to see information on the
current broadcast
Available source selection
Previous channel
P : Next channel
P : Previous channel
Exit the on screen menu
Picture freeze
Picture size selection
Automatic Power-off
Selects the TV mode directly
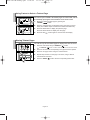
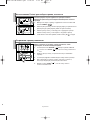
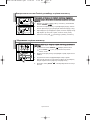
Teletext Functions
Teletext hold
Teletext index
Teletext sub page
Teletext size selection
Teletext display/mix both teletext
information and the normal broadcast
Teletext reveal
Teletext mode selection(LIST/FLOF)
P : Teletext next page
P : Teletext previous page
Teletext cancel
Teletext store
Exit from the teletext display
Fastext topic selection
The performance of the remote control may be affected by bright light.
This is a special remote control for the visually impaired, and has Braille
points on the Power, Channel and Volume buttons.
Viewing the Remote Control
BN68-01074E-X0Eng.qxd 8/24/06 11:13 PM Page 5

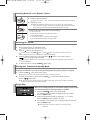
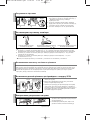
The mains lead is attached to the rear of your set.
1. Plug the mains lead into an appropriate socket.
The standby indicator lights up on the front of the set.
2. Press the button on the front of the set.
You also can press the POWER button or the TV ( ) button on the remote control to turn the TV on.
The programme that you were watching last is reselected automatically.
3. Press the numeric button (0~9) or channel up/down ( / ) button on the remote control or
button on the right side of the panel.
When you switch the set on for the very first time, you will be asked to choose language in which the menus
are to be displayed.
4. To switch your set off, press the POWER button again.
Your set can be placed in standby mode in order to reduce the power consumption. The standby
mode can be useful when you wish to interrupt viewing temporarily (during a meal, for example).
1. Press the POWER button on the remote control.
The screen is turned off and a standby indicator appears on the front of your set.
2. To switch your set back on, simply press the POWER , numeric buttons (0~9) or channel
up/down ( / ) button again.
Do not leave your set in standby mode for long periods of time (when you are away on holiday, for example).
It is best to unplug the set from the mains and aerial.
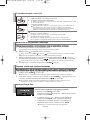
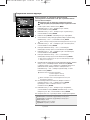
When the TV is initially powered on, several basic settings proceed automati-
cally and subsequently. The following settings are available.
1. Press the POWER button on the remote control.
The message “Start Plug & Play” is displayed with “OK” selected.
Press the
ENTER button.
2. Select the appropriate language by pressing the or button.
Press the
ENTER button to confirm your choice.
3. The message “Check antenna input.” is displayed with “OK” selected.
Press the
ENTER button.
Please check that the antenna or cable TV is connected correctly.
English-6
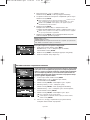
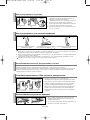
1. Lift the cover at the back of the remote control upward as shown in the figure.
2. Install two AAA size batteries.
Make sure to match the “+” and “–” ends of the batteries with the diagram inside the compartment.
3. Replace the cover.
Remove the batteries and store them in a cool, dry place if you won’t be using the
remote control for a long time. The remote control can be used up to about 23 feet from
the TV. (Assuming typical TV usage, the batteries last for about one year.)
If the remote control doesn’t work, check the following:
1. Is the TV power on?
2. Are the plus and minus ends of the batteries reversed?
3. Are the batteries drained?
4. Is there a power outage, or is the power cord unplugged?
5. Is there a special fluorescent light or neon sign nearby?
Installing Batteries in the Remote Control
Switching On and Off
Placing Your Television in Standby Mode
Plug & Play
BN68-01074E-X0Eng.qxd 8/24/06 11:13 PM Page 6

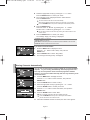
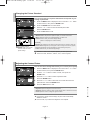
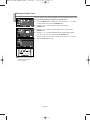
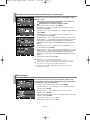
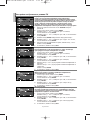
English-7
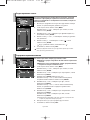
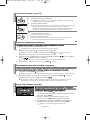
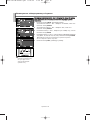
Language: Select your language.
Country: Select your country.
Auto Store: Automatically scans for and stores channels available in the local area.
Clock Set: Sets the current time for the TV clock.
If you want to reset this feature...
1. Press the MENU button to display the menu.
Press the or
button
to select “Setup”, then press the
ENTER button.
2.
Press the ENTER
button
to select
“Plug & Play”
.
3. This message “Start Plug & Play” is displayed.
4. Select the appropriate country by pressing the or button.
Press the
ENTER button to confirm your choice.
5. The “Auto Store” menu is displayed with the “Start” selected.
Press the
ENTER button.
The channel search will start and end automatically.
After all the available channels are stored, the “Clock Set” menu appears.
Press the ENTER button at any time to interrupt the memorization process.
6. Press the ENTER button.
Select the “Hour” or “Minute” by pressing the
or
button.
Set the “Hour” or “Minute” by pressing the
or
button.
You can also set the hour and minute by pressing the number buttons on the
remote control.
7. Press the ENTER button to confirm your setting.
The message “Enjoy your viewing.” is displayed.
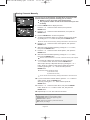
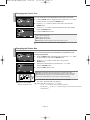
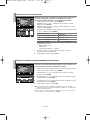
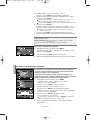
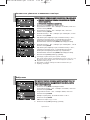
You can scan for the frequency ranges available to you (and availability
depends on your country). Automatically allocated programme num-
bers may not correspond to actual or desired programme numbers.
However, you can sort numbers manually and clear any channels you do
not wish to watch.
1. Press the MENU button to display the menu.
Press the
or button to select “Channel”, then press the
ENTER button.
2. Press the ENTER button to select “Country”.
3. Select the appropriate country by pressing the or button.
Press the
ENTER button to confirm your choice.
4. Press the or button to select “Auto Store”, then press the
ENTER button.
5. Press the ENTER button to select “Start”.
The TV will begin memorizing all of the available channels.
Press the ENTER button at any time to interrupt the memorization
process and return to the “Channel” menu.
6. After all the available channels are stored, the “Sort” menu appears.
Storing Channels Automatically
BN68-01074E-X0Eng.qxd 8/24/06 11:13 PM Page 7

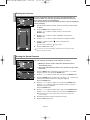
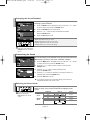
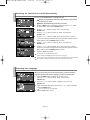
English-8
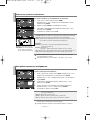
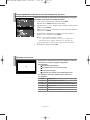
You can store up to 100 channels, including those received via cable
networks. When storing channels manually, you can choose:
Whether or not to store each of the channels found.
The programme number of each stored channel which you wish
to identify.
1. Press the MENU button to display the menu.
Press the
or button to select “Channel”, then press the
ENTER button.
2. Press the or button to select “Manual Store”, then press the
ENTER button.
3. Press the ENTER button to select “Programme”.
4. To assign a programme number to a channel, find the correct number
by pressing the
or button and then press the ENTER button.
You can also set a channel number by pressing number buttons on the remote control.
5. Press the or button to select “Colour System”, then press the
ENTER button.
6. Select the colour standard required by pressing the or button,
then press the
ENTER button.
7. Press the or button to select “Sound System”, then press the
ENTER button.
8. Select the sound standard required by pressing the or button,
then press the
ENTER button.
If there is an abnormal sound or no sound, re-select the sound system required.
9. If you know the number of the channel to be stored, press the
or button to select “Channel”. Press the ENTER button.
Select
C (Air channel) or S (Cable channel) by pressing the or
button. Press the button to select channel. Select the required
number by pressing the
or button and then press the
ENTER button.
Channel mode: P (Programme mode)
C (Air channel mode)
S (Cable channel mode)
You can also set a channel number by pressing number buttons on the remote control.
10. If you do not know the channel numbers, press the or button to
select “Search”. Press the
ENTER button.
Search by pressing the
or button and then press the
ENTER button.
11. Press the or button to select “Store”, then press the ENTER
button. Press the or button to select “OK”, then press the
ENTER button.
12. Repeat steps 3 to 11 for each channel to be stored.
Programme: Selects a program number for the channel.
Colour System: Sets the colour supporting system.
Sound System: Sets the sound supporting system.
Channel: Selects a channel.
Search: Scans for the frequency value for the channel.
Store: Saves your settings.
Storing Channels Manually
BN68-01074E-X0Eng.qxd 8/24/06 11:13 PM Page 8

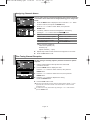
English-9
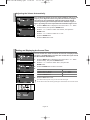
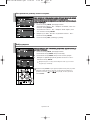
You can exclude the channels you chose from the channels you
scanned. When you scan through the stored channels, those you
have chosen to skip are not displayed.
All channels that you do not specifically choose to skip are displayed
during scanning.
1. Use the number buttons to directly select the channel that will be added
or deleted.
2. Press the MENU button to display the menu.
Press the
or button to select “Channel”, then press the
ENTER button.
3. Press the or button to select “Add/Delete”, then press the
ENTER button.
4. Press the or button to select channels to be deleted or added.
5. Press the button to select “ ” column, then press the
ENTER button.
The channels marked with “ ” will be added.
6. Press the EXIT button to exit.
You can view any channel (including an erased channel) by using the number
buttons on the remote control.
You can exchange the numbers of two channels, in order to:
Modify the numeric order in which the channels have been
automatically stored.
Give easily remembered numbers to the channels that you watch
most often.
1. Press the MENU button to display the menu. Press the or button
to select “Channel”, then press the
ENTER button.
2.
Press the or button to select “Sort”, then press the ENTER button.
3.
Press the ENTER button to select “From”. Press the or button until
the channel number that you wish to change is displayed.
Press the
ENTER button.
4.
Press the or button to select “To”, then press the ENTER button.
Press the
or button until the new number by which you wish to
identify the channel is displayed.
Press the
ENTER button.
5.
Press the or button to select “Store”, then press the ENTER button.
Press the
or button to select “OK”, then press the ENTER button.
The selected channel is exchanged with the one previously stored to the
chosen number.
6.
Repeat steps 3 to 5 for another channel to be sorted.
7.
Press the EXIT button to exit.
Editing the Channels
Sorting the Stored Channels
BN68-01074E-X0Eng.qxd 8/24/06 11:13 PM Page 9

English-10
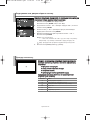
Channel names will be assigned automatically when channel information
is broadcast. These names can be changed, allowing you to assign new
names.
1. Press the MENU button to display the menu. Press the or button
to select “Channel”, then press the
ENTER button.
2.
Press the or button to select “Name”, then press the
ENTER button.
3.
If necessary, select the channel to be assigned to a new name by
pressing the
or
button. Press the
ENTER
button.
4.
The characters available are :
Letters of the alphabet (A~Z)
Numbers (0~9)
Special characters (
-
, space)
5.
Repeat steps 3 to 4 for each channel to be assigned to a new name.
6.
Press the EXIT button to exit.
To...
Select a letter, number or symbol
Move on the next letter
Move back the previous letter
Confirm the name
Then...
Press the
or
button
Press the
button
Press the
button
Press the ENTER button
Fine tuned channels that have been saved are marked with an asterisk “
*
” on the
right-hand side of the channel number in the channel banner. And the channel
number turns red.
To reset the fine-tuning, select “Reset” by pressing the
or button and then
press the
ENTER
button.
Use fine tuning to manually adjust a particular channel for optimal
reception.
1. Use the number buttons to directly select the channel that
you want to fine tune.
2. Press the MENU button to display the menu.
Press the
or button to select “Channel”, then press the
ENTER button.
3. Press the or button to select “Fine Tune”, then press the
ENTER button.
4. Press the or button to adjust the fine tuning.
Press the
ENTER
button.
5. Press the EXIT button to exit.
Assigning Channels Names
Fine Tuning Channel Reception
BN68-01074E-X0Eng.qxd 8/24/06 11:13 PM Page 10

English-11
You can select the type of picture which best corresponds to your
viewing requirements.
1. Press the MENU button to display the menu. Press the or button
to select “Picture”, then press the
ENTER button.
2.
Press the ENTER button to select “Mode”.
3.
Press the
or
button to select the desired picture effect.
Press the
ENTER
button.
4.
Press the EXIT button to exit.
Dynamic: Selects the picture for high-definition in a bright room.
Standard: Selects the picture for optimum display in a normal environment.
Movie: Selects the picture for comfortable display in a dark room.
Custom: Select to view your favorite display settings.
(Refer to “Adjusting the Custom Picture”)
[PC mode]
• Entertain: High brightness. (For watching motion pictures such as a DVD or Video CD.)
• Internet: Medium brightness.
(For working with a mixture of images such as text and graphics.)
• Text: Normal brightness. (For documentations or works involving heavy text.)
• Custom: Select to view your favorite display settings.
You can also press the
P.MODE button on the remote
control to select one of the
picture settings.
The Picture mode must be adjusted separately for each input source.
The the PC mode, “Entertain”, “Internet”, “Text”, “Custom” appears.
If you make any changes to these settings, the picture mode is automatically
switched to “Custom”.
In the PC mode, only “Contrast” and “Brightness” can be adjusted.
Contrast: Adjusts the lightness and darkness between objects and the background.
Brightness: Adjusts the brightness of the whole screen.
Sharpness: Adjusts the outline of objects to either sharpen them or make them more dull.
Colour: Adjusts the colours, making them lighter or darker.
Your set has several settings which allow you to control picture quality.
1. Press the MENU button to display the menu. Press the or button
to select “Picture”, then press the
ENTER button.
2.
Press the or button to select “Custom”, then press the
ENTER button.
3.
Press the
or button
to select a particular item.
Press the
ENTER
button.
4.
Press the
or button
to decrease or increase the value of a
particular item.
Press the ENTER button.
5.
Press the EXIT button to exit.
Changing the Picture Standard
Adjusting the Custom Picture
BN68-01074E-X0Eng.qxd 8/24/06 11:13 PM Page 11

English-12
You can select the most comfortable colour tone to your eyes.
1. Press the MENU button to display the menu. Press the or button
to select “Picture”, then press the
ENTER button.
2. Press the or button to select “Colour Tone”, then press the
ENTER button.
3.
Press the
or button
to select the desired colour tone setting.
Press the
ENTER
button.
4.
Press the EXIT button to exit.
Cool 2: Makes the colour temperature bluer than “Cool 1” menu.
Cool 1: Makes whites bluish.
Normal: Keeps whites white.
Warm1: Makes whites reddish.
Warm2: Makes the colour temperature redder than “Warm1” menu.
In the PC mode, “Cool” ,“Normal”, “Warn”, “Custom” appears.
You can select the picture size which best corresponds to your
viewing requirements.
1. Press the MENU button to display the menu. Press the or button
to select “Picture”, then press the
ENTER button.
2. Press the or button to select “Size”, then press the
ENTER button.
3.
Select the required option by pressing the
or button
.
Press the
ENTER
button.
4.
Press the EXIT button to exit.
Auto Wide: Automatically adjusts the picture size to the "Wide" aspect ratio.
Wide: Adjusts the picture size to Wide appropriate for DVDs or wide broadcasting.
Zoom: Magnifies the Wide picture (in the vertical direction) to fit the screen size.
4:3: This is the default setting for a video movie or normal broadcasting.
In the PC and DVI mode, only “Wide” and “4:3” mode can be adjusted.
(The “Zoom”, “Auto Wide” mode is not supported.)
Zoom:
Select by pressing the
or
buttons.
Use the
or
button to move the picture up and down.
After selecting , use the
or
button to magnify or reduce the picture size in the
vertical direction.
You can select these options by
simply pressing the
P.SIZE
button on the remote control.
Changing the Colour Tone
Changing the Picture Size
BN68-01074E-X0Eng.qxd 8/24/06 11:13 PM Page 12

English-13
e
Adjust the individual R, G, B Colour Controls.
1. Press the MENU button to display the menu.
Press the
or button to select “Picture”, then press the
ENTER button.
2. Press the or button to select “Colour Control ”, then press the
ENTER button.
3.
Press the
or button
to select a particular item.
Press the
ENTER
button.
4.
Press the
or button
to decrease or increase the value of a
particular item.
Press the ENTER button.
5.
Press the EXIT button to exit.
Available in PC Mode Only.
1. Press the STILL button to freeze a moving picture.
Normal sound will still be heard. Press again to cancel.
This function doesn’t work when the input Source is DVI, ane PC.
Adjusting the Colour Control
Freezing the Picture
BN68-01074E-X0Eng.qxd 8/24/06 11:13 PM Page 13

English-14
The sound settings can be adjusted to suit your personal preferences.
(Alternatively, you can use one of the “automatic” settings.)
1. Press the MENU button to display the menu. Press the or button
to select “Sound”, then press the
ENTER button.
2. Press the or button to select “Custom”, then press the
ENTER button.
3. Press the or button to select a particular item.
Press the
ENTER button.
4. Press the or button to decrease or increase the value of a
particular item. Press the
ENTER button.
5. Press the EXIT button to exit.
You can select the type of the special sound effect to be used when
watching a given broadcast.
1. Press the MENU button to display the menu. Press the or button
to select “Sound”, then press the
ENTER button.
2. Press the ENTER button to select “Mode”.
3.
Press the
or
button to select the desired sound effect.
Press the
ENTER
button.
4. Press the EXIT button to exit.
Standard: Selects the normal sound mode.
Music: Emphasizes music over voices.
Movie: Provides live and full sound for movies.
Speech: Emphasizes voices over other sounds.
Custom: Selects your custom sound settings.
You can also select these
options by simply pressing the
S.MODE button on the remote
control.
You can also set these options
simply by pressing the
DUAL I-II button on remote
control.
If you make any changes to the “automatic” settings, the sound mode is
automatically switched to the “Custom” mode.
Changing the Sound Standard
Customizing the Sound
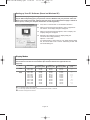
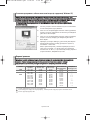
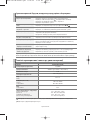
You can set the sound mode by pressing the “DUAL” button.
When you press it, the current sound mode is displayed on the
screen.
Selecting the Sound mode
Audio Type
Mono
Stereo
Dual
Mono
Stereo
Dual
DUAL 1/2
MONO
STEREO MONO
DUAL1 DUAL 2
MONO
MONO STEREO
MONO DUAL1
DUAL 2
Default
Automatic
change
DUAL 1
Automatic
change
DUAL 1
FM
Stereo
NICAM
Stereo
BN68-01074E-X0Eng.qxd 8/24/06 11:13 PM Page 14

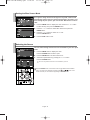
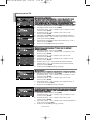
English-15
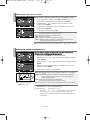
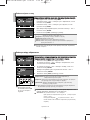
You can set the TV’s clock so that the current time is displayed when
you press the INFO button. You must also set the time if you wish to
use the automatic On/Off timers.
1. Press the MENU button to display the menu. Press the or button
to select “Setup”, then press the
ENTER button.
2. Press the or button to select “Time”, then press the
ENTER button.
3. Press the ENTER button to select “Clock Set”.
4.
5.
Press the EXIT button to exit.
If you disconnect the power cord, you have to set the clock again.
You can also set hour and minute by pressing the number buttons on the remote control.
To...
Move to “Hour” or “Minute”
Set the “Hour” or “Minute”
Press the
ENTER button.
Press the...
or button.
or button.
Each broadcasting station has its own signal conditions, and so it is not
easy for you to adjust the volume every time the channel is changed.
This feature let you automatically adjust the volume of the desired
channel by lowering the sound output when the modulation signal is
high or by raising the sound output when the modulation signal is low.
1. Press the MENU button to display the menu. Press the or button
to select “Sound”, then press the
ENTER button.
2. Press the or button to select “Auto Volume”, then press the
ENTER button.
3. Press the or button to select “On” or “Off”.
Press the
ENTER button.
4. Press the EXIT button to exit.
Adjusting the Volume Automatically
Setting and Displaying the Current Time
BN68-01074E-X0Eng.qxd 8/24/06 11:13 PM Page 15

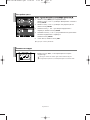
English-16
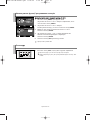
You can select a time period of between 30 and 180 minutes after which
the television automatically switches to standby mode.
1. Press the MENU button to display the menu. Press the or button
to select “Setup”, then press the
ENTER button.
2. Press the or button to select “Time”, then press the
ENTER button.
3. Press the or button to select “Sleep Timer”, then press the
ENTER button.
4. Press the or button repeatedly until the desired time appears
(Off, 30, 60, 90, 120, 150, 180). Press the
ENTER
button.
The TV automatically switches to standby mode when the timer reaches 0.
5. Press the EXIT button to exit.
Press the SLEEP button on
the remote control repeatedly
until the appropriate time
interval appears.
Setting the Sleep Timer
BN68-01074E-X0Eng.qxd 8/24/06 11:13 PM Page 16

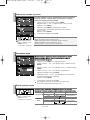
English-17
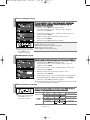
You can set the On/Off timers so that the set will:
Switch on automatically and tune to the channel of your choice
at the time you select.
Switch off automatically at the time you select.
1. Press the MENU button to display the menu. Press the or button
to select “Setup”, then press the
ENTER button.
2. Press the or button to select “Time”, then press the
ENTER button.
3. Press the or button to select “On Timer”, then press the
ENTER button.
4. Press the or button to adjust “Hour”, then press the button to
move to the next step. Set other items using the same method as above.
When finished, press the
ENTER button to return.
5. Press the or button to select “Off Timer”, then press the
ENTER button.
6. Press the or button to adjust “Hour”, then press the button to
move to the next step. Set other items using the same method as above.
When finished, press the
ENTER button to return.
7. Press the EXIT button to exit.
The first step is to set the television’s clock.
(refer to “Setting and Displaying the Current Time” on page 15)
You can also set hour and minute by pressing the number buttons on the remote control.
The "Activation" setting must be set to "On" in order for the timers to work.
When you start using your set for the first time, you must select the
language which will be used for displaying menus and indications.
1. Press the MENU button to display the on-screen menu.
Press the
or button to select “Setup”, then press the
ENTER button.
2. Press the or button to select “Language”, then press the
ENTER button.
3. Select a particular language by pressing the or button repeatedly.
Press the
ENTER button.
You can choose one of 15 languages.
4. Press the EXIT button to exit.
Switching the Television On and Off Automatically
Choosing Your Language
BN68-01074E-X0Eng.qxd 8/24/06 11:13 PM Page 17

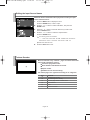
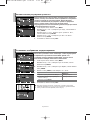
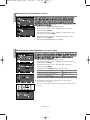
English-18
If no signal is being received or the signal is very weak, a blue screen
automatically replaces the noisy picture background. If you wish to con-
tinue viewing the poor picture, you must set the "Blue Screen" mode to
"Off".
1. Press the MENU button to display the menu. Press the or button
to select “Setup”, then press the
ENTER button.
2. Press the or button to select “Blue Screen” then press the
ENTER button.
3. Press the or button to select “On” or “Off”.
Press the
ENTER button.
4. Press the EXIT button to exit.
You can select among external sources connected to your TV’s input
jacks.
1. Press the MENU button to display the menu.
Press the
ENTER button to select “Input”.
2. Press the ENTER button to select “Source List”.
3. Select the required device by pressing the or button.
Press the
ENTER button.
You can only select a source if it is connected to your TV.
Press the SOURCE button on the remote control to toggel between all the available
source.
TV mode can be selected by pressing
the
TV or P / button
on the
remote control but you cannot select it by pressing the
SOURCE button.
Setting the Blue Screen Mode
Selecting the Source
BN68-01074E-X0Eng.qxd 8/24/06 11:13 PM Page 18
Sayfa yükleniyor...
Sayfa yükleniyor...
Sayfa yükleniyor...
Sayfa yükleniyor...
Sayfa yükleniyor...
Sayfa yükleniyor...
Sayfa yükleniyor...
Sayfa yükleniyor...
Sayfa yükleniyor...
Sayfa yükleniyor...
Sayfa yükleniyor...
Sayfa yükleniyor...
Sayfa yükleniyor...
Sayfa yükleniyor...
Sayfa yükleniyor...
Sayfa yükleniyor...
Sayfa yükleniyor...
Sayfa yükleniyor...
Sayfa yükleniyor...
Sayfa yükleniyor...
Sayfa yükleniyor...
Sayfa yükleniyor...
Sayfa yükleniyor...
Sayfa yükleniyor...
Sayfa yükleniyor...
Sayfa yükleniyor...
Sayfa yükleniyor...
Sayfa yükleniyor...
Sayfa yükleniyor...
Sayfa yükleniyor...
Sayfa yükleniyor...
Sayfa yükleniyor...
Sayfa yükleniyor...
Sayfa yükleniyor...
Sayfa yükleniyor...
Sayfa yükleniyor...
Sayfa yükleniyor...
Sayfa yükleniyor...
Sayfa yükleniyor...
Sayfa yükleniyor...
Sayfa yükleniyor...
Sayfa yükleniyor...
Sayfa yükleniyor...
Sayfa yükleniyor...
Sayfa yükleniyor...
Sayfa yükleniyor...
Sayfa yükleniyor...
Sayfa yükleniyor...
Sayfa yükleniyor...
Sayfa yükleniyor...
Sayfa yükleniyor...
Sayfa yükleniyor...
Sayfa yükleniyor...
Sayfa yükleniyor...
Sayfa yükleniyor...
Sayfa yükleniyor...
Sayfa yükleniyor...
Sayfa yükleniyor...
Sayfa yükleniyor...
-
 1
1
-
 2
2
-
 3
3
-
 4
4
-
 5
5
-
 6
6
-
 7
7
-
 8
8
-
 9
9
-
 10
10
-
 11
11
-
 12
12
-
 13
13
-
 14
14
-
 15
15
-
 16
16
-
 17
17
-
 18
18
-
 19
19
-
 20
20
-
 21
21
-
 22
22
-
 23
23
-
 24
24
-
 25
25
-
 26
26
-
 27
27
-
 28
28
-
 29
29
-
 30
30
-
 31
31
-
 32
32
-
 33
33
-
 34
34
-
 35
35
-
 36
36
-
 37
37
-
 38
38
-
 39
39
-
 40
40
-
 41
41
-
 42
42
-
 43
43
-
 44
44
-
 45
45
-
 46
46
-
 47
47
-
 48
48
-
 49
49
-
 50
50
-
 51
51
-
 52
52
-
 53
53
-
 54
54
-
 55
55
-
 56
56
-
 57
57
-
 58
58
-
 59
59
-
 60
60
-
 61
61
-
 62
62
-
 63
63
-
 64
64
-
 65
65
-
 66
66
-
 67
67
-
 68
68
-
 69
69
-
 70
70
-
 71
71
-
 72
72
-
 73
73
-
 74
74
-
 75
75
-
 76
76
-
 77
77
-
 78
78
-
 79
79


Samsung LE19R71B Kullanici rehberi
- Kategori
- LCD TV'ler
- Tip
- Kullanici rehberi
- Bu kılavuz aynı zamanda aşağıdakiler için de uygundur:
İlgili makaleler
-
Samsung LE20S52BP Kullanım kılavuzu
-
Samsung LW17M24CP Kullanım kılavuzu
-
Samsung LE23R71B Kullanici rehberi
-
Samsung LE19R71B Kullanım kılavuzu
-
-
-
-
-
Samsung LW20M11C Kullanım kılavuzu
-